- Home /
- Resources /
- Learning center /
- Building Resilienc...
Building Resiliency for Data with Backups
A hands-on implementation for resiliency of your data on Equinix Metal via backups.

On this page
In our introduction to resiliency, we discussed the importance of resiliency in the face of failure. We distinguished between providing resiliency for your processes running on your servers and your critical data itself.
In this guide, we will walk you through a hands-on implementation for resiliency of your data on Equinix Metal via backups. For information about redundancy, see the guide Building Resiliency for Data with Redundancy.
In order to keep things simple, we will not spend time on advanced enterprise backup systems, or any system that coordinates across multiple servers. Instead, we will focus on what you can do with a single server using basic freely available tools.
We will provide backups to another server running on Equinix Metal. Rather than a simple copy, we will use the S3 protocol. This is pretty much a standard for object storage. The same protocol will allow you to back up to another server, or even a cloud service, such as S3 in Amazon Web Services.
Software and Tools
For this getting started guide, we will show replication at the operating system level, using the popular open source database MariaDB.
For the backup software itself, we will use the very powerful yet basic rsync protocol. The rsync site contains great information on rsync itself and how to use it for backups. Perhaps most importantly, it includes a library, which is included in lots of other software, making it easier to use across protocols. To keep things simple, we will use the open-source and easy-to-use duplicity.
In addition to wrapping the rsync protocol, which is highly efficient, duplicity also provides management of full and incremental backups, can verify the state of backups, and encrypts the backups using GnuPG.
To receive the backups on our Equinix Metal server, we will run minio, which is an open source S3-compatible object storage server.
Overview
These are the steps we will take in this guide to take to provide resiliency for our data:
- Deploy a server on Equinix Metal
- Install and configure database software on the server
- Deploy the backup server on Equinix Metal
- Install and configure the backup tool on the backup server
- Install and configure the backup tool on the database server
- Test the backups
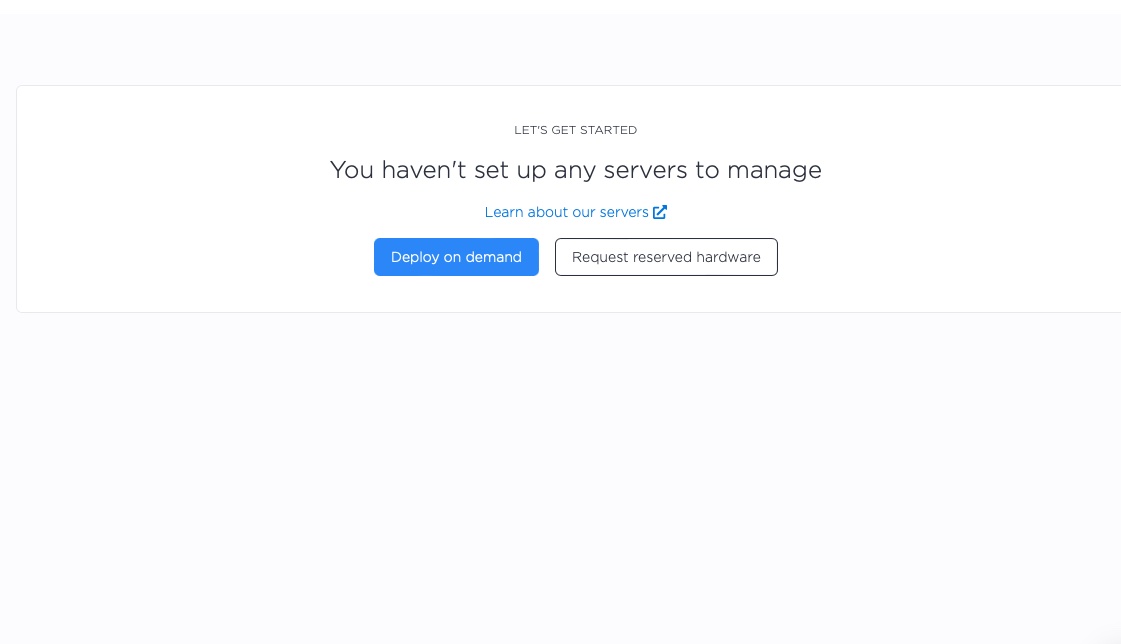
Step 1: Deploy a Server on Equinix Metal
Start by setting up the primary server. You can do this via the Equinix Metal Console, the CLI, Terraform, or any tool that interacts with the Equinix Metal API.
We will use the Equinix Metal Console for this example. For a guide to deploying your first server, see Deploy Your First Server.
We are deploying to Dallas, using a c3.small.x86 server, but you can deploy whichever server types to whichever metro suits your purposes.
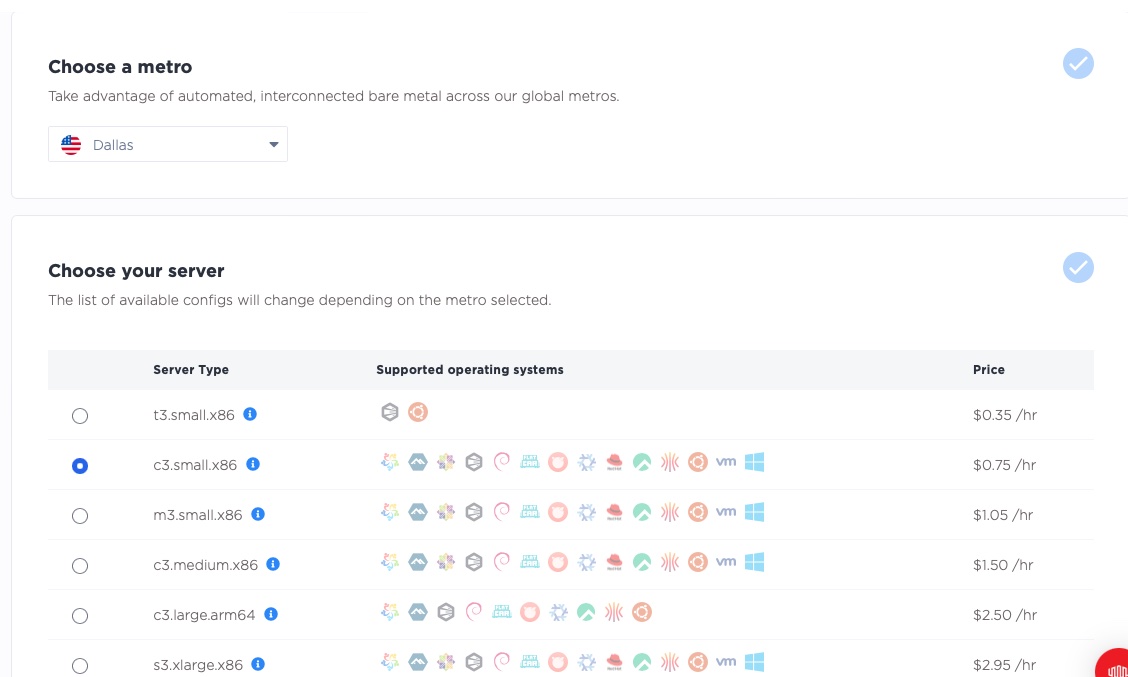
Next, select the operating system; we'll use Ubuntu 22.04 for this guide. Pick whichever operating system you prefer. We are deploying just one server, the database server.

Click "Deploy Now" to start the deployment.

Wait for the server to be ready. This can take a few minutes.
Step 2: Install and configure database software on the server
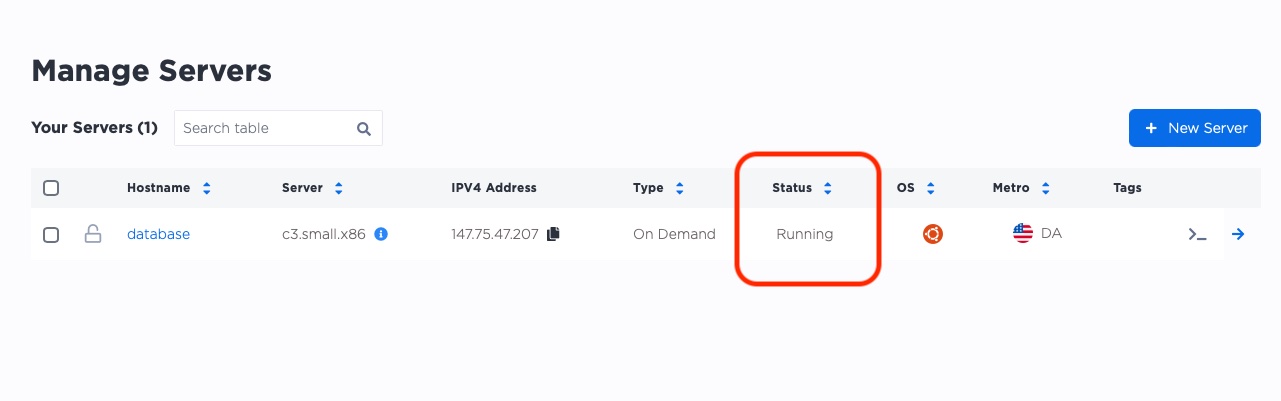
Navigate back to our main manage servers page. You'll see that the server was given a public IP by Equinix Metal. You'll use that IP to SSH into the server and set it up.
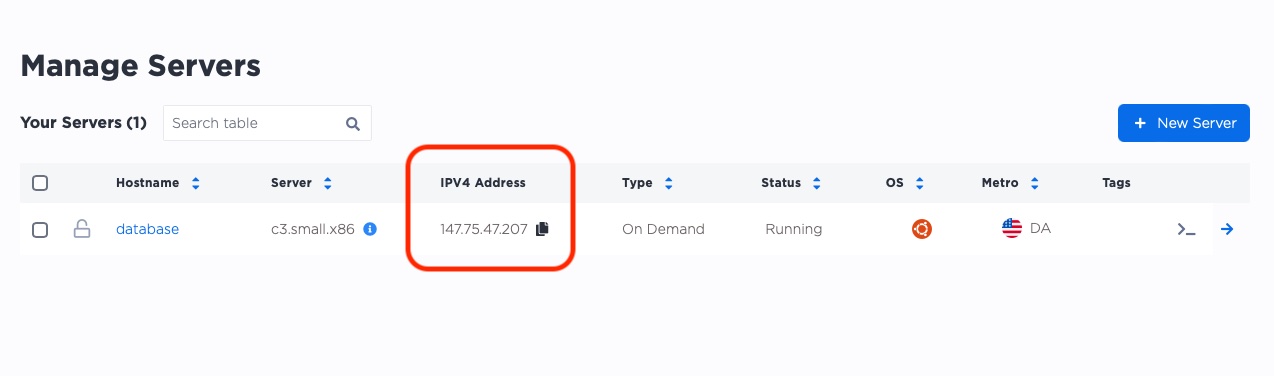
In our example, the IP address is 147.75.47.207.
In your project, the IP address will be different, so be sure to change it as you follow the examples.
On your server, you'll do the following.
- SSH to the server
- update the package manager
- install the software we need, specifically
mariadb, as well as some other utilities
To start, SSH to the database server. Use the ssh command with the IP address of your server:
ssh root@[your_ip_address]
When you connect for the first time, you'll be asked if you want to trust the SSH key of the server. Type yes to continue.
$ ssh root@147.75.47.207
The authenticity of host '147.75.47.207 (147.75.47.207)' can't be established.
ED25519 key fingerprint is SHA256:OydezYaS2j/5/t4fd06g+34lZjFan8X/GRRVqwdMXAA.
This key is not known by any other names
Are you sure you want to continue connecting (yes/no/[fingerprint])? yes
Warning: Permanently added '147.75.47.207' (ED25519) to the list of known hosts.
Next, update the package manager before you install anything with the apt update command:
root@database:~# apt update -y
The output will look like this (shortened for brevity):
root@database:~# apt update -y
Get:1 http://security.ubuntu.com/ubuntu jammy-security InRelease [110 kB]
Hit:2 http://archive.ubuntu.com/ubuntu jammy InRelease
...
Fetched 6191 kB in 2s (2744 kB/s)
Reading package lists... Done
Building dependency tree... Done
Reading state information... Done
83 packages can be upgraded. Run 'apt list --upgradable' to see them.
There's no need to upgrade packages at this point.
Next, install the MariaDB Client and MariaDB Server software with this command:
root@database:~# apt install -y mariadb-server mariadb-client
The output includes a lot of extraneous data, so the output in this guide is truncated, to keep it readable.
root@database:~# apt install -y mariadb-server mariadb-client
Reading package lists... Done
Building dependency tree... Done
Reading state information... Done
...
Selecting previously unselected package mariadb-server.
Preparing to unpack .../20-mariadb-server_1%3a10.6.12-0ubuntu0.22.04.1_all.deb ...
Unpacking mariadb-server (1:10.6.12-0ubuntu0.22.04.1) ...
Setting up libconfig-inifiles-perl (3.000003-1) ...
...
Setting up mariadb-server (1:10.6.12-0ubuntu0.22.04.1) ...
Processing triggers for man-db (2.10.2-1) ...
Processing triggers for libc-bin (2.35-0ubuntu3.1) ...
Now use systemctl to check that the database service is running:
root@database:~# systemctl status mariadb
The output will look like this:
root@database:~# systemctl status mariadb
● mariadb.service - MariaDB 10.6.12 database server
     Loaded: loaded (/lib/systemd/system/mariadb.service; enabled; vendor preset: enabled)
     Active: active (running) since Sun 2023-04-09 17:51:10 UTC; 1min 46s ago
       Docs: man:mariadbd(8)
             https://mariadb.com/kb/en/library/systemd/
    Process: 3311 ExecStartPre=/usr/bin/install -m 755 -o mysql -g root -d /var/run/mysqld (code=exited, status=0/SUCCESS)
    Process: 3312 ExecStartPre=/bin/sh -c systemctl unset-environment _WSREP_START_POSITION (code=exited, status=0/SUCCESS)
    Process: 3314 ExecStartPre=/bin/sh -c [ ! -e /usr/bin/galera_recovery ] && VAR= ||   VAR=`cd /usr/bin/..; /usr/bin/galera>
    Process: 3357 ExecStartPost=/bin/sh -c systemctl unset-environment _WSREP_START_POSITION (code=exited, status=0/SUCCESS)
    Process: 3359 ExecStartPost=/etc/mysql/debian-start (code=exited, status=0/SUCCESS)
   Main PID: 3343 (mariadbd)
     Status: "Taking your SQL requests now..."
      Tasks: 9 (limit: 38073)
     Memory: 61.1M
        CPU: 201ms
     CGroup: /system.slice/mariadb.service
             └─3343 /usr/sbin/mariadbd

Apr 09 17:51:10 database mariadbd[3343]: 2023-04-09 17:51:10 0 [Note] Plugin 'FEEDBACK' is disabled.
Apr 09 17:51:10 database mariadbd[3343]: 2023-04-09 17:51:10 0 [Note] InnoDB: Loading buffer pool(s) from /var/lib/mysql/ib_b>
Apr 09 17:51:10 database mariadbd[3343]: 2023-04-09 17:51:10 0 [Warning] You need to use --log-bin to make --expire-logs-days>
Apr 09 17:51:10 database mariadbd[3343]: 2023-04-09 17:51:10 0 [Note] Server socket created on IP: '127.0.0.1'.
Apr 09 17:51:10 database mariadbd[3343]: 2023-04-09 17:51:10 0 [Note] InnoDB: Buffer pool(s) load completed at 230409 17:51:10
Apr 09 17:51:10 database mariadbd[3343]: 2023-04-09 17:51:10 0 [Note] /usr/sbin/mariadbd: ready for connections.
Apr 09 17:51:10 database mariadbd[3343]: Version: '10.6.12-MariaDB-0ubuntu0.22.04.1'  socket: '/run/mysqld/mysqld.sock'  port>
Apr 09 17:51:10 database systemd[1]: Started MariaDB 10.6.12 database server.
Apr 09 17:51:10 database /etc/mysql/debian-start[3361]: Upgrading MySQL tables if necessary.
Apr 09 17:51:10 database /etc/mysql/debian-start[3376]: Triggering myisam-recover for all MyISAM tables and aria-recover for >
The status is active (running), which is what you want to see. You have your first server set up with a database instance running on it, which will serve as your primary server for this guide.
Step 3: Deploy the backup server on Equinix Metal
Deploy a second serever using the process covered in Step 1. For this guide, we'll call the second server backup. For the purposes of this guide, we will deploy in the same Dallas metro as our database server.
You could also deploy the backup server in a different Equinix Metal metro. This is good practice as it provides extra safety in case of failure of a metro. When you deploy to a different metro, the private IP address space is not shared between servers, even in the same project, which means you need to set up connectivity. Backend transfer is one way to do that that.
Once again, wait a few minutes for the server to be deployed, and then you can start to use it. Don't forget to record the server's IP address. In
our case, it is 147.75.53.31.

4. Install and configure the backup tool on the backup server
On our backup server, we will do the following.
- SSH to the server
- Update the package manager
- Install the software we need, specifically
minio - Configure minio
As in Step 2, use ssh to connect to the server:
ssh root@[backup_server_ip_address]
The output will look like this:
$ ssh root@147.75.53.31
The authenticity of host '147.75.53.31 (147.75.53.31)' can't be established.
ED25519 key fingerprint is SHA256:OA1v9dYFvNEkNujDT+RmpdYq8MFgLDHr/3BZUXa6nps.
...
As before, use apt update to update the package manager:
root@backup:~# apt update -y
Next, download minio and install it with the following command:
root@backup:~# curl -L -o /usr/local/bin/minio https://dl.min.io/server/minio/release/linux-amd64/minio
The output will look like this:
root@backup:~# curl -L -o /usr/local/bin/minio https://dl.min.io/server/minio/release/linux-amd64/minio
  % Total    % Received % Xferd  Average Speed   Time    Time     Time  Current
                                 Dload  Upload   Total   Spent    Left  Speed
100 94.0M  100 94.0M    0     0  31.7M      0  0:00:02  0:00:02 --:--:-- 31.7M
Use the chmod command to make the file executable:
root@backup:~# chmod +x /usr/local/bin/minio
Use minio --version to verify that minio installed successfully:
root@backup:~# minio --version
minio version RELEASE.2023-04-07T05-28-58Z (commit-id=260a63ca73b09cf029a872554aceed809ae47231)
Runtime: go1.20.3 linux/amd64
License: GNU AGPLv3 <https://www.gnu.org/licenses/agpl-3.0.html>
Copyright: 2015-2023 MinIO, Inc.
Next you'll create a minio user and group. Running software as root when it does not need to be is
not a good security practice. Use the adduser command:
root@backup:~# adduser --system --no-create-home --shell /bin/bash --group minio
Adding system user `minio' (UID 114) ...
Adding new group `minio' (GID 121) ...
Adding new user `minio' (UID 114) with group `minio' ...
Not creating home directory `/home/minio'.
Then create a special directory to store our data, /var/s3, and change ownership of that directory
to the minio user and group:
root@backup:~# mkdir -p /var/s3
root@backup:~# chown minio:minio /var/s3
Next, set up the minio server to listen only on the private IP address, not on all interfaces, especially not public ones. Since both of the servers are deployed in the same Equinix Metal project, they should have no problem communicating with each other over their private IP addresses.
Find the private IP address with ip addr:
root@backup:~# ip addr show bond0
5: bond0: <BROADCAST,MULTICAST,MASTER,UP,LOWER_UP> mtu 1500 qdisc noqueue state UP group default qlen 1000
    link/ether b4:96:91:70:26:78 brd ff:ff:ff:ff:ff:ff
    inet 147.75.53.31/31 brd 255.255.255.255 scope global bond0
       valid_lft forever preferred_lft forever
    inet 10.65.7.131/31 brd 255.255.255.255 scope global bond0:0
       valid_lft forever preferred_lft forever
    inet6 2604:1380:4642:4900::3/127 scope global
       valid_lft forever preferred_lft forever
    inet6 fe80::b696:91ff:fe70:2678/64 scope link
       valid_lft forever preferred_lft forever
You'll see two IPv4 addresses, one of which is the public IP address, and the other is the private IP address. We want the private IP address, which is 10.65.7.131 in this example. The two IPv6 addresses marked as inet6 are not relevant for this guide.
Become the minio user:
root@backup:~# su - minio
Switch to the /var/s3 directory:
minio@backup:/root$ cd /var/s3
Launch minio server:
minio@backup:/var/s3$ minio server --address 10.65.7.131:9000 /var/s3
Formatting 1st pool, 1 set(s), 1 drives per set.
WARNING: Host local has more than 0 drives of set. A host failure will result in data becoming unavailable.
WARNING: Detected default credentials 'minioadmin:minioadmin', we recommend that you change these values with 'MINIO_ROOT_USER' and 'MINIO_ROOT_PASSWORD' environment variables
MinIO Object Storage Server
Copyright: 2015-2023 MinIO, Inc.
License: GNU AGPLv3 <https://www.gnu.org/licenses/agpl-3.0.html>
Version: RELEASE.2023-04-07T05-28-58Z (go1.20.3 linux/amd64)

Status:         1 Online, 0 Offline.
API: http://10.65.7.131:9000
RootUser: minioadmin
RootPass: minioadmin
Console: http://10.65.7.131:40405 http://147.75.53.31:40405 http://127.0.0.1:40405
RootUser: minioadmin
RootPass: minioadmin

Command-line: https://min.io/docs/minio/linux/reference/minio-mc.html#quickstart
   $ mc alias set myminio http://10.65.7.131:9000 minioadmin minioadmin

Documentation: https://min.io/docs/minio/linux/index.html
Warning: The standard parity is set to 0. This can lead to data loss.
There are lots of warnings here, but you can ignore them for this example. If you run minio in production, we strongly recommend that you fully configure all of your servers and software.
Our backup server now is ready. Now it's time to set up the backup tool on the first server.
Step 5: Install and configure the backup tool on the database server
Switch back to the database server. If you logged out, be sure to SSH back in.
First, make sure the database server can reach the backup server. Ping the backup server's private IP address:
root@database:~# ping 10.65.7.131
root@database:~# ping 10.65.7.131
PING 10.65.7.131 (10.65.7.131) 56(84) bytes of data.
64 bytes from 10.65.7.131: icmp_seq=1 ttl=61 time=0.967 ms
64 bytes from 10.65.7.131: icmp_seq=2 ttl=61 time=0.679 ms
^C
--- 10.65.7.131 ping statistics ---
2 packets transmitted, 2 received, 0% packet loss, time 1002ms
rtt min/avg/max/mdev = 0.679/0.823/0.967/0.144 ms
The test is successful. Now, install the minio client (mc):
root@database:~# curl -L https://dl.min.io/client/mc/release/linux-amd64/mc -o /usr/local/bin/mc
  % Total    % Received % Xferd  Average Speed   Time    Time     Time  Current
                                 Dload  Upload   Total   Spent    Left  Speed
100 24.9M  100 24.9M    0     0  24.3M      0  0:00:01  0:00:01 --:--:-- 24.3M
root@database:~# chmod +x /usr/local/bin/mc
Use mc --version to make sure that it runs:
root@database:~# mc --version
mc version RELEASE.2023-04-06T16-51-10Z (commit-id=1c6f4f48aba72b4c9770d911e95225f9de6e9488)
Runtime: go1.20.3 linux/amd64
Copyright (c) 2015-2023 MinIO, Inc.
License GNU AGPLv3 <https://www.gnu.org/licenses/agpl-3.0.html>
Now use mc to connect to the minio server:
root@database:~# mc alias set myminio http://10.65.7.131:9000 minioadmin minioadmin
Added `myminio` successfully.
root@database:~# mc ping myminio
  1: http://10.65.7.131:9000:9000   min=1.95ms     max=1.95ms     average=1.95ms     errors=0   roundtrip=1.95ms
  2: http://10.65.7.131:9000:9000   min=1.32ms     max=1.95ms     average=1.63ms     errors=0   roundtrip=1.32ms
  3: http://10.65.7.131:9000:9000   min=1.32ms     max=1.95ms     average=1.53ms     errors=0   roundtrip=1.32ms
Now you'll install the backup software. The version of duplicity packaged by Ubuntu is out of date. Instead, install the latest version from the duplicity PPA:
root@database:~# add-apt-repository ppa:duplicity-team/duplicity-release-git
Repository: 'deb https://ppa.launchpadcontent.net/duplicity-team/duplicity-release-git/ubuntu/ jammy main'
Description:
Stable release versions of duplicity
...
Duplicity is a tool to manage a single backup. You can run an incremental or full backup, verify a backup, or run a restore. It does not, however, have scheduling services build in.
You'll need to make a bucket to which we can back up. Earlier, you aliased the backup server to the name myminio, so the bucket
will be named myminio/backups. Use mc to create the bucket:
root@database:~# mc mb myminio/backups
Bucket created successfully `myminio/backups`.
Next, create credentials, and give those credentials access to the bucket. You can use the mc tool
to do that, with the credentials ACCCESSKEY1 and SECRETKEY1 to do so (in production, be sure to use secure credentials):
root@database:~# mc admin user add myminio ACCESSKEY1 SECRETKEY1
Added user `ACCESSKEY1` successfully.

root@database:~# cat > /tmp/policy.json <<EOF
{
  "Version": "2012-10-17",
  "Statement": [
    {
      "Action": [
            "s3:ListBucket",
            "s3:PutObject",
            "s3:GetObject",
            "s3:DeleteObject"
        ],
      "Effect": "Allow",
      "Resource": [
        "arn:aws:s3:::backups/*", "arn:aws:s3:::backups"
      ],
      "Sid": "BucketAccessForUser"
    }
  ]
}
EOF

root@database:~# mc admin policy create myminio backups-bucket-policy /tmp/policy.json
Created policy `backups-bucket-policy` successfully.

root@database:~# mc admin policy attach myminio backups-bucket-policy --user ACCESSKEY1
Policy `backups-bucket-policy` successfully attached to user `ACCESSKEY1`
The last two commands make adjustments to the access policy for the backup server. This policy allows the user ACCESSKEY to create, delete, list, and get objects from the myminio/backups bucket.
6. Testing backups
Now that the database and backup servers are prepared with the necessary software, it's time to test the process.
We're doing this a little bit suboptimally for databases. Although they are built to handle inconsistent data, for example, if you run a backup during a write, you will get a backup that is not consistent. Good database servers are built from the ground up to handle this, but it still is good practice to use database-native tools to produce a dump on a regular basis, preferably from a replica, and then back that up. For our purposes, however, we will just back up the data directory.
The default data directory for mariadb is /var/lib/mysql, per this official mariadb knowledge base article.
Looking in that directory, you will see all of the database files:
root@database:~# ls -l /var/lib/mysql
total 123328
-rw-rw---- 1 mysql mysql    417792 Apr  9 17:51 aria_log.00000001
-rw-rw---- 1 mysql mysql        52 Apr  9 17:51 aria_log_control
-rw-rw---- 1 mysql mysql         9 Apr  9 17:51 ddl_recovery.log
-rw-r--r-- 1 root  root          0 Apr  9 17:51 debian-10.6.flag
-rw-rw---- 1 mysql mysql       942 Apr  9 17:51 ib_buffer_pool
-rw-rw---- 1 mysql mysql 100663296 Apr  9 17:53 ib_logfile0
-rw-rw---- 1 mysql mysql  12582912 Apr  9 17:51 ibdata1
-rw-rw---- 1 mysql mysql  12582912 Apr  9 17:51 ibtmp1
-rw-rw---- 1 mysql mysql         0 Apr  9 17:51 multi-master.info
drwx------ 2 mysql mysql      4096 Apr  9 17:51 mysql
-rw-r--r-- 1 root  root         15 Apr  9 17:51 mysql_upgrade_info
drwx------ 2 mysql mysql      4096 Apr  9 17:51 performance_schema
drwx------ 2 mysql mysql     12288 Apr  9 17:51 sys
Use duplicity to run a single full backup of this directory:
root@database:~# duplicity --s3-endpoint-url http://10.65.7.131:9000 /var/lib/mysql s3://backups/database
Local and Remote metadata are synchronized, no sync needed.
Last full backup date: none
GnuPG passphrase for decryption:
Retype passphrase for decryption to confirm:
No signatures found, switching to full backup.
--------------[ Backup Statistics ]--------------
StartTime 1681068957.81 (Sun Apr  9 19:35:57 2023)
EndTime 1681068959.58 (Sun Apr  9 19:35:59 2023)
ElapsedTime 1.76 (1.76 seconds)
SourceFiles 207
SourceFileSize 130450962 (124 MB)
NewFiles 207
NewFileSize 130450962 (124 MB)
DeletedFiles 0
ChangedFiles 0
ChangedFileSize 0 (0 bytes)
ChangedDeltaSize 0 (0 bytes)
DeltaEntries 207
RawDeltaSize 130426386 (124 MB)
TotalDestinationSizeChange 1139231 (1.09 MB)
Errors 0
-------------------------------------------------
For the GnuPG passphrase, I used the string abcdefg. In production you would configure this to use a proper key.
Now you'll update the database, and run the backup again.
root@database:~# cat > servers.txt <<EOF
a3.large.x86    2   1024
c3.medium.x86   24    64
m3.large.x86    32 256
EOF
Then use the 'mysql' command to start MariaDB's interactive shell:
root@c3-small-x86-01:~# mysql
MariaDB [(none)]> show databases;
+--------------------+
| Database           |
+--------------------+
| information_schema |
| mysql              |
| performance_schema |
| sys                |
+--------------------+
4 rows in set (0.001 sec)

MariaDB [(none)]> create database metal;
Query OK, 1 row affected (0.001 sec)

MariaDB [(none)]> use metal;
Database changed
MariaDB [metal]> create table servers (class varchar(20), cores smallint, memgb int);
Query OK, 0 rows affected (0.006 sec)

MariaDB [metal]> describe servers;
+-------+-------------+------+-----+---------+-------+
| Field | Type        | Null | Key | Default | Extra |
+-------+-------------+------+-----+---------+-------+
| class | varchar(20) | YES  |     | NULL    |       |
| cores | smallint(6) | YES  |     | NULL    |       |
| memgb | int(11)     | YES  |     | NULL    |       |
+-------+-------------+------+-----+---------+-------+
3 rows in set (0.002 sec)

MariaDB [metal]> load data local infile 'servers.txt' into table servers;
Query OK, 3 rows affected, 9 warnings (0.001 sec)
Records: 3  Deleted: 0  Skipped: 0  Warnings: 9

MariaDB [metal]> select * from servers;
+----------------------+-------+-------+
| class                | cores | memgb |
+----------------------+-------+-------+
| a3.large.x86    2    |  NULL |  NULL |
| c3.medium.x86   24   |  NULL |  NULL |
| m3.large.x86    32 2 |  NULL |  NULL |
+----------------------+-------+-------+
3 rows in set (0.001 sec)
You've now made some changes to the Maria database that you can use to test the backup.
Now run another backup with duplicity:
root@database:~# duplicity --s3-endpoint-url http://10.65.7.131:9000 /var/lib/mysql s3://backups/database
Local and Remote metadata are synchronized, no sync needed.
Last full backup date: Sun Apr  9 19:35:47 2023
GnuPG passphrase for decryption:
Retype passphrase for decryption to confirm:
--------------[ Backup Statistics ]--------------
StartTime 1681069164.21 (Sun Apr  9 19:39:24 2023)
EndTime 1681069164.62 (Sun Apr  9 19:39:24 2023)
ElapsedTime 0.41 (0.41 seconds)
SourceFiles 211
SourceFileSize 130533505 (124 MB)
NewFiles 5
NewFileSize 74360 (72.6 KB)
DeletedFiles 0
ChangedFiles 2
ChangedFileSize 100675584 (96.0 MB)
ChangedDeltaSize 0 (0 bytes)
DeltaEntries 7
RawDeltaSize 328237 (321 KB)
TotalDestinationSizeChange 3719 (3.63 KB)
Errors 0
-------------------------------------------------
The output shows that there are two changed files and five new files.
Now test the setup. First, shut down the database:
root@database:~# systemctl stop mariadb
Next, move the data directory out of the way, and make a clean one. This will replicate the situation of having a new database server.
root@database:~# mv /var/lib/mysql /var/lib/mysql.bak
root@database:~# mkdir /var/lib/mysql
Use duplicity to restore the database from the backup:
root@database:~# duplicity --s3-endpoint-url http://10.65.7.131:9000 s3://backups/database /var/lib/mysql
Local and Remote metadata are synchronized, no sync needed.
Last full backup date: Sun Apr  9 19:35:47 2023
GnuPG passphrase for decryption:
Restart the database:
root@database:~# systemctl start mariadb
Now check to see if the data is there.
root@database:~# mysql
Welcome to the MariaDB monitor.  Commands end with ; or \g.
Your MariaDB connection id is 31
Server version: 10.6.12-MariaDB-0ubuntu0.22.04.1 Ubuntu 22.04

Copyright (c) 2000, 2018, Oracle, MariaDB Corporation Ab and others.

Type 'help;' or '\h' for help. Type '\c' to clear the current input statement.

MariaDB [(none)]> use metal;
Reading table information for completion of table and column names
You can turn off this feature to get a quicker startup with -A

Database changed
MariaDB [metal]> select * from servers;
+----------------------+-------+-------+
| class                | cores | memgb |
+----------------------+-------+-------+
| a3.large.x86    2    |  NULL |  NULL |
| c3.medium.x86   24   |  NULL |  NULL |
| m3.large.x86    32 2 |  NULL |  NULL |
+----------------------+-------+-------+
3 rows in set (0.001 sec)
This matches the data added to the database before the most recent backup, so you know that it completed successfully.
Conclusion
In this tutorial, you set up a mock database server with MariaDB, then set up a second server as a backup server using MinIO. You installed duplicity on the database server and used it to create a backup, which was automatically copied to an s3 bucket on the backup server. Finally, you tested the backed up database to ensure that it worked as planned.
This is a relatively simple case to demonstrate how to use MinIO for backups. In the real world, you'd be dealing with much larger files and more complex data sets. However, the principle remains the same: set up data redundancy to protect yourself and your customers' data in an emergency.
You may also like
Digger deeper into similar topics in our archives
Configuring BGP with BIRD 1.6 on an Equinix Metal Server
Set up BGP on your Equinix Metal server using BIRD 1.6, covering IP configuration, installation, and neighbor setup to ensure robust routing capabilities between your server and the Equinix...

Configuring BGP with FRR on an Equinix Metal Server
Establish a robust BGP configuration on your Equinix Metal server using FRR, including setting up network interfaces, installing and configuring FRR software, and ensuring secure and efficie...

Crosscloud VPN with Wireguard
Learn to establish secure VPN connections across cloud environments using WireGuard, including detailed setups for site-to-site tunnels and VPN gateways with NAT on Equinix Metal, enhancing...

Deploy Your First Server
Learn the essentials of deploying your first server with Equinix Metal. Set up your project & SSH keys, provision a server and connect it to the internet.

Ready to kick the tires?
Use code DEPLOYNOW for $300 credit