- Home /
- Resources /
- Learning center /
- Building Resilienc...
Building Resiliency for Data with Redundancy
A hands-on implementation for resiliency of your data on Equinix Metal via redundancy.

On this page
How do we get resiliency for data?
In our introduction to resiliency, we discussed the importance of resiliency in the face of failure. We distinguished between providing resiliency for your processes running on your servers and your critical data itself.
In this guide, we will walk you through a hands-on implementation for resiliency of your data on Equinix Metal via redundancy. Another guide will address backups.
There are many ways to get redundancy for your data. The best usually is if your software inherently supports it. For example, many databases support replication, which means that you can run multiple instances of the database. Often you even can use all of them for read simultaneously, while one remains the primary location for writes. Some databases even support "multimaster", which means that all instances can be used simultaneously for writes.
If your software does not support replication, you can still get data redundancy via infrastructure-level, such as RAID or zfs on a single server, or replicated filesystems on multiple servers.
For this getting started guide, we will show replication at the software level, using the popular open source database MariaDB.
We will deploy 3 servers, one of which will be the "source", while the other 2 will be the "replicas".
We will do this in several stages:
- Deploy servers
- Install software on our servers
- Configure the software
- Load data
- Test our setup
1. Deploy servers
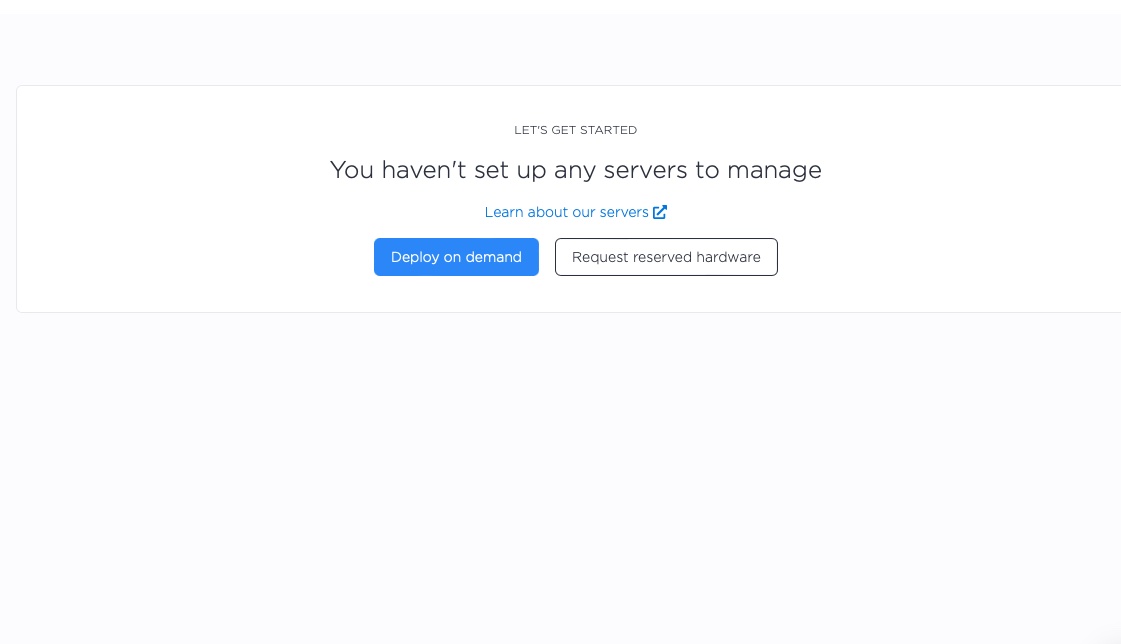
Let's start by setting up three servers. You can do this via the Equinix Metal Console, the CLI, Terraform, or any tool that interacts with the Equinix Metal API.
We will use the Equinix Metal Console for this example. For a basic getting started guide to deploying your first server, see Deploy Your First Server.
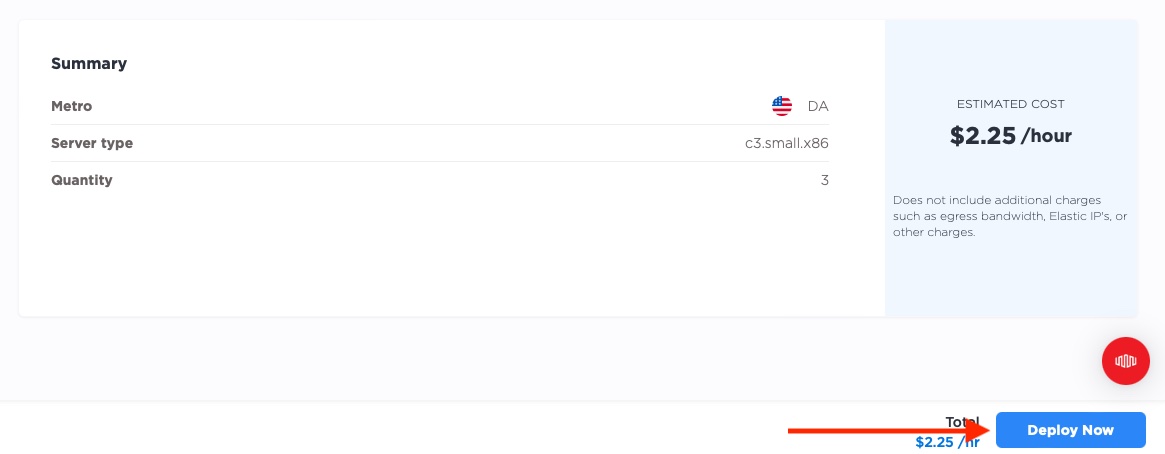
We are deploying to Dallas, using our c3.small.x86, but of course, you can deploy whichever server types to whichever region suits your purposes.
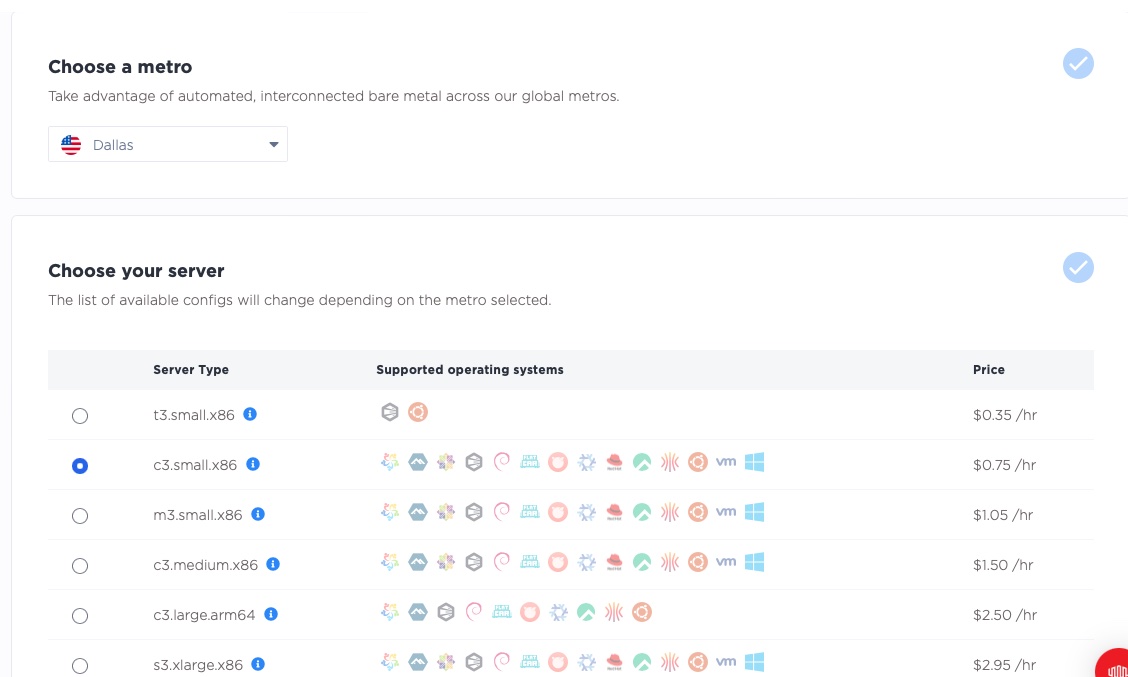
Next, we select our operating system, Ubuntu 22.04, which is widely accepted in the cloud and easy to use. Pick whichever operating system you prefer. As described above, we deploy 3 servers.

And we click "Deploy Now".
Now we wait for the servers to be ready. This can take a few minutes.
2. Install software on our servers
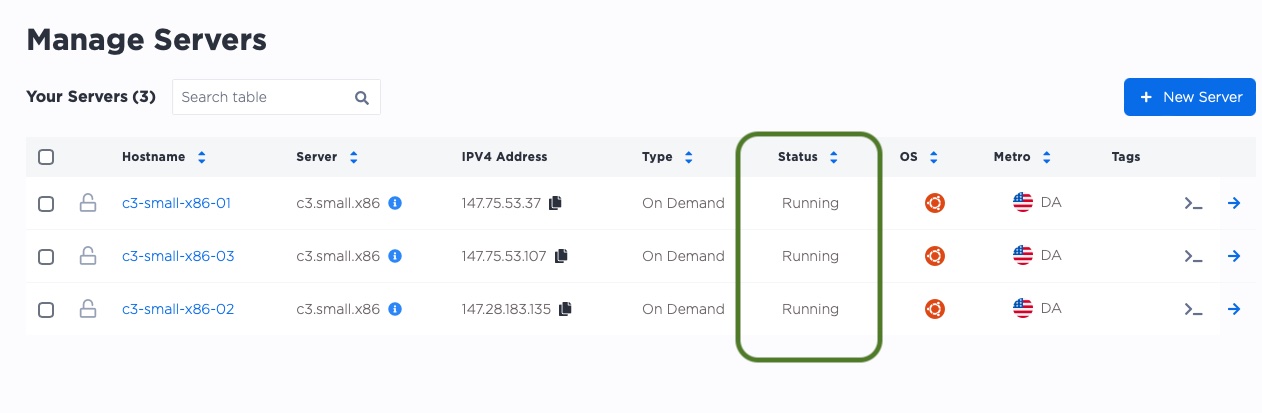
Let's navigate back to our main manage servers page. We can see that each server was given a public IP by Equinix Metal. We will use those IPs to ssh into the server and set it up.
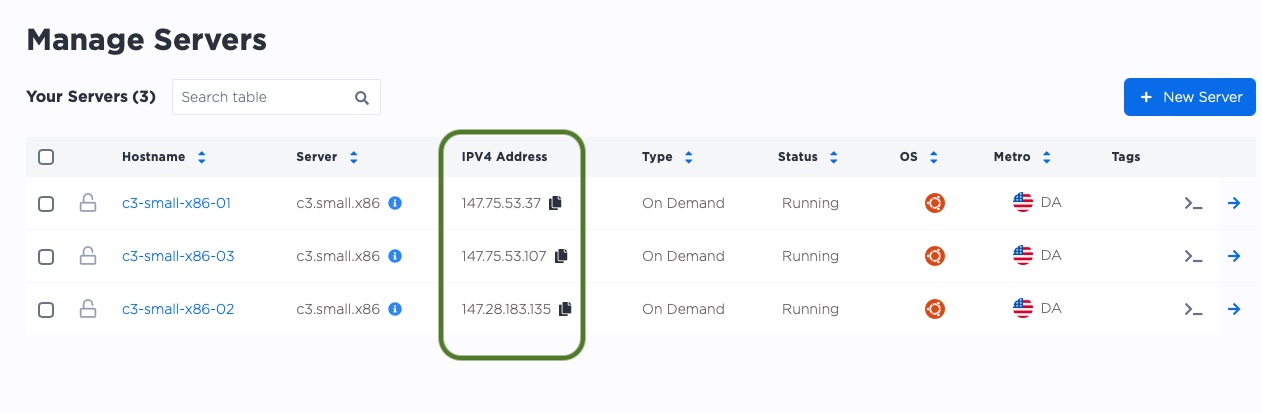
In the above example, the IPs are:
-
147.75.53.37 -
147.75.53.107 -
147.28.183.135
In your project, these IP addresses are likely different, so be sure to change them as you follow the examples.
On each of the servers, we will do the following.
- ssh to the server
- update the package manager
- install the software we need, specifically
mariadb, as well as some other utilities
Let's ssh to the first server.
$ ssh root@147.75.53.37
The authenticity of host '147.75.53.37 (147.75.53.37)' can't be established.
ED25519 key fingerprint is SHA256:f9042p0q0gD1jjzBI6+L06PbTWoWLEO5dsGqy/1wZok.
This key is not known by any other names
Are you sure you want to continue connecting (yes/no/[fingerprint])? yes
Warning: Permanently added '147.75.53.37' (ED25519) to the list of known hosts.
Welcome to Ubuntu 22.04.1 LTS (GNU/Linux 5.15.0-58-generic x86_64)

 * Documentation:  https://help.ubuntu.com
 * Management:     https://landscape.canonical.com
 * Support:        https://ubuntu.com/advantage

  System information as of Mon Apr  3 12:10:10 UTC 2023

  System load:            0.0
  Usage of /:             0.7% of 438.04GB
  Memory usage:           2%
  Swap usage:             0%
  Temperature:            38.0 C
  Processes:              255
  Users logged in:        0
  IPv4 address for bond0: 147.75.53.37
  IPv6 address for bond0: 2604:1380:4643:1400::1

6 updates can be applied immediately.
6 of these updates are standard security updates.
To see these additional updates run: apt list --upgradable


The list of available updates is more than a week old.
To check for new updates run: sudo apt update


The programs included with the Ubuntu system are free software;
the exact distribution terms for each program are described in the
individual files in /usr/share/doc/*/copyright.

Ubuntu comes with ABSOLUTELY NO WARRANTY, to the extent permitted by
applicable law.

root@c3-small-x86-01:~#
We now are logged into the server. Notice that the first time we log in, it asks us if we want to trust the ssh key of the server,
as our local system has not seen it before. We can answer yes to this question for now.
With each login, it also gives us information about the server and operating system.
We end up with our command-prompt, giving us the username with which we are logged in (root), the name of the server (c3-small-x86-01),
and the # prompt, indicating that we are the superuser, or root.
We can now update the package manager and install the software we need.
root@c3-small-x86-01:~# apt update -y
Hit:1 http://archive.ubuntu.com/ubuntu jammy InRelease
Get:2 http://security.ubuntu.com/ubuntu jammy-security InRelease [110 kB]
Get:3 http://archive.ubuntu.com/ubuntu jammy-updates InRelease [119 kB]
Get:4 http://security.ubuntu.com/ubuntu jammy-security/main amd64 Packages [728 kB]
Get:5 http://archive.ubuntu.com/ubuntu jammy-backports InRelease [108 kB]
Get:6 http://archive.ubuntu.com/ubuntu jammy-updates/main amd64 Packages [990 kB]
Get:7 http://security.ubuntu.com/ubuntu jammy-security/main Translation-en [147 kB]
Get:8 http://security.ubuntu.com/ubuntu jammy-security/main amd64 c-n-f Metadata [9016 B]
Get:9 http://security.ubuntu.com/ubuntu jammy-security/restricted amd64 Packages [701 kB]
Get:10 http://archive.ubuntu.com/ubuntu jammy-updates/main Translation-en [210 kB]
Get:11 http://archive.ubuntu.com/ubuntu jammy-updates/main amd64 c-n-f Metadata [13.9 kB]
Get:12 http://archive.ubuntu.com/ubuntu jammy-updates/restricted amd64 Packages [743 kB]
Get:13 http://security.ubuntu.com/ubuntu jammy-security/restricted Translation-en [109 kB]
Get:14 http://security.ubuntu.com/ubuntu jammy-security/restricted amd64 c-n-f Metadata [588 B]
Get:15 http://security.ubuntu.com/ubuntu jammy-security/universe amd64 Packages [716 kB]
Get:16 http://archive.ubuntu.com/ubuntu jammy-updates/restricted Translation-en [115 kB]
Get:17 http://archive.ubuntu.com/ubuntu jammy-updates/restricted amd64 c-n-f Metadata [588 B]
Get:18 http://archive.ubuntu.com/ubuntu jammy-updates/universe amd64 Packages [898 kB]
Get:19 http://security.ubuntu.com/ubuntu jammy-security/universe Translation-en [118 kB]
Get:20 http://security.ubuntu.com/ubuntu jammy-security/universe amd64 c-n-f Metadata [14.1 kB]
Get:21 http://security.ubuntu.com/ubuntu jammy-security/multiverse amd64 Packages [19.4 kB]
Get:22 http://archive.ubuntu.com/ubuntu jammy-updates/universe Translation-en [180 kB]
Get:23 http://security.ubuntu.com/ubuntu jammy-security/multiverse Translation-en [4068 B]
Get:24 http://archive.ubuntu.com/ubuntu jammy-updates/universe amd64 c-n-f Metadata [18.5 kB]
Get:25 http://security.ubuntu.com/ubuntu jammy-security/multiverse amd64 c-n-f Metadata [228 B]
Get:26 http://archive.ubuntu.com/ubuntu jammy-updates/multiverse amd64 Packages [24.1 kB]
Get:27 http://archive.ubuntu.com/ubuntu jammy-updates/multiverse Translation-en [6312 B]
Get:28 http://archive.ubuntu.com/ubuntu jammy-updates/multiverse amd64 c-n-f Metadata [444 B]
Get:29 http://archive.ubuntu.com/ubuntu jammy-backports/main amd64 Packages [40.6 kB]
Get:30 http://archive.ubuntu.com/ubuntu jammy-backports/main Translation-en [9800 B]
Get:31 http://archive.ubuntu.com/ubuntu jammy-backports/main amd64 c-n-f Metadata [388 B]
Get:32 http://archive.ubuntu.com/ubuntu jammy-backports/universe amd64 Packages [20.3 kB]
Get:33 http://archive.ubuntu.com/ubuntu jammy-backports/universe Translation-en [14.4 kB]
Get:34 http://archive.ubuntu.com/ubuntu jammy-backports/universe amd64 c-n-f Metadata [480 B]
Fetched 6189 kB in 2s (2785 kB/s)
Reading package lists... Done
Building dependency tree... Done
Reading state information... Done
82 packages can be upgraded. Run 'apt list --upgradable' to see them.
That went well enough. We are not going to bother upgrading packages at this point, as we are not interested in general operating system updates, just getting our example to work.
Next, let's install the software we need. The output includes a lot of extraneous data, so out output in this guide is somewhat truncated, to keep it readable.
root@c3-small-x86-01:~# apt install -y mariadb-server mariadb-client
Reading package lists... Done
Building dependency tree... Done
Reading state information... Done
The following package was automatically installed and is no longer required:
  grub-pc-bin
Use 'apt autoremove' to remove it.
The following additional packages will be installed:
  galera-4 libcgi-fast-perl libcgi-pm-perl libclone-perl libconfig-inifiles-perl libdaxctl1 libdbd-mysql-perl libdbi-perl
  libencode-locale-perl libfcgi-bin libfcgi-perl libfcgi0ldbl libhtml-parser-perl libhtml-tagset-perl libhtml-template-perl
  libhttp-date-perl libhttp-message-perl libio-html-perl liblwp-mediatypes-perl libmariadb3 libmysqlclient21 libndctl6
  libpmem1 libsnappy1v5 libtimedate-perl liburi-perl liburing2 mariadb-client-10.6 mariadb-client-core-10.6 mariadb-common
  mariadb-server-10.6 mariadb-server-core-10.6 mysql-common socat
Suggested packages:
  libmldbm-perl libnet-daemon-perl libsql-statement-perl libdata-dump-perl libipc-sharedcache-perl libbusiness-isbn-perl
  libwww-perl mailx mariadb-test
The following NEW packages will be installed:
  galera-4 libcgi-fast-perl libcgi-pm-perl libclone-perl libconfig-inifiles-perl libdaxctl1 libdbd-mysql-perl libdbi-perl
  libencode-locale-perl libfcgi-bin libfcgi-perl libfcgi0ldbl libhtml-parser-perl libhtml-tagset-perl libhtml-template-perl
  libhttp-date-perl libhttp-message-perl libio-html-perl liblwp-mediatypes-perl libmariadb3 libmysqlclient21 libndctl6
  libpmem1 libsnappy1v5 libtimedate-perl liburi-perl liburing2 mariadb-client mariadb-client-10.6 mariadb-client-core-10.6
  mariadb-common mariadb-server mariadb-server-10.6 mariadb-server-core-10.6 mysql-common socat
0 upgraded, 36 newly installed, 0 to remove and 82 not upgraded.
Need to get 18.6 MB of archives.
After this operation, 165 MB of additional disk space will be used.
Get:1 http://archive.ubuntu.com/ubuntu jammy/main amd64 mysql-common all 5.8+1.0.8 [7212 B]
...
...
Get:36 http://archive.ubuntu.com/ubuntu jammy-updates/universe amd64 mariadb-server all 1:10.6.12-0ubuntu0.22.04.1 [11.8 kB]
Fetched 18.6 MB in 4s (4182 kB/s)
Extracting templates from packages: 100%
Preconfiguring packages ...
...
...
Selecting previously unselected package mariadb-server.
Preparing to unpack .../20-mariadb-server_1%3a10.6.12-0ubuntu0.22.04.1_all.deb ...
Unpacking mariadb-server (1:10.6.12-0ubuntu0.22.04.1) ...
Setting up libconfig-inifiles-perl (3.000003-1) ...
...
...
Setting up mariadb-server (1:10.6.12-0ubuntu0.22.04.1) ...
Processing triggers for man-db (2.10.2-1) ...
Processing triggers for libc-bin (2.35-0ubuntu3.1) ...
Scanning processes...
Scanning processor microcode...
Scanning linux images...

Running kernel seems to be up-to-date.

The processor microcode seems to be up-to-date.

No services need to be restarted.

No containers need to be restarted.

No user sessions are running outdated binaries.

No VM guests are running outdated hypervisor (qemu) binaries on this host.
Notice that mariadb-server and mariadb-client have a large number of dependencies, and that apt installs them all for us.
Now check that it is running:
root@c3-small-x86-01:~# systemctl status mariadb
● mariadb.service - MariaDB 10.6.12 database server
     Loaded: loaded (/lib/systemd/system/mariadb.service; enabled; vendor preset: enabled)
     Active: active (running) since Mon 2023-04-03 12:13:13 UTC; 5min ago
       Docs: man:mariadbd(8)
             https://mariadb.com/kb/en/library/systemd/
    Process: 3382 ExecStartPre=/usr/bin/install -m 755 -o mysql -g root -d /var/run/mysqld (code=exited, status=0/SUCCESS)
    Process: 3383 ExecStartPre=/bin/sh -c systemctl unset-environment _WSREP_START_POSITION (code=exited, status=0/SUCCESS)
    Process: 3385 ExecStartPre=/bin/sh -c [ ! -e /usr/bin/galera_recovery ] && VAR= ||   VAR=`cd /usr/bin/..; /usr/bin/galera>
    Process: 3435 ExecStartPost=/bin/sh -c systemctl unset-environment _WSREP_START_POSITION (code=exited, status=0/SUCCESS)
    Process: 3437 ExecStartPost=/etc/mysql/debian-start (code=exited, status=0/SUCCESS)
   Main PID: 3414 (mariadbd)
     Status: "Taking your SQL requests now..."
      Tasks: 7 (limit: 38270)
     Memory: 61.2M
        CPU: 313ms
     CGroup: /system.slice/mariadb.service
             └─3414 /usr/sbin/mariadbd

Apr 03 12:13:13 c3-small-x86-01 mariadbd[3414]: 2023-04-03 12:13:13 0 [Note] /usr/sbin/mariadbd: ready for connections.
Apr 03 12:13:13 c3-small-x86-01 mariadbd[3414]: Version: '10.6.12-MariaDB-0ubuntu0.22.04.1'  socket: '/run/mysqld/mysqld.sock>
Apr 03 12:13:13 c3-small-x86-01 systemd[1]: Started MariaDB 10.6.12 database server.
Apr 03 12:13:13 c3-small-x86-01 /etc/mysql/debian-start[3439]: Upgrading MySQL tables if necessary.
Apr 03 12:13:13 c3-small-x86-01 /etc/mysql/debian-start[3442]: Looking for 'mariadb' as: /usr/bin/mariadb
Apr 03 12:13:13 c3-small-x86-01 /etc/mysql/debian-start[3442]: Looking for 'mariadb-check' as: /usr/bin/mariadb-check
Apr 03 12:13:13 c3-small-x86-01 /etc/mysql/debian-start[3442]: This installation of MariaDB is already upgraded to 10.6.12-Ma>
Apr 03 12:13:13 c3-small-x86-01 /etc/mysql/debian-start[3442]: There is no need to run mysql_upgrade again for 10.6.12-MariaD>
Apr 03 12:13:13 c3-small-x86-01 /etc/mysql/debian-start[3442]: You can use --force if you still want to run mysql_upgrade
Apr 03 12:13:13 c3-small-x86-01 /etc/mysql/debian-start[3454]: Triggering myisam-recover for all MyISAM tables and aria-recov>
The status is active (running), which sounds good to us.
Repeat on the other two servers.
3. Configure the Software
We are going to configure mariadb in a simple fashion, with one "source" and two "replica" instances. We aren't going to do any sort of database optimization, proper database and table structures, logins and security, or any of that.
We highly (really highly) recommend you do both of those things in a production environment. You want your database running properly, and you want to keep it secure.
For the purposes of this getting started guide, though, this will do.
On the source database:
root@c3-small-x86-01:~# vi /etc/mysql/mariadb.conf.d/50-server.cnf
And edit it to include the following lines. The default will contain the comments shown below, so look for those to insert them, around line 65. We are adding or uncommenting the following important lines:
-
server-id- this is the unique ID of this server. It must be unique in the cluster. -
log-bin -
log-basename- this is the base name of the log files. We are usingmaster1here, but you can use whatever you want. -
binlog-format- this is the format of the log files. -
#bind-address- we are commenting this out with the#character. By default, mariadb binds to just the localhost, but we need the source server to bind to all interfaces.
# The following can be used as easy to replay backup logs or for replication.
# note: if you are setting up a replication slave, see README.Debian about
#       other settings you may need to change.
server-id              = 1
log_bin                = /var/log/mysql/mysql-bin.log
expire_logs_days        = 10
#max_binlog_size        = 100M
log-bin
log-basename=master1
binlog-format=mixed

# comment out bin-address to localhost
#bind-address            = 127.0.0.1
With that done, restart mariadb:
root@c3-small-x86-01:~# systemctl restart mariadb
Then create the replication user with a password. We are using the not-quite-super-secret bigs3cret here, but you should use
proper security proedures. We need to grant the user the REPLICATION SLAVE permission, which is required for replication.
root@c3-small-x86-01:~# mysql
Welcome to the MariaDB monitor.  Commands end with ; or \g.
Your MariaDB connection id is 32
Server version: 10.6.12-MariaDB-0ubuntu0.22.04.1-log Ubuntu 22.04

Copyright (c) 2000, 2018, Oracle, MariaDB Corporation Ab and others.

Type 'help;' or '\h' for help. Type '\c' to clear the current input statement.

MariaDB [(none)]> CREATE USER 'replication_user'@'%' IDENTIFIED BY 'bigs3cret';
Query OK, 0 rows affected (0.001 sec)

MariaDB [(none)]> GRANT REPLICATION SLAVE ON *.* TO 'replication_user'@'%';
Query OK, 0 rows affected (0.001 sec)
Next, let's get the status of the master:
root@c3-small-x86-01:~# mysql
MariaDB [(none)]> show master status
    -> ;
+--------------------+----------+--------------+------------------+
| File               | Position | Binlog_Do_DB | Binlog_Ignore_DB |
+--------------------+----------+--------------+------------------+
| master1-bin.000002 |      344 |              |                  |
+--------------------+----------+--------------+------------------+
1 row in set (0.000 sec)
Now we are ready to configure the replica servers. The process is the same on all:
- ssh to the server
- Configure the server ID
- Restart mariadb
- Configure it to be a replica
- Start the replica
$ ssh root@147.75.53.107
root@c3-small-x86-02:~# vi /etc/mysql/mariadb.conf.d/50-server.cnf
Set the server ID to 2 for server -02, 3 for server -03, and restart mariadb:
server-id = 2
Restart mariadb:
root@c3-small-x86-02:~# systemctl restart mariadb
Finally, we can configure the replica. The data you need is:
-
MASTER_HOST- the IP address or domain name of the source server, in our case 147.75.53.37 -
MASTER_USER- the username of the replication user we set on the source server, in our casereplication_user -
MASTER_PASSWORD- the password of the replication user we set on the source server, in our casebigs3cret -
MASTER_PORT- the port of the source server, in our case the mysql and mariadb standard of 3306 -
MASTER_LOG_FILE- the name of the log file, in our casemaster1-bin.000002. We got this from earlier, when we ranshow master statuson the source server. -
MASTER_LOG_POS- the position in the log file, in our case344. We got this from earlier, when we ranshow master statuson the source server.
# mysql
MariaDB [(none)]> CHANGE MASTER TO
  MASTER_HOST='147.75.53.37',
  MASTER_USER='replication_user',
  MASTER_PASSWORD='bigs3cret',
  MASTER_PORT=3306,
  MASTER_LOG_FILE='master1-bin.000002',
  MASTER_LOG_POS=344,
  MASTER_CONNECT_RETRY=10;

MariaDB [(none)]> START SLAVE;
At this point, everything is being replicated.
4. Load Data
Our primary source server, c3-small-x86-01, is the only one where we should be doing writes, while -02 and -03 are read-only replicas.
Let's ssh back into c3-small-x86-01, create a database, and load some data into the database.
Of course, we will name our database "metal"! We will create one table named servers to hold information about the
server types Equinix Metal has to offer.
To keep it simple, our servers table will just have three columns and three rows. Needless to say, the real one has a lot more
valuable information (the technical term is "goodies") and many more rows. Check out the list of awesome servers we have
at the servers page.
Note that the fields in the table are separated by tabs, not spaces. This is because we are going to use the LOAD DATA INFILE
$ ssh root@147.75.53.37
root@c3-small-x86-01:~# cat > servers.txt <<EOF
a3.large.x86    2   1024
c3.medium.x86   24    64
m3.large.x86    32 256
EOF
root@c3-small-x86-01:~# mysql
MariaDB [(none)]> show databases;
+--------------------+
| Database           |
+--------------------+
| information_schema |
| mysql              |
| performance_schema |
| sys                |
+--------------------+
4 rows in set (0.001 sec)

MariaDB [(none)]> create database metal;
Query OK, 1 row affected (0.001 sec)

MariaDB [(none)]> use metal;
Database changed
MariaDB [metal]> create table servers (class varchar(20), cores smallint, memgb int);
Query OK, 0 rows affected (0.006 sec)

MariaDB [metal]> describe servers;
+-------+-------------+------+-----+---------+-------+
| Field | Type        | Null | Key | Default | Extra |
+-------+-------------+------+-----+---------+-------+
| class | varchar(20) | YES  |     | NULL    |       |
| cores | smallint(6) | YES  |     | NULL    |       |
| memgb | int(11)     | YES  |     | NULL    |       |
+-------+-------------+------+-----+---------+-------+
3 rows in set (0.002 sec)

MariaDB [metal]> load data local infile 'servers.txt' into table servers;
We can check the data is there by running a select query:
MariaDB [metal]> select * from servers;
+---------------+-------+-------+
| class         | cores | memgb |
+---------------+-------+-------+
| a3.large.x86  |     2 |  1024 |
| c3.medium.x86 |    24 |    64 |
| m3.large.x86  |    32 |   256 |
|               |  NULL |  NULL |
+---------------+-------+-------+
4 rows in set (0.001 sec)
Those certainly look like the servers we have!
5. Test Replication
With all of that in place, we should be able to go to our replicated server and see the data we just loaded.
$ ssh root@147.28.183.135
root@c3-small-x86-02:~# mysql
Welcome to the MariaDB monitor.  Commands end with ; or \g.
Your MariaDB connection id is 38
Server version: 10.6.12-MariaDB-0ubuntu0.22.04.1 Ubuntu 22.04

Copyright (c) 2000, 2018, Oracle, MariaDB Corporation Ab and others.

Type 'help;' or '\h' for help. Type '\c' to clear the current input statement.

MariaDB [(none)]> use metal;
Reading table information for completion of table and column names
You can turn off this feature to get a quicker startup with -A

Database changed
MariaDB [metal]> select * from servers;
+---------------+-------+-------+
| class         | cores | memgb |
+---------------+-------+-------+
| a3.large.x86  |     2 |  1024 |
| c3.medium.x86 |    24 |    64 |
| m3.large.x86  |    32 |   256 |
|               |  NULL |  NULL |
+---------------+-------+-------+
4 rows in set (0.001 sec)
Success!
You may also like
Digger deeper into similar topics in our archives
Configuring BGP with BIRD 1.6 on an Equinix Metal Server
Set up BGP on your Equinix Metal server using BIRD 1.6, covering IP configuration, installation, and neighbor setup to ensure robust routing capabilities between your server and the Equinix...

Configuring BGP with FRR on an Equinix Metal Server
Establish a robust BGP configuration on your Equinix Metal server using FRR, including setting up network interfaces, installing and configuring FRR software, and ensuring secure and efficie...

Crosscloud VPN with Wireguard
Learn to establish secure VPN connections across cloud environments using WireGuard, including detailed setups for site-to-site tunnels and VPN gateways with NAT on Equinix Metal, enhancing...

Deploy Your First Server
Learn the essentials of deploying your first server with Equinix Metal. Set up your project & SSH keys, provision a server and connect it to the internet.

Ready to kick the tires?
Use code DEPLOYNOW for $300 credit