- Home /
- Resources /
- Learning center /
- Deploy Your First...
Deploy Your First Server
Learn the essentials of deploying your first server with Equinix Metal. Set up your project & SSH keys, provision a server and connect it to the internet.

On this page
Bare metal infrastructure acts a lot like the hyperscaler clouds you may know, while providing more control and power. If you’re new to the space, these capabilities can feel a bit overwhelming. The high-performance, low-latency infrastructure that puts you in control of your stack is well worth learning it.
If you haven’t been introduced to the Equinix Metal console, we recommend you take some time to orient yourself to your new platform.
In this guide, you'll create and set up your first server, following these steps:
- Create a project: register for an account, create an organization, and create a project.
- Set SSH keys: create an SSH key pair and upload it to your account.
- Deploy your server: create a server, attach an elastic IP, and connect to it.
- Assign an IP address: create an elastic IP and attach it to the server.
Step 1: Create a project
Start by pointing your browser to the Equinix Metal Console at https://console.equinix.com. If you have an account, log in. If not, select "Create your account."
If you choose to create your account, you'll be asked for the name of a new organization and your billing information. You won’t be charged until after you spin up your first server, but we do need a credit card on file to prevent fraudulent activity.
If you already have an account, go ahead and log in. Select the organization you want to work in.
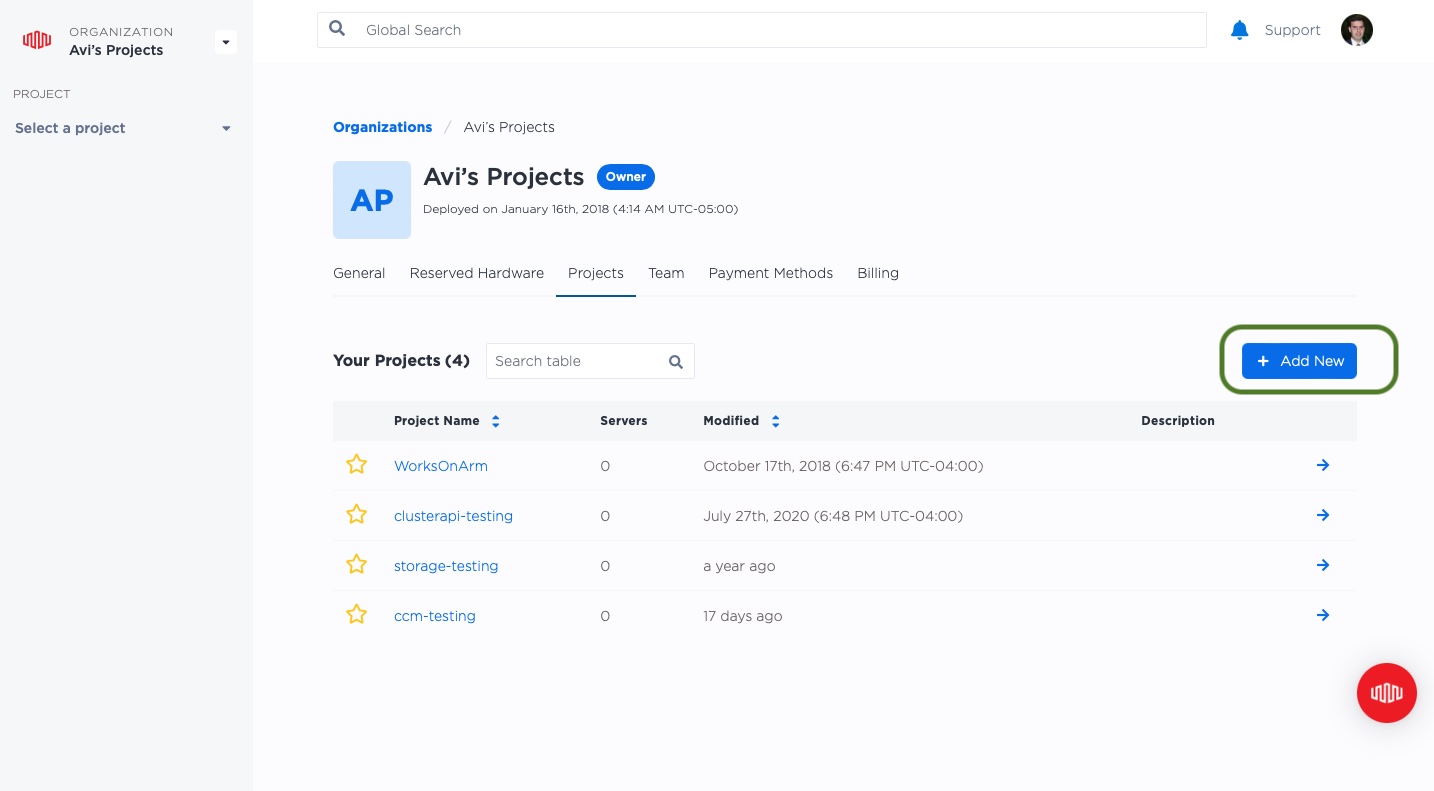
Next, you'll create a new project to work with. In the upper-left corner, under "PROJECT", click the drop-down and select "All Projects."
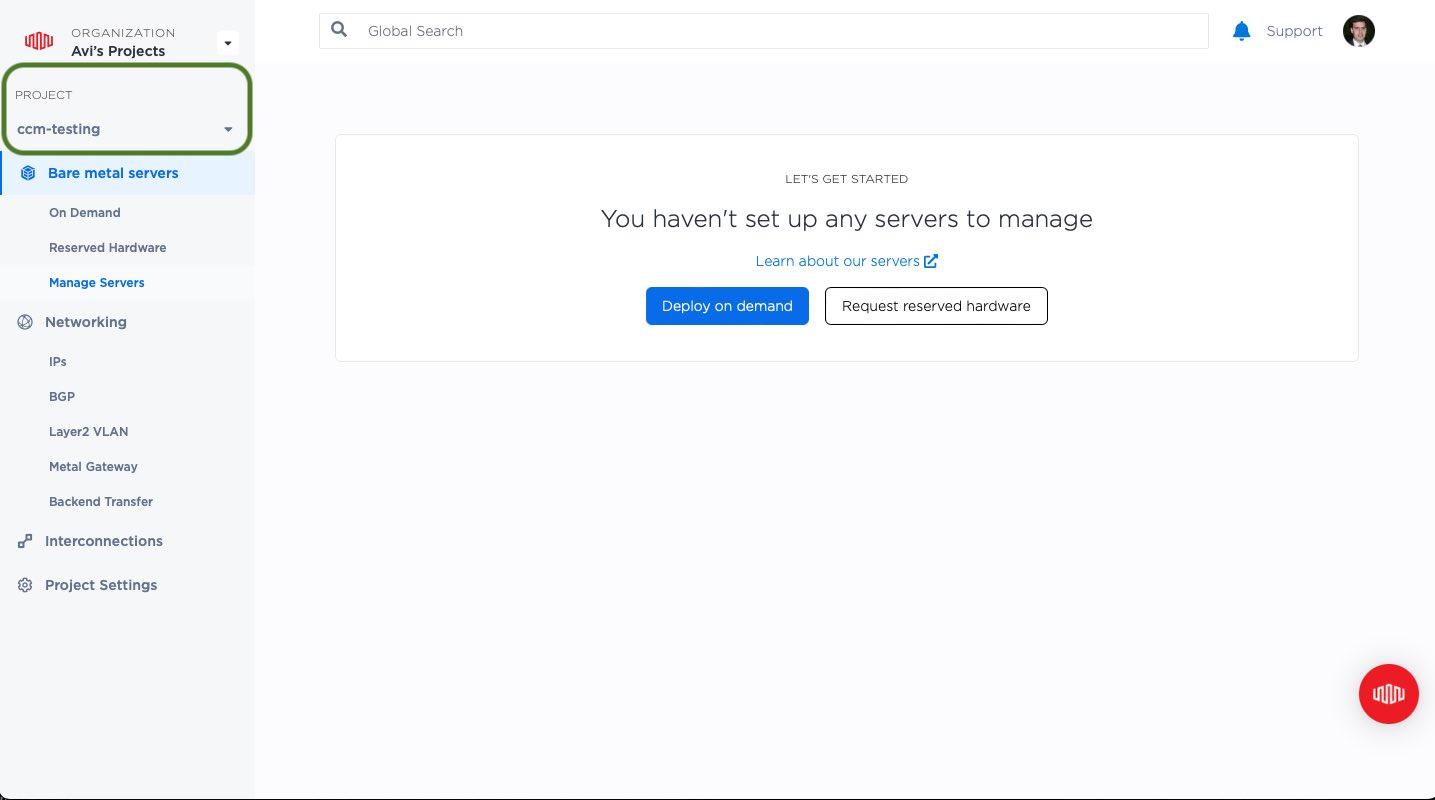
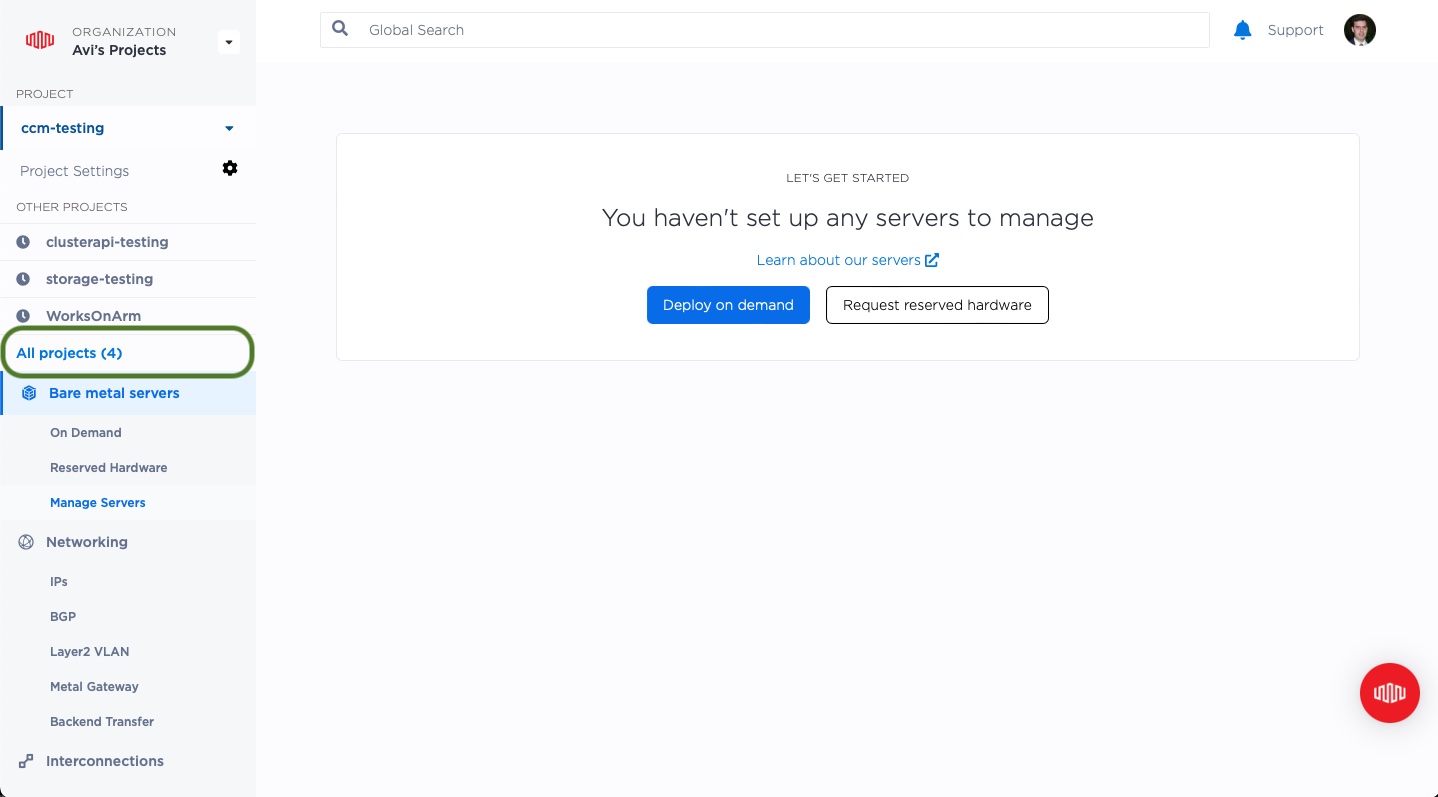
This will fill the Main Panel with information on projects in your organization.
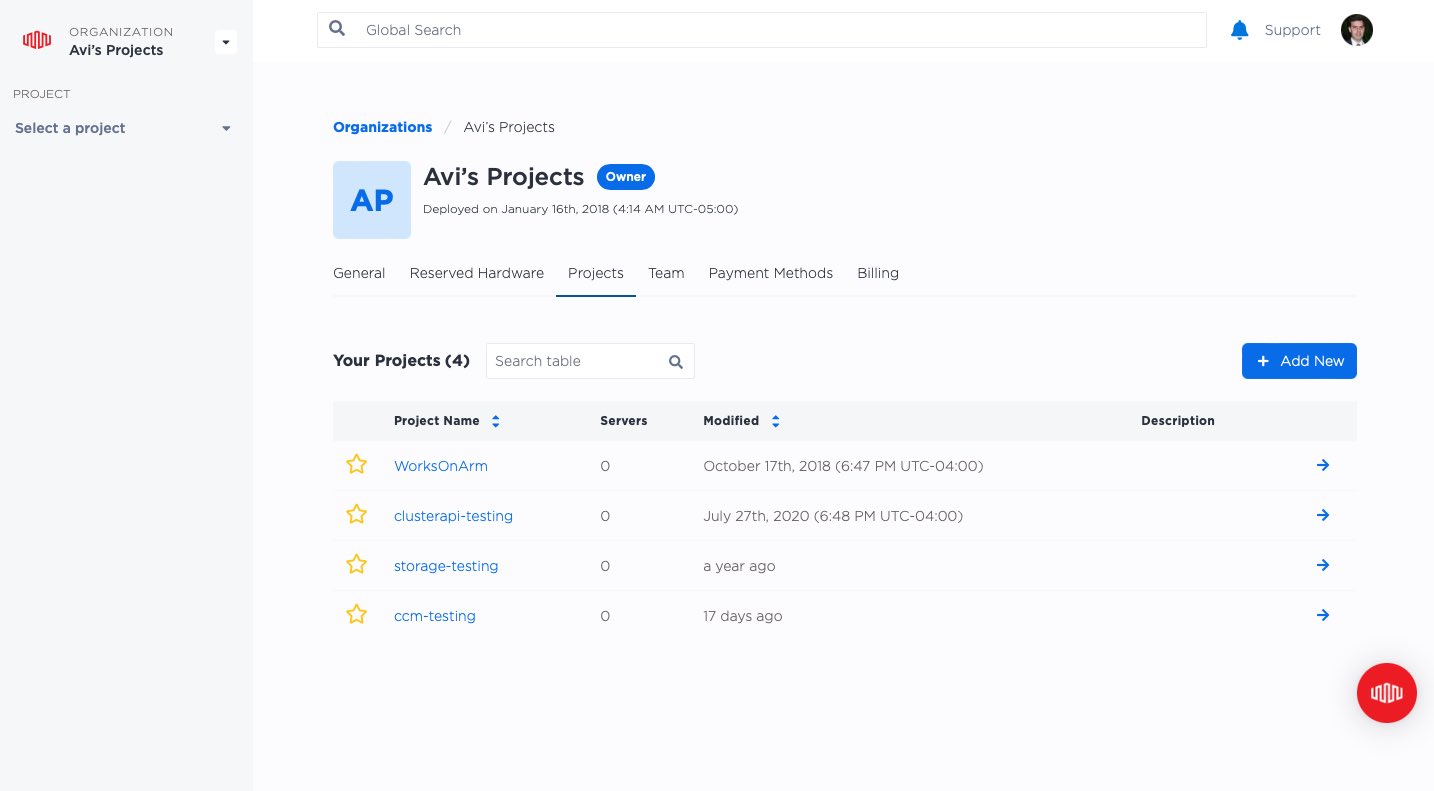
Click the "Add New" button, give your new project a name such as "Getting Started," and click "Let's go."
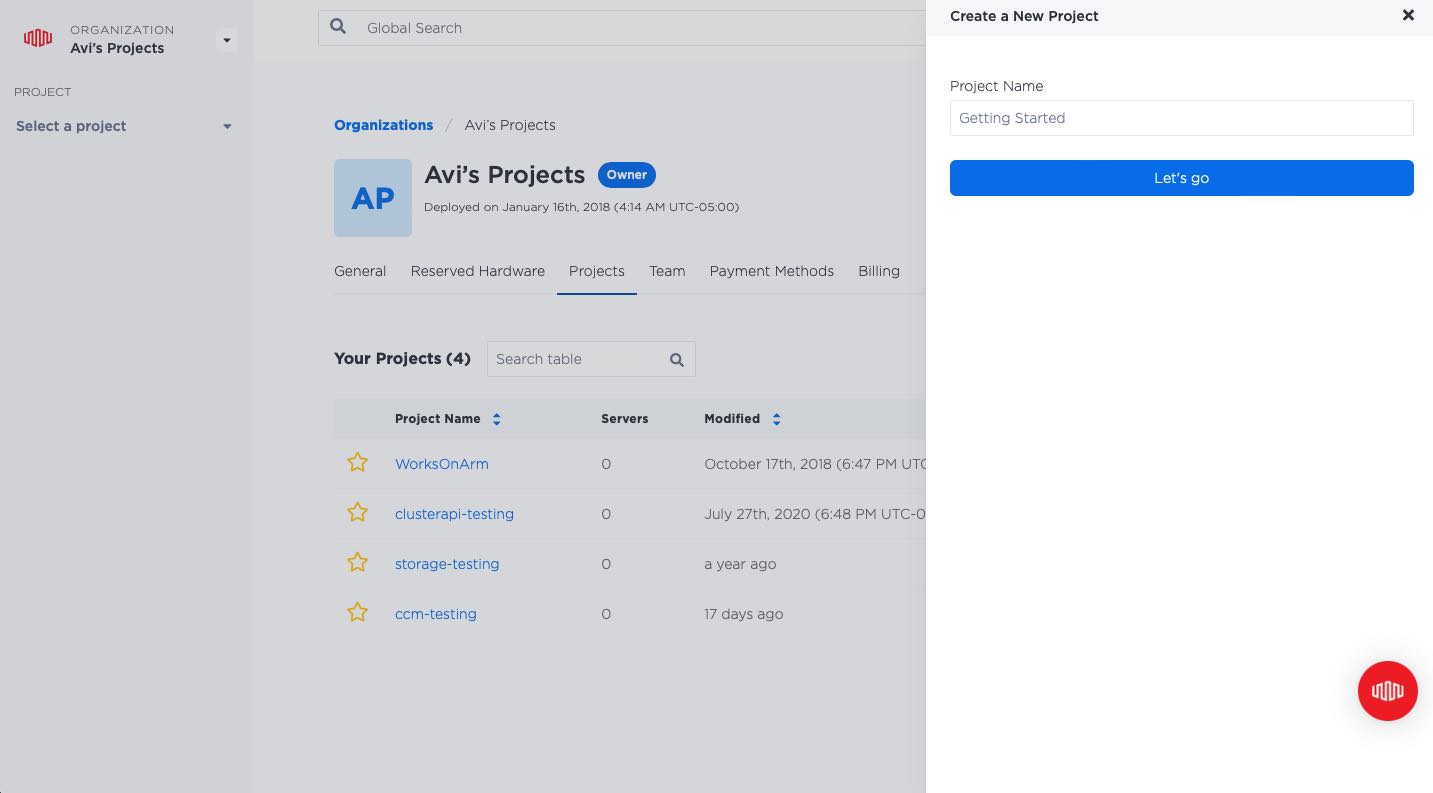
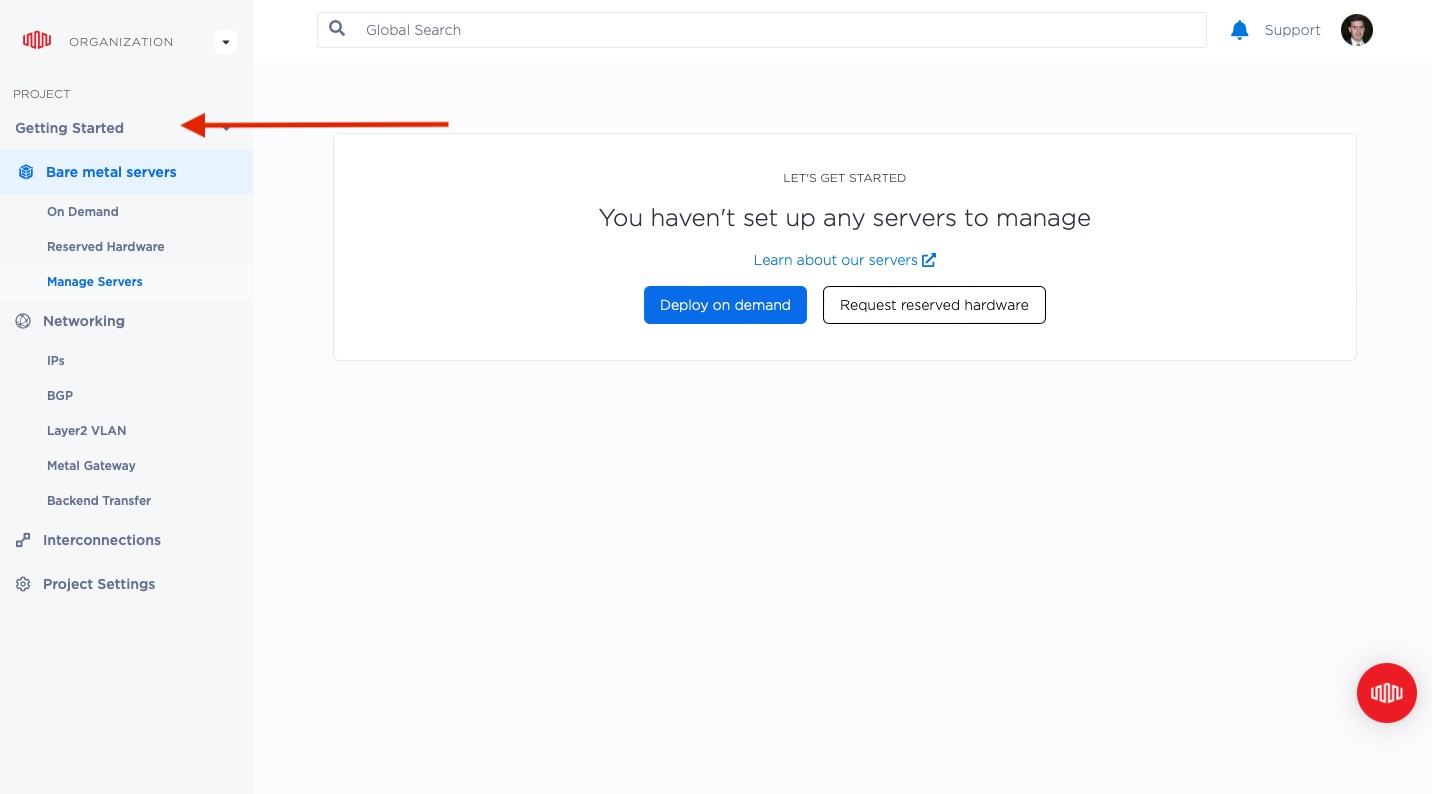
You now have a new project named "Getting Started," which appears in the left navigation pane.
Step 2: Set up SSH keys
You'll get to deploying a server shortly, but there's another piece you need to do first. You need to be able to access it so you can deploy and start the software that will make that server useful.
SSH is a secure way to authenticate to a server. In a username/password system, the password proves who you are, that is, it authenticates you. You send it, hopefully over a secure channel, to another service, like a server. That server then compares your secret password with a safely stored copy it has of it, and lets you in if they matche.
SSH, on the other hand, uses public key cryptography to secure your communications in two ways.
First, it creates an encrypted communications channel. SSH the protocol will communicate to the server only over that encrypted channel.
Second, it uses mathematical calculations to generate a pair of keys, or keypair: a public key that goes to all the servers with which you want to communicate; and a secret private key which never leaves your personal laptop or desktop computer.
When you connect with the server, additional calculations prove that you are in possession of the secret private key, without it ever being sent to the server.
You can read more about how Equinix Metal uses SSH keys, as well as how to add personal ones or project ones, and their differences, in the Equinix Metal SSH Keys Documentation. For a more detailed dive into SSH keys, read about them at the SSH Academy.
In order to use SSH keys, you need to first generate a keypair and then share your public key with the target server.
Generate a keypair
How you generate an SSH keypair depends on whether your platform is Windows or Linux, macOS and similar Unix-like systems.
This guide will generate a keypair on Linux or macOS. See the Equinix Metal SSH Keys Documentation for more options and other platforms.
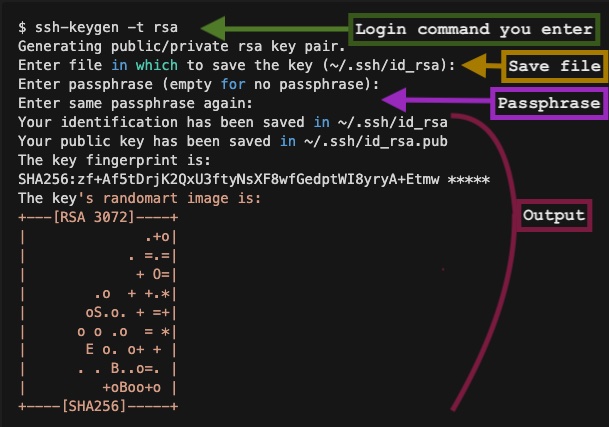
First, open the terminal, and then run the following command
ssh-keygen -t rsa
Follow the prompts that appear. These prompts ask for a few things:
- Where to store the keypair. The default location is shown, so press Enter to accept it.
- The passphrase to encrypt the private key. This is especially important on shared devices, or if the key needs to be kept extremely secure, beyond just the workstation on which it is kept. You can enter a passphrase or if you don't need to encrypt the keypair, just press Enter. In this instance, since we are using the keypair entirely locally, we will not encrypt it.
The following image shows what this looks like:
The command generates a new keypair of type RSA, and stores it in the default locations:
-
~/.ssh/id_rsafor the private key -
~/.ssh/id_rsa.pubfor the public key
Upload the public key to Equinix Metal
Equinix Metal takes care of deploying the public key to the servers for you. You upload the public key you generated to Equinix Metal, and it will ensure each server you deploy has the key installed in the right location so you can log in.
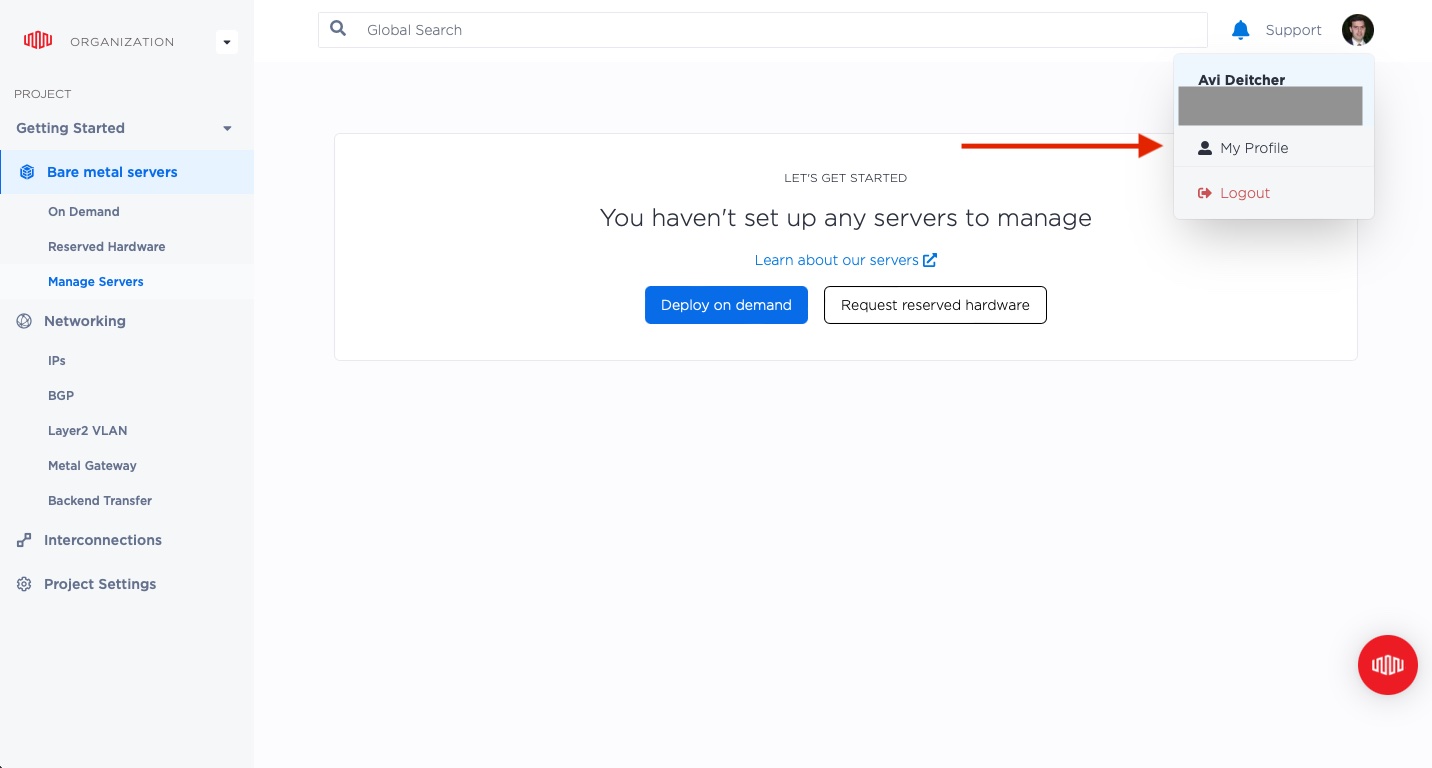
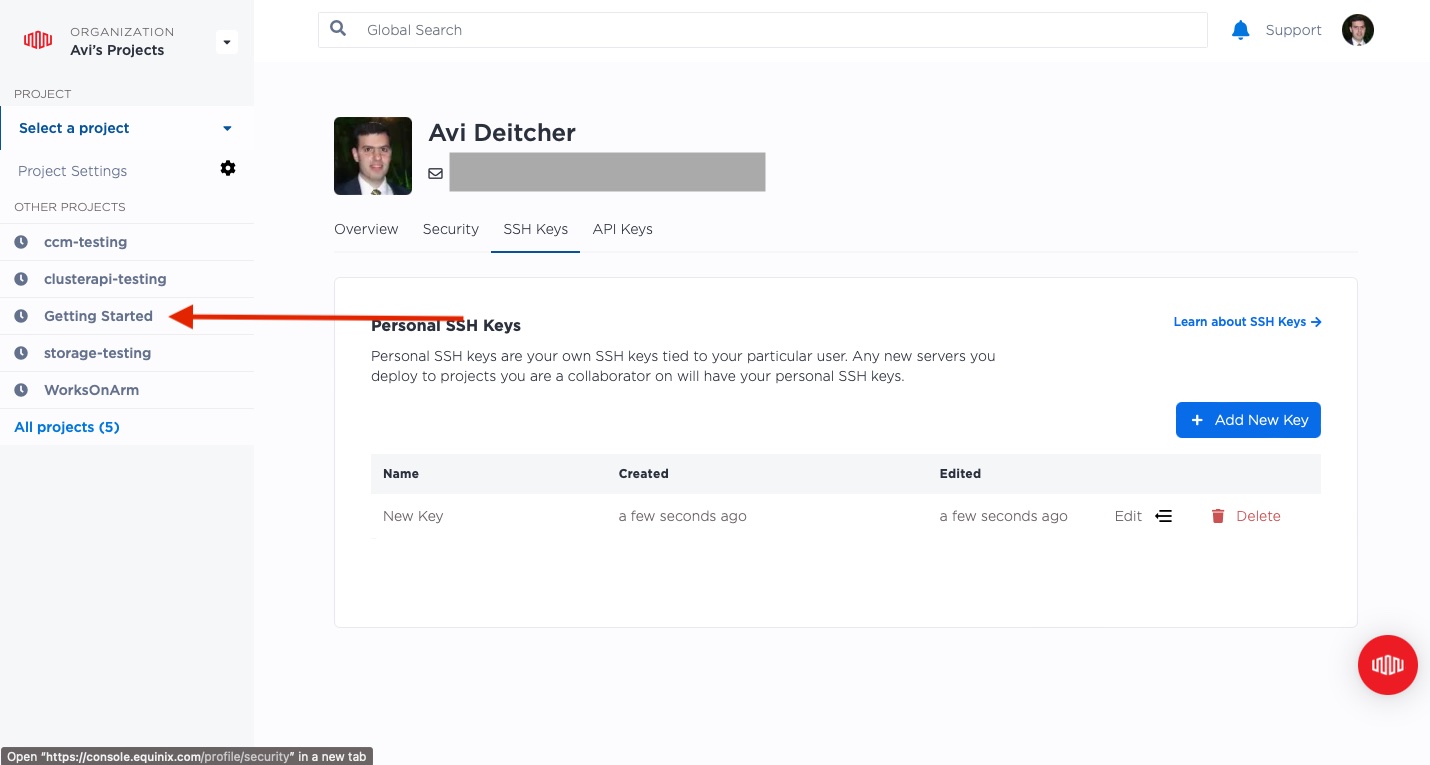
Select your picture on the upper-right, and then select "My Profile" from the drop-down.
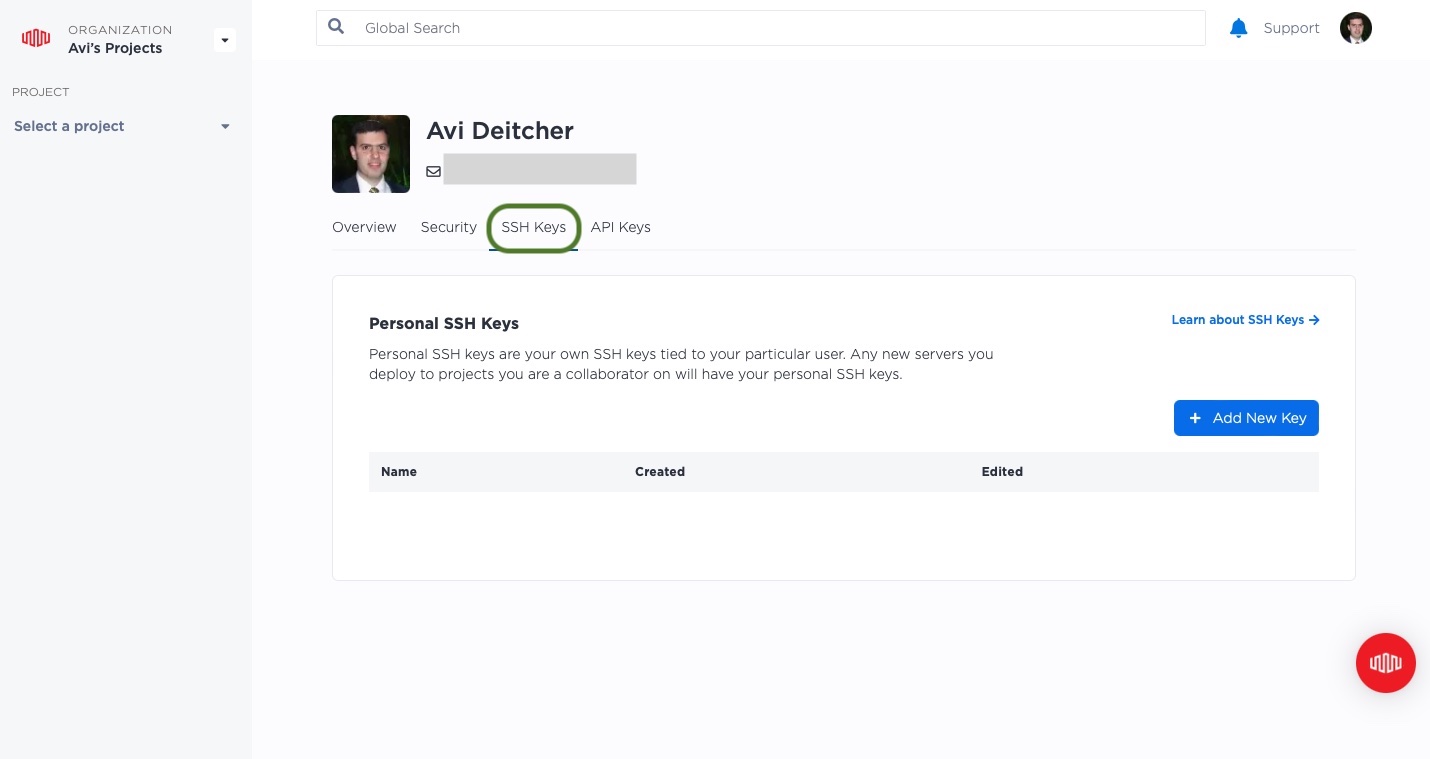
Now select "SSH Keys" from the tabs.
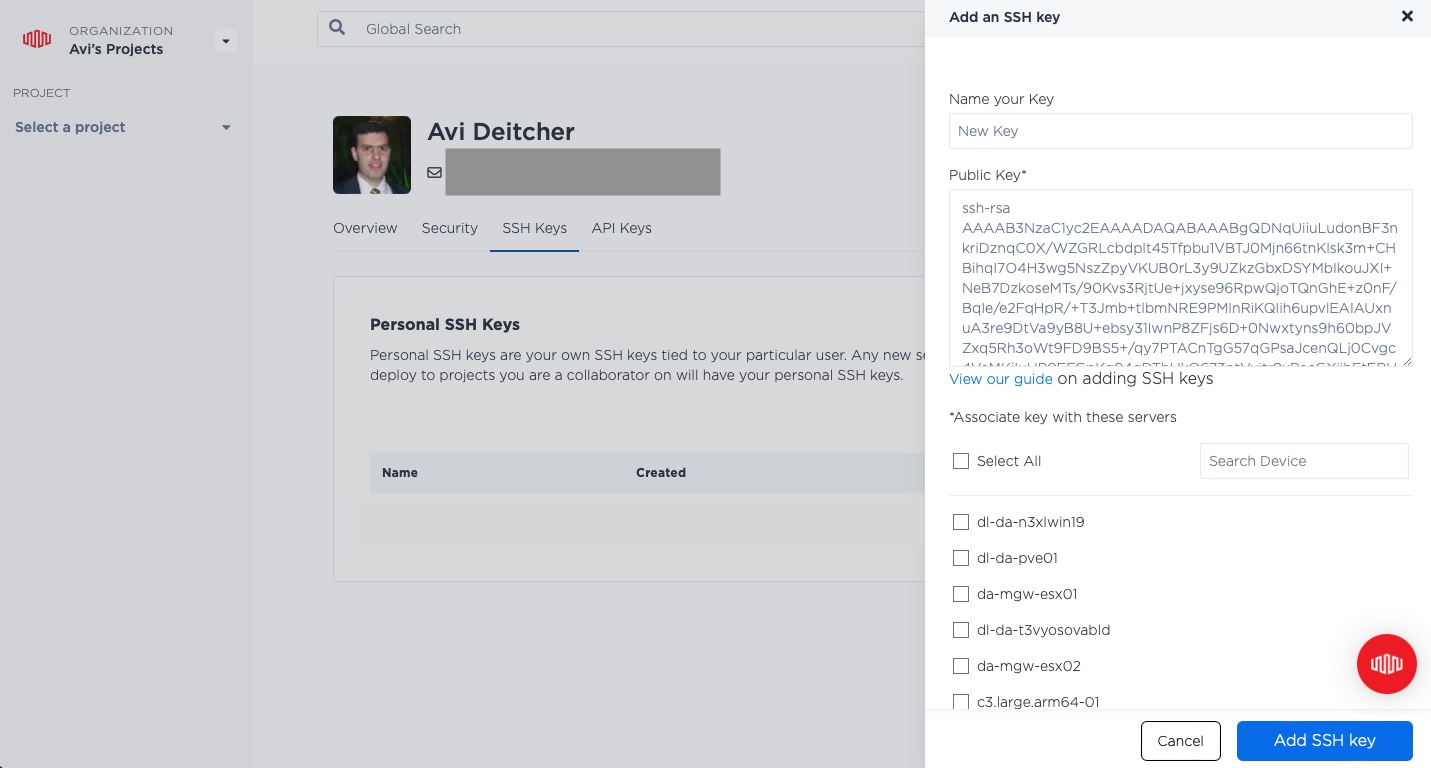
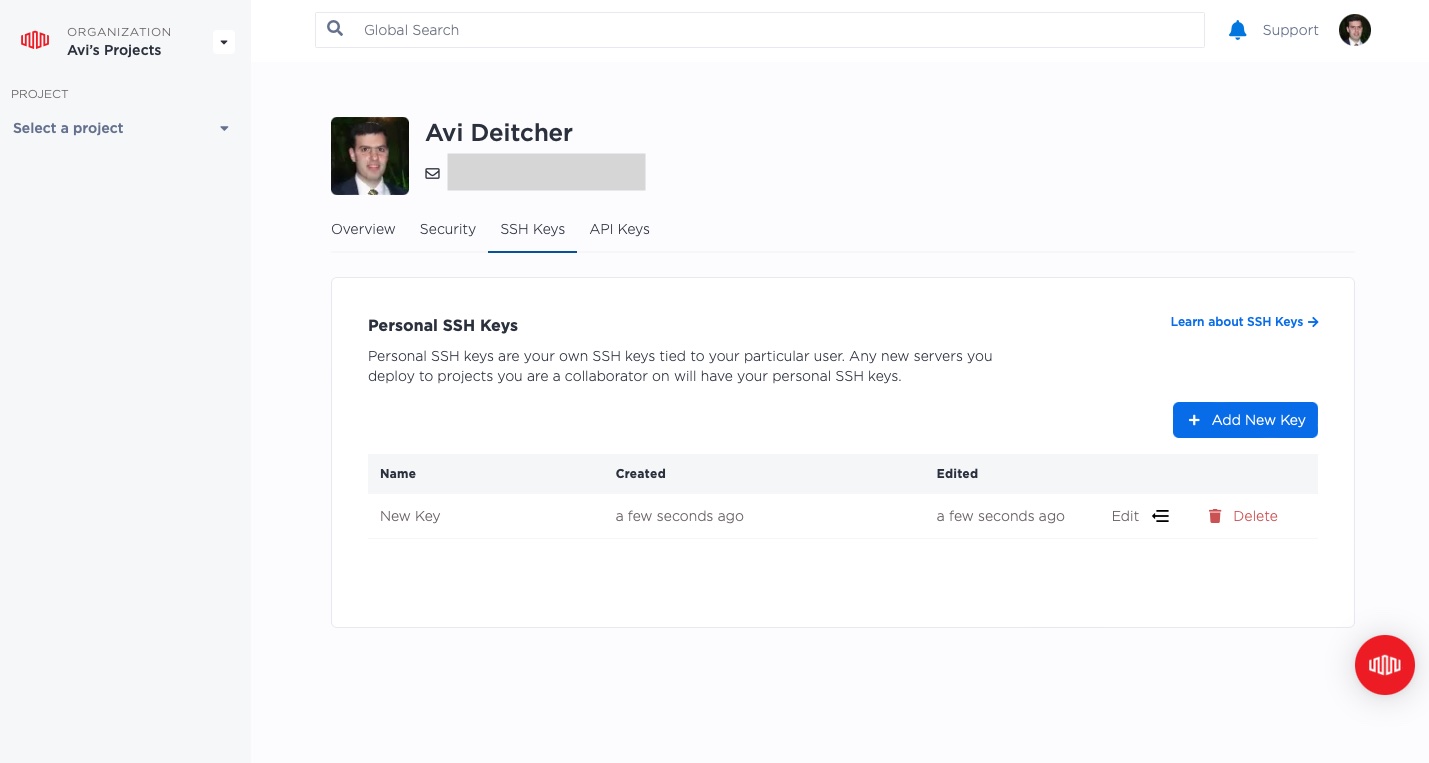
Click "Add New Key," give the key a name, such as "My new key," and paste in the public key you generated in the previous section. Be sure that you paste in only the public portion, not the private portion. Click "Add SSH key."
Step 3: Deploy your server
Now you're ready to deploy a server. For subsequent servers, you won't need to repeat the steps you've done so far. New servers will be placed in an existing project and ssh keys will be populated automatically. You likely know what type of server you want to deploy, and for what purpose. If you are not quite sure yet, or just want to see the options, check out our list of on-demand server configurations.
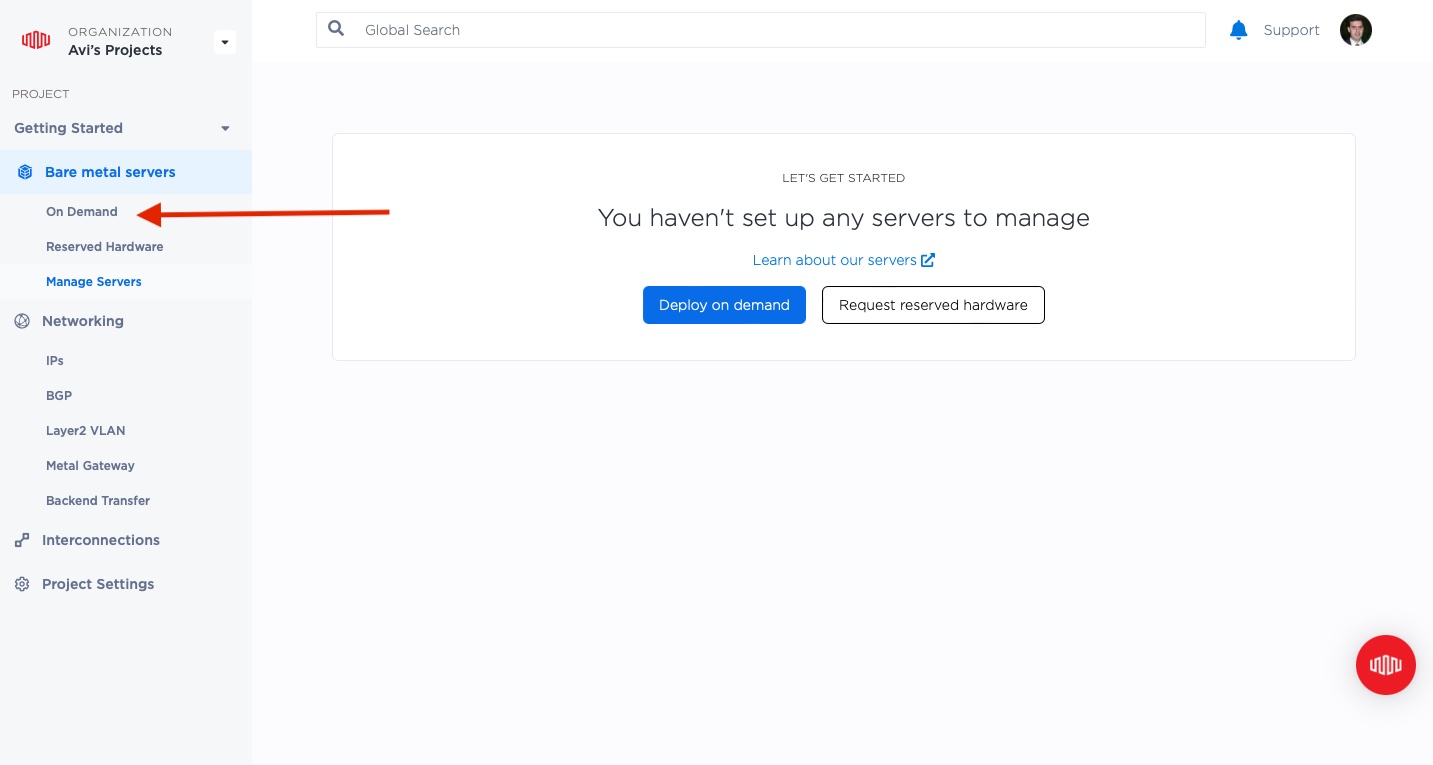
In the left-side navigation pane, select your new project (which we called "Getting Started") from the projects drop-down.
Next, click "On Demand," under "Bare metal servers."
Select the metro where you'd like your server to be deployed. For this example, we'll select the Dallas metro.
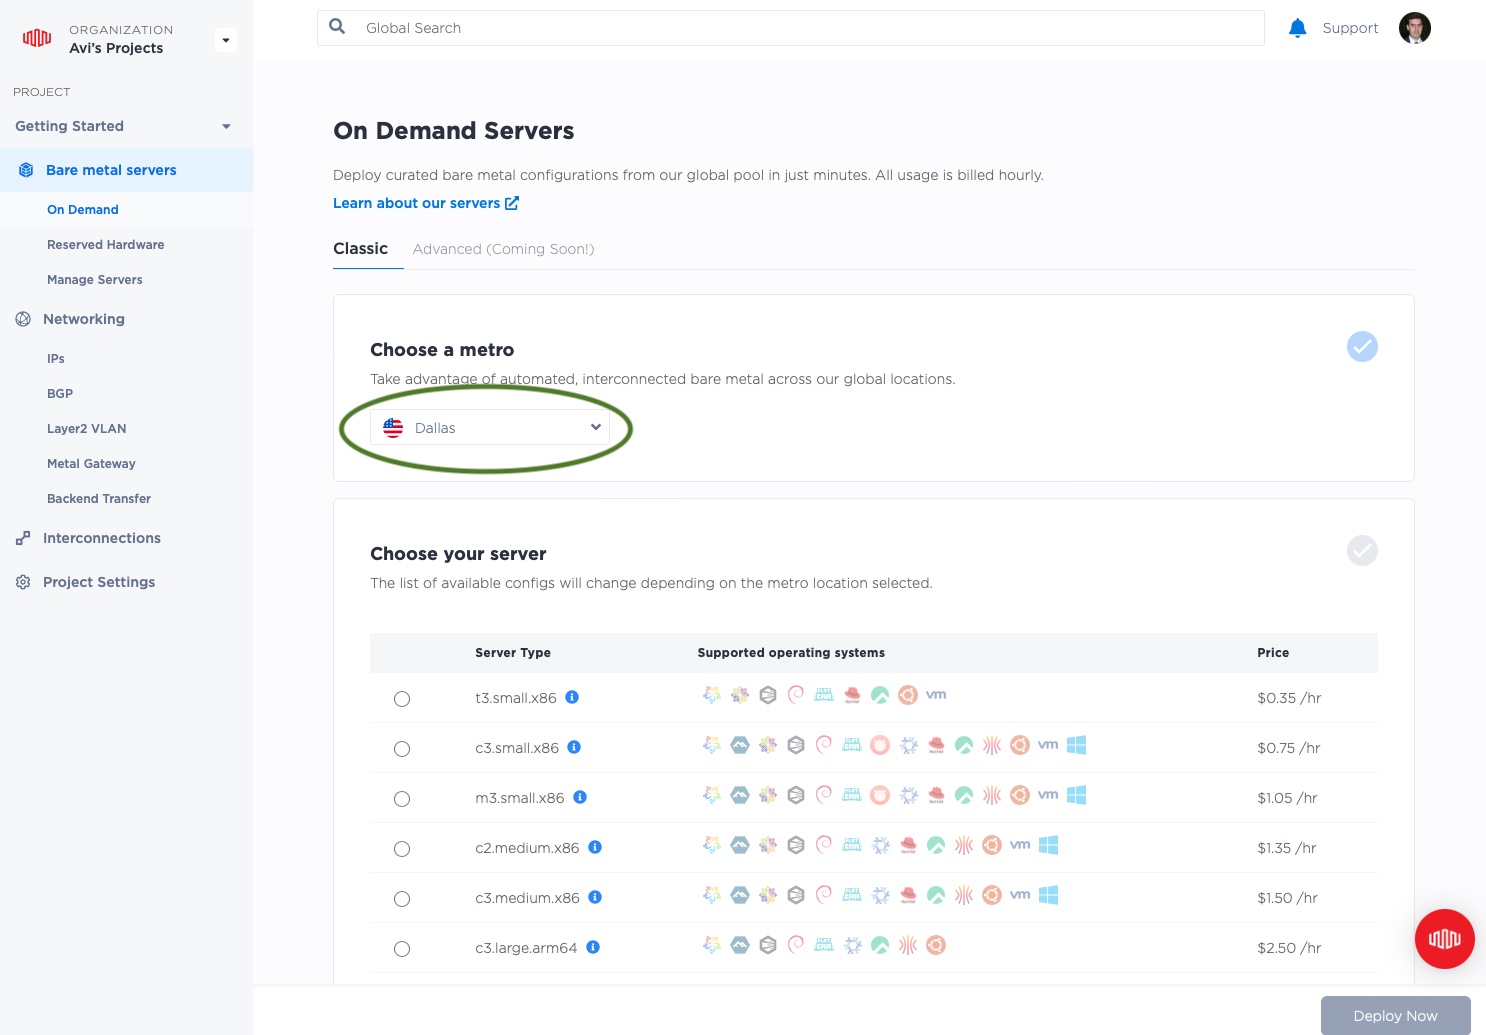
Choose the server type. For this example, we don't plan to run anything heavy on this server, so we will select the t3.small.x86. If your use case has different needs, make your choice accordingly.

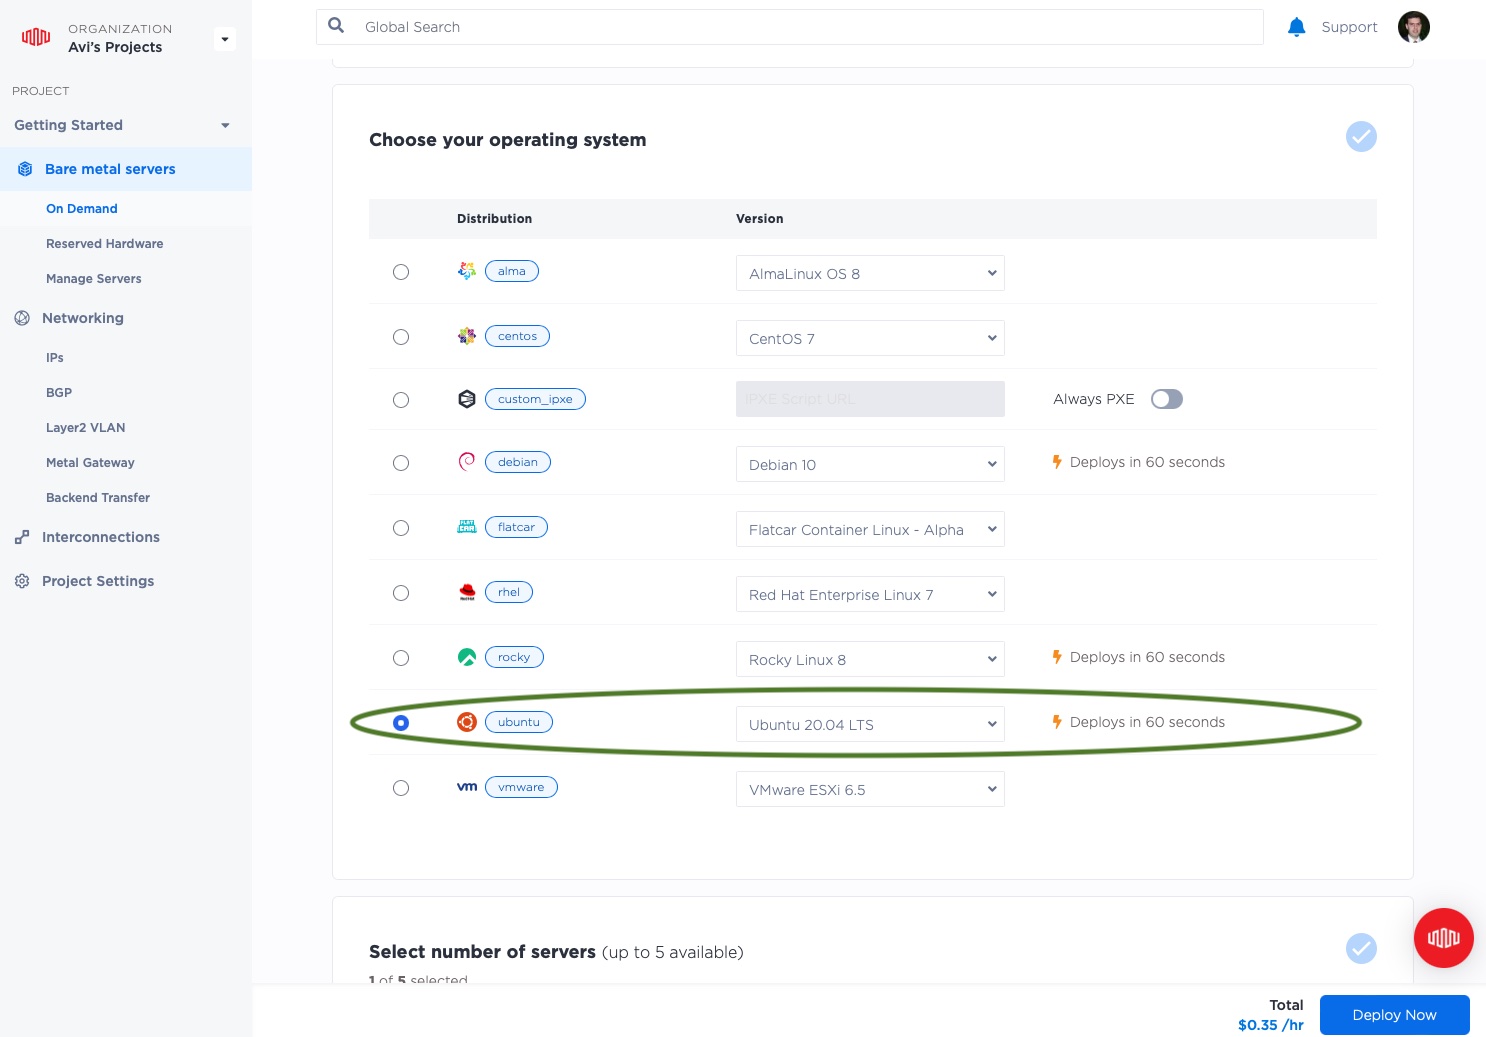
Scroll down and choose an operating system. There are lots of choices, but for this guide we'll use Ubuntu 20.04 LTS.
Select the number of servers you need. Because all of these servers are in the same project, they will be able to communicate directly with each other over private 10.0.0.0/8 addresses. For this guide, we will start with just one.
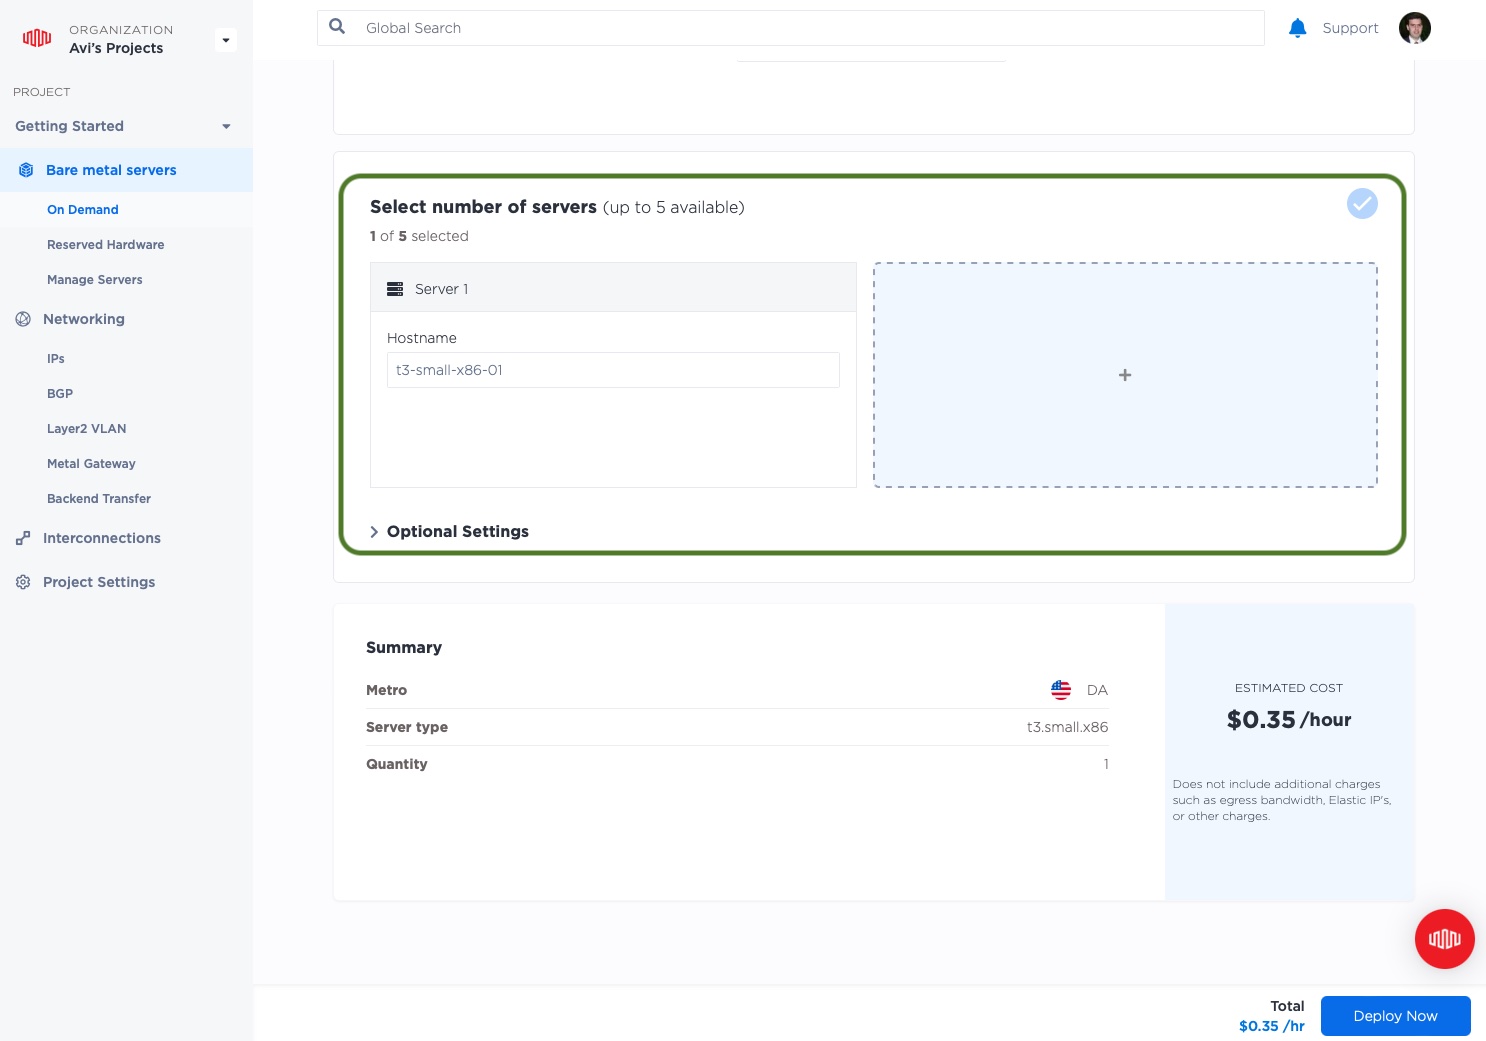
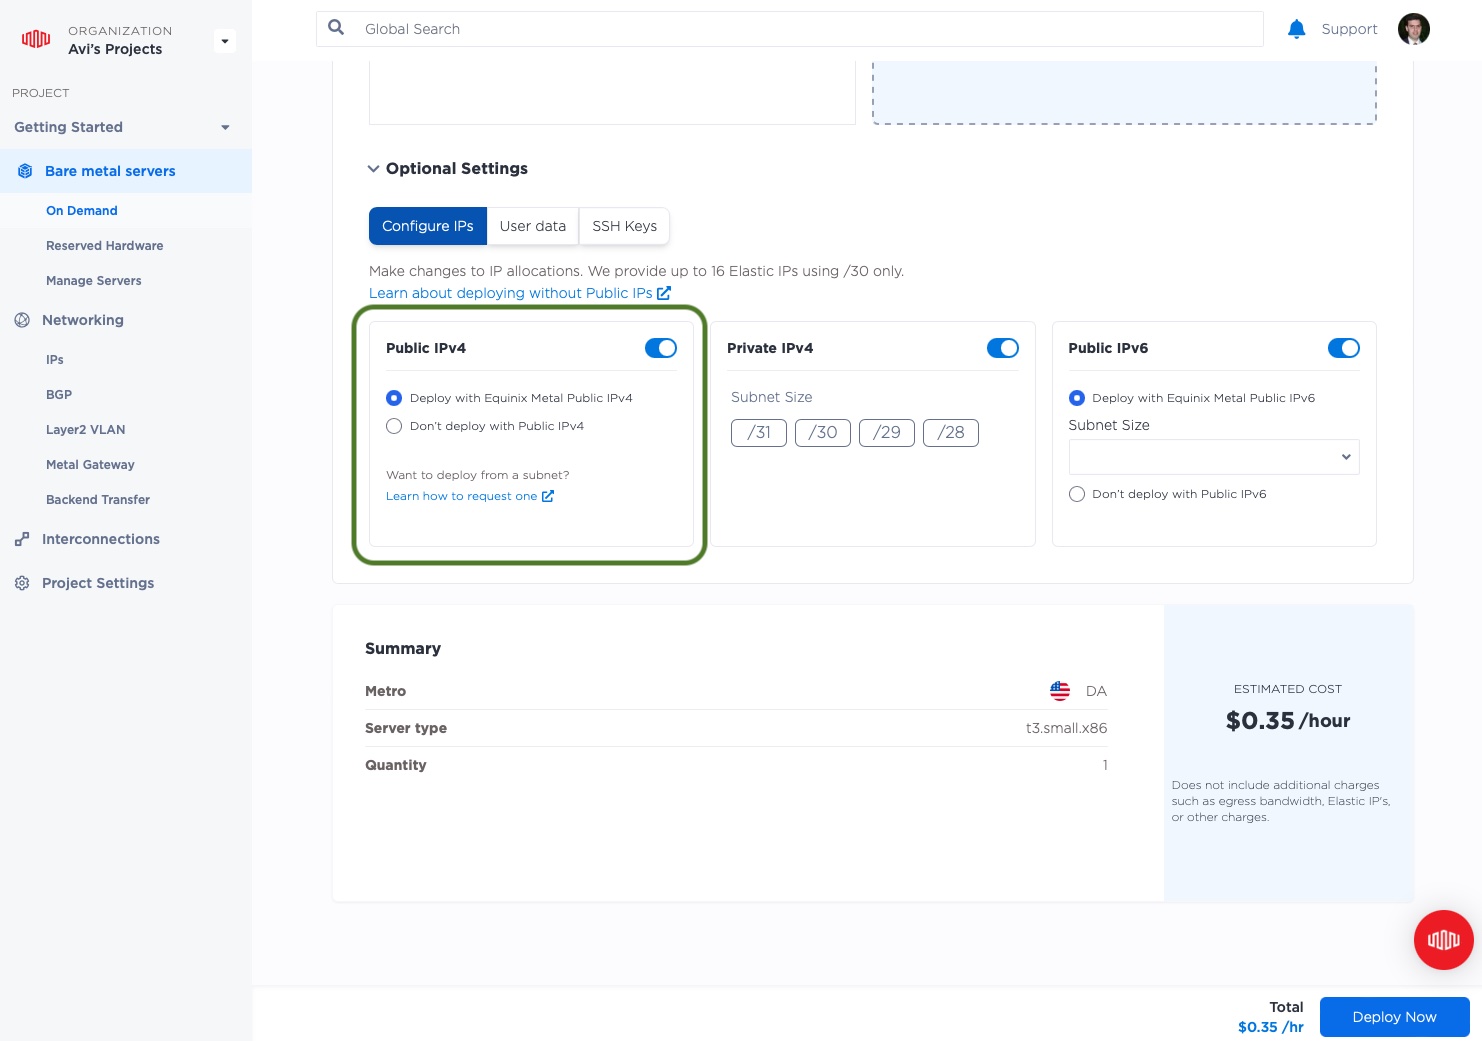
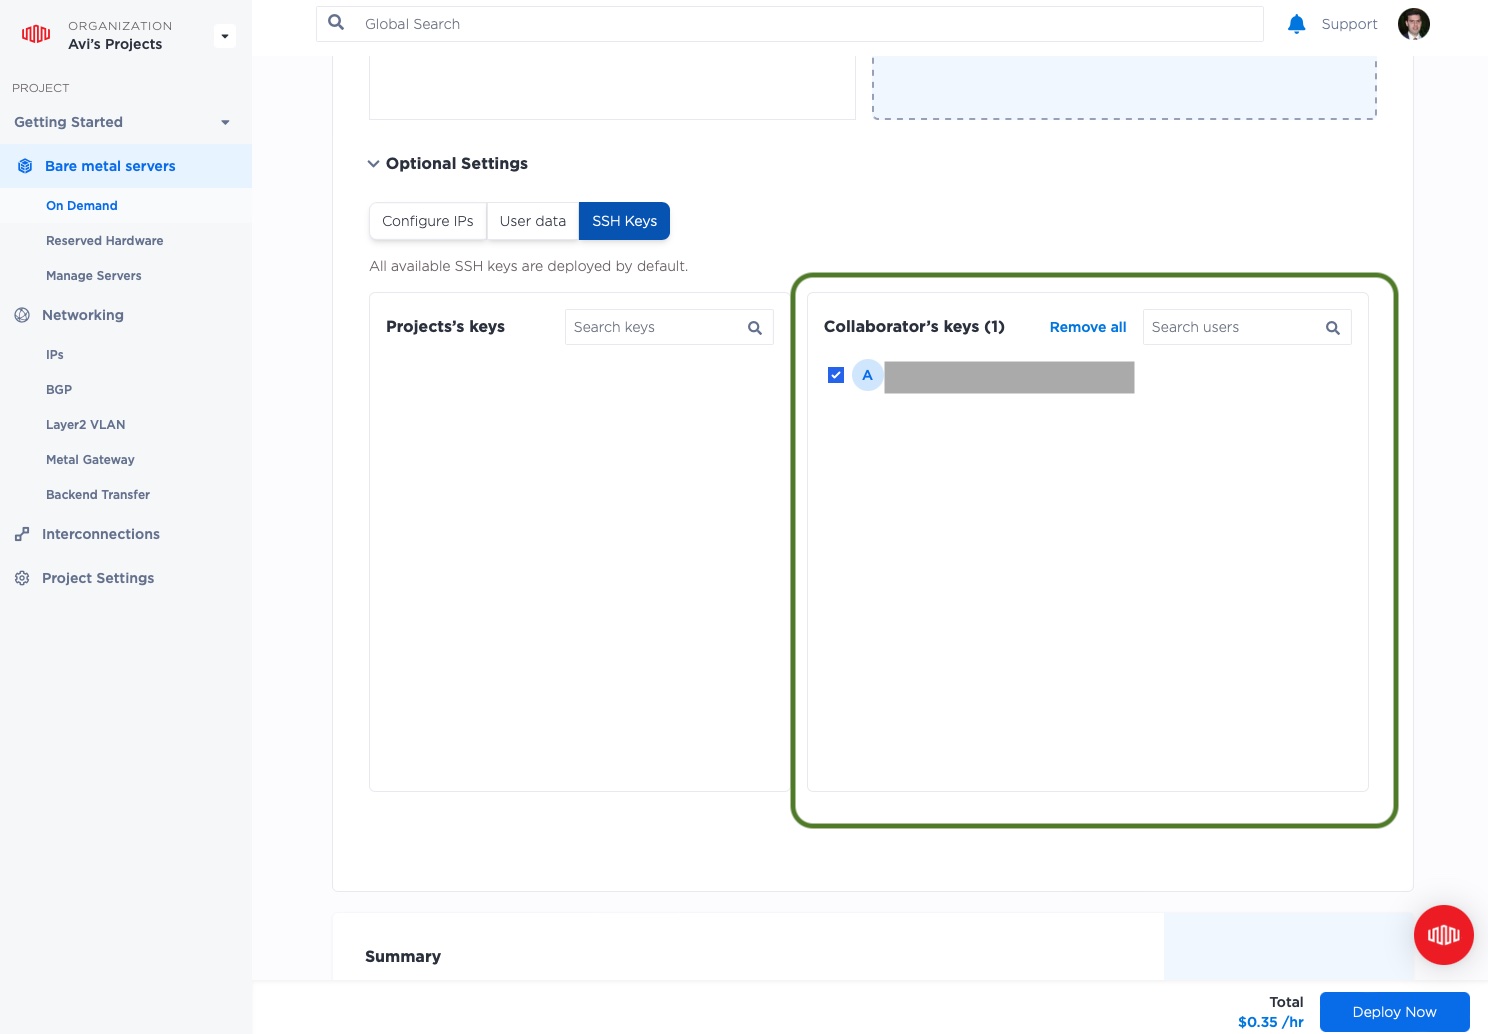
You could deploy the server now, but it's a good idea to check that the public IPs and ssh keys are set correctly. Select Optional Settings to reveal theses options.
Under "Configure IPs," make sure that "Deploy with Equinix Metal Public IPv4" is selected. This will provide a public IPv4 address that you can use to log in to the server.
Under "SSH Keys," make sure to select the key that you uploaded earlier. This will ensure that the key is loaded onto the server and you can log in.
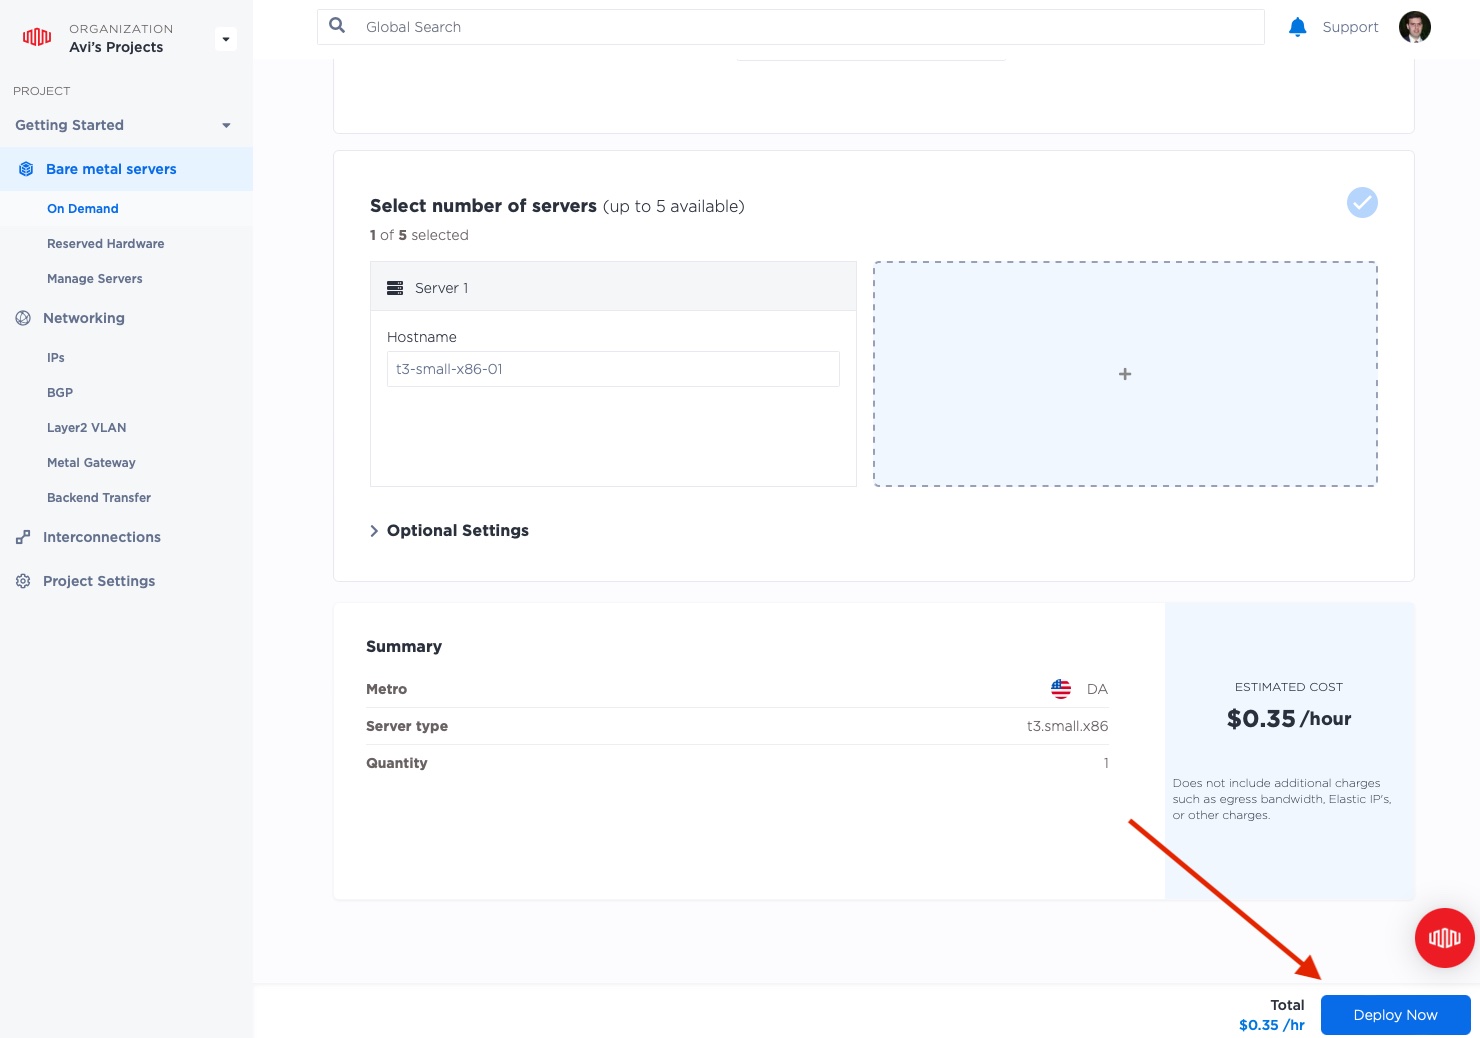
Once you've verified that information is correct, click the "Deploy Now" button.
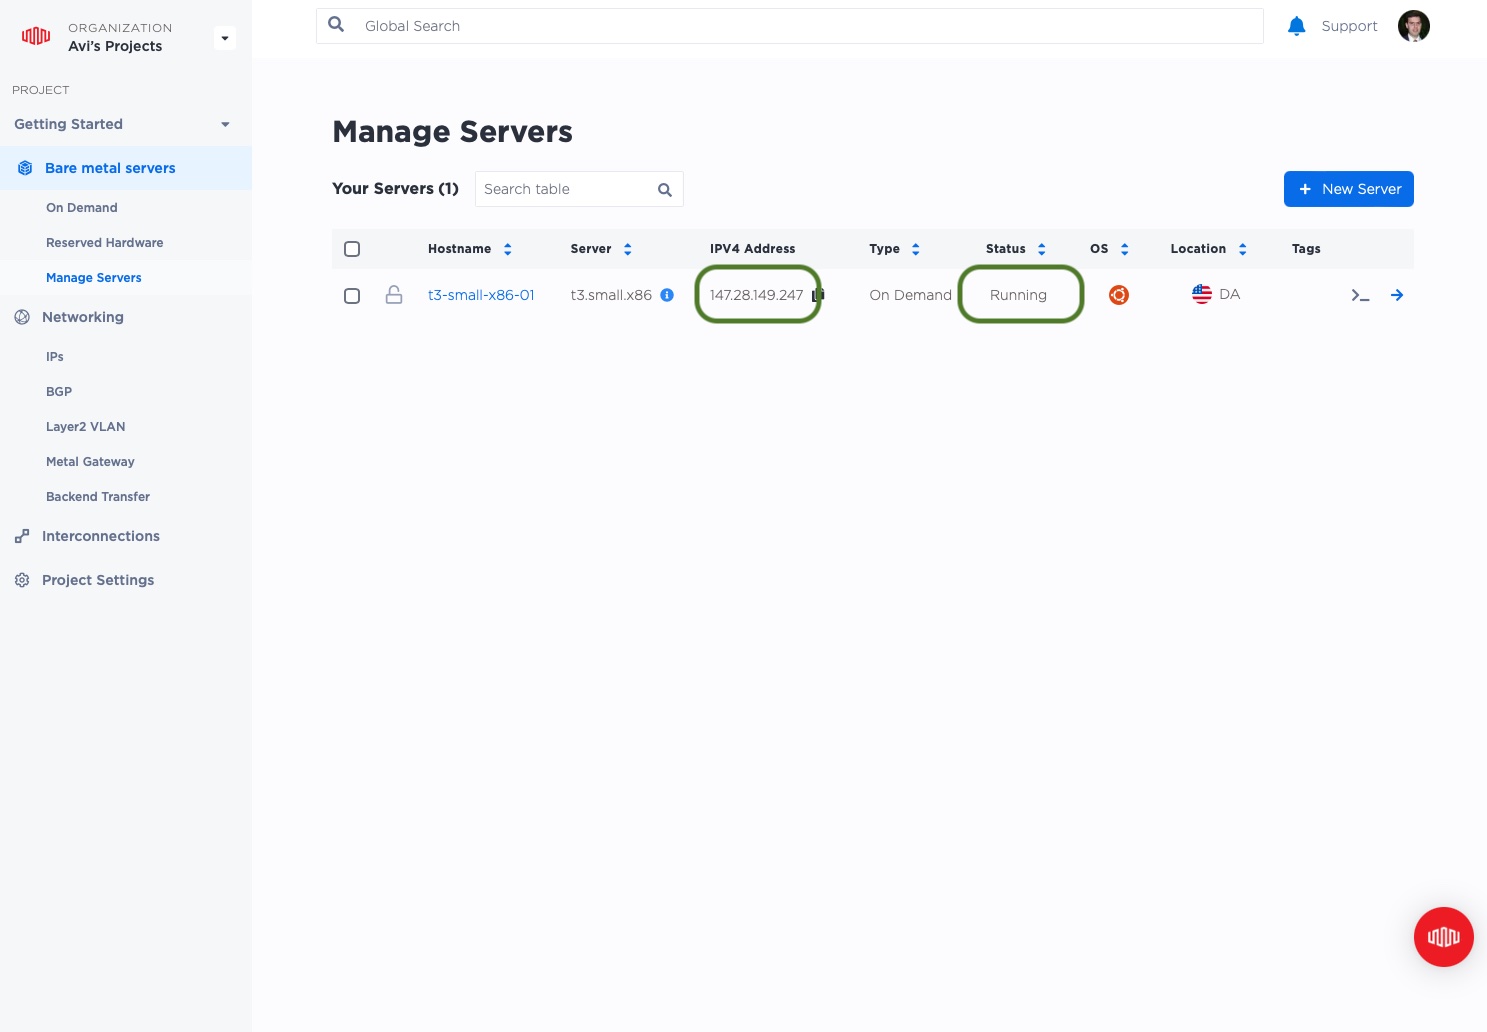
You will see a progress bar, and then a list of servers that were deployed.
While the deployment is happening, you can click on the server name in the console to see its details.
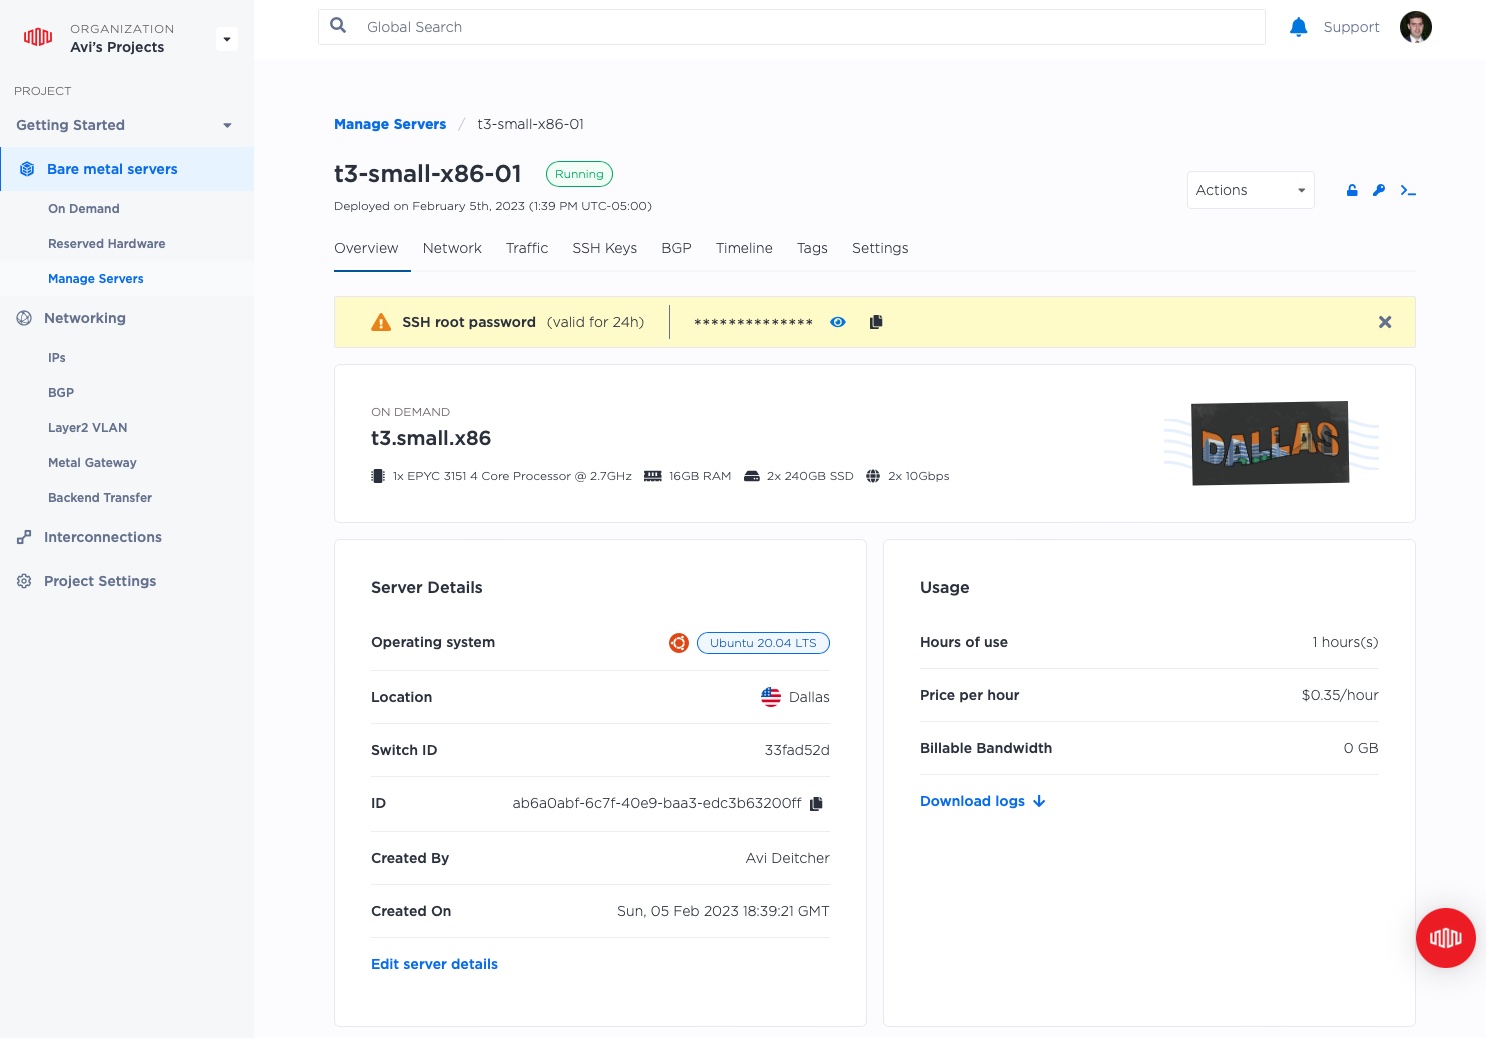
When the server is ready, the status column will indicate that it is Running, and you will be able to see the public IP.
Now, it's time to log in.
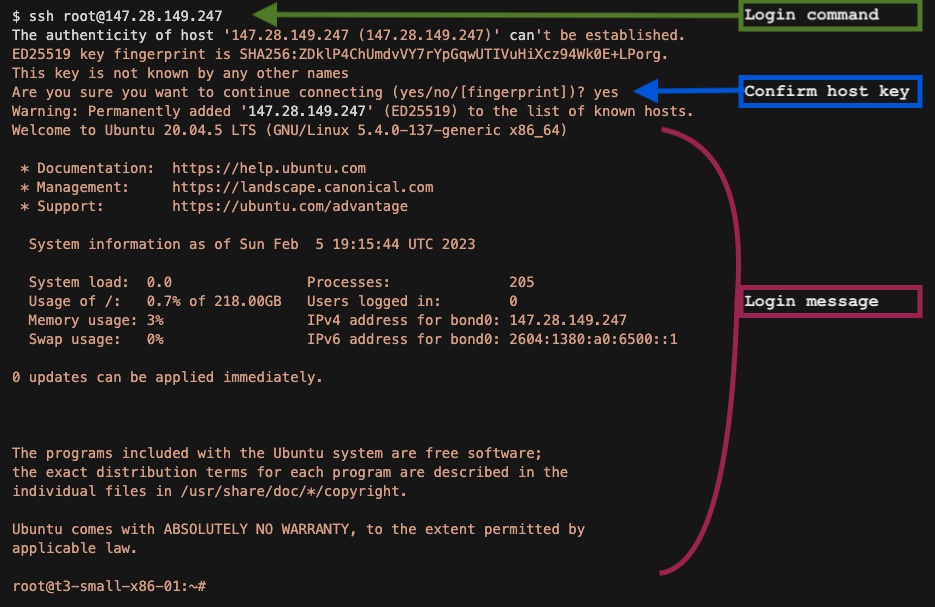
On Linux, macOS and other Unix-like operating systems, start a terminal and enter the following command:
ssh root@<ip>`
Be sure to replace <ip> with the IP address of your server as shown in the console.
If you're on Windows, use Putty.
The first time you connect to the server, you'll be asked to confirm the authenticity of the server. This is a security measure performed by ssh. Type "yes" to confirm this is the server you want. Once that succeeds, you will see the login message of the server, and finally a command prompt.
You now have access to your new server.
Step 4: Assign an IP address
Now you have a server deployed, and it came with both a private Equinix-managed IP address, and a public Equinix-owned IP address. When that server goes away, so does the public IP address.
If the services you plan to use this server for are internet-facing, you're going to want a consistent IP address, one that you can use not only on this server, but on any server that replaces it in the future. For that matter, you might make your service highly available, on multiple servers at the same time.
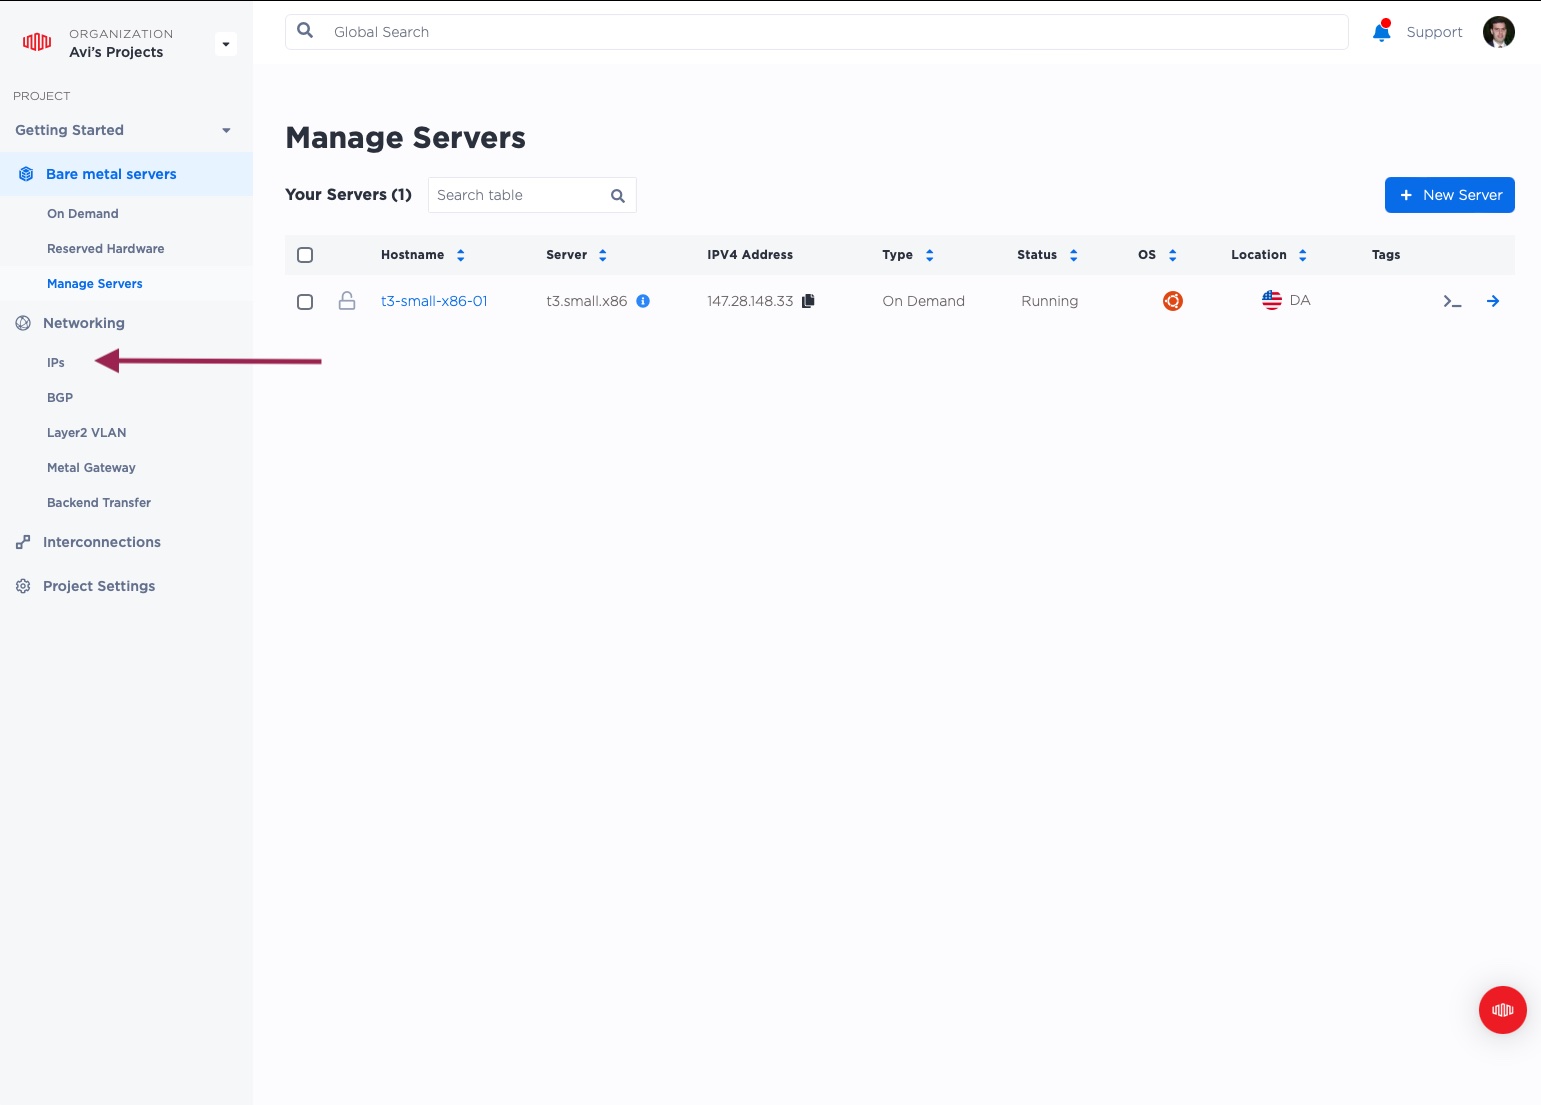
Go to your project's main page. On the left-side navigation bar, select "IPs" from under the "Networking" section.
You will see all of the IP ranges that are affiliated with your project. Note that the "IP Type" of the existing ranges is "Management." This means that they are provided by Equinix Metal. These will last as long as your server. When it is deleted, the Public IPv4 "Management" addresses will disappear. The Public IPv6 and Private IPv4 may continue to exist through the life of the project.
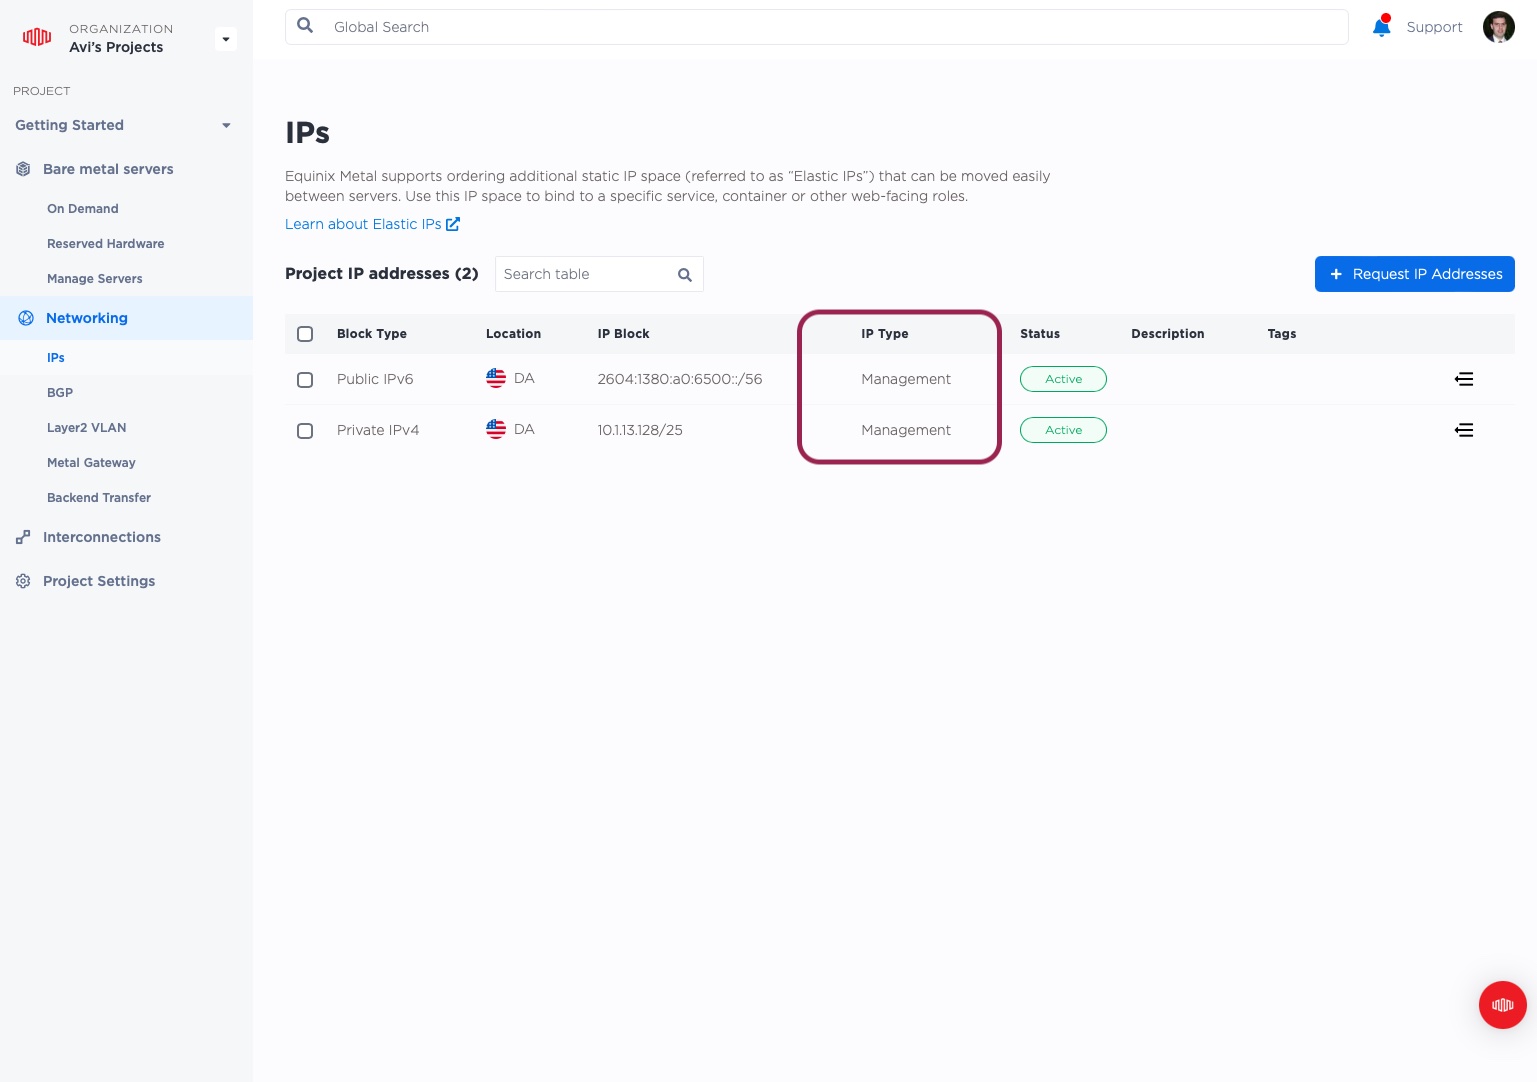
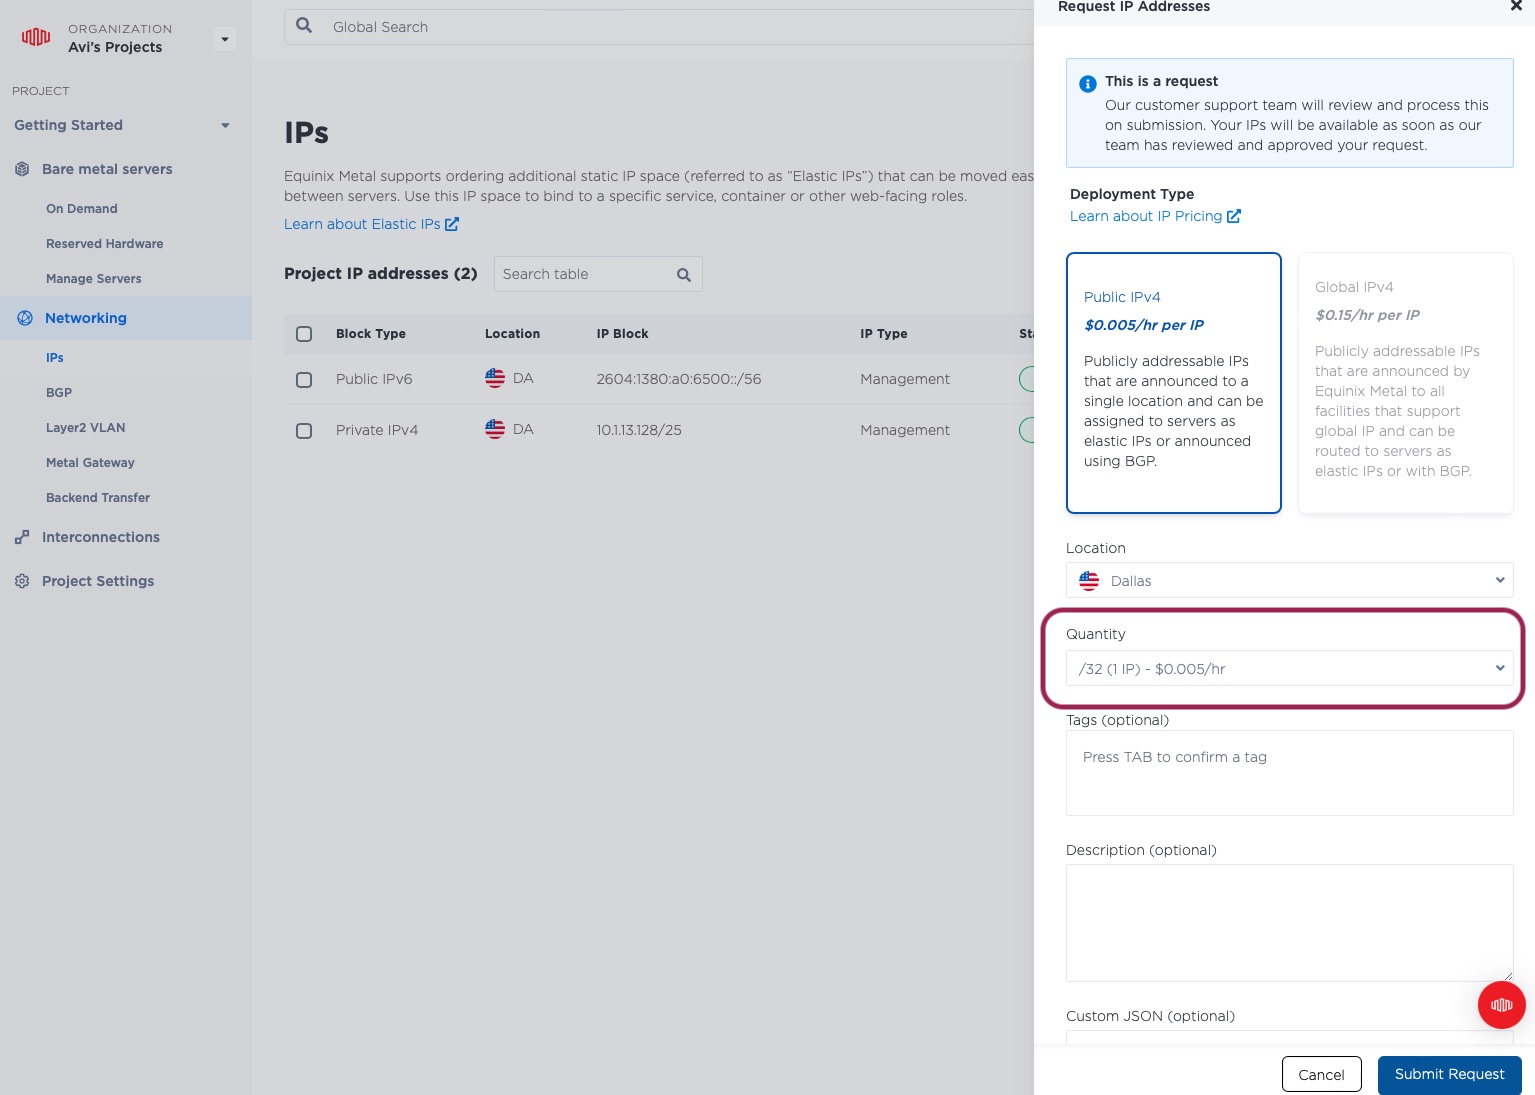
Click the "Request IP Addresses" button.
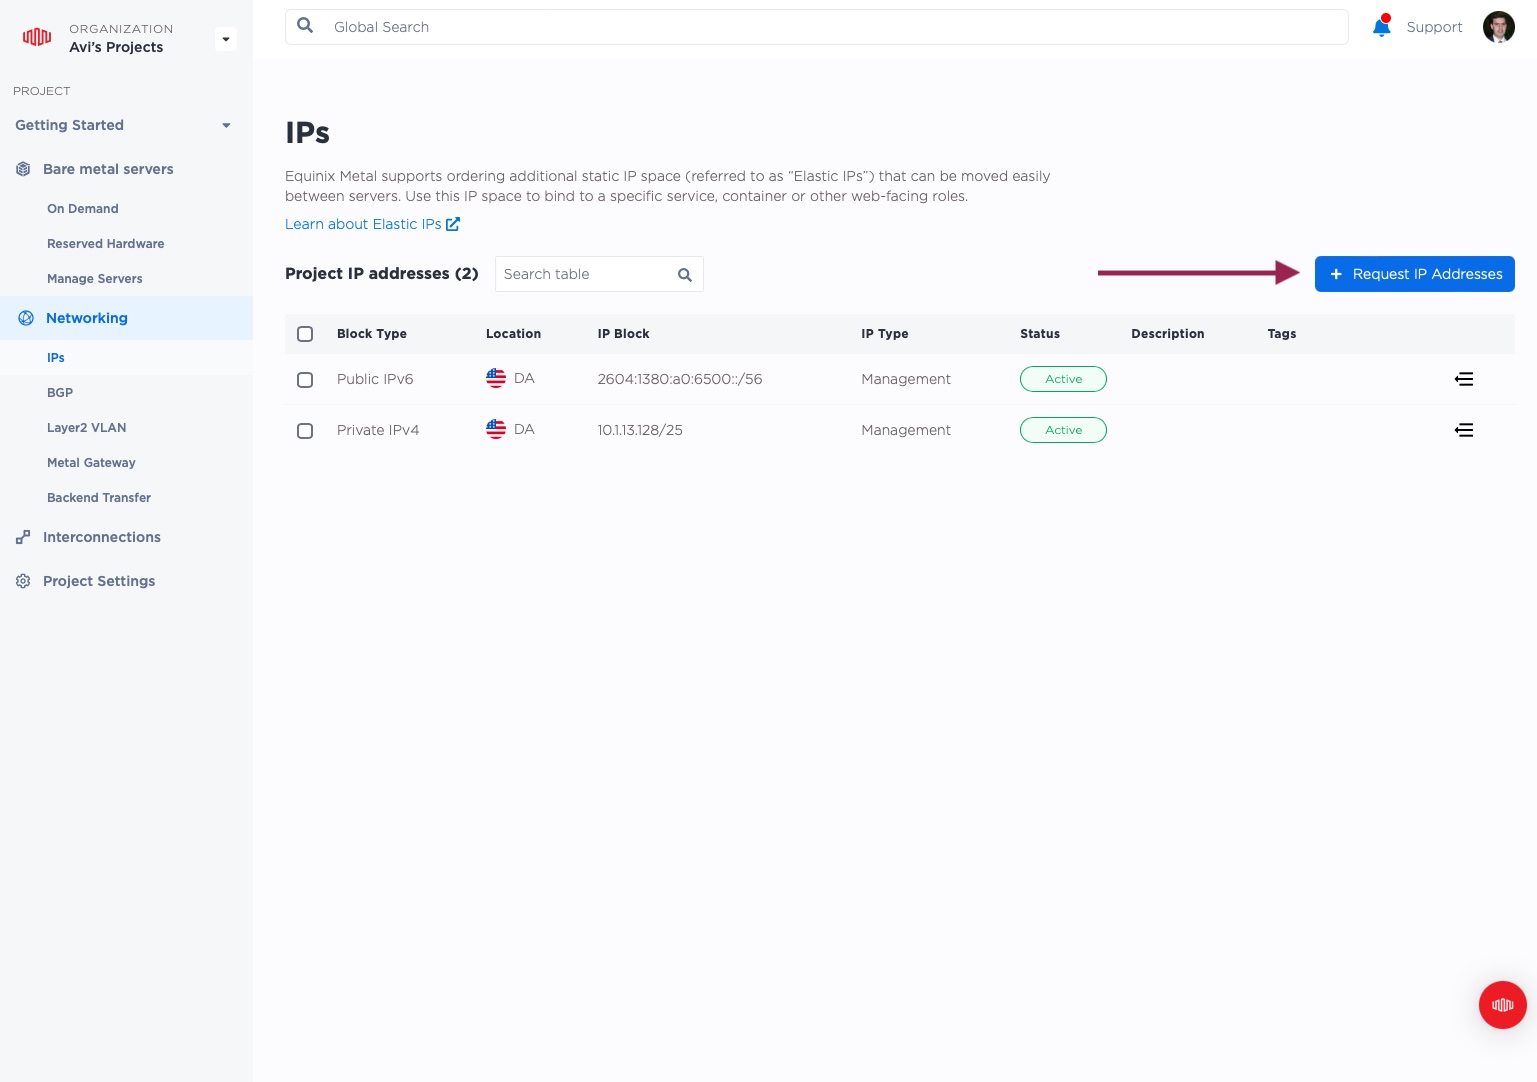
You now can request a public IP, or more correctly, a block of several contiguous public IPs.
You have a choice between a regular Public IPv4, on the left, which is affiliated with just one region, and a Global IPv4, on the right, which is affiliated with all regions.
As you can see, there is a significant price difference between the two. For this guide, we will pick the regular Public IPv4.
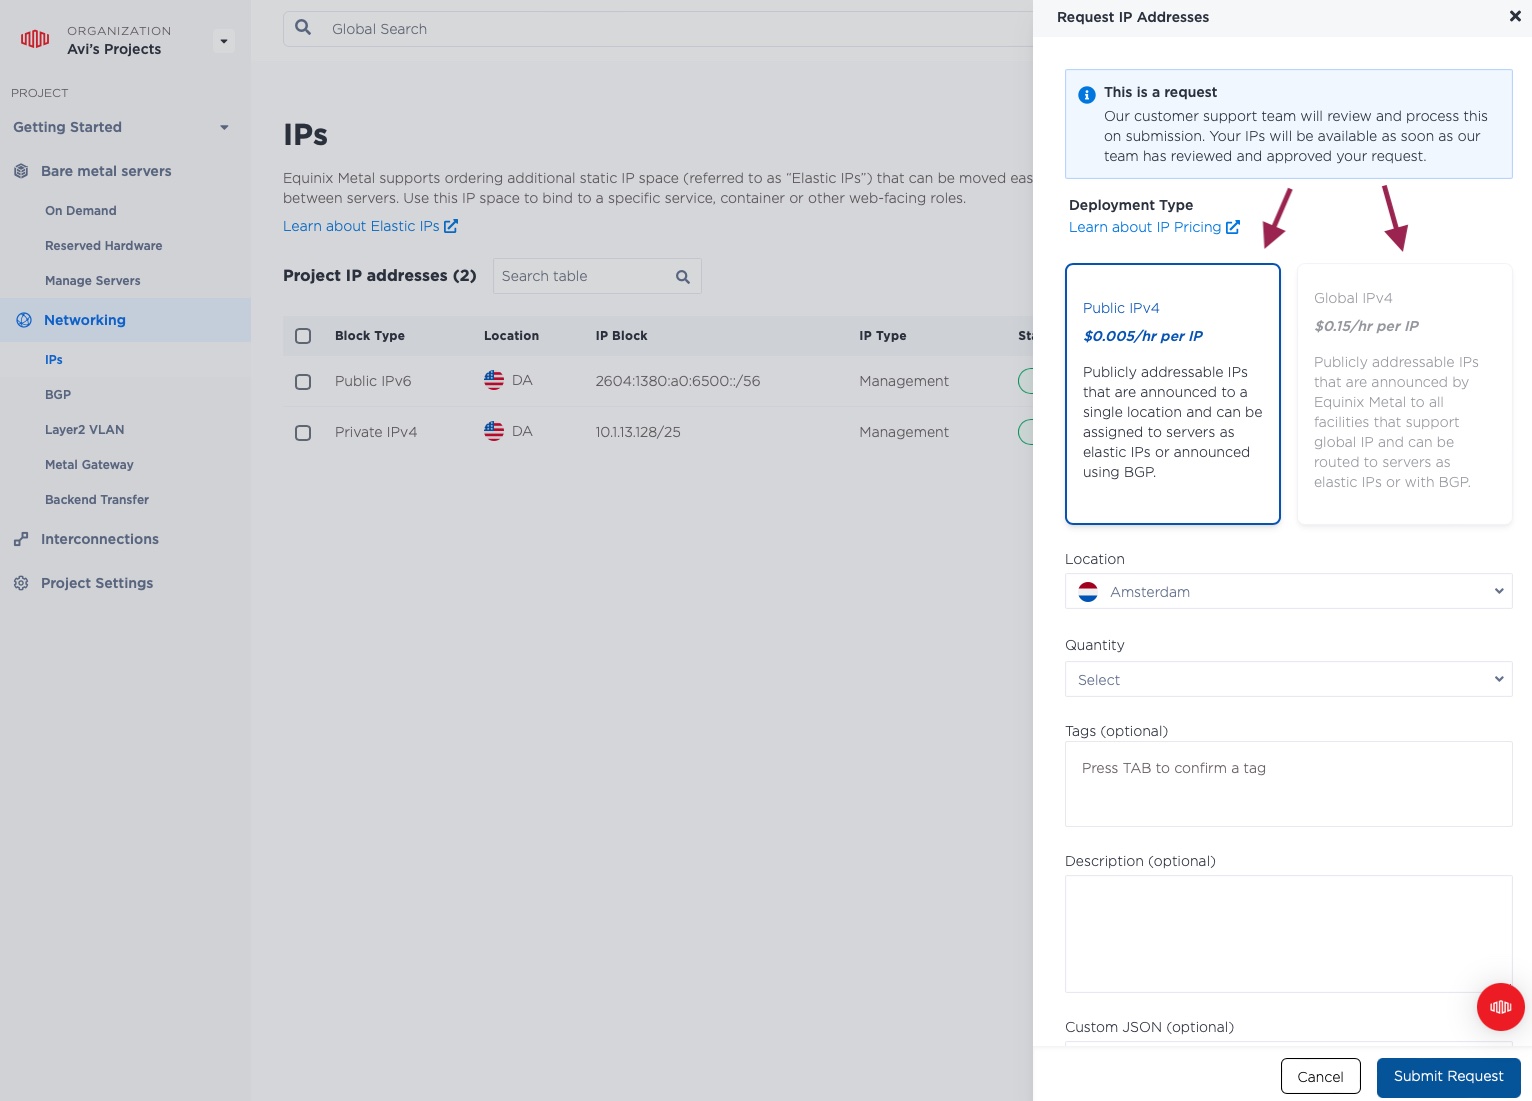
Select the same location as your servers, in our case, Dallas.

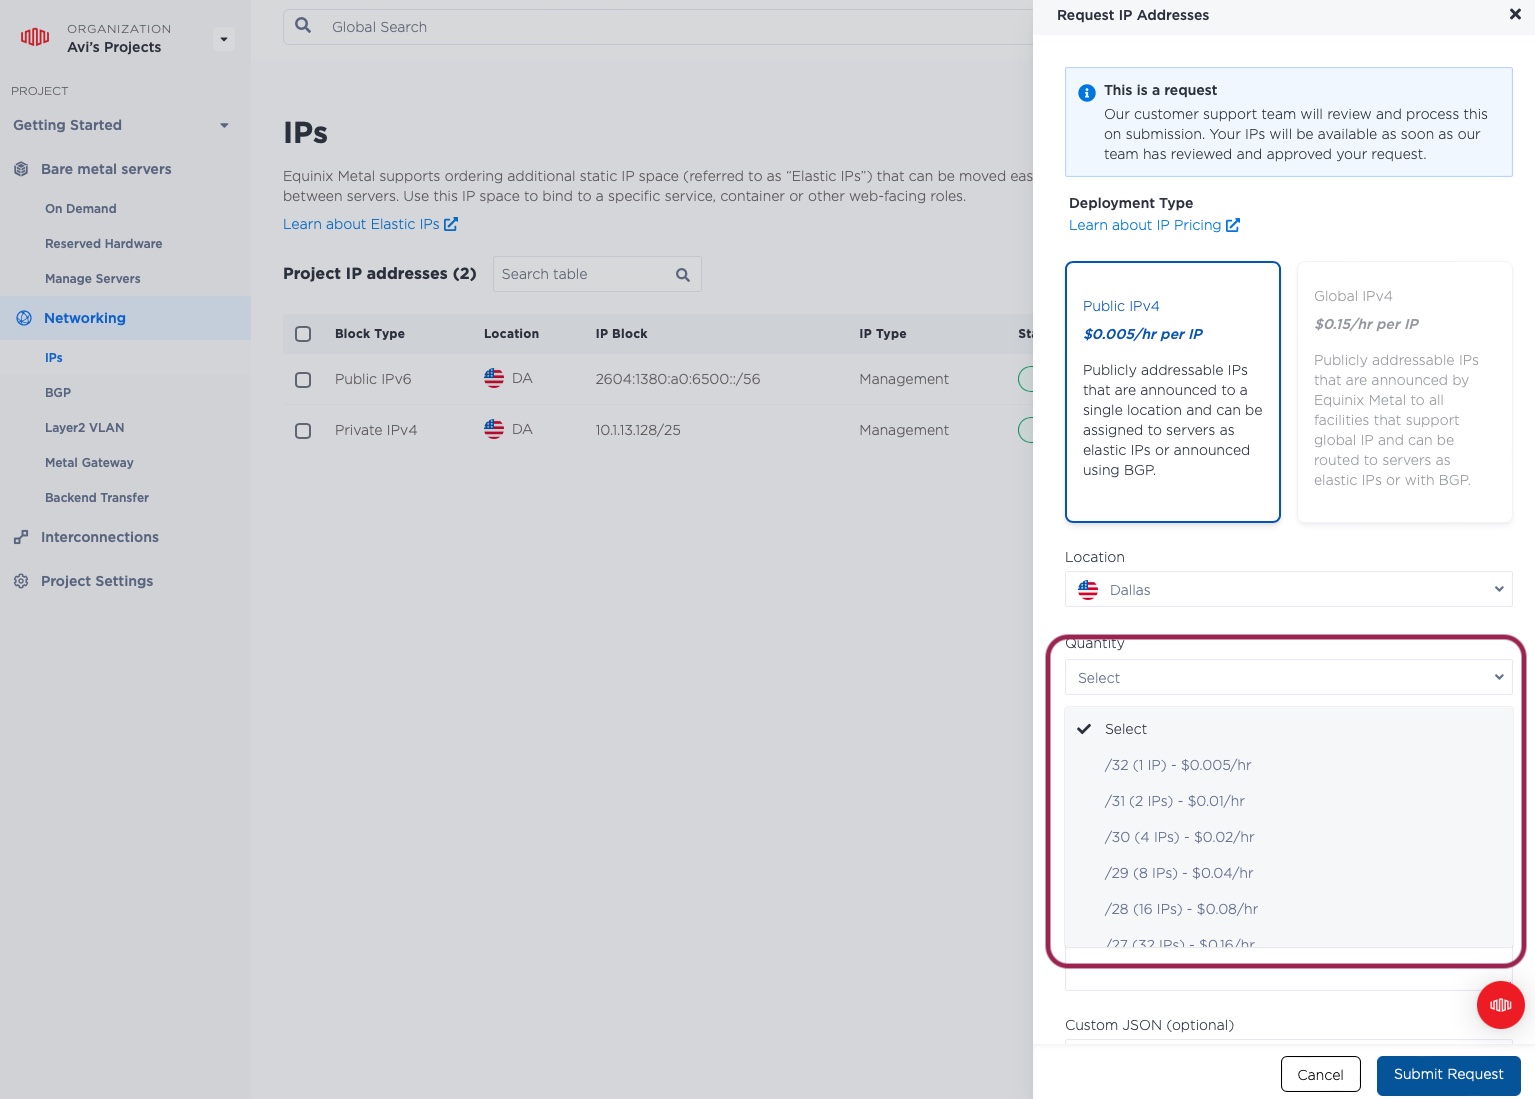
Next, select how many contiguous IPs you want. We will select 1. If you want more than one, pick a larger number. Remember that you pay for these IPs by the hour, so more IPs will cost you more. In addition, larger contiguous sets are subject to Equinix supply controls. If you pick too large a block, you may need to wait for Equinix to approve it.
With just one requested:
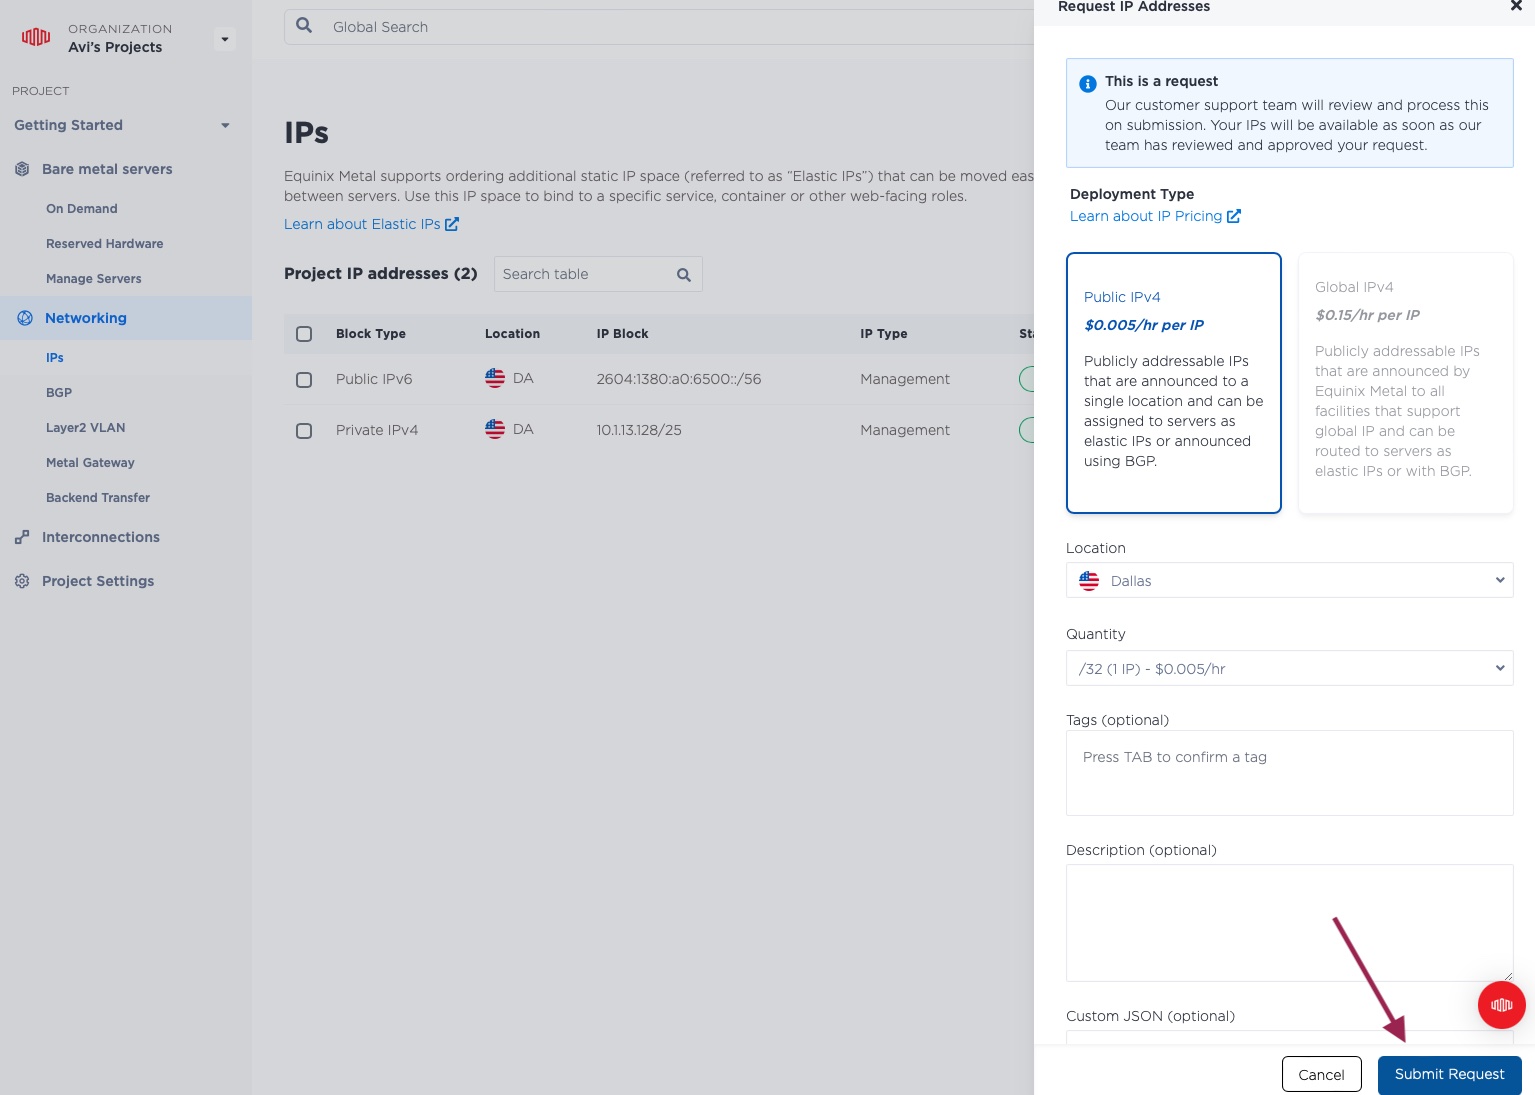
Finally, click the "Submit Request" button.
This returns you to the main IPs page. Because we requested just a single IP, it was ready for us immediately. Notice that we now have an additional IP Block, whose type is "Elastic," unlike the others, which are "Management."
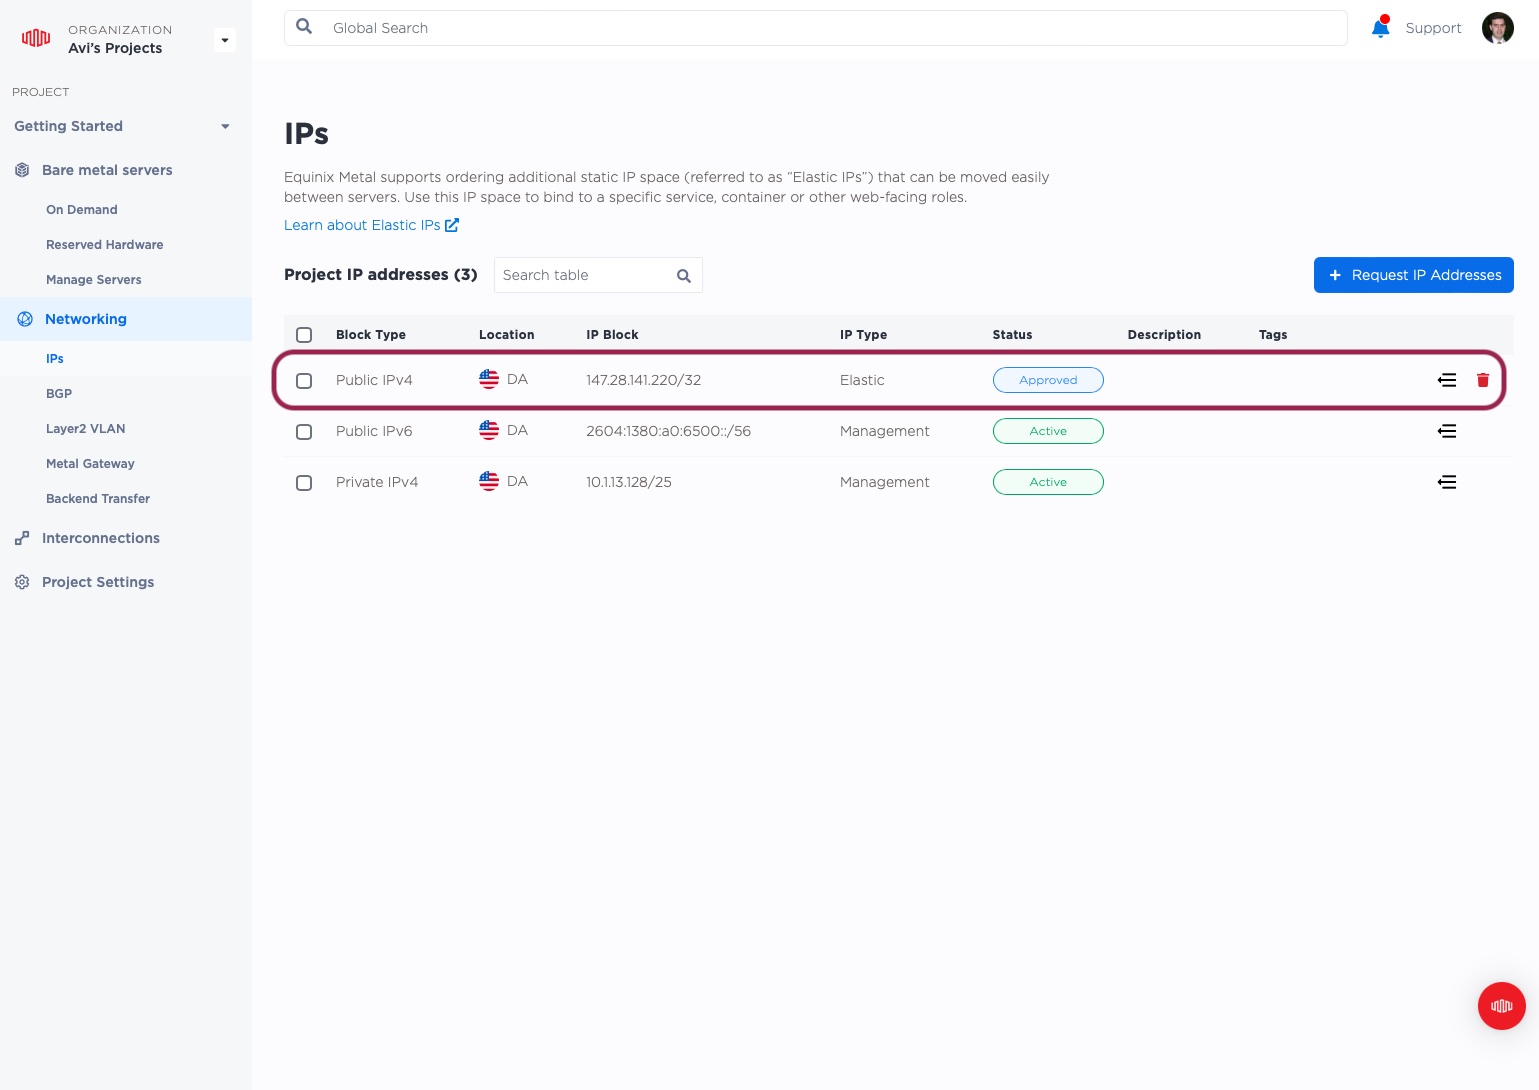
At any point, you can delete the IP block by clicking the garbage can icon. If you do, you will no longer be charged for it.
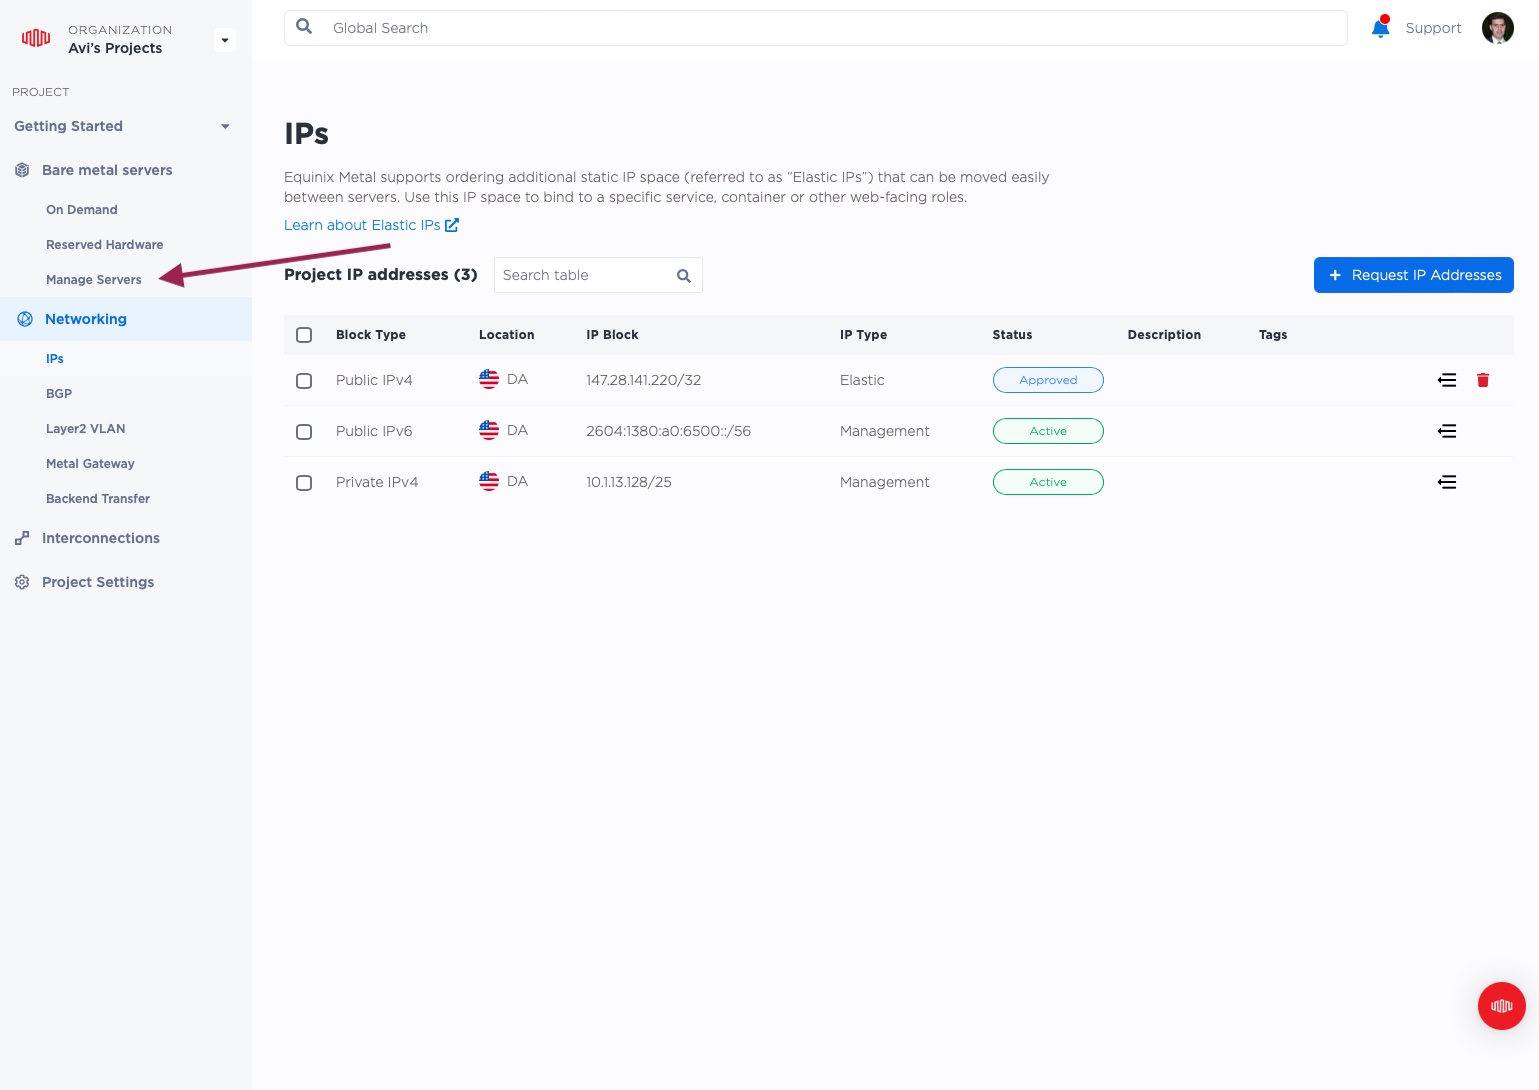
Now, you can allocate the IP to the server.
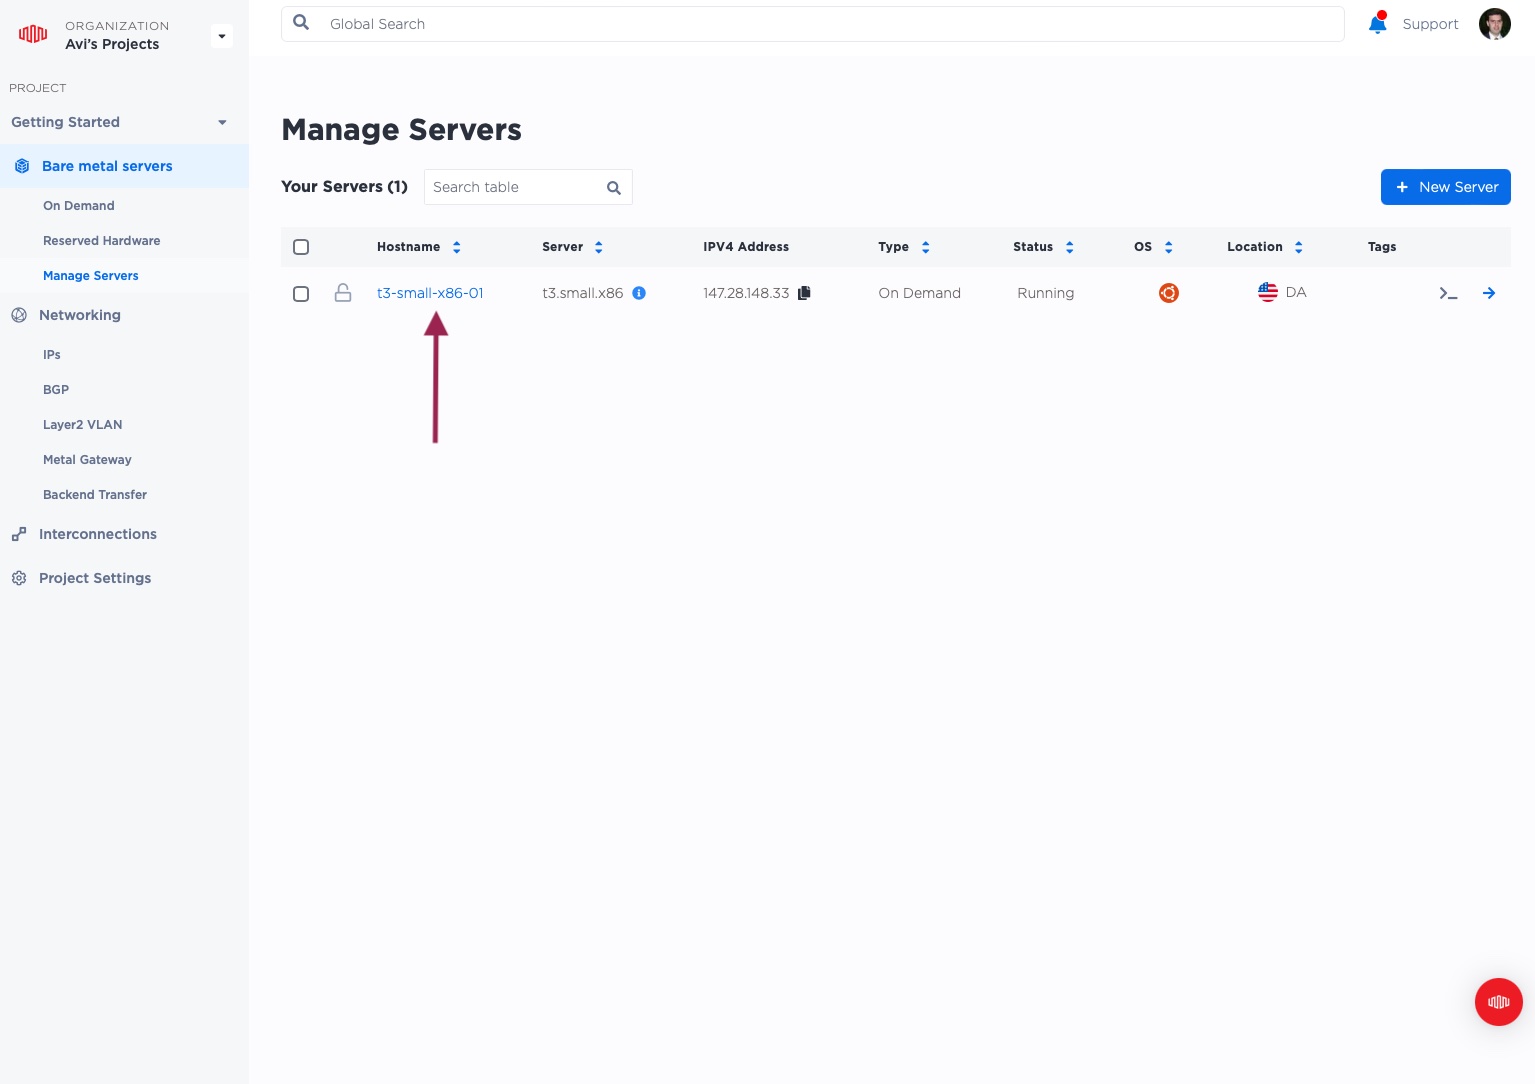
Select "Manage Servers" from the left-side navigation bar.
This brings you back to your list of servers. Click on the server hostname.
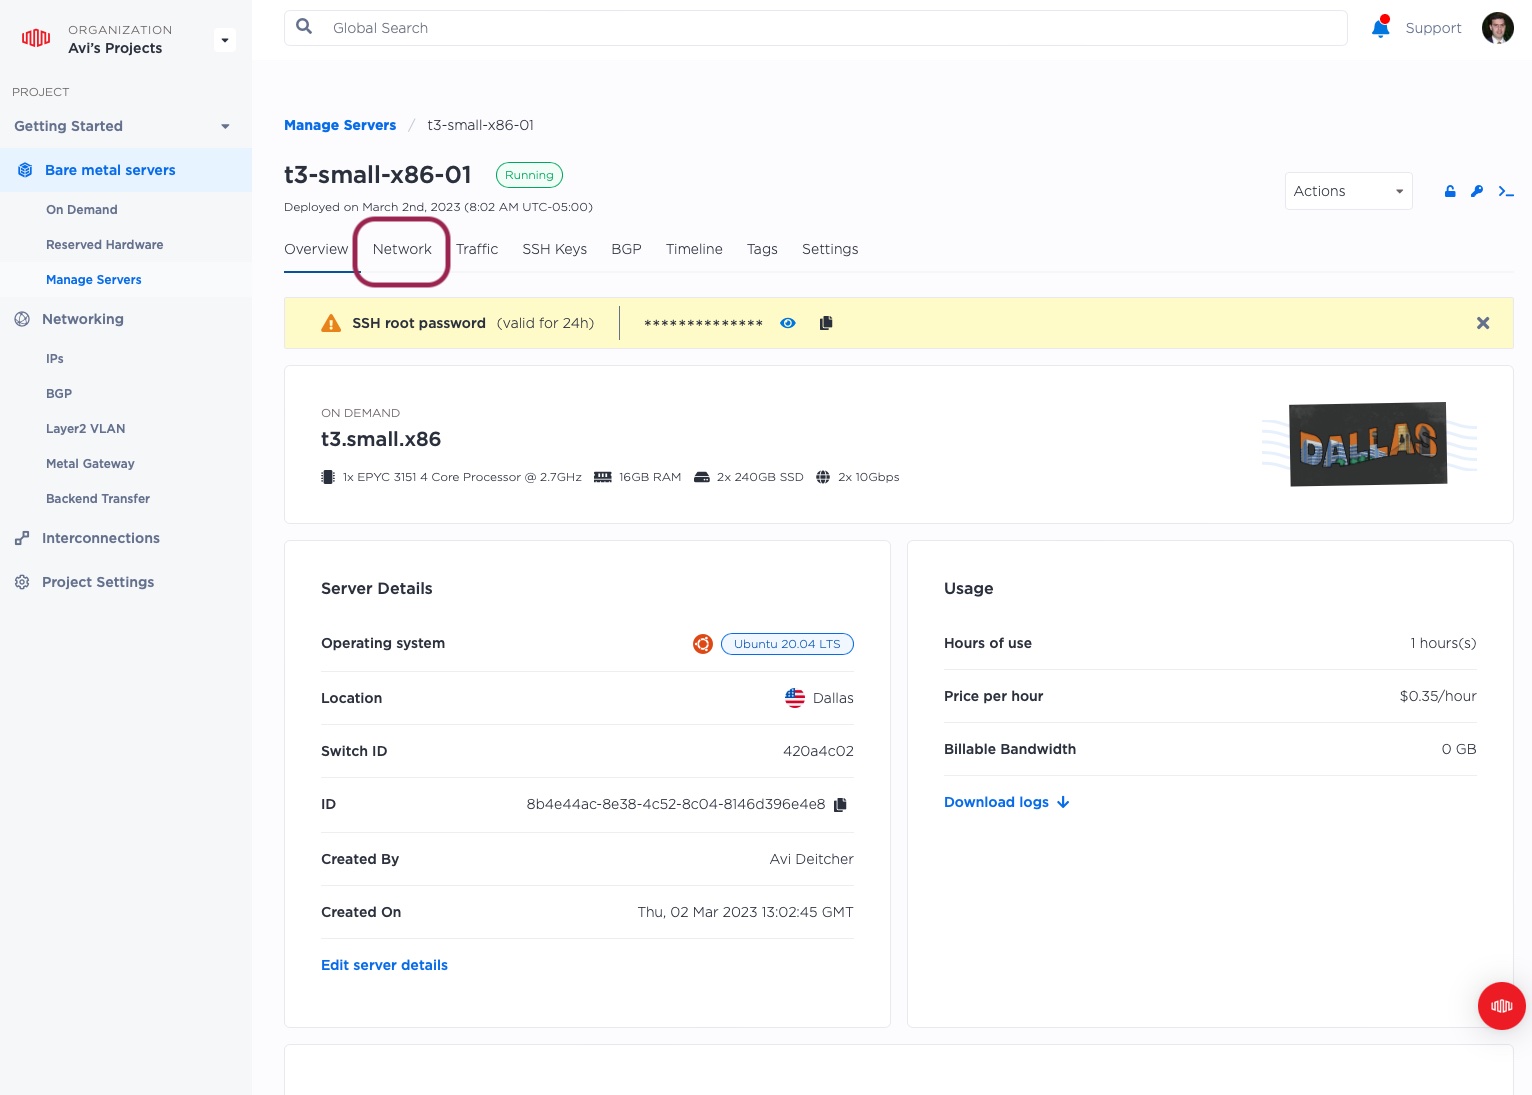
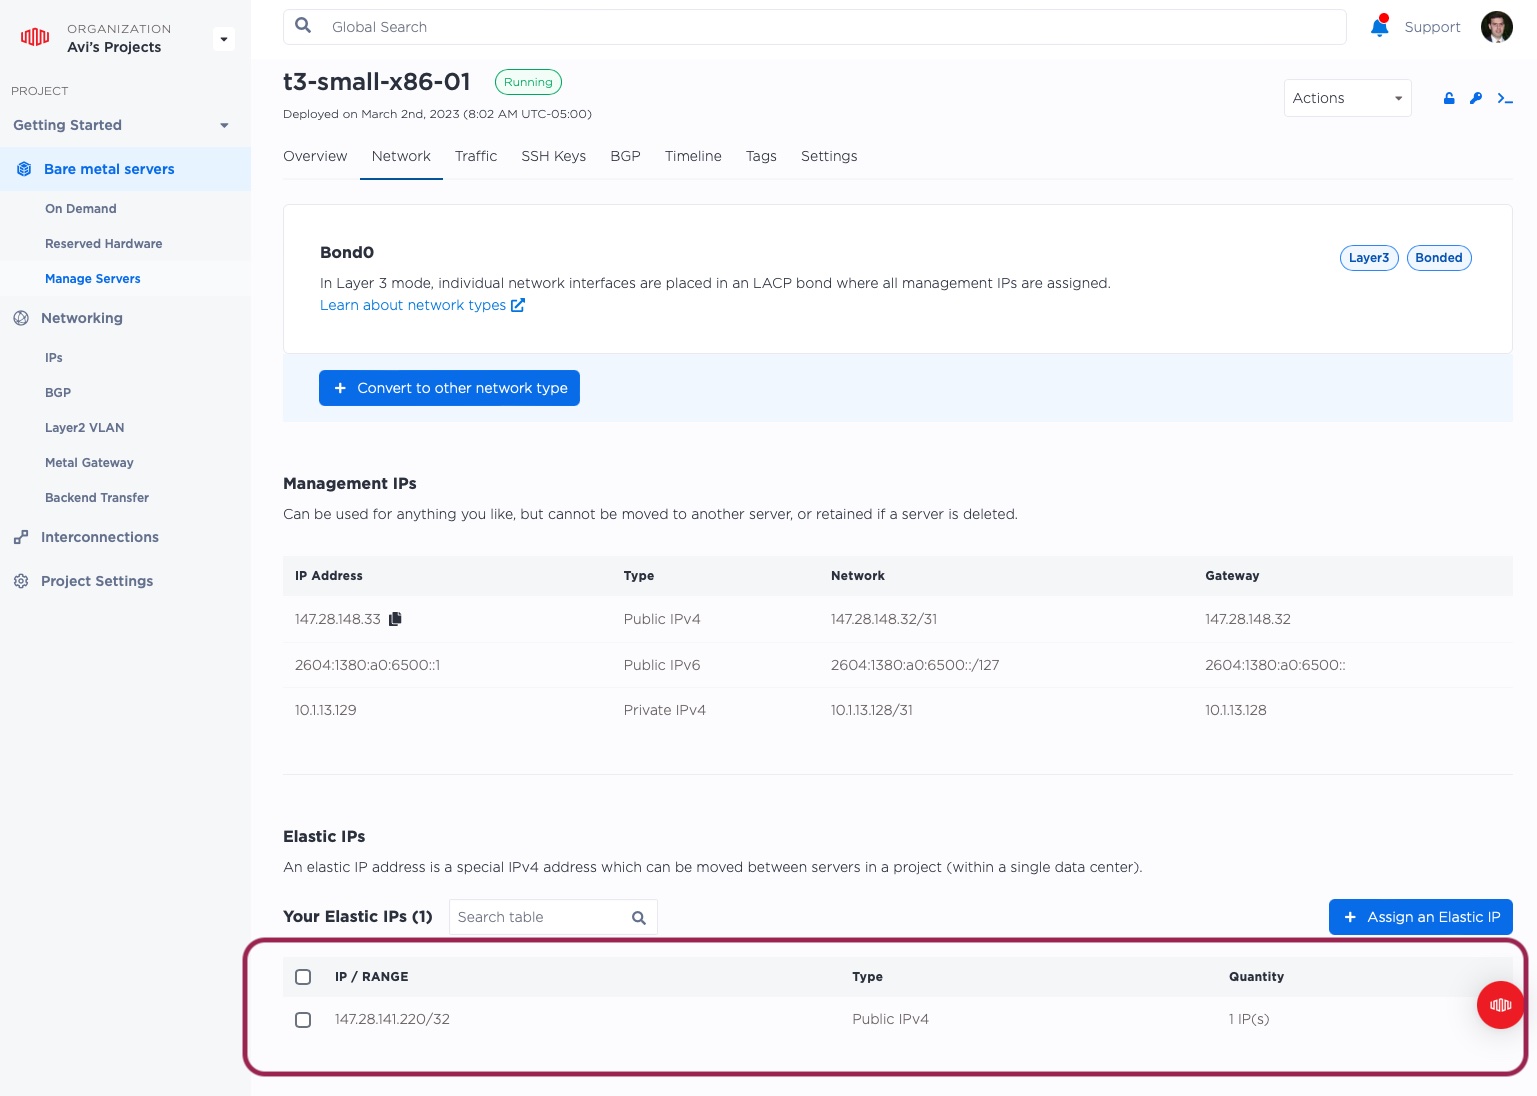
This brings you to the detailed view of your server. Across the top are tabs, providing the things you can do to manage the server. Select "Network."
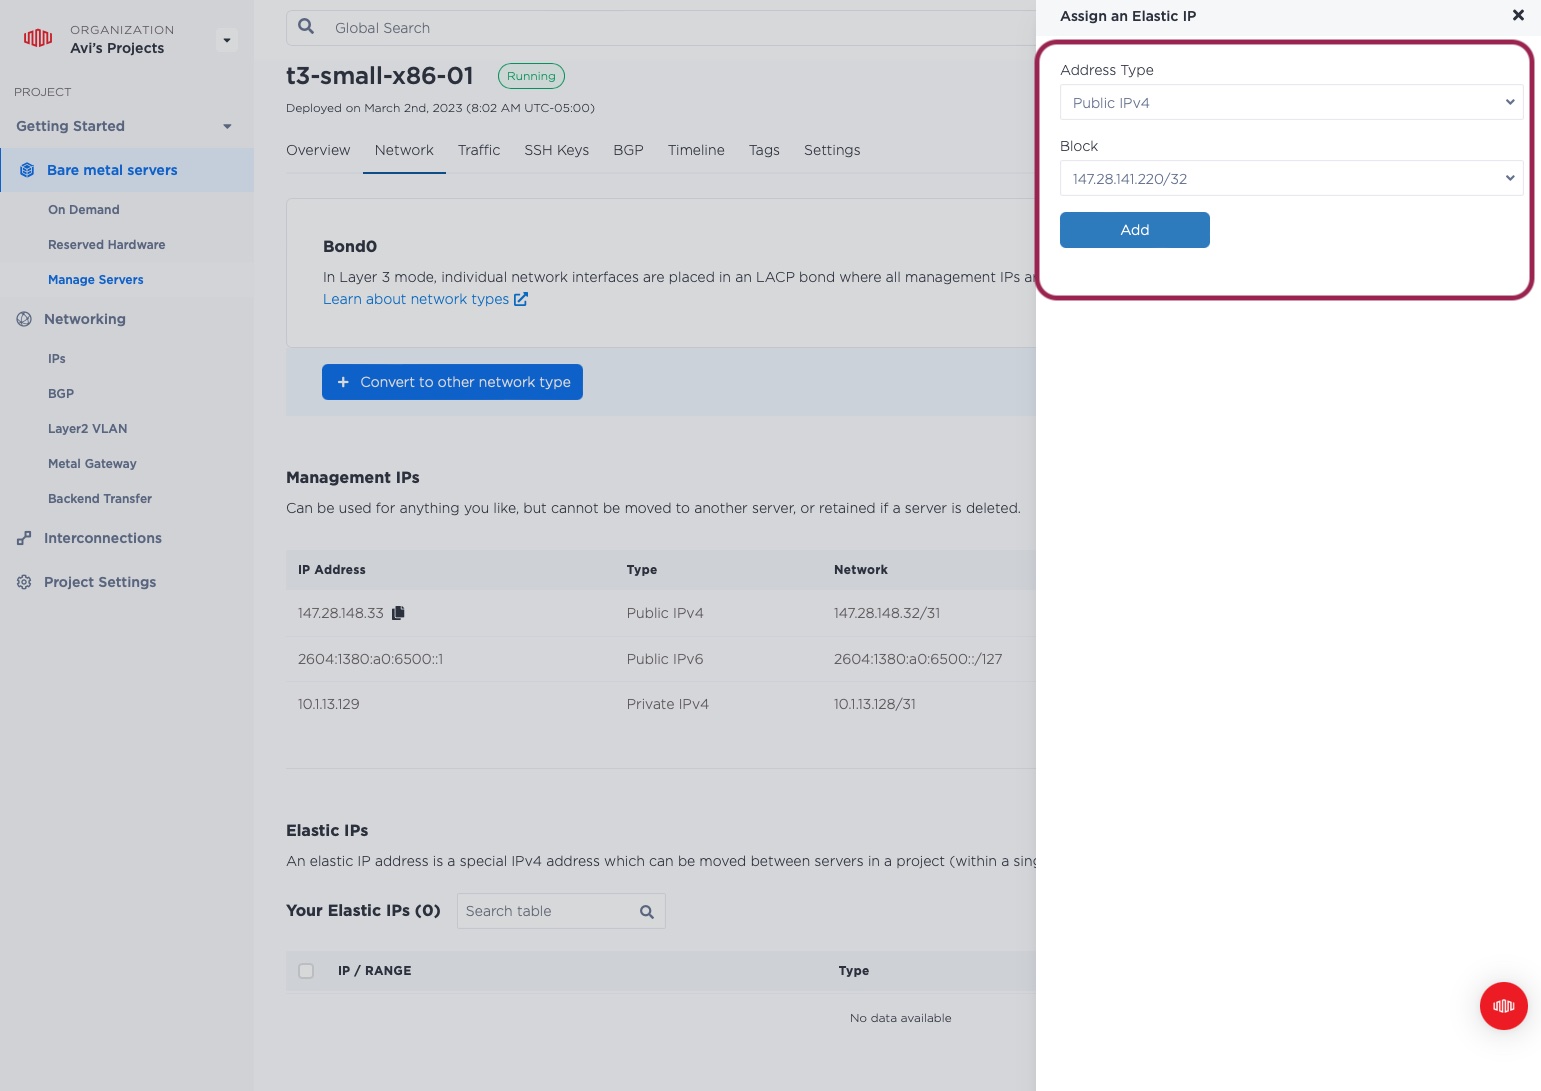
You will see the "Manage Network" page for your server. At the bottom right, click "Assign an Elastic IP."
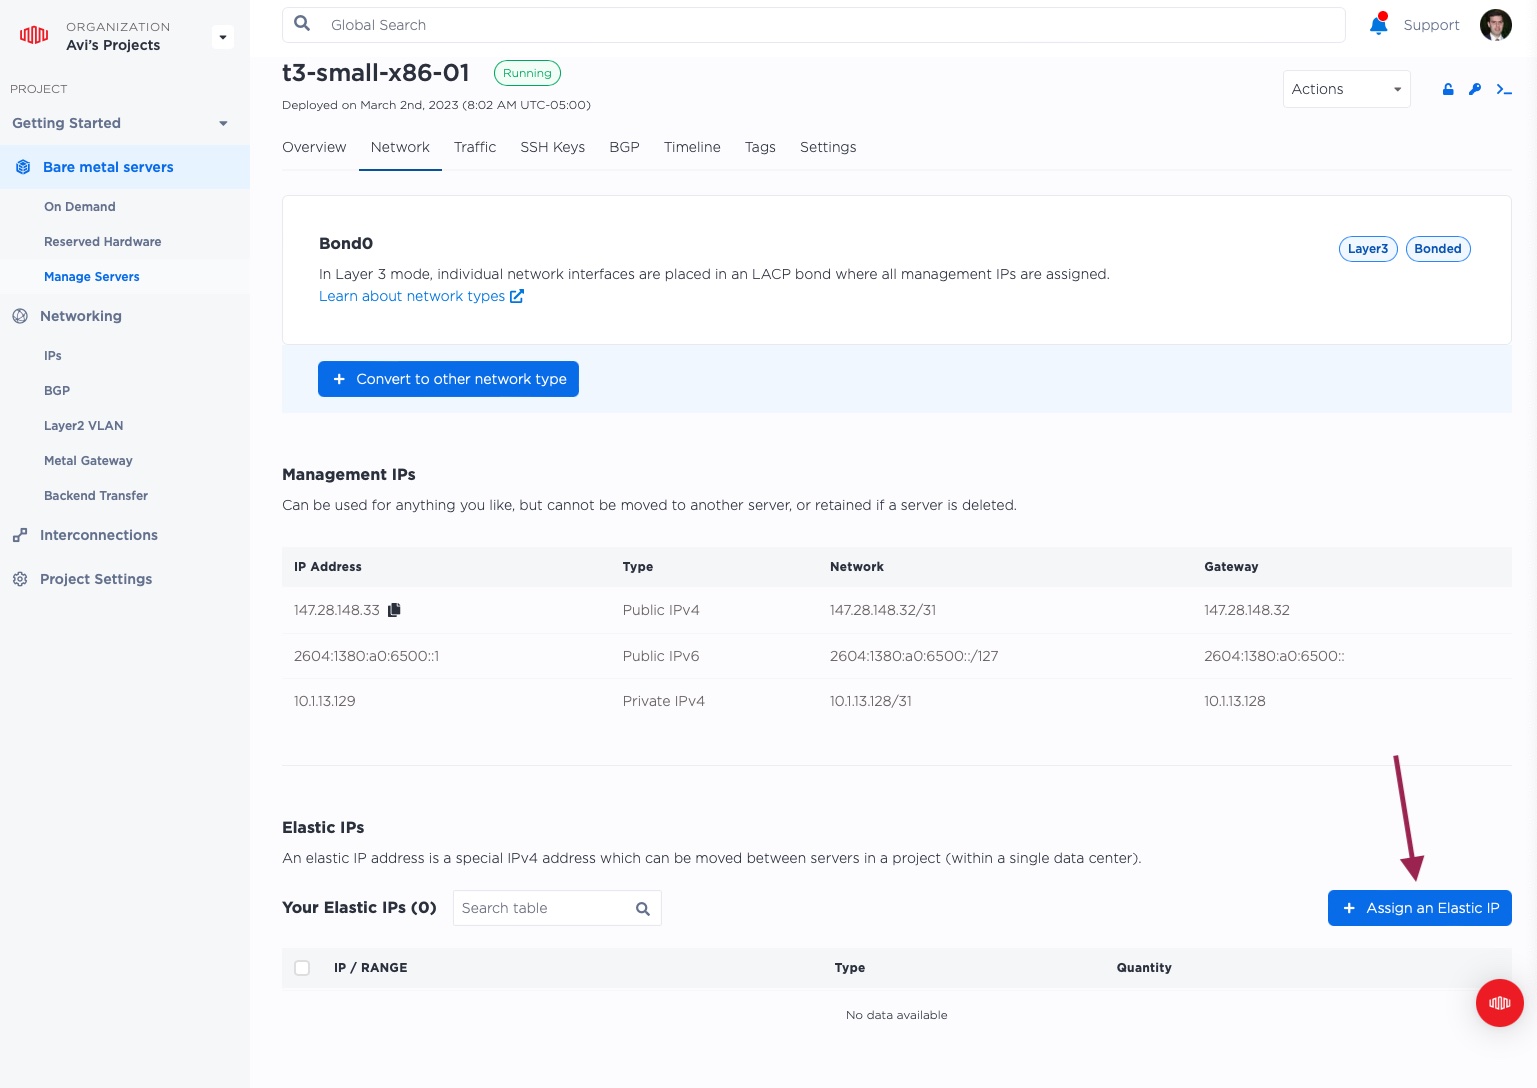
Select the address type, in this case, "Public IPv4," and the specific block. In this case, we only have block that we just allocated. If you have more than one Elastic IP block with available addresses, they will appear here. Select the block you want and click "Add."
Your IP now is assigned to your server, which will be reflected on the server's Network page.
It can take up to a minute for the allocation to take effect.
As far as Equinix Metal is concerned, all traffic for your Elastic IP will be routed to the server.
You may, however, need to tell the server to accept the traffic on that new IP. One way to do that
is just to add it as an address on the main bond0 interface.
Connect to the server via ssh, and add the address with the following command:
ssh root@147.28.148.33
Now that you've connected to the server, add the elastic IP address to interface bond0:
root@t3-small-x86-01:~# ip addr add 147.28.141.220 dev bond0
To check the result, use the ip addr command. The #4 interface bond0 should include the elastic IP address.
root@t3-small-x86-01:~# ip addr
1: lo: <LOOPBACK,UP,LOWER_UP> mtu 65536 qdisc noqueue state UNKNOWN group default qlen 1000
    link/loopback 00:00:00:00:00:00 brd 00:00:00:00:00:00
    inet 127.0.0.1/8 scope host lo
       valid_lft forever preferred_lft forever
    inet6 ::1/128 scope host
       valid_lft forever preferred_lft forever
2: enp3s0f0: <BROADCAST,MULTICAST,SLAVE,UP,LOWER_UP> mtu 1500 qdisc mq master bond0 state UP group default qlen 1000
    link/ether b4:96:91:89:70:68 brd ff:ff:ff:ff:ff:ff
3: enp3s0f1: <NO-CARRIER,BROADCAST,MULTICAST,SLAVE,UP> mtu 1500 qdisc mq master bond0 state DOWN group default qlen 1000
    link/ether b4:96:91:89:70:68 brd ff:ff:ff:ff:ff:ff
4: bond0: <BROADCAST,MULTICAST,MASTER,UP,LOWER_UP> mtu 1500 qdisc noqueue state UP group default qlen 1000
    link/ether b4:96:91:89:70:68 brd ff:ff:ff:ff:ff:ff
    inet 147.28.148.33/31 brd 255.255.255.255 scope global bond0
       valid_lft forever preferred_lft forever
    inet 10.1.13.129/31 brd 255.255.255.255 scope global bond0:0
       valid_lft forever preferred_lft forever
    inet 147.28.141.220/32 scope global bond0
       valid_lft forever preferred_lft forever
    inet6 2604:1380:a0:6500::1/127 scope global
       valid_lft forever preferred_lft forever
    inet6 fe80::b696:91ff:fe89:7068/64 scope link
       valid_lft forever preferred_lft forever
You can check that the address was assigned correctly by pinging the server from anywhere:
$ ping 147.28.141.220
PING 147.28.141.220 (147.28.141.220): 56 data bytes
64 bytes from 147.28.141.220: icmp_seq=0 ttl=47 time=185.140 ms
64 bytes from 147.28.141.220: icmp_seq=1 ttl=47 time=184.757 ms
64 bytes from 147.28.141.220: icmp_seq=2 ttl=47 time=183.440 ms
64 bytes from 147.28.141.220: icmp_seq=3 ttl=47 time=184.044 ms
^C
--- 147.28.141.220 ping statistics ---
4 packets transmitted, 4 packets received, 0.0% packet loss
round-trip min/avg/max/stddev = 183.440/184.345/185.140/0.654 ms
Once you are done with this guide, if you don't want to keep using the server, be sure to delete it to avoid being charged for it. You also should detach and deprovision the Elastic IP, as you are charged for that as well.
Conclusion
You've now created a new project to hold your servers, created new SSH keys to access them, provisioned the servers, and added an elastic IP range to them. From here, you can get to work creating the services that you want to deploy. If you add more servers to this project, it will take less time, as you already have the project and SSH keys set up.
You may also like
Digger deeper into similar topics in our archives
Configuring BGP with BIRD 1.6 on an Equinix Metal Server
Set up BGP on your Equinix Metal server using BIRD 1.6, covering IP configuration, installation, and neighbor setup to ensure robust routing capabilities between your server and the Equinix...

Configuring BGP with FRR on an Equinix Metal Server
Establish a robust BGP configuration on your Equinix Metal server using FRR, including setting up network interfaces, installing and configuring FRR software, and ensuring secure and efficie...

Crosscloud VPN with Wireguard
Learn to establish secure VPN connections across cloud environments using WireGuard, including detailed setups for site-to-site tunnels and VPN gateways with NAT on Equinix Metal, enhancing...

AWS ECS Anywhere on Equinix Metal
Learn to deploy Amazon ECS Anywhere on Equinix Metal.

Ready to kick the tires?
Use code DEPLOYNOW for $300 credit