- Home /
- Resources /
- Learning center /
- AWS ECS Anywhere o...
AWS ECS Anywhere on Equinix Metal
Learn to deploy Amazon ECS Anywhere on Equinix Metal.
On this page
- What's in this guide?
- You will need
- Create the Equinix Metal Connection
- AWS Credentials for Accepting DX Connection Automatically
- Deploy Network Edge Device and Fabric Connection
- Attach the VLAN to the Connection
- Testing Network Connectivity
- Build and Deploy the Application Demo
- Testing Demo Application
- Adding More Workers
- Cleanup
What's in this guide?
Want to deploy an AWS ECS worker node in Equinix Metal? ECS-Anywhere allows you to deploy an ECS agent in a bare metal server like Equinix Metal. You'll be able to extend your ECS cluster outside of AWS. In this guide, we'll walk you through how to extend an ECS cluster using Equinix Metal. Additionally, we'll show you how to keep the communication private and secure between Equinix Metal and AWS without using the Internet. We're giving you a Terraform template that deploys several resources with the aim that you have a complete solution. It's going to be easier to remove resources you don't need, rather than figuring out things like how to configure a private connectivity.
You will need
- An AWS account
- An AWS secret and access key combo
- Configure Terraform properly to provision infrastructure in your AWS account
- A Consumer Key and Secret to interact with the Equinix API
- An Equinix Metal org-id and API key
- A Billing Account in Equinix
- Python 3
- Docker
Create the Equinix Metal Connection
Before you start deploying the resources, you need to create the Connection for communicating directly with Equinix Fabric. You need to use the guide we have in our documentation site where we're including all the steps you need follow to create the connection either through the console or the API.
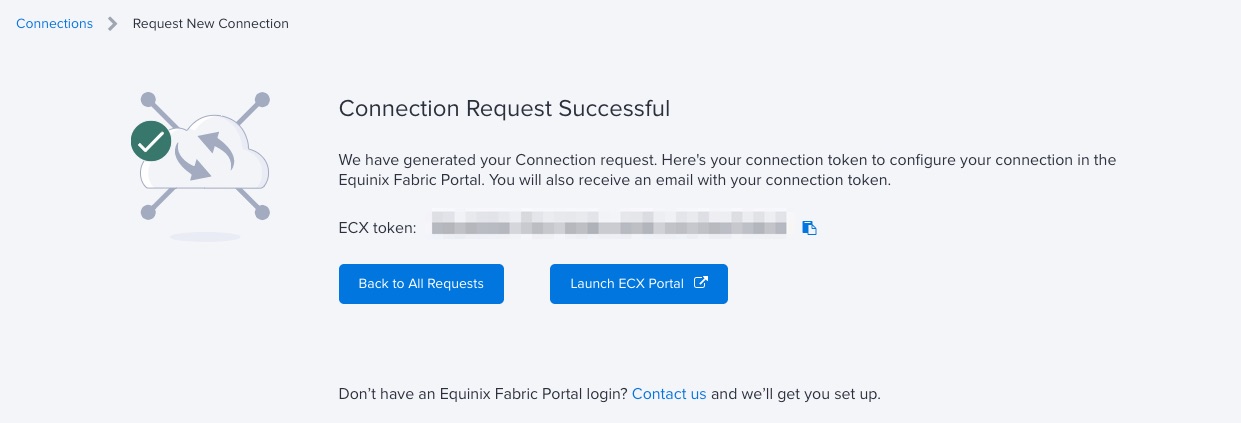
Once you create the connection, save the ECX token generated because we'll use it as a value for the paramter eqx_metal_token in the terraform.tfvars you'll create later for the Terraform template.
AWS Credentials for Accepting DX Connection Automatically
As part of automating as much as possible, we're including in the Terraform template a way to accept automatically the AWS Direct Connection we create when creating the Equinix Fabric connection for AWS. Therefore, you need to create an IAM user with the proper permissions to accept the DX Connection. Then, you need to generate the secret and access keys combo for that user. You can specify those values in the terraform.tfvars, like this.
aws_access_key = "YOUR_ACCESS_KEY_FOR_USER_ACCEPTING_DX_CONNECTION"
aws_secret_key = "YOUR_SECRET_KEY_FOR_USER_ACCEPTING_DX_CONNECTION"
Deploy Network Edge Device and Fabric Connection
To create all resources needed in this guide, we need to do it in two parts. You create first all the connectivity resources needed, and once the Equinix Metal Connection you created in the first step is approved, you'll be able to continue with the second part, which is going to be the ECS worker node(s) in Equinix Metal.
So, let's create a terraform.tfvars in the root directory of the Terraform template files like the following (feel free to adapt any value to your needs):
worker_count            = 1
cluster_name            = "ecs-any"
metro                   = "am"
worker_plan             = "c3.small.x86"
cluster_private_network = "192.168.72"

eqx_seller_ne_metro_code    = "AM"
eqx_seller_aws_metro_code   = "AM"
eqx_seller_metal_metro_code = "AM"
eqx_fabric_speed            = "200"
eqx_fabric_speed_unit       = "MB"
eqx_ne_throughput           = 500
eqx_ne_throughput_unit      = "Mbps"
eqx_account                 = "133002"
eqx_device_hostname         = "ecsany"
eqx_ne_acl_template_name    = "ecsanydemo"
eqx_ne_ssh_user             = "ecsanydemo"
eqx_ne_ssh_pwd              = "ecsanymet"

aws_region                      = "eu-central-1"
aws_network_cidr                = "172.16.0.0/16"
aws_subnet1_cidr                = "172.16.0.0/24"
aws_dx_bgp_equinix_side_asn     = 65432
aws_dx_bgp_authkey              = "Vz8PmPjOvq"
aws_dx_bgp_amazon_address       = "169.254.235.17/30"
aws_dx_bgp_equinix_side_address = "169.254.235.18/30"
ecs_cluster_name                = "ecs-any"

project_id             = ""
auth_token             = ""
aws_account            = ""
aws_access_key         = ""
aws_secret_key         = ""
eqx_consumer_key       = ""
eqx_consumer_secret    = ""
eqx_notification_users = [""]
eqx_metal_token        = ""
From the previous section, there are a few empty string values because they're sensitive data that you need to provide before you start provisioning all the resources. The following is a list of instructions about how to get the missing values.
- project_id = You can get this ID from the Project Settings page in the Equinix Metal Console.
- auth_token = You need to create an API key for the user in the Equinix Metal Console, and use that value for this parameter.
- aws_account = It's the AWS account number that you'll use.
- aws_access_key = It's the access key for the IAM user in charge of accepting the DX connection.
- aws_secret_key = It's the secret key for the IAM user in charge of accepting the DX connection.
- eqx_consumer_key = It's the consumer key you created at the beggining of this guide.
- eqx_consumer_secret = It's the consumer secret you created at the beggining of this guide.
- eqx_notification_users = It's the list of emails, separated by comma, where you want to receive notifications from Equinix regarding your resources.
- eqx_metal_token = It's the token generated when you created the Metal Connection.
Once you have all the required values, you can start using Terraform to provision all resources. Run the following command to download all the required dependencies:
terraform init
You should see an output like the following one:
Initializing the backend...

...

Terraform has been successfully initialized!

You may now begin working with Terraform. Try running "terraform plan" to see
any changes that are required for your infrastructure. All Terraform commands
should now work.

If you ever set or change modules or backend configuration for Terraform,
rerun this command to reinitialize your working directory. If you forget, other
commands will detect it and remind you to do so if necessary.
If there are no issues, you can start to create the resources by running the following command:
terraform apply
You'll be asked to confirm the creation of all the resources, like this:
...
Plan: 43 to add, 0 to change, 0 to destroy.

Changes to Outputs:
  + activation_code     = (known after apply)
  + aws-region          = "eu-central-1"
  + ecr-url             = (known after apply)
  + ecs-cluster         = "cm-ecs-any2"
  + iam-exec-role       = (known after apply)
  + iam-task-role       = (known after apply)
  + sqs-url             = (known after apply)
  + sqs-url-public      = (known after apply)
  + ssm_activation_pair = (known after apply)

Do you want to perform these actions?
  Terraform will perform the actions described above.
  Only 'yes' will be accepted to approve.

  Enter a value:
It will take about 25 to 30 minutes to finish the provisioning, you can see all the progress in the logs from the command you just ran.
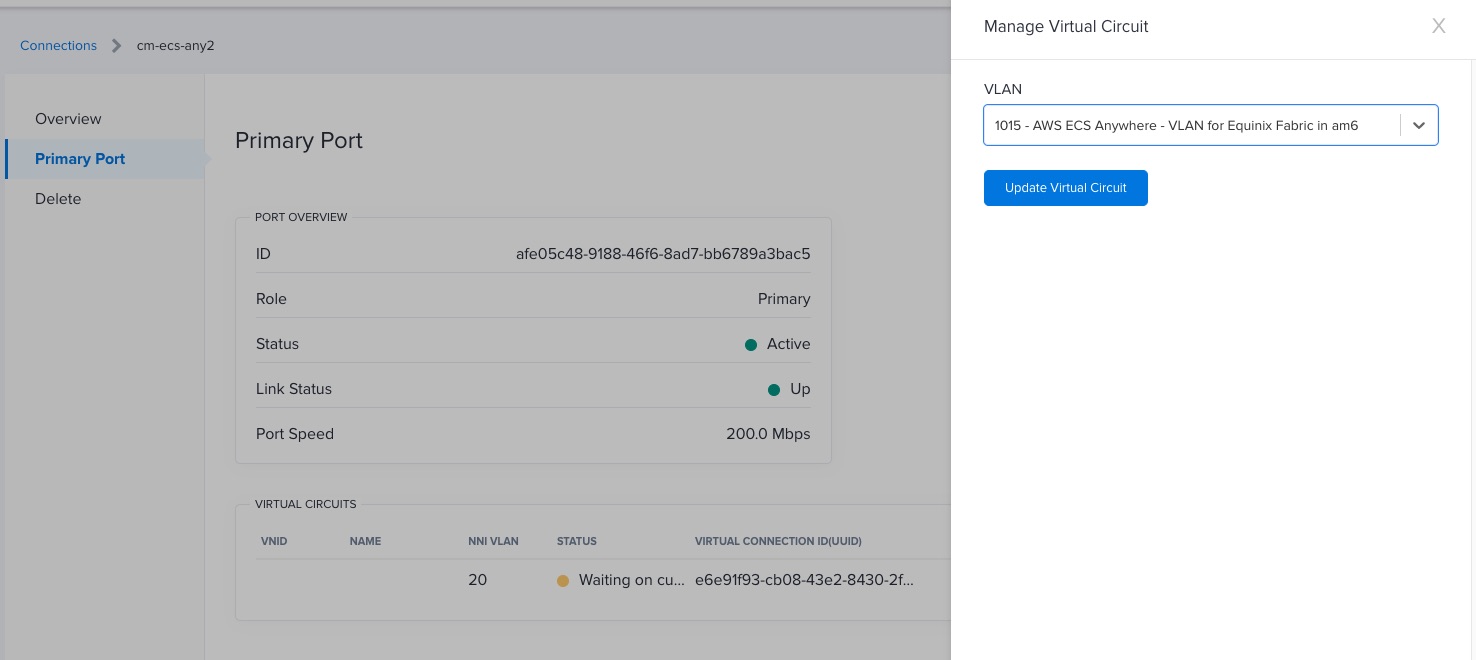
Attach the VLAN to the Connection
Once Terraform has finished creating all the resources needed for interconnection, you need to attach the VLAN to the Connection in the Equinix Metal Console. In case you have too many VLANs created in your project, you can get the VLAN ID that Terraform creates by running the following command:
terraform output metal_vlan
Now that you have the VLAN ID, go to the Connections section in the Equinix Metal Console and attach the VLAN. You can find the detailed instructions in our documentation site.
Go back to editing the terraform.tfvars file and include the following parameter to continue the provisioning of the other resources:
metal_connection_is_vlan_attached = true
Make sure that you also have the netmiko library installed as there's a Python script in the Terraform templates that does some configuration in the Cisco Router that Network Edge creates. To install the netmiko library, run the following command:
python3 -m pip install netmiko
At this point, you're ready to create the resources with Terraform, run this command:
terraform apply
You'll see that Terraform is planning to add 10 resources, and destroy 2 (don't worry about this, Terraform needs to re-create some resources).
Plan: 10 to add, 0 to change, 2 to destroy.

Do you want to perform these actions?
  Terraform will perform the actions described above.
  Only 'yes' will be accepted to approve.

  Enter a value:
Accept the plan, and wait for Terraform to finish, it should take around 15 minutes.
Testing Network Connectivity
Terraform has provisioned an EC2 instance for testing the connectivity between AWS and Equinix Metal. You can get the private IP of the EC2 instance by running the following command:
terraform output -raw ec2_private_ip
Then, SSH into any of the Equinix Metal servers created as ECS workers and try a ping:
ping $EC2_PRIVATE_IP
If the private connectivity is working, you should see that the ping is working:
root@cm-ecs-any2-l264w-worker-01:~# ping 172.16.0.111
PING 172.16.0.111 (172.16.0.111) 56(84) bytes of data.
64 bytes from 172.16.0.111: icmp_seq=1 ttl=61 time=8.53 ms
64 bytes from 172.16.0.111: icmp_seq=2 ttl=61 time=8.28 ms
64 bytes from 172.16.0.111: icmp_seq=3 ttl=61 time=8.93 ms
^C
--- 172.16.0.111 ping statistics ---
3 packets transmitted, 3 received, 0% packet loss, time 2004ms
rtt min/avg/max/mdev = 8.277/8.576/8.928/0.268 ms
If the private connectivity doesn't work, try recreating the Cisco configuration resource in Terraform by running the following commands:
terraform taint null_resource.configure_cisco
terraform apply
Accept the plan, and run the connecitivty test again.
Build and Deploy the Application Demo
We're going to be using the same application that the AWS team used to demonstrate ECS Anywhere. But first, you need to build the Docker image and push it to the ECR you created previously with Terraform. To do so, simply run the following commands:
aws ecr get-login-password --region $(terraform output -raw aws-region) | docker login --password-stdin --username AWS $(terraform output -raw ecr-url)
docker build -t $(terraform output -raw ecr-url) ./app
docker push $(terraform output -raw ecr-url)
You can verify that the task definition has been created with the following command:
aws ecs list-task-definitions
aws ecs list-tasks
Give it some time, in around 15 minutes or less, ECS will try again to create the task in the Equinix Metal worker. If you don't want to wait, you can recreate the ECS service by taining the resource, like this:
terraform taint aws_ecs_service.demo
terraform apply
Testing Demo Application
Once the application is running, you can test the application by SSHing into the Metal servers. You need to start by creating some files that the application will process in the /data/sourcefolder. Run the following command:
for i in `seq 10 20`; do touch /data/sourcefolder/0$i; done
Let's keep an eye open to watch what happens in the /data/sourcefolder folder:
watch ls -la /data/sourcefolder/
Open a new terminal tab (or Window) to watch the /data/destinationfolder folder:
watch ls -la /data/destinationfolder/
Now send some messages to the SQS queue, like this:
for i in `seq 10 20`; do aws sqs send-message --queue-url $(terraform output -raw sqs-url-public) --region $(terraform output -raw aws-region) --message-body "0$i"; done
You should see how the files are moving from the source folder to the destination folder.
Adding More Workers
If you want to add more worker ECS worker nodes in Equinix Metal, simply modify the value of the variable worker_count to the desired number (it could be zero if you want to turn off the environment in Equinix Metal).
The SSM Activation Terraform creates to register the worker node might have expired at the time you want to add a worker node, so you need to re-create it. Simply run the following commands after changing the number worker nodes you want:
terraform taint aws_ssm_activation.ssm_activation_pair
terraform apply
Accept the plan, and wait for the nodes get registered in ECS.
Cleanup
After you've finished with your tests, you can delete all the resources by running the following commands:
terraform destroy
You may also like
Digger deeper into similar topics in our archives
Configuring BGP with BIRD 1.6 on an Equinix Metal Server
Set up BGP on your Equinix Metal server using BIRD 1.6, covering IP configuration, installation, and neighbor setup to ensure robust routing capabilities between your server and the Equinix...

Configuring BGP with FRR on an Equinix Metal Server
Establish a robust BGP configuration on your Equinix Metal server using FRR, including setting up network interfaces, installing and configuring FRR software, and ensuring secure and efficie...

Crosscloud VPN with Wireguard
Learn to establish secure VPN connections across cloud environments using WireGuard, including detailed setups for site-to-site tunnels and VPN gateways with NAT on Equinix Metal, enhancing...

Deploy Your First Server
Learn the essentials of deploying your first server with Equinix Metal. Set up your project & SSH keys, provision a server and connect it to the internet.

Ready to kick the tires?
Use code DEPLOYNOW for $300 credit