- Home /
- Resources /
- Learning center /
- Setting Up an ESXi...
Setting Up an ESXi Server
Explore the steps for configuring and securing an ESXi server on Equinix Metal, focusing on network settings to ensure your system operates safely within a private network environment without public internet access.

On this page
If you are looking to run VMware on Equinix Metal™, we offer a 60-day trial ESXi operating system image. This guide is a basic set up for configuring the networking so that your ESXi server is not accessible on the public Internet, but still accessible over private networking provided by a Layer 2 VLAN.
Deploying the Server
Deploy a fresh ESXi server On Demand from the Equinix Metal console. Select the Location, Plan, and ESXi as your Operating System. This guide was written deploying VMware ESXi 7.0 with the default networking configuration.
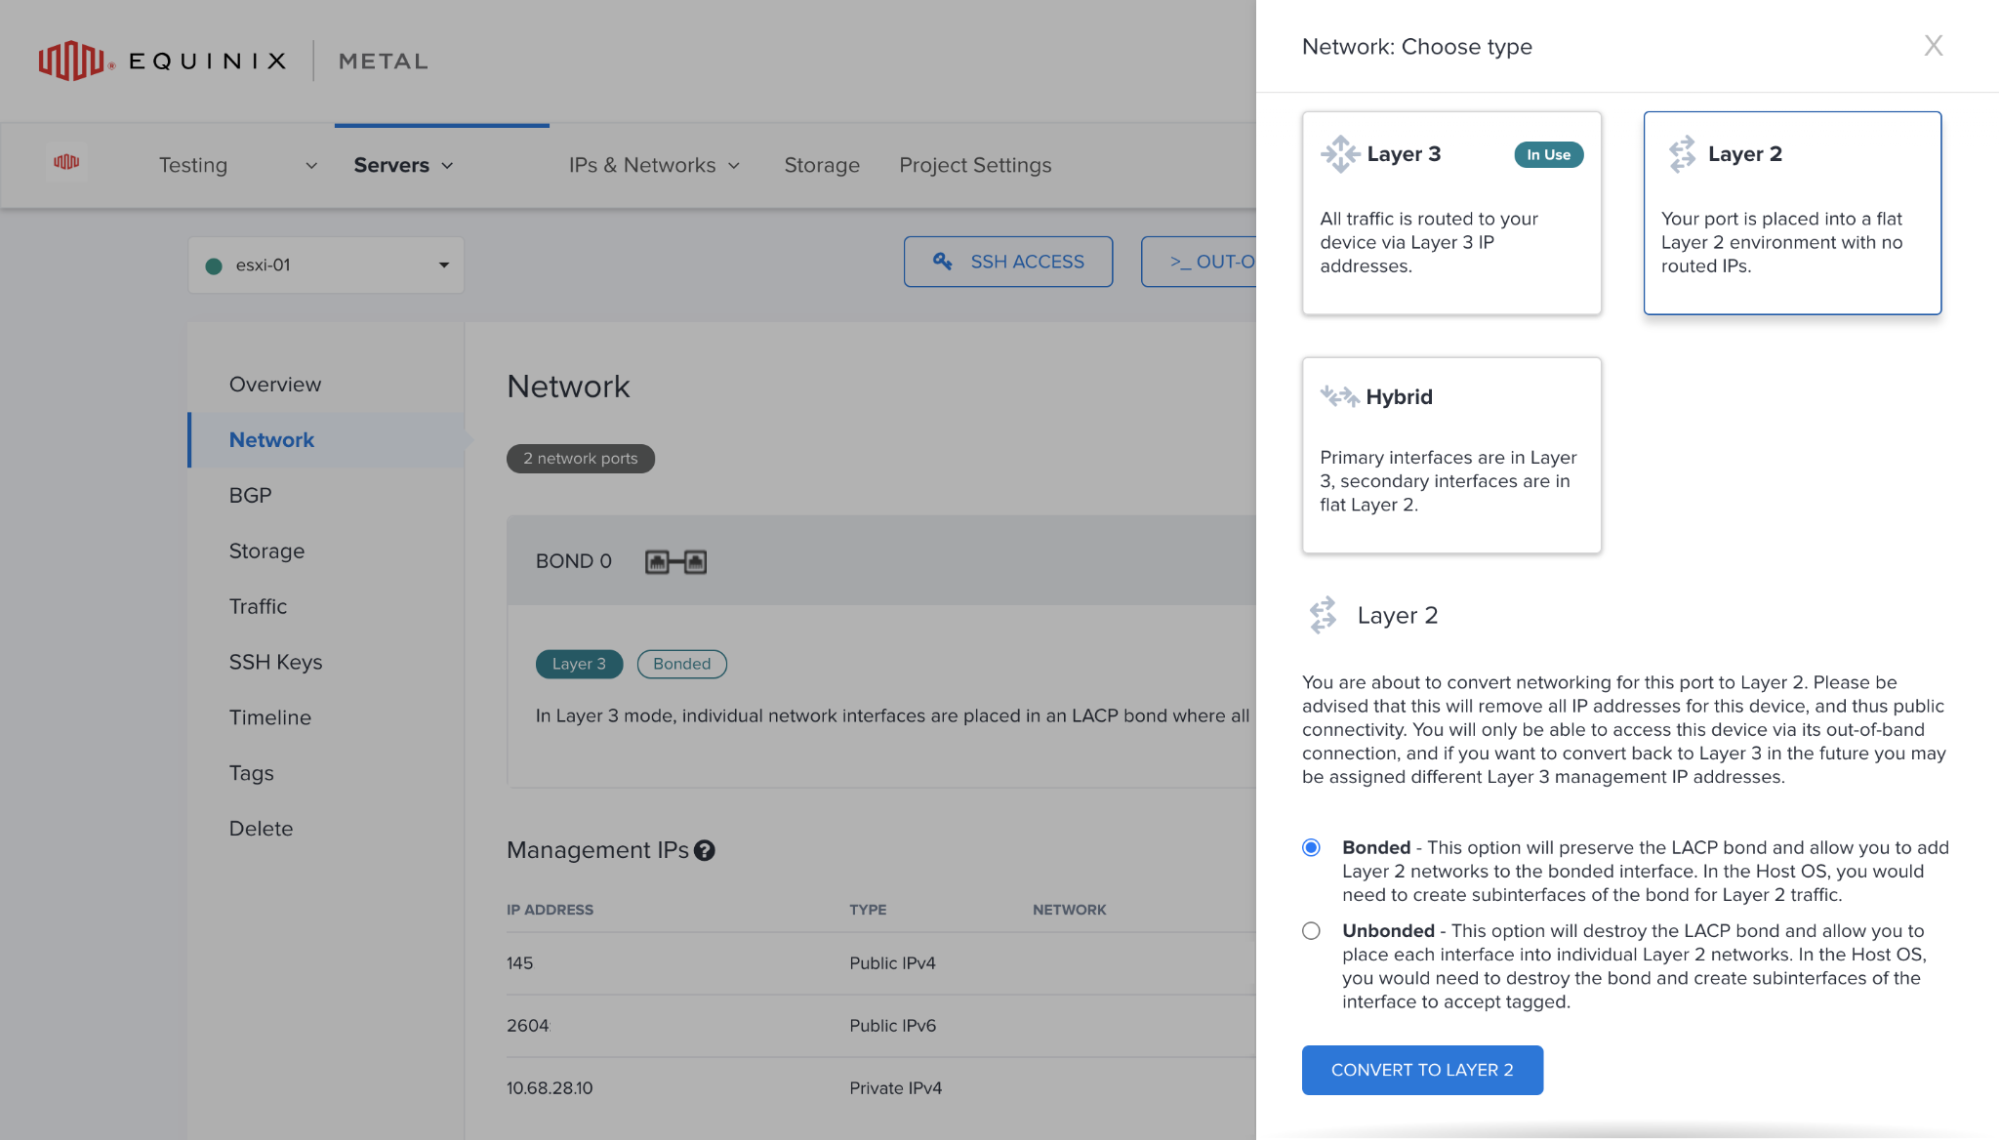
Once the server has finished provisioning, convert the networking mode to Layer 2 Bonded mode, which isolates it from the open Internet by removing its public IP addresses and provides the ability to attach the server to a VLAN. Navigate to your server's Overview in the console. Open the Network tab, and click the Convert to Other Network Type. Choose Layer 2, and select the Bonded option for redundancy. Then click the CONVERT TO LAYER 2 button.
Deploying with No Public IP Address
If you have requirements around provisioning in an isolated environment, you can deploy your server without public IP addresses. When configuring your deployment pre-provision, select the options to deploy without a public IP address in the Configure IPs section.
- Under Public IPv4, select the "Don’t deploy with Public IPv4" option.
- Under Private IPv4, you must use a
/29or/28subnet size. The recommended subnet size for ESXi is/29. - Under Public IPv6, select the "Don’t deploy with Public IPv6" option.
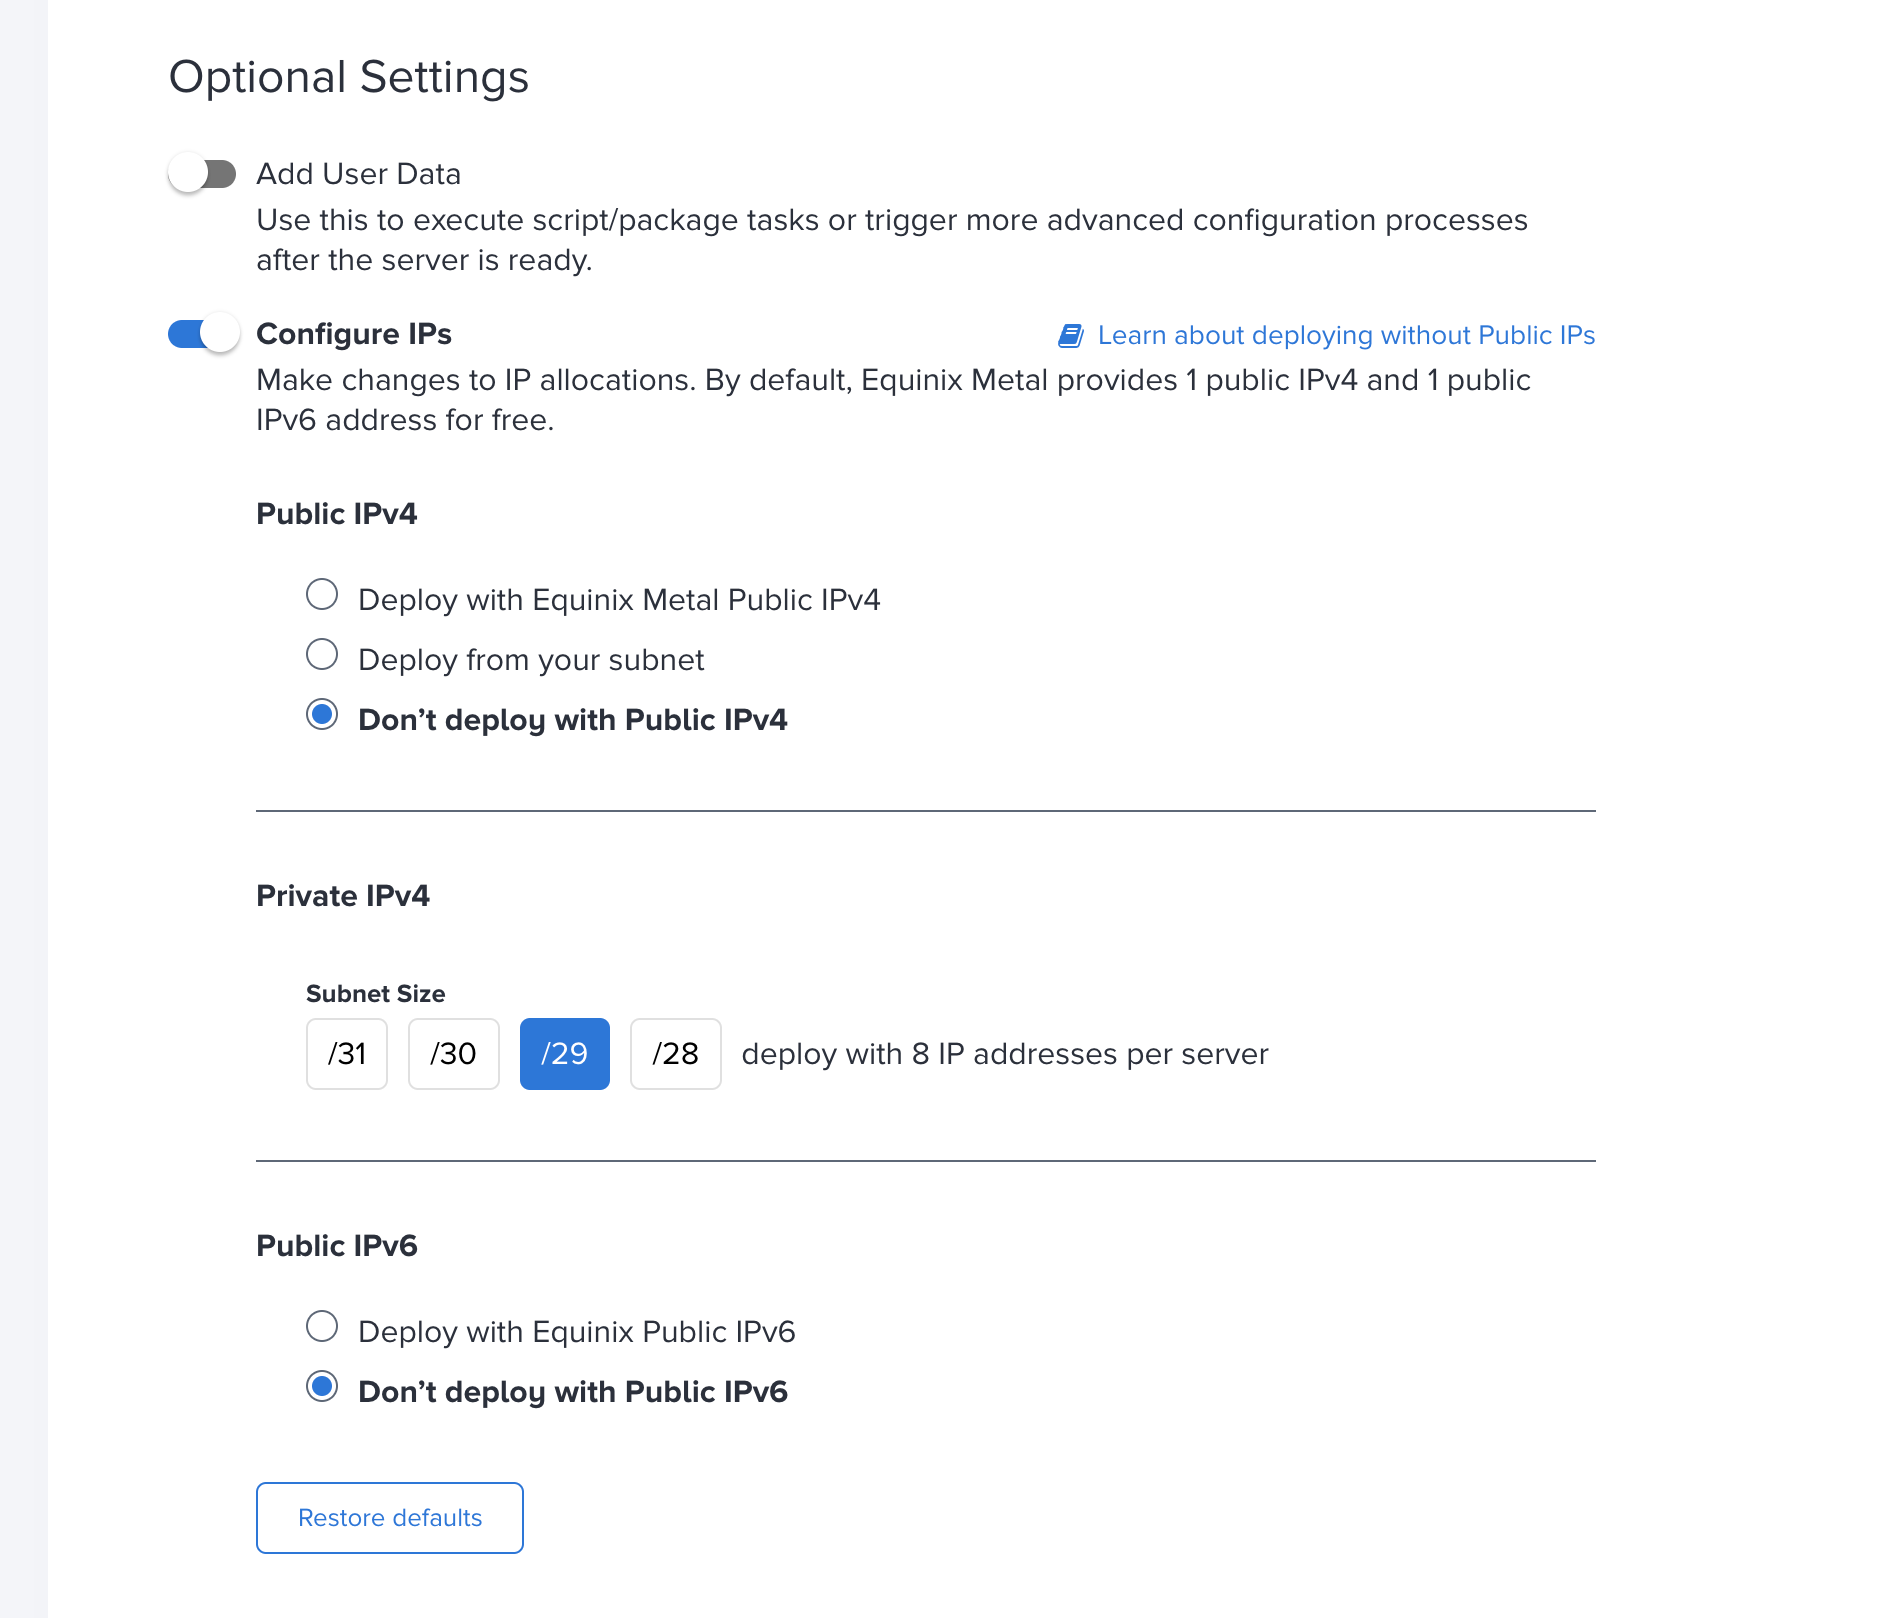
Note that even if you deploy without public IP addresses, your server will still be provisioned in the default Layer 3 Bonded networking mode and you will still have to convert it to Layer 2.
Setting up a VLAN
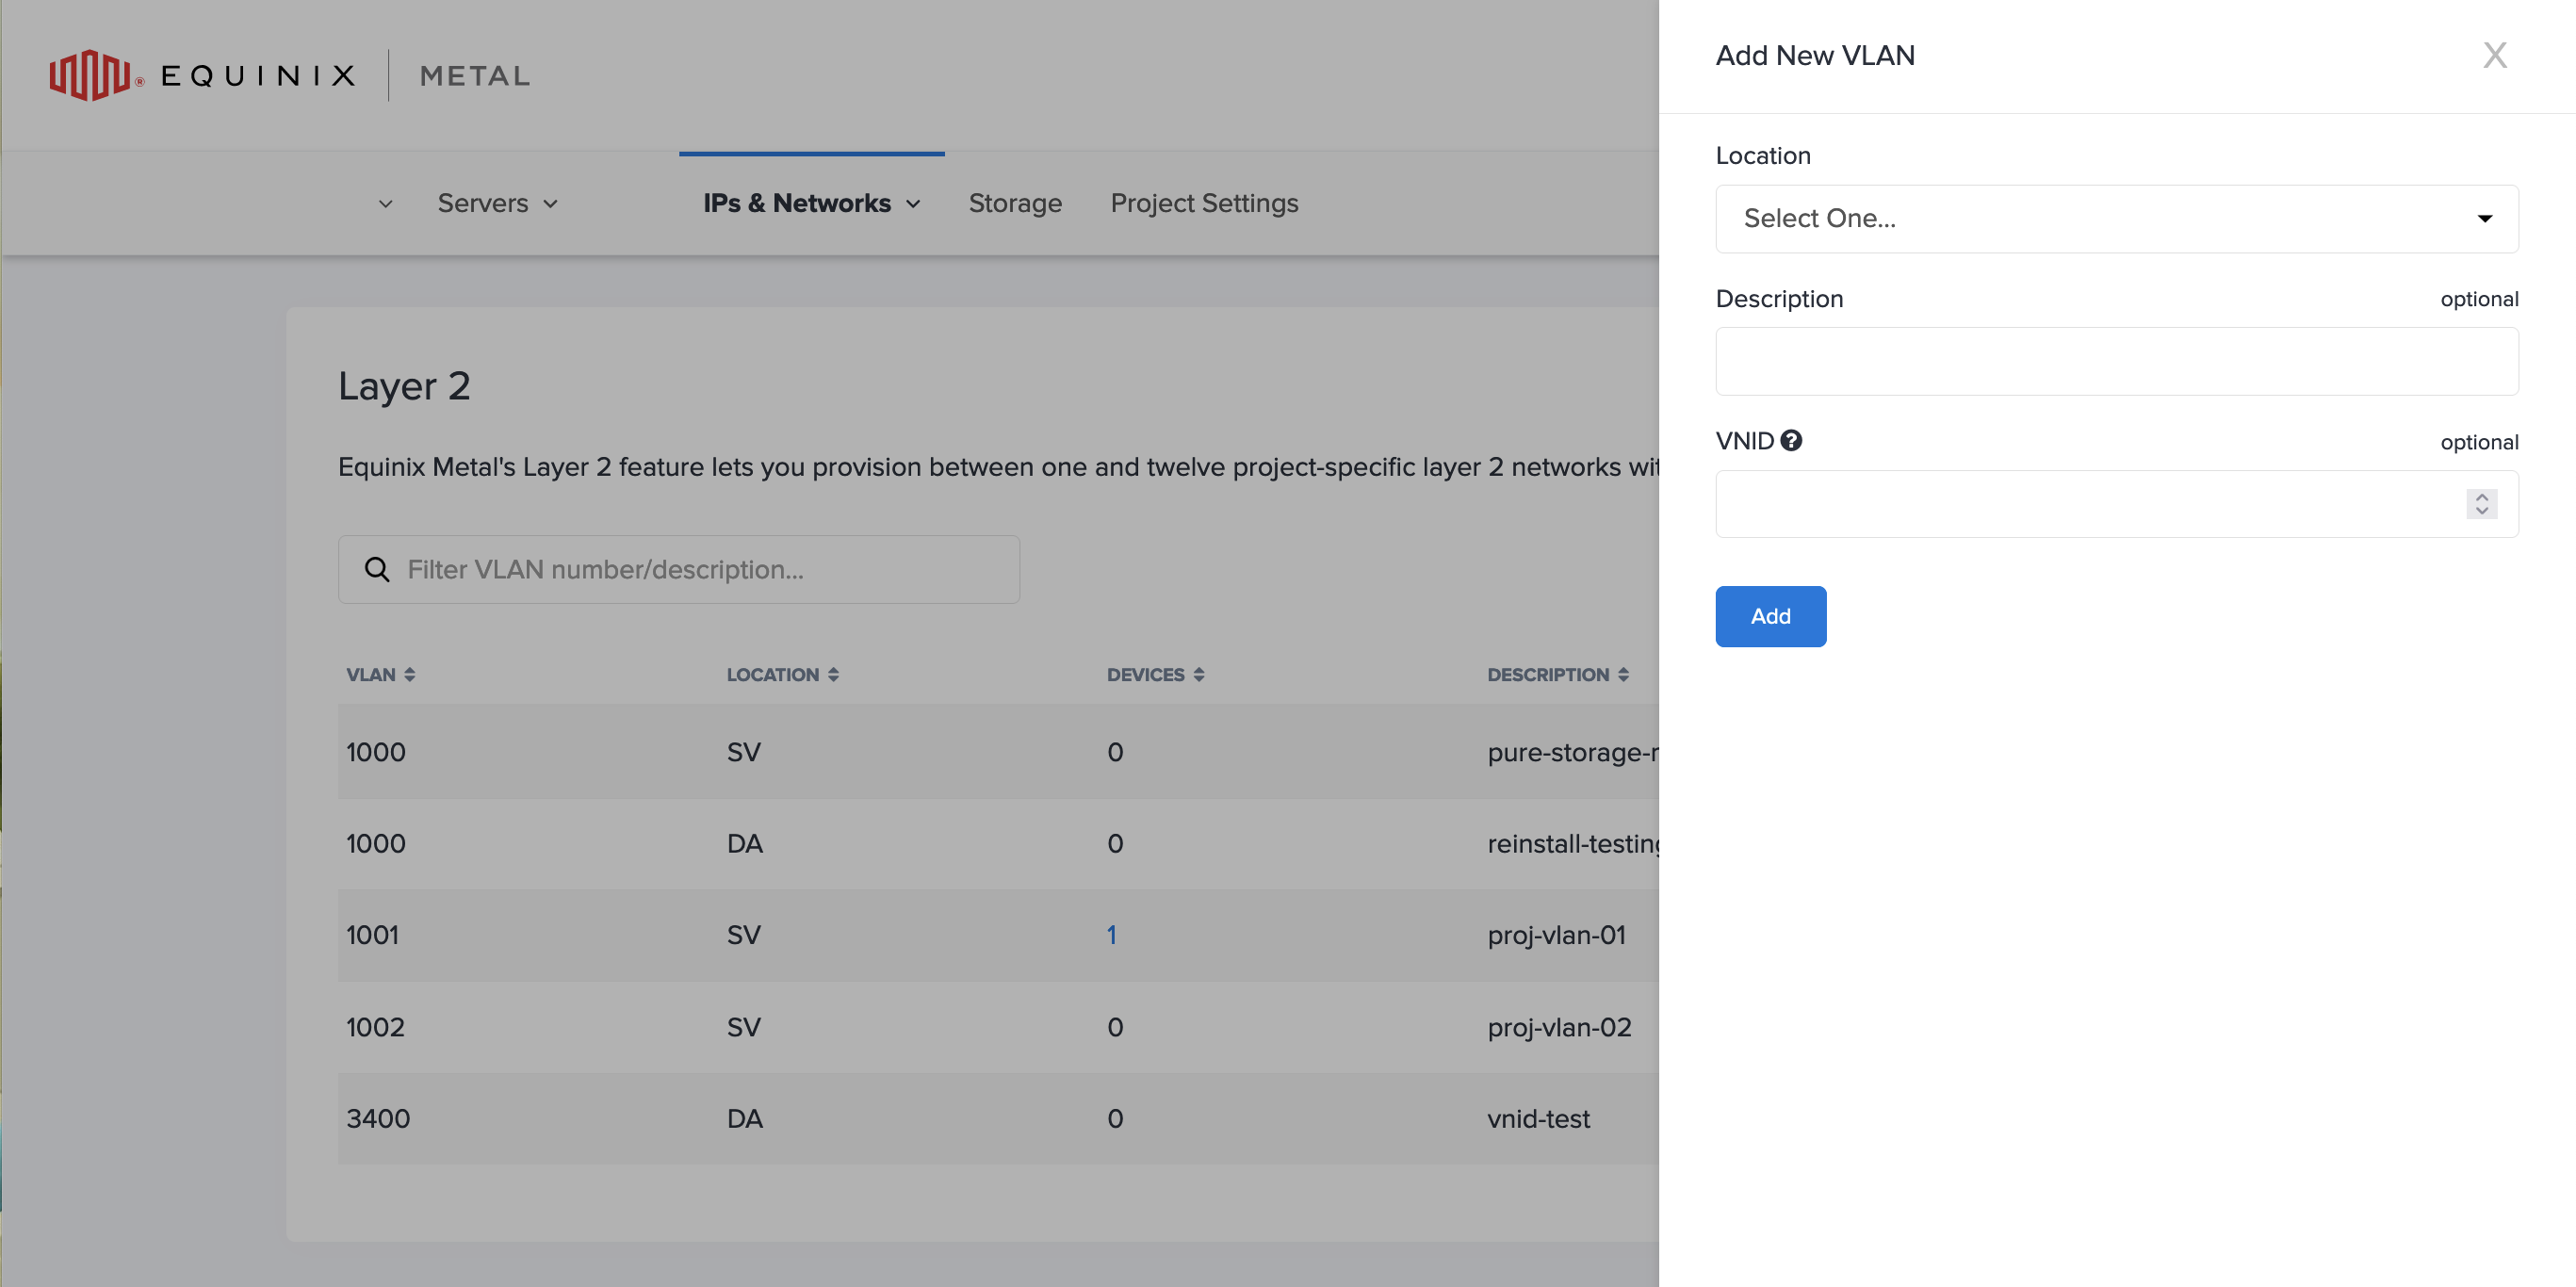
Once your server is in Layer 2 mode, you can provision a Layer 2 VLAN to connect it to. Navigate to your Project's IPs & Networks tab and select Layer 2. To provision a new VLAN, click + Add VLAN, and from the panel choose the location of the VLAN (should be the same as the ESXi server) , and give the VLAN a name and VNID.
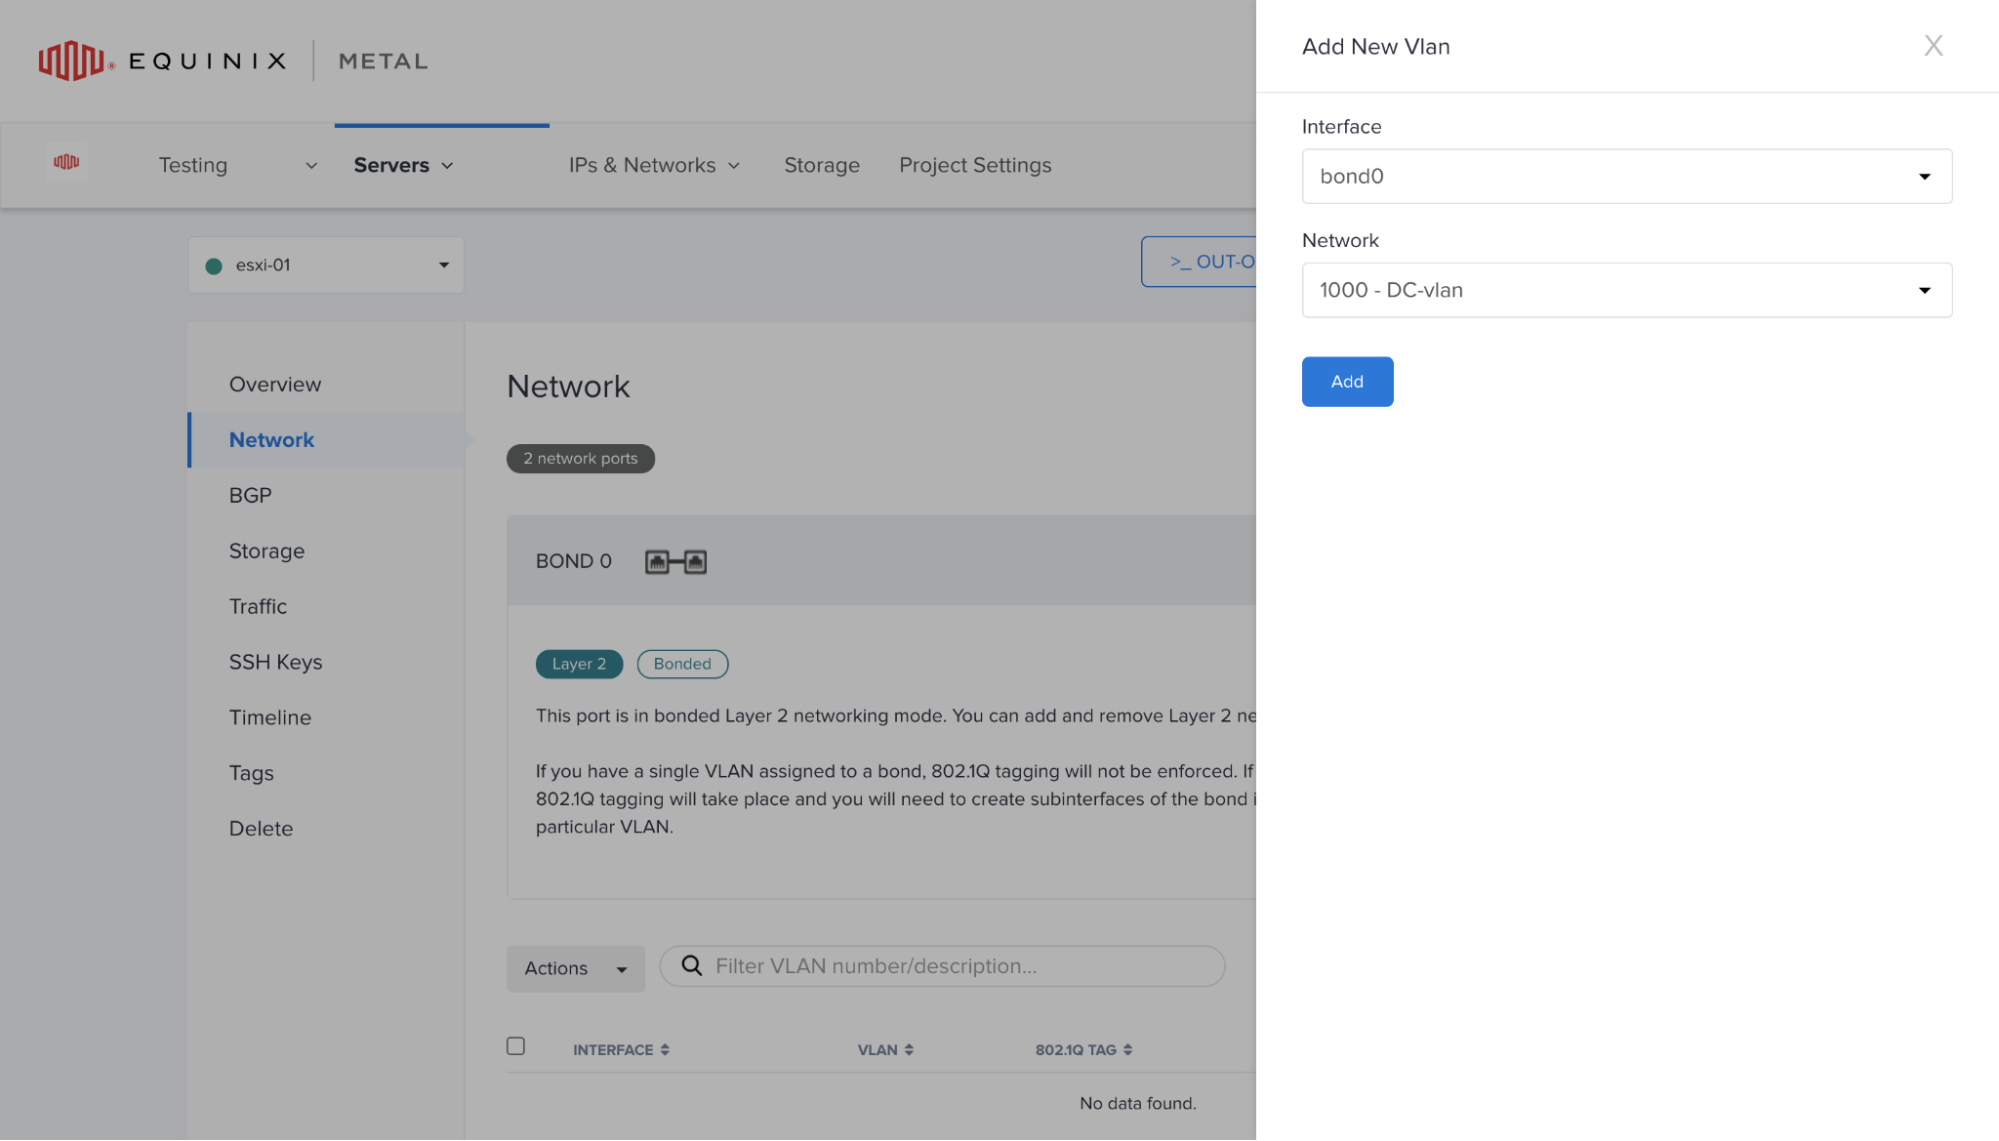
Once you have your VLAN, attach the it to the ESXi server. Navigate to the server's Network page.
Click Add New VLAN, select the bond0 interface, and choose your VLAN from the drop-down of options. Click the Add button to complete the VLAN attachment.
Configure the Networking in ESXi
Currently, your ESXi server doesn't have a a public IP address, and you can not access its Management WebUI. The next few steps outline how to configure the ESXi networking so that the Management IP address is accessible on the private network VLAN you just set up. We're going to change the Management WebUI IP address through the Equinix Metal Out-Of-Band (OOB) console.
SSH into the Equinix Metal Out-of-Band (OOB) console by getting the SSH command in the instance overview page. You should see a ESXi menu.
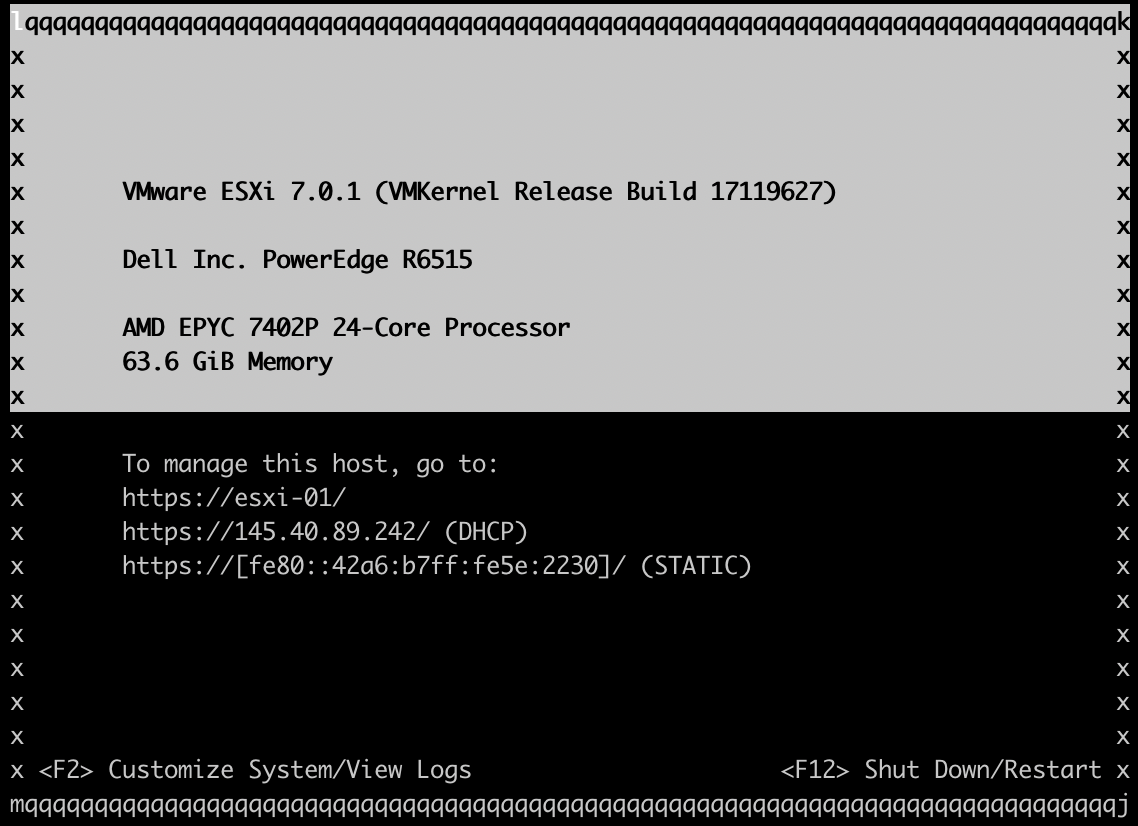
Press the F2 function key to enter the System Customization menu, which will prompt you to login with the root user. The root user password is found on the instance overview page on the Equinix Metal portal.
Note: The root password given by Equinix Metal disappears from the API/Portal after 24hrs, please change it now.
Resetting the Network Settings
Once logged in as the root user, you're presented with the System Customization menu. Arrow down to Network Restore Options and press Enter.
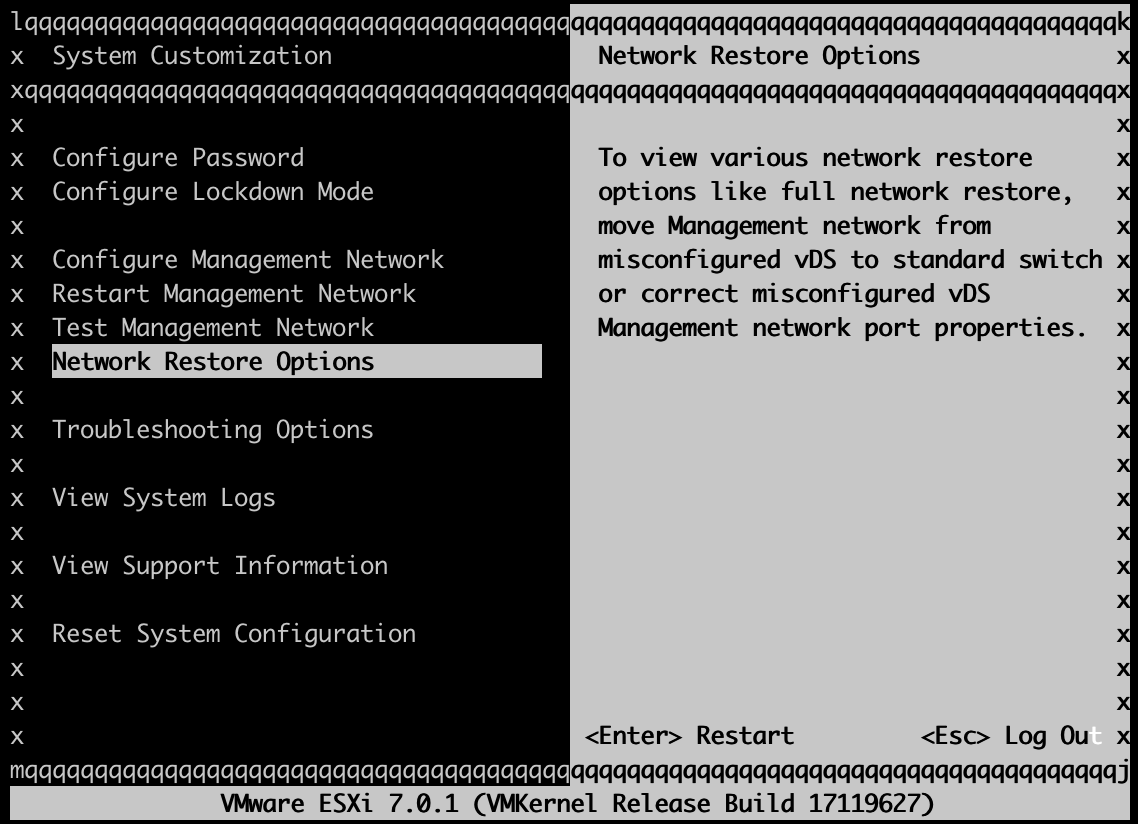
We are restoring the server's network configuration to a default state, removing any extra configurations that could conflict with your own private network if you are using subnets in the 10.x.x.x range.
In the Network Restore Options submenu, select the Restore Network Settings option and press Enter. Once you press Enter, it will prompt you to confirm this action by pressing the F11 function key.
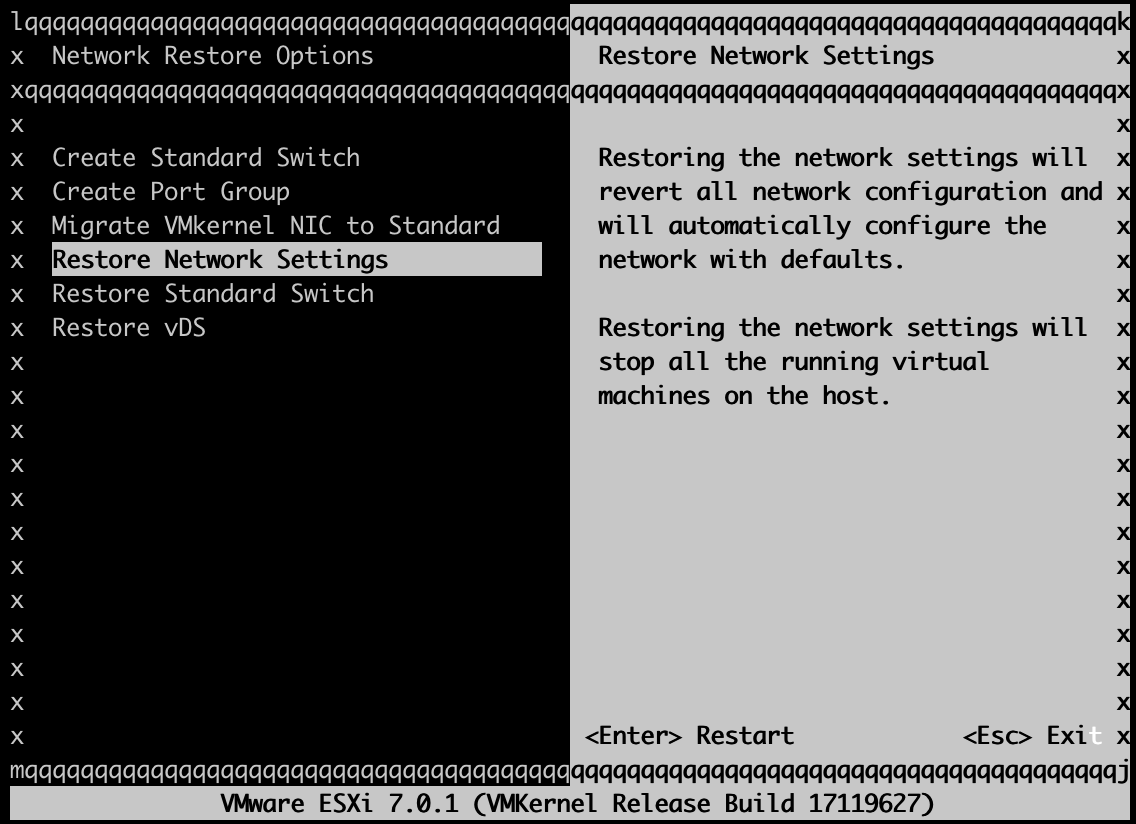
After restoring the network settings, you'll get a confirmation. Press Enter to close the prompt and go back to the main System Customization menu.
Note: you may now see either a blank field for the management network IP address or a random IP address configuration but that is normal and you can ignore it.
Set the Management WebUI IP Address
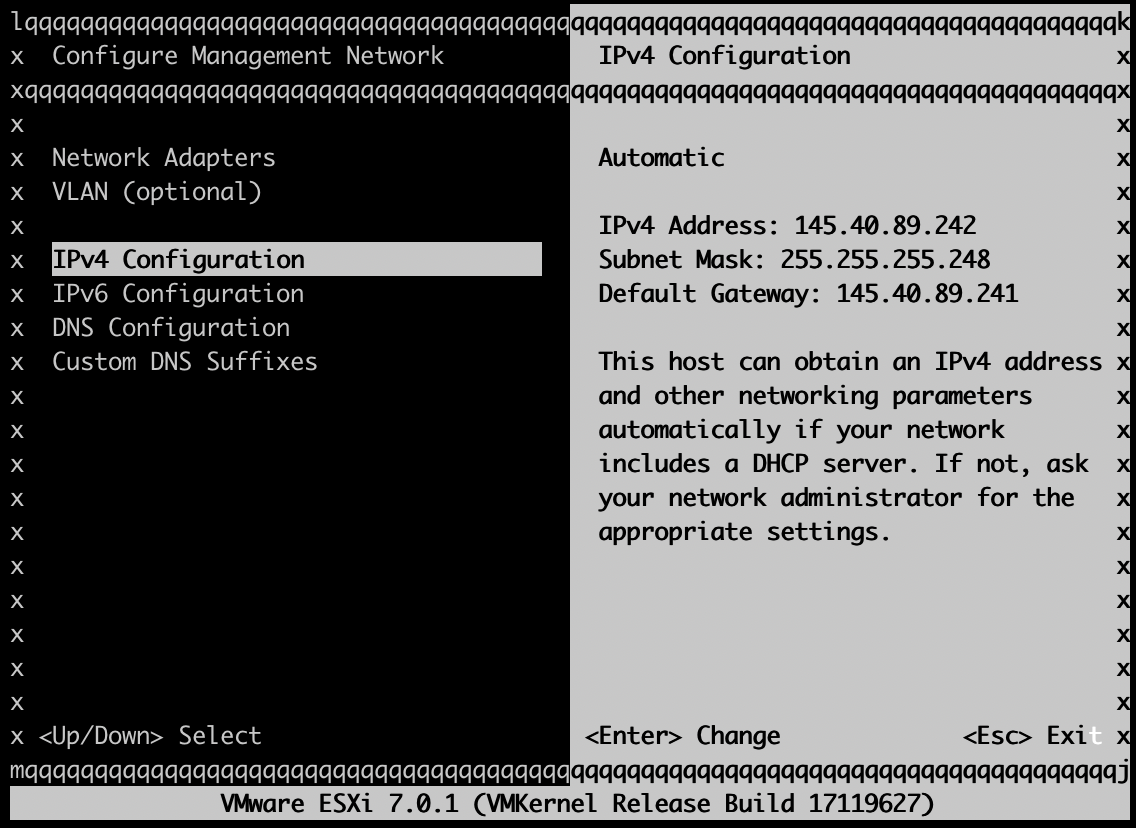
In the System Customization menu, select Configure Management Network and press Enter.
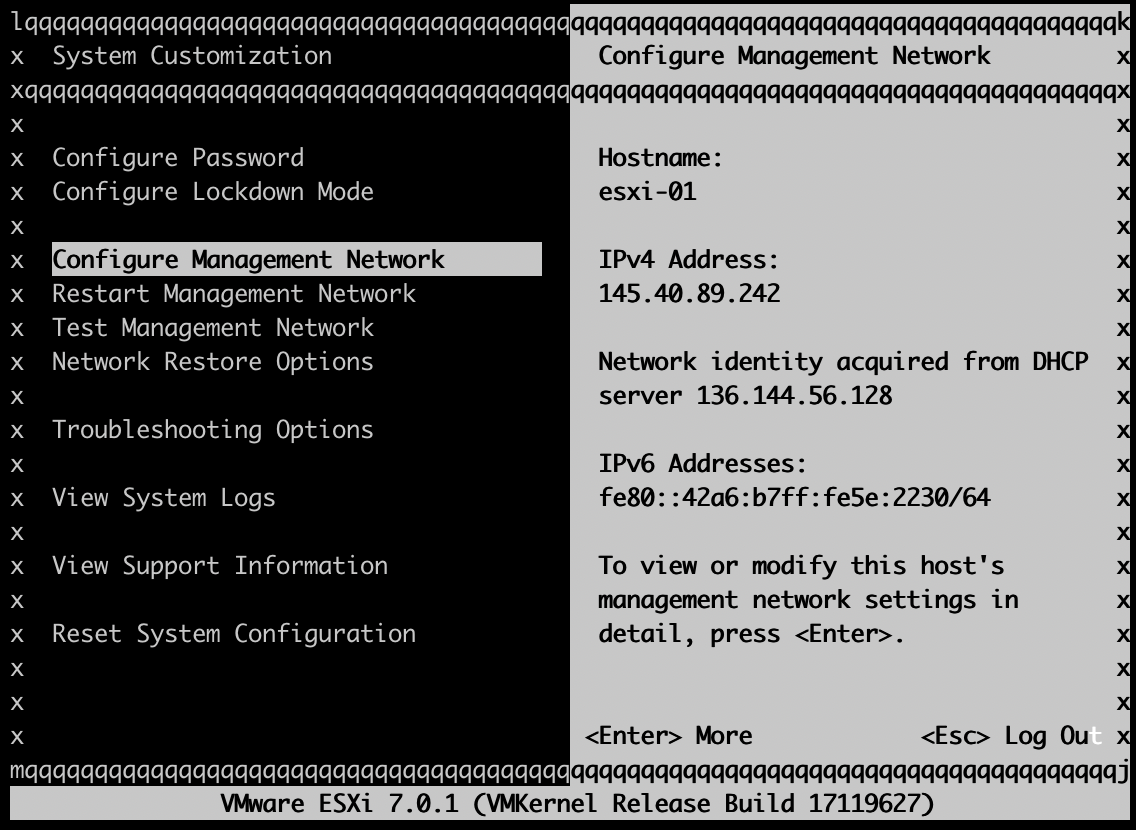
In the Configure Management Network menu, arrow down to IPv4 Configuration section and press Enter.
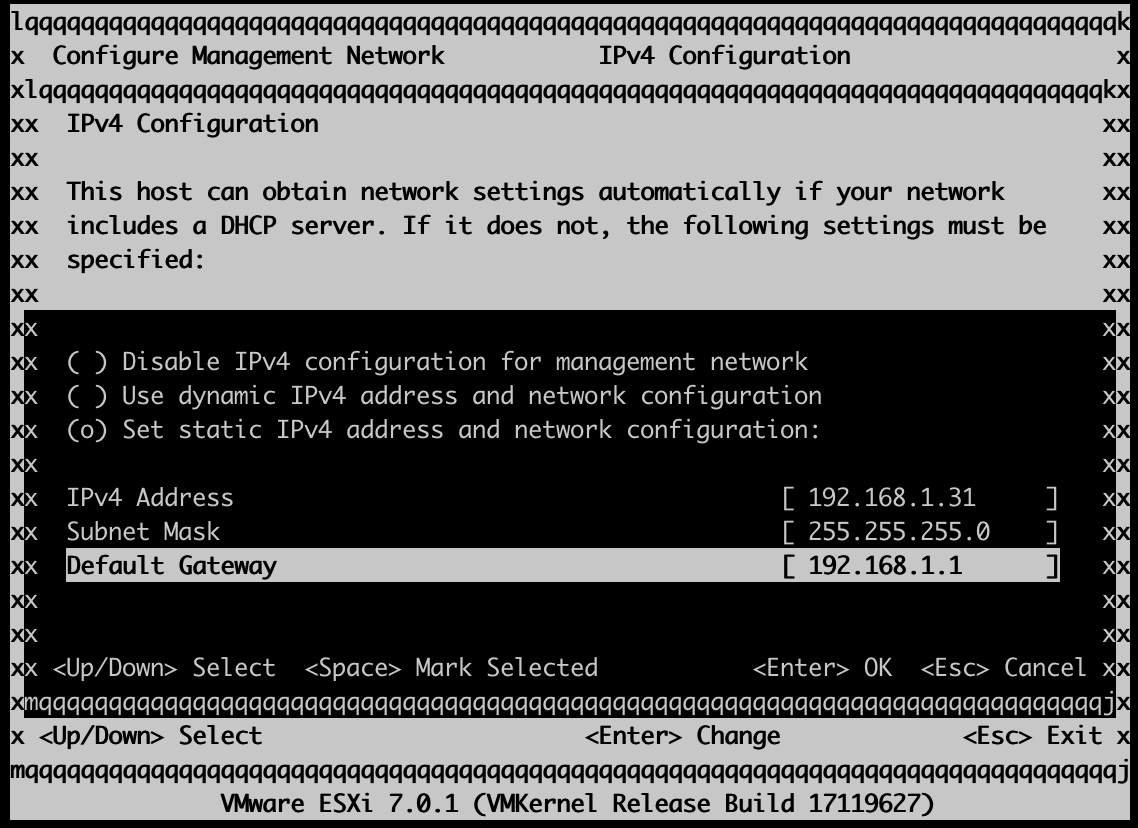
You can now set up the management network to have an IP address on the private network VLAN. First, select the "Set static IPv4 address and network configuration" by pressing Space.
Then, change the IPv4 Address field to your own private IP address that will be used for VLAN traffic. In the example, this address is 192.168.1.31 and the Subnet Mask is 255.255.255.0 to match with the subnet size. 192.168.1.1 is set as the Default Gateway. Once you have set up the IPs, press Enter to confirm the change.
Confirm the DNS Settings
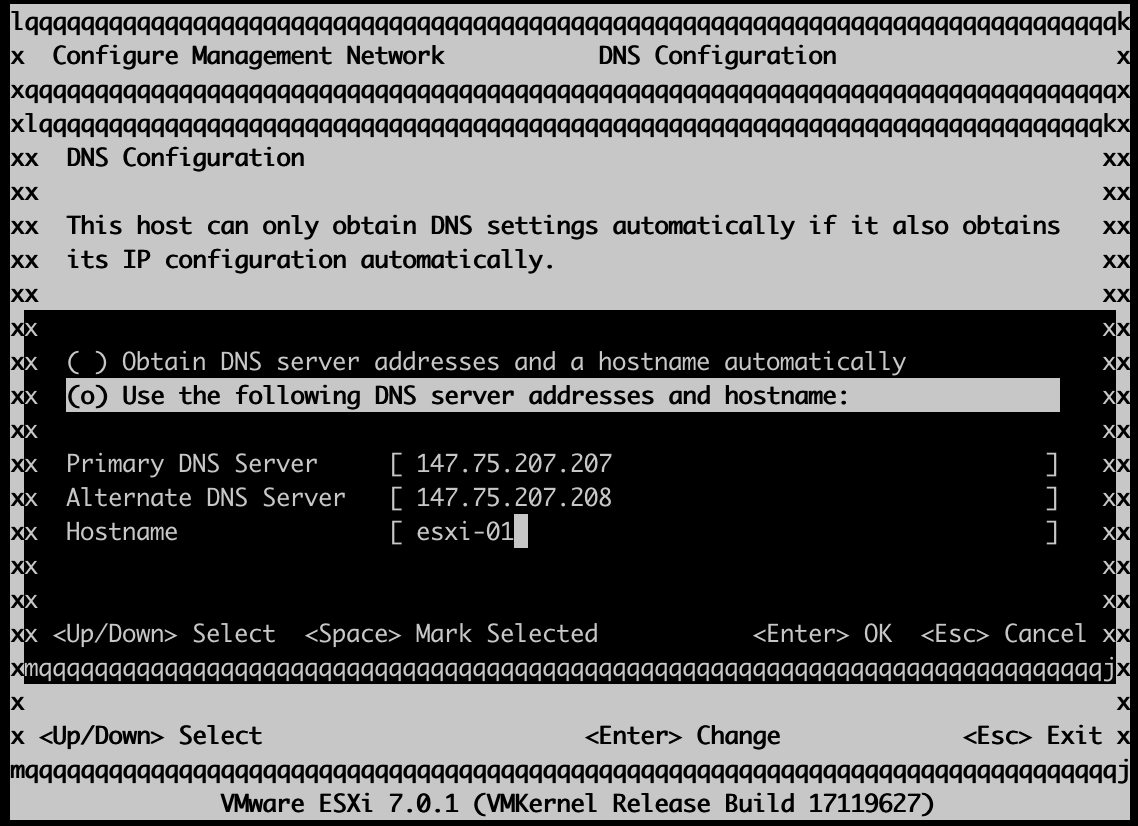
While we're here configuring the management network, it's worthwhile to check the DNS settings. From the Configure Management Network menu, select DNS Configuration. In the DNS configuration menu, select the Use the following DNS server addresses and hostname option and add your preferred DNS servers. You can use the default Equinix Metal DNS servers which are 147.75.207.207 and 147.75.207.208. These might already be the ones configured. Once you have added the DNS servers, press Enter to confirm the change.
Restart the Management Network
If you made DNS changes, press Escape, which will prompt you to restart the Management Network. Press Y to confirm the restart. Otherwise, from the System Customization menu, select Restart Management Network. It will take a couple of seconds for the restart to occur and for the OOB console to become responsive again.
After restarting the Management Network, the Management WebUI should be available at the private IP address you set. And you should be able to access it from any other server that is connected to the same VLAN.
Accessing the ESXi Management WebUI
Once you have assigned the Management WebUI an IP address on your VLAN, you can set up other servers that can access it.
Provision a new server in the same project and metro as your ESXi server. You can choose any operating system, but this example uses Ubuntu and then SSH for accessing the Management WebUI (as opposed to say, Windows and RDP). You can leave all the network settings with their provisioning defaults. This will mean that this particular server does have access to the Internet.
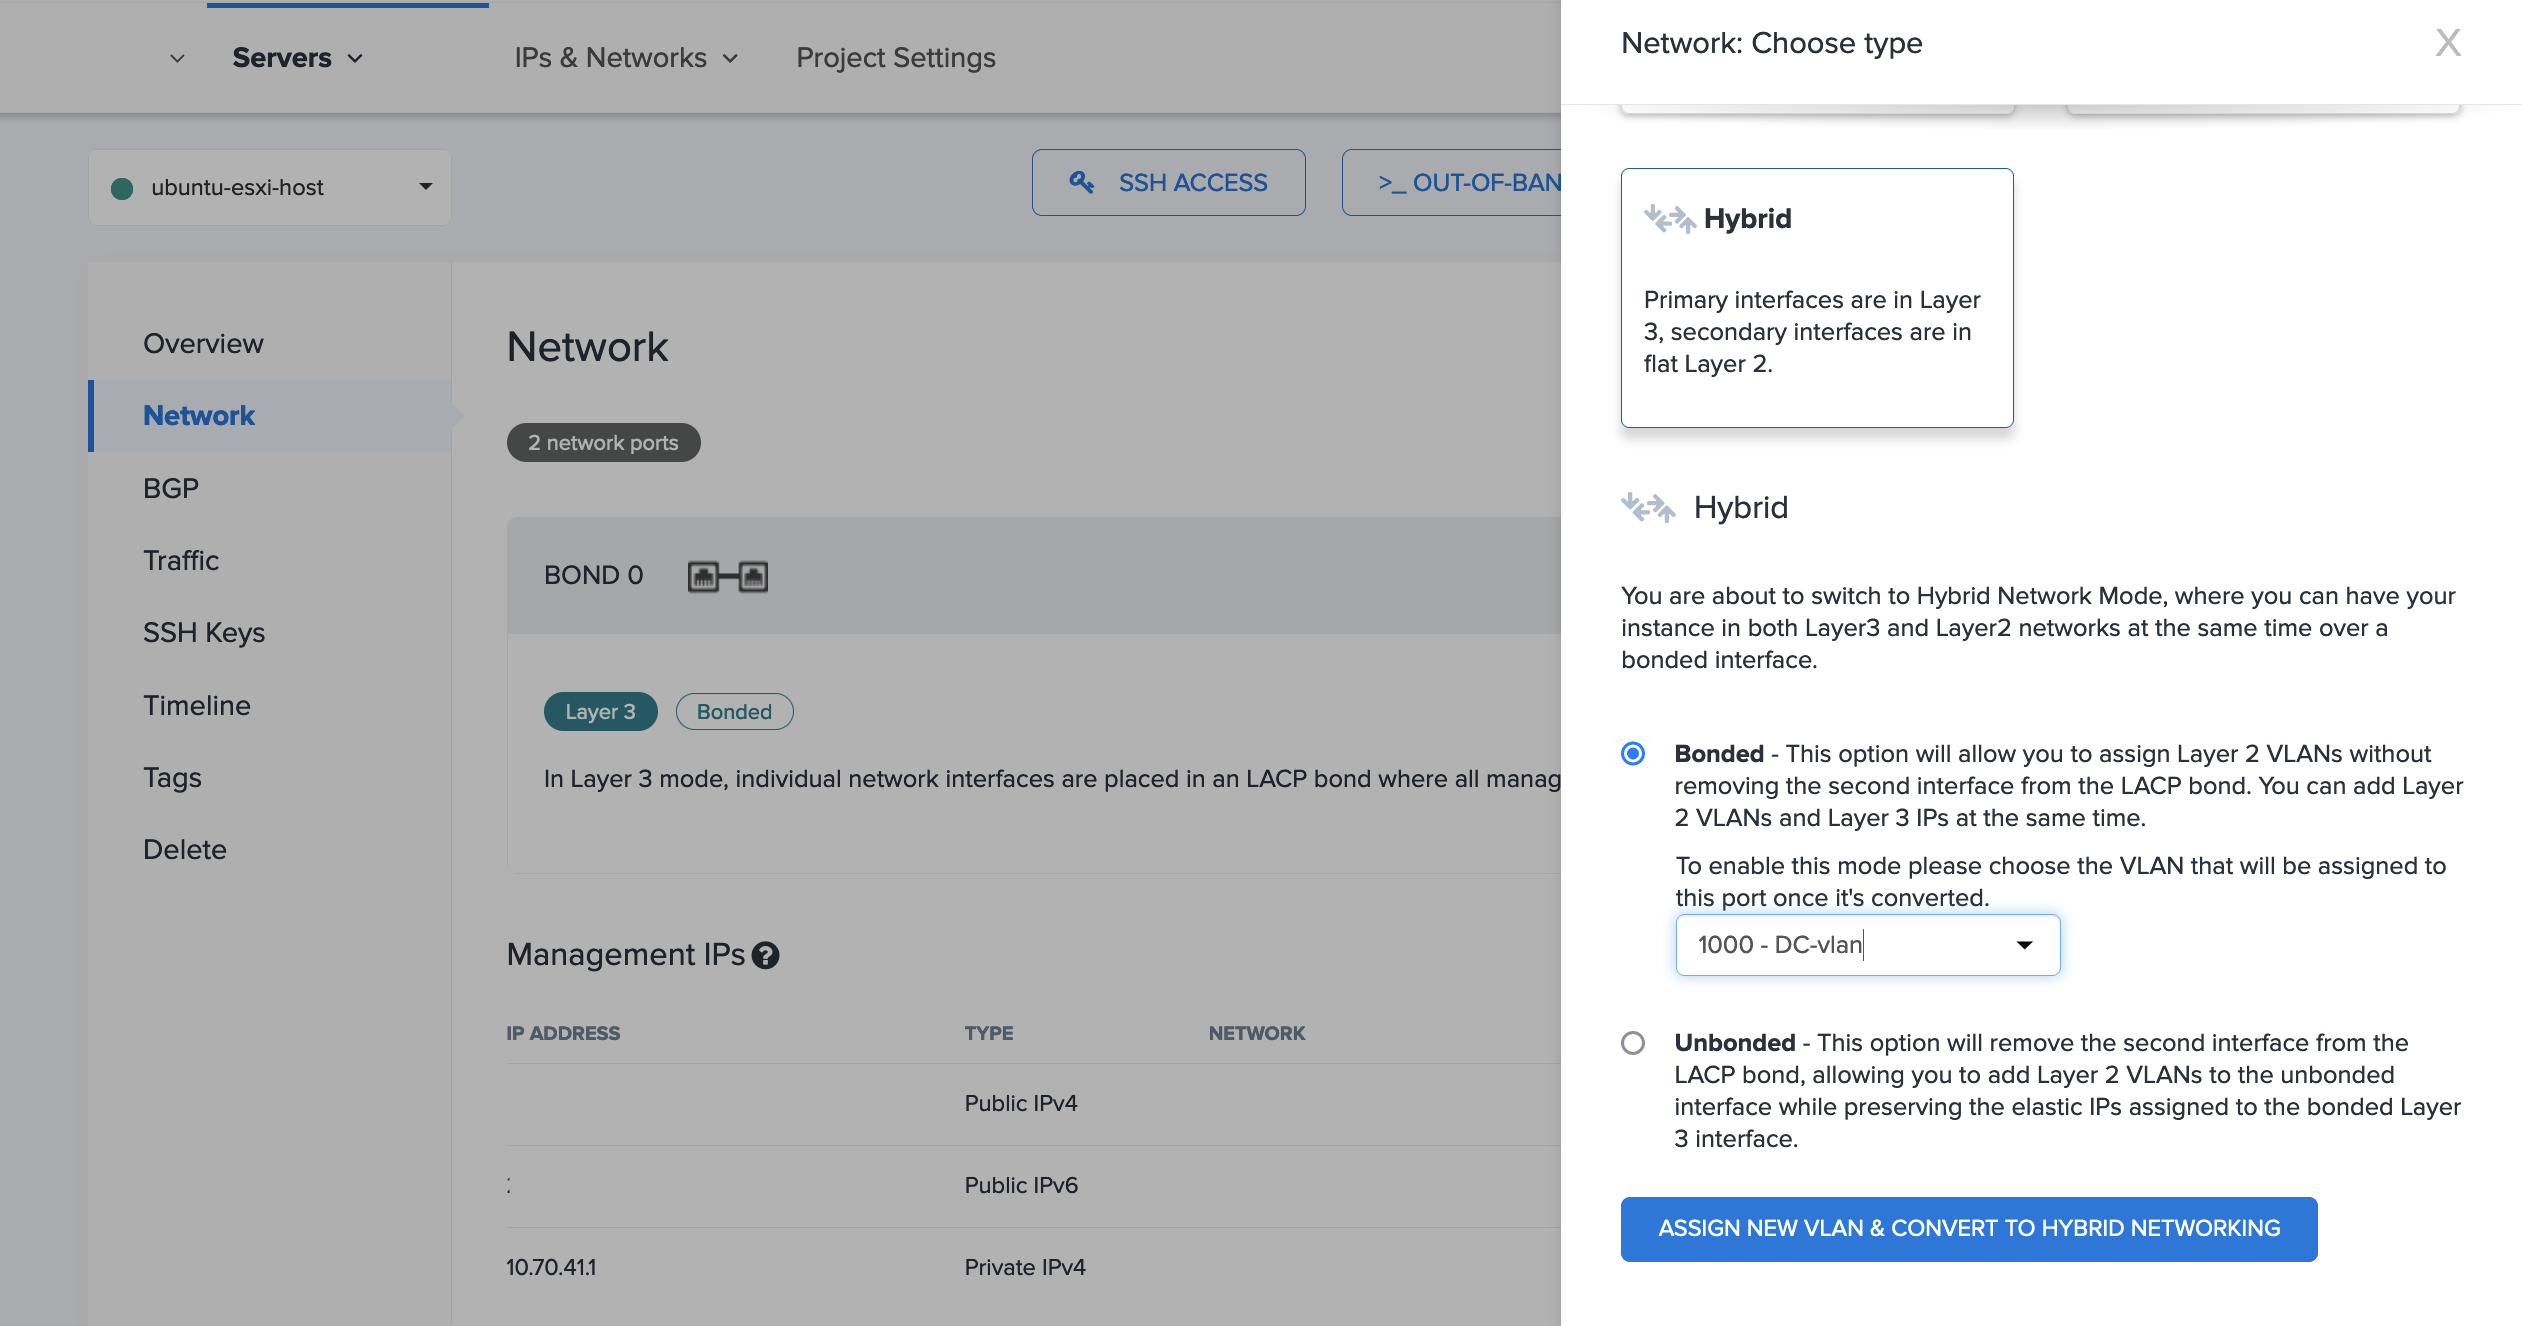
Once the server is up, convert it to Hybrid Bonded for the networking mode and attach your VLAN.
Configure the networking in the OS to use the VLAN and assign it an IP address. In Ubuntu, first enable VLAN support.
modprobe 8021q
lsmod | grep 8021q
echo "8021q" >> /etc/modules-load.d/networking.conf
Then, add the VLAN configuration and an IP address for your server to /etc/network/interfaces.
auto bond0.1000
iface bond0.1000 inet static
address 192.168.1.10
netmask 255.255.255.0
vlan-raw-device bond0
Restart the networking for your changes to take effect. Now, you should be able to use SSH to access the Management WebUI on your local machine through the Ubuntu server.
ssh -L <localhost:port>:<Management-WebUI-IP:443> root@<ubuntu-public-ip>
So to follow the example, since we set the Management WebUI to be available at IP address 192.168.1.31 and the public IP address of our Ubuntu server is 203.0.113.0, then the command is:
ssh -L 127.0.0.1:8080:192.168.1.31:443 root@203.0.113.0
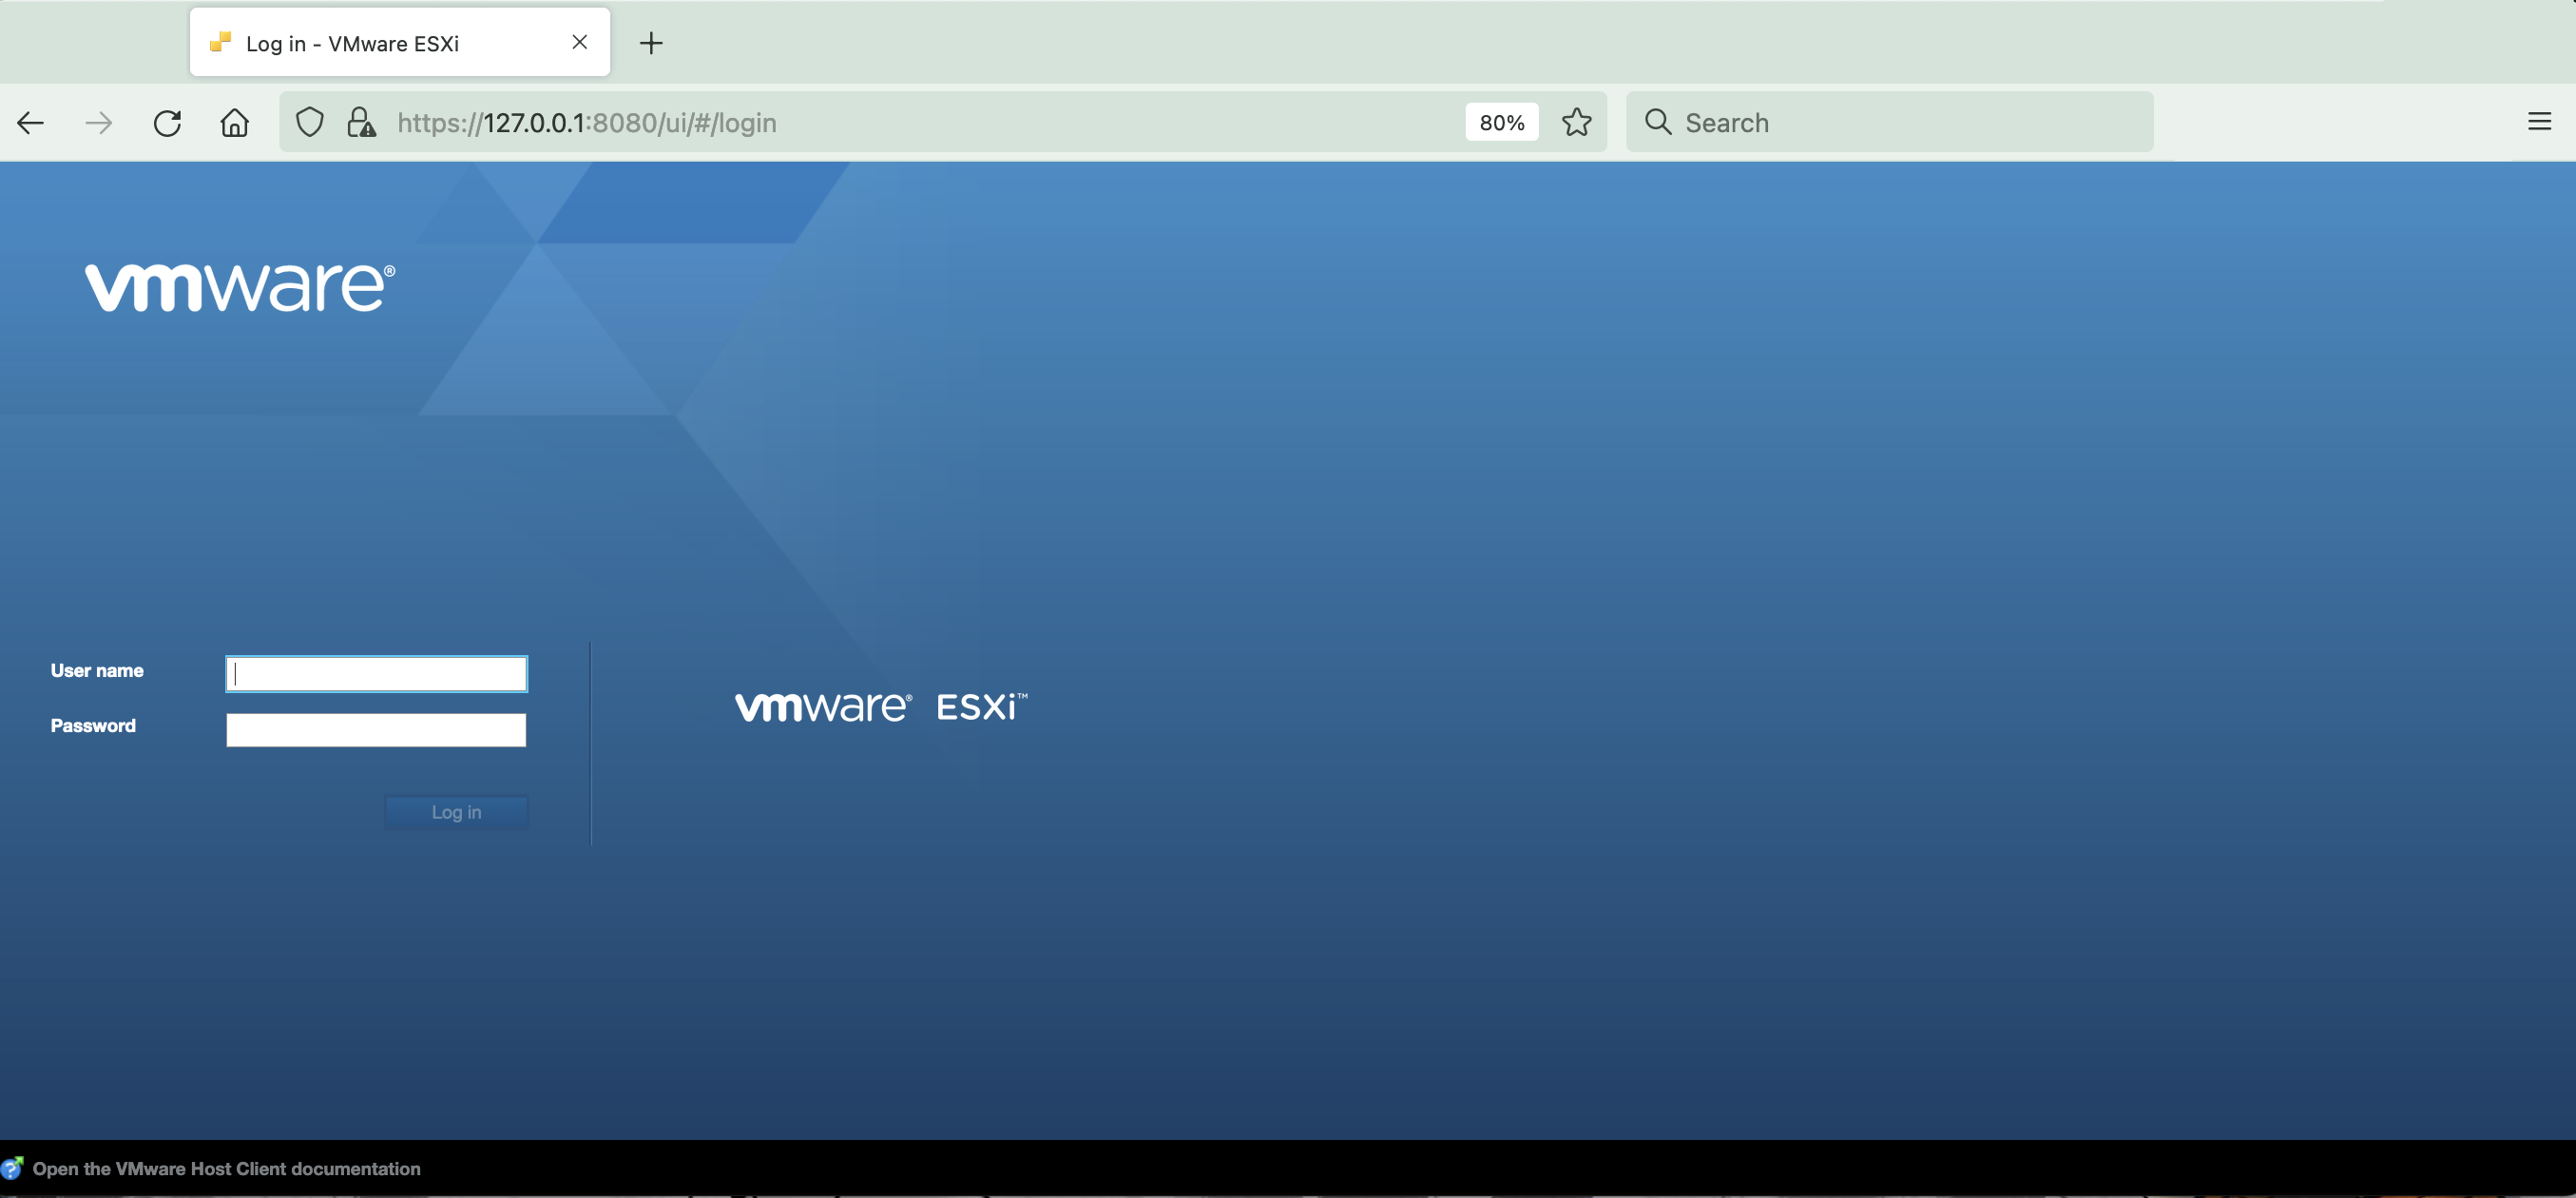
And assuming everything is set up correctly, you should see the login screen for the Management WebUI at https://127.0.0.1:8080 in a browser on your local machine.
Next Steps
You are free to evaluate and experiment with ESXi on Equinix Metal as operating system comes with a 60-day evaluation license. You have to arrange your own License of ESXi and vSphere through VMware; but you can activate licenses on the components that you have set up on Equinix Metal. If you don't plan on using or activating ESXi, do remember to spin down your server before your evaluation period expires.
If you're ready to dive in and set up vSphere Cluster, we have a guide on setting up and configuring it to use the networking features on Equinix Metal.
You may also like
Digger deeper into similar topics in our archives
Configuring BGP with BIRD 1.6 on an Equinix Metal Server
Set up BGP on your Equinix Metal server using BIRD 1.6, covering IP configuration, installation, and neighbor setup to ensure robust routing capabilities between your server and the Equinix Metal network.

Configuring BGP with FRR on an Equinix Metal Server
Establish a robust BGP configuration on your Equinix Metal server using FRR, including setting up network interfaces, installing and configuring FRR software, and ensuring secure and efficient IP address announcement.
Crosscloud VPN with Wireguard
Learn to establish secure VPN connections across cloud environments using WireGuard, including detailed setups for site-to-site tunnels and VPN gateways with NAT on Equinix Metal, enhancing cross-platform security and connectivity.

Deploy Your First Server
Learn the essentials of deploying your first server with Equinix Metal. Set up your project & SSH keys, provision a server and connect it to the internet.

Ready to kick the tires?
Use code DEPLOYNOW for $250 credit