- Home /
- Resources /
- Learning center /
- All About Elastic...
All About Elastic IPs
What are Equinix Metal Elastic IPs? What are they good for and how do we use them?

On this page
What are Equinix Metal Elastic IPs? What are they good for and how do we use them?
In this guide, we will walk you through the answers to those questions, as well as assigning one to your server and seeing how it works.
What is an Elastic IP?
Let's start with the basics: What is an IP address?
Your IP address is the way your computer is identified on your local network, and possibly on the Internet. It is how the networks that connect systems enable information packets to be routed to your computer, whether initiated from the outside, or in response to your computer initiating a connection.
An IP address is made up of a series of numbers, each from 0 to 255. The series can be either 4 numbers long or 16 numbers long, depending on the version of the Internet Protocol. For the original IPv4, it is 4 numbers; for the more modern IPv6, it is 16 numbers.
A typical IPv4 address is something you likely are very familiar with; it looks something like this:
174.269.78.121
An IPv6 address is a little more complicated, but it looks something like this:
2001:0db8:85a3:0000:0000:8a2e:0370:7334
The key point is that your IP address is the critical identifier for addressing information to your computer.
Fixed vs Changing Addresses
When you connect to the Internet from your phone or laptop, you are the client. Every time you send out a communication, connecting to an email server or reading information from www.google.com, your IP address is given as the source of that communication, which enables the remote server to send the information back to you.
As a client, or the one initiating the conversation, the IP address you use often doesn't matter that much. Indeed, as you move around from WiFi network to cell tower to other WiFi network to other cell tower, your IP address sometimes changes. Since you start the communication to the remote service, it knows each time how to respond to you.
When running services on the Internet on the other hand, for example on your servers on Equinix Metal, you want to expose those services to the world. They need to be able to reach you. That means your address has to be fixed.
Further, that address needs to work even if you move your service from one server to another, or have multiple servers doing load balancing, or even across data centers and geographic regions.
What comes with your servers
When you deploy a server on Equinix Metal, it comes with several fixed IP addresses.
- private IPv4 address - this address is only available to other servers in Equinix Metal in the same project and metro
- public IPv4 address - this address is available to the Internet, and is the one you use to ssh into the server
- public IPv6 address - this address is available to the Internet, but we do not cover IPv6 in this guide
All of these addresses are provided by Equinix Metal, and are tied directly to your server. They are useful for that server, but not for services that you want to run across multiple servers and that you want to be able to move around.
We will deploy several servers to see this live. To save on space, we won't walk through the entire "how to deploy a server" process here, but you can find that in the "Deploy Your First Server" guide. For now, be sure that all of your servers are in the same metro.
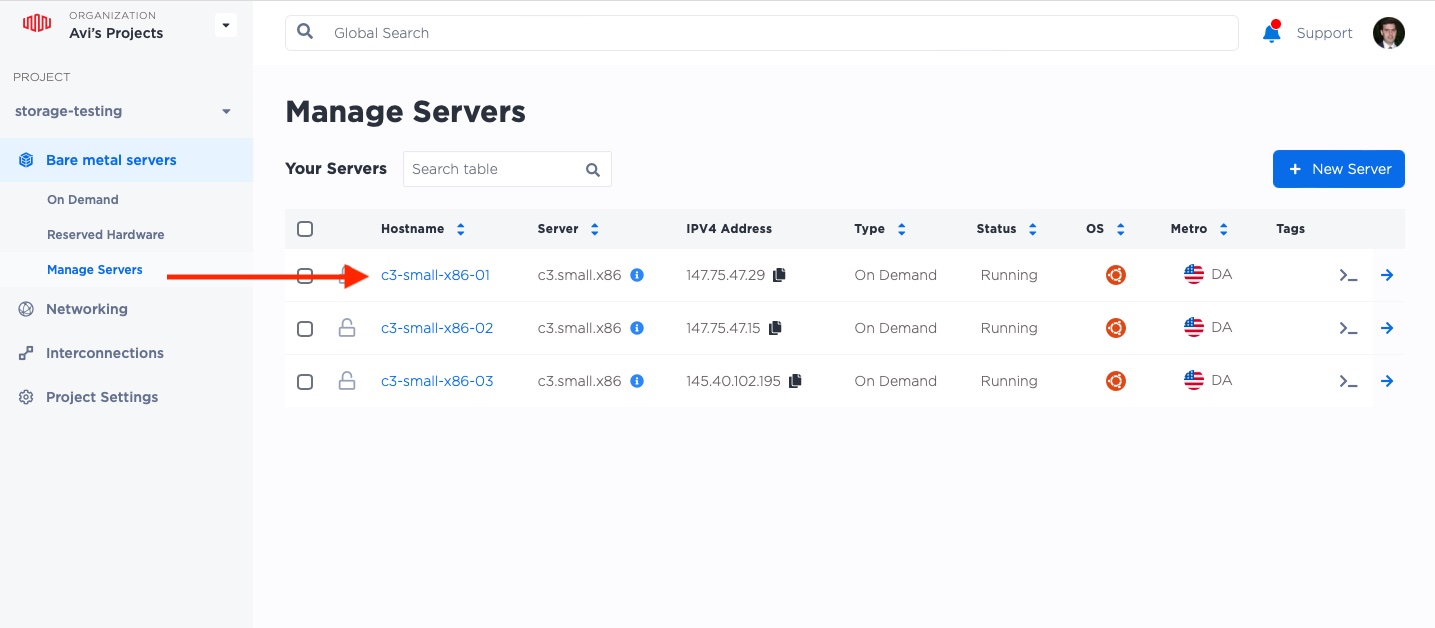
We deployed 3 server of type c3.small.x86 in the metro Dallas. Once
they are up and ready, we will see them in the main console.
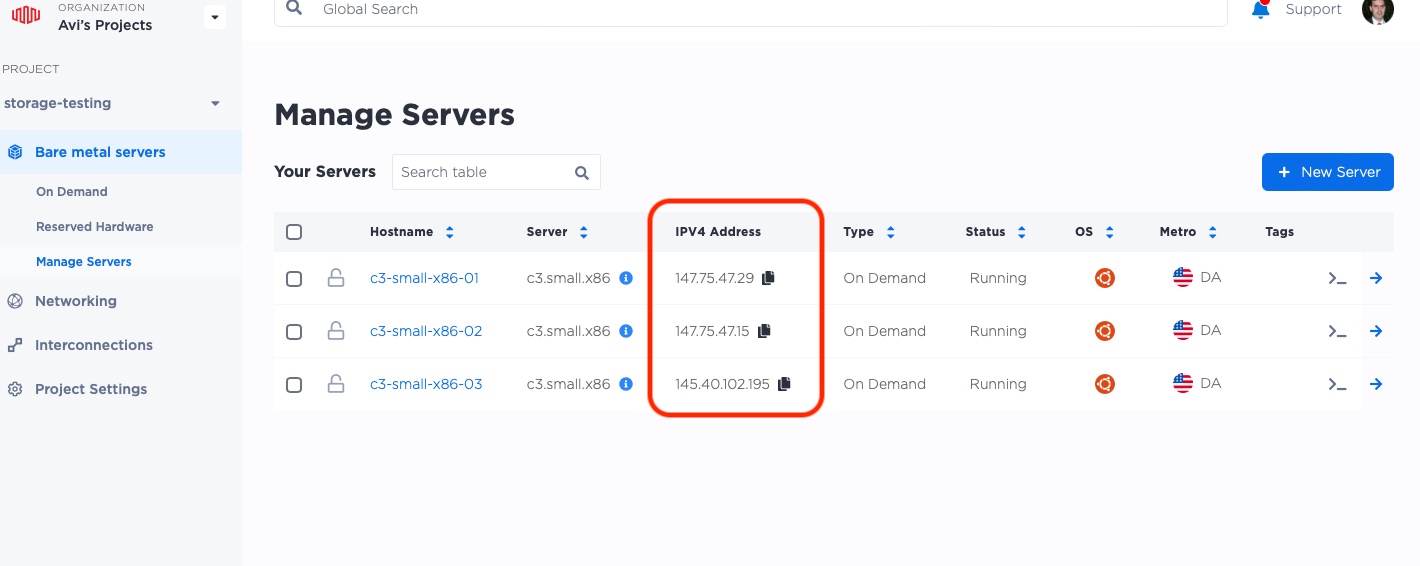
Pay attention to the IPv4 addresses listed. These addresses, on the main "Manage Servers" page, are the Metal-provided public IPv4 addresses. They are fixed, but they are tied to the individual servers.
In the example listed above, these are:
-
147.75.47.29 -
147.75.47.15 -
145.40.102.195
Let's dig a little deeper by clicking on the first server's name, in this case
c3-small-x86-01, and then on the "Network" tab.
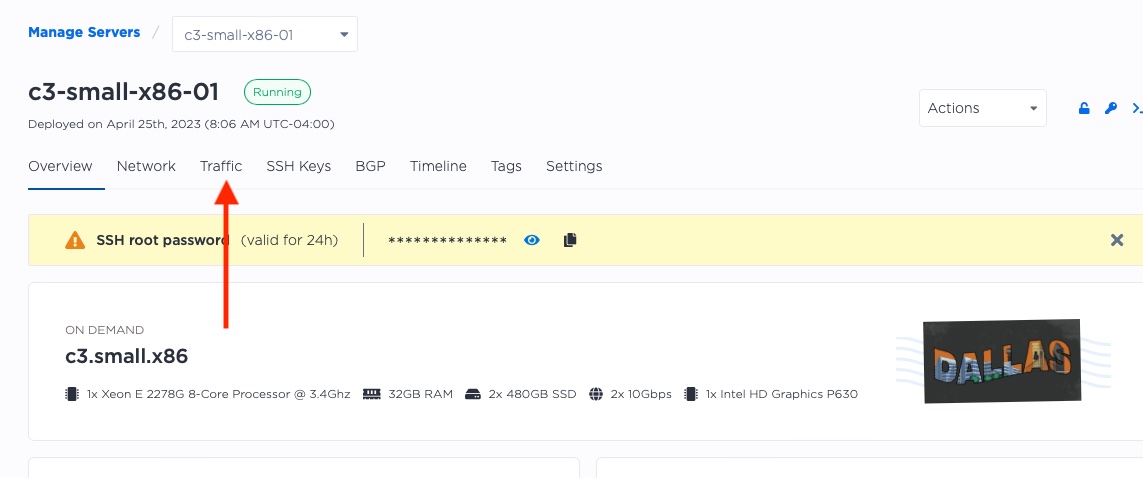
This brings up information and configuration not just about IP addresses, but also about the various network modes. We will not be looking at network modes here, rather sticking with the default "Layer 3". If you want to learn more about the other options, see the Equinix Metal Layer 2 Networking docs.
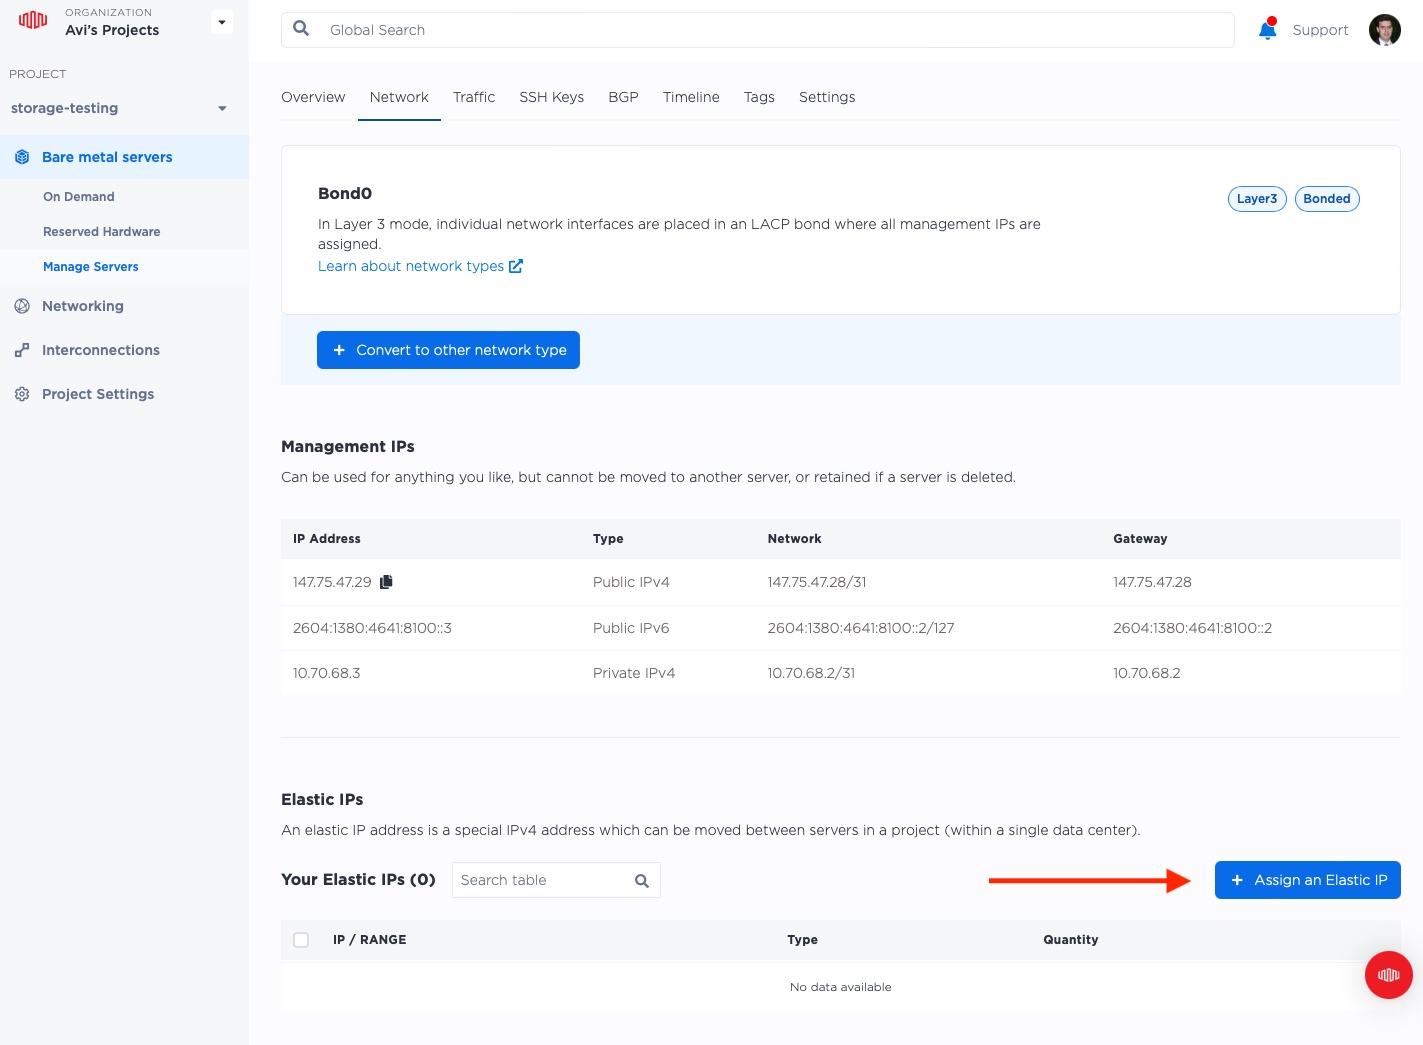
As we slide towards the bottom of the network page, we can see the various IPs.
There are two sections here:
- Management IPs
- Elastic IPs
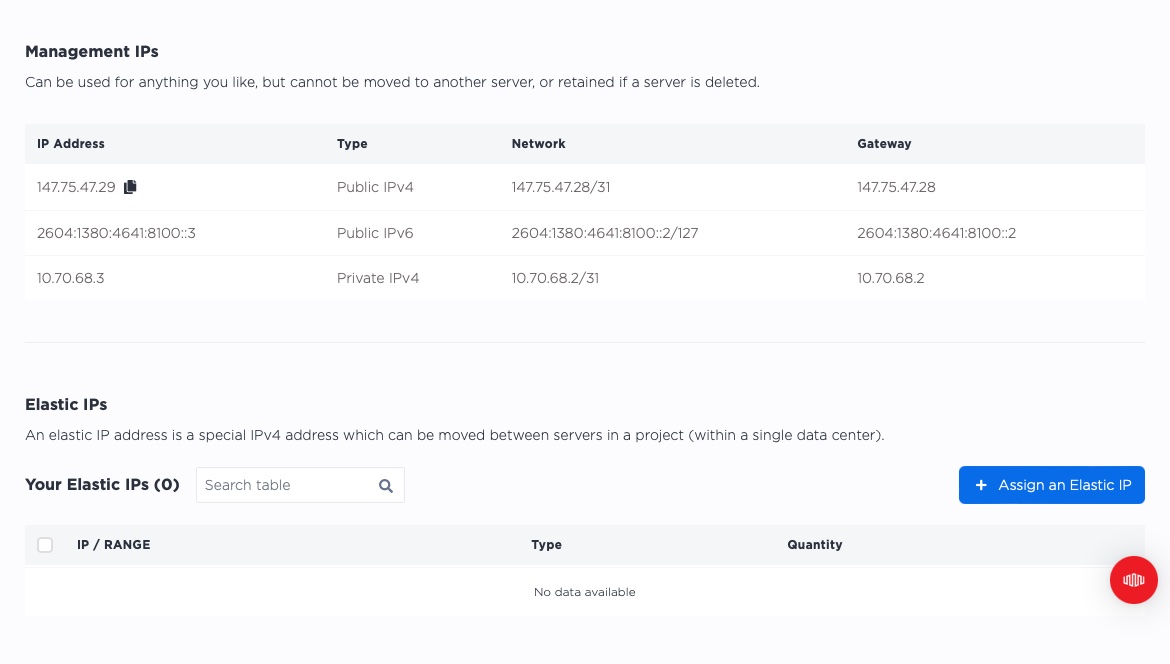
Management IPs
There are three IPs here for each server, as you can see from the image above:
- Public IPv4: This is the address also listed on the main "Manage Servers" page, and is the one you use to ssh into the server, as it is accessible over the Internet.
- Public IPv6: This is the IPv6 address, and is also accessible over the Internet. We do not cover IPv6 in this guide.
- Private IPv4: This is the address you use to communicate with other servers in the same project and metro, and is not accessible over the Internet.
Management IPs are the IPs assigned by Equinix Metal. They are fixed, but they are tied to the individual servers. In a sense, you don't own them (or even rent them), your servers do. If you deleted the servers, the IPs would go away.
That is great, as long as two conditions hold true.
- Your service will not outlive your server.
- Your service will not be run across more than one server.
As we discussed in our series on resiliency, whenever possible, you should run services across multiple servers, and always assume that it will go away on you, likely when you least expect it.
So if you shouldn't rely on these Management IPs, what should you rely on to expose your awesome service to the Internet?
Elastic IPs.
Elastic IPs
Elastic IPs are IP addresses that you lease from Equinix Metal, but are not tied specifically to any one server. They even have the option to be global, i.e. not tied to a single metro.
Notice that there are no addresses listed here, as we have not gotten any yet.
Deploy nginx
Before we go any further, let's deploy nginx on each server, and configure it to report the name of the server. This will help us see how the Elastic IPs work.
We covered this in depth in our guide to resiliency for servers, so we shall do it briefly here.
On each server:
- ssh to the server
- update the package manager
- install the software we need, specifically
nginxfor the Web server, as well as some other utilities - configure nginx to report the name of the server
We condensed the output to make it more readable:
$ ssh root@147.75.47.29
The authenticity of host '147.75.47.29 (147.75.47.29)' can't be established.
ED25519 key fingerprint is SHA256:etJS9eOtJ3ksapvCqicg+ebzhxS4Wic85rzsiM9fNjM.
This key is not known by any other names
Are you sure you want to continue connecting (yes/no/[fingerprint])? yes
Warning: Permanently added '147.75.47.29' (ED25519) to the list of known hosts.
Welcome to Ubuntu 22.04.1 LTS (GNU/Linux 5.15.0-58-generic x86_64)

 * Documentation:  https://help.ubuntu.com
 * Management:     https://landscape.canonical.com
 * Support:        https://ubuntu.com/advantage

  System information as of Tue Apr 25 12:43:14 UTC 2023

  System load:            0.0
  Usage of /:             0.7% of 437.17GB
  Memory usage:           1%
  Swap usage:             0%
  Temperature:            44.0 C
  Processes:              226
  Users logged in:        0
  IPv4 address for bond0: 147.75.47.29
  IPv6 address for bond0: 2604:1380:4641:8100::3

 * Introducing Expanded Security Maintenance for Applications.
   Receive updates to over 25,000 software packages with your
   Ubuntu Pro subscription. Free for personal use.

     https://ubuntu.com/pro

6 updates can be applied immediately.
6 of these updates are standard security updates.
To see these additional updates run: apt list --upgradable


The list of available updates is more than a week old.
To check for new updates run: sudo apt update


The programs included with the Ubuntu system are free software;
the exact distribution terms for each program are described in the
individual files in /usr/share/doc/*/copyright.

Ubuntu comes with ABSOLUTELY NO WARRANTY, to the extent permitted by
applicable law.
We are in, so update the system:
root@c3-small-x86-01:~# apt update -y

Hit:1 http://archive.ubuntu.com/ubuntu jammy InRelease
Get:2 http://security.ubuntu.com/ubuntu jammy-security InRelease [110 kB]
...
...
Fetched 6488 kB in 2s (2760 kB/s)
Reading package lists... Done
Building dependency tree... Done
Reading state information... Done
93 packages can be upgraded. Run 'apt list --upgradable' to see them.
Install nginx and the utilities we need:
root@c3-small-x86-01:~# apt install -y nginx jq
Reading package lists... Done
Building dependency tree... Done
Reading state information... Done
...
...
Setting up nginx-core (1.18.0-6ubuntu14.3) ...
 * Upgrading binary nginx                                                                                              [ OK ]
Setting up nginx (1.18.0-6ubuntu14.3) ...
Processing triggers for ufw (0.36.1-4build1) ...
Processing triggers for man-db (2.10.2-1) ...
Processing triggers for libc-bin (2.35-0ubuntu3.1) ...
Scanning processes...
Scanning processor microcode...
Scanning linux images...

Running kernel seems to be up-to-date.

The processor microcode seems to be up-to-date.

No services need to be restarted.

No containers need to be restarted.

No user sessions are running outdated binaries.

No VM guests are running outdated hypervisor (qemu) binaries on this host.
Finally, let's configure nginx to report the server it is on:
The default page for nginx here is in /var/www/html/index.nginx-debian.html. We can edit it with vim:
root@c3-small-x86-01:~# vim /var/www/html/index.nginx-debian.html
We are only going to change line 15, so that rather than saying, "If you see this page, the nginx web server is successfully installed and working. Further configuration is required.", it will say, "I am server 01". For server 02, it will say, "I am server 02", and for server 03, it will say, "I am server 03".
The file on server 01 should look like this:
<!DOCTYPE html>
<html>
<head>
<title>Welcome to nginx!</title>
<style>
    body {
        width: 35em;
        margin: 0 auto;
        font-family: Tahoma, Verdana, Arial, sans-serif;
    }
</style>
</head>
<body>
<h1>Welcome to nginx!</h1>
<p>I am server 01</p>

<p>For online documentation and support please refer to
<a href="http://nginx.org/">nginx.org</a>.<br/>
Commercial support is available at
<a href="http://nginx.com/">nginx.com</a>.</p>

<p><em>Thank you for using nginx.</em></p>
</body>
</html>
Then run curl localhost:80 to see that the results are correct.
root@c3-small-x86-01:~# curl localhost
<!DOCTYPE html>
<html>
<head>
<title>Welcome to nginx!</title>
<style>
    body {
        width: 35em;
        margin: 0 auto;
        font-family: Tahoma, Verdana, Arial, sans-serif;
    }
</style>
</head>
<body>
<h1>Welcome to nginx!</h1>
<p>I am server 01</p>

<p>For online documentation and support please refer to
<a href="http://nginx.org/">nginx.org</a>.<br/>
Commercial support is available at
<a href="http://nginx.com/">nginx.com</a>.</p>

<p><em>Thank you for using nginx.</em></p>
</body>
</html>
Because nginx reads the file from the disk with each request, there is no need to restart the server.
Finally, exit the server, and check it from your own device over the Internet.
Since the public IP address for this server was 147.75.47.29, I can check it at that
address; yours, of course, is likely to be different:
$ http://147.75.47.29
<!DOCTYPE html>
<html>
<head>
<title>Welcome to nginx!</title>
<style>
    body {
        width: 35em;
        margin: 0 auto;
        font-family: Tahoma, Verdana, Arial, sans-serif;
    }
</style>
</head>
<body>
<h1>Welcome to nginx!</h1>
<p>I am server 01</p>

<p>For online documentation and support please refer to
<a href="http://nginx.org/">nginx.org</a>.<br/>
Commercial support is available at
<a href="http://nginx.com/">nginx.com</a>.</p>

<p><em>Thank you for using nginx.</em></p>
</body>
</html>
Repeat the process on the other servers, and we will be ready to move on.
Getting an Elastic IP
Now we have our nginx Web server running on each of the three servers, and each is accessible at its own IP address. That is a good start.
Now we want to address the issues we raised above, ensuring that our service can outlast the failure of any single server.
We will do this via an Elastic IP from Equinix Metal.
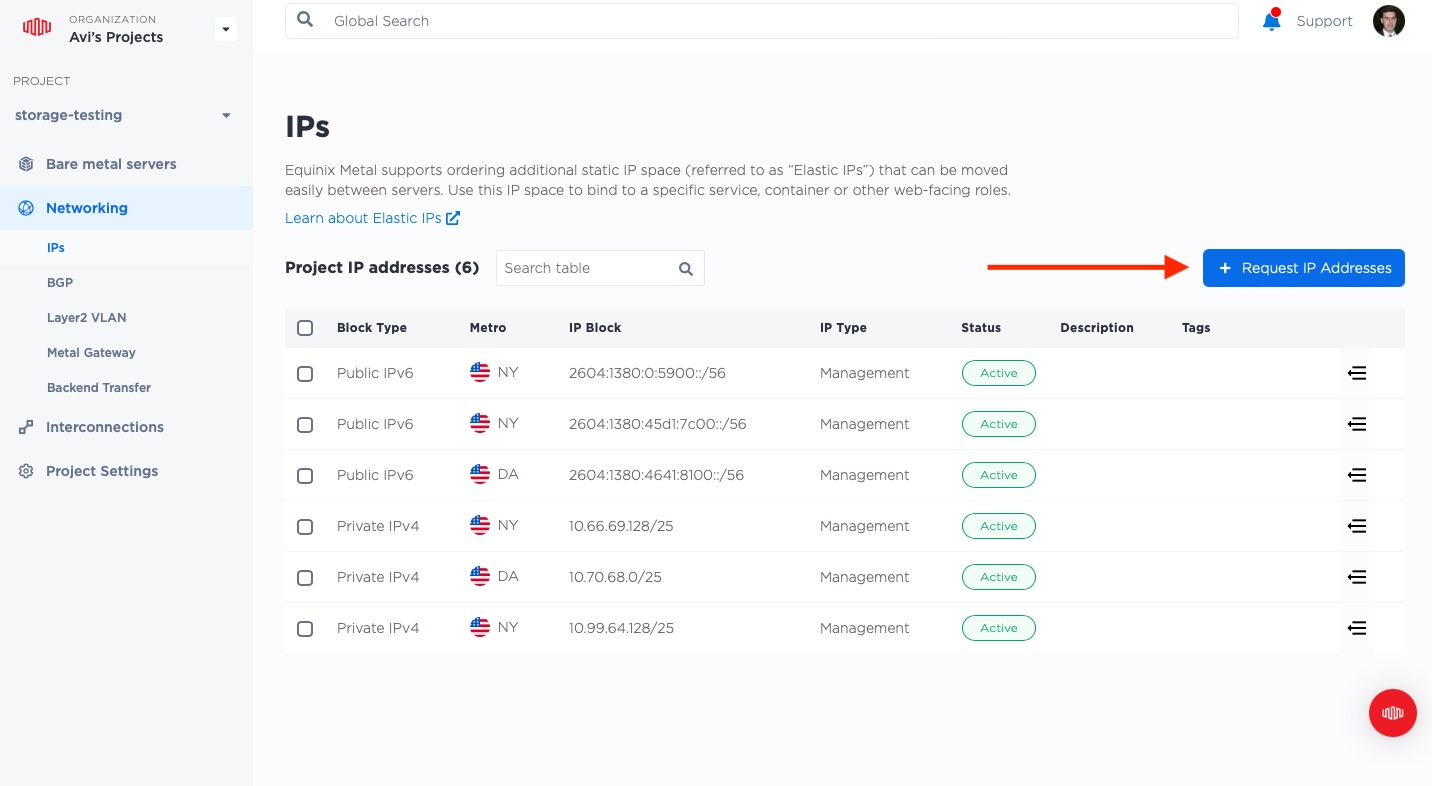
Let's head back to the console, but this time we will select "Networking" from the left-hand-side menu.
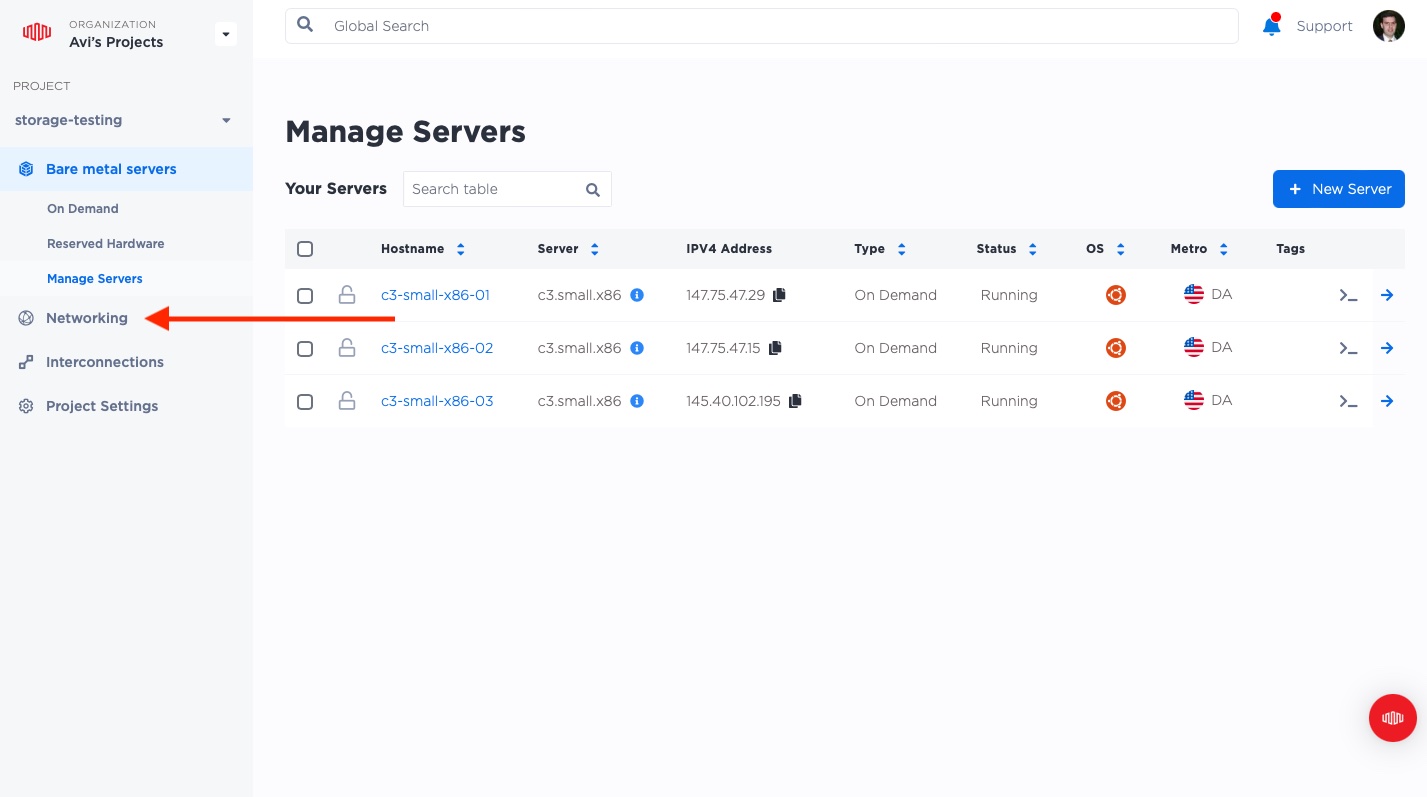
Now we can request an Elastic IP by clicking the "Request IP Address" button.
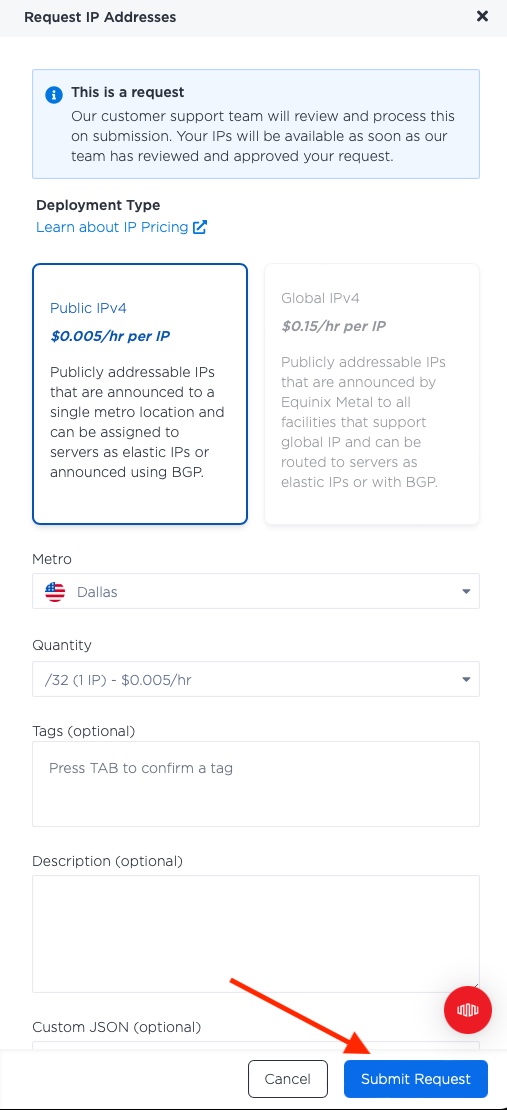
You can see that you have two choices for Elastic IP: "Public" and "Global".
- Public: Public IPs are tied to a specific Metro. They can direct traffic to your servers in that metro, but not to servers in other metros.
- Global: Global IPs are not tied to a specific metro. They can direct traffic to your servers in any metro.
Unsurprisingly, Global IPs are more expensive than Public IPs.
In this guide, we will focus on the simpler, metro-specific Public IPs. In a future guide, we will deploy a Global IP.
Select "Public IPv4", and choose the metro in which you deployed your servers. In my case, that was Dallas.
Next, let's discuss the quantity. When you reserve an Elastic IP from Equinix Metal, they don't actually give you an IP address, but rather a range of addresses. These use CIDR, and specifically the suffix, to indicate how many address you will receive.
For example, if you request a /32, you will receive a single IP address. If you request a /31, you will receive two IP addresses. If you request a /30, you will receive four IP addresses, and so on.
Fortunately, the console makes it easy to see the sizes:
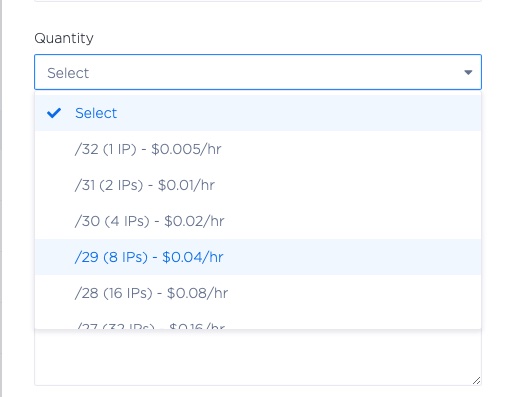
Depending on the size you request, availability in the metro, and your account's quotas, Metal may immediately approve and assign your address, or it may send it in for approval. And the larger the quantity, the greater the price.
We only need one address for today, so pick just one, or /32.
With all of that set, click "Submit Request".
Once it is approved, you will see it in the "Networking" -> "IPs" page:
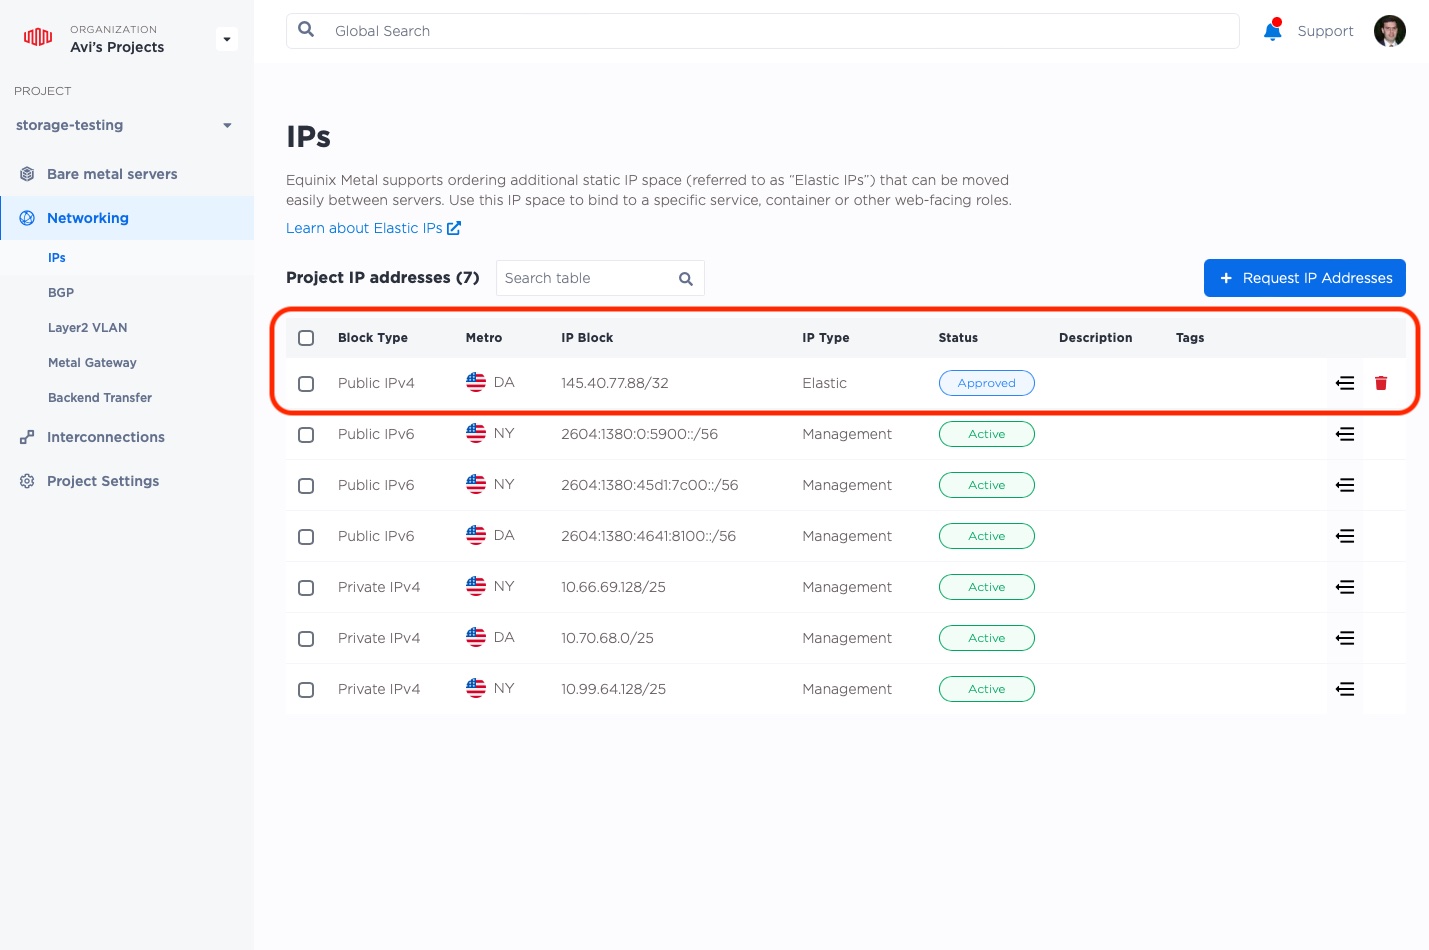
As you can see, I was assigned the Elastic IP 145.40.77.88.
So, now we have it, we can just use that address, right?
$ curl http://145.40.77.88
curl: (28) Failed to connect to 145.40.77.88 port 80 after 75007 ms: Couldn't connect to server
That certainly didn't work!
Although we allocated an Elastic IP, we have not yet told any of the servers that they can handle the IP, nor have we told Equinix Metal where to route it.
Configuring servers to handle the IP
In order for the servers to agree to process traffic for our Elastic IP, we need to inform them about the IP. We do this by adding the IP to the server's network interface.
On each server, we will add the Elastic IP to the loopback interface lo as an extra IP.
Be sure to replace the IP address with your elastic IP.
root@c3-small-x86-01:~# cat >> /etc/network/interfaces <<EOF

auto lo:0
iface lo:0 inet static
  address 145.40.77.88
  netmask 255.255.255.255
EOF
root@c3-small-x86-01:~# ifup lo:0
We can test that the server is handling the IP by trying to access our Web server:
root@c3-small-x86-02:~# curl 145.40.77.88
<!DOCTYPE html>
<html>
<head>
<title>Welcome to nginx!</title>
<style>
    body {
        width: 35em;
        margin: 0 auto;
        font-family: Tahoma, Verdana, Arial, sans-serif;
    }
</style>
</head>
<body>
<h1>Welcome to nginx!</h1>
<p>I am server 01</p>

<p>For online documentation and support please refer to
<a href="http://nginx.org/">nginx.org</a>.<br/>
Commercial support is available at
<a href="http://nginx.com/">nginx.com</a>.</p>

<p><em>Thank you for using nginx.</em></p>
</body>
</html>
The content in the middle of "I am server" should match the number of the server you are on.
Repeat on all of your servers.
Now that the servers know to accept the traffic for the IP, all that is left is to configure Equinix Metal to send the traffic to one (or more) of the servers
Configuring Equinix Metal to route the IP
There are two ways to tell Equinix Metal where to route the Elastic IP: BGP and Equinix Metal API.
The Equinix Metal API is the easiest to use, but it is also the least flexible. We can assign the IP right there in the Equinix Metal console, and doesn't require any additional setup on the server.
What's the downside?
It only allows us to assign the Elastic IP to a single server at a time. If we want a different server to respond to the IP, we have to go back to the Equinix Metal console, unassign it from our first server, and then reassign it to a different one.
BGP is more flexible, but it is also more complicated. We can assign the IP to multiple servers at a time, and we can even have the servers share the IP, so that if one server goes down, the other can take over. But it requires us to configure BGP on the servers, and to configure Equinix Metal as well.
In the rest of this guide, we will use the Equinix Metal API, via the console. If you want to use BGP, you can follow the BGP for Elastic IPs guide instead. Our BGP guide also provides a nice introduction as to how BGP works, and why it requires extra steps.
Equinix Metal API
Using the Equinix Metal API, we can assign our Elastic IP to a single server at a time. If we want a different server to respond to requests, we will need to unassign it from the first server, and assign it to a different one.
Go back to the main "Manage Servers" page, and select the server to which you want to assign the
Elastic IP. In my case, I will select c3-small-x86-01.
Next, select the network tab, which we did before:
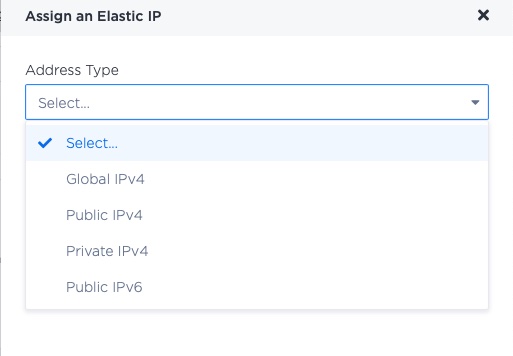
This time, we will assign our unused Elastic IP to this server:
Select the type of Elastic IP. Since we created a Public IPv4, we will select that.
Next select which Elastic IP block of that type to use. We only have one, which makes it easy:
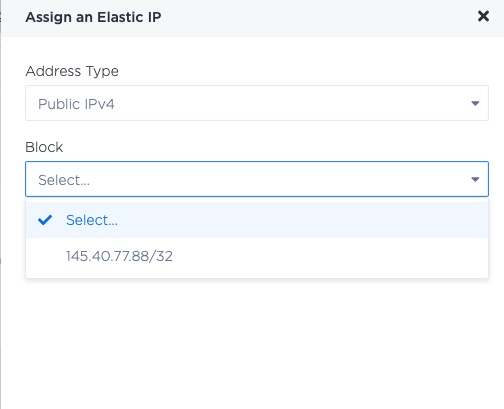
Finally, click "Add".
This will bring you back to the server networking page, where you now can see the IP is assigned to the server:
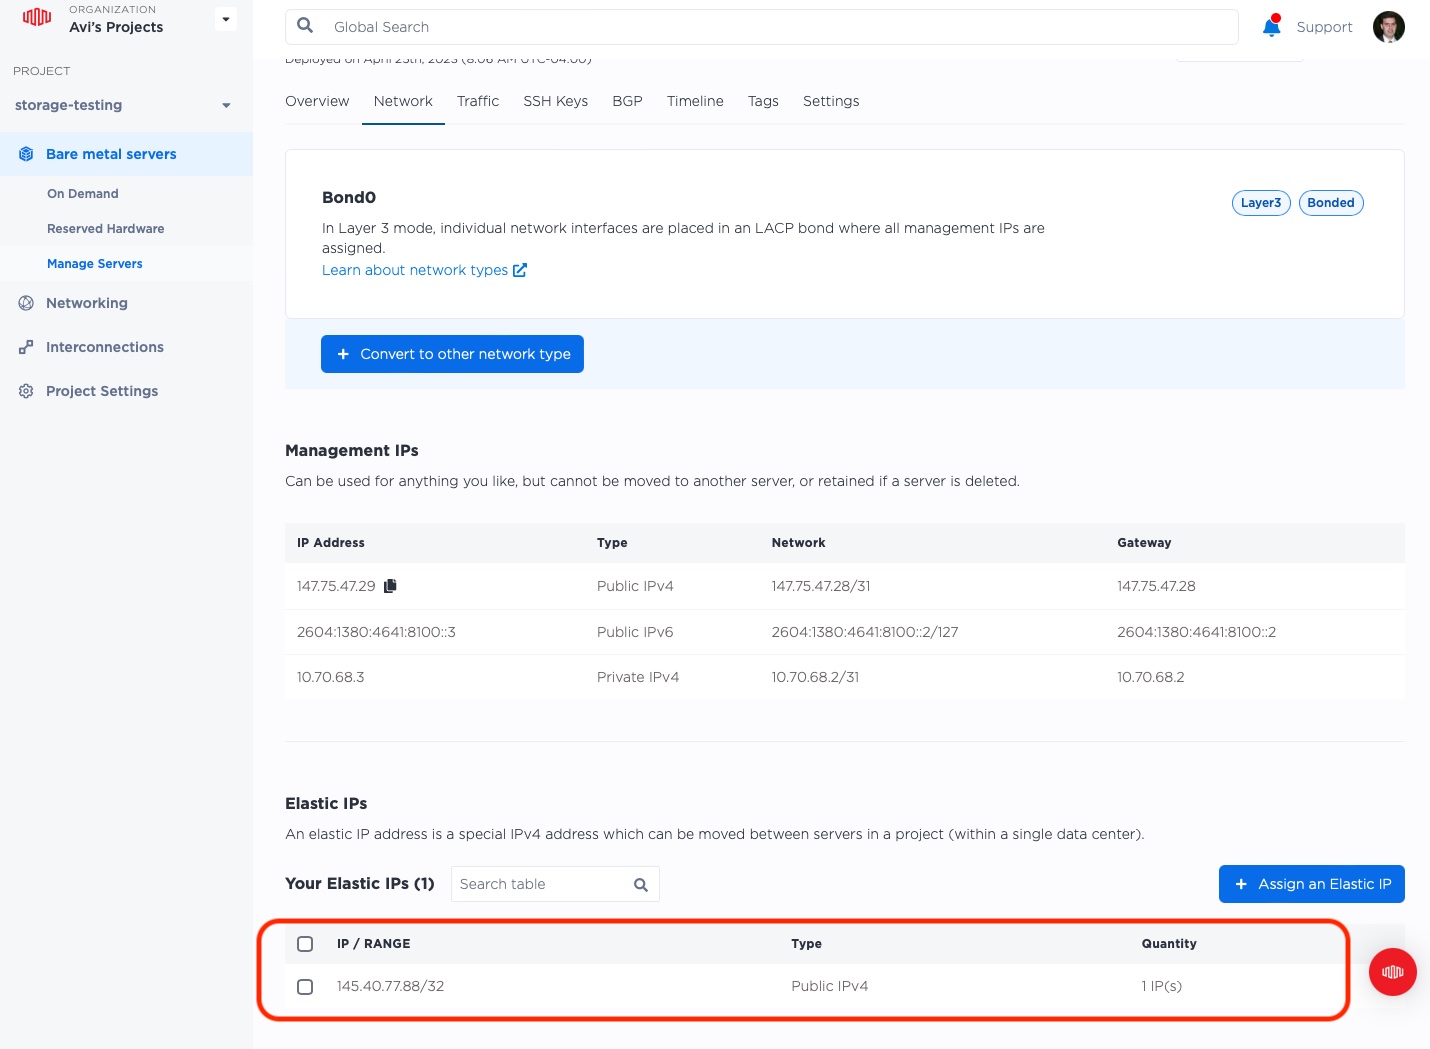
Let's test that it works! From another device, i.e. not on the server itself, try to access the server:
$ curl http://145.40.77.88
<!DOCTYPE html>
<html>
<head>
<title>Welcome to nginx!</title>
<style>
    body {
        width: 35em;
        margin: 0 auto;
        font-family: Tahoma, Verdana, Arial, sans-serif;
    }
</style>
</head>
<body>
<h1>Welcome to nginx!</h1>
<p>I am server 01</p>

<p>For online documentation and support please refer to
<a href="http://nginx.org/">nginx.org</a>.<br/>
Commercial support is available at
<a href="http://nginx.com/">nginx.com</a>.</p>

<p><em>Thank you for using nginx.</em></p>
</body>
</html>
Success! The blessed small victories of life and technology!
Notice that the server sending it to us is 01. As many times as we do it, we will get the response
from server 01, because that is where Equinix Metal has assigned the IP.
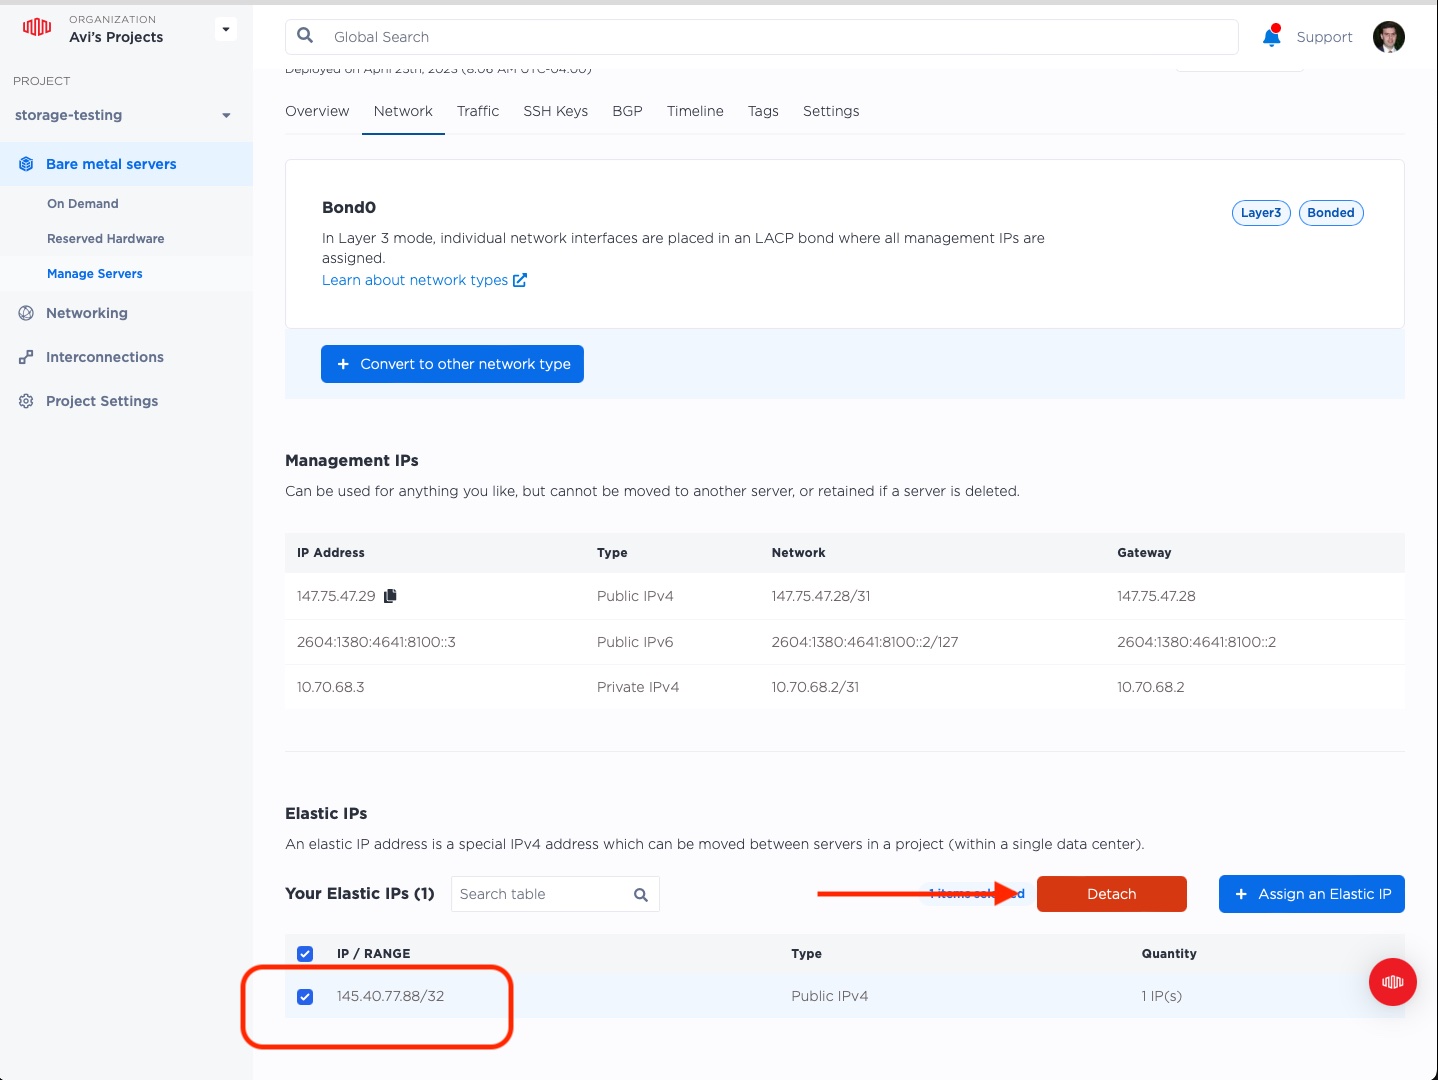
Let's move it over to a different server.
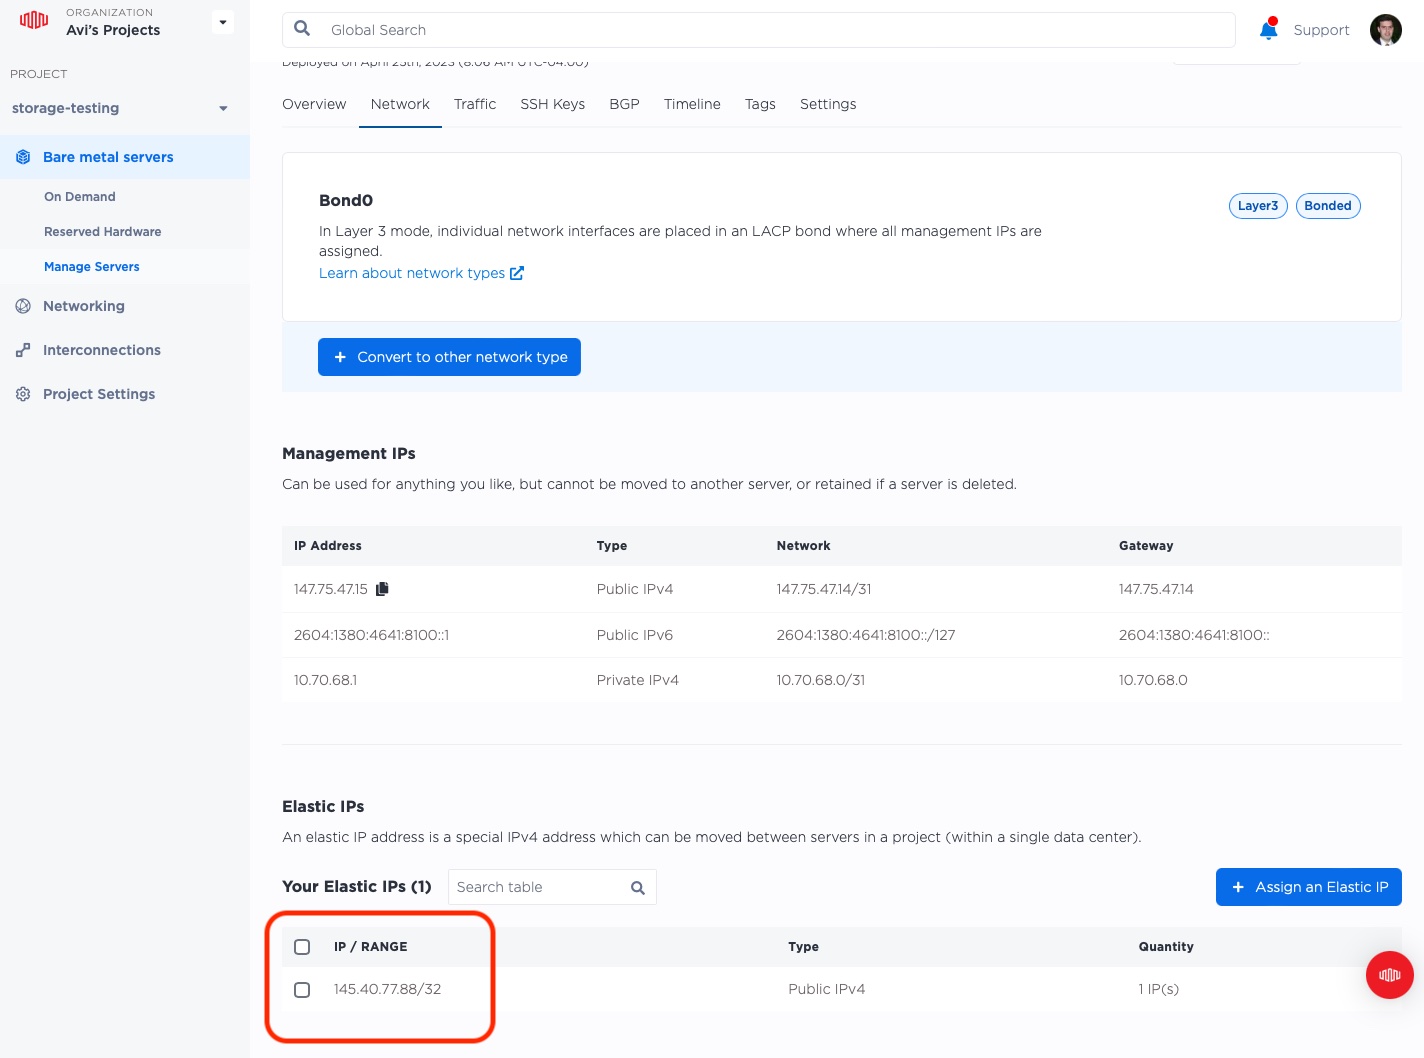
Go back to the server IP networking page, select the specific IP. As soon as you do, a button will show up letting you "Detach" it. Click it.
Now select a different server, say 02, click its details, "Network" tab, and "Assign an Elastic IP",
just as we did before.
Now try to access the server again, and see which server is responding:
$ curl http://145.40.77.88
<!DOCTYPE html>
<html>
<head>
<title>Welcome to nginx!</title>
<style>
    body {
        width: 35em;
        margin: 0 auto;
        font-family: Tahoma, Verdana, Arial, sans-serif;
    }
</style>
</head>
<body>
<h1>Welcome to nginx!</h1>
<p>I am server 02</p>

<p>For online documentation and support please refer to
<a href="http://nginx.org/">nginx.org</a>.<br/>
Commercial support is available at
<a href="http://nginx.com/">nginx.com</a>.</p>

<p><em>Thank you for using nginx.</em></p>
</body>
</html>
Success! Now server 2 is responding.
This works very well, and the response time is pretty quick.
Last updated
25 June, 2024Category
Tagged
QuickstartYou may also like
Digger deeper into similar topics in our archives
Configuring BGP with BIRD 1.6 on an Equinix Metal Server
Set up BGP on your Equinix Metal server using BIRD 1.6, covering IP configuration, installation, and neighbor setup to ensure robust routing capabilities between your server and the Equinix...

Configuring BGP with FRR on an Equinix Metal Server
Establish a robust BGP configuration on your Equinix Metal server using FRR, including setting up network interfaces, installing and configuring FRR software, and ensuring secure and efficie...

Crosscloud VPN with Wireguard
Learn to establish secure VPN connections across cloud environments using WireGuard, including detailed setups for site-to-site tunnels and VPN gateways with NAT on Equinix Metal, enhancing...

Deploy Your First Server
Learn the essentials of deploying your first server with Equinix Metal. Set up your project & SSH keys, provision a server and connect it to the internet.

Ready to kick the tires?
Use code DEPLOYNOW for $300 credit