- Home /
- Resources /
- Learning center /
- Global Elastic IPs
Global Elastic IPs
Ready to go global? Learn how you can route traffic to distributed servers in any Equinix Metal metro using a single IP address.

On this page
In our previous guide, we introduced you to the wonders of using Equinix Metal-provided Elastic IPs. We explained what an Elastic IP is, why it is useful, and how it helps you create greater flexibility and resiliency across your services.
Elastic IPs normally are limited to a single metro. For many cases, that may be more than enough.
Equinix Metal metros cover multiple facilities, each independent buildings, with separate power, cooling, physical access. As a short reminder (because, well, we wouldn't want anyone at Legal to be unhappy with us), this is just a getting started guide. See Equinix Metal's official terms and conditions to understand exactly what reliability provisions are made for facilities and metros.
What if your service is global? We don't just mean "global", as in, it serves people all over the world. The Internet itself is global. The overwhelming majority of Internet services and Websites serve users all over the world, from a single location - sometimes even a single server!
No, we mean, what if your service itself is distributed all over the world? Perhaps you have good compliance reasons to distribute data centres across two or more metros. Maybe you are serving customers in Europe, North America, Asia, the Middle East and Australia simultaneously.
Whatever your reasons, you need to have a single face to the globe, a single address for your services.
Welcome to Global Elastic IPs.
Global Elastic IPs are just like regular Equinix Metal Elastic IPs, with one big difference: you can route the traffic to servers in any Equinix Metal metro.
In this guide, we will combine some of the best features of our Elastic IPs guide and our Elastic IPs with BGP guide. If you have not read those yet, we strongly recommend you do so first.
We will do things very similar to, but not quite the same, as in those other guides.
- Deploy three servers across three different metros
- Deploy nginx on each server
- Create a Global Elastic IP
- Configure the servers to respond to the Global Elastic IP address
- Attach the Global Elastic IP to the servers in both available ways, obviously one at a time:
- Attach the Elastic IP using the Equinix Metal API
- Advertise the Elastic IP using BGP
Let's get started.
1. Deploy three servers across three different metros
To save on space, we won't walk through the entire "how to deploy a server" process here, but you can find that in the "Deploy Your First Server" guide. Because this is a Global Elastic IP guide, let's be sure to deploy our servers are in different metros.
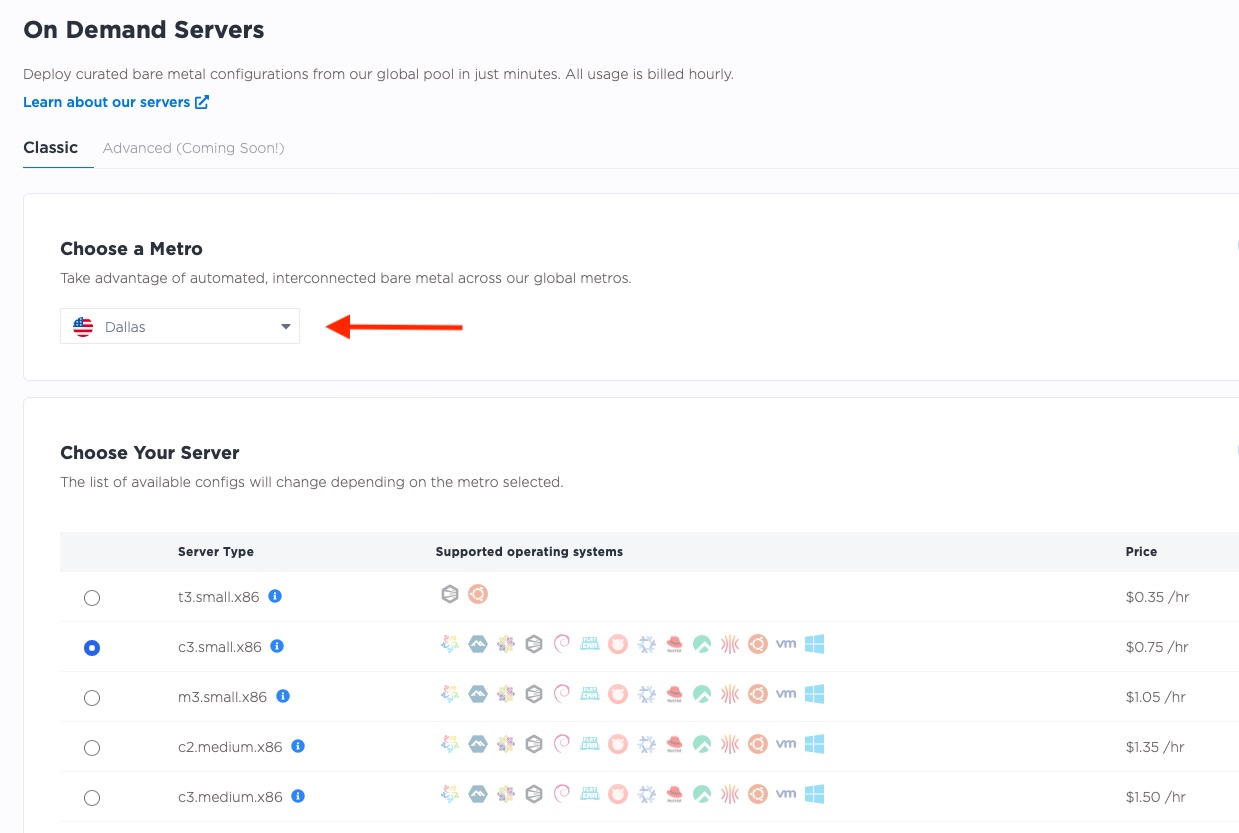
If you are using the Equinix Metal Console, you need to deploy the three servers separately, each time selecting a different metro. Here we deploy them, one at a time.
One in Dallas:
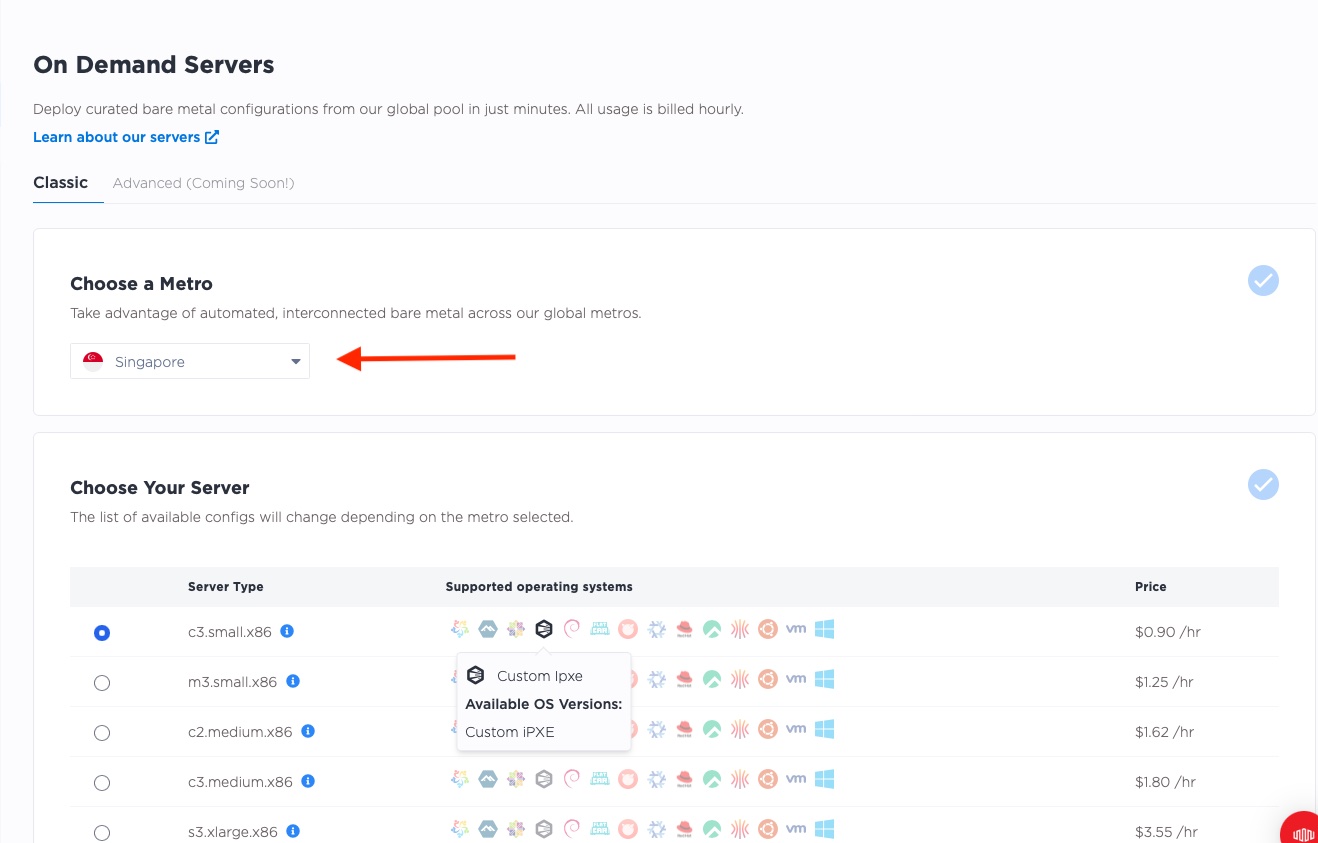
And one in Singapore:
And finally one in London:
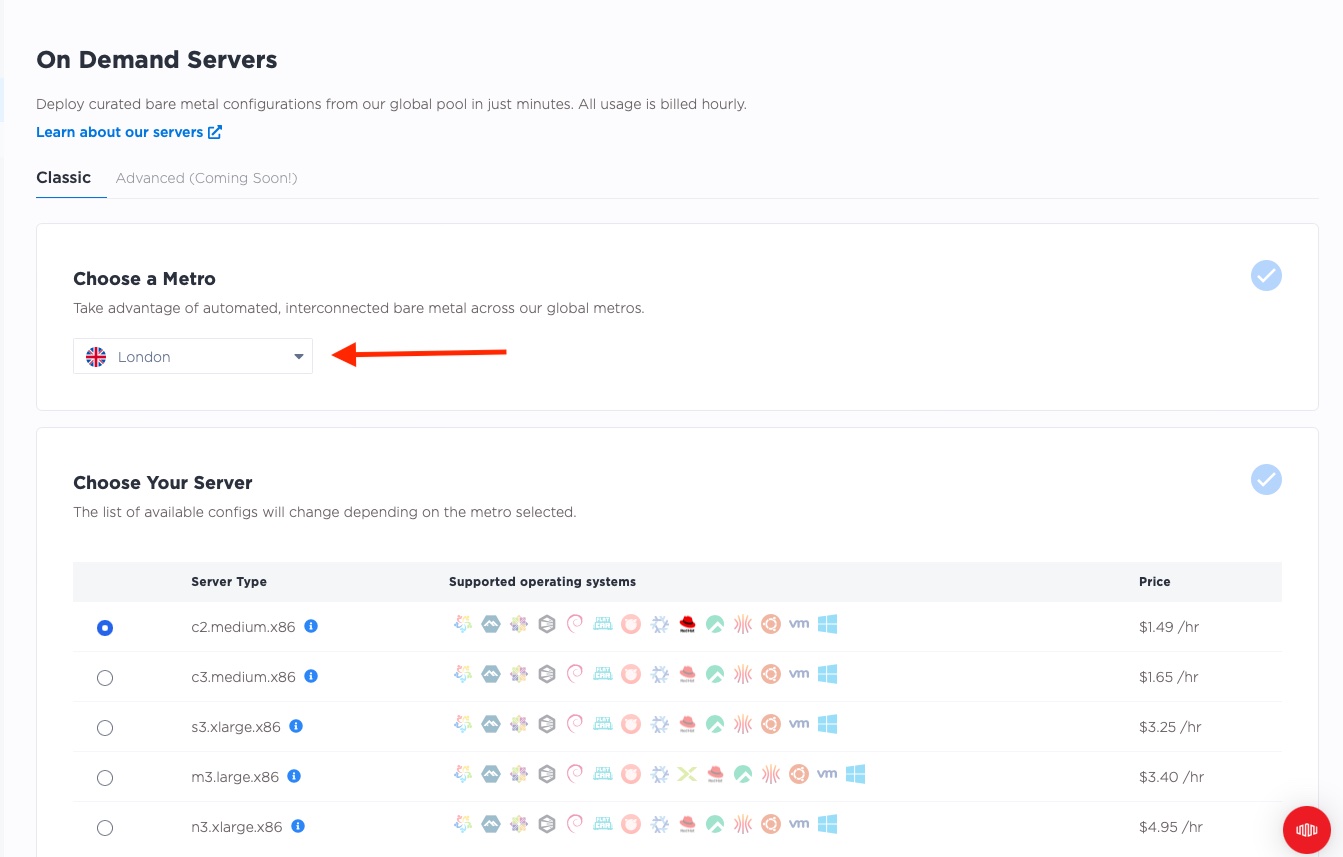
We deployed different server types as well, using a c3.small.x86 in Dallas and Singapore, but a
c2.medium.x86 in London.
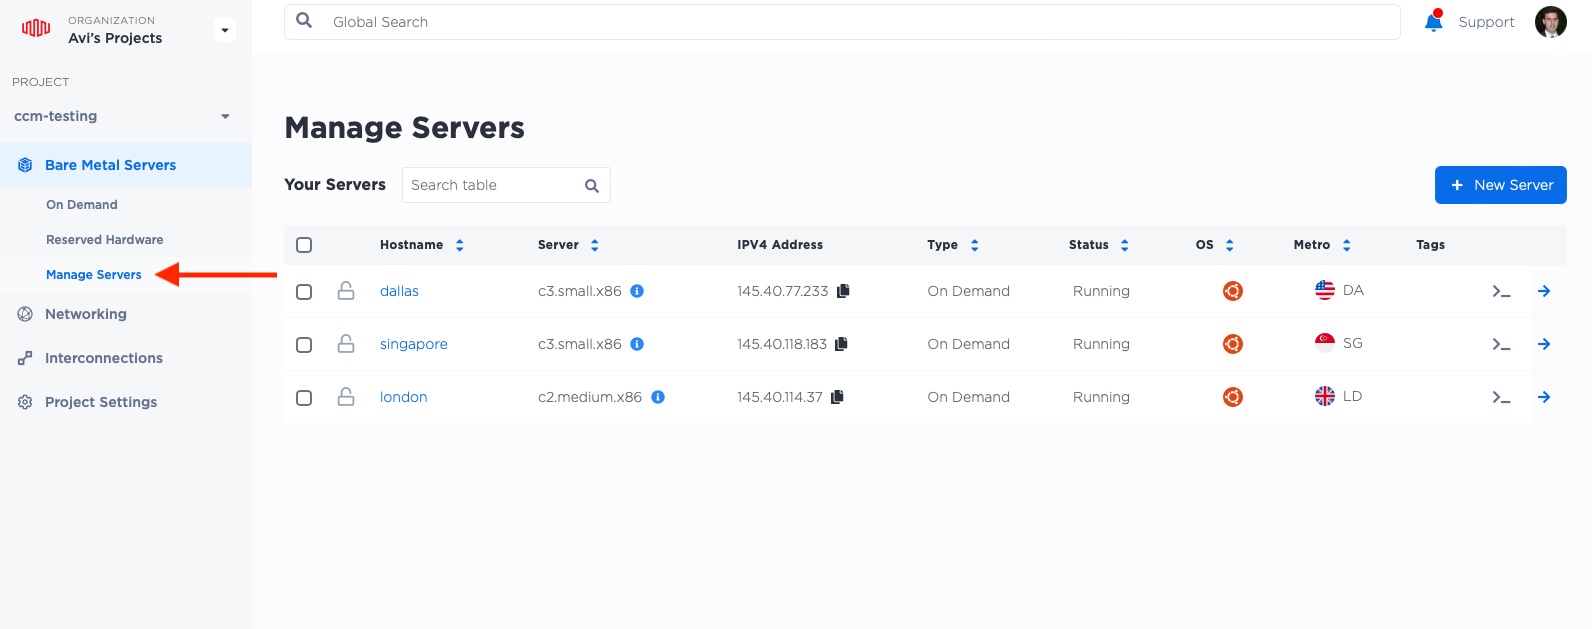
Once they are up and ready, we will see them in the main console.
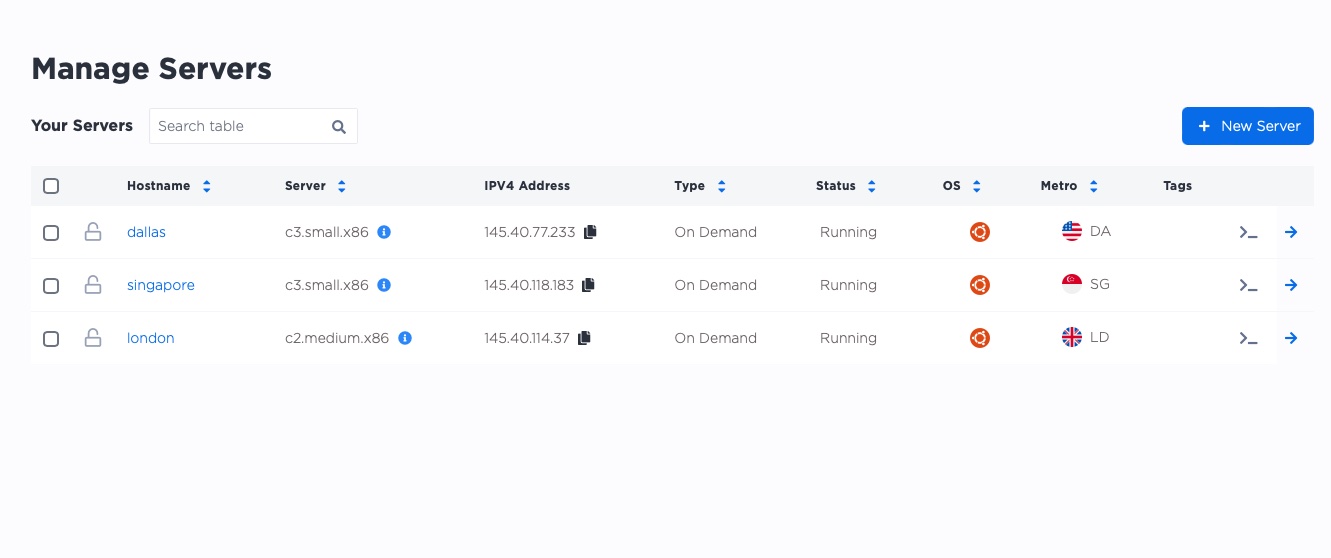
Our public IP addresses are:
- Dallas:
145.40.77.233 - Singapore:
145.40.118.183 - London:
145.40.114.37
2. Deploy nginx on each server
We are going to ssh into each server and deploy nginx to the server. As in our other guides, we will configure it so that it tells us the name of the server on which it is running.
We covered this in depth in our guide to resiliency for servers, so we shall do it briefly here.
On each server:
- ssh to the server
- update the package manager
- install the software we need, specifically
nginxfor the Web server, as well as some other utilities - configure nginx to report the name of the server
We condensed the output to make it more readable:
$ ssh root@145.40.77.233
The authenticity of host '145.40.77.233 (145.40.77.233)' can't be established.
ED25519 key fingerprint is SHA256:HKh0xNMsHmQn4/u5q6Br9/wvy0kXgKGs+iezxW59zog.
This key is not known by any other names
Are you sure you want to continue connecting (yes/no/[fingerprint])? yes
Warning: Permanently added '145.40.77.233' (ED25519) to the list of known hosts.
Welcome to Ubuntu 22.04.1 LTS (GNU/Linux 5.15.0-58-generic x86_64)

 * Documentation:  https://help.ubuntu.com
 * Management:     https://landscape.canonical.com
 * Support:        https://ubuntu.com/advantage

  System information as of Mon May 15 15:09:23 UTC 2023

  System load:            0.06689453125
  Usage of /:             0.7% of 437.17GB
  Memory usage:           1%
  Swap usage:             0%
  Temperature:            47.0 C
  Processes:              238
  Users logged in:        0
  IPv4 address for bond0: 145.40.77.233
  IPv6 address for bond0: 2604:1380:4641:bf00::3

 * Introducing Expanded Security Maintenance for Applications.
   Receive updates to over 25,000 software packages with your
   Ubuntu Pro subscription. Free for personal use.

     https://ubuntu.com/pro

6 updates can be applied immediately.
6 of these updates are standard security updates.
To see these additional updates run: apt list --upgradable


The list of available updates is more than a week old.
To check for new updates run: sudo apt update


The programs included with the Ubuntu system are free software;
the exact distribution terms for each program are described in the
individual files in /usr/share/doc/*/copyright.

Ubuntu comes with ABSOLUTELY NO WARRANTY, to the extent permitted by
applicable law.

root@dallas:~#
We are in, so let's update the package manager, and install nginx, along with utilities we will need later,
specifically bird and jq:
root@dallas:~# apt update -y
Get:1 http://security.ubuntu.com/ubuntu jammy-security InRelease [110 kB]
Get:2 http://security.ubuntu.com/ubuntu jammy-security/main amd64 Packages [363 kB]
Get:3 http://security.ubuntu.com/ubuntu jammy-security/main Translation-en [108 kB]
Get:4 http://security.ubuntu.com/ubuntu jammy-security/main amd64 c-n-f Metadata [9732 B]
Get:5 http://security.ubuntu.com/ubuntu jammy-security/restricted amd64 Packages [225 kB]
Get:6 http://security.ubuntu.com/ubuntu jammy-security/restricted Translation-en [33.3 kB]
Get:7 http://security.ubuntu.com/ubuntu jammy-security/restricted amd64 c-n-f Metadata [604 B]
Get:8 http://security.ubuntu.com/ubuntu jammy-security/universe amd64 Packages [709 kB]
Hit:9 http://archive.ubuntu.com/ubuntu jammy InRelease
Get:10 http://archive.ubuntu.com/ubuntu jammy-updates InRelease [119 kB]
Get:11 http://security.ubuntu.com/ubuntu jammy-security/universe Translation-en [122 kB]
Get:12 http://security.ubuntu.com/ubuntu jammy-security/universe amd64 c-n-f Metadata [14.3 kB]
Get:13 http://security.ubuntu.com/ubuntu jammy-security/multiverse amd64 Packages [30.2 kB]
Get:14 http://archive.ubuntu.com/ubuntu jammy-backports InRelease [108 kB]
Get:15 http://archive.ubuntu.com/ubuntu jammy-updates/main amd64 Packages [605 kB]
Get:16 http://archive.ubuntu.com/ubuntu jammy-updates/main Translation-en [169 kB]
Get:17 http://archive.ubuntu.com/ubuntu jammy-updates/main amd64 c-n-f Metadata [14.4 kB]
Get:18 http://archive.ubuntu.com/ubuntu jammy-updates/restricted amd64 Packages [271 kB]
Get:19 http://archive.ubuntu.com/ubuntu jammy-updates/restricted Translation-en [41.3 kB]
Get:20 http://archive.ubuntu.com/ubuntu jammy-updates/restricted amd64 c-n-f Metadata [604 B]
Get:21 http://archive.ubuntu.com/ubuntu jammy-updates/universe amd64 Packages [887 kB]
Get:22 http://archive.ubuntu.com/ubuntu jammy-updates/universe Translation-en [182 kB]
Get:23 http://security.ubuntu.com/ubuntu jammy-security/multiverse Translation-en [5828 B]
Get:24 http://security.ubuntu.com/ubuntu jammy-security/multiverse amd64 c-n-f Metadata [252 B]
Get:25 http://archive.ubuntu.com/ubuntu jammy-updates/universe amd64 c-n-f Metadata [18.8 kB]
Get:26 http://archive.ubuntu.com/ubuntu jammy-updates/multiverse amd64 Packages [35.3 kB]
Get:27 http://archive.ubuntu.com/ubuntu jammy-updates/multiverse Translation-en [8452 B]
Get:28 http://archive.ubuntu.com/ubuntu jammy-updates/multiverse amd64 c-n-f Metadata [468 B]
Get:29 http://archive.ubuntu.com/ubuntu jammy-backports/main amd64 Packages [40.9 kB]
Get:30 http://archive.ubuntu.com/ubuntu jammy-backports/main Translation-en [10.2 kB]
Get:31 http://archive.ubuntu.com/ubuntu jammy-backports/main amd64 c-n-f Metadata [388 B]
Get:32 http://archive.ubuntu.com/ubuntu jammy-backports/universe amd64 Packages [22.2 kB]
Get:33 http://archive.ubuntu.com/ubuntu jammy-backports/universe Translation-en [15.0 kB]
Get:34 http://archive.ubuntu.com/ubuntu jammy-backports/universe amd64 c-n-f Metadata [548 B]
Fetched 4282 kB in 59s (72.8 kB/s)
Reading package lists... Done
Building dependency tree... Done
Reading state information... Done
101 packages can be upgraded. Run 'apt list --upgradable' to see them.
root@dallas:~#
And then for the packages:
root@dallas:~# apt install -y nginx jq bird
Reading package lists... Done
Building dependency tree... Done
Reading state information... Done
The following package was automatically installed and is no longer required:
  grub-pc-bin
Use 'apt autoremove' to remove it.
The following additional packages will be installed:
  fontconfig-config fonts-dejavu-core libdeflate0 libfontconfig1 libgd3 libjbig0 libjpeg-turbo8 libjpeg8 libjq1
  libnginx-mod-http-geoip2 libnginx-mod-http-image-filter libnginx-mod-http-xslt-filter libnginx-mod-mail
  libnginx-mod-stream libnginx-mod-stream-geoip2 libonig5 libtiff5 libwebp7 libxpm4 nginx-common nginx-core
Suggested packages:
  bird-doc libgd-tools fcgiwrap nginx-doc ssl-cert
The following NEW packages will be installed:
  bird fontconfig-config fonts-dejavu-core jq libdeflate0 libfontconfig1 libgd3 libjbig0 libjpeg-turbo8 libjpeg8 libjq1
  libnginx-mod-http-geoip2 libnginx-mod-http-image-filter libnginx-mod-http-xslt-filter libnginx-mod-mail
  libnginx-mod-stream libnginx-mod-stream-geoip2 libonig5 libtiff5 libwebp7 libxpm4 nginx nginx-common nginx-core
0 upgraded, 24 newly installed, 0 to remove and 101 not upgraded.
Need to get 3427 kB of archives.
After this operation, 10.7 MB of additional disk space will be used.
Get:1 http://archive.ubuntu.com/ubuntu jammy/main amd64 fonts-dejavu-core all 2.37-2build1 [1041 kB]
...
...
Get:24 http://archive.ubuntu.com/ubuntu jammy/universe amd64 bird amd64 1.6.8-2.1 [381 kB]
Fetched 3427 kB in 1min 19s (43.6 kB/s)
Preconfiguring packages ...

...
...
Selecting previously unselected package nginx-core.
Preparing to unpack .../21-nginx-core_1.18.0-6ubuntu14.3_amd64.deb ...
Unpacking nginx-core (1.18.0-6ubuntu14.3) ...
Selecting previously unselected package nginx.
Preparing to unpack .../22-nginx_1.18.0-6ubuntu14.3_amd64.deb ...
Unpacking nginx (1.18.0-6ubuntu14.3) ...
Selecting previously unselected package bird.
Preparing to unpack .../23-bird_1.6.8-2.1_amd64.deb ...
Unpacking bird (1.6.8-2.1) ...
Setting up bird (1.6.8-2.1) ...

Creating config file /etc/bird/bird.conf with new version

Creating config file /etc/bird/bird6.conf with new version
Created symlink /etc/systemd/system/multi-user.target.wants/bird.service → /lib/systemd/system/bird.service.
Created symlink /etc/systemd/system/multi-user.target.wants/bird6.service → /lib/systemd/system/bird6.service.
Setting up libxpm4:amd64 (1:3.5.12-1ubuntu0.22.04.1) ...
...
...
Setting up nginx-core (1.18.0-6ubuntu14.3) ...
 * Upgrading binary nginx                                                                                              [ OK ]
Setting up nginx (1.18.0-6ubuntu14.3) ...
Processing triggers for ufw (0.36.1-4build1) ...
Processing triggers for man-db (2.10.2-1) ...
Processing triggers for libc-bin (2.35-0ubuntu3.1) ...
Scanning processes...
Scanning processor microcode...
Scanning linux images...

Running kernel seems to be up-to-date.

The processor microcode seems to be up-to-date.

No services need to be restarted.

No containers need to be restarted.

No user sessions are running outdated binaries.

No VM guests are running outdated hypervisor (qemu) binaries on this host.
root@dallas:~#
Now, let's configure nginx to report the server it is on. We named each server based on its location, so it will be easy to see which one is answering: Dallas, London or Singapore.
The default page for nginx here is in /var/www/html/index.nginx-debian.html. We can edit it with vim:
root@dallas:~# vim /var/www/html/index.nginx-debian.html
We are only going to change lines 14 and 15.
Line 14 is the header for the page, so that rather than saying "Welcome to nginx!", it will say, "Welcome to Dallas!". Similarly for line 15, rather than saying, "If you see this page, the nginx web server is successfully installed and working. Further configuration is required.", it will say, "I am in Dallas".
The servers in the other metros will report their own metros.
The file on server 01 should look like this:
<!DOCTYPE html>
<html>
<head>
<title>Welcome to nginx!</title>
<style>
    body {
        width: 35em;
        margin: 0 auto;
        font-family: Tahoma, Verdana, Arial, sans-serif;
    }
</style>
</head>
<body>
<h1>Welcome to Dallas!</h1>
<p>I am in Dallas</p>

<p>For online documentation and support please refer to
<a href="http://nginx.org/">nginx.org</a>.<br/>
Commercial support is available at
<a href="http://nginx.com/">nginx.com</a>.</p>

<p><em>Thank you for using nginx.</em></p>
</body>
</html>
Because nginx reads the file from the disk with each request, there is no need to restart the server.
Run curl localhost:80 to see that the results are correct.
root@dallas:~# curl localhost:80
<!DOCTYPE html>
<html>
<head>
<title>Welcome to nginx!</title>
<style>
    body {
        width: 35em;
        margin: 0 auto;
        font-family: Tahoma, Verdana, Arial, sans-serif;
    }
</style>
</head>
<body>
<h1>Welcome to Dallas!</h1>
<p>I am in Dallas</p>

<p>For online documentation and support please refer to
<a href="http://nginx.org/">nginx.org</a>.<br/>
Commercial support is available at
<a href="http://nginx.com/">nginx.com</a>.</p>

<p><em>Thank you for using nginx.</em></p>
</body>
</html>
Looks great!
Exit the server and repeat for each of the other two servers. In our case, that would be Singapore
at 145.40.118.183 and London at 145.40.114.37.
3. Create a Global Elastic IP
Time to get ourselves a Global Elastic IP.
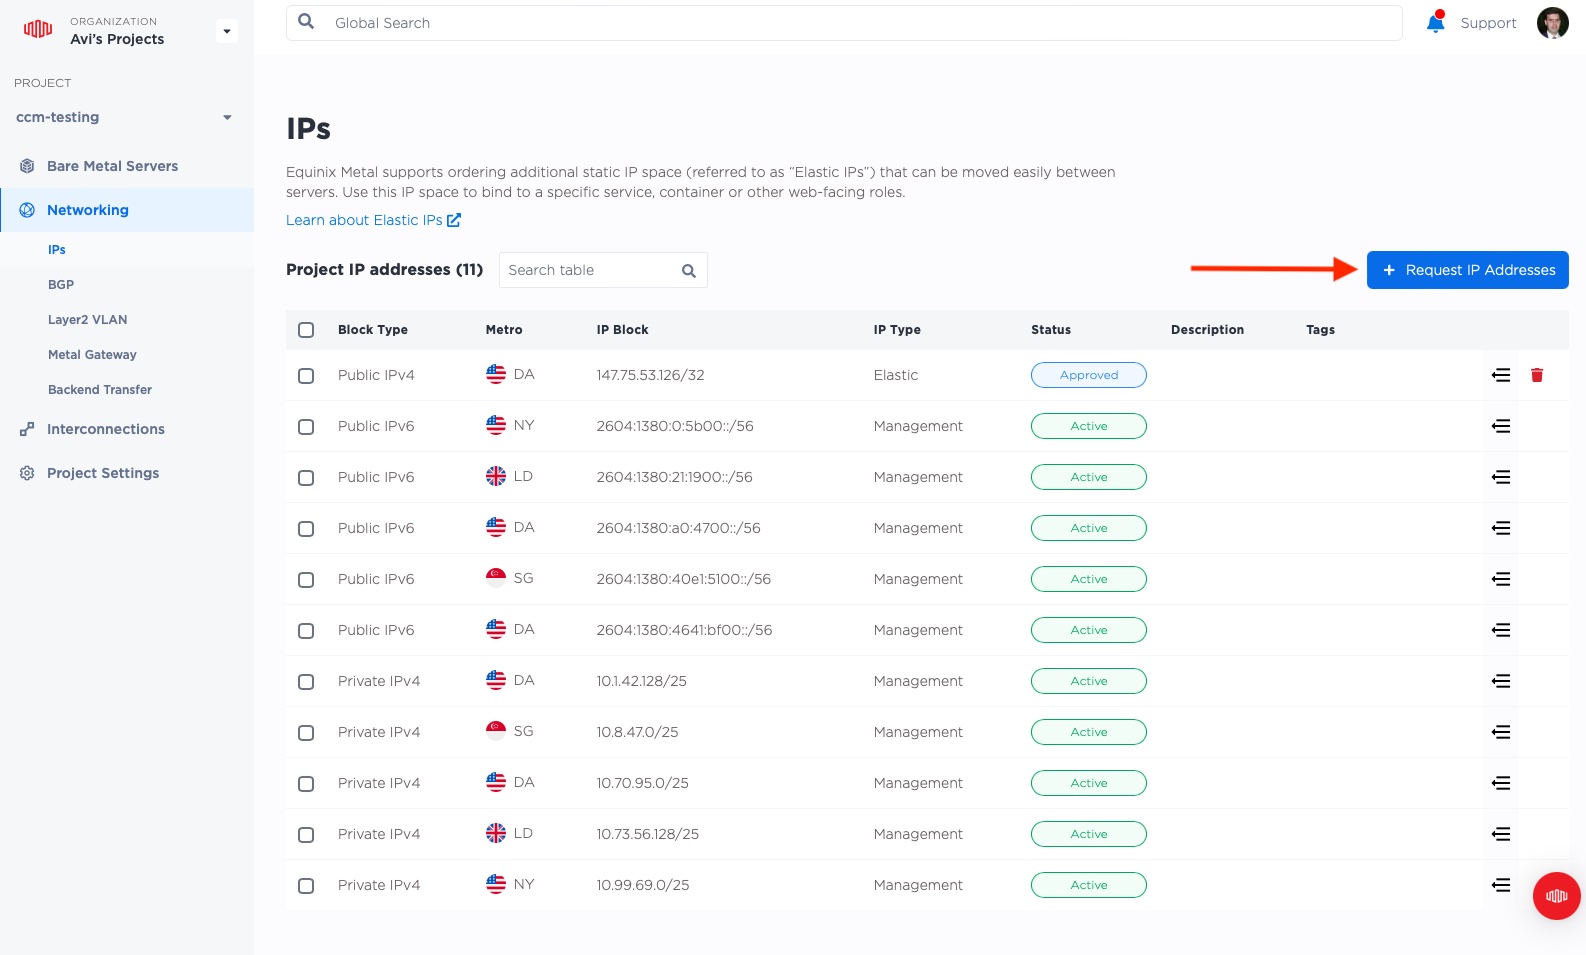
Head back over to the Equinix Metal Console, and select "Networking", which will bring you to the IPs page.
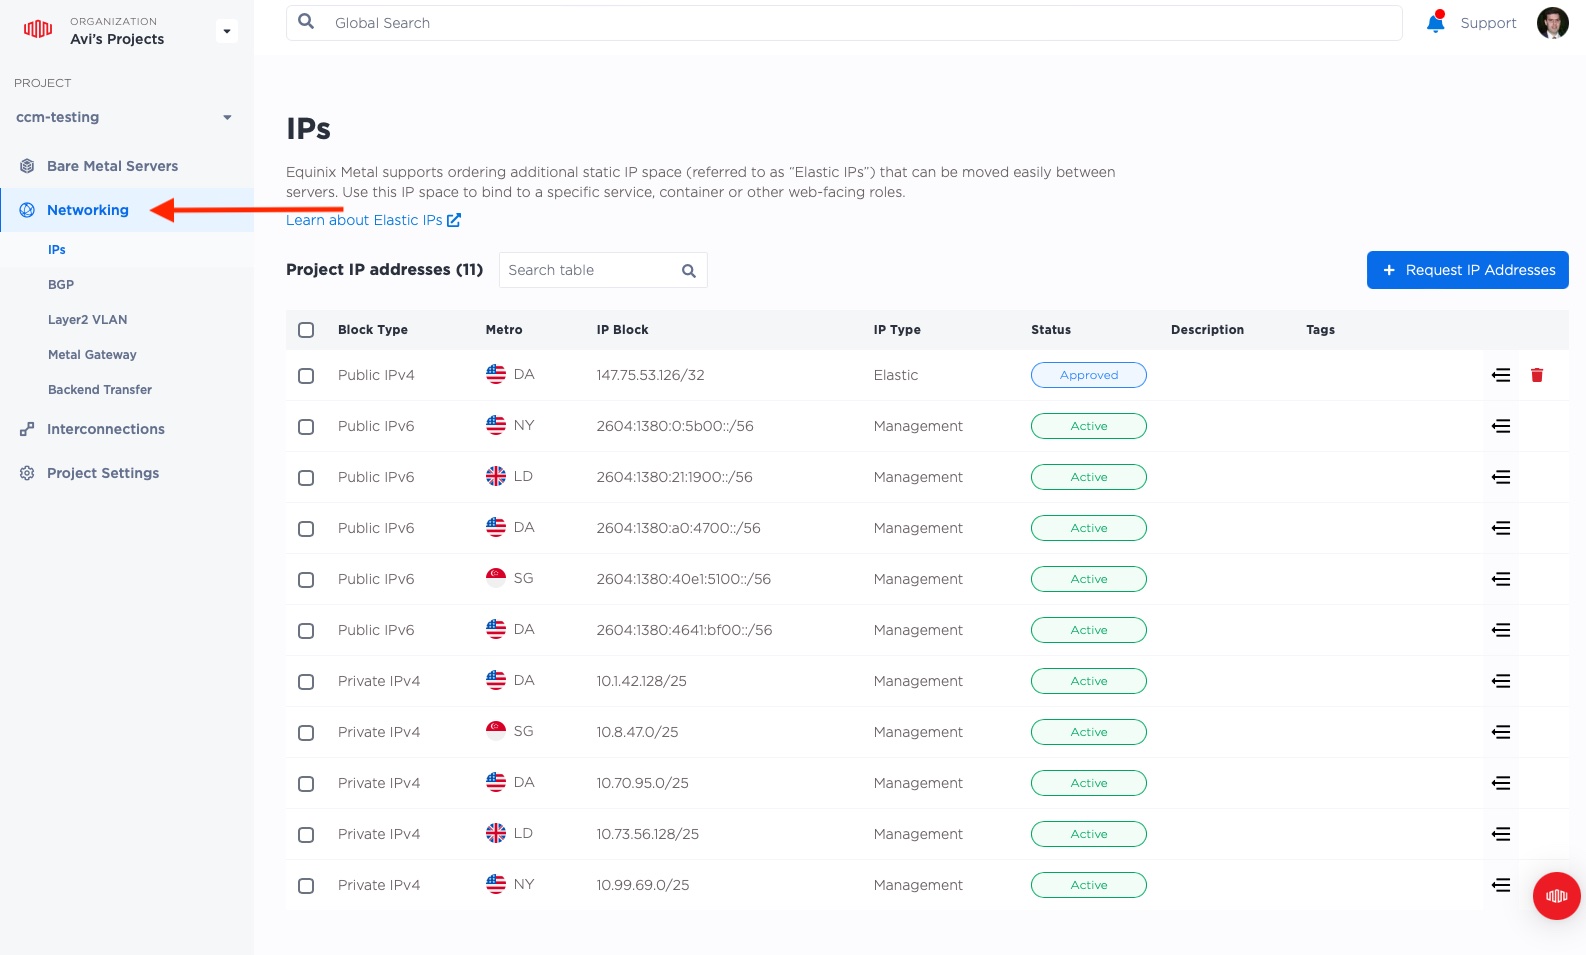
Then click the "Request IP Addresses" button on the upper-right:
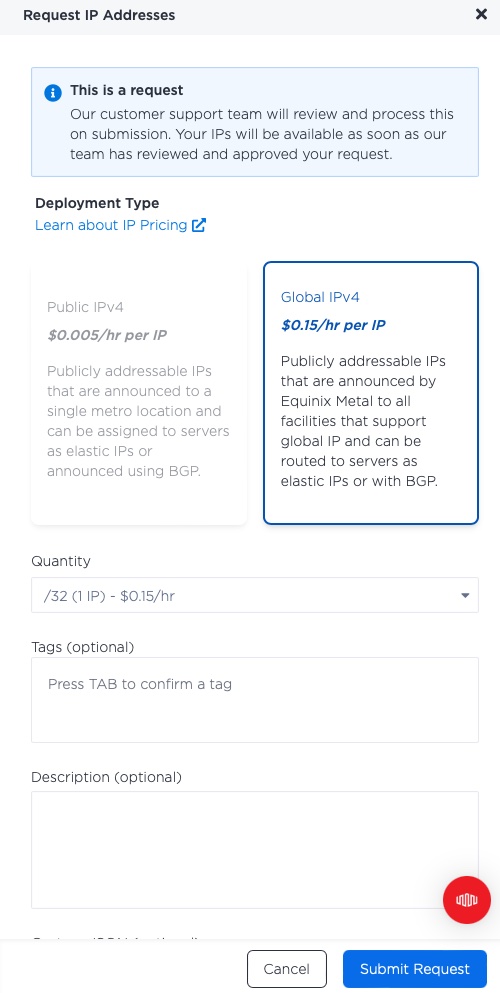
This time, rather than the previous "Public IPv4", we will click the right side and select a
"Global IPv4". Notice that there is no "Metro" pulldown this time, because, well, it is global.
We will take a quantity of /32, or just 1 IP address, as that is all we need.
Click "Submit Request". We are going global!
When it is ready, you will see it listed in your IPs, with a nice globe indicating that it is not in one particular metro, but for the whole world.
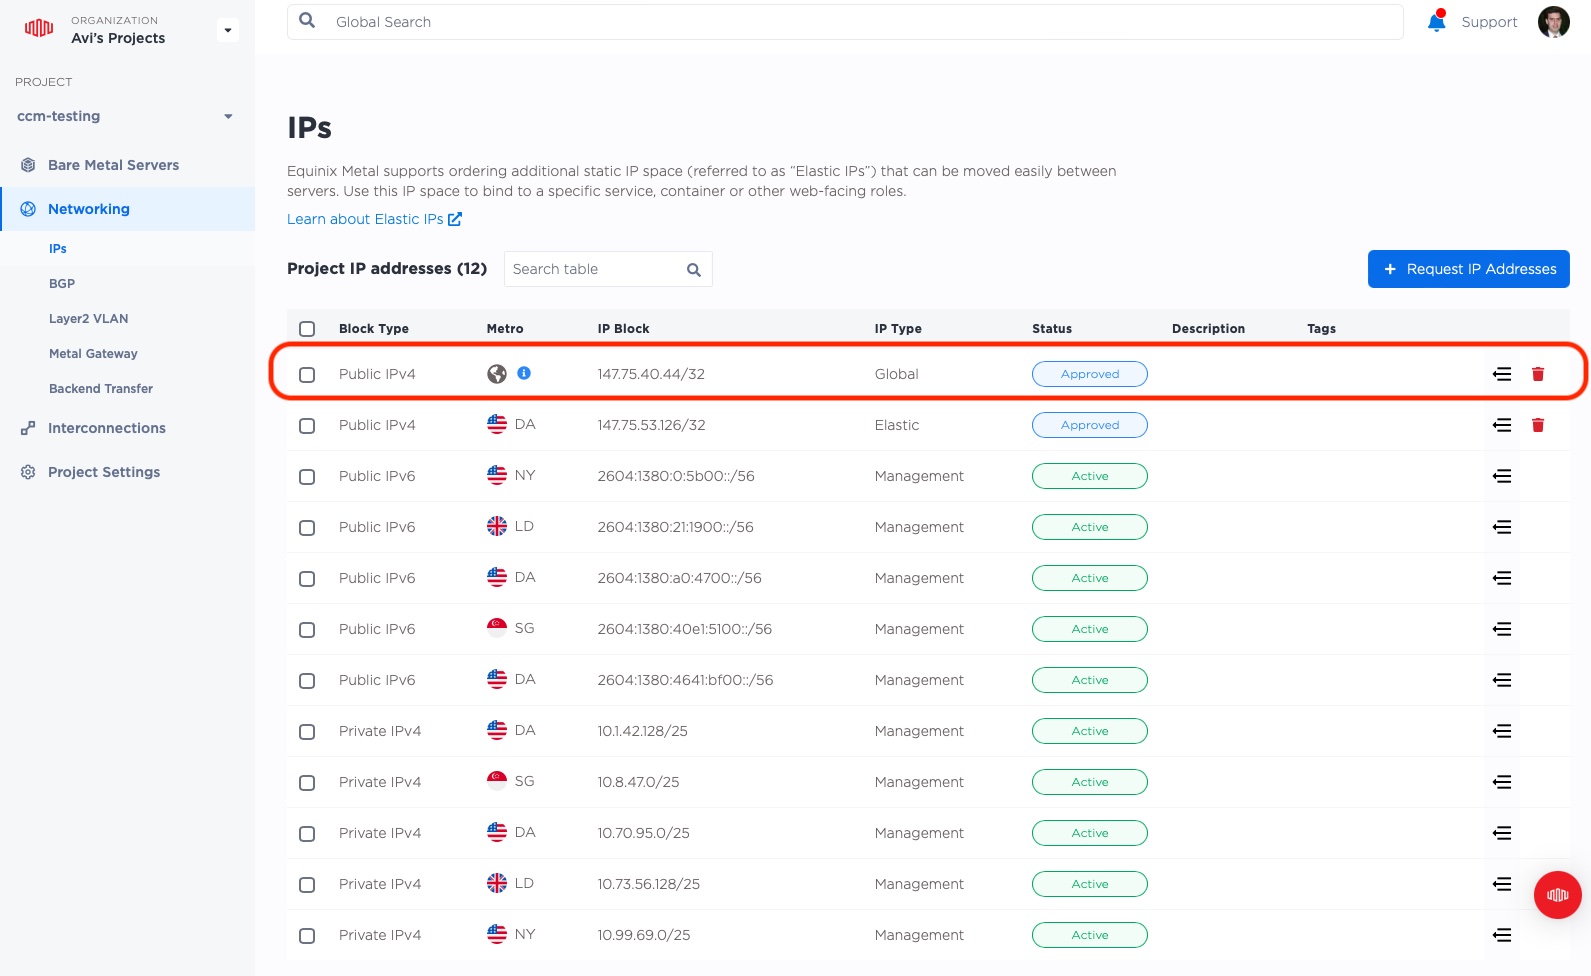
Our new global IP is 147.75.40.44.
4. Configure the servers to respond to the Global Elastic IP address
As with the metro-specific Public Elastic IP, in order for the servers to agree to process traffic for our Global Elastic IP, we need to inform them about the IP. We do this by adding the IP to the server's network interface.
On each server, we will add the Elastic IP to the loopback interface lo as an extra IP.
Be sure to replace the IP address with your elastic IP.
root@dallas:~# cat >> /etc/network/interfaces <<EOF

auto lo:0
iface lo:0 inet static
  address 147.75.40.44
  netmask 255.255.255.255
EOF
root@dallas:~# ifup lo:0
We can test that the server is handling the IP by trying to access our Web server:
root@dallas:~# curl 147.75.40.44
<!DOCTYPE html>
<html>
<head>
<title>Welcome to nginx!</title>
<style>
    body {
        width: 35em;
        margin: 0 auto;
        font-family: Tahoma, Verdana, Arial, sans-serif;
    }
</style>
</head>
<body>
<h1>Welcome to Dallas!</h1>
<p>I am in Dallas</p>

<p>For online documentation and support please refer to
<a href="http://nginx.org/">nginx.org</a>.<br/>
Commercial support is available at
<a href="http://nginx.com/">nginx.com</a>.</p>

<p><em>Thank you for using nginx.</em></p>
</body>
</html>
The content in the middle should tell you the server that you are on. In my above case, you can see it sas "Welcome to Dallas!" and "I am in Dallas".
Repeat on all of your servers.
5. Attach the Global Elastic IP to the servers
As with the metro-specific Elastic IP, we have two ways to assign the Global Elastic IP to a server:
- Equinix Metal API (via the Console)
- BGP
First we will do it via the Console.
Attach via the Console
When attaching the Global Elastic IP via the console, as with a regular metro Elastic IP, it only can be attached to one server at a time.
We will start by attaching it to London.
Head back to the Console, and select "Manage Servers".
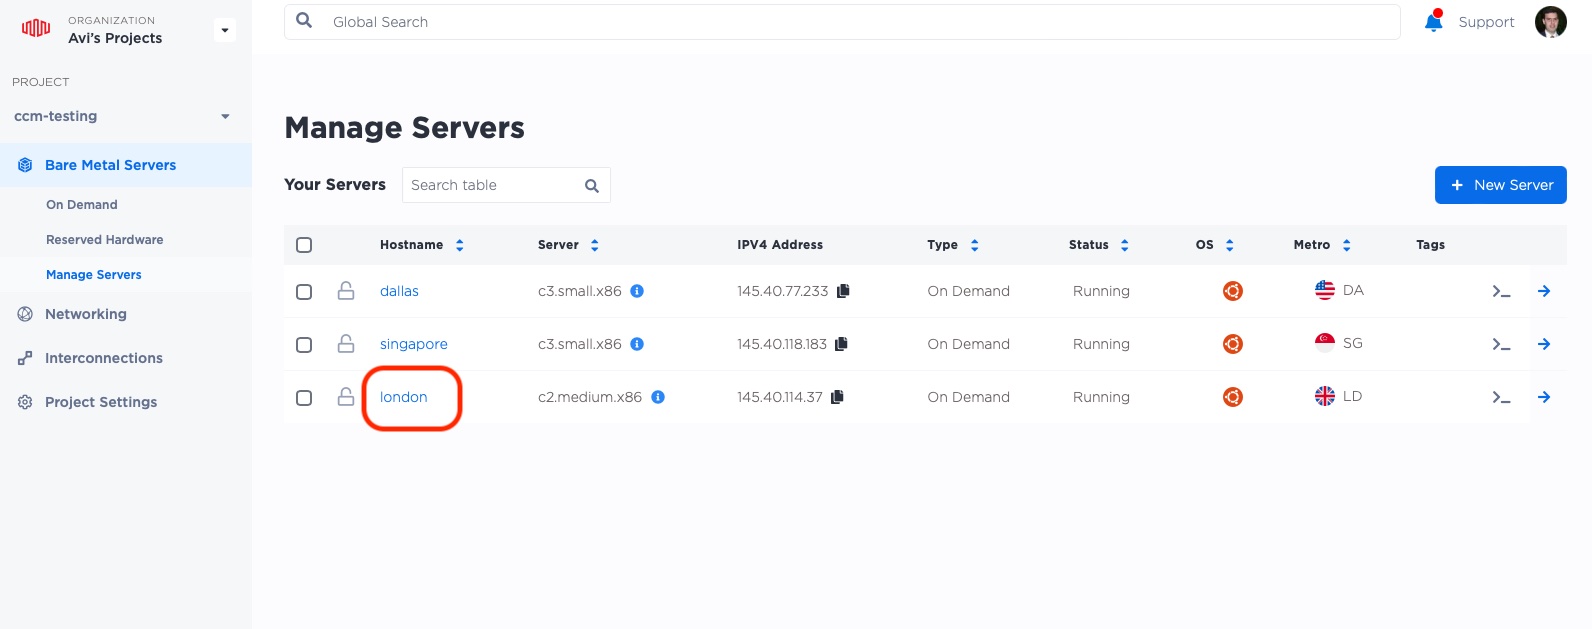
Then, click on the name of the server to which we want to attach the IP, in this case, "london".
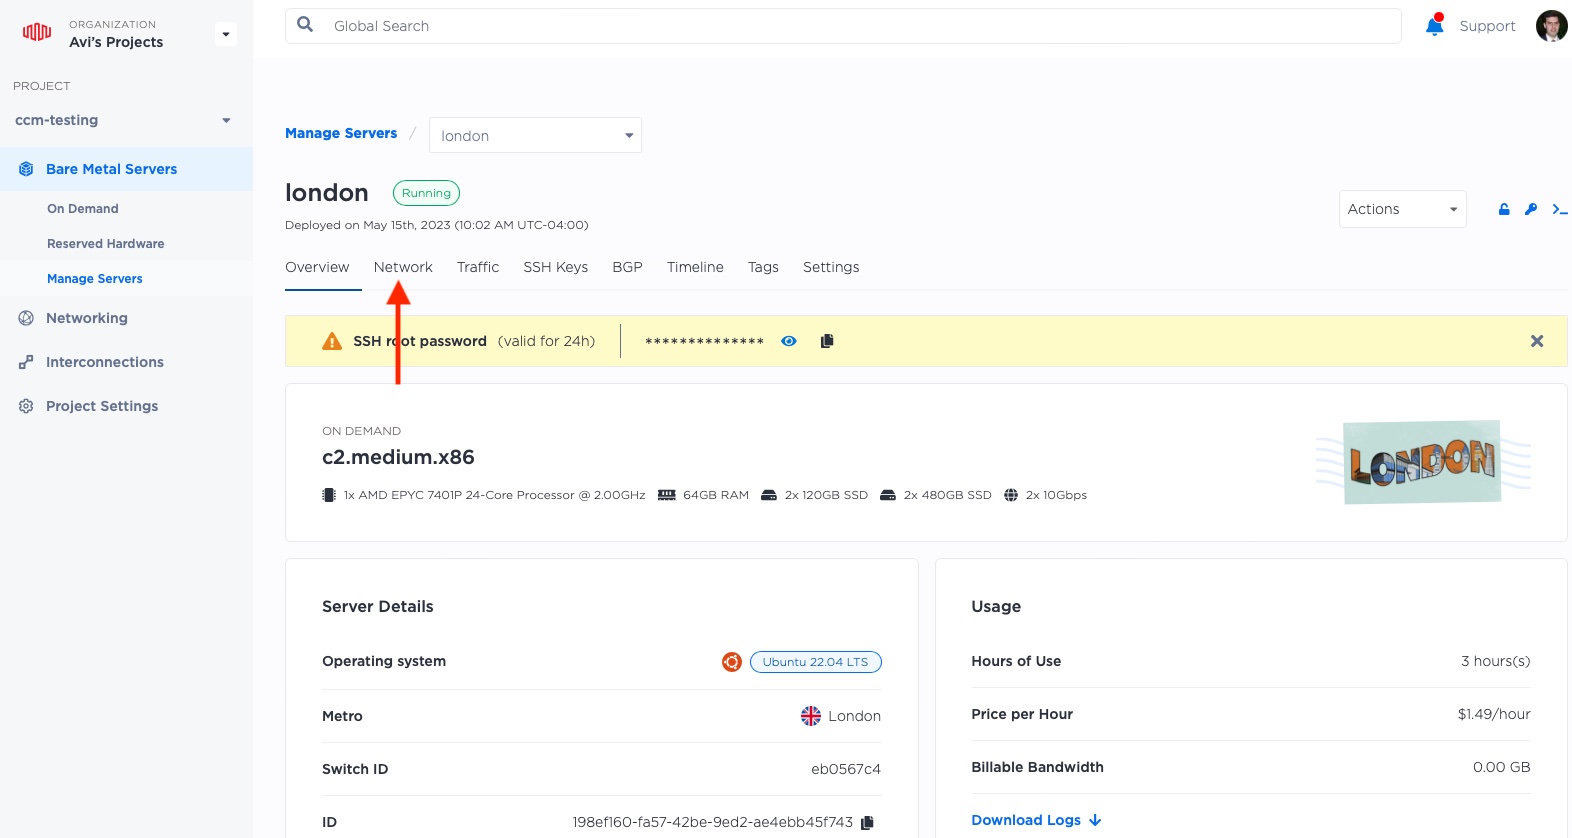
This brings up the main page for the server. IPs are managed under the "Network" tab.
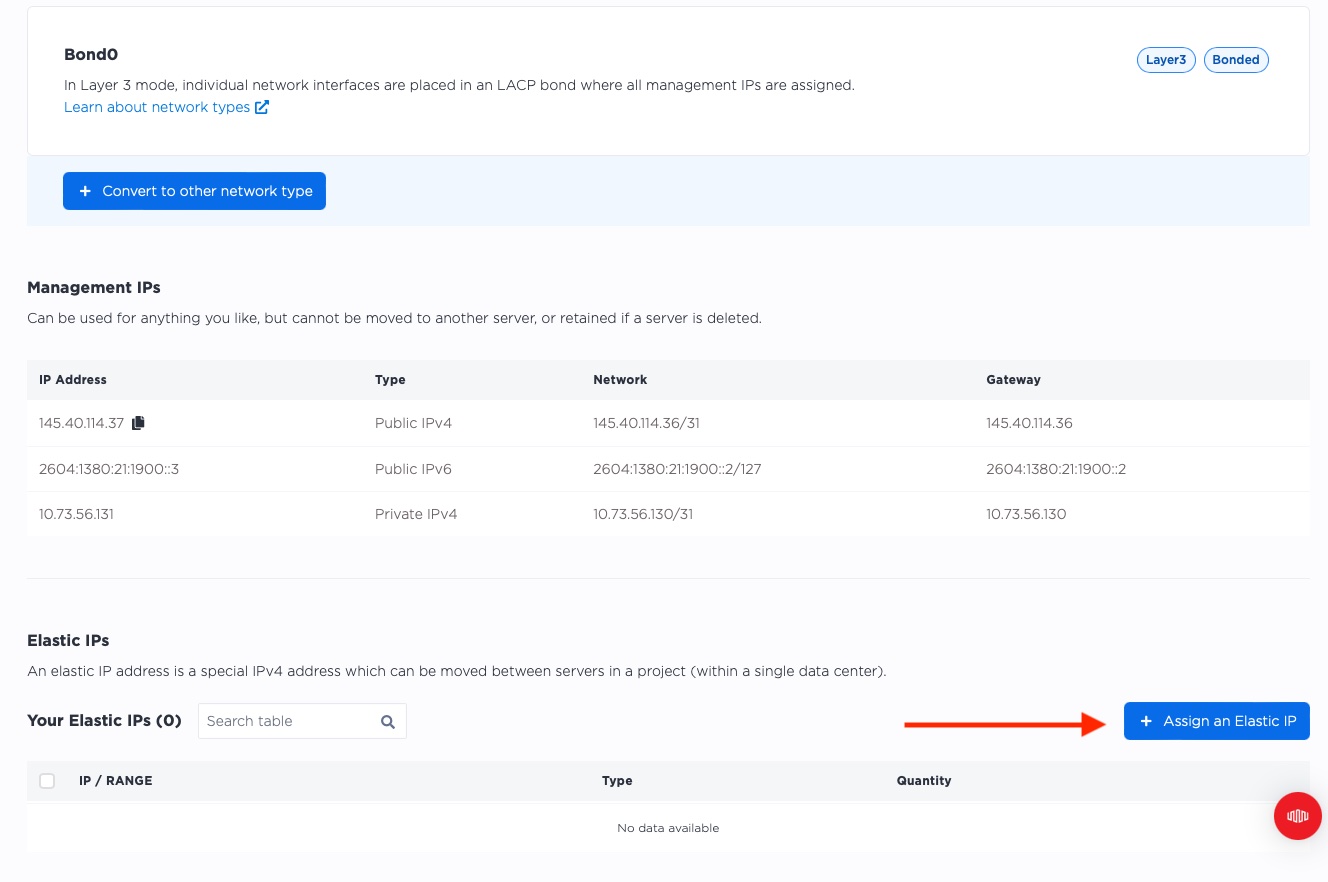
If you slide all the way to the bottom, you should see all of the Elastic IPs. Of course, as of now, the server has none. Click on "Assign an Elastic IP".
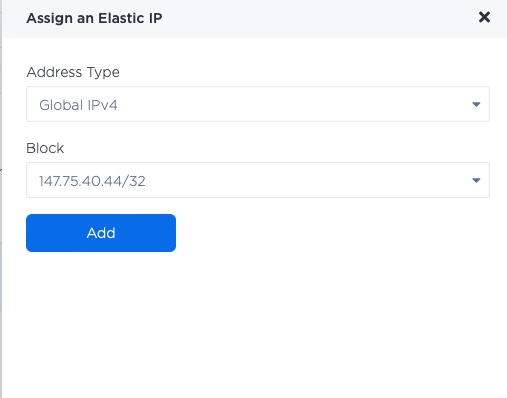
This brings up a bar that slides in from the right.
- For "Address Type" select "Global IPv4"
- For "Block" select the range we had from before; in my case, that is
147.75.40.44/32 - Click "Add"
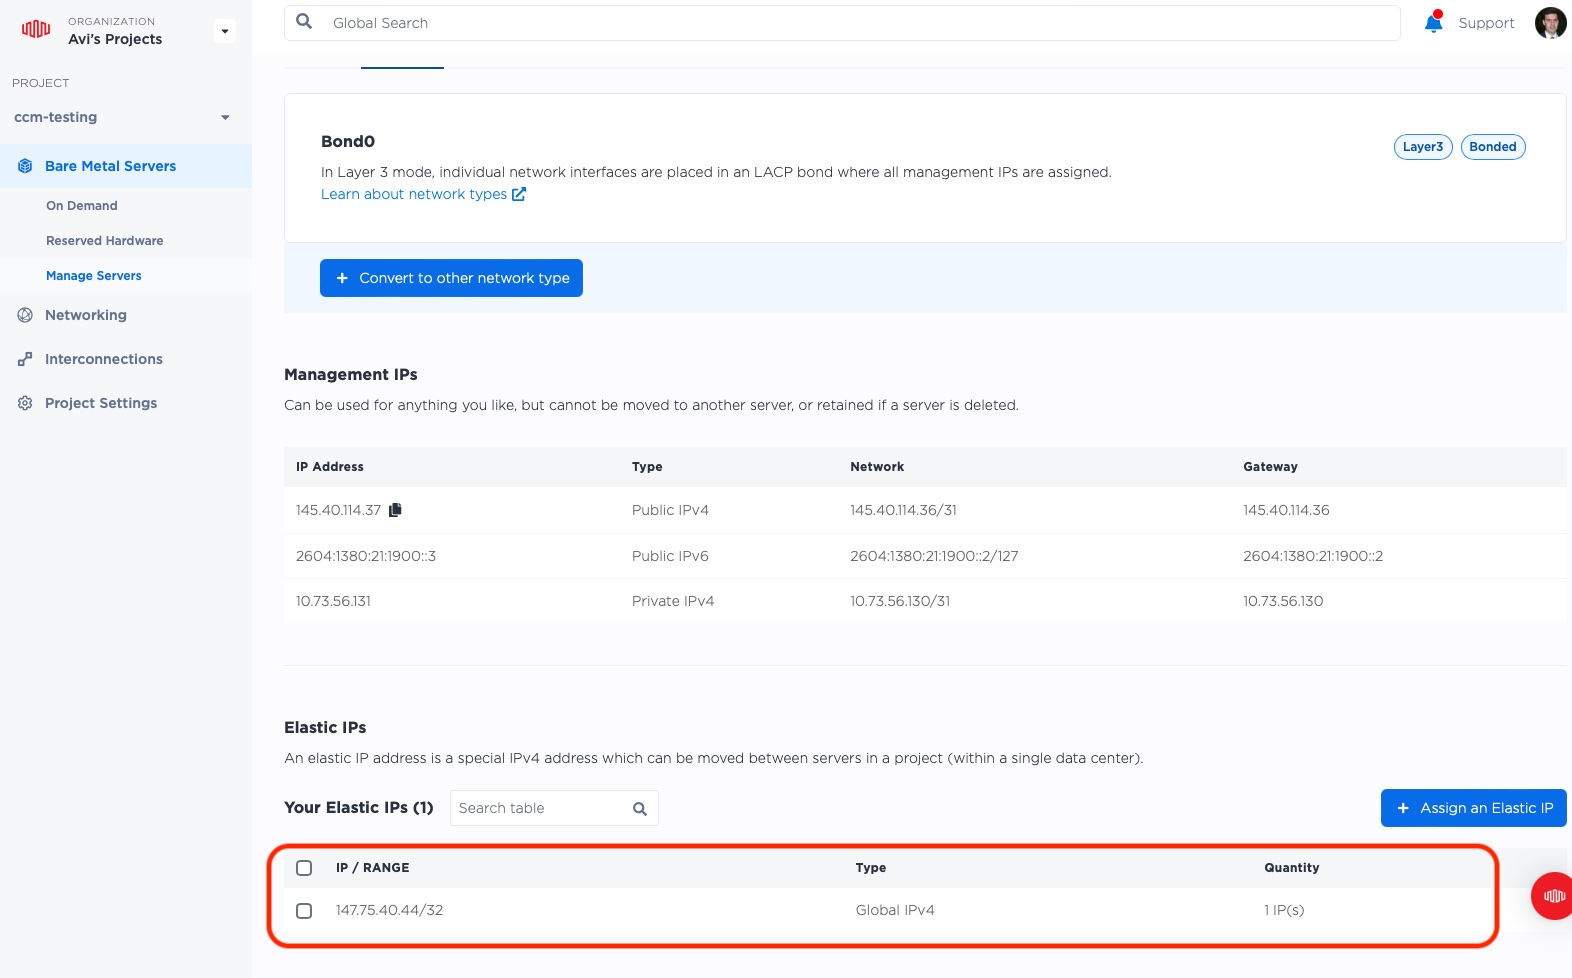
Now, you should see the IP assigned under the server's Elastic IPs:
Let's try it out! From your own laptop, let's access it:
$ curl 147.75.40.44
<!DOCTYPE html>
<html>
<head>
<title>Welcome to nginx!</title>
<style>
    body {
        width: 35em;
        margin: 0 auto;
        font-family: Tahoma, Verdana, Arial, sans-serif;
    }
</style>
</head>
<body>
<h1>Welcome to London!</h1>
<p>I am in London</p>

<p>For online documentation and support please refer to
<a href="http://nginx.org/">nginx.org</a>.<br/>
Commercial support is available at
<a href="http://nginx.com/">nginx.com</a>.</p>

<p><em>Thank you for using nginx.</em></p>
</body>
</html>
It worked!
We love London, lovely city with lots of amazing history, but sometimes we want to see the world. Let's take our Global IP from London and send it to Singapore.
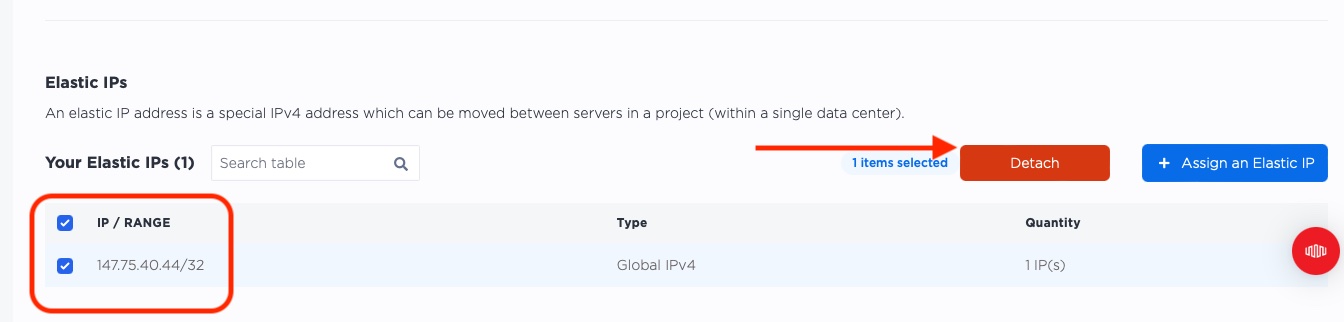
First, select the IP from within London, and then click "Detach".
Next, just like when we assigned the IP to our "london" server, head back to "Manage Servers", select the "Network" tab, "Assign an Elastic IP":
As before:
- For "Address Type" select "Global IPv4"
- For "Block" select the range we had from before; in my case, that is
147.75.40.44/32 - Click "Add"
Now let's try accessing it again from our laptop:
$ curl 147.75.40.44
<!DOCTYPE html>
<html>
<head>
<title>Welcome to nginx!</title>
<style>
    body {
        width: 35em;
        margin: 0 auto;
        font-family: Tahoma, Verdana, Arial, sans-serif;
    }
</style>
</head>
<body>
<h1>Welcome to Singapore!</h1>
<p>I am in Singapore</p>

<p>For online documentation and support please refer to
<a href="http://nginx.org/">nginx.org</a>.<br/>
Commercial support is available at
<a href="http://nginx.com/">nginx.com</a>.</p>

<p><em>Thank you for using nginx.</em></p>
</body>
</html>
That was quick! In a few minutes, our IP traveled from London to Singapore. If only we could get our planes (or Hyperloop) to move that quickly!
We are done with assigning via the Equinix Metal API. Before we finish, though, head back tp the Console, and be sure to detach the Elastic IP from "singapore".
Announce via BGP
As with our metro-specific Elastic IP, using BGP for announcing our Global Elastic IP has lots of advantages.
- the servers announce the routes they can handle autonomously
- the route updates are very quick
- multiple servers can handle the same IP in parallel.
For more details on BGP, read our guide to Elastic IPs with BGP and the links from there.
Fortunately, the process is pretty much the same. In order to use BGP, we need to:
- Enable BGP on the Equinix Metal project, if it was not already done.
- Enable BGP on each server in the Equinix Metal project.
- Configure BGP on each server to announce the routes.
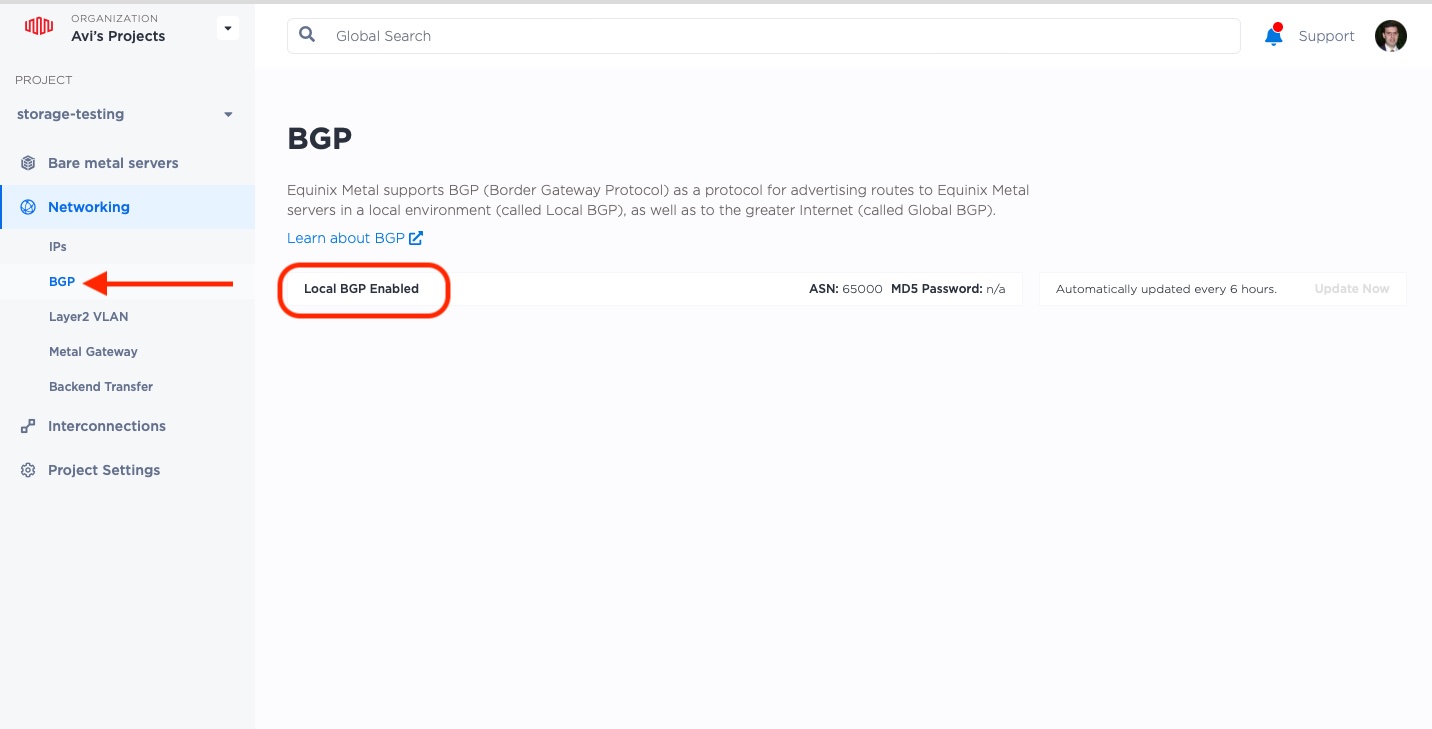
To enable BGP on your project, select "Networking" -> "BGP" from the left-hand menu, then enable BGP. Once it is set, you will see "Local BGP Enabled".
Next, for each server, select the server, and then select the "BGP" tab at the top.
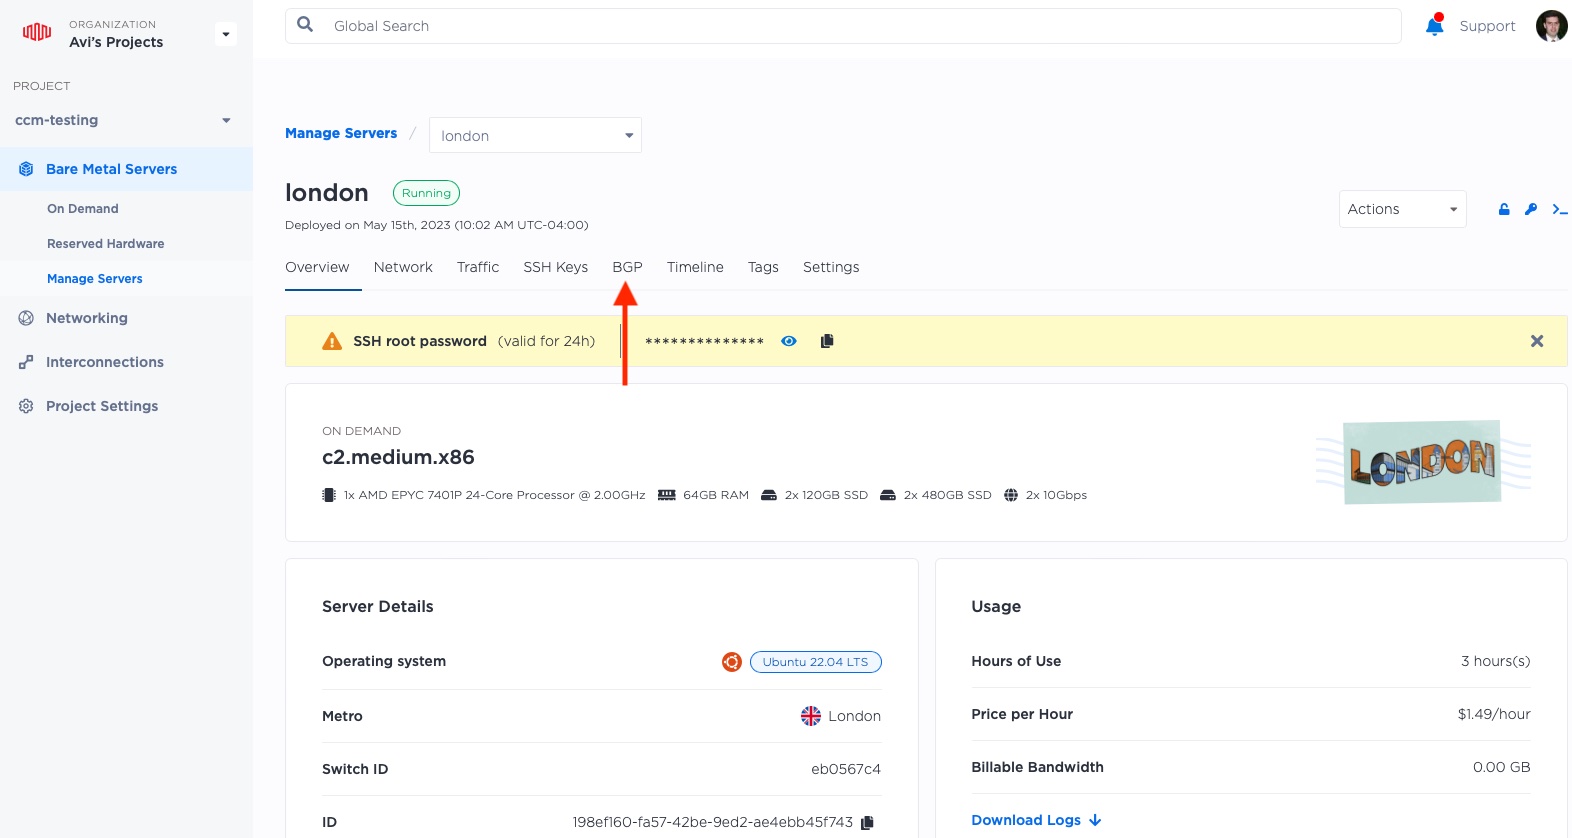
Select the blue arrow on the right on the "IPV4" row:
![]()
Now use the knob to enable BGP:
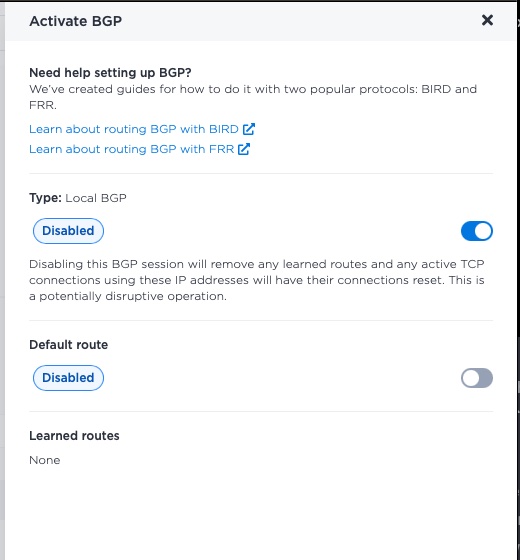
It can take up to 10 minutes for BGP to be enabled on the server. In the meantime, repeat with your other servers.
When they are ready, the status moves from "Unknown" to "Down".
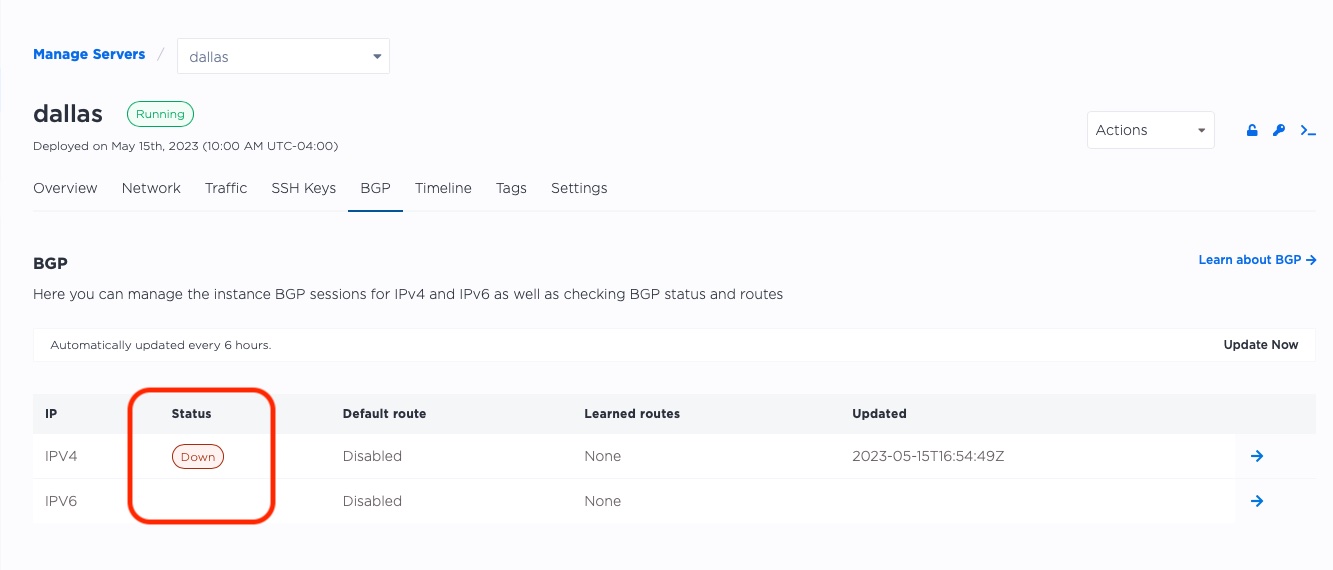
It is "Down", because it is ready, but has not received any communications from the servers. That is our next task.
Finally, we configure BGP on our servers, telling it to announce the Elastic IP address.
We will use bird, which we installed earlier along with nginx,
to announce our routes. This means that the bird software on each server will "announce", or report
which IPs it can handle, to the Equinix Metal routing infrastructure.
Configuring bird can be a bit trickier. We need the following for each server:
- The elastic IP address we gathered earlier. This is shared across all of the servers. In our example, that is
147.75.40.44, but it will be different for you. - The local private IP for each server. We are going to get that from Metal metadata.
- The IPs of our upstream BGP peers. We are going to get that from Metal metadata.
- The ASN of our upstream BGP peers. We are going to get that from Metal metadata.
- The IP of our upstream router.
- The interface we will use. In all of our examples, we are going to use
bond0.
On each server, do the following:
- ssh to the server.
- Get the information from the metadata with the following command:
curl https://metadata.platformequinix.com/metadata | jq '.bgp_neighbors[0] | { customer_ip: .customer_ip, customer_as: .customer_as, multihop: .multihop, peer_ips: .peer_ips, peer_as: .peer_as }' - Create the bird configuration file.
- Restart bird.
We already added the Elastic IP to the lo loopback interface earlier, so bird should just pick it
up, if we configure it correctly (which we will, of course).
Let's start with "dallas":
root@dallas:~# curl -s https://metadata.platformequinix.com/metadata | jq '.bgp_neighbors[0] | { customer_ip: .customer_ip, customer_as: .customer_as, multihop: .multihop, peer_ips: .peer_ips, peer_as: .peer_as }'
{
  "customer_ip": "10.70.95.3",
  "customer_as": 65000,
  "multihop": true,
  "peer_ips": [
    "169.254.255.1",
    "169.254.255.2"
  ],
  "peer_as": 65530
}
Our upstream peers are at 169.254.255.1 and 169.254.255.2, our customer IP, or the expected
private IP, is 10.70.95.3, and our peer ASN is 65530.
Equinix Metal actually uses both the peer ASN and the upstream peer IPs as pretty much the same across its entire plant, but you should not rely upon it. Instead, use the metadata as we did above.
The only missing pieces is our upstream router IP, which we can get via ip route list 10.0.0.0/8:
root@dallas:~# ip route list 10.0.0.0/8
10.0.0.0/8 via 10.70.95.2 dev bond0
So in this case, our upstream router IP is 10.70.95.2.
Next, we need to create the bird configuration file /etc/bird/bird.conf. Chances are pretty good that a default one was installed,
so we will replace it with this one. We put comments in to show where we placed our own information.
10.0.0.0/8 via 10.70.95.2 dev bond0
root@dallas:~# vi /etc/bird/bird.conf
root@dallas:~# cat /etc/bird/bird.conf
filter metal_bgp {
if net = 147.75.40.44/32 then accept;  # Elastic IP
}

router id 10.70.95.3;   # Local private IP
protocol direct {
interface "lo";
}

protocol kernel {
persist;
scan time 20;
import all;
export all;
}

protocol device {
scan time 10;
}

protocol static {
  route 169.254.255.1/32 via 10.70.95.2; # Upstream router IP
  route 169.254.255.2/32 via 10.70.95.2; # Upstream router IP
}

protocol bgp neighbor_v4_1 {
  export filter metal_bgp;
  local as 65000;   # Our ASN
  multihop;
  neighbor 169.254.255.1 as 65530; # Upstream peer IP and ASN
}

protocol bgp neighbor_v4_2 {
  export filter metal_bgp;
  local as 65000;  # Our ASN
  multihop;
  neighbor 169.254.255.2 as 65530; # Upstream peer IP and ASN
}
To make your life easier, you can use this template, with fields to be filled in marked in ALL CAPS:
filter metal_bgp {
if net = ELASTICIP/32 then accept;  # Elastic IP
}

router id PRIVATEIP;   # Local private IP
protocol direct {
interface "lo";
}

protocol kernel {
persist;
scan time 20;
import all;
export all;
}

protocol device {
scan time 10;
}

protocol static {
  route PEERIP1/32 via ROUTERIP; # Upstream router IP
  route PEERIP2/32 via ROUTERIP; # Upstream router IP
}

protocol bgp neighbor_v4_1 {
  export filter metal_bgp;
  local as 65000;   # Our ASN
  multihop;
  neighbor PEERIP1 as 65530; # Upstream peer IP and ASN
}

protocol bgp neighbor_v4_2 {
  export filter metal_bgp;
  local as 65000;  # Our ASN
  multihop;
  neighbor PEERIP2 as 65530; # Upstream peer IP and ASN
}
Now restart bird:
root@dallas:~# systemctl restart bird
bird should be working now and connected to the upstream BGP peers. You can check by asking it with birdc. If it is working, the
connection should be "Established".
root@dallas:~# birdc show protocol neighbor_v4_1
BIRD 1.6.8 ready.
name     proto    table    state  since       info
neighbor_v4_1 BGP      master   up     17:06:25    Established
root@dallas:~# birdc show protocol neighbor_v4_2
BIRD 1.6.8 ready.
name     proto    table    state  since       info
neighbor_v4_2 BGP      master   up     17:06:25    Established
Looks like "dallas" is ready to rock and BGP!
Repeat on the other 2 servers.
Test it Out!
Now we have:
- One Global Elastic IP,
- Not assigned to any one server by Equinix Metal API,
- With all three of our servers worldwide announcing it via BGP.
Let's try to reach it from the outside world.
➜  ~ curl 147.75.40.44
<!DOCTYPE html>
<html>
<head>
<title>Welcome to nginx!</title>
<style>
    body {
        width: 35em;
        margin: 0 auto;
        font-family: Tahoma, Verdana, Arial, sans-serif;
    }
</style>
</head>
<body>
<h1>Welcome to London!</h1>
<p>I am in London</p>

<p>For online documentation and support please refer to
<a href="http://nginx.org/">nginx.org</a>.<br/>
Commercial support is available at
<a href="http://nginx.com/">nginx.com</a>.</p>

<p><em>Thank you for using nginx.</em></p>
</body>
</html>
"Hello?"
"Hello, this is London answering."
That isn't too surprising; I tried it from Israel, where I am closest to London.
Let's try it from a server sitting in Ashburn, VA:
$ curl 147.75.40.44
<!DOCTYPE html>
<html>
<head>
<title>Welcome to nginx!</title>
<style>
    body {
        width: 35em;
        margin: 0 auto;
        font-family: Tahoma, Verdana, Arial, sans-serif;
    }
</style>
</head>
<body>
<h1>Welcome to Dallas!</h1>
<p>I am in Dallas</p>

<p>For online documentation and support please refer to
<a href="http://nginx.org/">nginx.org</a>.<br/>
Commercial support is available at
<a href="http://nginx.com/">nginx.com</a>.</p>

<p><em>Thank you for using nginx.</em></p>
</body>
</html>
$ curl http://145.40.77.88
<!DOCTYPE html>
<html>
<head>
<title>Welcome to nginx!</title>
<style>
    body {
        width: 35em;
        margin: 0 auto;
        font-family: Tahoma, Verdana, Arial, sans-serif;
    }
</style>
</head>
<body>
<h1>Welcome to nginx!</h1>
<p>I am server 01</p>

<p>For online documentation and support please refer to
<a href="http://nginx.org/">nginx.org</a>.<br/>
Commercial support is available at
<a href="http://nginx.com/">nginx.com</a>.</p>

<p><em>Thank you for using nginx.</em></p>
</body>
</html>
"Dallas is awake and ready!"
Success!
Last updated
05 July, 2024Category
Tagged
QuickstartYou may also like
Digger deeper into similar topics in our archives
Configuring BGP with BIRD 1.6 on an Equinix Metal Server
Set up BGP on your Equinix Metal server using BIRD 1.6, covering IP configuration, installation, and neighbor setup to ensure robust routing capabilities between your server and the Equinix...

Configuring BGP with FRR on an Equinix Metal Server
Establish a robust BGP configuration on your Equinix Metal server using FRR, including setting up network interfaces, installing and configuring FRR software, and ensuring secure and efficie...

Crosscloud VPN with Wireguard
Learn to establish secure VPN connections across cloud environments using WireGuard, including detailed setups for site-to-site tunnels and VPN gateways with NAT on Equinix Metal, enhancing...

Deploy Your First Server
Learn the essentials of deploying your first server with Equinix Metal. Set up your project & SSH keys, provision a server and connect it to the internet.

Ready to kick the tires?
Use code DEPLOYNOW for $300 credit