- Home /
- Resources /
- Learning center /
- How to Get Resilie...
How to Get Resiliency For Your Servers?
A hands-on implementation for redundancy of your servers on Equinix Metal.

On this page
How do we get resiliency for servers?
In our introduction to resiliency, we discussed the importance of resiliency in the face of failure. We distinguished between providing resiliency for your processes running on your servers and your critical data itself.
In this guide, we will walk you through a hands-on implementation for redundancy of your servers on Equinix Metal.
Our software will be a standard case of Web servers, using the highly popular nginx. We will deploy three servers. We will acquire a unique Elastic IP from Equinix Metal to direct traffic to the different servers. And we will use BGP to route the traffic.
We will do this in several stages:
- Deploy servers
- Request an Elastic IP
- Enable BGP on our project and servers
- Install software on our servers
- Configure nginx
- Configure BGP
- Test our setup
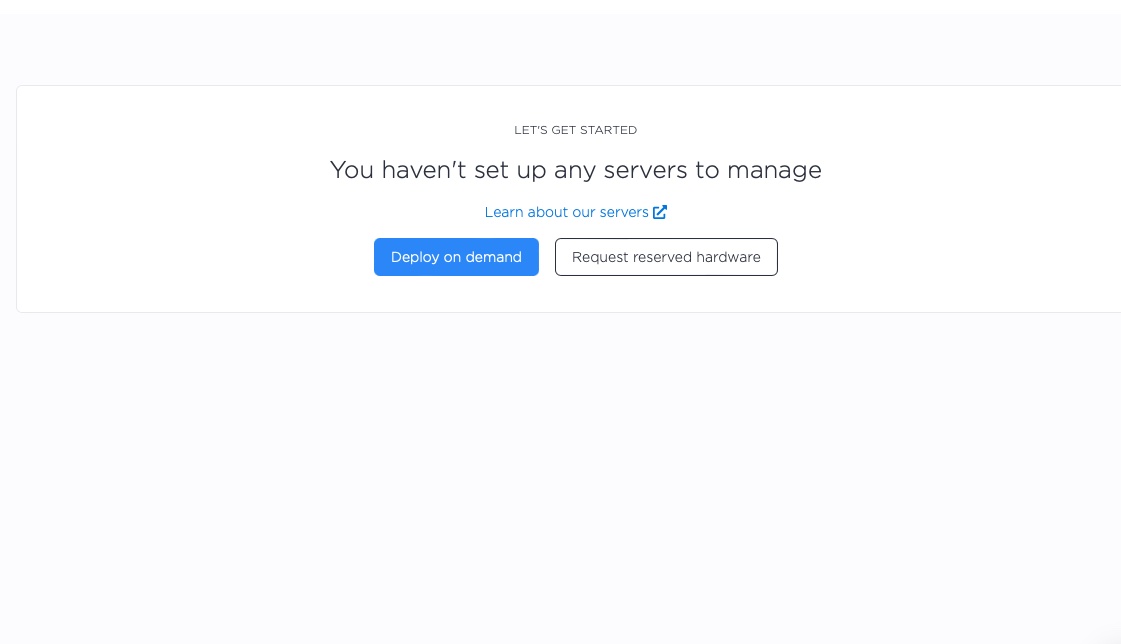
1. Deploy servers
Let's start by setting up three servers. You can do this via the Equinix Metal Console, the CLI, Terraform, or any tool that interacts with the Equinix Metal API.
We will use the Equinix Metal Console for this example. For a basic getting started guide to deploying your first server, see Deploy Your First Server.
We are deploying to Dallas, using our c3.small.x86, but of course, you can deploy whichever server types to whichever region suits your purposes.
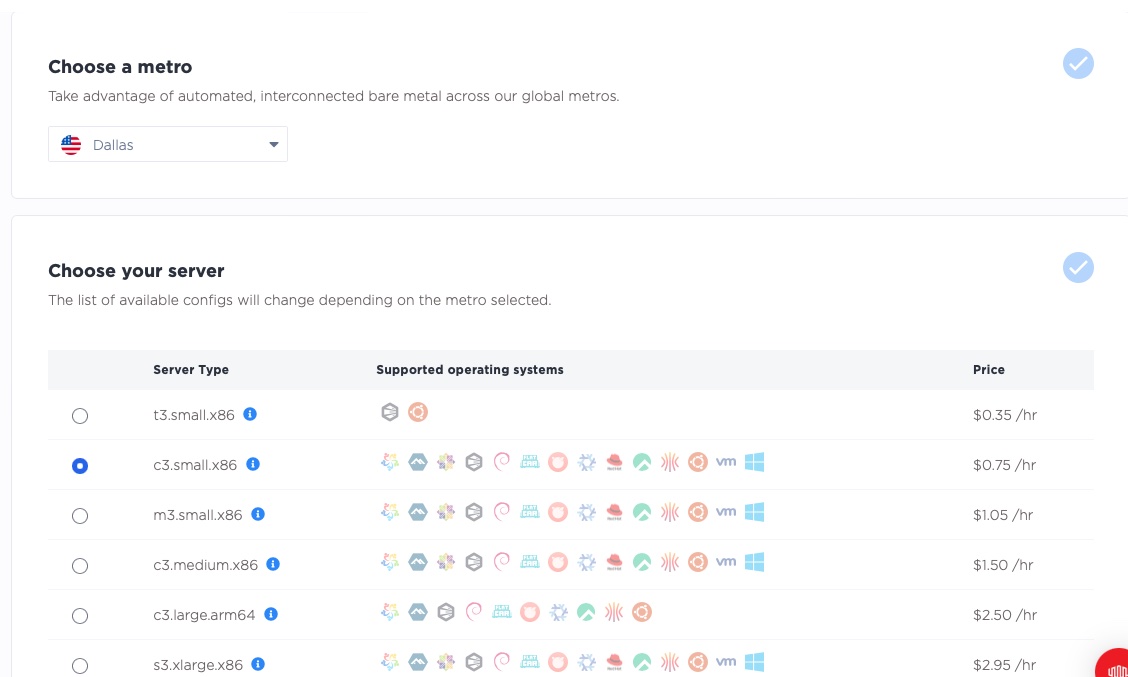
Next, we select our operating system, Ubuntu 22.04, which is widely accepted in the cloud and easy to use. Pick whichever operating system you prefer. As described above, we deploy 3 servers.

And we click "Deploy Now".
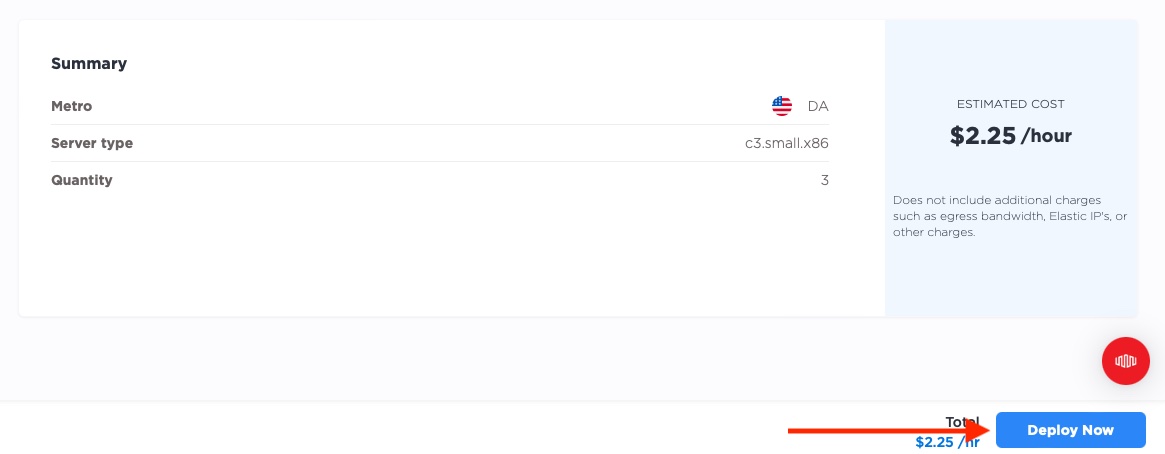
Now we wait for the servers to be ready. This can take a few minutes.
2. Request an Elastic IP
Now that we have our servers, we need to get our Elastic IP set up. We will use this Elastic IP to direct traffic to our servers.
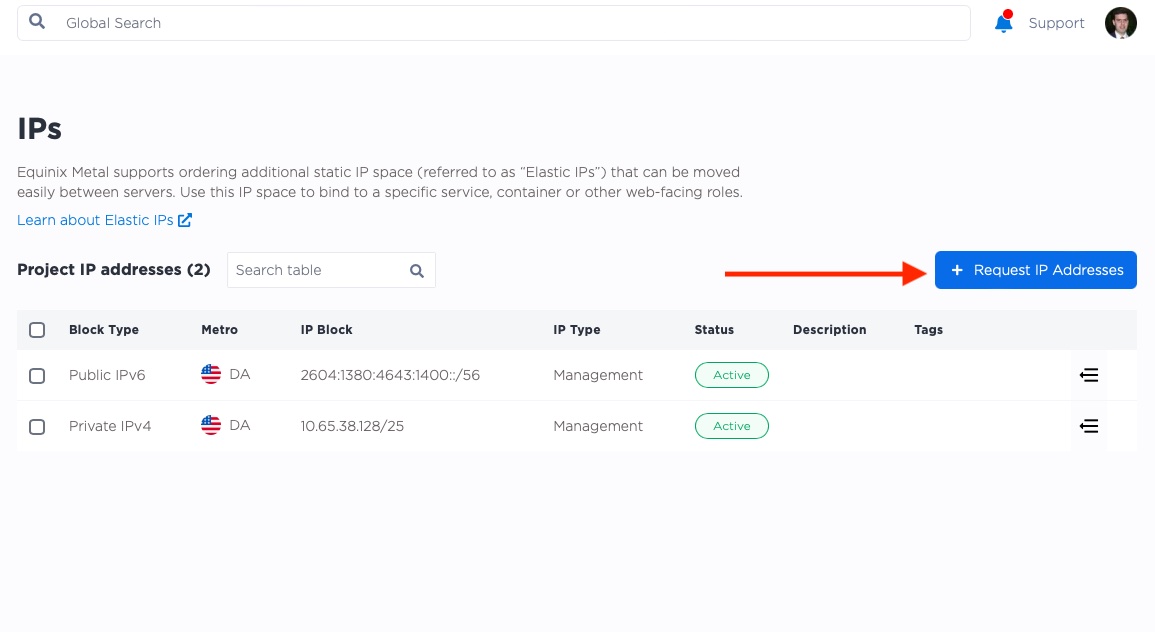
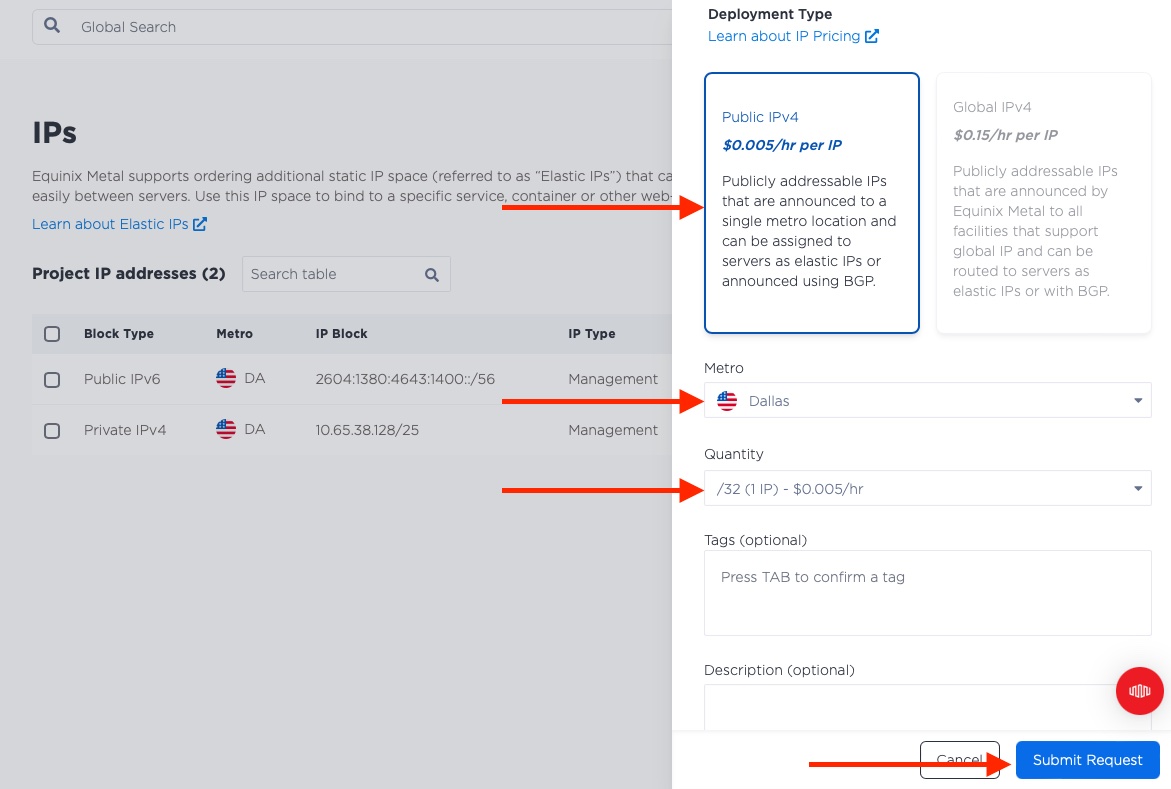
We are requesting a single /32 Public IP in the same region as our servers, in this case, Dallas. Then select "Submit Request".
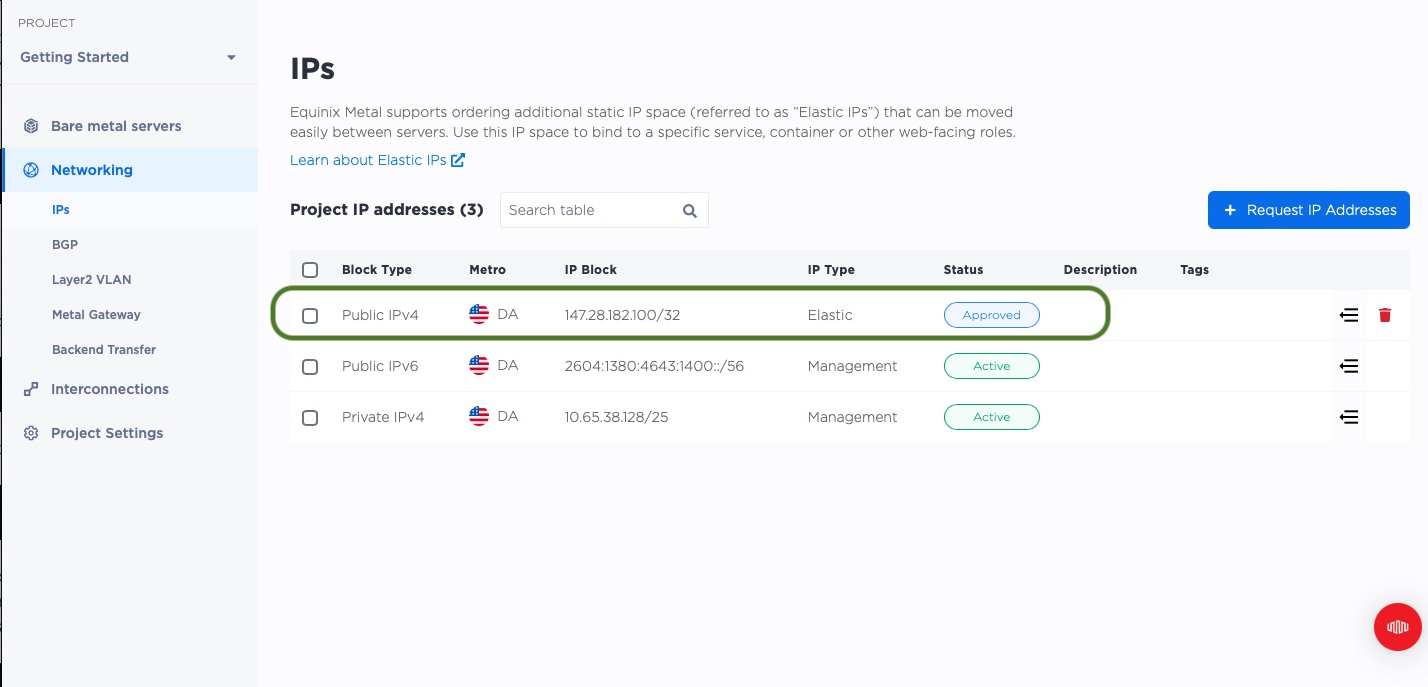
Once the Elastic IP is ready, we will see it in our list of IPs.
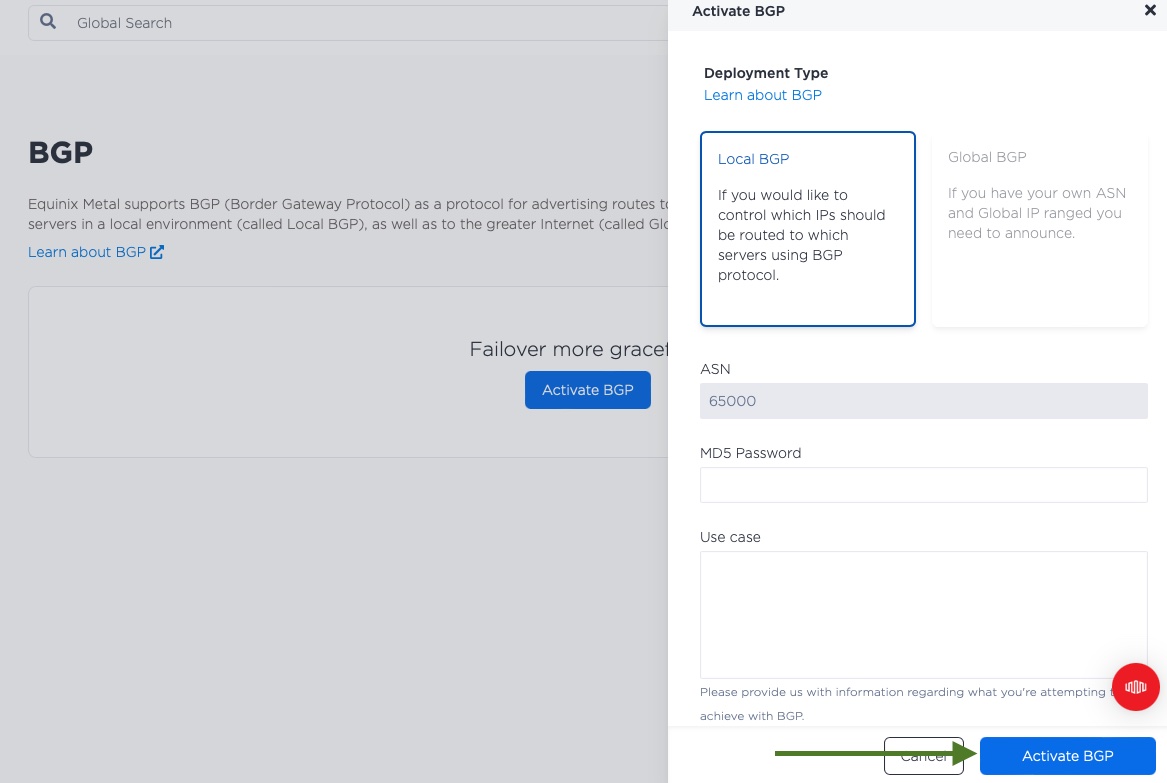
3. Enable BGP on our project and servers
You need to ensure that BGP is enabled, both for your project and for your servers.
Go to your project's main page, select "Networking" -> "BGP" from the left-hand-side menu. Then click "Activate BGP".
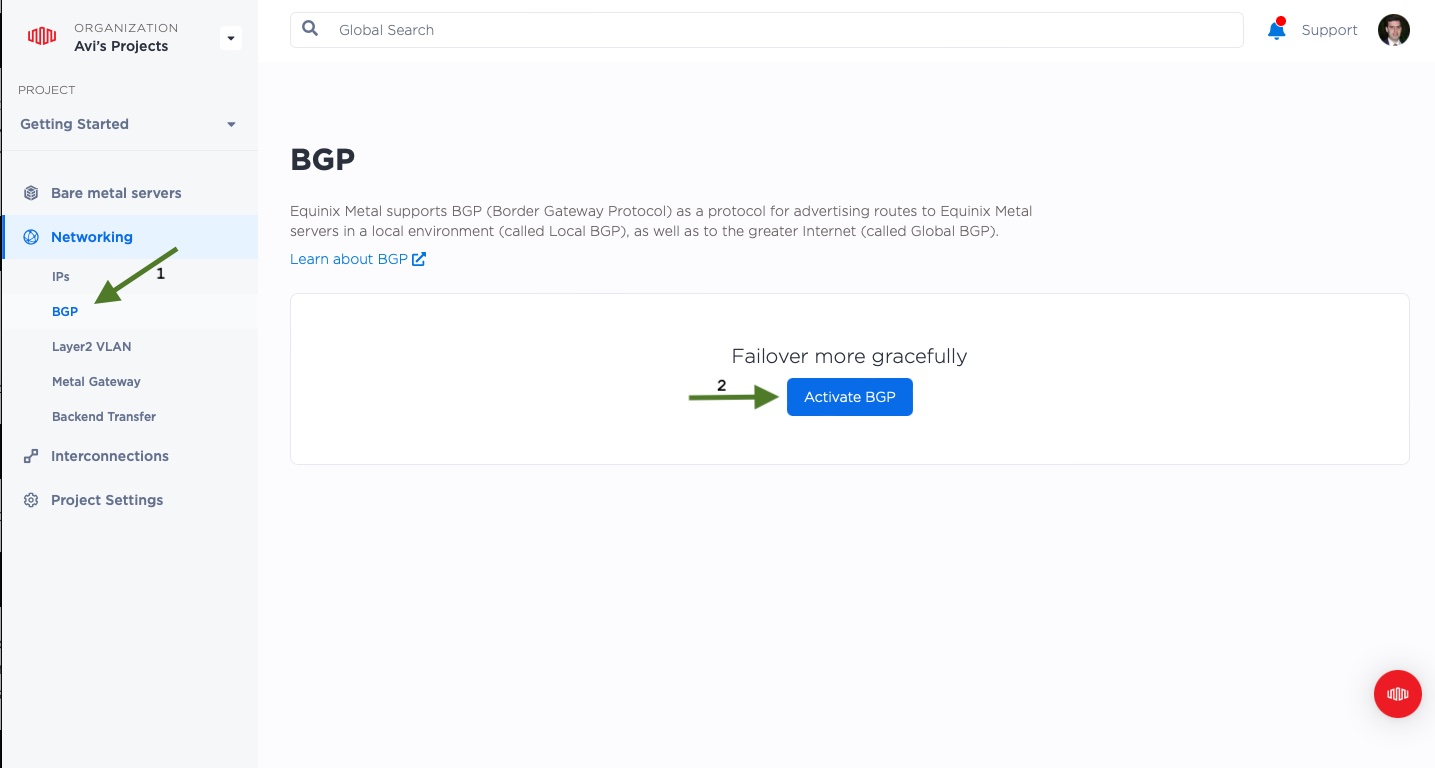
We accept the default of "Local BGP" and click "Activate BGP".
Now that our project supports BGP, let's head over to each server and enable it.
Go back to "Manage Servers", and click on one of the servers, to get to the server details page. From there, select the "BGP" tag.
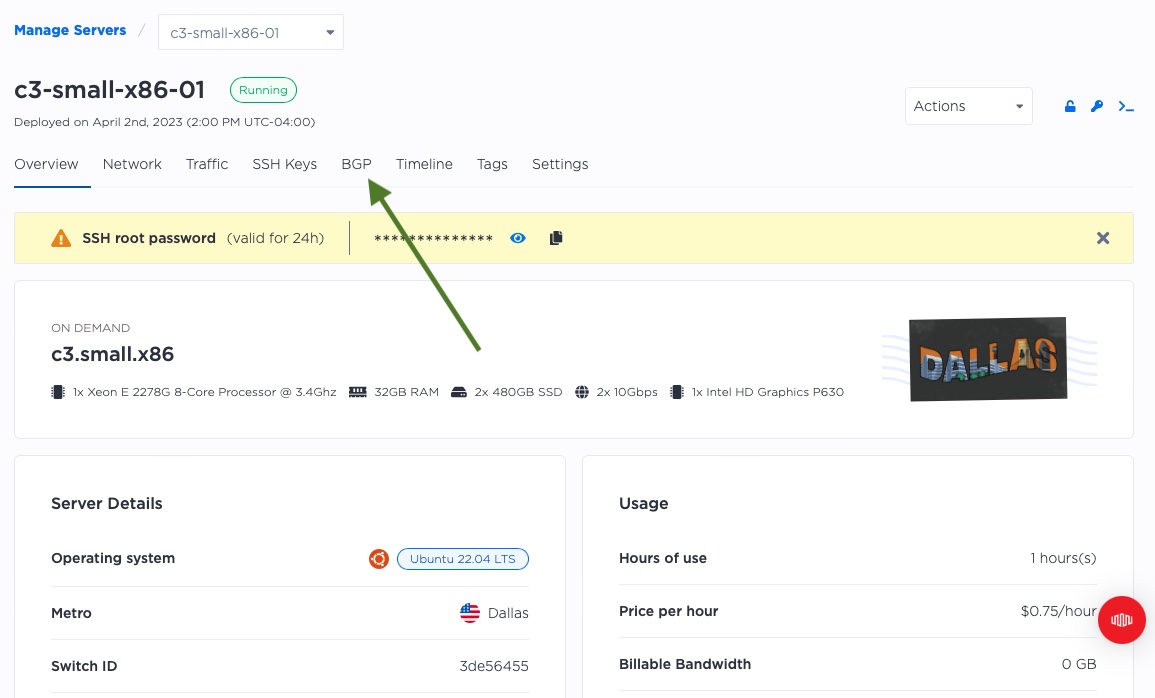
You should see two options, one each for IPv4 and IPv6. We will be enabling just IPv4 for this example. Click the arrow all the way on the right.
![]()
Now you can enable BGP for this server with the toggle. There is no need to enable the default route.
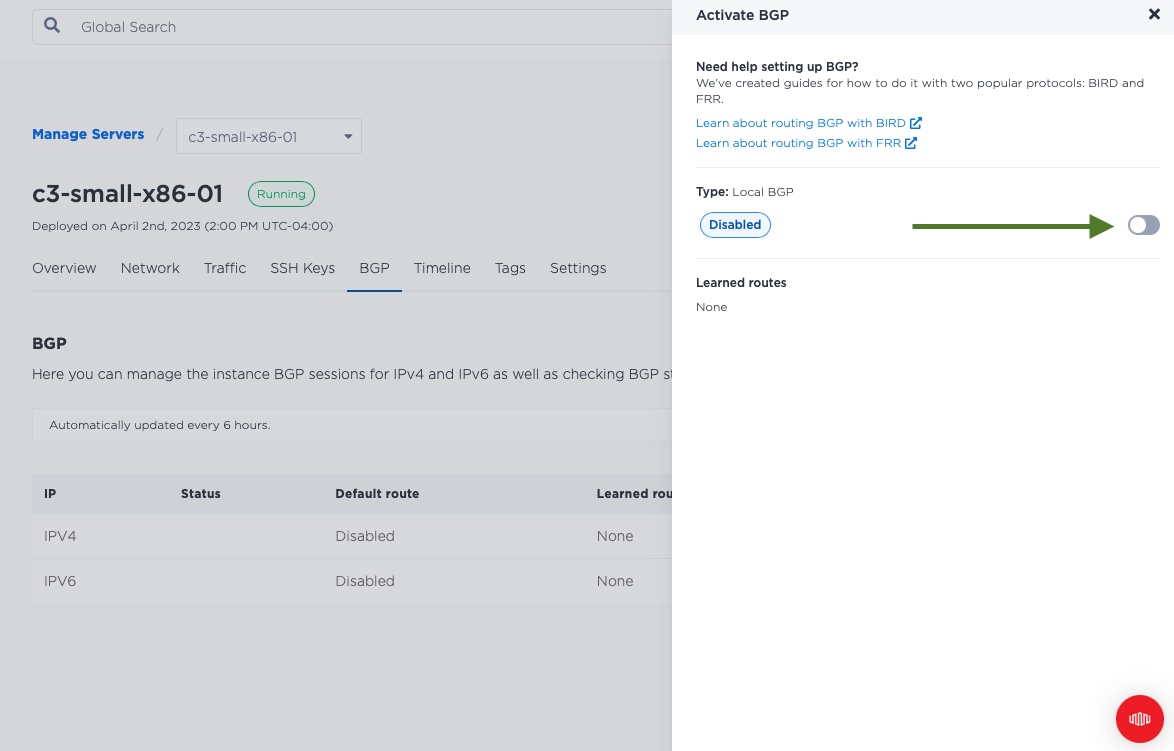
Repeat the process for your other servers.
4. Install software on our servers
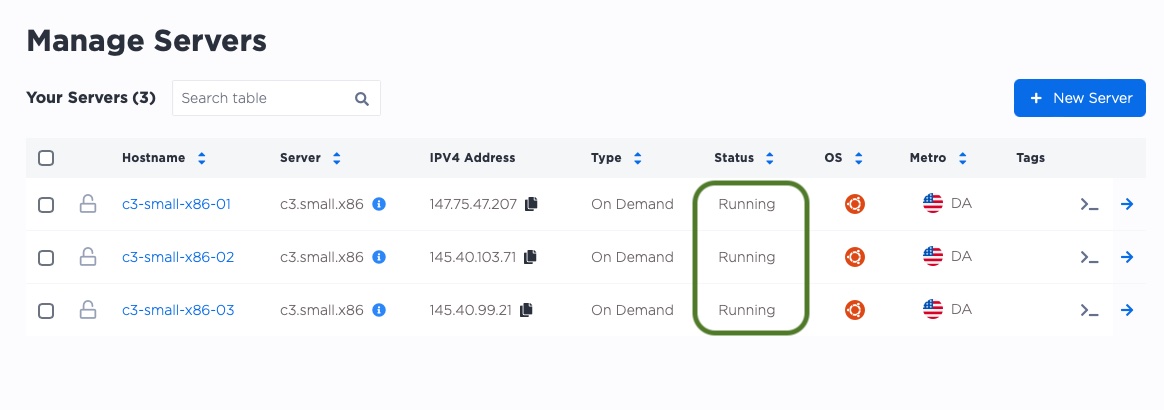
Let's navigate back to our main manage servers page. We can see that each server was given a public IP by Equinix Metal. We will use those IPs as management IPs, to ssh into the server and set it up.
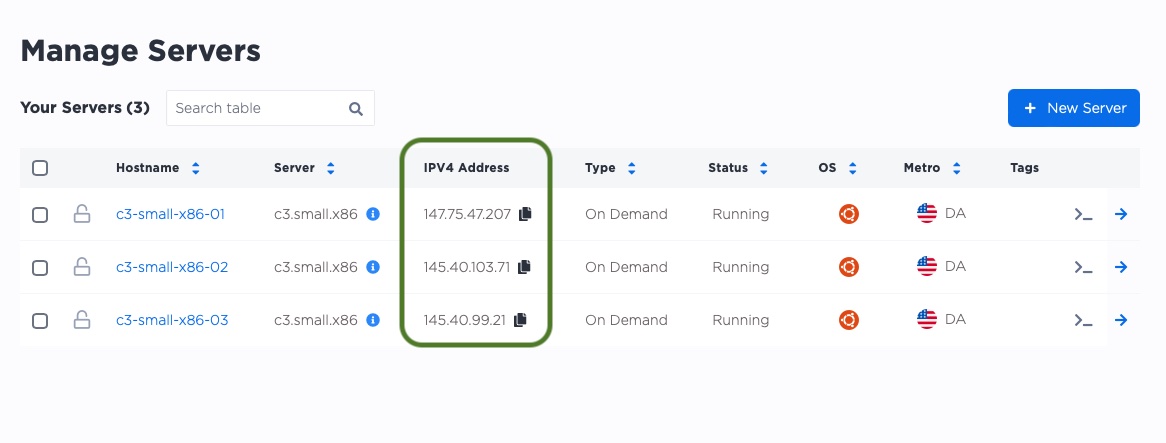
In the above example, the IPs are:
-
147.75.47.207 -
145.40.103.71 -
145.40.99.21
In your project, these IP addresses are likely different, so be sure to change them as you follow the examples.
On each of the servers, we will do the following.
- ssh to the server
- update the package manager
- install the software we need, specifically
birdfor BGP andnginxfor the Web server, as well as some other utilities
Let's ssh to the first server.
$ ssh root@147.75.47.207
The authenticity of host '147.75.47.207 (147.75.47.207)' can't be established.
ED25519 key fingerprint is SHA256:Py0QPcOILL7Ijb6ksgJs8RPThSl0k6hM5EUUzZTeLZk.
This key is not known by any other names
Are you sure you want to continue connecting (yes/no/[fingerprint])? yes
Warning: Permanently added '147.75.47.207' (ED25519) to the list of known hosts.
Welcome to Ubuntu 22.04.1 LTS (GNU/Linux 5.15.0-58-generic x86_64)

 * Documentation:  https://help.ubuntu.com
 * Management:     https://landscape.canonical.com
 * Support:        https://ubuntu.com/advantage

  System information as of Sun Apr  2 18:24:44 UTC 2023

  System load:            0.0
  Usage of /:             0.7% of 438.04GB
  Memory usage:           1%
  Swap usage:             0%
  Temperature:            50.0 C
  Processes:              240
  Users logged in:        0
  IPv4 address for bond0: 147.75.47.207
  IPv6 address for bond0: 2604:1380:4643:1400::1

6 updates can be applied immediately.
6 of these updates are standard security updates.
To see these additional updates run: apt list --upgradable


The list of available updates is more than a week old.
To check for new updates run: sudo apt update


The programs included with the Ubuntu system are free software;
the exact distribution terms for each program are described in the
individual files in /usr/share/doc/*/copyright.

Ubuntu comes with ABSOLUTELY NO WARRANTY, to the extent permitted by
applicable law.

root@c3-small-x86-01:~#
We now are logged into the server. Notice that the first time we log in, it asks us if we want to trust the ssh key of the server,
as our local system has not seen it before. We can answer yes to this question for now.
With each login, it also gives us information about the server and operating system.
We end up with our command-prompt, giving us the username with which we are logged in (root), the name of the server (c3-small-x86-01),
and the # prompt, indicating that we are the superuser, or root.
We can now update the package manager and install the software we need.
root@c3-small-x86-01:~# apt update -y
Hit:1 http://archive.ubuntu.com/ubuntu jammy InRelease
Get:2 http://security.ubuntu.com/ubuntu jammy-security InRelease [110 kB]
Get:3 http://archive.ubuntu.com/ubuntu jammy-updates InRelease [119 kB]
Get:4 http://security.ubuntu.com/ubuntu jammy-security/main amd64 Packages [728 kB]
Get:5 http://archive.ubuntu.com/ubuntu jammy-backports InRelease [108 kB]
Get:6 http://archive.ubuntu.com/ubuntu jammy-updates/main amd64 Packages [989 kB]
Get:7 http://security.ubuntu.com/ubuntu jammy-security/main Translation-en [147 kB]
Get:8 http://security.ubuntu.com/ubuntu jammy-security/main amd64 c-n-f Metadata [9016 B]
Get:9 http://security.ubuntu.com/ubuntu jammy-security/restricted amd64 Packages [701 kB]
Get:10 http://security.ubuntu.com/ubuntu jammy-security/restricted Translation-en [109 kB]
Get:11 http://security.ubuntu.com/ubuntu jammy-security/restricted amd64 c-n-f Metadata [588 B]
Get:12 http://security.ubuntu.com/ubuntu jammy-security/universe amd64 Packages [715 kB]
Get:13 http://security.ubuntu.com/ubuntu jammy-security/universe Translation-en [118 kB]
Get:14 http://security.ubuntu.com/ubuntu jammy-security/universe amd64 c-n-f Metadata [14.1 kB]
Get:15 http://security.ubuntu.com/ubuntu jammy-security/multiverse amd64 Packages [19.4 kB]
Get:16 http://archive.ubuntu.com/ubuntu jammy-updates/main Translation-en [210 kB]
Get:17 http://archive.ubuntu.com/ubuntu jammy-updates/main amd64 c-n-f Metadata [13.9 kB]
Get:18 http://archive.ubuntu.com/ubuntu jammy-updates/restricted amd64 Packages [743 kB]
Get:19 http://archive.ubuntu.com/ubuntu jammy-updates/restricted Translation-en [115 kB]
Get:20 http://archive.ubuntu.com/ubuntu jammy-updates/restricted amd64 c-n-f Metadata [588 B]
Get:21 http://archive.ubuntu.com/ubuntu jammy-updates/universe amd64 Packages [898 kB]
Get:22 http://archive.ubuntu.com/ubuntu jammy-updates/universe Translation-en [180 kB]
Get:23 http://security.ubuntu.com/ubuntu jammy-security/multiverse Translation-en [4068 B]
Get:24 http://security.ubuntu.com/ubuntu jammy-security/multiverse amd64 c-n-f Metadata [228 B]
Get:25 http://archive.ubuntu.com/ubuntu jammy-updates/universe amd64 c-n-f Metadata [18.5 kB]
Get:26 http://archive.ubuntu.com/ubuntu jammy-updates/multiverse amd64 Packages [24.1 kB]
Get:27 http://archive.ubuntu.com/ubuntu jammy-updates/multiverse Translation-en [6312 B]
Get:28 http://archive.ubuntu.com/ubuntu jammy-updates/multiverse amd64 c-n-f Metadata [444 B]
Get:29 http://archive.ubuntu.com/ubuntu jammy-backports/main amd64 Packages [40.6 kB]
Get:30 http://archive.ubuntu.com/ubuntu jammy-backports/main Translation-en [9800 B]
Get:31 http://archive.ubuntu.com/ubuntu jammy-backports/main amd64 c-n-f Metadata [388 B]
Get:32 http://archive.ubuntu.com/ubuntu jammy-backports/universe amd64 Packages [20.3 kB]
Get:33 http://archive.ubuntu.com/ubuntu jammy-backports/universe Translation-en [14.4 kB]
Get:34 http://archive.ubuntu.com/ubuntu jammy-backports/universe amd64 c-n-f Metadata [480 B]
Fetched 6188 kB in 2s (2635 kB/s)
Reading package lists... Done
Building dependency tree... Done
Reading state information... Done
82 packages can be upgraded. Run 'apt list --upgradable' to see them.
That went well enough. We are not going to bother upgrading packages at this point, as we are not interested in general operating system updates, just getting our example to work.
Next, let's install the software we need. The output includes a lot of extraneous data, so out output in this guide is somewhat truncated, to keep it readable.
root@c3-small-x86-01:~# apt install -y nginx bird jq
Reading package lists... Done
Building dependency tree... Done
Reading state information... Done
The following package was automatically installed and is no longer required:
  grub-pc-bin
Use 'apt autoremove' to remove it.
The following additional packages will be installed:
  fontconfig-config fonts-dejavu-core libdeflate0 libfontconfig1 libgd3 libjbig0 libjpeg-turbo8 libjpeg8
  libnginx-mod-http-geoip2 libnginx-mod-http-image-filter libnginx-mod-http-xslt-filter libnginx-mod-mail
  libnginx-mod-stream libnginx-mod-stream-geoip2 libtiff5 libwebp7 libxpm4 nginx-common nginx-core
Suggested packages:
  bird-doc libgd-tools fcgiwrap nginx-doc ssl-cert
The following NEW packages will be installed:
  bird fontconfig-config fonts-dejavu-core libdeflate0 libfontconfig1 libgd3 libjbig0 libjpeg-turbo8 libjpeg8
  libnginx-mod-http-geoip2 libnginx-mod-http-image-filter libnginx-mod-http-xslt-filter libnginx-mod-mail
  libnginx-mod-stream libnginx-mod-stream-geoip2 libtiff5 libwebp7 libxpm4 nginx nginx-common nginx-core
0 upgraded, 21 newly installed, 0 to remove and 82 not upgraded.
Need to get 3070 kB of archives.
After this operation, 9640 kB of additional disk space will be used.
Get:1 http://archive.ubuntu.com/ubuntu jammy/main amd64 fonts-dejavu-core all 2.37-2build1 [1041 kB]
Get:2 http://archive.ubuntu.com/ubuntu jammy/main amd64 fontconfig-config all 2.13.1-4.2ubuntu5 [29.1 kB]
Get:3 http://archive.ubuntu.com/ubuntu jammy/main amd64 libdeflate0 amd64 1.10-2 [70.9 kB]
Get:4 http://archive.ubuntu.com/ubuntu jammy/main amd64 libfontconfig1 amd64 2.13.1-4.2ubuntu5 [131 kB]
Get:5 http://archive.ubuntu.com/ubuntu jammy/main amd64 libjpeg-turbo8 amd64 2.1.2-0ubuntu1 [134 kB]
Get:6 http://archive.ubuntu.com/ubuntu jammy/main amd64 libjpeg8 amd64 8c-2ubuntu10 [2264 B]
Get:7 http://archive.ubuntu.com/ubuntu jammy-updates/main amd64 libjbig0 amd64 2.1-3.1ubuntu0.22.04.1 [29.2 kB]
Get:8 http://archive.ubuntu.com/ubuntu jammy/main amd64 libwebp7 amd64 1.2.2-2 [206 kB]
Get:9 http://archive.ubuntu.com/ubuntu jammy-updates/main amd64 libtiff5 amd64 4.3.0-6ubuntu0.4 [183 kB]
Get:10 http://archive.ubuntu.com/ubuntu jammy-updates/main amd64 libxpm4 amd64 1:3.5.12-1ubuntu0.22.04.1 [36.4 kB]
Get:11 http://archive.ubuntu.com/ubuntu jammy/main amd64 libgd3 amd64 2.3.0-2ubuntu2 [129 kB]
Get:12 http://archive.ubuntu.com/ubuntu jammy-updates/main amd64 nginx-common all 1.18.0-6ubuntu14.3 [40.0 kB]
Get:13 http://archive.ubuntu.com/ubuntu jammy-updates/main amd64 libnginx-mod-http-geoip2 amd64 1.18.0-6ubuntu14.3 [11.9 kB]
Get:14 http://archive.ubuntu.com/ubuntu jammy-updates/main amd64 libnginx-mod-http-image-filter amd64 1.18.0-6ubuntu14.3 [15.4 kB]
Get:15 http://archive.ubuntu.com/ubuntu jammy-updates/main amd64 libnginx-mod-http-xslt-filter amd64 1.18.0-6ubuntu14.3 [13.7 kB]
Get:16 http://archive.ubuntu.com/ubuntu jammy-updates/main amd64 libnginx-mod-mail amd64 1.18.0-6ubuntu14.3 [45.7 kB]
Get:17 http://archive.ubuntu.com/ubuntu jammy-updates/main amd64 libnginx-mod-stream amd64 1.18.0-6ubuntu14.3 [72.8 kB]
Get:18 http://archive.ubuntu.com/ubuntu jammy-updates/main amd64 libnginx-mod-stream-geoip2 amd64 1.18.0-6ubuntu14.3 [10.1 kB]
Get:19 http://archive.ubuntu.com/ubuntu jammy-updates/main amd64 nginx-core amd64 1.18.0-6ubuntu14.3 [482 kB]
Get:20 http://archive.ubuntu.com/ubuntu jammy-updates/main amd64 nginx amd64 1.18.0-6ubuntu14.3 [3882 B]
Get:21 http://archive.ubuntu.com/ubuntu jammy/universe amd64 bird amd64 1.6.8-2.1 [381 kB]
Fetched 3070 kB in 2s (1381 kB/s)
Preconfiguring packages ...
...
...
Selecting previously unselected package nginx.
Preparing to unpack .../19-nginx_1.18.0-6ubuntu14.3_amd64.deb ...
Unpacking nginx (1.18.0-6ubuntu14.3) ...
Selecting previously unselected package bird.
Preparing to unpack .../20-bird_1.6.8-2.1_amd64.deb ...
Unpacking bird (1.6.8-2.1) ...
Setting up bird (1.6.8-2.1) ...

Creating config file /etc/bird/bird.conf with new version

Creating config file /etc/bird/bird6.conf with new version
Created symlink /etc/systemd/system/multi-user.target.wants/bird.service → /lib/systemd/system/bird.service.
Created symlink /etc/systemd/system/multi-user.target.wants/bird6.service → /lib/systemd/system/bird6.service.
...
...
Setting up libnginx-mod-http-image-filter (1.18.0-6ubuntu14.3) ...
Setting up nginx-core (1.18.0-6ubuntu14.3) ...
 * Upgrading binary nginx                                                                                              [ OK ]
Setting up nginx (1.18.0-6ubuntu14.3) ...
Processing triggers for ufw (0.36.1-4build1) ...
Processing triggers for man-db (2.10.2-1) ...
Processing triggers for libc-bin (2.35-0ubuntu3.1) ...
Scanning processes...
Scanning processor microcode...
Scanning linux images...

Running kernel seems to be up-to-date.

The processor microcode seems to be up-to-date.

No services need to be restarted.

No containers need to be restarted.

No user sessions are running outdated binaries.

No VM guests are running outdated hypervisor (qemu) binaries on this host.
Great, our software is ready! Repeat on our other two servers, and then let's move on to configuring the software.
5. Configure nginx
When we installed nginx, it already set up a default Web server running on port 80. We can see it by running curl localhost:80:
root@c3-small-x86-01:~# curl localhost:80
<!DOCTYPE html>
<html>
<head>
<title>Welcome to nginx!</title>
<style>
    body {
        width: 35em;
        margin: 0 auto;
        font-family: Tahoma, Verdana, Arial, sans-serif;
    }
</style>
</head>
<body>
<h1>Welcome to nginx!</h1>
<p>If you see this page, the nginx web server is successfully installed and
working. Further configuration is required.</p>

<p>For online documentation and support please refer to
<a href="http://nginx.org/">nginx.org</a>.<br/>
Commercial support is available at
<a href="http://nginx.com/">nginx.com</a>.</p>

<p><em>Thank you for using nginx.</em></p>
</body>
</html>
We aren't going to tweak this Web site much, since this is not a guide to building Websites or configuring nginx. We do want to show how we serve from different servers, so we are going to change the default page to show the server's hostname.
The default page for nginx here is in /var/www/html/index.nginx-debian.html. We can edit it with vim:
root@c3-small-x86-01:~# vim /var/www/html/index.nginx-debian.html
We are only going to change line 15, so that rather than saying, "If you see this page, the nginx web server is successfully installed and working. Further configuration is required.", it will say, "I am server 01". For server 02, it will say, "I am server 02", and for server 03, it will say, "I am server 03".
The file on server 01 should look like this:
<!DOCTYPE html>
<html>
<head>
<title>Welcome to nginx!</title>
<style>
    body {
        width: 35em;
        margin: 0 auto;
        font-family: Tahoma, Verdana, Arial, sans-serif;
    }
</style>
</head>
<body>
<h1>Welcome to nginx!</h1>
<p>I am server 01</p>

<p>For online documentation and support please refer to
<a href="http://nginx.org/">nginx.org</a>.<br/>
Commercial support is available at
<a href="http://nginx.com/">nginx.com</a>.</p>

<p><em>Thank you for using nginx.</em></p>
</body>
</html>
Then run curl localhost:80 to see that the results are correct.
root@c3-small-x86-01:~# curl localhost
<!DOCTYPE html>
<html>
<head>
<title>Welcome to nginx!</title>
<style>
    body {
        width: 35em;
        margin: 0 auto;
        font-family: Tahoma, Verdana, Arial, sans-serif;
    }
</style>
</head>
<body>
<h1>Welcome to nginx!</h1>
<p>I am server 01</p>

<p>For online documentation and support please refer to
<a href="http://nginx.org/">nginx.org</a>.<br/>
Commercial support is available at
<a href="http://nginx.com/">nginx.com</a>.</p>

<p><em>Thank you for using nginx.</em></p>
</body>
</html>
Because nginx reads the file from the disk with each request, there is no need to restart the server.
Repeat the process on each of the other servers, of course changing to 02 and 03, respectively.
6. Configure bird
Configuring bird can be a bit trickier. We need the following for each server:
- The elastic IP address we gathered earlier. This is shared across all of the servers. In our example, that is
147.28.182.100, but it will be different for you. - The local private IP for each server. We are going to get that from Metal metadata.
- The IPs of our upstream BGP peers. We are going to get that from Metal metadata.
- The ASN of our upstream BGP peers. We are going to get that from Metal metadata.
- The IP of our upstream router.
- The interface we will use. In all of our examples, we are going to use
bond0.
On each server, do the following:
- ssh to the server.
- Get the information from the metadata with the following command:
curl https://metadata.platformequinix.com/metadata | jq '.bgp_neighbors[0] | { customer_ip: .customer_ip, customer_as: .customer_as, multihop: .multihop, peer_ips: .peer_ips, peer_as: .peer_as }' - Create the bird configuration file.
- Restart bird.
- Add the Elastic IP to the loopback interface
lo, which will cause bird to announce it.
root@c3-small-x86-01:~# curl https://metadata.platformequinix.com/metadata | jq '.bgp_neighbors[0] | { customer_ip: .customer_ip, customer_as: .customer_as, multihop: .multihop, peer_ips: .peer_ips, peer_as: .peer_as }'
  % Total    % Received % Xferd  Average Speed   Time    Time     Time  Current
                                 Dload  Upload   Total   Spent    Left  Speed
100  3951  100  3951    0     0  87960      0 --:--:-- --:--:-- --:--:-- 89795
{
  "customer_ip": "10.65.38.129",
  "customer_as": 65000,
  "multihop": true,
  "peer_ips": [
    "169.254.255.1",
    "169.254.255.2"
  ],
  "peer_as": 65530
}
Our upstream peers are at 169.254.255.1 and 169.254.255.2, our customer IP, or the expected private IP, is 10.65.38.129, and our peer ASN is
65530.
The only missing pieces is our upstream router IP, which we can get via ip route list 10.0.0.0/8:
root@c3-small-x86-01:~# ip route list 10.0.0.0/8
10.0.0.0/8 via 10.65.38.128 dev bond0
So in this case, our upstream router IP is 10.65.38.128.
Next, we need to create the bird configuration file /etc/bird/bird.conf. Chances are pretty good that a default one was installed,
so we will replace it with this one. We put comments in to show where we placed our own information.
filter metal_bgp {
if net = 147.28.182.100/32 then accept;  # Elastic IP
}

router id 10.65.38.129;   # Local private IP
protocol direct {
interface "lo";
}

protocol kernel {
persist;
scan time 20;
import all;
export all;
}

protocol device {
scan time 10;
}

protocol static {
  route 169.254.255.1/32 via 10.65.38.128; # Upstream router IP
  route 169.254.255.2/32 via 10.65.38.128; # Upstream router IP
}

protocol bgp neighbor_v4_1 {
  export filter metal_bgp;
  local as 65000;   # Our ASN
  multihop;
  neighbor 169.254.255.1 as 65530; # Upstream peer IP and ASN
}

protocol bgp neighbor_v4_2 {
  export filter metal_bgp;
  local as 65000;  # Our ASN
  multihop;
  neighbor 169.254.255.2 as 65530; # Upstream peer IP and ASN
}
To make your life easier, you can use this template, with fields to be filled in marked in ALL CAPS:
filter metal_bgp {
if net = ELASTICIP/32 then accept;  # Elastic IP
}

router id PRIVATEIP;   # Local private IP
protocol direct {
interface "lo";
}

protocol kernel {
persist;
scan time 20;
import all;
export all;
}

protocol device {
scan time 10;
}

protocol static {
  route PEERIP1/32 via ROUTERIP; # Upstream router IP
  route PEERIP2/32 via ROUTERIP; # Upstream router IP
}

protocol bgp neighbor_v4_1 {
  export filter metal_bgp;
  local as 65000;   # Our ASN
  multihop;
  neighbor PEERIP1 as 65530; # Upstream peer IP and ASN
}

protocol bgp neighbor_v4_2 {
  export filter metal_bgp;
  local as 65000;  # Our ASN
  multihop;
  neighbor PEERIP2 as 65530; # Upstream peer IP and ASN
}
Now restart bird:
root@c3-small-x86-01:~# systemctl restart bird
bird should be working now and connected to the upstream BGP peers. You can check by asking it with birdc. If it is working, the
connection should be "Established".
root@c3-small-x86-01:~# birdc show protocol neighbor_v4_1
BIRD 1.6.8 ready.
name     proto    table    state  since       info
neighbor_v4_1 BGP      master   up     18:52:38    Established
root@c3-small-x86-01:~# birdc show protocol neighbor_v4_2
BIRD 1.6.8 ready.
name     proto    table    state  since       info
neighbor_v4_2 BGP      master   up     18:52:39    Established
Looks great!
Almost done on this server. Let's add the Elastic IP to the loopback interface lo. We need to add the Elastic IP to the loopback
interface as an extra IP so that the server knows to handle it, and bird knows to announce it. Be sure to replace the IP address
with your elastic IP.
root@c3-small-x86-01:~# cat >> /etc/network/interfaces <<EOF

auto lo:0
iface lo:0 inet static
  address 147.28.182.100
  netmask 255.255.255.255
EOF
root@c3-small-x86-01:~# ifup lo:0
Repeat on your other servers.
7. Test
From any server, whether one of the servers, elsewhere on Equinix Metal, or anywhere on the Internet, test the IP. You can use curl, or
even any regular browser.
Let's do it first with curl. We will do it multiple times, to see that different servers respond.
$ curl 147.28.182.100
<!DOCTYPE html>
<html>
<head>
<title>Welcome to nginx!</title>
<style>
    body {
        width: 35em;
        margin: 0 auto;
        font-family: Tahoma, Verdana, Arial, sans-serif;
    }
</style>
</head>
<body>
<h1>Welcome to nginx!</h1>
<p>I am server 03</p>

<p>For online documentation and support please refer to
<a href="http://nginx.org/">nginx.org</a>.<br/>
Commercial support is available at
<a href="http://nginx.com/">nginx.com</a>.</p>

<p><em>Thank you for using nginx.</em></p>
</body>
</html>

$ curl 147.28.182.100
<!DOCTYPE html>
<html>
<head>
<title>Welcome to nginx!</title>
<style>
    body {
        width: 35em;
        margin: 0 auto;
        font-family: Tahoma, Verdana, Arial, sans-serif;
    }
</style>
</head>
<body>
<h1>Welcome to nginx!</h1>
<p>I am server 02</p>

<p>For online documentation and support please refer to
<a href="http://nginx.org/">nginx.org</a>.<br/>
Commercial support is available at
<a href="http://nginx.com/">nginx.com</a>.</p>

<p><em>Thank you for using nginx.</em></p>
</body>
</html>

$ curl 147.28.182.100
<!DOCTYPE html>
<html>
<head>
<title>Welcome to nginx!</title>
<style>
    body {
        width: 35em;
        margin: 0 auto;
        font-family: Tahoma, Verdana, Arial, sans-serif;
    }
</style>
</head>
<body>
<h1>Welcome to nginx!</h1>
<p>I am server 01</p>

<p>For online documentation and support please refer to
<a href="http://nginx.org/">nginx.org</a>.<br/>
Commercial support is available at
<a href="http://nginx.com/">nginx.com</a>.</p>

<p><em>Thank you for using nginx.</em></p>
</body>
</html>
Server 03, then 02, then 01 twice. Success!
While we are at it, let's look at a browser.
First time:

Second time:
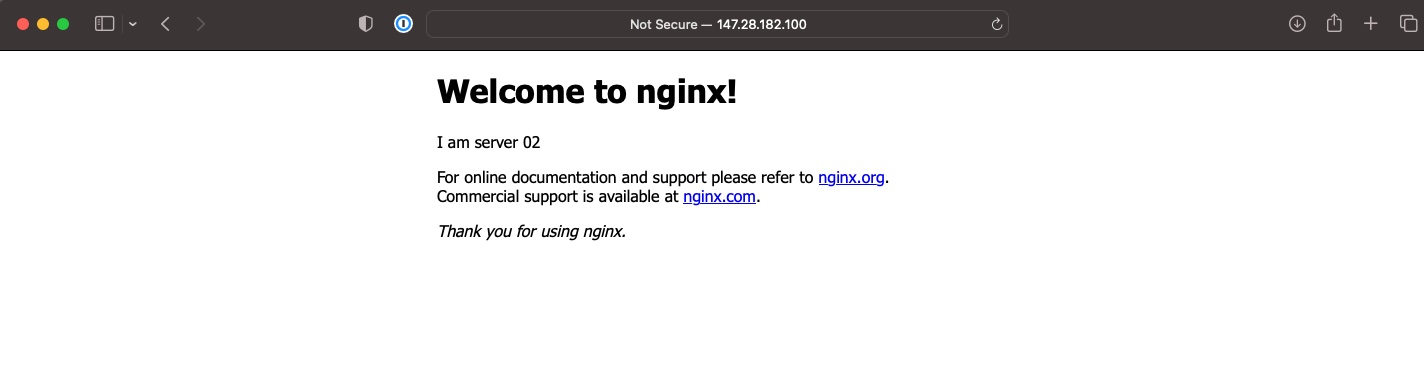
Hooray!
You may also like
Digger deeper into similar topics in our archives
Configuring BGP with BIRD 1.6 on an Equinix Metal Server
Set up BGP on your Equinix Metal server using BIRD 1.6, covering IP configuration, installation, and neighbor setup to ensure robust routing capabilities between your server and the Equinix...

Configuring BGP with FRR on an Equinix Metal Server
Establish a robust BGP configuration on your Equinix Metal server using FRR, including setting up network interfaces, installing and configuring FRR software, and ensuring secure and efficie...

Crosscloud VPN with Wireguard
Learn to establish secure VPN connections across cloud environments using WireGuard, including detailed setups for site-to-site tunnels and VPN gateways with NAT on Equinix Metal, enhancing...

Deploy Your First Server
Learn the essentials of deploying your first server with Equinix Metal. Set up your project & SSH keys, provision a server and connect it to the internet.

Ready to kick the tires?
Use code DEPLOYNOW for $300 credit