- Home /
- Resources /
- Learning center /
- The Essential Nuta...
The Essential Nutanix Translation: Key Terms and Concepts Demystified
This guide serves as a comprehensive translation from VMware to Nutanix, aimed at helping hypervisor administrators understand the similarities and differences between the two platforms. It provides detailed comparisons of key components, management processes, and migration steps, making it easier for those familiar with VMware to transition to and effectively manage Nutanix environments.

On this page
The field of virtualization has been growing in recent years. To make the best decisions for applications and workloads, hypervisor administrators should have a good understanding of the available options. When someone says the word “virtualization,” VMware is often the first hypervisor which comes to mind, and the platform many administrators have the most experience with.
Nutanix is another platform that has been around for some time, but administrators may not have experience with it. The Nutanix platform is a great platform for administrators to look at for deploying new workloads, or changing up their current environment.
This is the translation guide from VMware to Nutanix. It will help you dive deeper into Nutanix and get a solid understanding of how it works using terms you are already familiar with.
Translating VMware to Nutanix
No matter what hypervisor product you use, the end game is to run virtual machines on top of a cluster of physical hardware. The concepts are the same, however the terms and implementation may be a bit different. Let’s look at some of the key components of a hypervisor environment, and how they relate to each other using VMware and Nutanix terms.
| Function | VMware | Nutanix |
|---|---|---|
| Bare metal hypervisor | VMware ESXi | Nutanix AHV |
| Hypervisor and cluster management | vSphere Host Client / vCenter | Nutanix Prism Element / Prism Central |
| Workload protection against node hardware failure | VMware High Availability (HA) | AHV Virtual Machine High Availability (VM HA) |
| Resource scheduling to balance performance | VMware Distributed Resource Scheduler (DRS) | Acropolis Dynamic Scheduling (ADS) |
| Storage for VMs | vSAN | AOS Storage |
| Host and VM networking | NSX | Flow Virtual Networking |
| A complete virtualization platform | VMware Cloud Foundation | Nutanix Cloud Platform |
While each Nutanix component provides similar functionality to the hypervisors you may already be used to, there are some differences and nuances. Before we go into these components, it is useful to understand a bit more about the Nutanix platform, and how it evolved.
What makes Nutanix different
Nutanix was created to take a fundamentally different approach to virtualization. Unlike most virtualization solutions at the time, Nutanix used hardware nodes that had compute, memory, and storage all located on the same node. This allowed them to scale with predictable performance, and simplified the deployment and operations processes for virtualized infrastructures.
The term “hyperconverged infrastructure” was born thanks to Nutanix. Their radical approach consisted of hardware nodes that had compute, memory, and storage all located on the same node. This allowed them to scale with predictable performance, and radically simplified the deployment and operations processes for virtualized infrastructures.
The true magic of Nutanix is at the storage level. VMware vSphere features began to put a huge emphasis on shared storage, and Nutanix made this simple without sacrificing performance. Their software defined storage system set the precedent for Nutanix creating their own complete suite of hypervisor software in 2015.
Let’s examine the main components of a Nutanix environment.
Nutanix AHV (Acropolis Hypervisor)
Nutanix AHV is the hypervisor which was created by Nutanix, similar to VMware ESXi. Nutanix started out supporting VMware ESXi as well as hypervisors, and proceeded to create their own hypervisor product in later years. Like ESXi, AHV is a bare metal hypervisor, which means it gets directly installed on hardware such as the m3.large.opt-c2s1 and m3.large.opt-c2m3s3 Equinix Metal servers.
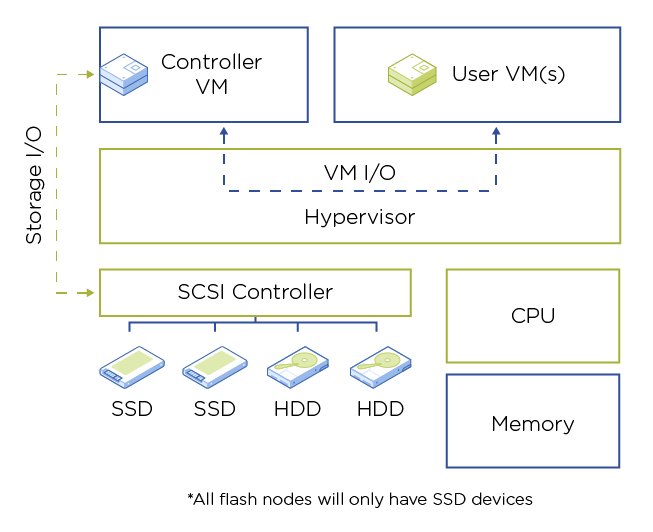
There are some differences in the components of an AHV node versus an ESXi node. A major difference is that all AHV nodes have a Controller VM (CVM) running on them as depicted in this diagram, whereas ESXi nodes do not. The CVM is deployed as part of the AHV installation. This is an essential component of the hyperconverged infrastructure.
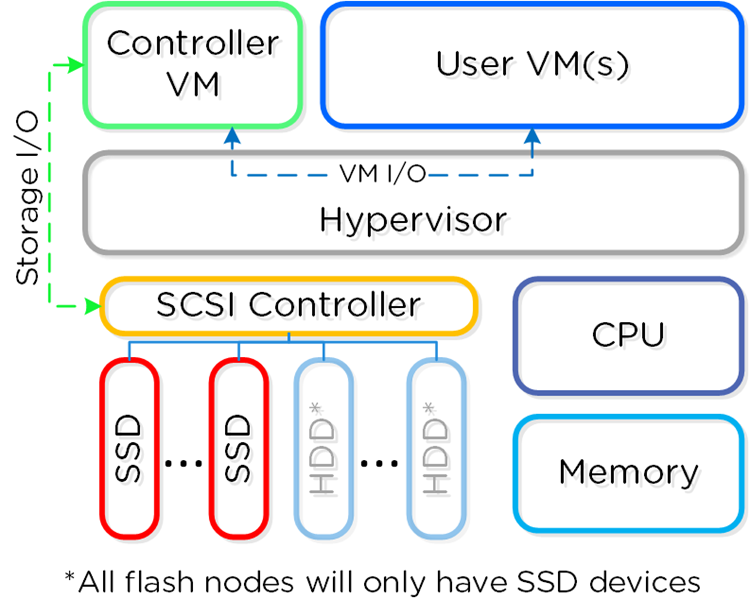
(You can find more on the Controller VM here)
The Storage I/O travels from the SCSI Controller to the Controller VM, where it is then accessible to the hypervisor. User VM IO travels from the VM to through the hypervisor to the CVM. The CVM is also where the local Nutanix cluster management software, Prism Element, runs.
Nutanix released AHV and the associated products in 2015, which means it has had a great deal of time to mature, and supports enterprise grade workloads at this point in time. AHV nodes need to be put into an Acropolis cluster in order to support many features that you are used to in the world of virtualization, which brings us to our next topic.
Nutanix Prism Management (Prism Element / Prism Central)
Nutanix Prism is the management layer of a Nutanix deployment, and has some key differences from the VMware hypervisor management products.
Nutanix Prism Element can be roughly compared to the vSphere Host Client with a number of key differences. Prism Element allows complete configuration, management, and monitoring of an Acropolis cluster, whereas the vSphere Host Client allows basic management and monitoring at the single host level.
This is a huge benefit for ease of use and deployment for Nutanix. Prism Element can be accessed via a web browser on any host in the cluster. For single-cluster deployments, no additional software is needed and you can hit the ground running. After you have built your cluster, you can simply navigate to the CVM IP address of any of your cluster nodes and log in to Prism (you can see the AHV deployment and cluster creation process on Metal here)
In contrast, for any type of cluster level management in the VMware ecosystem, you will need to deploy VMware vCenter. VMware vCenter is deployed as a virtual appliance, which means it cannot be deployed until after you have an operational ESXi host. Even if you want to build a small environment for a proof of concept or to test something, you must deploy vCenter to have any type of clustering capability.
For multi-cluster environments, you can deploy Prism Central, which allows management of multiple Nutanix clusters in a single pane of glass, similar to vCenter. There are some differences in the deployment process here as well, with Nutanix being simpler and quicker.
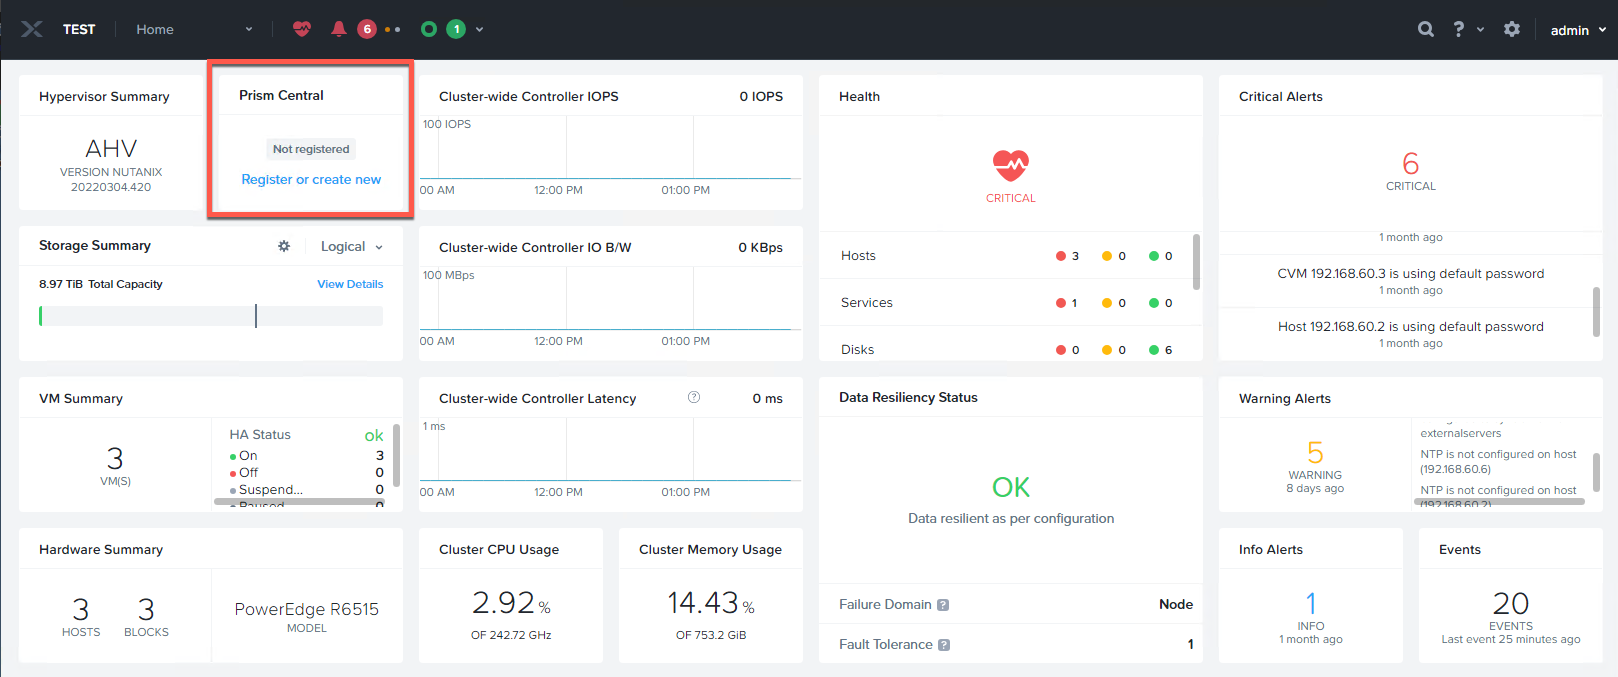
Prism Central can be quickly deployed from the Prism Element interface, by clicking Register or create new.
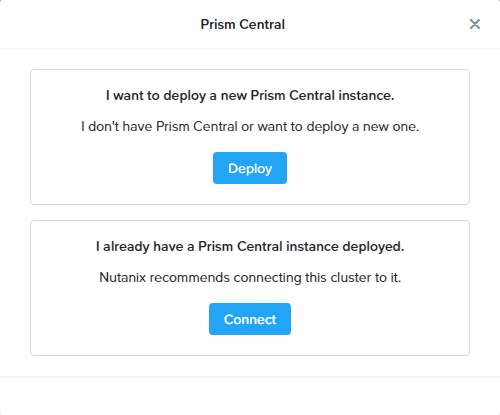
With a few clicks, you can install Prism Central, or connect your new cluster to an existing Prism Central if you have already deployed it previously.
This process is quick and simple, which is a big win in terms of management simplicity for Nutanix.
AHV Virtual Machine High Availability (VM HA)
One of the hallmark features of any virtualization system is the ability to protect VM workloads against host hardware failure. This feature, called High Availability (HA), is available on both the VMware and Nutanix platforms. In the VMware world, HA is configured in vCenter after a cluster has been created.
In Nutanix, HA is turned on by default, without any additional configuration necessary after the cluster has been created. While the default configuration is a huge win in terms of simplicity, it does have some limitations. The default mode does not guarantee resources will be available in the event of a failure.
To enable the guarantee, you need to mark a checkbox in Prism, found under Settings in the Manage VM High Availability tab, as you can see in the following image.
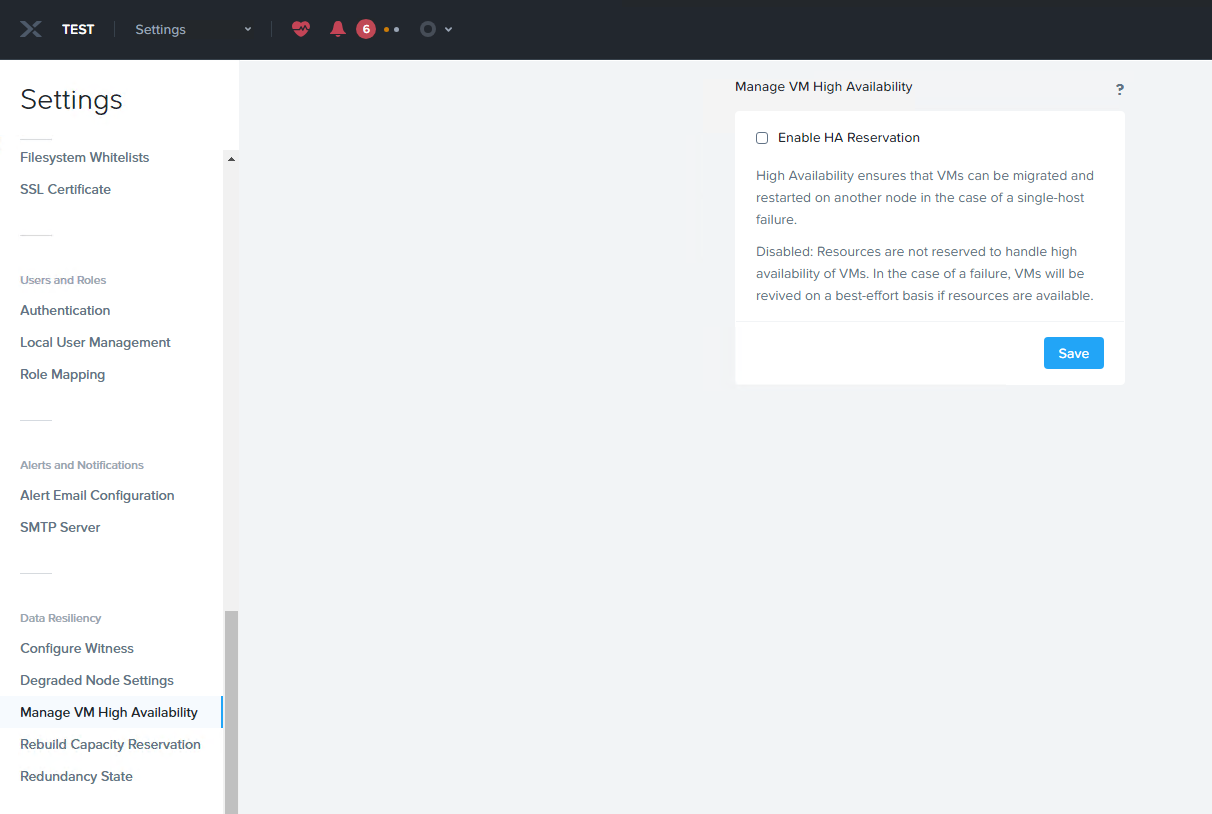
When this checkbox is marked, the system reserves resources for High Availability, since HA is enabled by default.
Acropolis Dynamic Scheduling
Acropolis Dynamic Scheduling (ADS) is enabled on an Acropolis cluster by default, and provides similar functionality to VMware’s DRS. As with High Availability, the difference is that ADS is enabled by default on the Nutanix platform when you create a cluster.
ADS monitors CPU, memory, and storage resources to proactively move workloads to avoid resource contention. To eliminate CPU and storage contention, ADS runs every 15 minutes, with ADS examining the CPU usage over the last 10 minutes. For memory, ADS runs every two minutes.
CALLOUT: You can learn more about how ADS works with this ADS admin guide.
It also handles VM-host affinity and VM-VM anti-affinity rules are configured, again, similar to VMware DRS.
Because ADS is enabled by default, and automatically rebalances workloads, there is no need to configure resource balancing in Prism. VM-host affinity rules are created when a VM is created, and VM-VM anti-affinity rules are configured using the CLI.
Nutanix’s implementation of ADS is simpler to use and manage than VMware’s DRS, especially for resource management.
AOS Storage
AOS Storage is the storage used by the AHV cluster. It is a Distributed Storage Fabric that scales out across the cluster. Remember, in a hyperconverged infrastructure environment, the storage co-exists with the compute resources on each node. This means you do not need to connect storage to your AHV cluster; it is already there. The storage is also configured by default when the cluster is created.
In the early days of Nutanix, the hyperconverged infrastructure aspect and storage was the hallmark feature of Nutanix, and continues to be in an AHV environment. Nutanix’s storage platform is hypervisor agnostic, and one of the central components of a Nutanix cluster.
(Image from Nutanix Architecture Overview)
ADS Storage is loosly comparable to VMware's vSAN. In many cases, VMware environments use external storage, whereas in the Nutanix architecture this is not an option. Nutanix will always use the storage on the hypervisor nodes.
Flow Virtual Networking
Flow Virtual Networking is Nutanix’s software defined networking solution, and answer to micro segmentation, similar to VMware NSX. Flow Virtual Networking uses the concept of a Virtual Private Cloud (VPC) which functions as its own isolated virtual network. It also supports a number of third-party network gateway appliances.
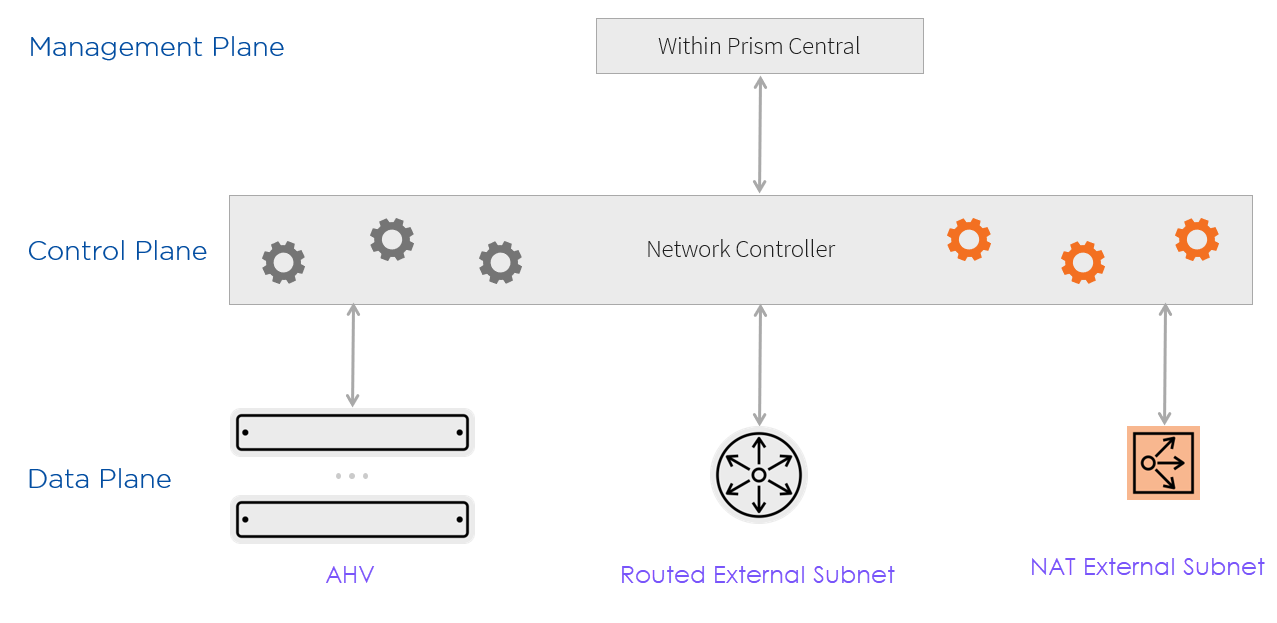
(Image from the Flow Virtual Networking Architecture Overview)
There is also Flow Network Security, which adds features such as firewalls and enhanced visibility into network communication.
You deploy and manage Flow through Prism Central. Deploy Prism Central in the three-VM scale out configuration to use Flow Virtual Networking. This architecture can easily be expanded when needed.
Flow was designed and created by Nutanix, specifically for their platform. VMware’s NSX, in contrast, was a product that resulted from VMware acquiring Nicira in 2012. NSX is very much a stand-alone implementation that integrates with a VMware vSphere environment, as opposed to being an extension of your vSphere environment.
If you are currently using NSX in your environment, you will find Flow Virtual Networking can accomplish much of the major features and functionally of NSX. Be sure to take a look at the Flow Virtual Networking Guide as you begin to design your Nutanix environment.
Nutanix Cloud Platform
Nutanix Cloud Platform is just a nice way to put it all together for Nutanix, similar to VMware Cloud Foundation. When we talk about Nutanix Cloud Platform, we are talking about the full features and functionality that Nutanix offers.
How Migrating to Nutanix Works
If Nutanix is a better fit for your virtualization needs, you can migrate your current setup. Before getting into the process, be aware of what is going to happen whenever you change the hypervisor platform you are running VMs on:
At some point in time during this migration, there will be downtime. This is unavoidable, as every hypervisor platform uses its own VM format. This downtime, however, can be planned for and managed.
If you are ready to move to Nutanix for your workloads, Nutanix has a tool called Nutanix Move to aid the migration from other hypervisors (and even hyperscale cloud platforms) to AHV. For the smoothest transition, there are some things to think about ahead of time when you are moving from VMware ESXi to Nutanix AHV.
Nutanix Move Basics
Nutanix Move is deployed to your target cluster, which in this case will be your new AHV Cluster on Equinix Metal. The Move deployment requires connectivity between your current vSphere environment and your new Nutanix environment.
You can deploy Nutanix Move from Prism Element, after you have downloaded the Move software package from the Nutanix Support Portal. You can find detailed instructions in the Move User Guide.
CALLOUT: Have additional questions? Check out the Nutanix Move FAQ.
Nutanix Move is designed to be similar to other Nutanix management tools. If you're comfortable using Prism Element, you should find Nutanix Move to be comparable.
Nutanix Move VM Migration Plans
At the heart of Nutanix Move are Migration Plans. These are created and viewed and created from the Nutanix Move dashboard.
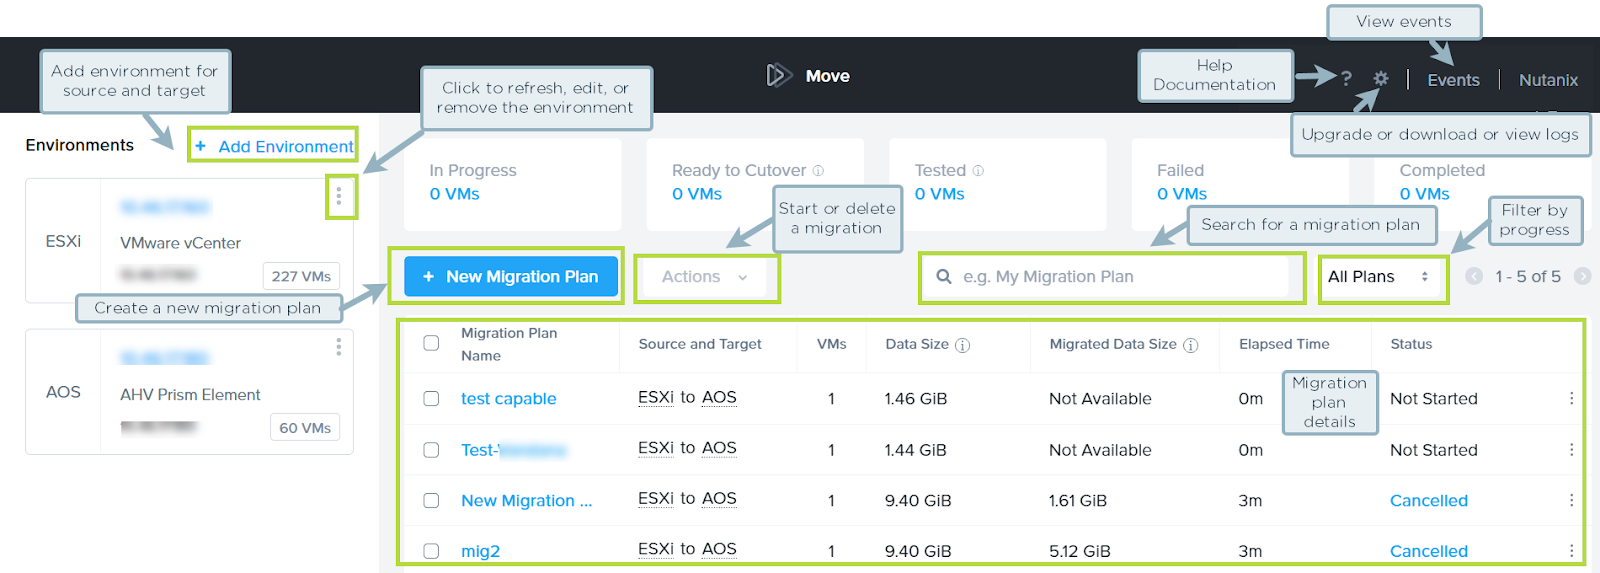
A Migration Plan consists of the VM or VMs you would like to move to Nutanix. Once you have created a Migration Plan, Move checks the environment to ensure there are enough compute and storage resources at the destination. It will also alert you to issues that would prevent the migration from succeeding.
You can then set the migration schedule and Move will seed the data to the destination. During the cutover process, Move will turn off the source VMs, perform a final sync, and bring the VMs up in the Nutanix environment. This is a quick process, but it does require a brief downtime. Move provides an estimate of cutover time to help you plan this downtime window.
Move can even create a Test Capable VM Migration Plan. This plan allows you to test the functionality of the VM in the Nutanix environment before final cutover. The major difference is Move will not shut down the source VM before it powers on the destination VM on AHV.
This is an essential feature when planning something like a hypervisor migration. It allows you to forecast and plan your migration for minimal downtime and minimal impact. Remember, some downtime is unavoidable when it comes to a hypervisor migration.
Steps for a Successful Migration
Once you've made the decision to migrate to Nutanix on Equinix Metal, you need to do some planning to kick off the process. Follow these steps to get ready:
Identify the workloads to migrate. The first step is to identify which workloads you would like to migrate to Nutanix. You may want to start with a few, smaller workloads as you gain familiarity with the Nutanix environment and migration process.
Size your Nutanix environment. Determine how many Nutanix nodes you will need to deploy. When you are deploying Nutanix on Equinix Metal, the sizing doesn't need to be perfect. Nutanix has streamlined the process of adding additional nodes, and Equinix Metal allows you to deploy them whenever they are needed. You can use the Nutanix Sizer tool to collect data from your existing VMware environment and size it for Nutanix.
Deploy and configure your Nutanix environment. Deploy your Nutanix environment on Equinix Metal. You can take a look at this detailed guide on deploying a Nutanix cluster for reference. By the end of this guide, you will have a fully functional Nutanix cluster up and running.
Deploy Prism Central. While Prism Element has everything you need to get started and manage a single Nutanix environment, Prism Central will allow you to manage multiple clusters from a single interface.
Kick the tires. Test your brand-new Nutanix environment. If this is your first time using Nutanix, consider trying out common administrative activities like deploying and destroying VMs to get a feel for the Prism management interface.
Migrate to Nutanix. Use Nutanix Move to migrate workloads from VMware vSphere to your new Nutanix cluster.
Transitioning Cloud Platforms: Final Considerations
The decision to transition cloud platforms is not an easy one. There are many things to keep in mind, from technical considerations to operational considerations to hosting considerations and more.
If you are looking to simplify your cloud platform transition, Nutanix Cloud Platform on Equinix Metal should be a strong contender. We’ve compared Nutanix Cloud Platform and VMware Cloud Foundation head to head, and you can find the same core functionality in each platform.
Keep in mind that these platforms are simply different. Nutanix Cloud Platform was created with virtualization in mind, simplifying the architecture by integrating storage, and also simplifying management operations.
If you are looking to transition your cloud platform away from VMware as quickly as possible, then Nutanix Cloud Platform on Equinix Metal is the way to go. The learning curve from VMware to Nutanix is not very large from an administrative aspect, with much of the configuration being enabled by default in Nutanix. You can also be up and running in Equinix Metal quickly, since you can order your hardware with a few clicks of a button, no more worrying about space racking, stacking, power or cooling.
Here are some additional resources to get you going.
Additional Resources
Deploying a multi-node Nutanix cluster on Metal
Acropolis Dynamic Scheduling in AHV
Steps to Migrate to Nutanix from VMware
Supported Hardware on Equinix Metal: m3.large.opt-c2s1 and m3.large.opt-c2m3s3
You may also like
Digger deeper into similar topics in our archives
Configuring BGP with BIRD 1.6 on an Equinix Metal Server
Set up BGP on your Equinix Metal server using BIRD 1.6, covering IP configuration, installation, and neighbor setup to ensure robust routing capabilities between your server and the Equinix...

Configuring BGP with FRR on an Equinix Metal Server
Establish a robust BGP configuration on your Equinix Metal server using FRR, including setting up network interfaces, installing and configuring FRR software, and ensuring secure and efficie...

Crosscloud VPN with Wireguard
Learn to establish secure VPN connections across cloud environments using WireGuard, including detailed setups for site-to-site tunnels and VPN gateways with NAT on Equinix Metal, enhancing...

Deploy Your First Server
Learn the essentials of deploying your first server with Equinix Metal. Set up your project & SSH keys, provision a server and connect it to the internet.

Ready to kick the tires?
Use code DEPLOYNOW for $300 credit