- Home /
- Resources /
- Learning center /
- Deploying a multi-...
Deploying a multi-node Nutanix cluster on Metal
A step-by-step guide on creating a three-node Nutanix cluster on Equinix Metal without DHCP.

On this page
As an ecosystem partner for Metal, Nutanix offers solutions for users looking to deploy VMs or container workloads. This guide will focus on setting up a multi-node Nutanix Cluster in Equinix Metal.
NOTE: This guide is not intended to represent best practices for Nutanix, nor a hardened, enterprise-ready platform, but rather to cover the process and considerations of setting up an environment.
Architecture
The desired end-state for this deployment is three Nutanix nodes, joined by a VLAN and a jump host as shown here:
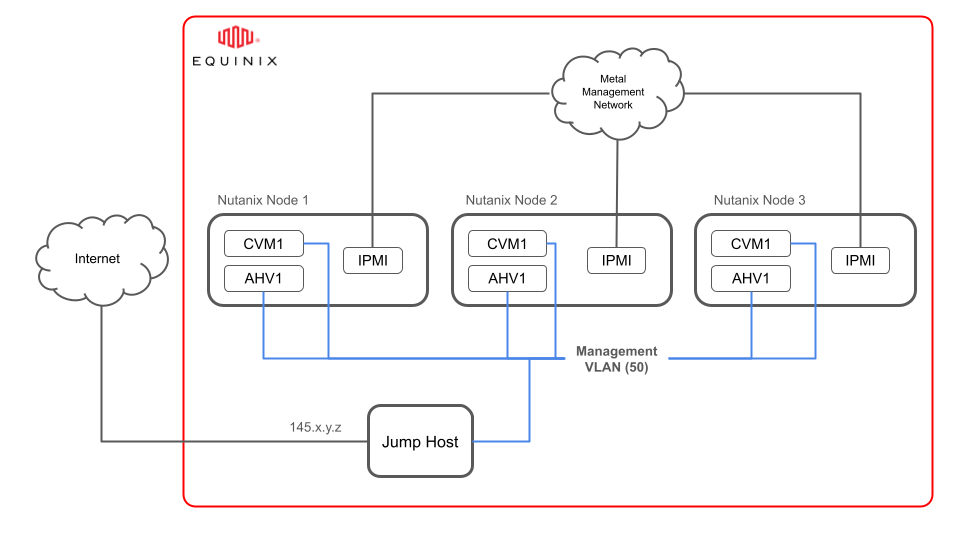
Note that you'll still need to access the Nutanix clusters. To do that, you can use a jump host to access the cluster and the user virtual machines.
Nutanix on Equinix Metal
Equinix Metal currently has two validated server configurations for running Nutanix AHV (Acropolis Hypervisor):
For this guide, we'll be using the m3.large.opt-c2s1.x86 server. We'll also use the Dallas metro because of its resource availability.
Understanding Nutanix networking
Before starting with the deployment for Nutanix on Metal, you should understand the default networking that Nutanix configures on the server as part of the boot process. This will also assist with seeing the changes you'll make to successfully create the desired end-state architecture.
The main networking components for this project are:
- Controller VM (CVM): The virtual machine responsible for the configuration and control of the cluster
- Acropolis Hypervisor (AHV): The Nutanix virtualisation layer installed on the Metal server
- Default networking: A set of Virtual Switches or Bridges used for connectivity of the server uplinks, CVM and AHV components
Here's an illustration of this environment:
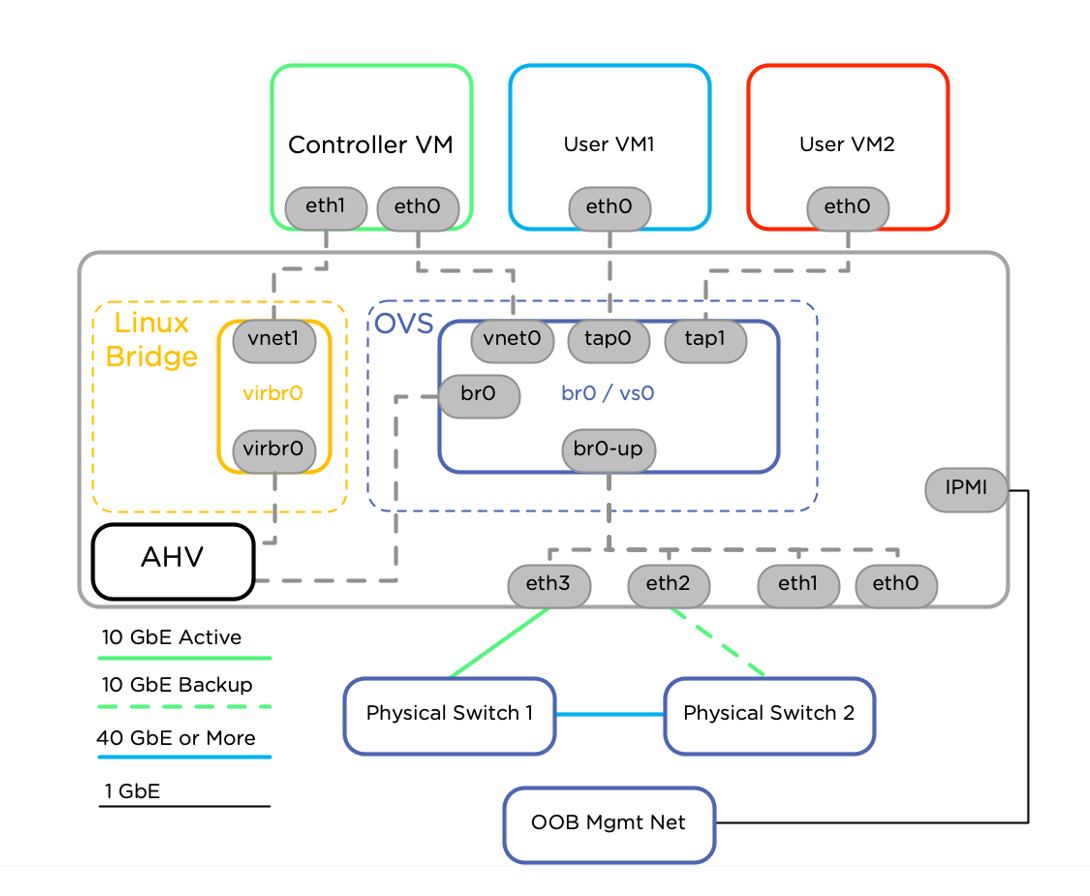
Some specific things to note about this environment:
- Both AHV br0 and CVM eth0 are configured to receive addresses via DHCP.
- By default, the Nutanix node is only given a /31 private IP block, creating one useable IP address.
- Because AHV is created first, it will lease this IP, leaving no available IPs for the CVM external interface. The CVM will use a link-local address instead.
- Eth1 of CVM is the internal interface that communicates with the AHV. It is always configured with 192.168.5.2 and 192.168.5.254.
- The AHV virbr0 interface is in the same subnet as CVM Eth1 (192.168.5.0/24) and always has the IP address of 192.168.5.1.
- The private IPv4 that Equinix metal deploys to the server is on br0 of the AHV –- this is the reason that the Nutanix console is accessible over SSH to this IP address.
- The IPMI interface is configured with a DHCP address from the 10.x.x.x range and connected to the SOS platform for Metal.
For all of the configurations in this guide, the internal management network (the one that both br0 and eth0 will be placed in) will exist on VLAN 50 and represent the network 192.168.50.0/24. We will see various configuration approaches that will see IPs from this range dynamically allocated through DHCP, as well as manually configured as static IPs.
Major steps in the guide
With a base level knowledge of the environment and the changes that need to be made, it is time to build the environment. This will be broken up into two main components:
- Deploying the infrastructure - heavily centralised around workflows in the Equinix Metal portal
- Configuring the Nutanix environment - predominantly terminal-based configuration steps to bring the cluster up
Step 1: Deploying the infrastructure
You'll deployment the infrastructure in Equinix Metal through the Equinix Metal console.
In this step, you'll create the Nutanix servers, a jump host and a VLAN, and then associate the servers with that VLAN.
Provisioning the Nutanix servers
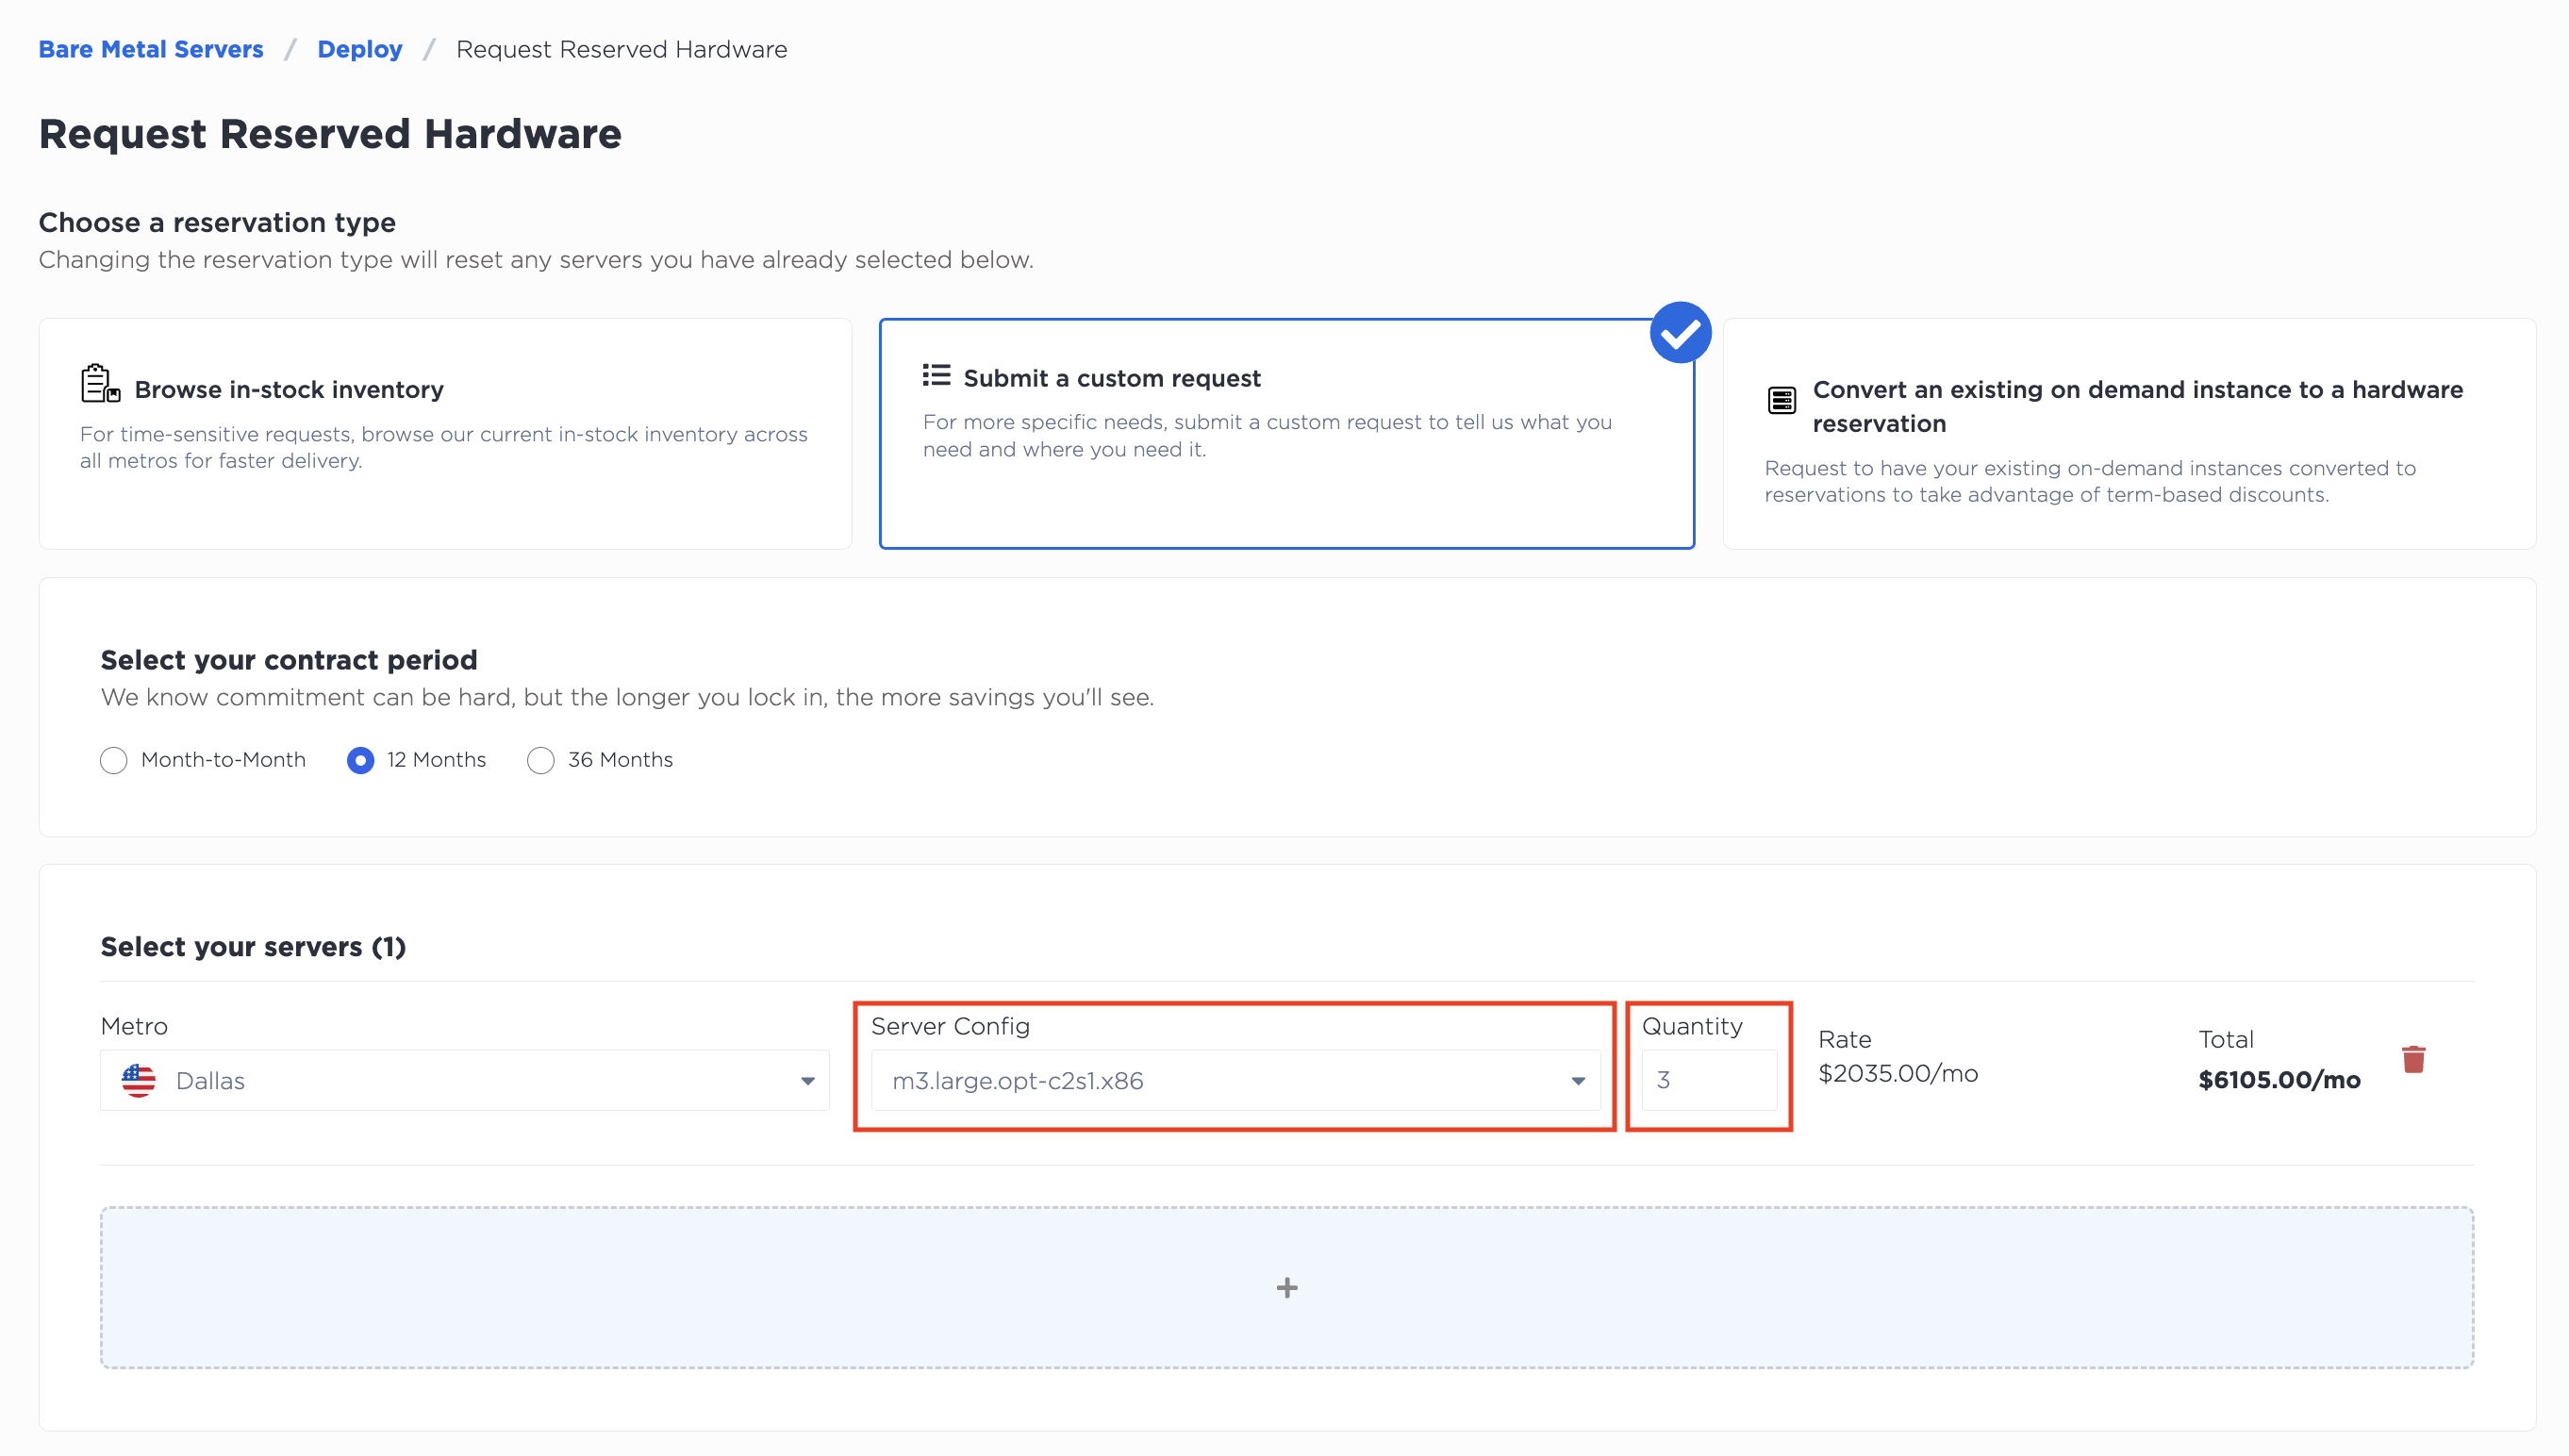
For this step, we'll be using Reserved Servers. Go to the console and select to deploy a reserved server.
Choose a custom request, the Dallas metro, and the m3.large.opt-c2s1.x86 server type. Don't forget to increase the quantity to 3 as you'll be creating a cluster.
Once the server is reserved, choose to deploy the reserved hardware. Select the recently deployed servers and choose Nutanix LTS 6.5 from the Operating System drop down. For this guide we'll use the following hostnames:
- nutanix-ahv01
- nutanix-ahv02
- nutanix-ahv03
Nutanix does not allow for the hypervisor to be deployed with a public IP address. Click the Configure option and ensure that the Public IPv4 and Public IPv6 options are disabled.

Access to this device will be managed through the SOS console. You could also use the Private IP address to access the console via the private L3 network, however, changes to the networking for the Nutanix Hypervisor (AHV) will result in a network drop and potential loss of access if misconfigured.
Create a jump host
You'll also need to create a jump host, with a public IP address, that can also access the Nutanix servers. The jump host will be used to verify access to the Nutanix Prism console once the deployment is complete.
To do this, choose to deploy another server in the same metro, a c3.small.x86 is sufficient. Use the latest version of Ubuntu and give it a name like nutanix-jump.
Setting up a VLAN
Once the servers come up, you can convert the interfaces to hybrid bonded and attach the management VLAN (50).
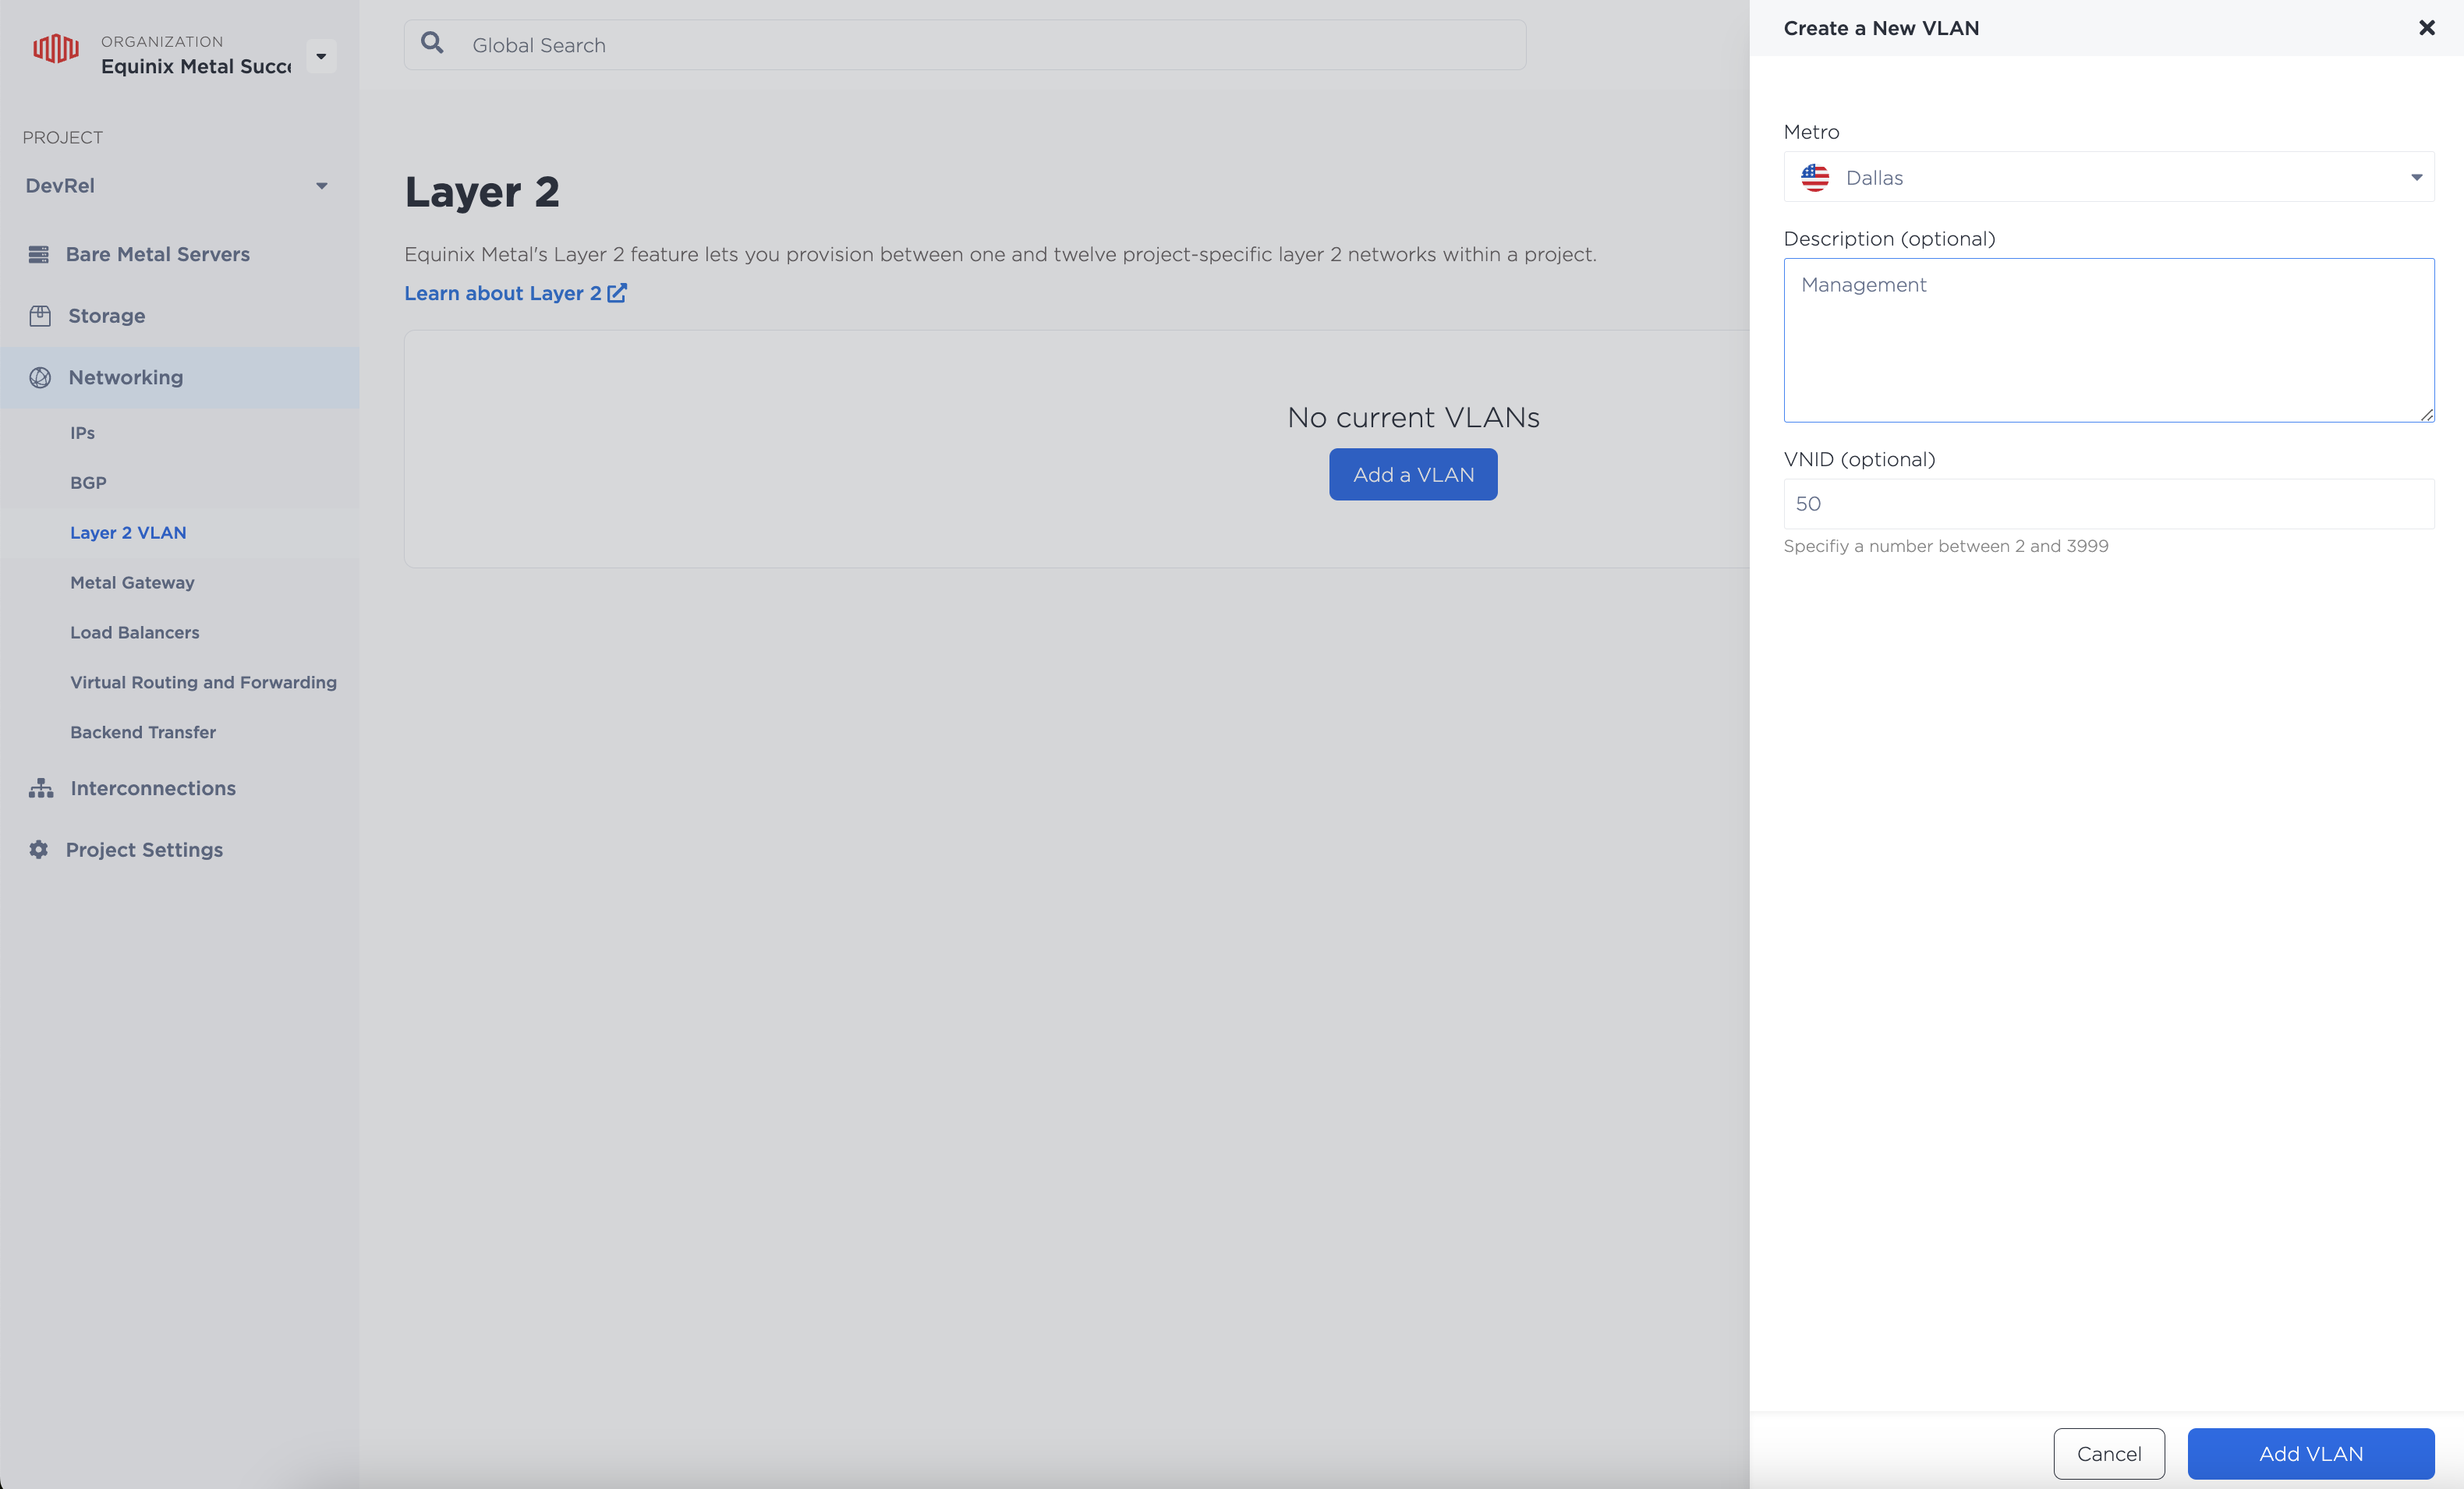
To do this, go to the Networking > Layer 2 VLAN option in the navigation menu.
Choose to create a new VLAN with the following attributes:
- Metro: The same metro that the servers are located in
- Description: Management
- VNID: 50
Associating the VLAN with each server
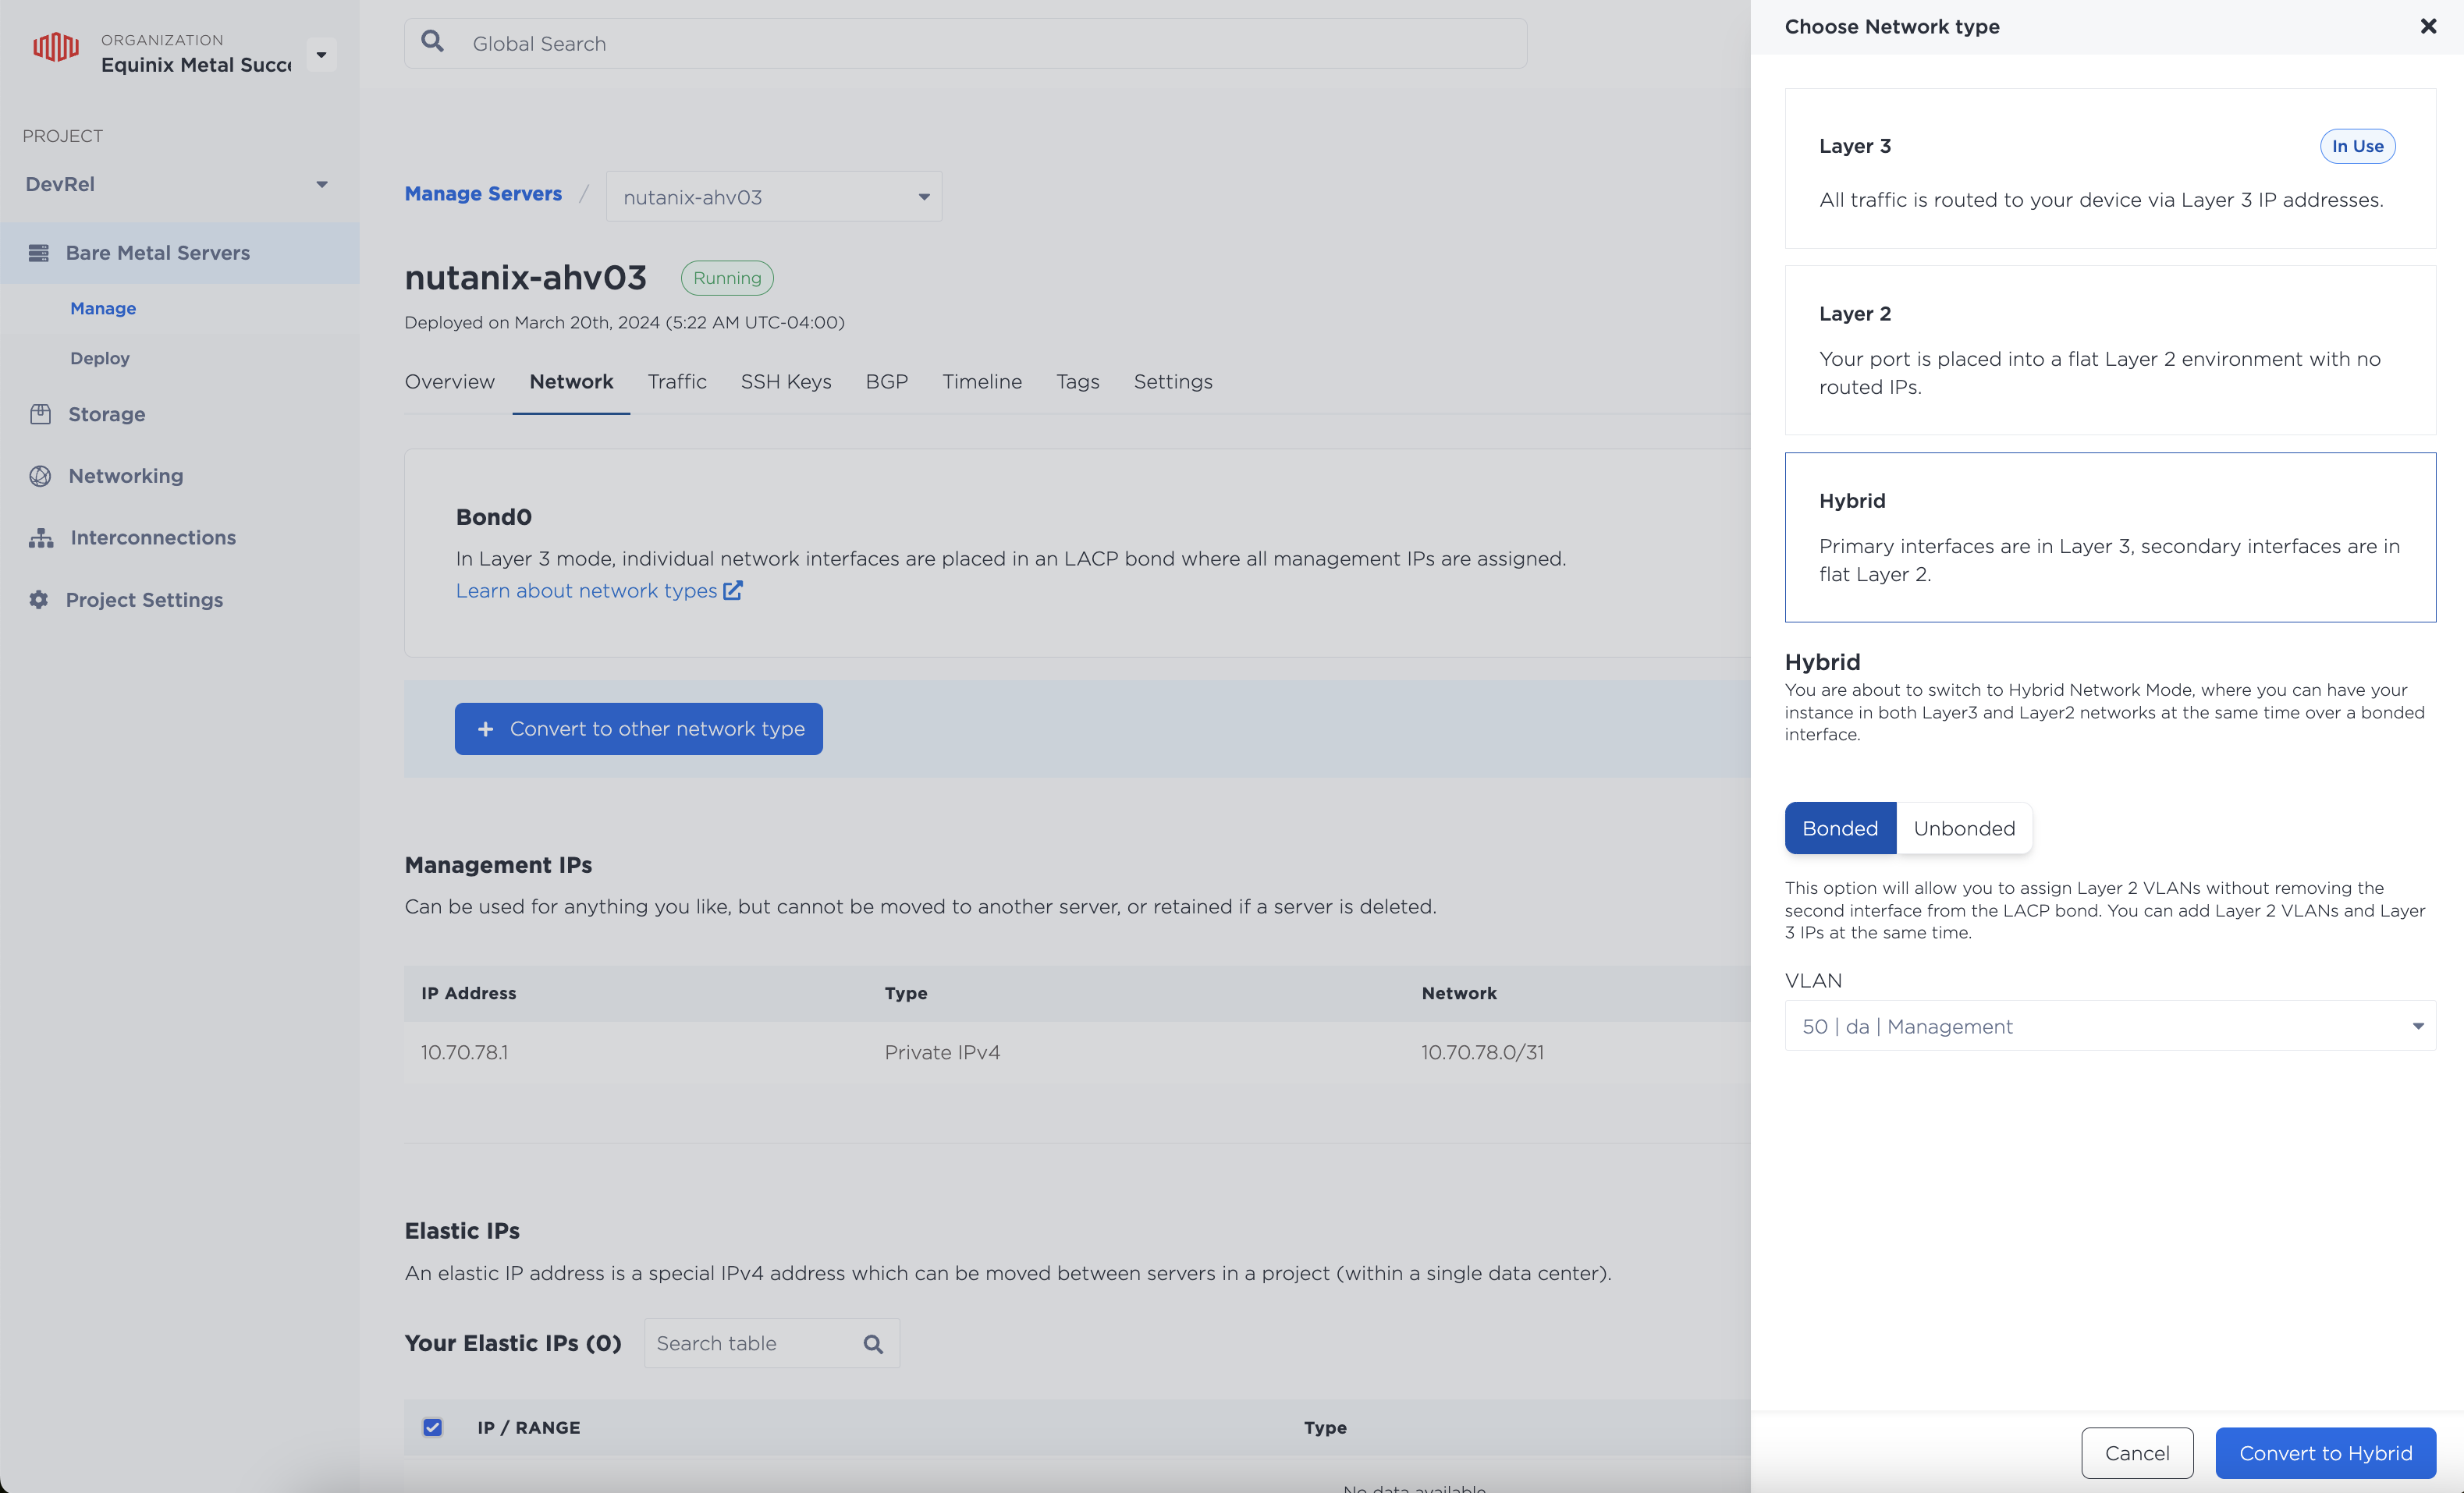
Once the VLAN is created, view the details of each Nutanix server (and the jump host). Click the Networking tab and choose the Convert to other network type button. Convert it with the following options:
- Type: Hybrid
- Hybrid: Bonded
- VLAN: The one you just created
Repeat this step for each Nutanix server and the jump host.
With all of the Metal networking done, you can now prepare each node to be joined into a single Nutanix cluster.
Step 2: Configuring the Nutanix environment
You'll need to complete all the steps described in this section for each of the Nutanix nodes. The instructions are identical, so we won't repeat them, but in order to complete this guide completely, you'll need to do this three times.
Use SOS to access the Nutanix servers
To access the Nutanix servers, we'll use SOS. To locate the SOS address for the server and initiate an SSH session, click on the terminal icon and copy the command into a terminal.
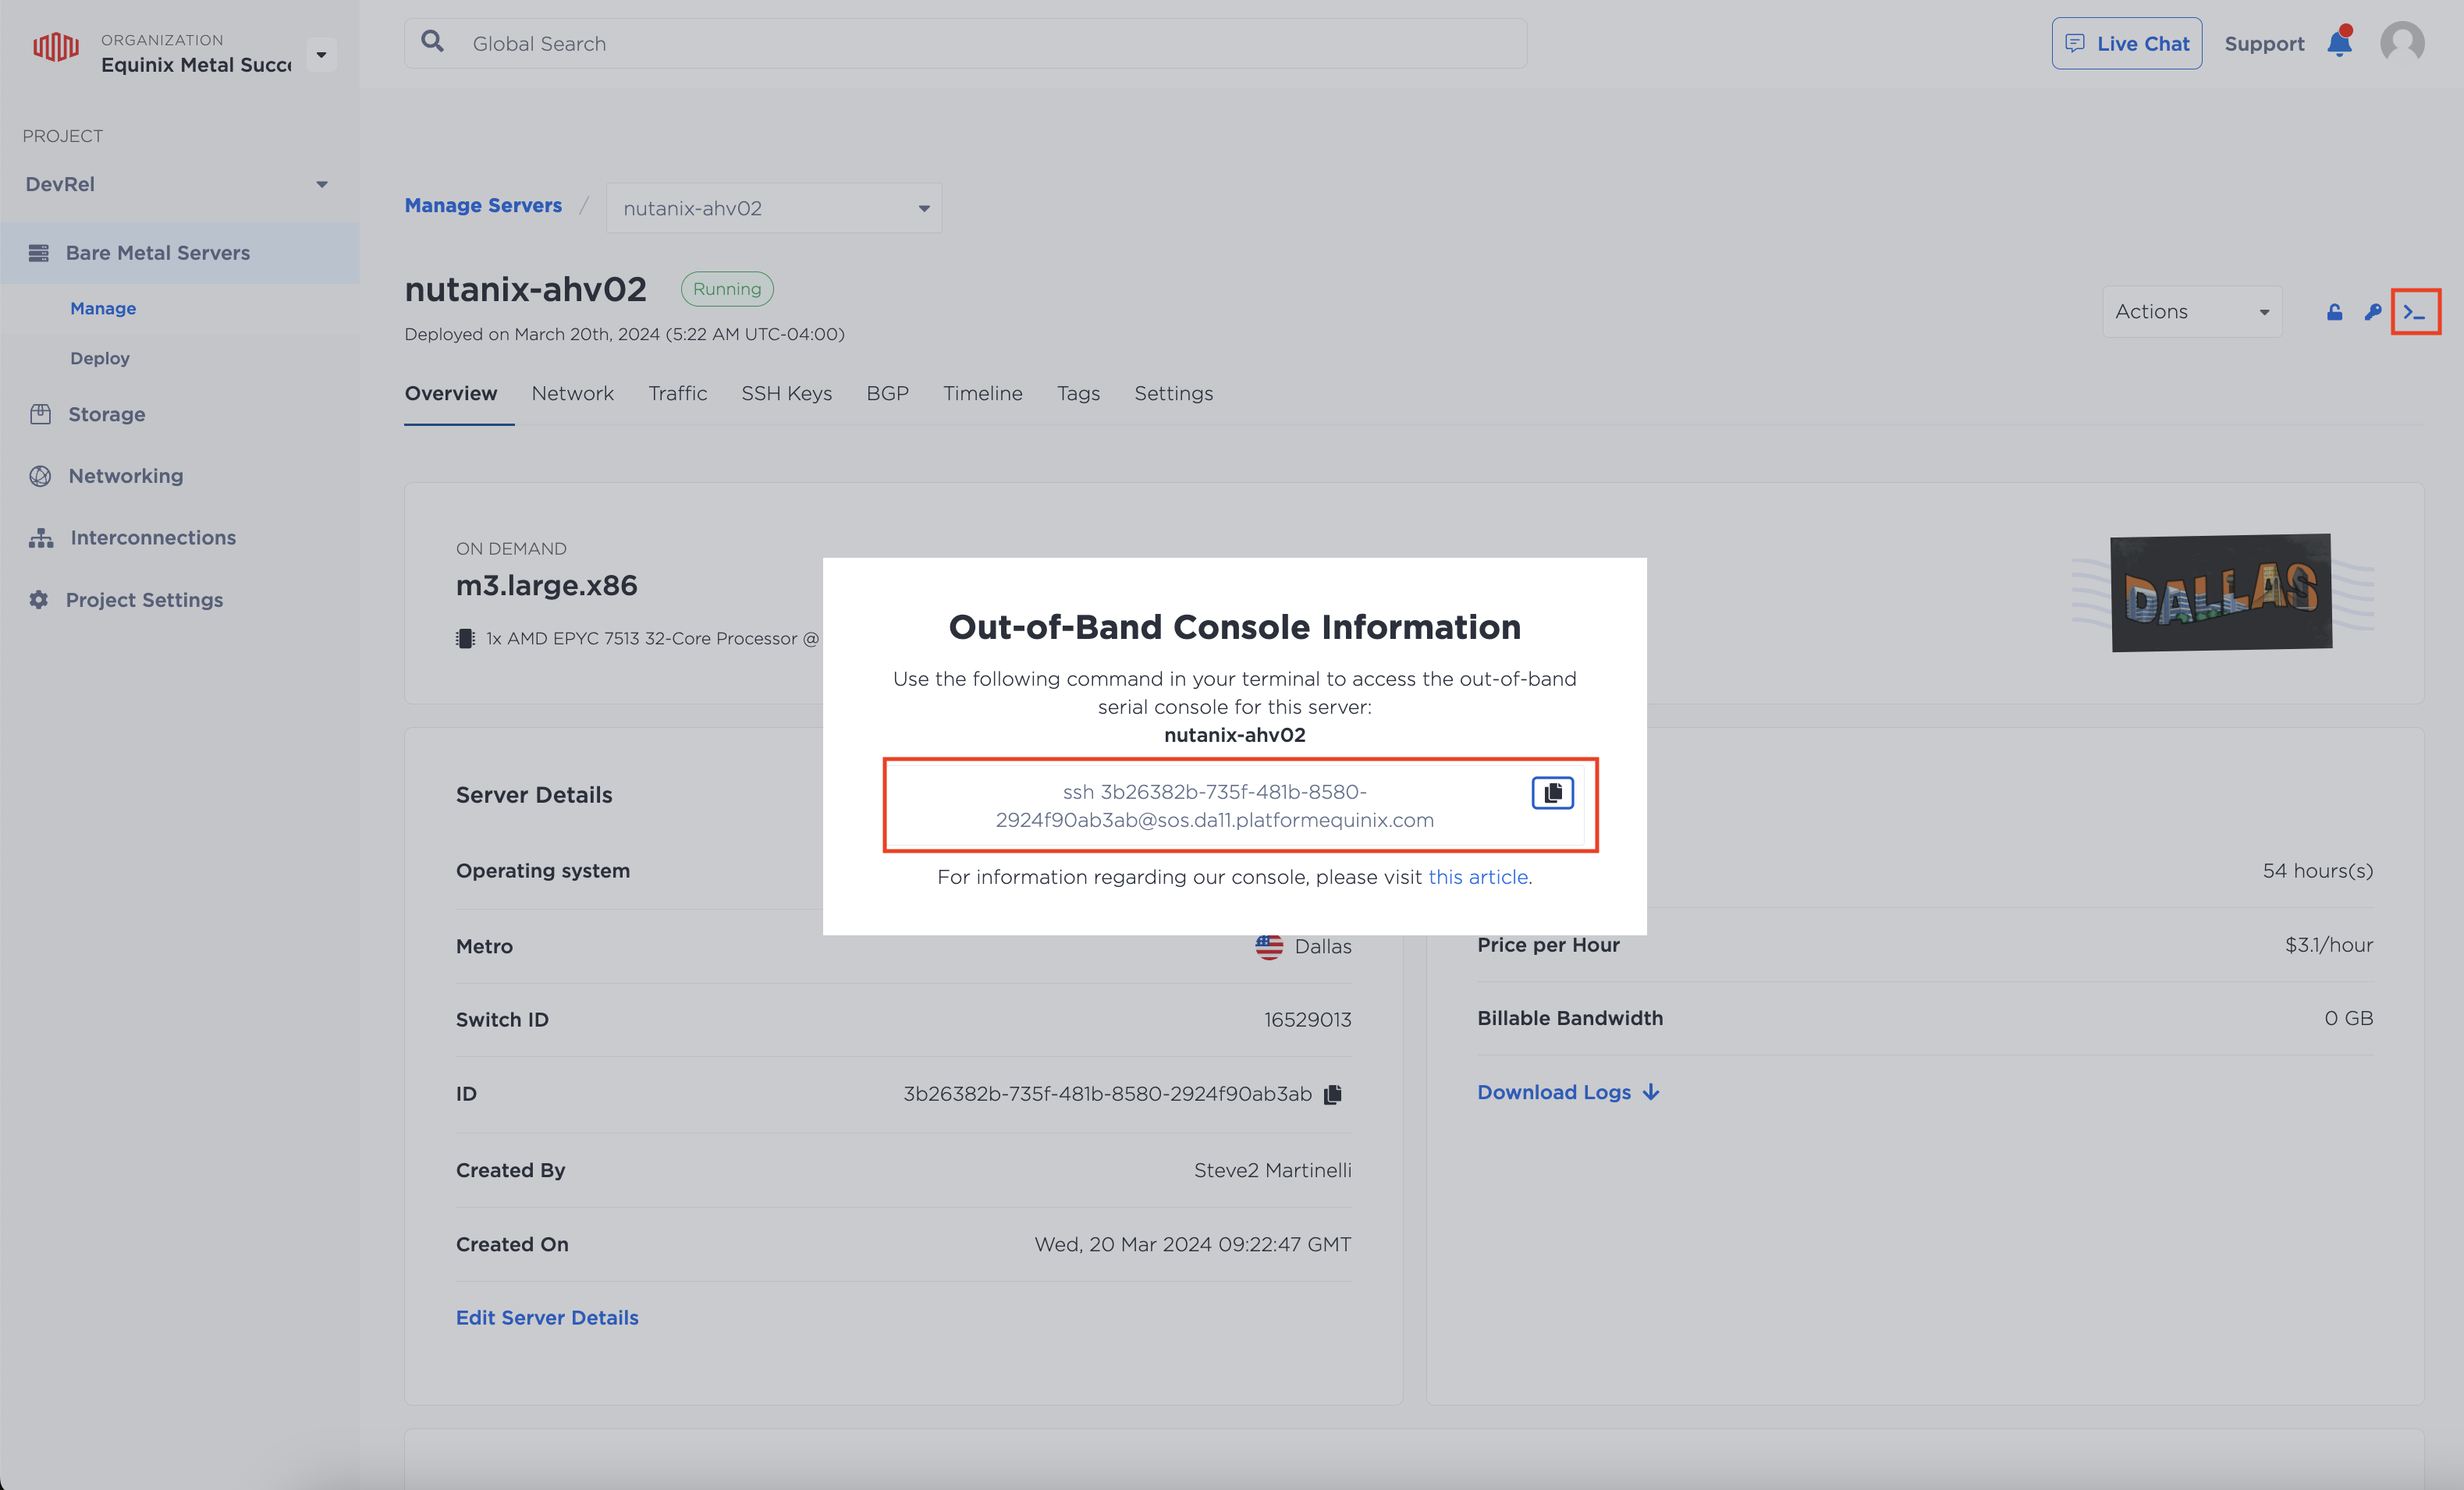
For example, it may look like tis:
ssh 3b26382b-735f-481b-8580-2924f90ab3ab@sos.da11.platformequinix.com
Through the SOS console, we will be connecting to AHV, for which he default credentials are:
username: root
password: nutanix/4u
Nutanix has default credentials for both AHV and CVM, which are available in this guide and expanded upon in the AHV Admin Guide.
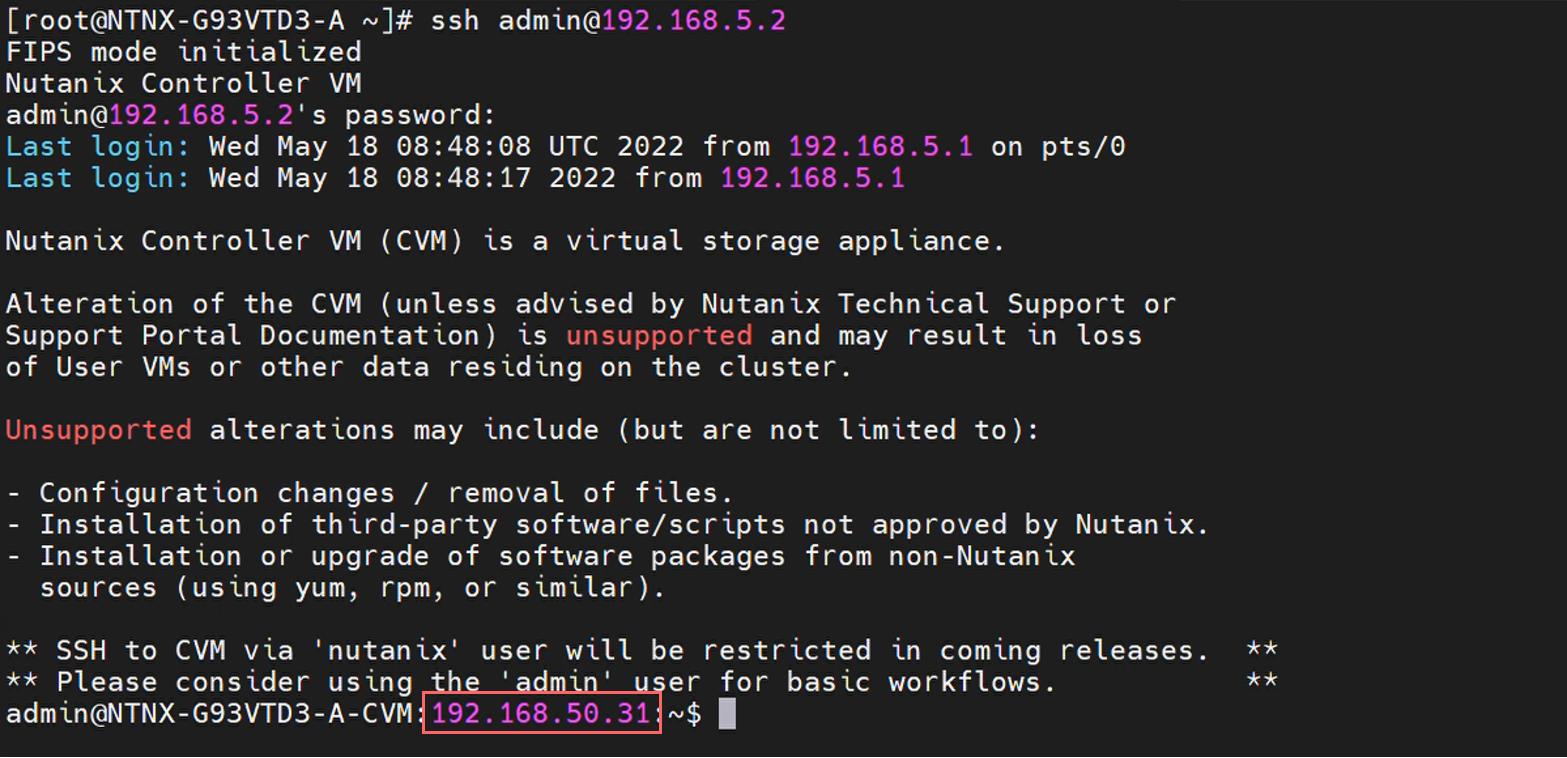
Once you're logged in, you'll need to connect to the CVM that is within the AHV.
Remember that CVM is reachable on the internal bridge (192.168.5.0/24) at either 192.168.5.2 or 192.168.5.254. You can SSH to this VM using these credentials (note the capital N in the password):
username: admin
password: Nutanix/4u
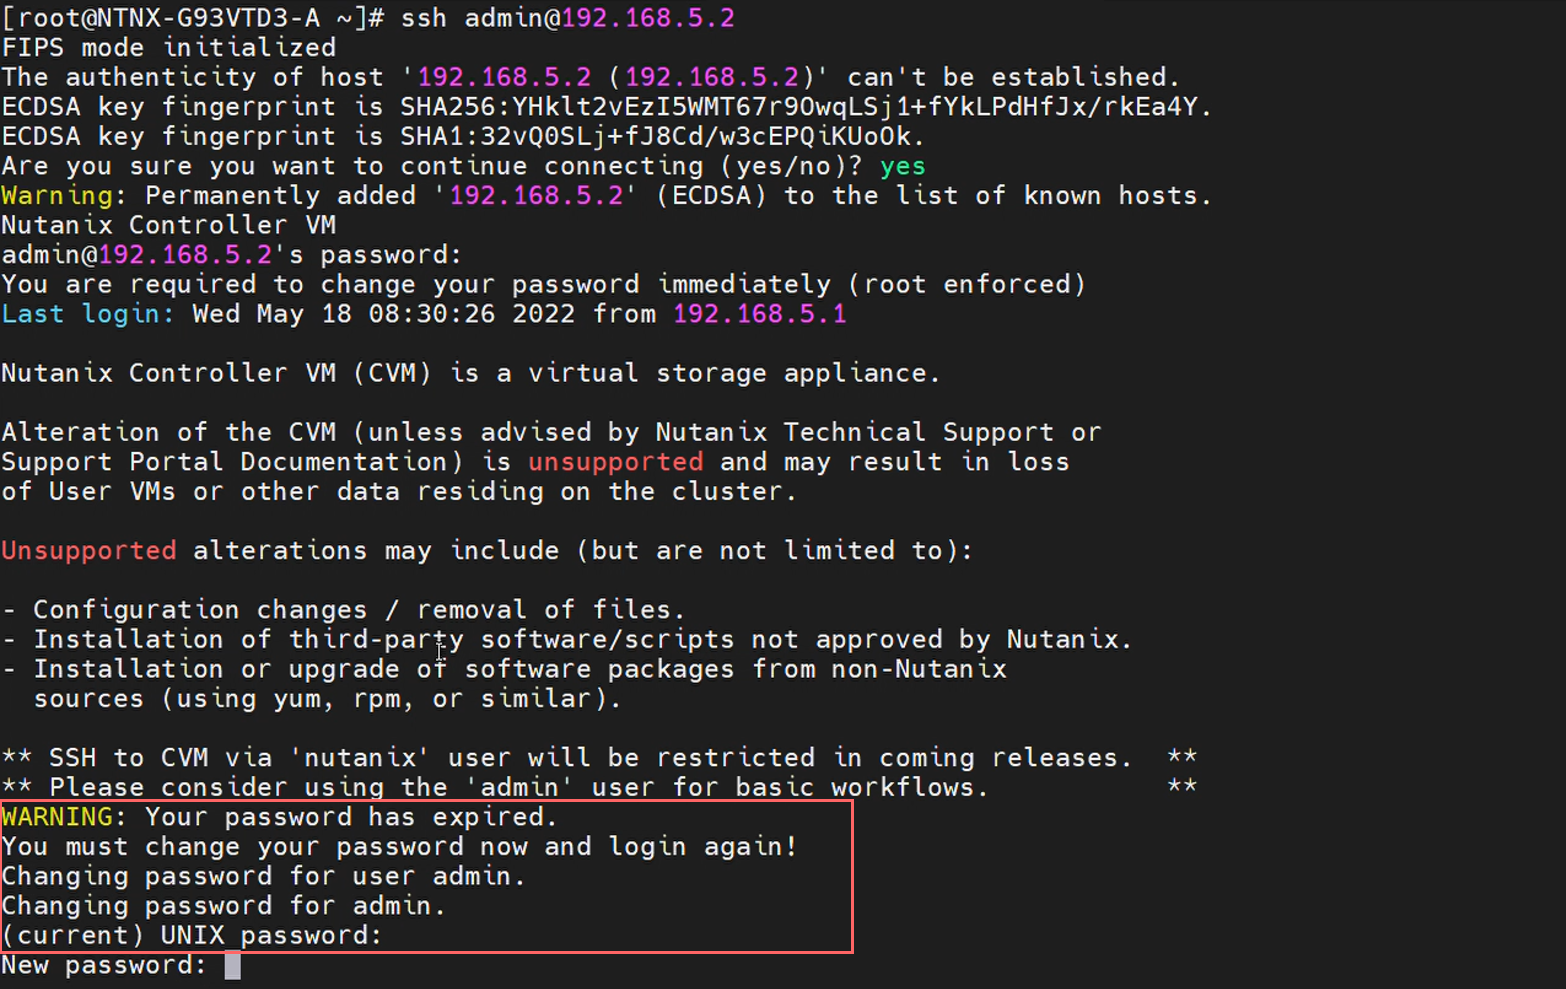
For instance, this may look like:
root@ahv# ssh admin@192.168.5.2
If this is the first time logging in to the CVM, you will be prompted to change the password from the default log in again.
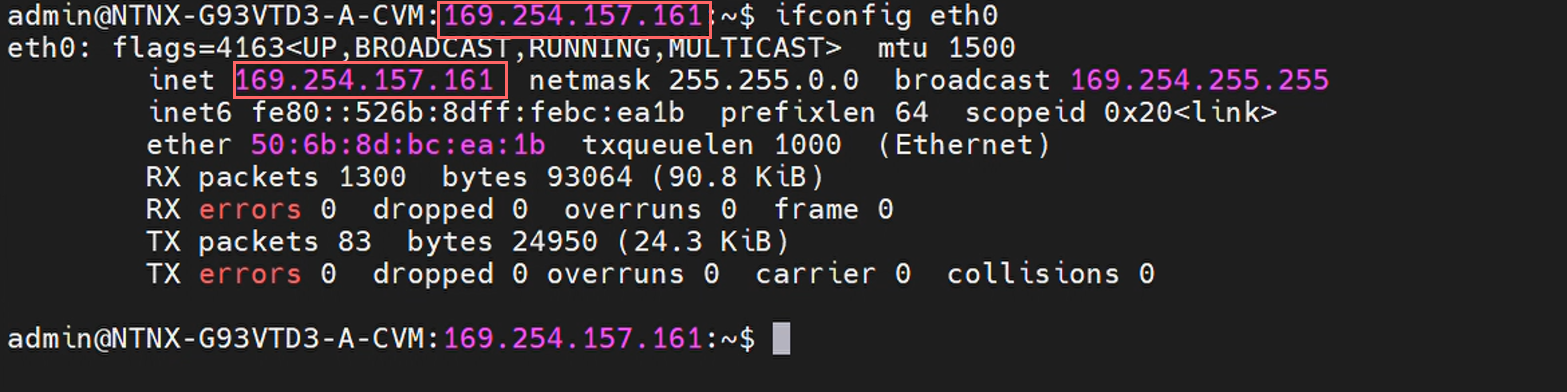
Once re-logged in to the CVM, you can view the current interface configurations, namely eth0 (external) and eth1 (internal). The CVM is always referenced by the external IP:
Summary of networking configuration
The following reference table summarizes the configuration for the entire environment (all in VLAN 50):
| Server | Component | IP Address |
|---|---|---|
nutanix-jump |
Management Interface | 192.168.50.254 |
nutanix-ahv01 |
AHV | 192.168.50.10 |
| CVM | 192.168.50.11 | |
nutanix-ahv02 |
AHV | 192.168.50.20 |
| CVM | 192.168.50.21 | |
nutanix-ahv03 |
AHV | 192.168.50.30 |
| CVM | 192.168.50.31 |
As there is no common network between all of the CVMs (across the three nodes), you'll begin by creating three single-node clusters. This allows you to make the appropriate configurations on each server. After which, you'll destroy the single-node clusters and create a new three-node cluster.
Creating a single node cluster
To create a single-node cluster on the Nutanix server, use the cluster command, setting the redundancy_factor option to 1:
admin@cvm# cluster -s <cvm_ip> --redundancy_factor=1 create
The cvm_ip value will be the external IP of the CVM (eth0) which is currently configured as a link-local address in the 169.254.x.x range, so for example:
admin@cvm# cluster -s 169.254.100.254 --redundancy_factor=1 create
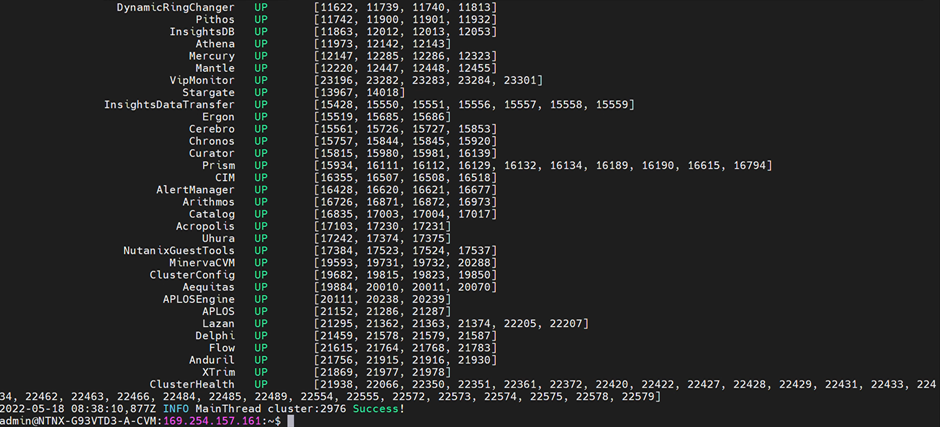
Executing this will start the cluster creation process, which will take some time with a lot of output. Once that is completed, use the cluster status command to check the status of the cluster:
admin@cvm# cluster status
You'll see output similar to this (with different PIDs):
Update the external IP address of the CVM
Now that the cluster has been created, you can modify the external IP address of CVM using the external_ip_reconfig command.
To execute this script, first stop the current cluster:
admin@cvm# cluster stop
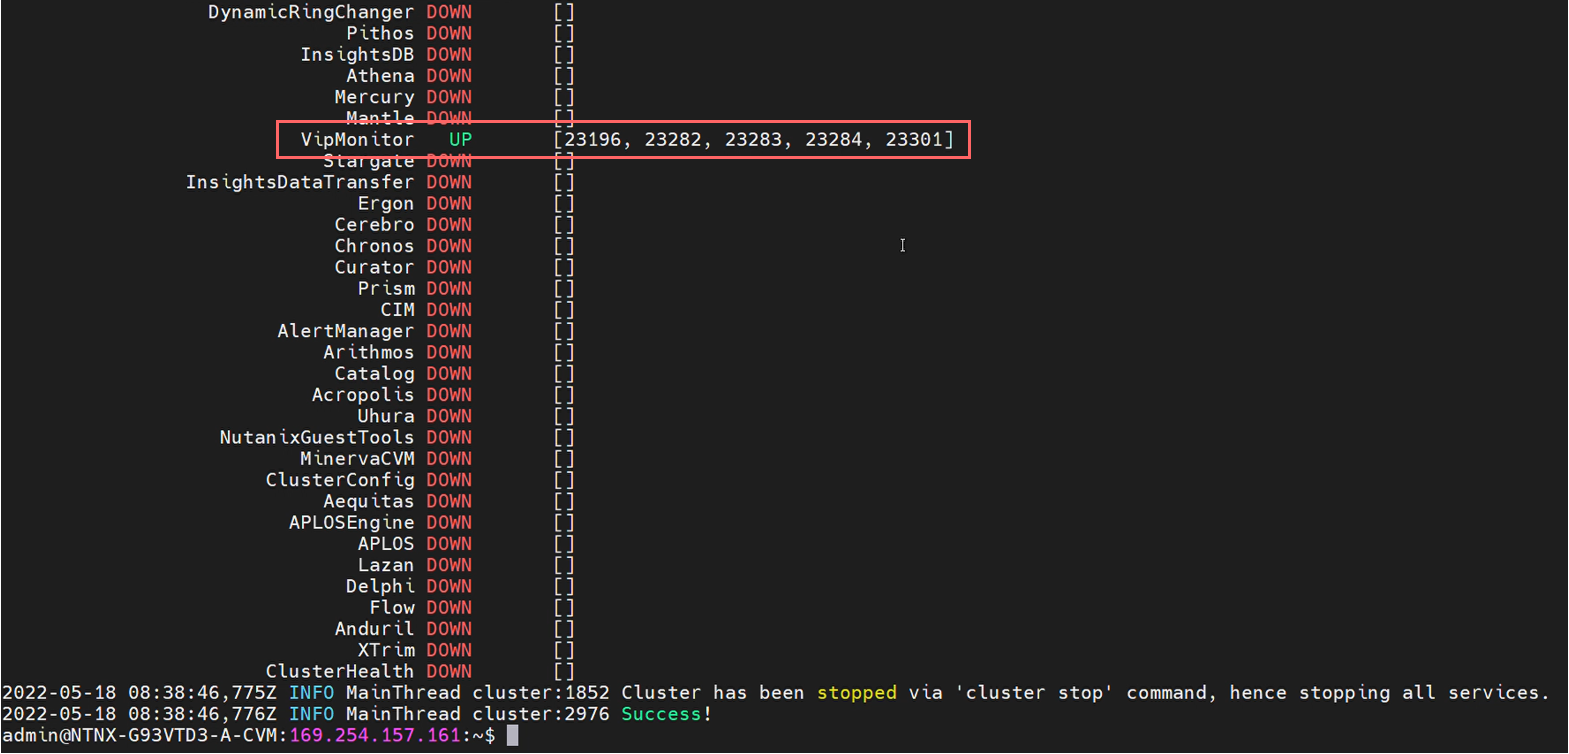
Every process except VipMonitor will shut down. You'll need to restart Genesis, a bootstrap service that will ensure everything is synced and performs some housekeeping for the CVM:
admin@cvm# genesis restart
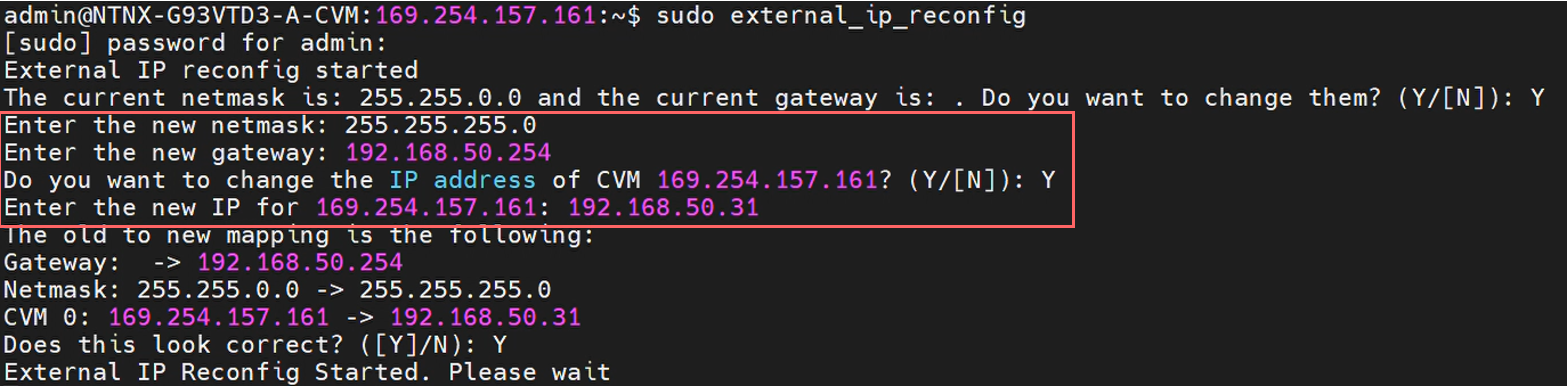
At this point, you can execute the script to reconfigure the external CVM IP. Due to the files within the CVM that the script interacts with, it needs to be run with elevated privileges:
admin@cvm# sudo external_ip_reconfig
This will start a workflow to reconfigure the network mask, default gateway, and interface IP of the CVM. For our node, these details will be:
Netmask: 255.255.255.0 Default Gateway: 192.168.50.254 CVM IP: 192.168.50.31
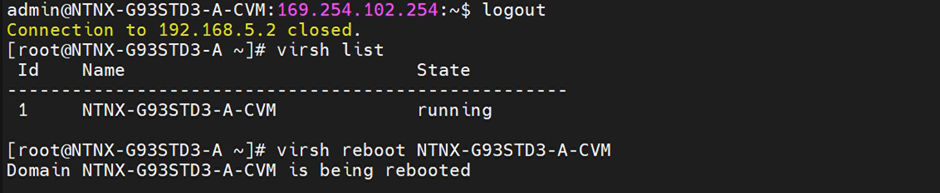
This reconfiguration will take a little bit of time to complete. Afterwards, log out of the CVM and use virsh to restart the VM:
root@ahv# virsh reboot <vm_name>
Which for this particular node is:
root@ahv# virsh reboot NTNX-G93STD3-A-CVM
When you log back into the CVM, the referenced external IP will have changed:
Update the VLAN at the CVM level
With the IP changed, You'll need to configure the VLAN that this network exists on. Remember, the management network defined in Metal was VLAN 50. The documentation in this process is available from this link.
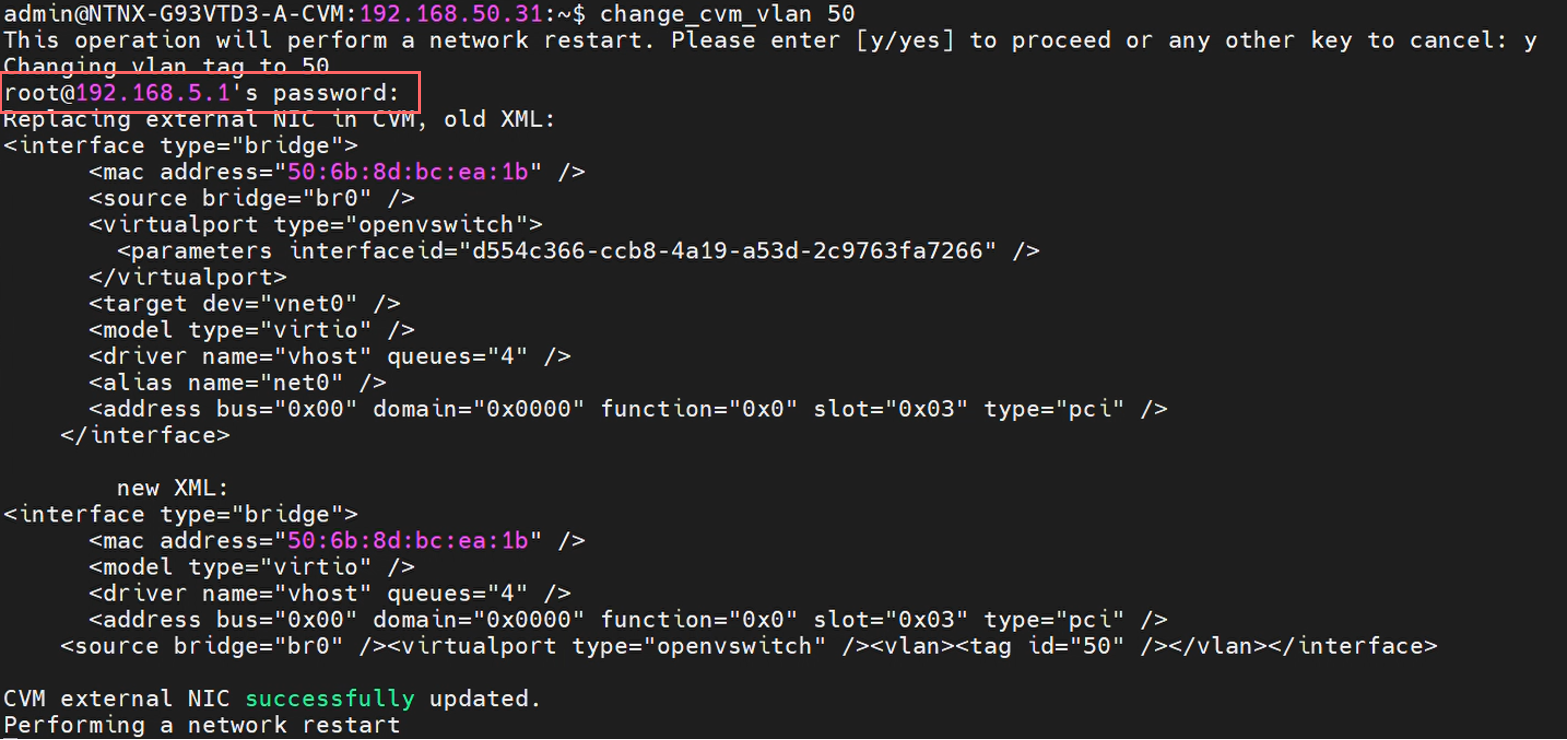
To do this, use the change_cvm_vlan command that is pre-installed on each CVM. Remember to log back into the CVM if needed.
admin@cvm# change_cvm_vlan <vlan_id>
Which for this environment would be:
admin@cvm# change_cvm_vlan 50
NOTE: The password that this process is asking for is that of AHV, not CVM! This is because the network changes are being configured on the virtual switch of the host.
These changes will take a long time to complete, but once successful, you can validate that it was successful at the AHV level. Check the tag on vnet0 (where the external interface of CVM is attached):
root@ahv# ovc-vsctl show
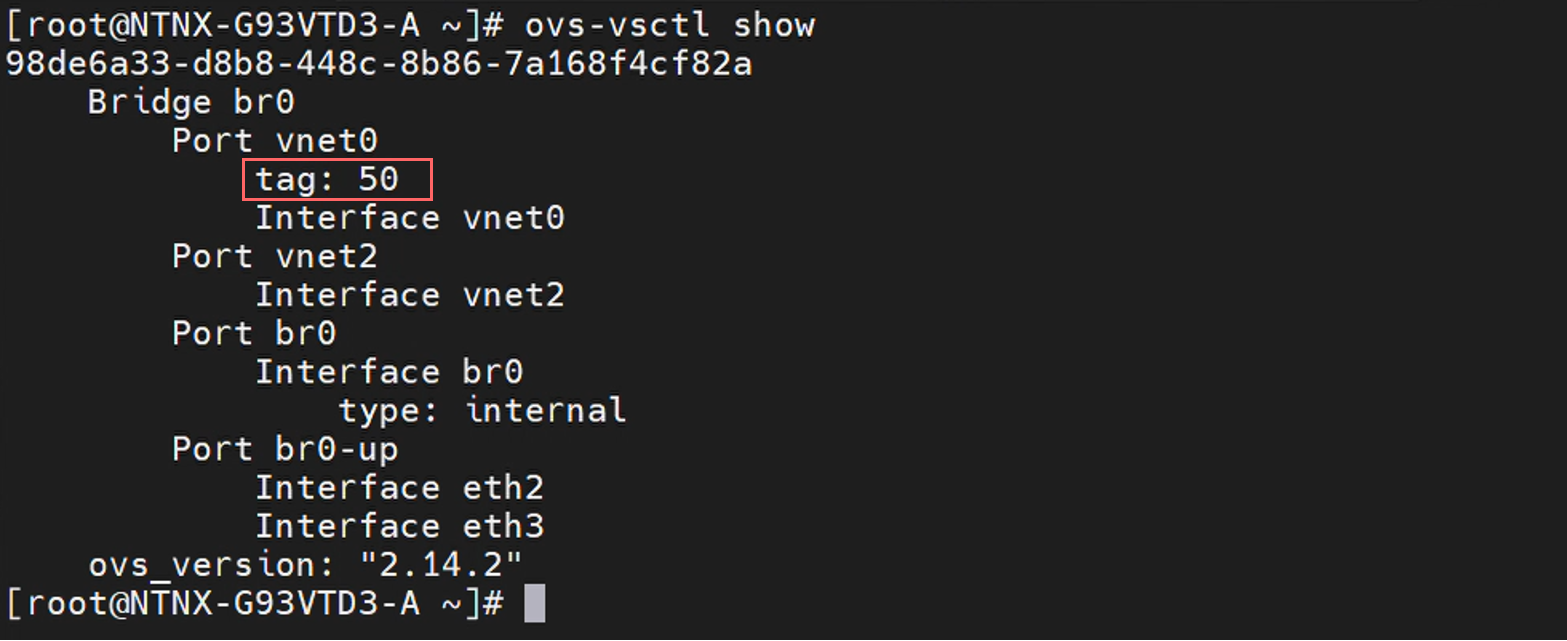
That completes the configuration of CVM. Now you can move on to AHV where similar changes will be made.
Update br0 at the AHV level
For each AHV, you'll need to make the following changes:
-
br0needs to be configured in the same subnet (VLAN 50) –192.168.50.0/24 -
br0needs to be tagged with VLAN 50
Log into the AHV as root and view the network-scripts configuration file for br0:
root@ahv# cat /etc/sysconfig/network-scripts/ifcfg-br0
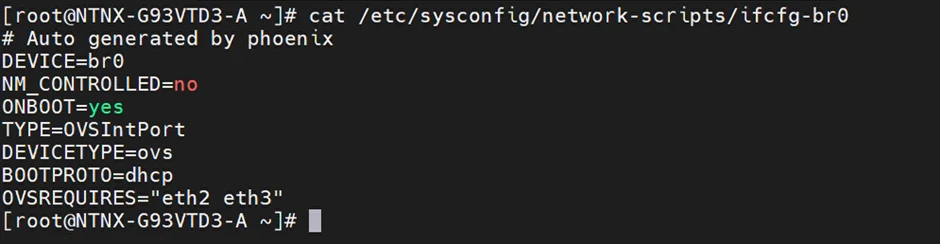
Right now, the interface is configure to receive addresses via DHCP (from Metal). Update the file with nano or vi:
root@ahv# nano /etc/sysconfig/network-scripts/ifcfg-br0
Change the configuration to look like the following:
DEVICE="br0"
NM_CONTROLLED="no"
ONBOOT="yes"

TYPE="ethernet"
BOOTPROTO="none"

PERSISTENT_DHCLIENT=1
NETMASK="255.255.255.0"
IPADDR="192.168.50.30"
GATEWAY="192.168.50.254"
Restart the network service to make the changes take effect:
root@ahv# /etc/init.d/network restart
Log into the CVM and restart the Genesis service:
admin@cvm# genesis restart
Finally, tag the br0 interface to place AHV in the management network.
root@ahv# ovs-vsctl set port br0 tag=<vlan_tag>
Which for this deployment would be:
root@ahv# ovs-vsctl set port br0 tag=50
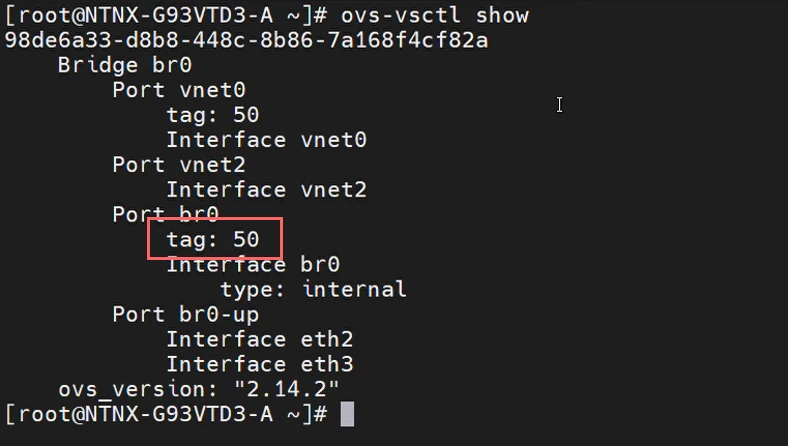
Confirmed the changes with the following command:
root@ahv# ovs-vsctl show
Check that the br0 port now has a tag of 50:
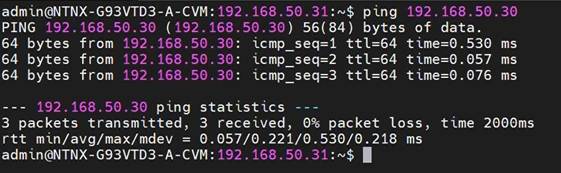
Verify with a ping test
Verify the configuration works with a ping test between AHV and CVM across vs0, as both interfaces are in VLAN 50:
admi@cvm# ping 192.168.50.30
There is a chance that the CVM will not display the external IP, which causes the ping test to fail. Restart the CVM with virsh to solve the issue:
root@ahv# virsh reboot <vm_name>
Destroy the cluster
Because the hosts were brought up in single-node clusters to configure the IPs, you first have to destroy those clusters. This will remove the CVM IP from the current cluster and allow you to reassign it to a new cluster.
Log in to the CVM and run the cluster destroy command.
admin@cvm# cluster destroy
After destruction, the CVM password might be reset. If it has, log out of CVM and log back in using the default credentials (username: admin, password: Nutanix/4u).
Verify that the process is complete by checking the cluster's status on each node:
admin@cvm# cluster status
Setup a three-node cluster
When the process is complete, you'll left with three nodes, each of which has their AHV and CVMs configured in a single management network. You can now create the three-node cluster.
From any CVM, run the following command:
admin@cvm# cluster -s <cvm_ips> create
In this example, it is:
admin@cvm# cluster -s 192.168.50.11,192.168.50.21,192.168.50.31 create
Nutanix will build a new cluster containing the three nodes. Again this will take some time to complete.
Testing the cluster
Once the configuration is finished, you can test the cluster. Since the CVM interface is in the same network as the management interface of the jump host, you can reach the Nutanix cluster from there.
Log in to the jump host, load a browser and connect to any of the CVM IP addresses. If everything has worked, the Nutanix Prism Console should be visible.
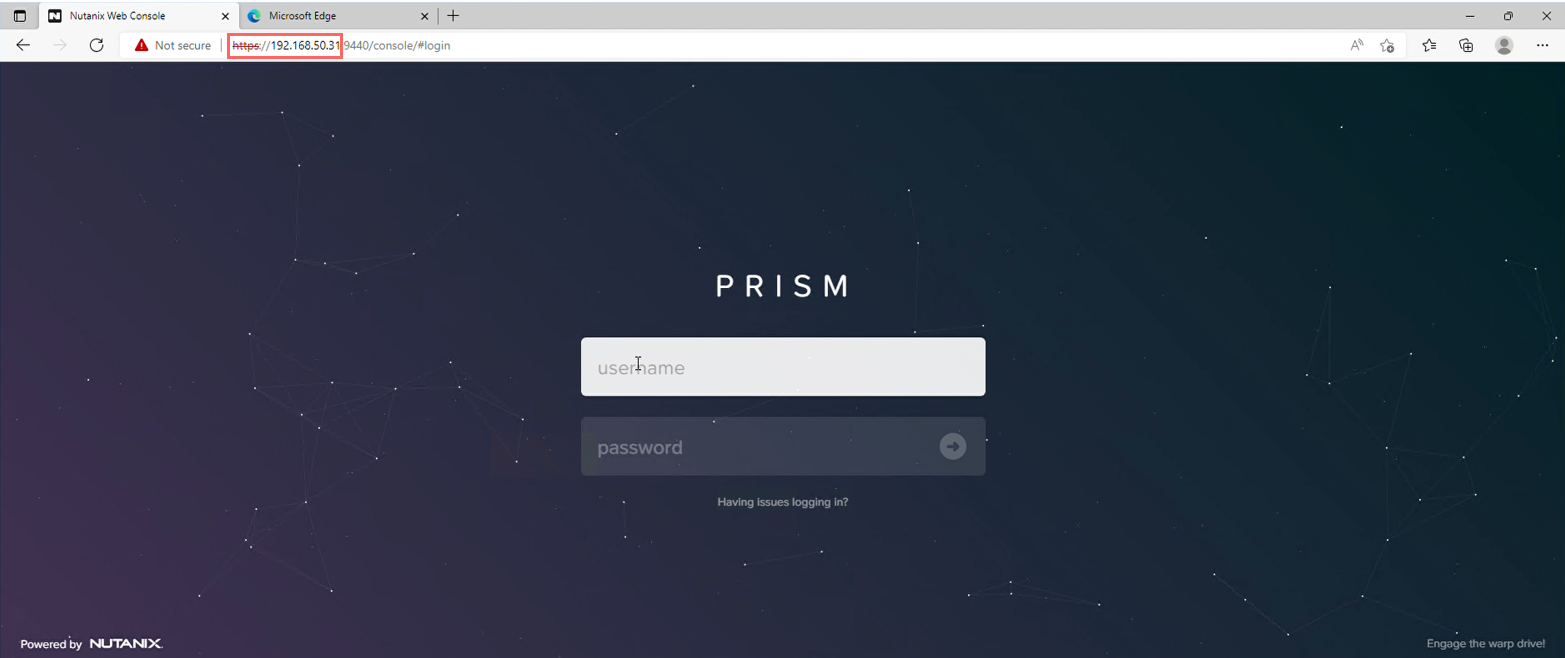
This portal uses the same credentials as the CVM itself. Log in and accept the license agreement, after which you'll see the management console, ready for other configuration.

You have now successfully deployed a multi-node Nutanix cluster.
Summary
In this guide we covered how to deploy the required infrastructure -- three Nutanix hosts and a jump host -- through Equinix Metal. You also configured each host to work in a multi-node configuration. To learn more about Nutanix and Equinix, check out the following resources:
Last updated
29 September, 2024Category
You may also like
Dig deeper into similar topics in our archives
Configuring BGP with BIRD 2 on Equinix Metal
Set up BGP on your Equinix Metal server using BIRD 2, including IP configuration, installation, and neighbor setup to ensure robust routing capabilities between your server and the Equinix M...

Configuring BGP with FRR on an Equinix Metal Server
Establish a robust BGP configuration on your Equinix Metal server using FRR, including setting up network interfaces, installing and configuring FRR software, and ensuring secure and efficie...

Crosscloud VPN with WireGuard
Learn to establish secure VPN connections across cloud environments using WireGuard, including detailed setups for site-to-site tunnels and VPN gateways with NAT on Equinix Metal, enhancing...

Deploy Your First Server
Learn the essentials of deploying your first server with Equinix Metal. Set up your project & SSH keys, provision a server and connect it to the internet.

Ready to kick the tires?
Use code DEPLOYNOW for $300 credit