- Home /
- Resources /
- Learning center /
- Red Hat OpenShift...
Red Hat OpenShift on Equinix Metal
Run Kubernetes on Equinix Metal with Red Hat’s compliant and supported distribution, OpenShift Container Platform.

On this page
Who’s This For?
Are you looking to run Kubernetes on bare metal? There’s a lot of challenges and if you’re an existing Red Hat customer, adopting OpenShift Container Platform could be the best route for you. You’ll get a fully CNCF compliant Kubernetes cluster that you can hook into your Red Hat support contracts across the full-stack.
Getting Started
In-order to get started, there are a few prerequisites that must be satisfied.
Equinix Metal Account
You’ll need to create a project and a project level API key. To create these, please follow these steps:[1]
- Login to the Equinix Metal Console
- Browse to the Organizations page
- Select your organization
- Click “Add new” to create a new project
- Click on “Project Settings”
- Copy the “Project ID” and keep it handy for later
- Click on “API Keys”
- Click “Add an API Key”
- Name it anything you like, such as “Terraform” and ensure it is “Read/Write” and create
- Copy this token and keep it handy for later
[1] Because Equinix Metal uses the organization ID in the URLs, we can’t provide nice links for these creations.
Red Hat Account
You’ll need an OpenShift Cluster Manager API token.
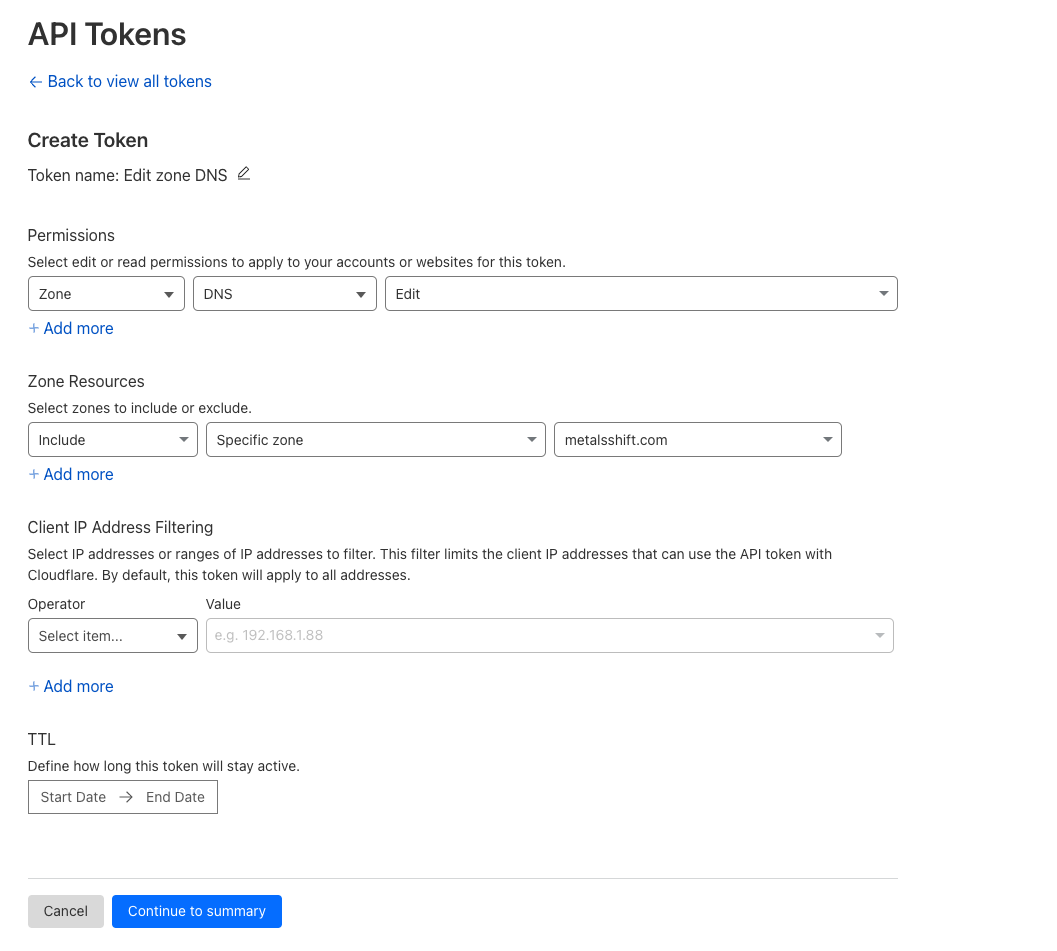
Cloudflare Account
You’ll need an API token and a domain name configured with Cloudflare nameservers. For this guide, we’ll be using the domain name metalsshift.com.
Please ensure your API token is configured with the following permissions for your chosen domain.
Local Tooling
The Terraform provisioner uses local-exec provider, which will required the machine you run Terraform on to have the following tools available:
-
curl -
jq
Terraform Variables
This guide uses the OpenShift via Terraform on Equinix Metal Terraform module collection.
Export Equinix Metal Variables
export TF_VAR_project_id="COPIED PROJECT ID FROM EQUINIX METAL SERTUP INSTRUCTIONS"
export TF_VAR_auth_token="COPIED API KEY FROM EQUINIX METAL SETUP INSTRUCTIONS"
Export Red Hat Variables
export TF_VAR_ocp_cluster_manager_token="COPIED API TOKEN FROM RED HAT SETUP INSTRUCTIONS"
Export Cloudflare Variables
export TF_VAR_dns_provider="cloudflare"
export TF_VAR_dns_options='{"api_token": "API TOKEN FROM CLOUDFLARE SETUP INSTRUCTIONS" }'
The default DNS provider is “cloudflare” and technically doesn’t need to be configured via a TF_VAR. However, it’s generally better to make these decisions explicitly than to rely on default behaviors.
Export Configuration Variables
export TF_VAR_cluster_basedomain="metalsshift.com"
Helping Future You
If you’re using this setup for a production cluster, you’ll want to prepare these tokens for multiple runs and perhaps even some automation. As such, you can store these exports inside a .envrc file and store it securely, or make these variables available within your CI system, such as Github Actions.
Preparing First Deploy
We need to ensure that Terraform fetches the required providers, and modules and also ensure that our lockfile upgrades to the latest versions of each.
terraform init -upgrade
terraform validate
First Deploy
Let’s kick off our first deployment with terraform apply. Note, before running you may have to comment out the AWS module and provider.
As part of this first deployment, our Terraform code is creating an Equinix Metal device that will act as our load balancer. After the load balancer is created, it then creates all our DNS records, user-data templates, and then finally bootstraps our cluster with a bootstrap machine and the OpenShift machines.
This will take anywhere from 30-50 minutes, so please be patient.
Accessing OpenShift
Now that the first deployment has completed, we can now begin to work with out OpenShift cluster.
You can run terraform output to access all the values you need to access the UI. Specifically, you can get the instructions to access the UI with terraform output Information.
This provides:
- URL for UI
- Credentials, username and password
- Export command to configure the local
kubectlaccess
Removing the Bootstrap Server
Once the first run is completed, it’s important to run Terraform again in order to clean up the bootstrap machine. This machine serves no purpose after the OpenShift deployment and should be removed in order to clean up and reduce on-going costs.
To remove the bootstrap machine, update the Terraform variables and set TF_VAR_count_compute=0 in your .envrc file, or as an environment variable in your CICD pipeline.
If you wish to perform this action with a manual terraform apply, you can with:
terraform apply -var=count_bootstrap=0
However, any subsequent runs of Terraform that forget this variable will recreate the bootstrap machine; so ensure that it’s either changed in code or environment.
Monitoring
OpenShift deploys Thanos with Prometheus, Grafana, and some basic exporters to the cluster to give you an overview of the node usage within your cluster. You can reach Grafana by using kubectl (or oc) to get the routes within the openshift-monitoring namespace. You’ll find the hostnames for Grafana, AlertManager, Prometheus, and Thanos.
kubectl -n openshift-monitoring get routes
All authentication is via the OpenShift admin credentials available via terraform output.
Backup and Restore
Control Plane
In-order to back up the control plane, we must first access one of the nodes. You can get the IP address for these nodes from the Terraform output: terraform output openshift_controlplane_ips.
When on one of the control plane machines, you can use the OpenShift provided backup script that creates a snapshot of etcd.
/usr/local/bin/cluster-backup.sh /home/core/assets/backup
This script will create two files inside /home/core/assets/backup. The snapshot_* file is a snapshot of etcd. This should be transferred off site and OpenShift provides no automated way to handle this. This is entirely up to you as the cluster operator.
The second file is the static_kuberesources_* file, which contains the static manifests and the etcd encryption keys. Again, it’s up to you to keep this file stored in a safe location. As it contains the etcd encryption keys (if encryption is enabled), you should keep this in a separate location from the snapshot above.
Workloads
OpenShift recommends using Velero for backup and restore. This can be deployed as any other Kubernetes resource using helm.
Once deployed, you’ll need an S3-compatible storage system to store the backups. You can use S3 itself, or deploy MinIO.
Conclusion
Thanks for following along with this guide! In this guide we covered various topics around getting up and running with OpenShift on Equinix Metal.
Specifically, we covered:
- Leveraging our support for Terraform.
- Accessing the OpenShift UI.
- Performing post-install steps, such as removing the bootstrap server, and accessing monitoring.
Good luck with your deployment! You can get started with Equinix Metal by going to https://deploy.equinix.com/get-started/.
You may also like
Dig deeper into similar topics in our archives
Configuring BGP with BIRD 2 on Equinix Metal
Set up BGP on your Equinix Metal server using BIRD 2, including IP configuration, installation, and neighbor setup to ensure robust routing capabilities between your server and the Equinix M...

Configuring BGP with FRR on an Equinix Metal Server
Establish a robust BGP configuration on your Equinix Metal server using FRR, including setting up network interfaces, installing and configuring FRR software, and ensuring secure and efficie...

Crosscloud VPN with WireGuard
Learn to establish secure VPN connections across cloud environments using WireGuard, including detailed setups for site-to-site tunnels and VPN gateways with NAT on Equinix Metal, enhancing...

Deploy Your First Server
Learn the essentials of deploying your first server with Equinix Metal. Set up your project & SSH keys, provision a server and connect it to the internet.

Ready to kick the tires?
Use code DEPLOYNOW for $300 credit