- Home /
- Resources /
- Learning center /
- Load Balancing and...
Load Balancing and High Availability
Learn how to implement critical backup with load balancing and high availability on Equinix Metal servers.

On this page
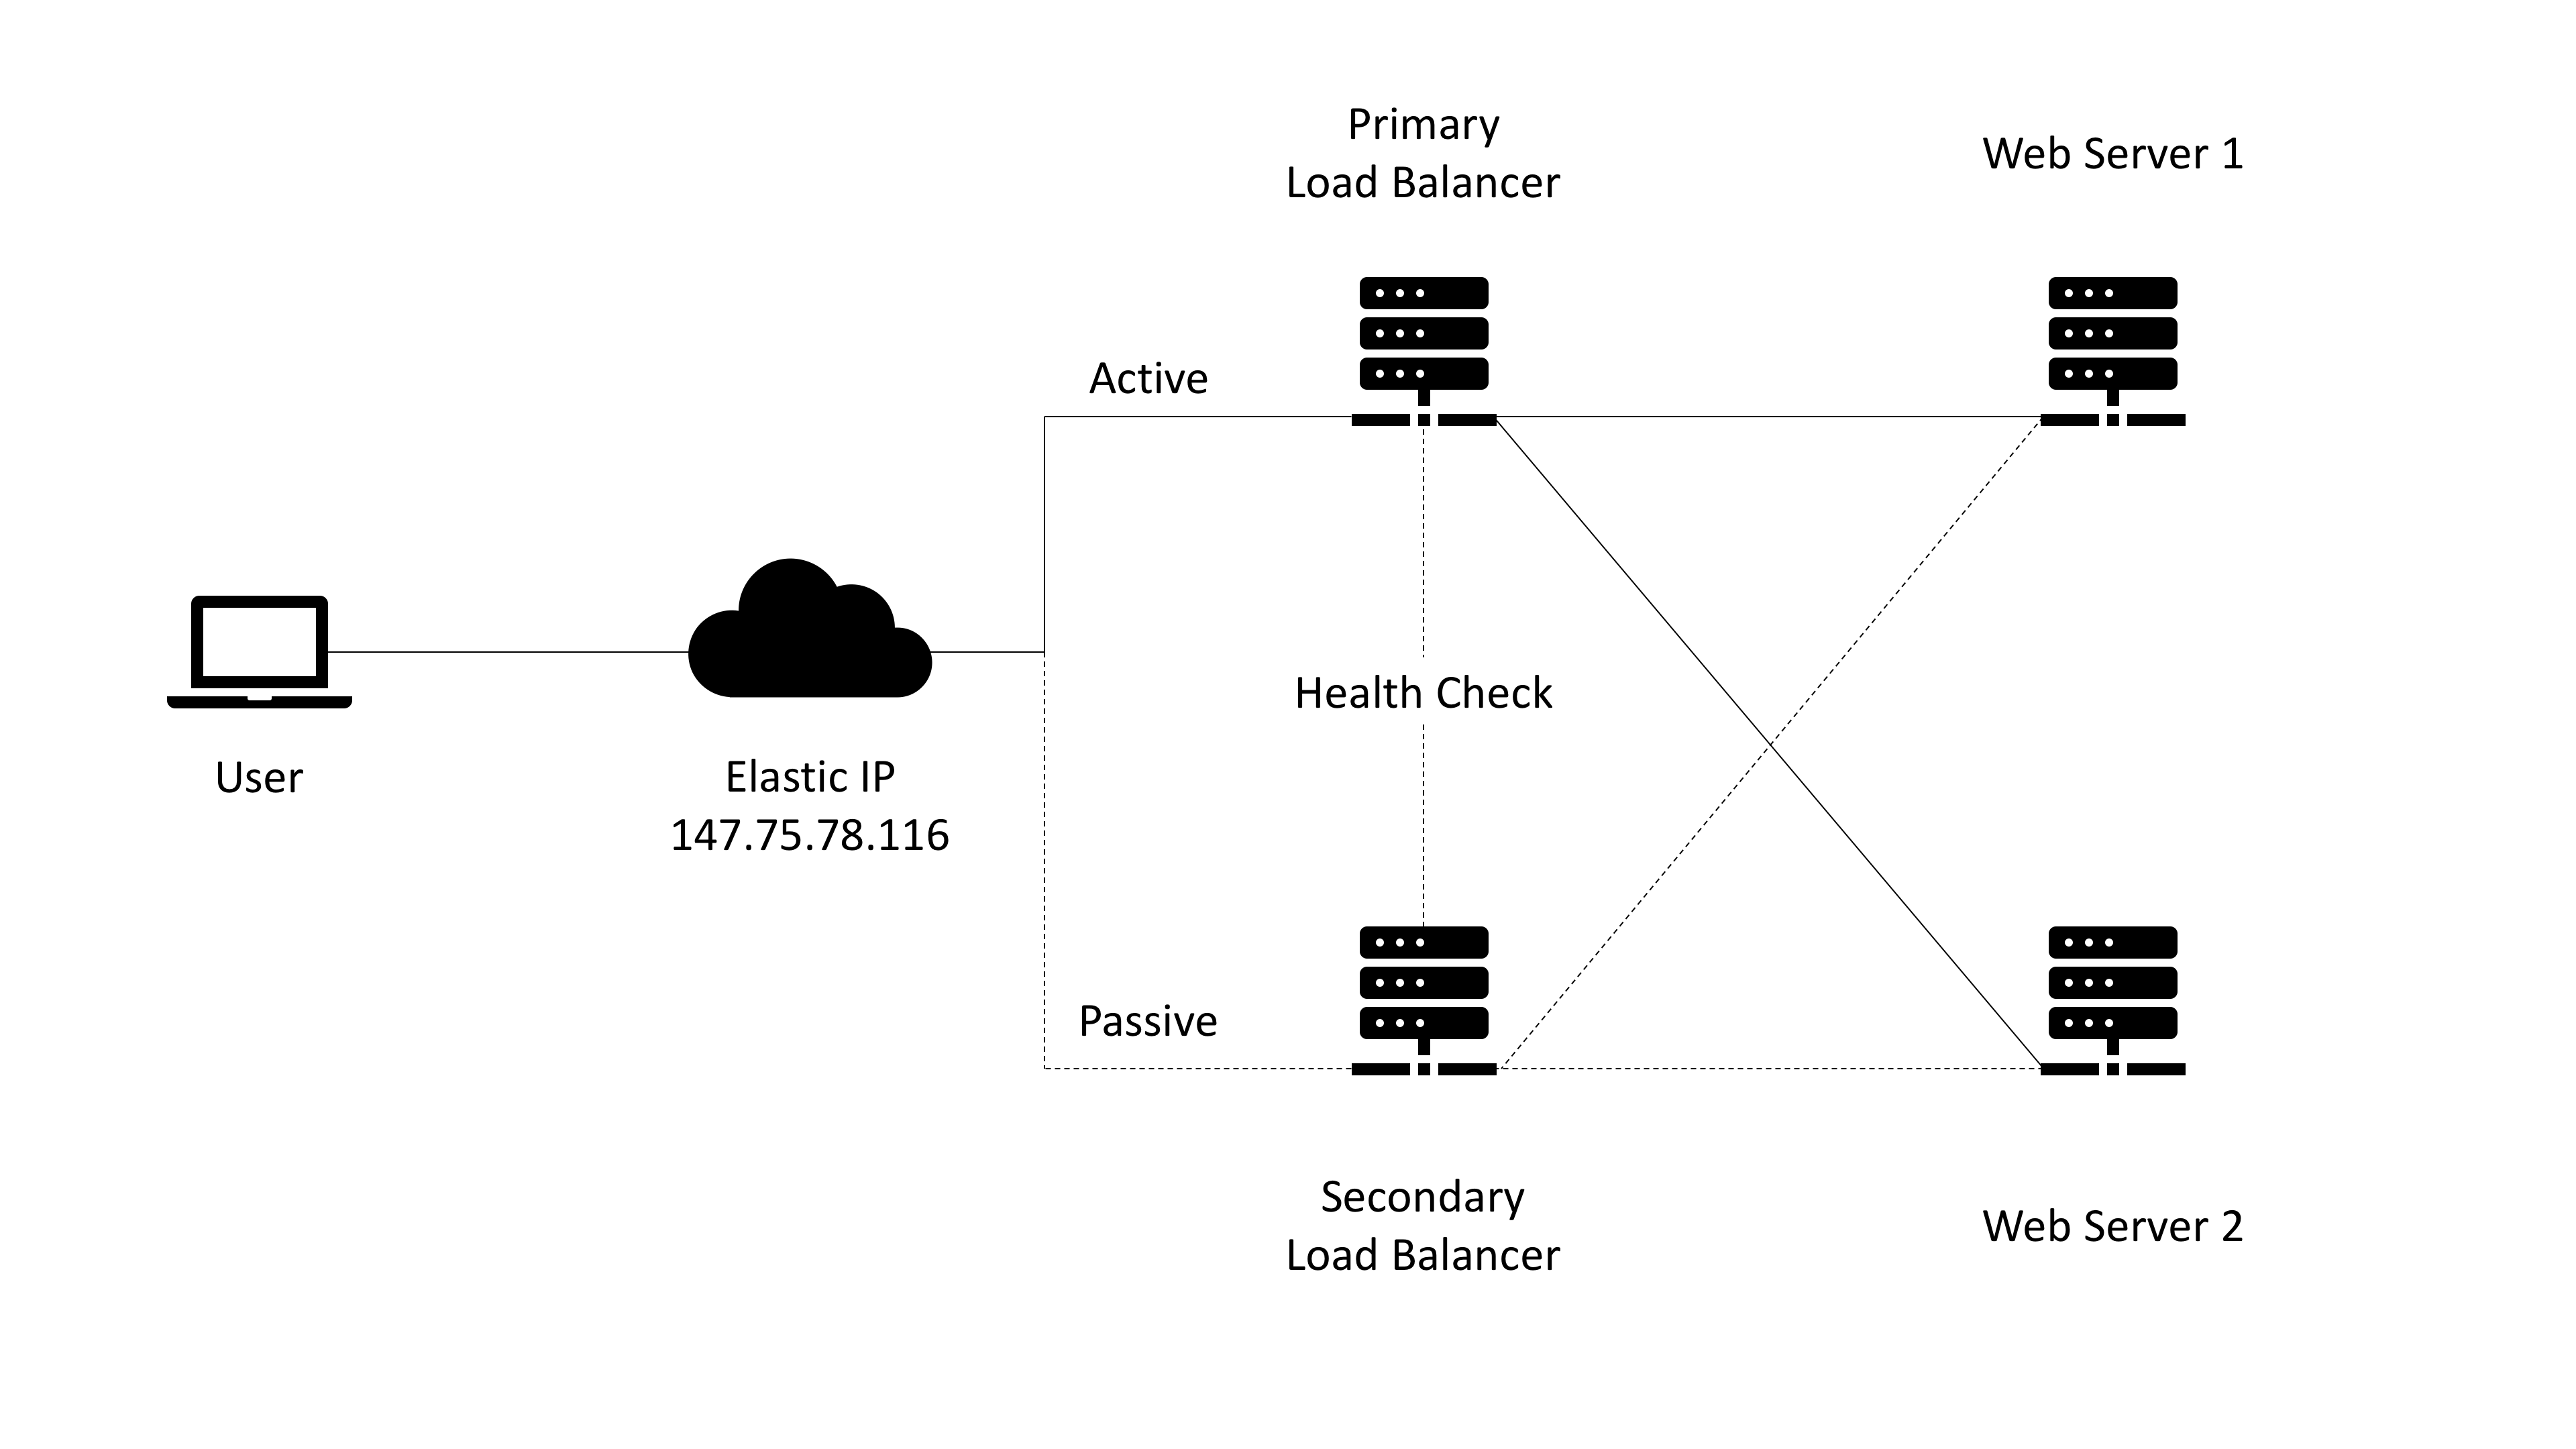
For any application or website that you have deployed, it's crucial to have load balancing and high availability implemented to sustain high traffic and failover in case your primary infrastructure goes down.
For those that are not familiar with these topics, in essence, load balancing refers to efficiently distributing incoming network traffic across a group of backend servers, also known as a server farm or server pool. High availability ensures that the server pool is ready for user requests in situations when your primary load balancer fails and you reroute that traffic to your backup/secondary load balancer with very minimal downtime which is usually not noticeable by users.
Prerequisites
For this guide, you will need four servers that support hybrid and layer 2 networking modes (servers with 2x 10gbps ports). The m1.xlarge.x86 server type with Ubuntu 19.04 is used in this guide but you can also go through it with other operating systems although you might need to make slight adjustments.
Two of the servers will be the Load Balancers and we will be using HAProxy for load balancing and Keepalived for high availability. These load balancers will be configured identically and will be setup in an active/passive mode. They will also act as a gateway for the web servers. The idea is that the active load balancer will route traffic to each web server in round robin mode. When the active load balancer crashes, the load balancer fails over to the passive node which routes traffic to the web servers.
The other two servers will the web servers with Nginx and they will be mostly identical with the main differences including different private IPs and html index text to see the load balancing in action.
You will need to create an Equinix Metal project and activate BGP for the project (local BGP works fine for this demo), which will be used to announce the load balancer public IP address. You will also need to create a Layer 2 VLAN (used for private communication between servers) in the datacenter where all the servers will reside. Lastly, request a single /32 elastic IP (public IPv4 address for the load balancer).
Configuration
Networking setup
Now that we have the prerequisites out of the way, we can start deploying and configuring the network for the webservers:
Deploy two servers and switch them to full bonded layer 2 mode. Next, configure the networking configuration by going to the interfaces configuration file in Ubuntu (This will be different for other operating systems such as CentOS):
For this guide, I will be using 192.168.1.10 and 192.168.1.11 as the private webserver IPs but you can use other IPs in the subnet range, and 192.168.1.1 as the gateway.
nano /etc/network/interfaces
You will need to change the following from the bond0 interface on both webservers:
# By default, these will be the public IP addresses of the server and gateway.

# Web server 1 configuration:

address 192.168.1.10
netmask 255.255.255.0
gateway 192.168.1.1

# Web server 2 configuration

address 192.168.1.11
netmask 255.255.255.0
gateway 192.168.1.1
Once you've saved your changes, restart the networking service for changes to be applied with the following command (a server reboot works as well):
service networking restart
Now we can deploy the other two load balancing servers and switch them to mixed/hybrid networking mode. You will need to configure the second networking interface by removing it from the bond0 interface and assigning it's private IP address in the OS. Both load balancing servers will have the same private IP address of 192.168.1.1 that will be the gateway for the two webservers which are in an isolated layer 2 environment.
Edit the interfaces configuration file:
nano /etc/network/interfaces
The configuration should look like this but with the correct IPs:
Mainly removing the second interface from bond-slaves in bond0, configuring the elastic IP that you requested earlier as an alias of bond0 and configuring the second interface with the private IP. Elastic IPs are usually configured as Loopback (lo) aliases but Keepalived does not work with loopback interfaces so we are adding it to bond0.
auto lo
iface lo inet loopback

auto bond0
iface bond0 inet static
    address 147.75.104.177
    netmask 255.255.255.254
    gateway 147.75.104.176
    bond-downdelay 200
    bond-miimon 100
    bond-mode 4
    bond-updelay 200
    bond-xmit_hash_policy layer3+4
    bond-lacp-rate 1
    bond-slaves ens14f0
    dns-nameservers 147.75.207.207 147.75.207.208

iface bond0 inet6 static
    address 2604:1380:1:5600::d
    netmask 127
    gateway 2604:1380:1:5600::c

auto bond0:0
iface bond0:0 inet static
    address 10.99.181.141
    netmask 255.255.255.254
    post-up route add -net 10.0.0.0/8 gw 10.99.181.140
    post-down route del -net 10.0.0.0/8 gw 10.99.181.140

auto bond0:1
iface bond0:1 inet static
   address 147.75.78.116
   netmask 255.255.255.255

auto ens14f0
iface ens14f0 inet manual
    bond-master bond0

auto ens14f1
iface ens14f1 inet static
    address 192.168.1.1
    netmask 255.255.255.0
Save the file and exit.
Next, make sure IP forwarding is enabled on the load balancing servers so that the web servers have internet access. You can do this by running the following commands:
sysctl net.ipv4.ip_forward=1 (for ipv4)
sysctl net.ipv6.conf.all.forwarding=1 (for ipv6)
To make these changes persistent across reboots, edit the sysctl.conf file:
nano /etc/sysctl.conf
Uncomment the following lines or add them if not shown in file:
net.ipv4.ip_forward=1 (for ipv4)
net.ipv6.conf.all.forwarding=1 (for ipv6)
Now we need to setup NAT by adding a new IP masquerade rule to the NAT table with iptables. We want this to route traffic from any of our private IPs through the internet facing network interface, in this case, bond0. The following IP tables command will setup NAT:
iptables -t nat -A POSTROUTING -s 192.168.1.0/24 -o bond0 -j MASQUERADE
To make it persistent across reboots, we need to use iptables-persistent:
apt-get install iptables-persistent
The installation will ask if you want to save the current configuration for ipv4 and ipv6, type yes.
To check the iptables rules:
nano /etc/iptables/rules.v4 (for IPv4)
nano /etc/iptables/rules.v6 (for IPv6)
Then we need to restart the networking service or reboot the server for the changes to apply.
service networking restart
At this point, the layer 2 web servers should be able to reach the public internet through the gateway load balancing servers.
Nginx web server setup
Now we will setup and configure Nginx on the web servers. Update all packages of the OS, install Nginx and edit the html index file to represent each separate server for demo purposes.
apt update && apt upgrade -y
apt install nginx
This step is optional, only needed to see the load balancing in action later.
nano /var/www/html/index.nginx-debian.html
Change the "welcome to nginx" text to something unique for each web server so we can see the load balancer in action later.
Configure Nginx to only allow requests from the Load Balancers. We want to tell Nginx to only listen for requests on the private IP address of the server. Furthermore, we will only serve requests coming from the private IP address of our two load balancers.
To make these changes, open the default Nginx server block file on each of your web servers:
nano /etc/nginx/sites-available/default
To start, we will modify the listen directives. Change the listen directive to listen to the current web server’s private IP address on port 80. Delete the extra listen line. Afterwards, we will set up two allow directives to permit traffic originating from the private IP addresses of our two load balancers. We will follow this up with a deny all rule to forbid all other traffic:
Web server 1 configuration:
server {
    listen 192.168.1.10:80;
    allow 192.168.1.1;
    deny all;
    . . .
Web server 2 configuration:
server {
    listen 192.168.1.11:80;
    allow 192.168.1.1;
    deny all;
    . . .
Save and close the files when you are finished.
Test that the changes that you made represent valid Nginx syntax by typing:
sudo nginx -t
If no problems were reported, restart the Nginx daemon by typing:
service nginx restart
Elastic IP configuration with BGP
Now go back to the load balancer hybrid servers, we will need to announce the public elastic IP with BGP from both nodes. We will be using the BIRD BGP speaker for this guide:
apt-get install bird
Edit the bird configuration file. You will find the file that BIRD uses at /etc/bird/bird.conf
I like to backup the existing file, which has some good explanations and examples.
mv /etc/bird/bird.conf /etc/bird/bird.conf.original
Then write a new configuration file for our setup, as follows: (Each server will have unique private bond0 and gateway IPs (10.x.x.x), these are used for BGP announcements on Equinix Metal for IPv4 addresses.)
nano /etc/bird/bird.conf
and add the following:
filter metaldns {
# IPs to announce (the elastic ip in our case)
# Doesn't have to be /32. Can be lower
if net = 147.75.78.116/32 then accept;
}

# your (Private) bond0 IP below here (unique to each LB server)
router id 10.10.237.129;
protocol direct {
interface "bond0"; # Restrict network interfaces it works with (it's lo in the BGP guide, changed to bond0)
}

protocol kernel {
# learn; # Learn all alien routes from the kernel
persist; # Don't remove routes on bird shutdown
scan time 20; # Scan kernel routing table every 20 seconds
import all; # Default is import all
export all; # Default is export none
# kernel table 5; # Kernel table to synchronize with (default: main)
}

# This pseudo-protocol watches all interface up/down events.
protocol device {
scan time 10; # Scan interfaces every 10 seconds
}

# your default gateway IP below here (unique to each LB server)
protocol bgp {
export filter rdns;
local as 65000;
neighbor 10.10.10.237.128 as 65530;
#password "md5password";
}
Save that file and restart the bird service, as follows:
service bird restart
Enable BGP for the server in the Equinix Metal™ console via the server detail page:
Go to the BGP tab of the server's overview page, and click Manage for IPv4 or IPv6, then click Enable BGP.
Note! It takes up to 5-10 minutes for BGP to come up, and it will learn the route(s) that we are announcing from our server. From my experience the learned routes have been instant. You can update the BGP status on the server detail page, click the button because that page only updates automatically every 6 hours.
In the server we can check the status of BGP by opening the bird daemon with the command:
birdc
Then we check the status of the BGP announcement with:
show protocols all bgp1
If the peering has been successful we will see it:
bird> show protocols all bgp1
name proto table state since info
bgp1 BGP master up 18:06:06 Established
 Preference: 100
 Input filter: ACCEPT
 Output filter: metaldns
 Routes: 0 imported, 1 exported, 0 preferred
 Route change stats: received rejected filtered ignored accepted
Import updates: 0 0 0 0 0
Import withdraws: 0 0 --- 0 0
Export updates: 1 0 0 --- 1
Export withdraws: 0 --- --- --- 0
 BGP state: Established
Neighbor address: 10.99.69.8
Neighbor AS: 65530
Neighbor ID: 192.80.8.235
Neighbor caps: refresh restart-aware AS4
Session: external AS4
Source address: 10.99.69.9
Hold timer: 85/90
Keepalive timer: 26/30
As you can see, the BGP state is Established and we are exporting 1 route.
If you check the server detail page, you will also see the route learned. The elastic IP should now be reachable.
HAProxy load balancing configuration
Next, let's configure HAProxy for layer 4 tcp load balancing. This will be identical for both servers.
apt-get install haproxy
We can open the main HAProxy configuration file:
nano /etc/haproxy/haproxy.cfg
The first item that we need to adjust is the mode that HAProxy will be operating in. We want to configure TCP, or layer 4 load balancing. To do this, we need to alter the mode line to tcpin the defaults section. We should also change the option immediately following that deals with the log, it should be tcplog:
Contents of /etc/haproxy/haproxy.cfg
. . .

defaults
    log     global
    mode    tcp
    option  tcplog

. . .
At the end of the haproxy configuration file, we need to define our front end configuration. This will dictate how HAProxy listens for incoming connections. We will bind HAProxy to the load balancer elastic IP address which is the IP that we requested earlier in the Equinix Metal console. This will allow it to listen for traffic originating from the elastic IP address. We will call our front end “www” for simplicity. We will also specify a default backend to pass traffic to (which we will be configuring in a moment):
Contents of /etc/haproxy/haproxy.cfg
. . .

defaults
    log     global
    mode    tcp
    option  tcplog

. . .

frontend www
    bind    147.75.78.116:80
    default_backend nginx_pool
Next, we can configure our backend section. This will specify the downstream locations where HAProxy will pass the traffic it receives. In our case, this will be the private IP addresses of both of the Nginx web servers we configured. We will specify traditional round-robin balancing and will set the mode to “tcp” again:
Contents of /etc/haproxy/haproxy.cfg
. . .

defaults
    log     global
    mode    tcp
    option  tcplog

. . .

frontend www
    bind load_balancer_elastic_IP:80
    default_backend nginx_pool

backend nginx_pool
    balance roundrobin
    mode tcp
    server web1 192.168.1.10:80 check
    server web2 192.168.1.11:80 check
When you are finished making the above changes, save and close the file.
Check that the configuration changes we made represent valid HAProxy syntax by typing:
sudo haproxy -c -f /etc/haproxy/haproxy.cfg
If no errors were reported, restart the haproxy service:
service haproxy restart
Keepalived high availability configuration
Next, we will setup Keepalived for high availability so if one primary server stops working, the load balancer fails over to the backup or secondary server.
!!! IMPORTANT !!! Keepalived does not work with loopback interfaces and requires the interface names to be the same. Some servers come with different interfaces names even though they are the same server type because there are different revisions and different NICs. So for configuring the VRRP instance for the private IP on the second interface, set the interface to bond0 and add "dev enp1s0f1 label gateway:0" after the virtual ip address.
interface bond0
virtual_ipaddress {
        192.168.1.1/24 dev enp1s0f1 label gateway:0
    }
Install keepalived:
apt install keepalived
Create the Keepalived configuration file. The service looks for its configuration files in the /etc/keepalived directory. Create that directory on both of your load balancers:
sudo mkdir -p /etc/keepalived
Creating the Primary (MASTER) Load Balancer’s Configuration:
Next, on the load balancer server that you wish to use as your primary server, create the main keepalived configuration file. The daemon looks for a file called keepalived.conf inside of the /etc/keepalived directory:
sudo nano /etc/keepalived/keepalived.conf
# Contents of /etc/keepalived/keepalived.conf

vrrp_script chk_haproxy {          (this checks if haproxy is running so it can failover)
    script "pgrep haproxy"
    interval 2
}

vrrp_instance VI_1 {
    state MASTER
    interface bond0
    unicast_src_ip 10.99.181.141   (this is the primary server private address)
    unicast_peer {
        10.99.181.129              (the IP of the secondary server)
    }
    virtual_router_id 101          (make sure router ID is unique for each VRRP instance)
    priority 101                   (the server with the highest priority is chosen)
    advert_int 1
    authentication {
        auth_type PASS
        auth_pass 1111
    }
    track_script {
        chk_haproxy
    }
    virtual_ipaddress {
        147.75.78.116              (the elastic IP address)
    }
}

vrrp_instance VI_2 {
    state MASTER
    interface ens14f1	           (This would be bond0 if servers have different interface names)
    unicast_src_ip 10.99.181.141
    unicast_peer {
        10.99.181.129
    }
    virtual_router_id 102
    priority 101
    advert_int 1
    authentication {
        auth_type PASS
        auth_pass 1111
    }
    track_script {
        chk_haproxy
    }
    virtual_ipaddress {
        192.168.1.1/24            (The private gateway address)("192.168.1.1/24 dev enp1s0f1 label gateway:0" if peer server has different interfaces names)
    }
}
Keepalived essentially removes the elastic IP and private IP from the server's configuration and enables them on the server that is currently chosen to route traffic.
This is the configuration of the second BACKUP server:
vrrp_script chk_haproxy {
    script "pgrep haproxy"
    interval 2
}

vrrp_instance VI_1 {
    state BACKUP
    interface bond0
    unicast_src_ip 10.99.181.129
    unicast_peer {
        10.99.181.141
    }
    virtual_router_id 101
    priority 100
    advert_int 1
    authentication {
        auth_type PASS
        auth_pass 1111
    }
    track_script {
        chk_haproxy
    }
    virtual_ipaddress {
        147.75.78.116
    }
}

vrrp_instance VI_2 {
    state BACKUP
    interface ens14f1
    unicast_src_ip 10.99.181.129
    unicast_peer {
        10.99.181.141
    }
    virtual_router_id 102
    priority 100
    advert_int 1
    authentication {
        auth_type PASS
        auth_pass 1111
    }
    track_script {
        chk_haproxy
    }
    virtual_ipaddress {
        192.168.1.1/24
    }
}
Save the configuration files and restart the keepalived service:
service keepalived start
At this point, your cluster should be up and running with load balancing and high availability.
Optional troubleshooting tips:
This command helps you track the keepalived logs which include the decision making process through priority levels and whether a host has failed:
tailf /var/log/syslog | grep Keepalived_vrrp
Check the interfaces to see how the IPs get removed and added to the primary server:
ip a
Additional logs for haproxy and keepalived:
systemctl status haproxy.service
systemctl status keepalived.service
Congratulations! You now have a cluster that routes traffic evenly between web servers and is capable of failing over to a backup system for high availability.
You may also like
Digger deeper into similar topics in our archives
Configuring BGP with BIRD 1.6 on an Equinix Metal Server
Set up BGP on your Equinix Metal server using BIRD 1.6, covering IP configuration, installation, and neighbor setup to ensure robust routing capabilities between your server and the Equinix...

Configuring BGP with FRR on an Equinix Metal Server
Establish a robust BGP configuration on your Equinix Metal server using FRR, including setting up network interfaces, installing and configuring FRR software, and ensuring secure and efficie...

Crosscloud VPN with Wireguard
Learn to establish secure VPN connections across cloud environments using WireGuard, including detailed setups for site-to-site tunnels and VPN gateways with NAT on Equinix Metal, enhancing...

Deploy Your First Server
Learn the essentials of deploying your first server with Equinix Metal. Set up your project & SSH keys, provision a server and connect it to the internet.

Ready to kick the tires?
Use code DEPLOYNOW for $300 credit