- Home /
- Resources /
- Learning center /
- Install any Operat...
Install any Operating System from an ISO image source
Install an OS with an ISO source by using the Rescue Mode available in Equinix Metal and using common utilities such as KVM, libvirtd, and VNC

On this page
- Overview
- A note on IP addresses
- Step 1: Provisioning an Equinix Metal Server
- Step 2: Log in to Rescue Mode and install helper utilities
- Step 3: Download an ISO and connect to the Desktop Environment
- Step 4: VM Creation and Install Target Selection
- Step 5: VM Customization
- Step 6: Install the Operating System
- Step 7: Post-Install Configuration
- Step 8: Rebooting the host instance
- Conclusion
This guide demonstrates how to install an operating system onto an Equinix Metal system from an ISO image source. For production use cases, you should always use a prebuilt operating system available from Equinix or a custom iPXE build. But for experimentation, proofs of concept, and other "just need it to work" scenarios, this will get the job done.
Note: This is an unsupported method for installing an operating system, and as such, not all ISOs are guaranteed to work on all systems or at all. If you encounter any issues with the installation process, check the metal-isometric-xepa repository for the latest status.
Overview
This process takes advantage of the Rescue Mode option to install the OS on a blank server which you'll call up with a false request for a custom iPXE OS. The process will look something like this:
- Provision a system using the custom iPXE boot option and a dummy URL.
- Use the server's Rescue Mode to install utilities, like VNC and a KVM hypervisor.
- Download the ISO into the rescue environment.
- Create and configure a VM for the OS.
- Configure serial ports so the out of band console can access the VM.
- Install the ISO to a virtual machine with the server local storage attached
- Configure any devices passed through that might need special drivers for boot.
- Reboot the machine directly off the newly installed OS on the local storage.
The rest of this guide will walk through these steps in detail using the example of installing Microsoft Windows 11 on your system.
A note on IP addresses
By default, Equinix Metal systems provision with a /31 IPv4 subnet space. For most OSes this is fine, but several (such as Windows or VMWare ESXi) may require a /30 subnet or larger. You can work around these in various ways but the simplest is to request a /30 Elastic IP subnet from Equinix. Since this guide is going to deal with Windows, we'll do that first. We'll cover how to do this with both the Equinix metal CLI and the Equinix Metal Console.
Using the metal CLI
To request a /30 Elastic IP subnet, use the ip request command.
metal ip request -p $PROJ -m ny -q 4 -t public_ipv4
Where:
| flag | value |
|---|---|
| -p | project ID |
| -m | metro where you'll deploy the device |
| -q | quantity (4 is the equivalent of a /30 subnet) |
| -t | the IP address type, either public_ipv4 or global_ipv4 |
In the Equinix Metal Console
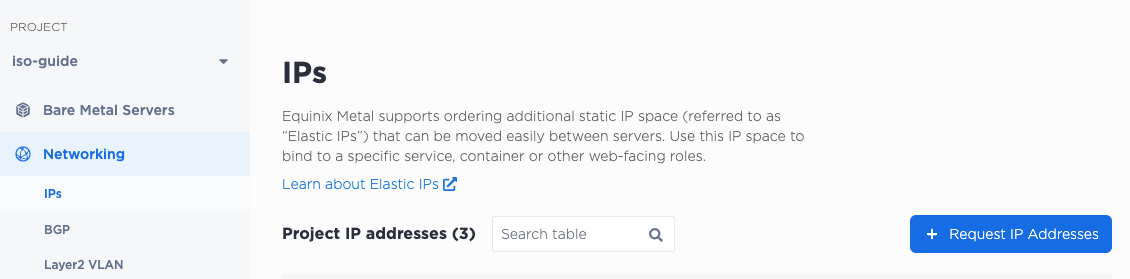
To accomplish the same from the Equinix Metal Console, follow these steps:
-
Select Networking and then IPs on the left navigation bar. Then click the blue + Request IP Addresses button.
-
Select the appropriate IP type, metro where you'll deploy the device, and quantity/subnet. Then click Submit Request. For this example we're requesting a /30 subnet, or 4 Public IPv4 addresses in the New York metro.
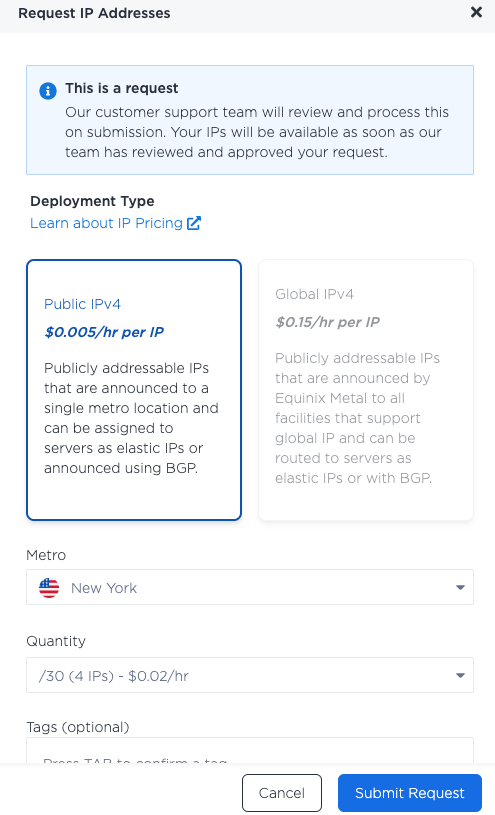
-
Once your request shows an Approved status you're all set.
With your IP addresses properly configured, you can start the process of installing an OS.
Step 1: Provisioning an Equinix Metal Server
You'll need a server to install the OS on, so you'll provision one in this step. This process can also be done from either the CLI or the Equinix Metal Console.
In the Equinix Metal Console
-
Make sure you're logged in to the Metal Console. In the left navigation bar, under Bare Metal Servers, select On Demand or Reserved Hardware to create a new device of your desired type, or select the New Server button on the Manage Servers page.
-
Select the Metro and Server Type you'd like to use. For this example we'll be deploying a
c3.small.x86to the New York metro.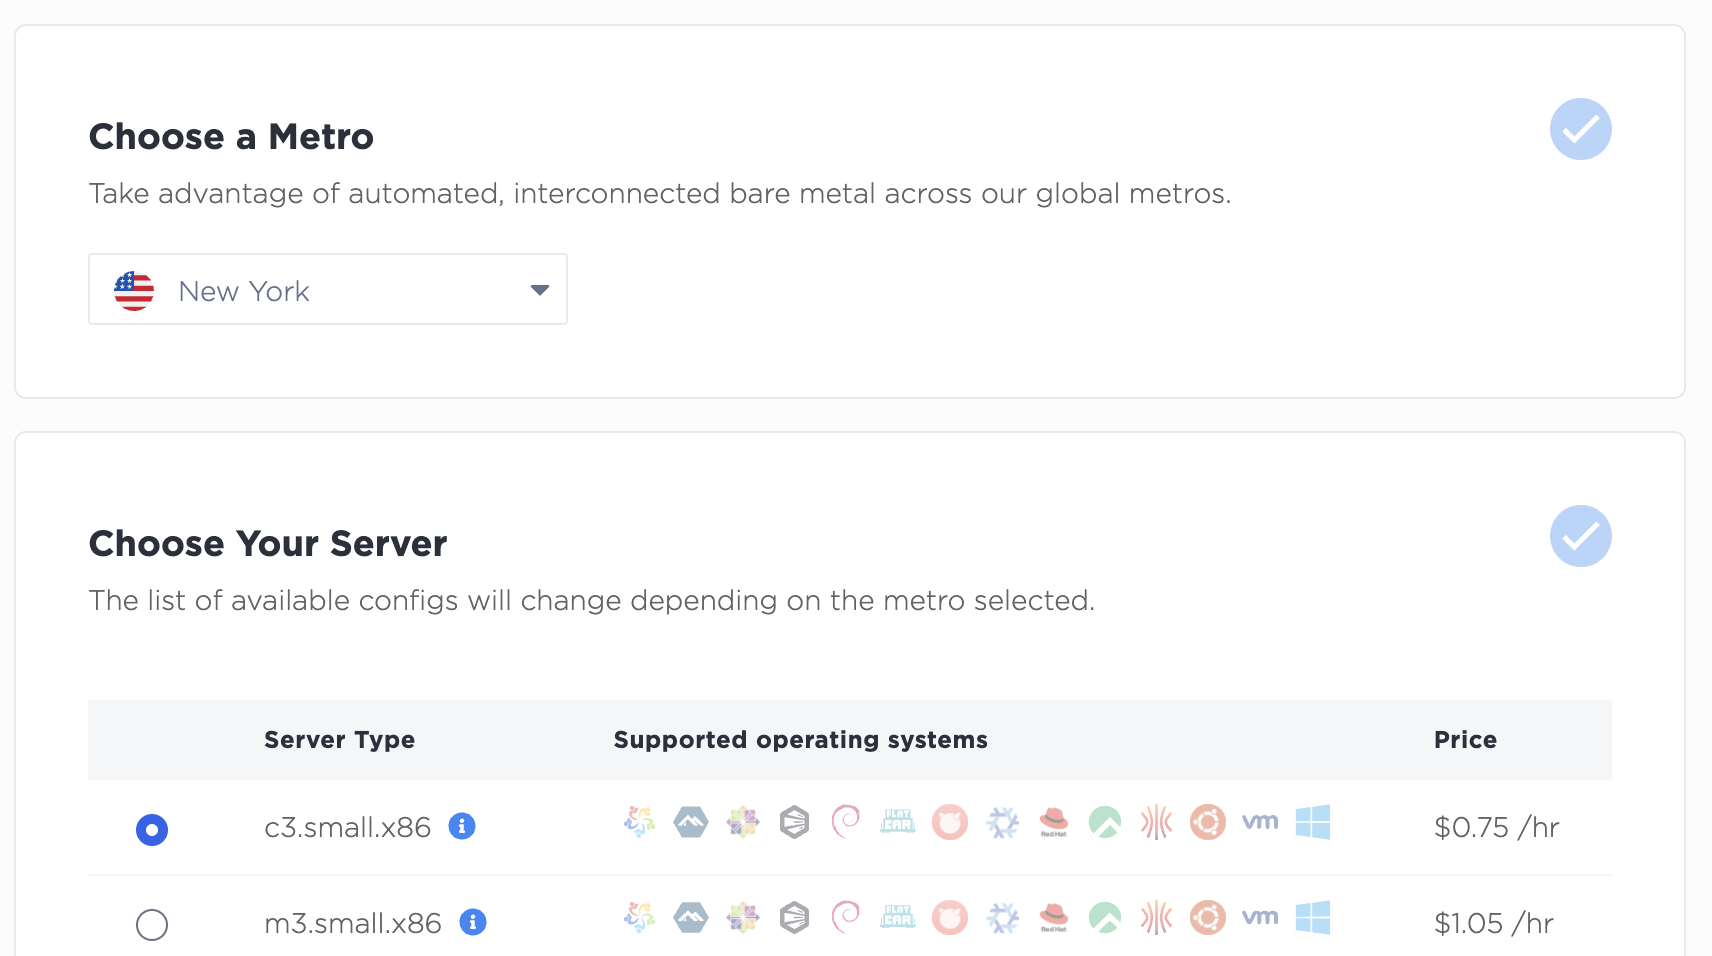
-
For the OS, select
custom_ipxeand fill in the IPXE script URL with a placeholder as you won't need it. In this example we've usedhttp://boot.netboot.xyz.
-
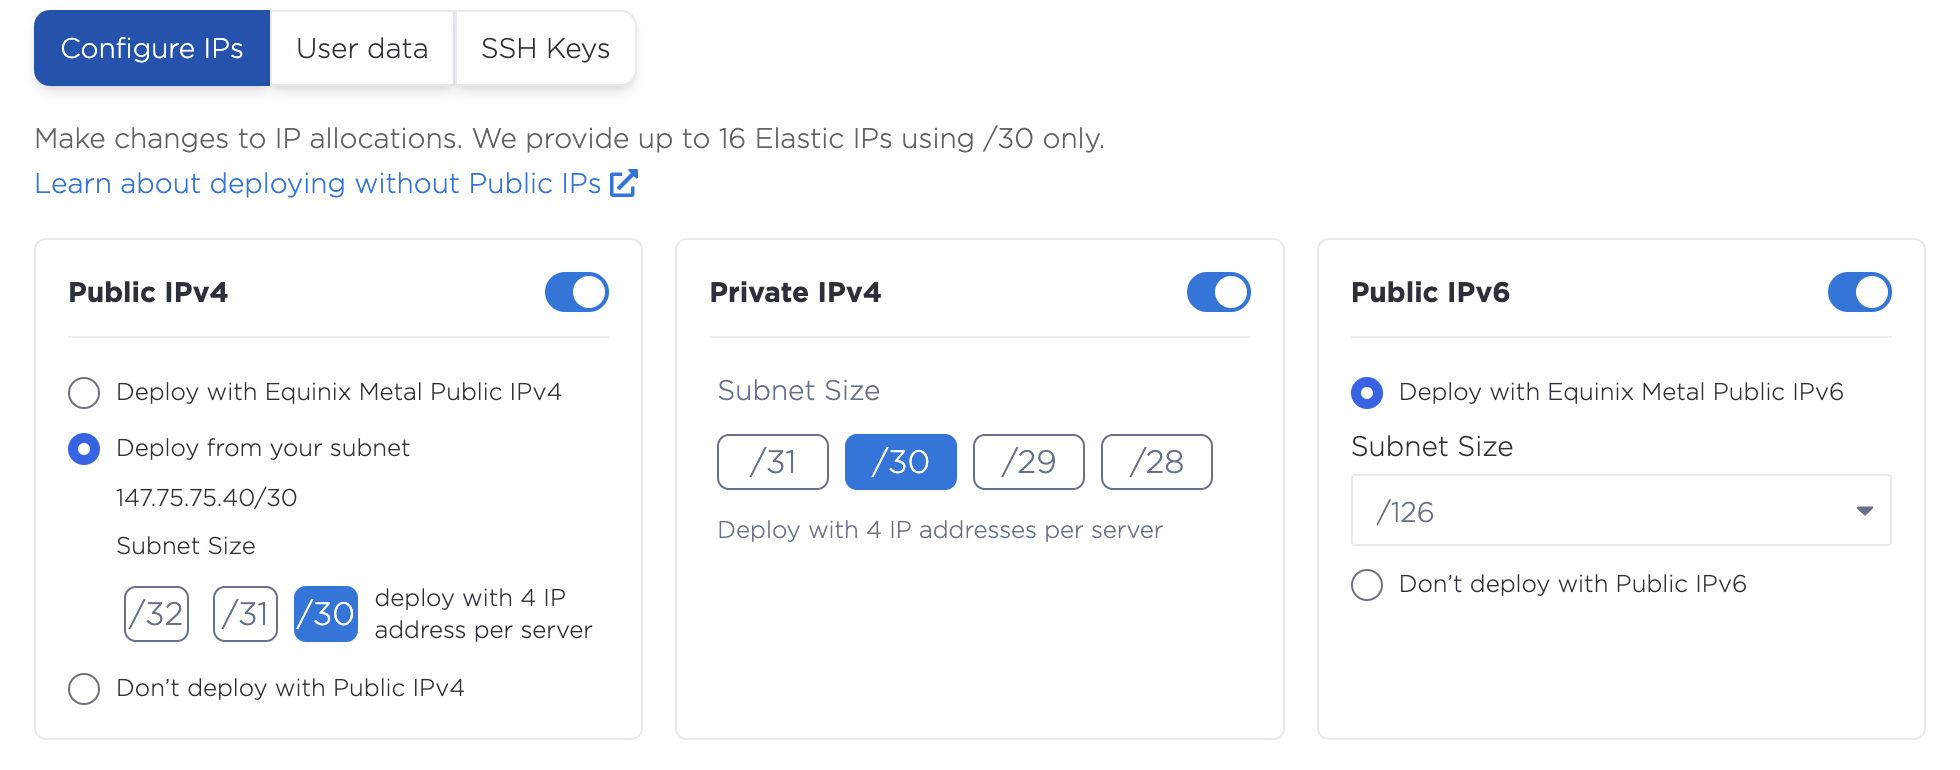
If you're using an OS as discussed above that requires a /30 address space, click the Optional Settings dropdown and make changes under the IP Addresses tab as necessary.
-
Once you've got the server settings filled in, select Deploy Now.
Using metal-cli
Alternatively, you can provision by using the device create command:
metal device create -p $PROJ -H "iso-test" -I "http://boot.netboot.xyz" -m ny -O custom_ipxe -P c3.small.x86 -S 30
Where:
| flag | value |
|---|---|
| -p | project ID |
| -H | device hostname |
| -I | custom iPXE URL (placeholder, because you won't use it) |
| -m | metro where you'll deploy the device |
| -O | the desired operating system slug (custom_ipxe in this case) |
| -P | the device plan or server type (`c3.small.x86 in this case) |
| -S | the subnet size in bit (30 for /30 in this case) |
Whichever method you choose, you'll have to wait a short period while the device is provisioned.
Step 2: Log in to Rescue Mode and install helper utilities
In this step, you'll log in to the server in Rescue Mode, which is a key part of the OS installation process.
-
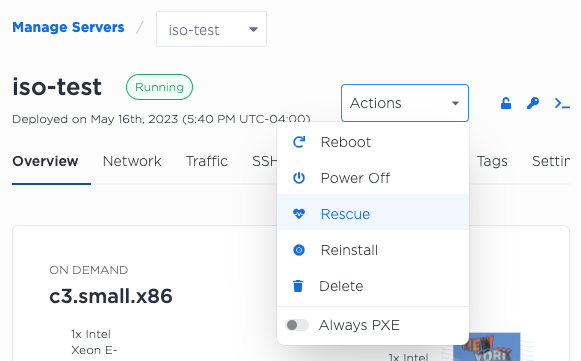
Click the hostname in the Manage Servers screen to open the server details page.
-
To enter rescue mode, click the Actions dropdown and select Rescue. Then confirm you're sure on the prompt.
-
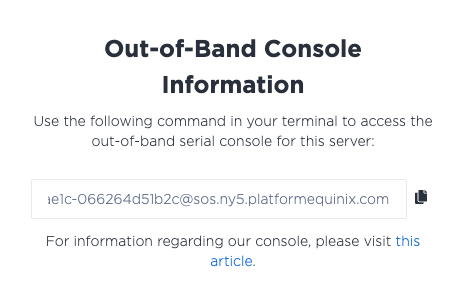
To log in to the server, you'll SSH into the out of band console. You can copy the precise ssh command for this using the
>_icon next to the action menu.
-
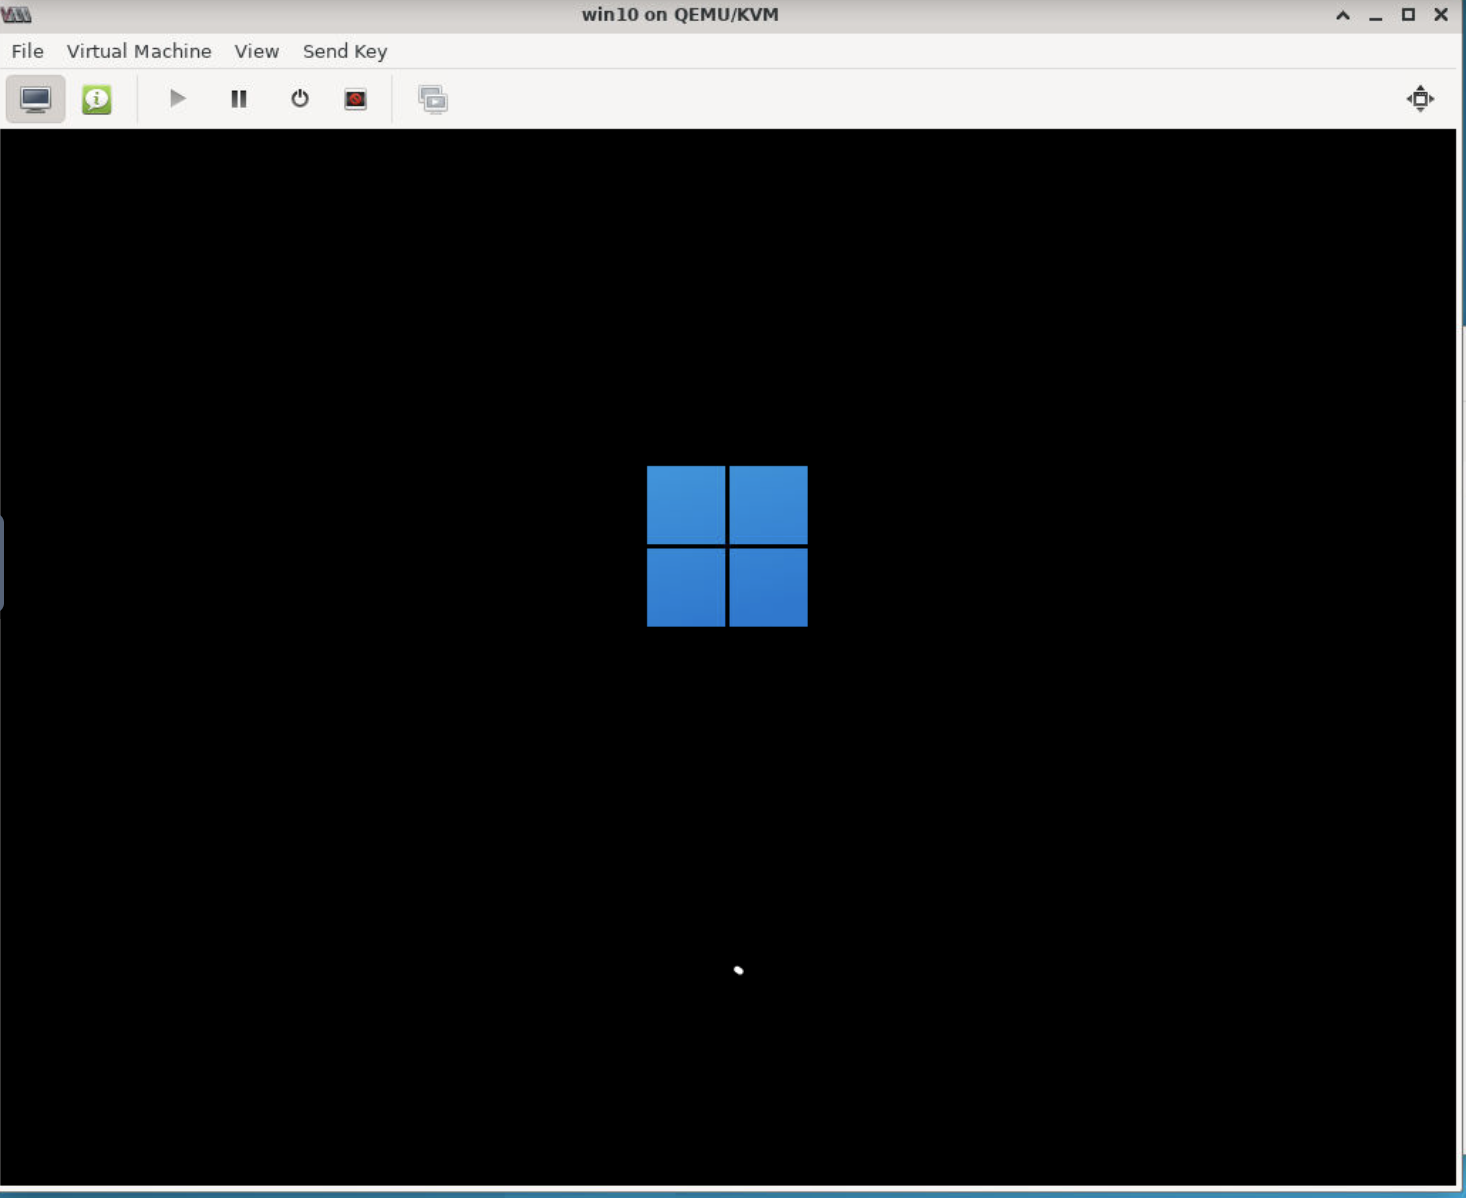
Once connected to the out of band console, you'll be able to monitor the reboot process until prompted for a login. Enter
rootat login and you will be presented with something similar to the image below.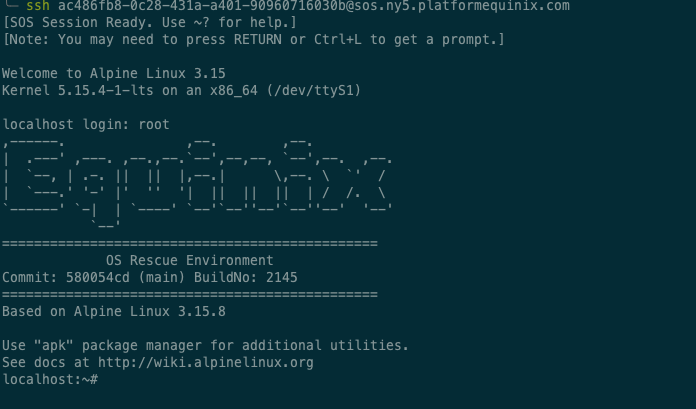
-
Once at the prompt, you'll need to do some preparation of the rescue mode environment so it is ready for installing an ISO. Use the command below to run a script that will streamline this process. The script primarily installs KVM, libvertd, and VNC, but you can read the full setup script here.
curl -s https://raw.githubusercontent.com/enkelprifti98/metal-isometric-xepa/main/setup.sh | shThis may take a minute or two to complete. When it's done, you'll be left with the prompt informing you of the URLs to access the system as follows:
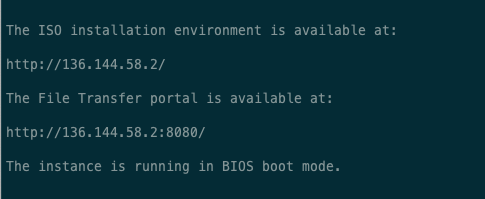
-
The URLs listed here are for the Desktop Environment and the File Transfer portal respectively. Also, take note of the boot mode of your Equinix Metal instance (
BIOSin the above example). You will need this later.
Step 3: Download an ISO and connect to the Desktop Environment
In order to install from an ISO, we'll need to load the ISO itself onto the rescue system. If you're going to download it from the internet, you can do that from the rescue interface, which we'll discuss later.
However, if you have an ISO on your local system you'd like to upload to the Equinix Metal device, you can either do so through the File Transfer portal (details below) or another method like scp to copy the image onto the rescue system to a directory that is easily accessible by the root user, such as the /root directory.
Uploading through the file transfer portal (optional)
You only need to complete these steps to upload an image from your computer. If you plan to download the ISO (from the internet or other source), you can ignore these steps and proceed to the next heading.
-
Copy the URL provided in your terminal window under
File Transfer portaland paste it into your web browser. If you don't see the URL it should be in the formhttp://<server_public_ip>:8080/. This will load the File Browser.
-
Log in using the username
adminand the passwordadmin. This will give you access to the/rootfolder on the remote server. We'll disable this later.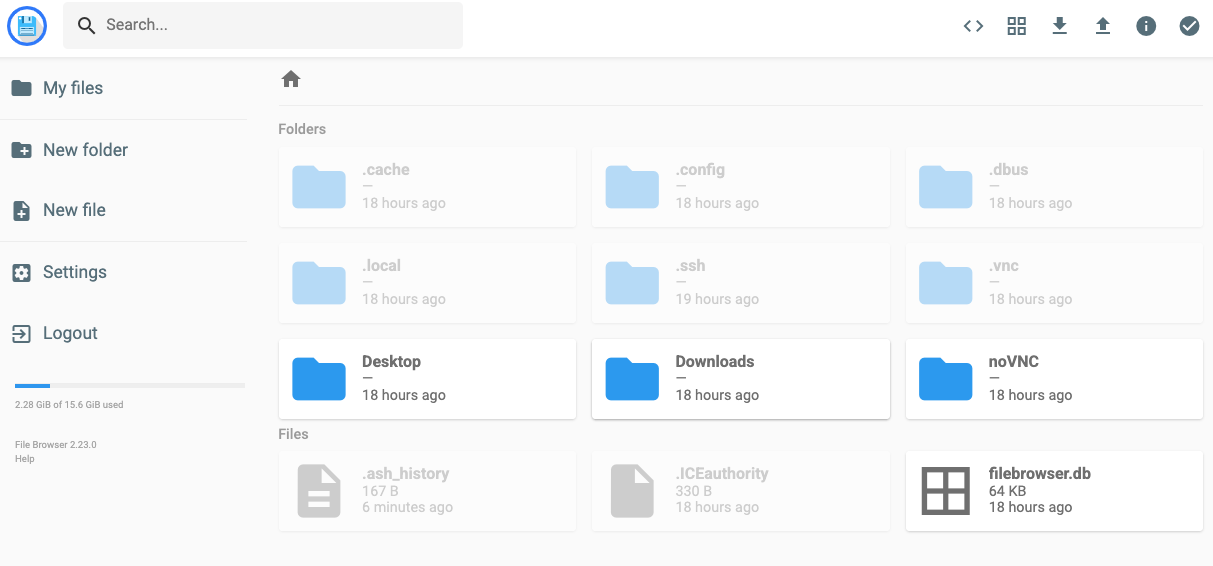
-
From here you can drag the ISO from your local system into the web browser and into the folder on the remote system where you would like it to be uploaded. The
Downloadsfolder is a good choice.
Connecting to the Desktop Environment
-
The easiest way to connect to the desktop graphical environment is to paste the public IP of your Equinix Metal server into your web browser. If you're having trouble, make sure the browser connects to
http://<your_public_ip>/and nothttps://as SSL has not been configured.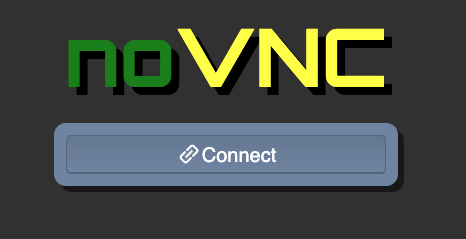
-
Click Connect to bring up the desktop in your browser. Alternately, you can point a VNC client of your choice to your server's pubic IP address.
-
When prompted, enter
adminfor the password and you will be presented with the desktop.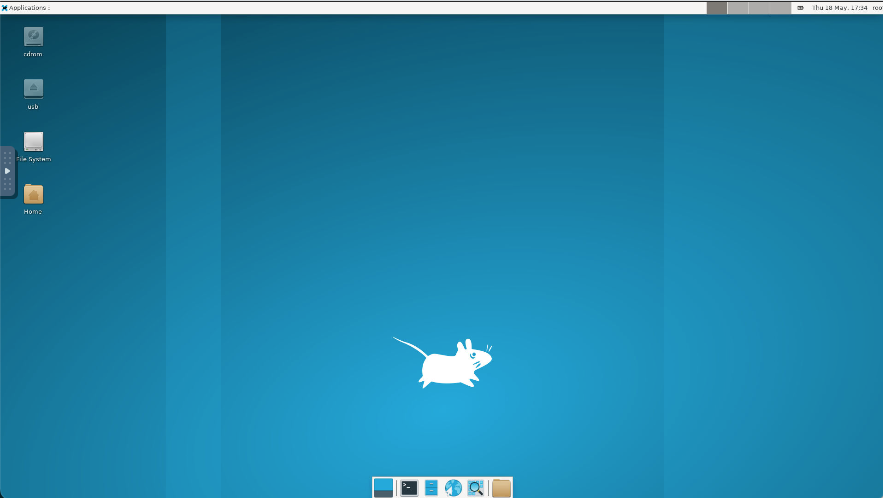
-
If you have not already uploaded an ISO image, download one using the desktop environment. You can open the web browser to download the latest version of Microsoft Windows, as we'll do in this example, or use the terminal window and
wgetto download from a URL directly. Either way, place it someplace easy to access in the next steps.
Step 4: VM Creation and Install Target Selection
With the remote system in Rescue Mode and the ISO uploaded, it's time to create a VM.
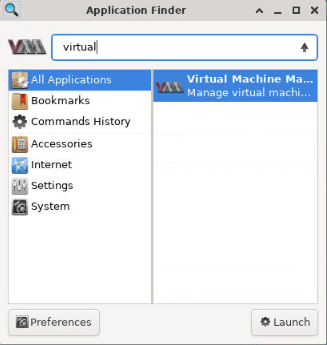
-
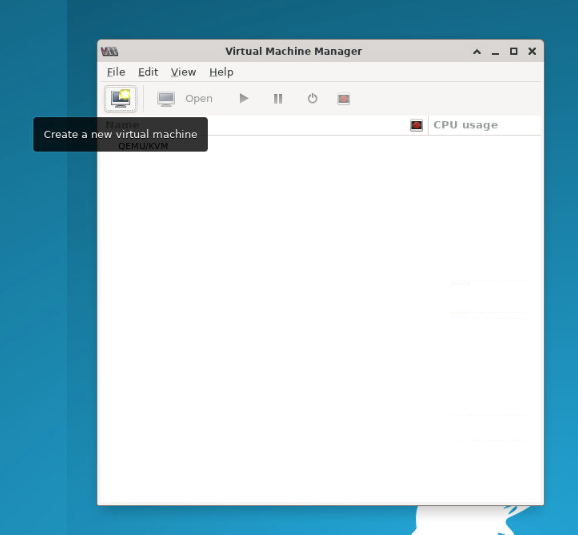
Open the Virtual Machine Manager by opening the Application Finder (the magnifying glass icon in the bottom dock) and searching for it in the search bar.
-
Click the monitor icon to create a new virtual machine.
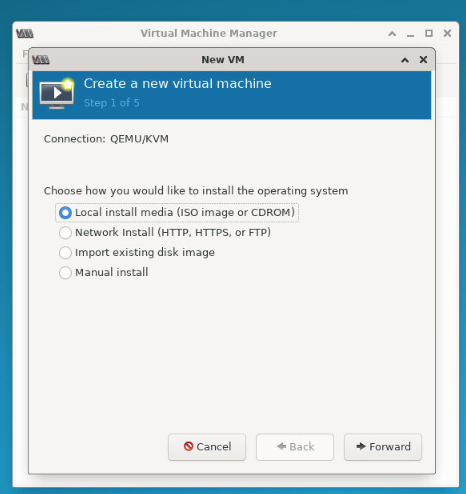
-
Choose to install using Local install media and select Forward.
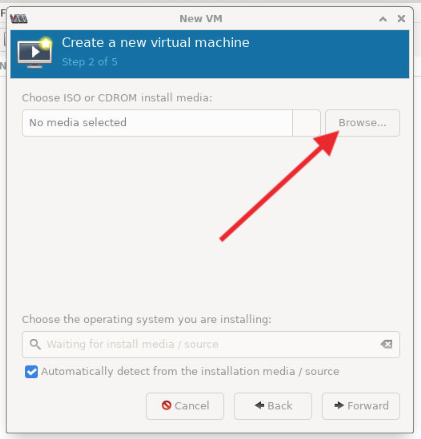
-
When prompted to select the media, click the Browse... button
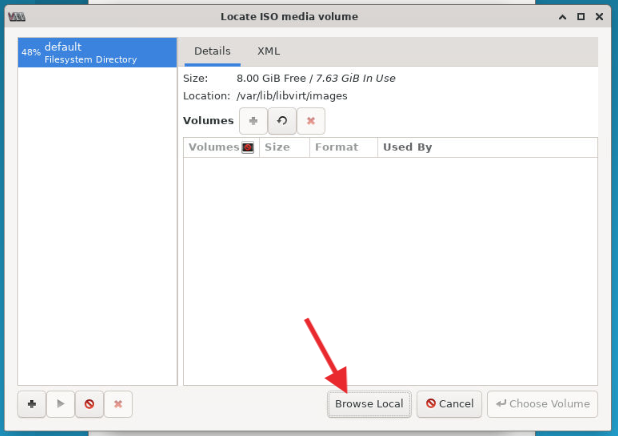
-
On the next screen, select Browse Local to search in your local file system.
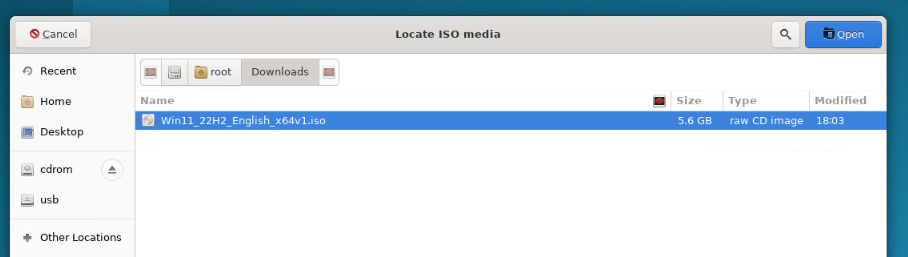
-
Use the file browser to locate the ISO you've loaded onto the server. In our case, the Windows 11 install media is in the Downloads folder of the home directory. Select the file and click Open in the top-right corner of the window.
-
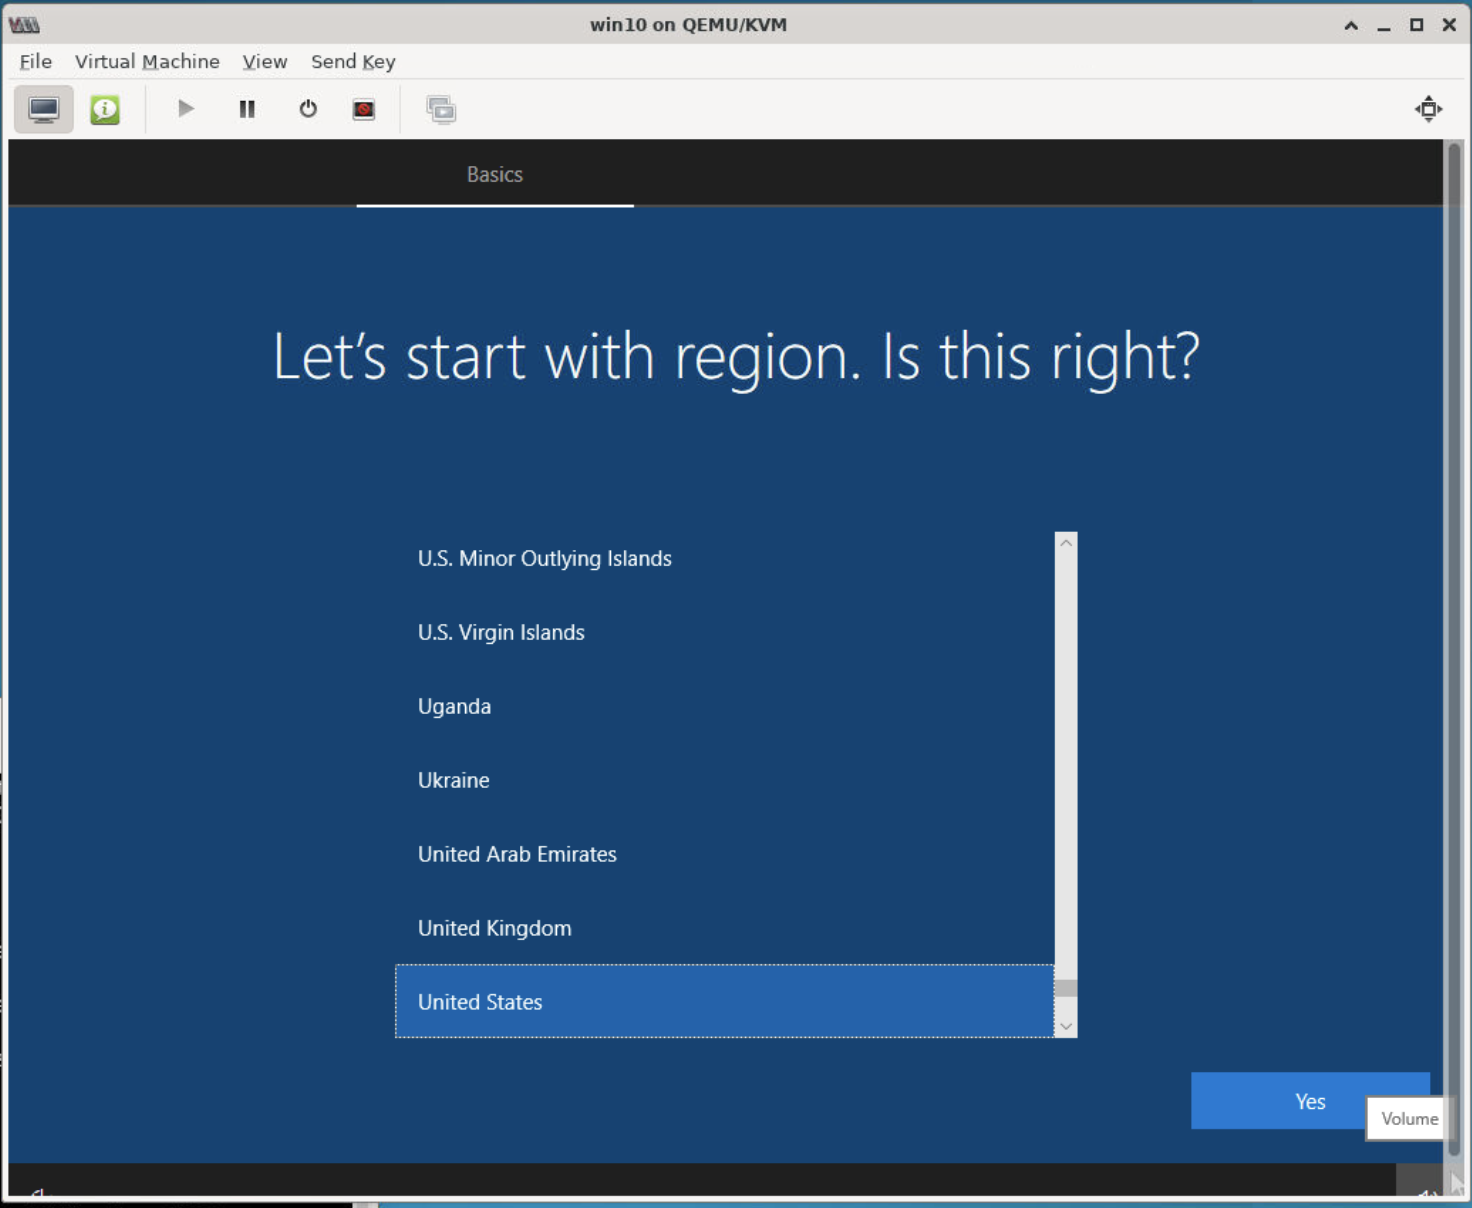
Once the ISO is selected the OS should be detected automatically from the source. In our case it shows Microsoft Windows 10, which is close enough. Confirm the OS and press Forward.
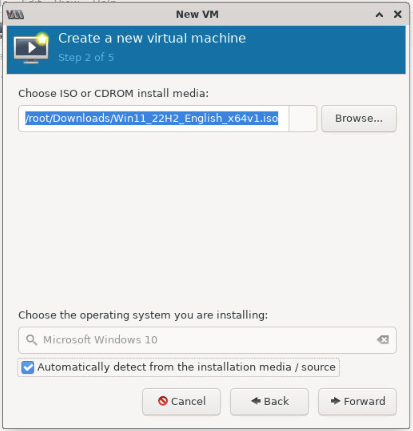
If the system doesn't find your OS, uncheck the Automatically detect... box and use the search field to find best match. You might need to use Generic OS if you can't find a matching one. If your OS uses something like Ubuntu or FreeBSD as it's base, you can select that instead of the generic option.
-
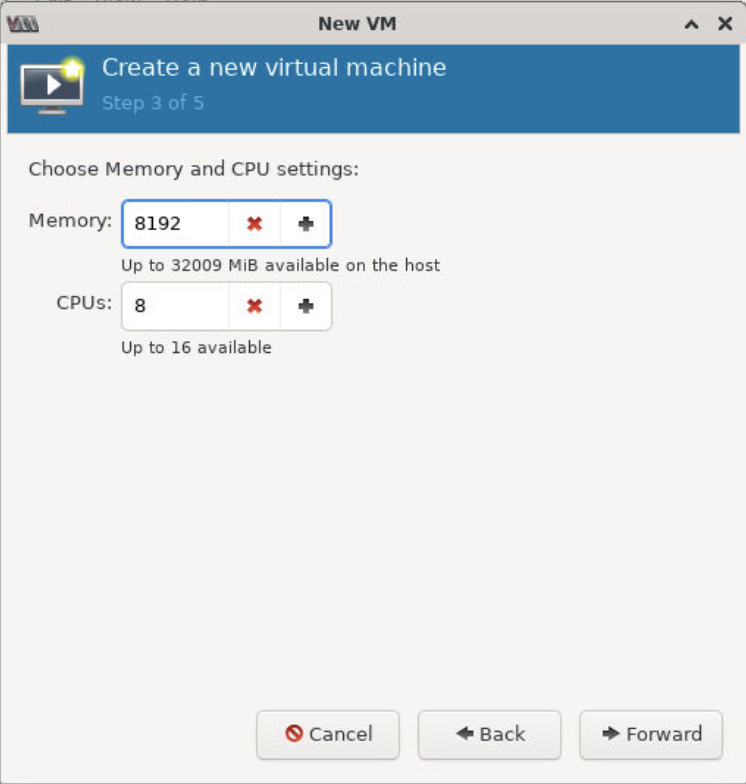
Allocate CPUs and RAM to the temporary virtual machine. In the example below, we chose 8 GiB of RAM and 8 vCPUs. Click the Forward button.
-
On the next screen, you'll be asked to configure storage. Pick Select or create custom storage and type the system device path to where you want to install the OS in the blank path below. Click Forward.
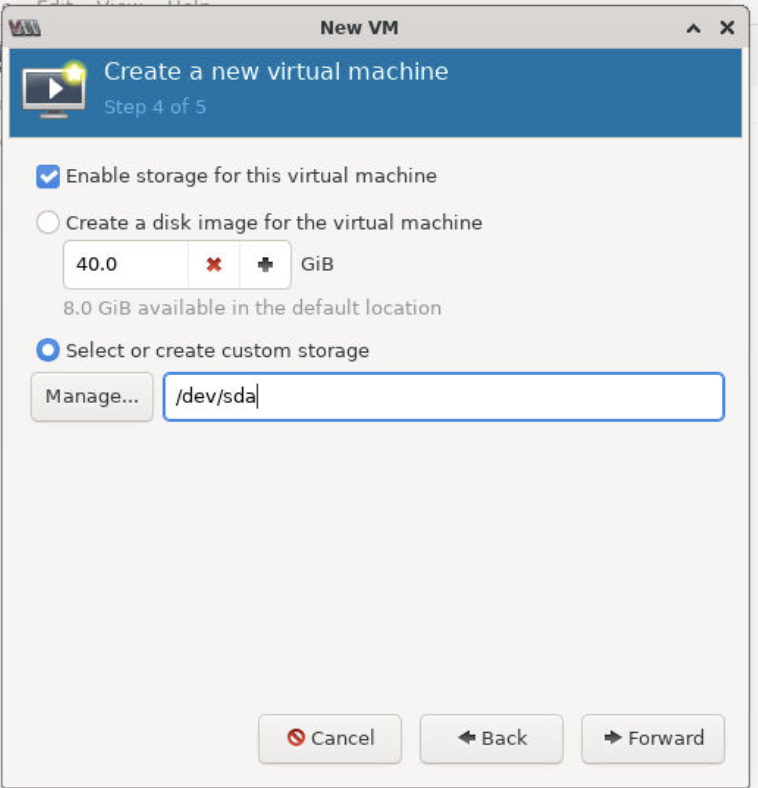
To look at the local volumes, open a terminal window and enter the command
lsblk -p. This will list available volumes for installation by their device paths. It's good practice to select the smallest device for OS installation; as you can see in the example below, the drives are the same size.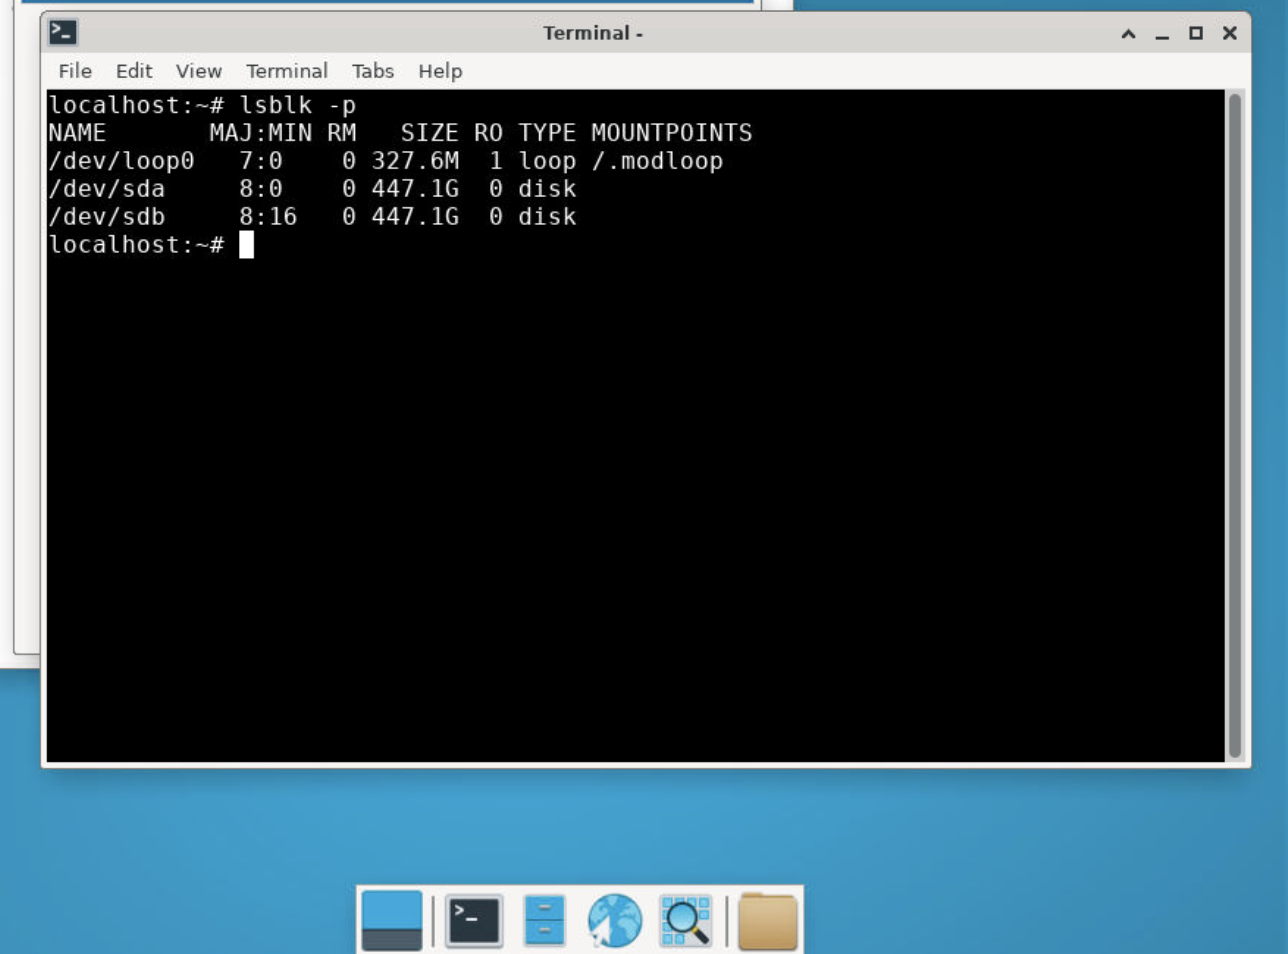
Depending on the selected server type you may see a number of NVMe storage devices (for example: /dev/nvmean1). You can only use them as a target for the bootable operating system if your instance is running in UEFI boot mode. NVMe drives cannot be used as the bootable devices in BIOS boot mode.
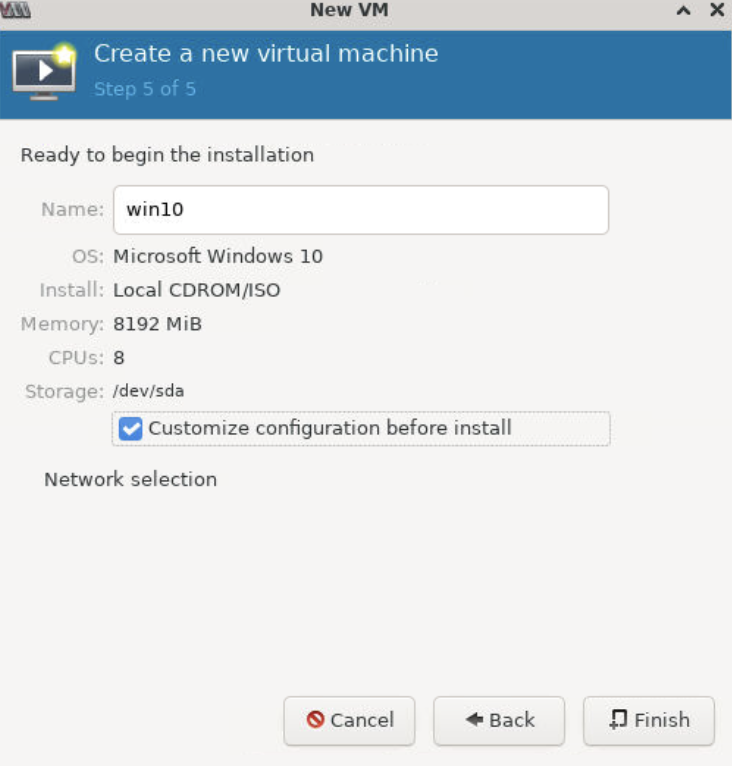
-
On the next screen, select Customize configuration before install before selecting Finish
Step 5: VM Customization
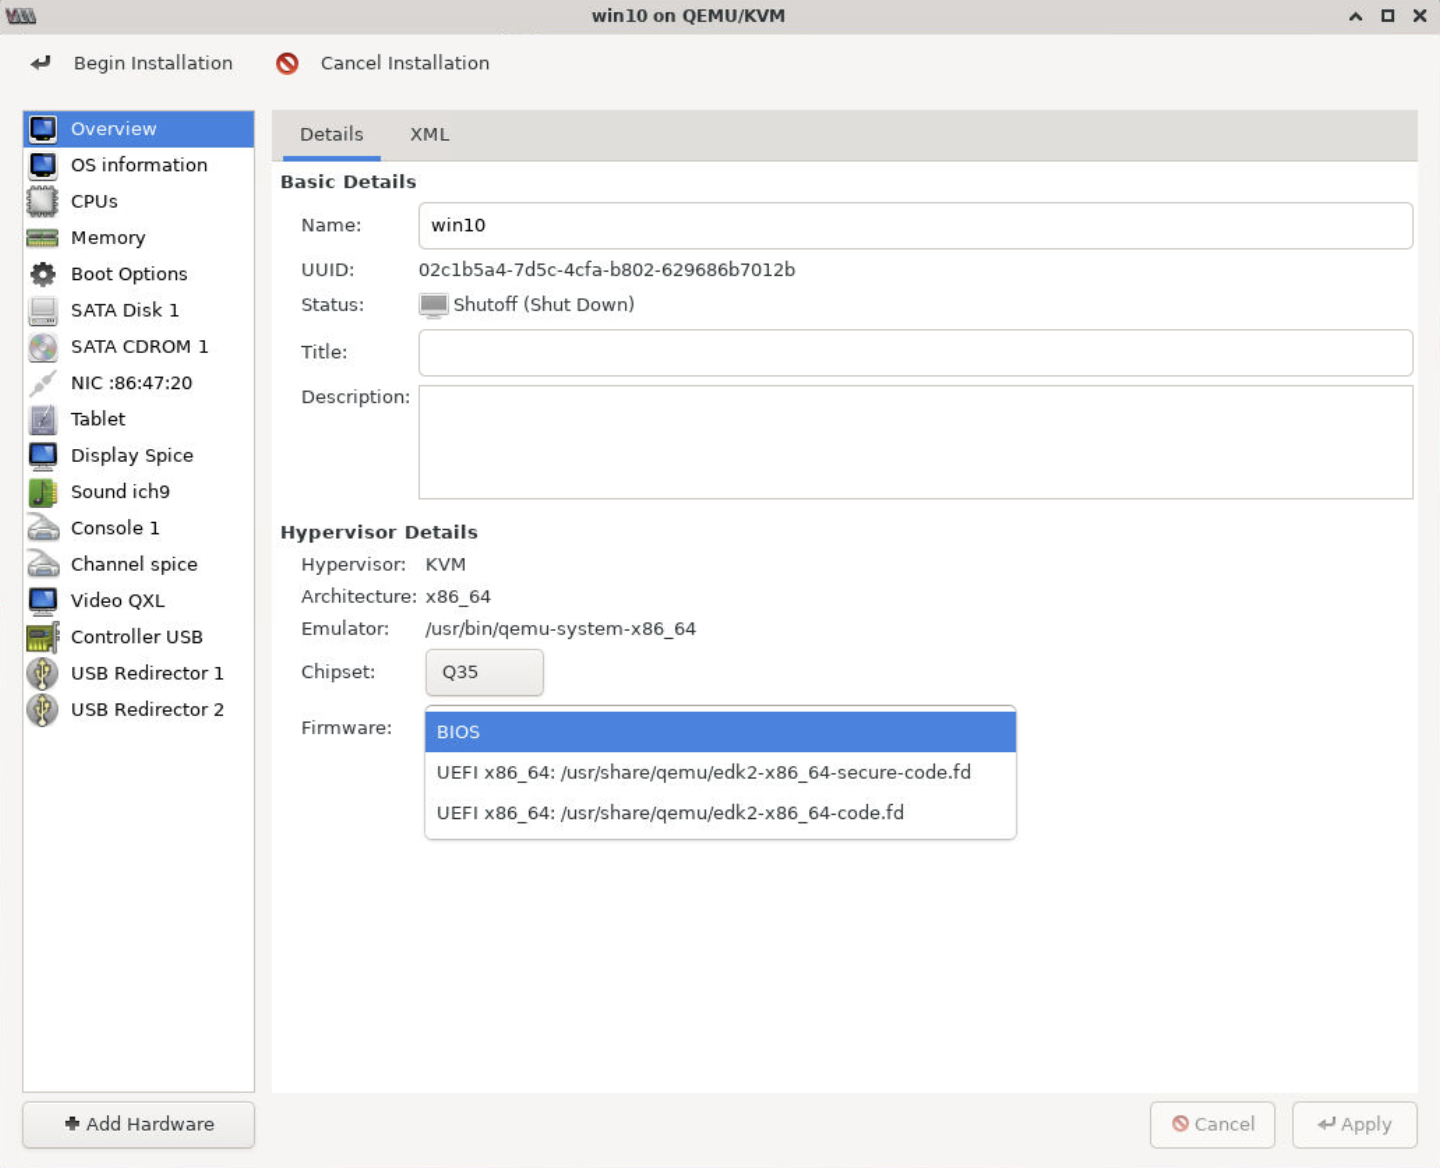
The next screen presents a set of options that allows you to customize some elements of the virtual machine to resemble the actual hardware of the instance you're installing to.
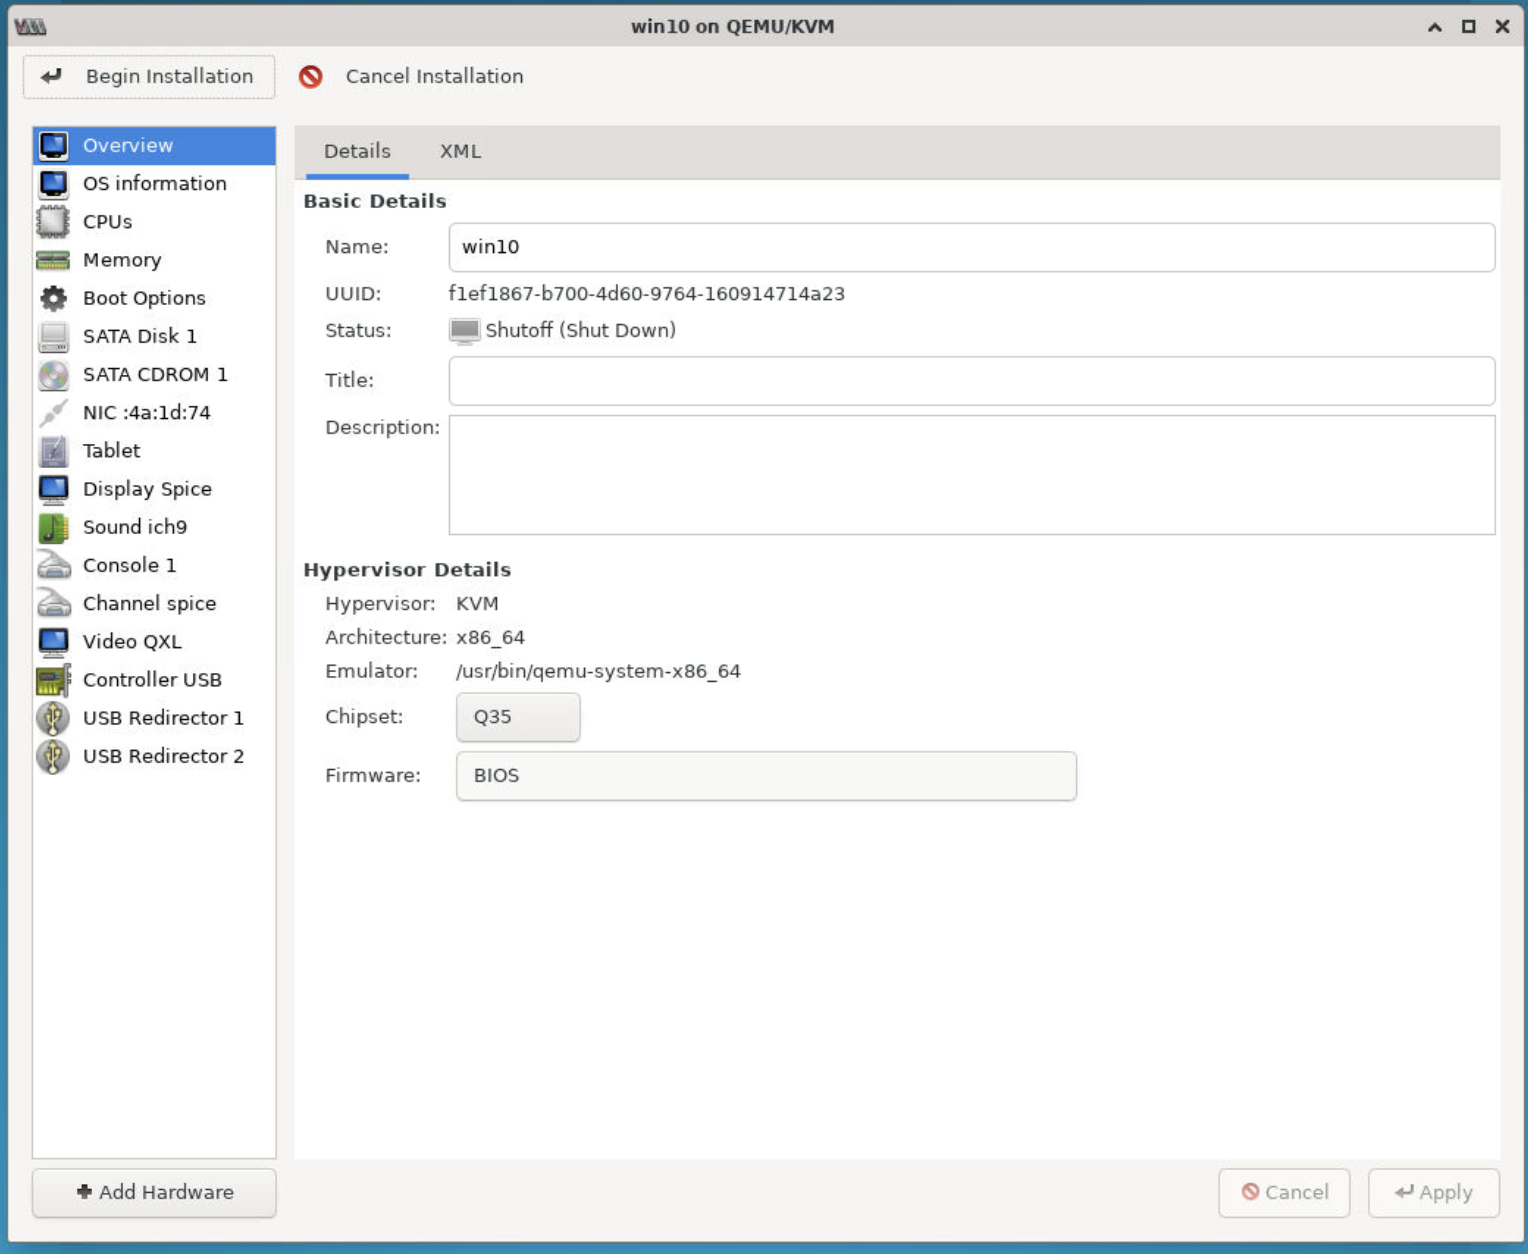
Boot Firmware
The boot firmware of the virtual machine should be set to resemble that of your instance. This was provided in the output of the initial setup script. In this example it let us know The instance is running in BIOS boot mode.
On the Virtual Machine overview page, select the BIOS or the appropriate UEFI option.
Serial Consoles for Out of Band Connection
For the Out of Band console to continue working after installation, you need to add two serial console devices to the Virtual Machine that you will enable after the OS installation.
-
Begin by selecting +Add Hardware from the overview window
-
Select Serial device in the left-hand column, and ensure the defaults are selected under the Details tab. It should look like the example below that uses the Pseudo TTY (pty) device type. Click Finish.
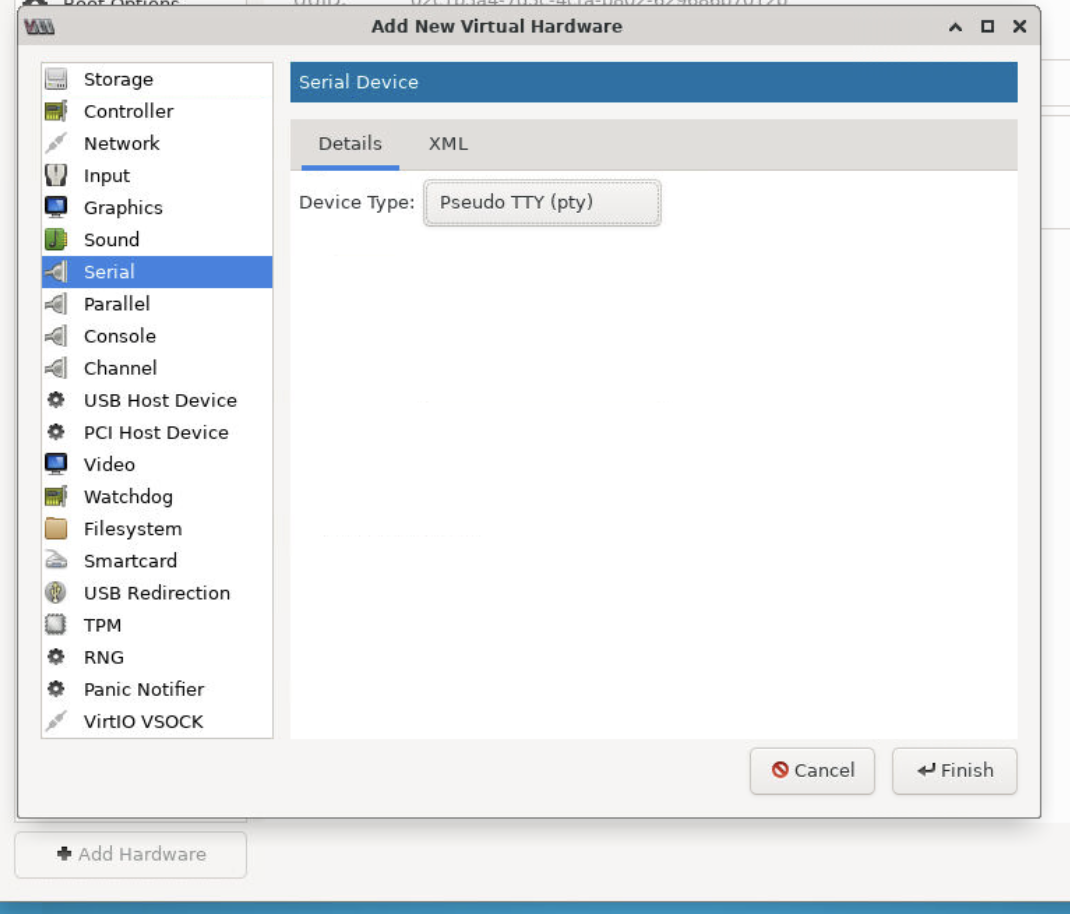
-
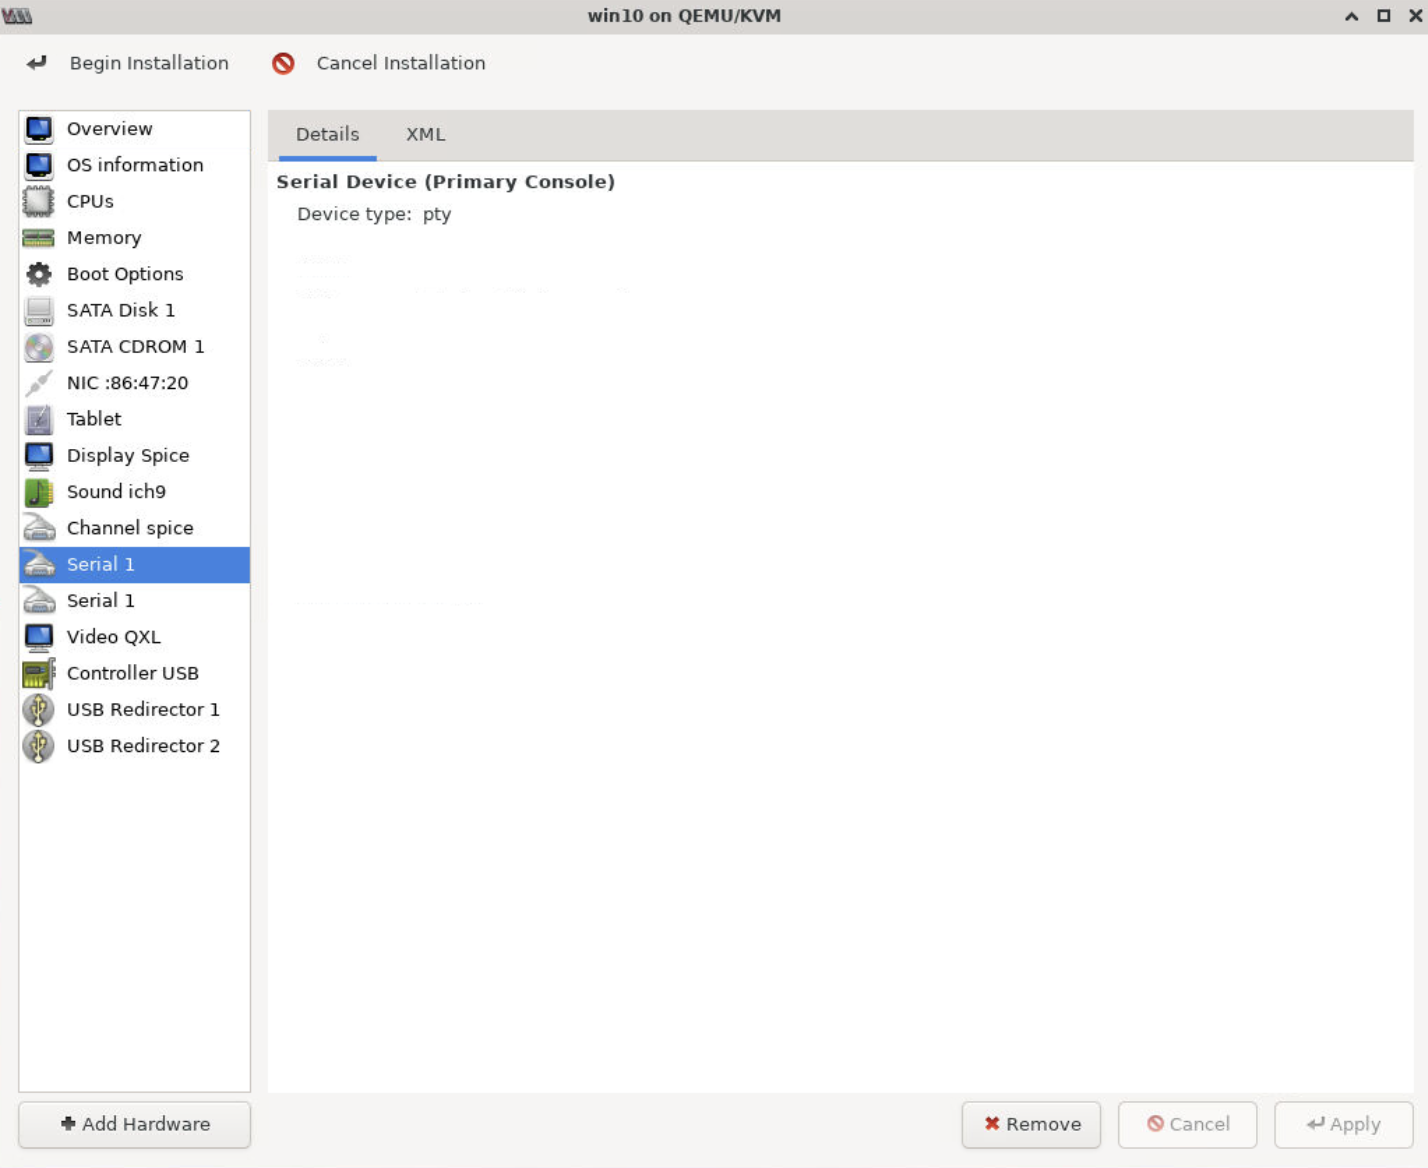
Repeat this process again to add a second device. You will now see two devices in the Serial section of the left-hand column of the overview window.
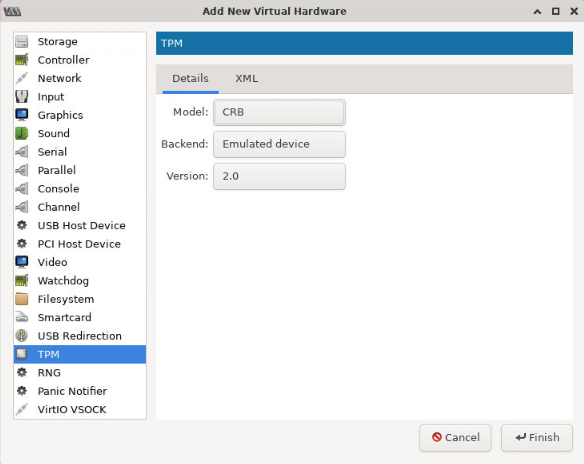
TPM for OS Boot Requirements
Some operating systems may require a TPM or Trusted Platform Module chip to run. Windows 11 is one such operating system.
-
Select +Add Hardware from the overview window.
-
Select the TPM category on the left-hand side and adjust the details.
-
The defaults generally should be fine with the Model as CRB, the Backend as Emulated device and Version set to 2.0. Select Finish when everything is set.
Attach a PCI device to the virtual machine (optional)
This step is required for an installation where you may want to pass through the physical networking PCIe card to the virtual machine. This is not strictly required, but it is helpful in cases where the original ISO image may not include drivers for the existing network cards, allowing you to download drivers using the internet provided to the virtual machine through the host.
This step may not be possible on legacy server types that do not support IOMM or VFIO PCI Passthrough properly. If the host does not support IOMMU or has not been configured properly, virt-manager will show errors when starting the virtual machine with PCI devices attached.
-
Start by selecting +Add Hardware from the overview window.
-
Select the PCI Host Device category on the left-hand side. On the right side, you will see a large list of different PCI devices available. Look for the network controllers. These may say Ethernet Controller somewhere in the name, or may not. Each entry should mention the interface they represent.
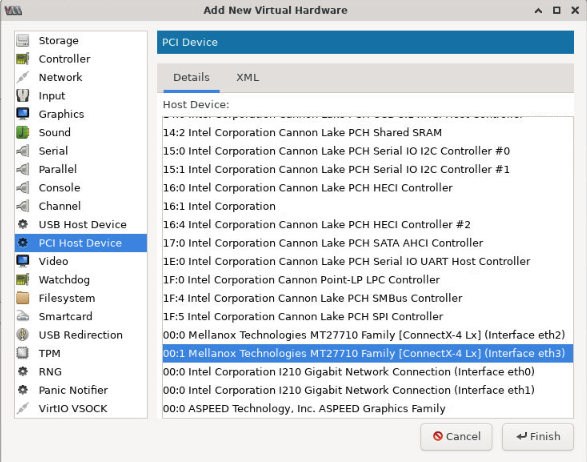
You should avoid passing through the network interface being used to give the current rescue environment internet access. Typically this is interface eth0, but you're always able to check using a command like ip address show in the terminal. You can see from the example output that this instance has 4 ethernet ports and it is using eth2 for the current service.
```
2: eth0: <BROADCAST,MULTICAST> mtu 1500 qdisc noop state DOWN qlen 1000
    link/ether 3c:ec:ef:6a:32:3a brd ff:ff:ff:ff:ff:ff
3: eth1: <BROADCAST,MULTICAST> mtu 1500 qdisc noop state DOWN qlen 1000
    link/ether 3c:ec:ef:61:32:3b brd ff:ff:ff:ff:ff:ff
4: eth2: <BROADCAST,MULTICAST,UP,LOWER_UP> mtu 1500 qdisc mq state UP qlen 1000
    link/ether 0c:42:a1:15:af:00 brd ff:ff:ff:ff:ff:ff
    inet 147.75.75.42/30 scope global eth2
        valid_lft forever preferred_lft forever
    inet6 fe80::e42:a1ff:fe15:af00/64 scope link
        valid_lft forever prefferred_lft forever
5: eth3:  <BROADCAST,MULTICAST> mtu 1500 qdisc noop state DOWN qlen 1000
    link/ether 0c:42:a1:15:af:01 brd ff:ff:ff:ff:ff:ff
```
- Select the device you'd like to passthrough to the virtual machine and select Finish.
Step 6: Install the Operating System
With all the preparations completed, you can install the OS.
-
Now that the VM has been configured, return to the VM Customization window and select Begin Installation in the top left of the window.
-
A new window will be launched where the OS will boot into the installer for the ISO.
-
When prompted for an installation target, find the storage device (
/dev/sdain our example case). You made added this storage device in Step 4.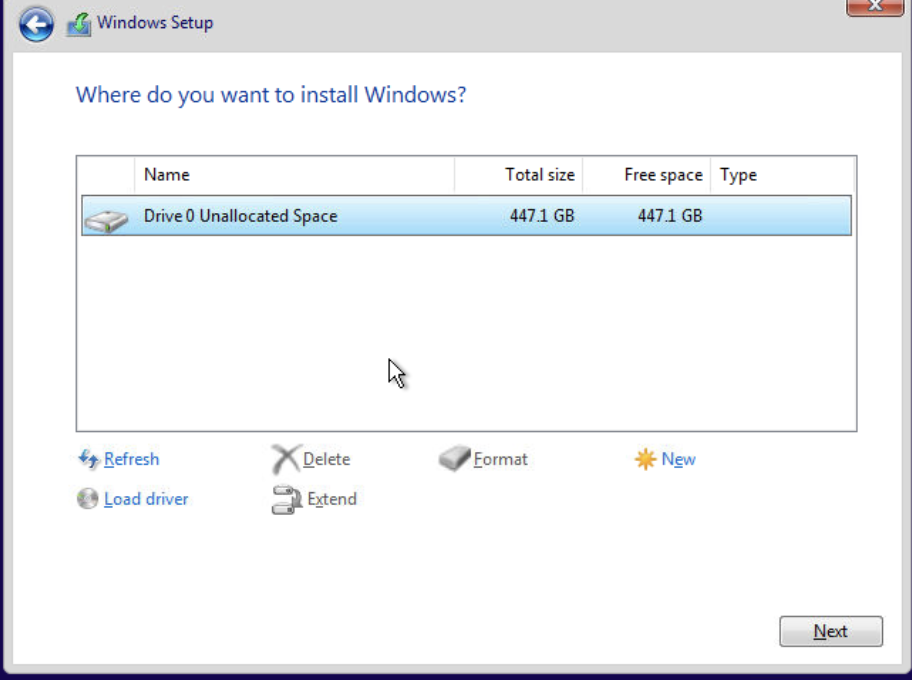
-
Step through the installation as necessary for your OS. Once completed the VM will reboot into the operating system you've now installed directly on the local disc with the normal first-time boot behviors. Complete these as you would for any other OS installation.
Step 7: Post-Install Configuration
Once the OS has been installed, there are a few more things to configure before rebooting the host device to run the operating system.
Networking Device Driver
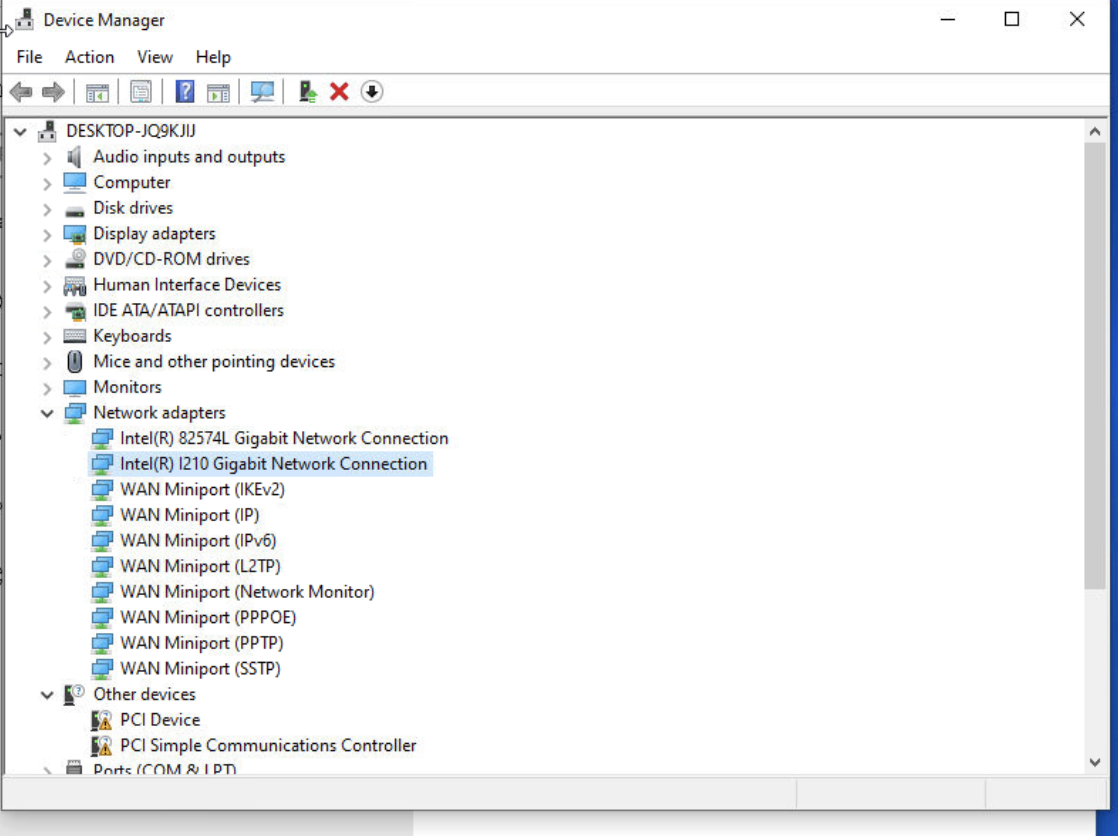
After reboot, you'll have to rely on the hardware networking device for an internet connection. You've passed this through to the guest OS earlier so you can install it now, while you have access to the host passthrough network as a backup. Many OSes already contain working drivers for the hardware in question, but in case yours doesn't, now is a good time to check. In my case, I can see the Intel I210 Gigabit Network Connection is already there, matching the device I passed through to the guest OS.
If your device does not show up, you can check for new drivers to install as you would normally using the working network connection.
Serial Console
The serial connections are required for enabling the Equinix Out-of-Band console, which can allow you access to your instance in events of network misconfiguration or other circumstances that may prevent remote access from the internet. Our systems expect to be able to connect to the COM2 serial port (I/O port 0x2F8, IRQ 3) with a baud rate of 115200, 8 data bits, no parity, and 1 stop bit for this console to work.
In some cases the OS may allow activation of the serial port through the GUI, but otherwise you'll need to use a terminal or command prompt to complete configuration.
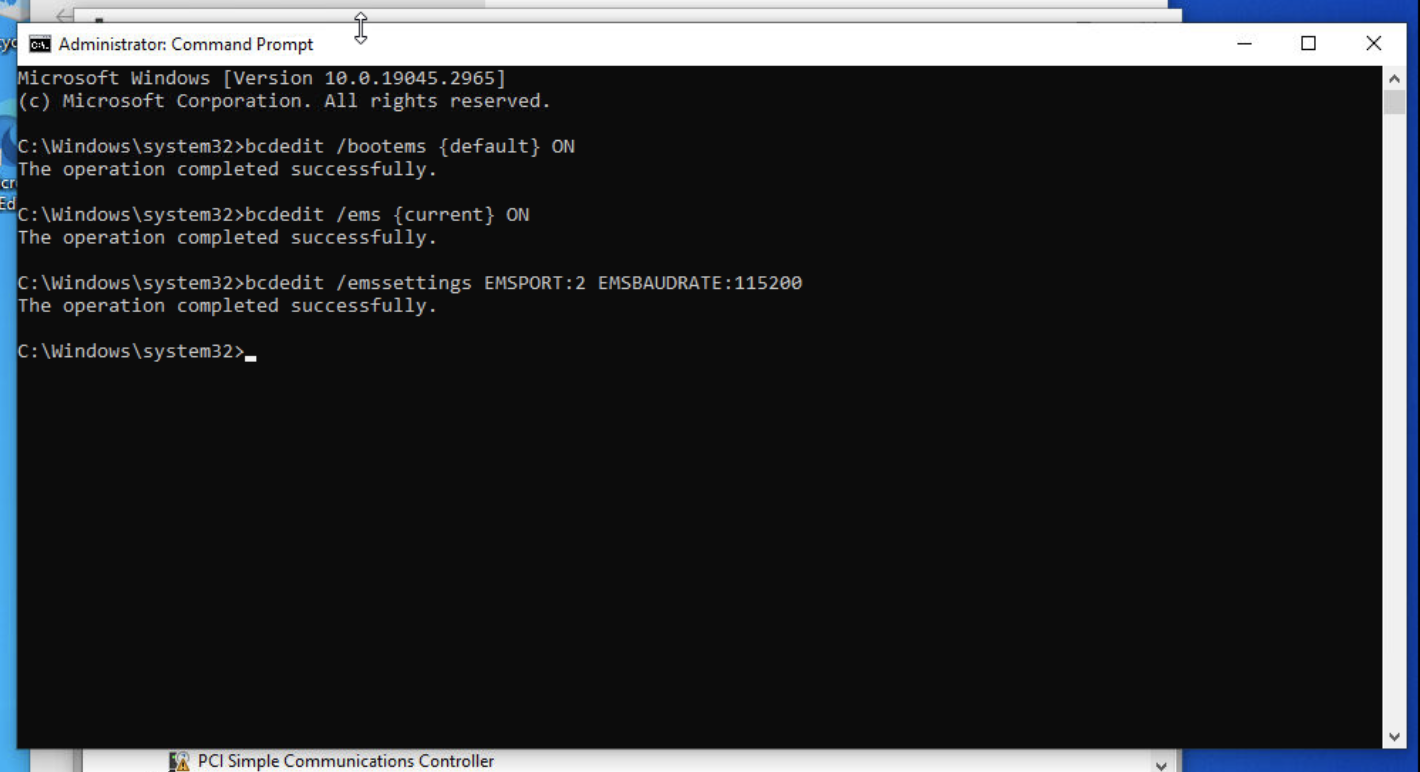
Windows
Standard Windows operating systems do not support serial console output, but if you're running a server edition of Windows, you can enable Emergency Management Services (EMS) redirection. Run the following commands at the Command Prompt as an Administrator:
bcdedit /bootems {default} ON
bcdedit /ems {current} ON
bcdedit /emssettings EMSPORT:2 EMSBAUDRATE:115200
You'll see a notification that the operation completed successfully:
Linux
For Linux-based operating systems, you can typically enable serial console output through the GRUB bootloader options found in /etc/default/grub. There you can add the following:
#GRUB_TIMEOUT_STYLE=hidden
GRUB_TIMEOUT=3
GRUB_CMDLINE_LINUX="console=tty0 console=ttyS1,115200n8"
GRUB_TERMINAL="serial console"
GRUB_SERIAL_COMMAND="serial --unit=1 --speed=115200 --word=8 --parity=no --stop=1"
Once you've edited the GRUB config file, apply the change with update-grub.
BSD
For BSD-based operating systems, you can add serial console support by editing the /boot/loader.conf bootloader configuration file. Add the following to the config file:
boot_multicons="YES"
boot_serial="YES"
comconsole_speed="115200"
console="comconsole,vidconsole"
comconsole_port=0x2F8
Once completed, restart the virtual machine to ensure the settings take effect.
Before rebooting the host instance, confirm through the rescue OS that the serial connection is working. Open a terminal window and run the command virsh console win10 serial1 where win10 is the name of the virtual machine you've just configured.
-
serial1is the alias name of the second serial device (Serial 2) added to the VM, which corresponds toCOM2. If you need to double check the alias name you can do so by viewing the XML settings of the serial device and looking for<alias name="serial1"/>. The Serial 2 device should also be usingport 1in<target type="isa-serial" port="1">. -
On the other hand, the Serial 1 device has an alias name of
<alias name="serial0"/> and is using port 0 in<target type="isa-serial" port="0">which corresponds toCOM1or0x3F8.
Equinix Metal uses uses the second sereal device/port for the Out-of-Band console.
You should be able to see output and also send keyboard input to the VM through the serial console. If you're not able to see any output you need to go back and adjust the operating system configuration.
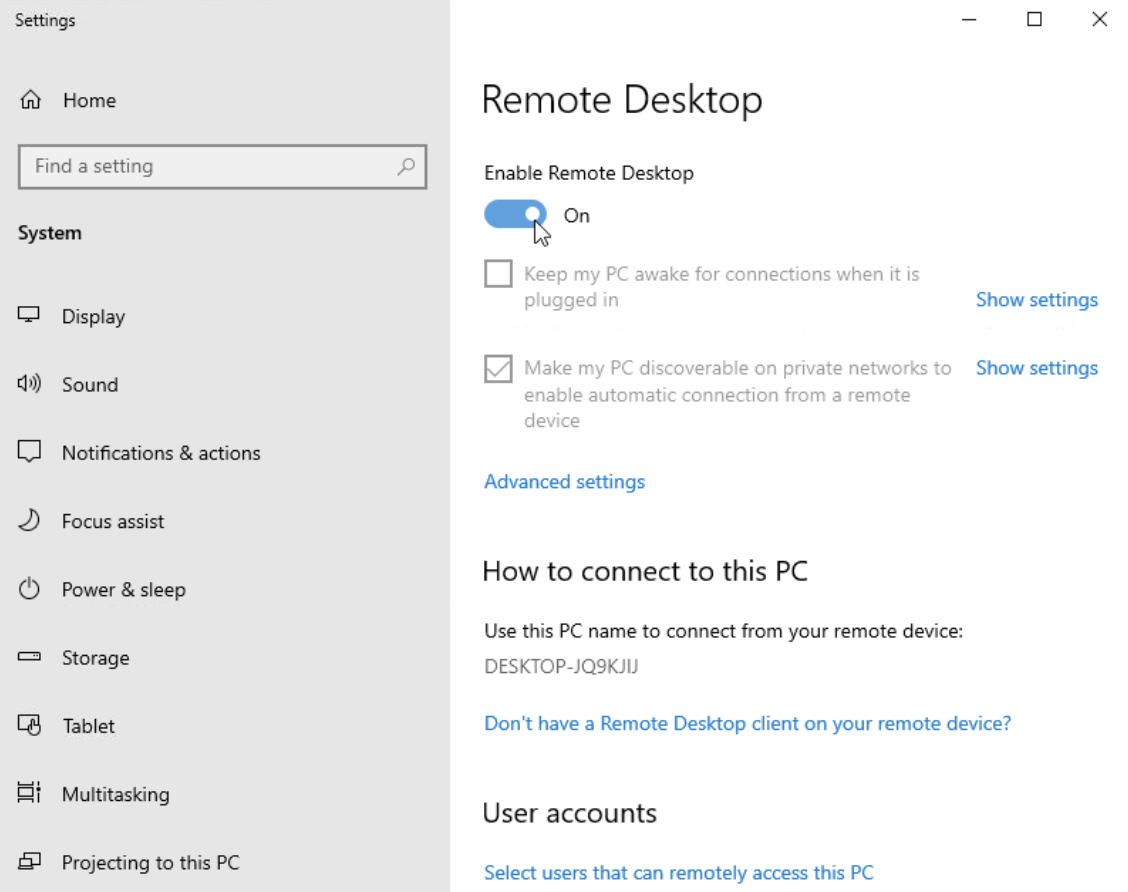
Remote Access
After reboot, you'll need to be able to access the OS remotely through the internet. For many operating systems this will be through SSH, but for Windows, you'll need to enable Remote Desktop Protocol (RDP). You can find this by searching for Remote Desktop Settings in Settings and turning it on.
For other OSes you'll need to install or enable the SSH server.
Step 8: Rebooting the host instance
Now that post install configuration steps are completed, it's time to reboot into the new OS from the host.
-
Shut down the Virtual machine, and disconnect it from the VNC instance or close the browser window.
-
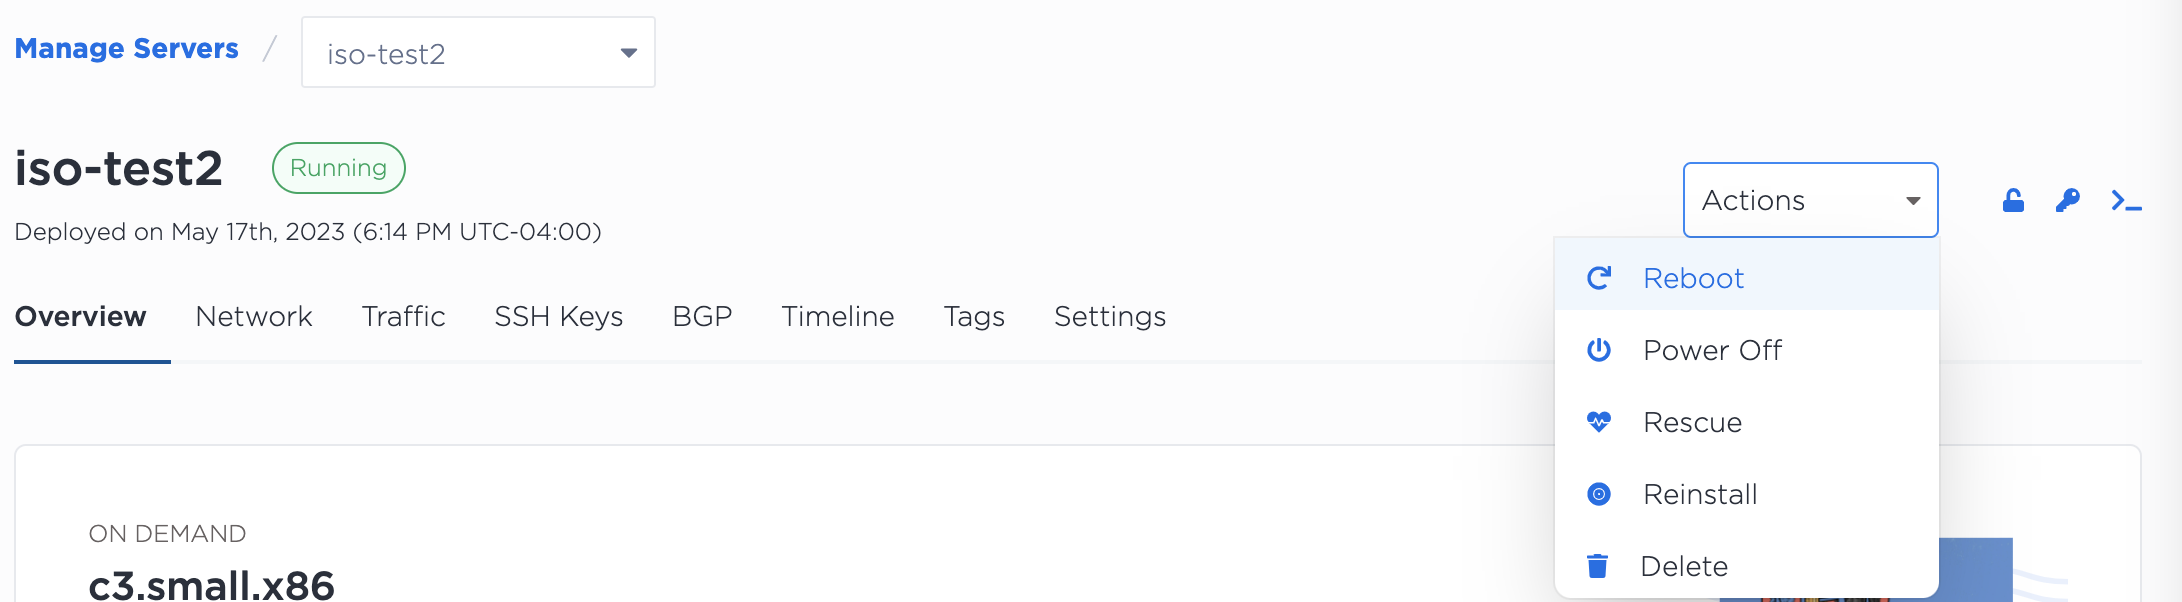
Open the Equinix Metal console, go to Manage Servers, and open the server details page.
-
In the Actions menu in the top right, select Reboot.
-
While the server is rebooting, you can (and may want to) monitor its progress using the out of band console. This is useful for detecting any kernel panics or undetected devices that might indicate issues with the underlying installation or hardware compatibility.
You may see a message about a kernel panic, indicating that the underlying hardware is not supported by your OS. This OS may not be able to be installed on this instance.
You may see a message about missing storage device or missing filesystem mount during the OS boot process. This could mean that the Operating System does not detect the underlying storage drives or controller. Try installing the OS in a different drive type under a different HBA or storage controller. For troubleshooting, try attaching the PCI storage controller to the VM inside the ISO installation environment to verify whether the OS can detect the drives.
-
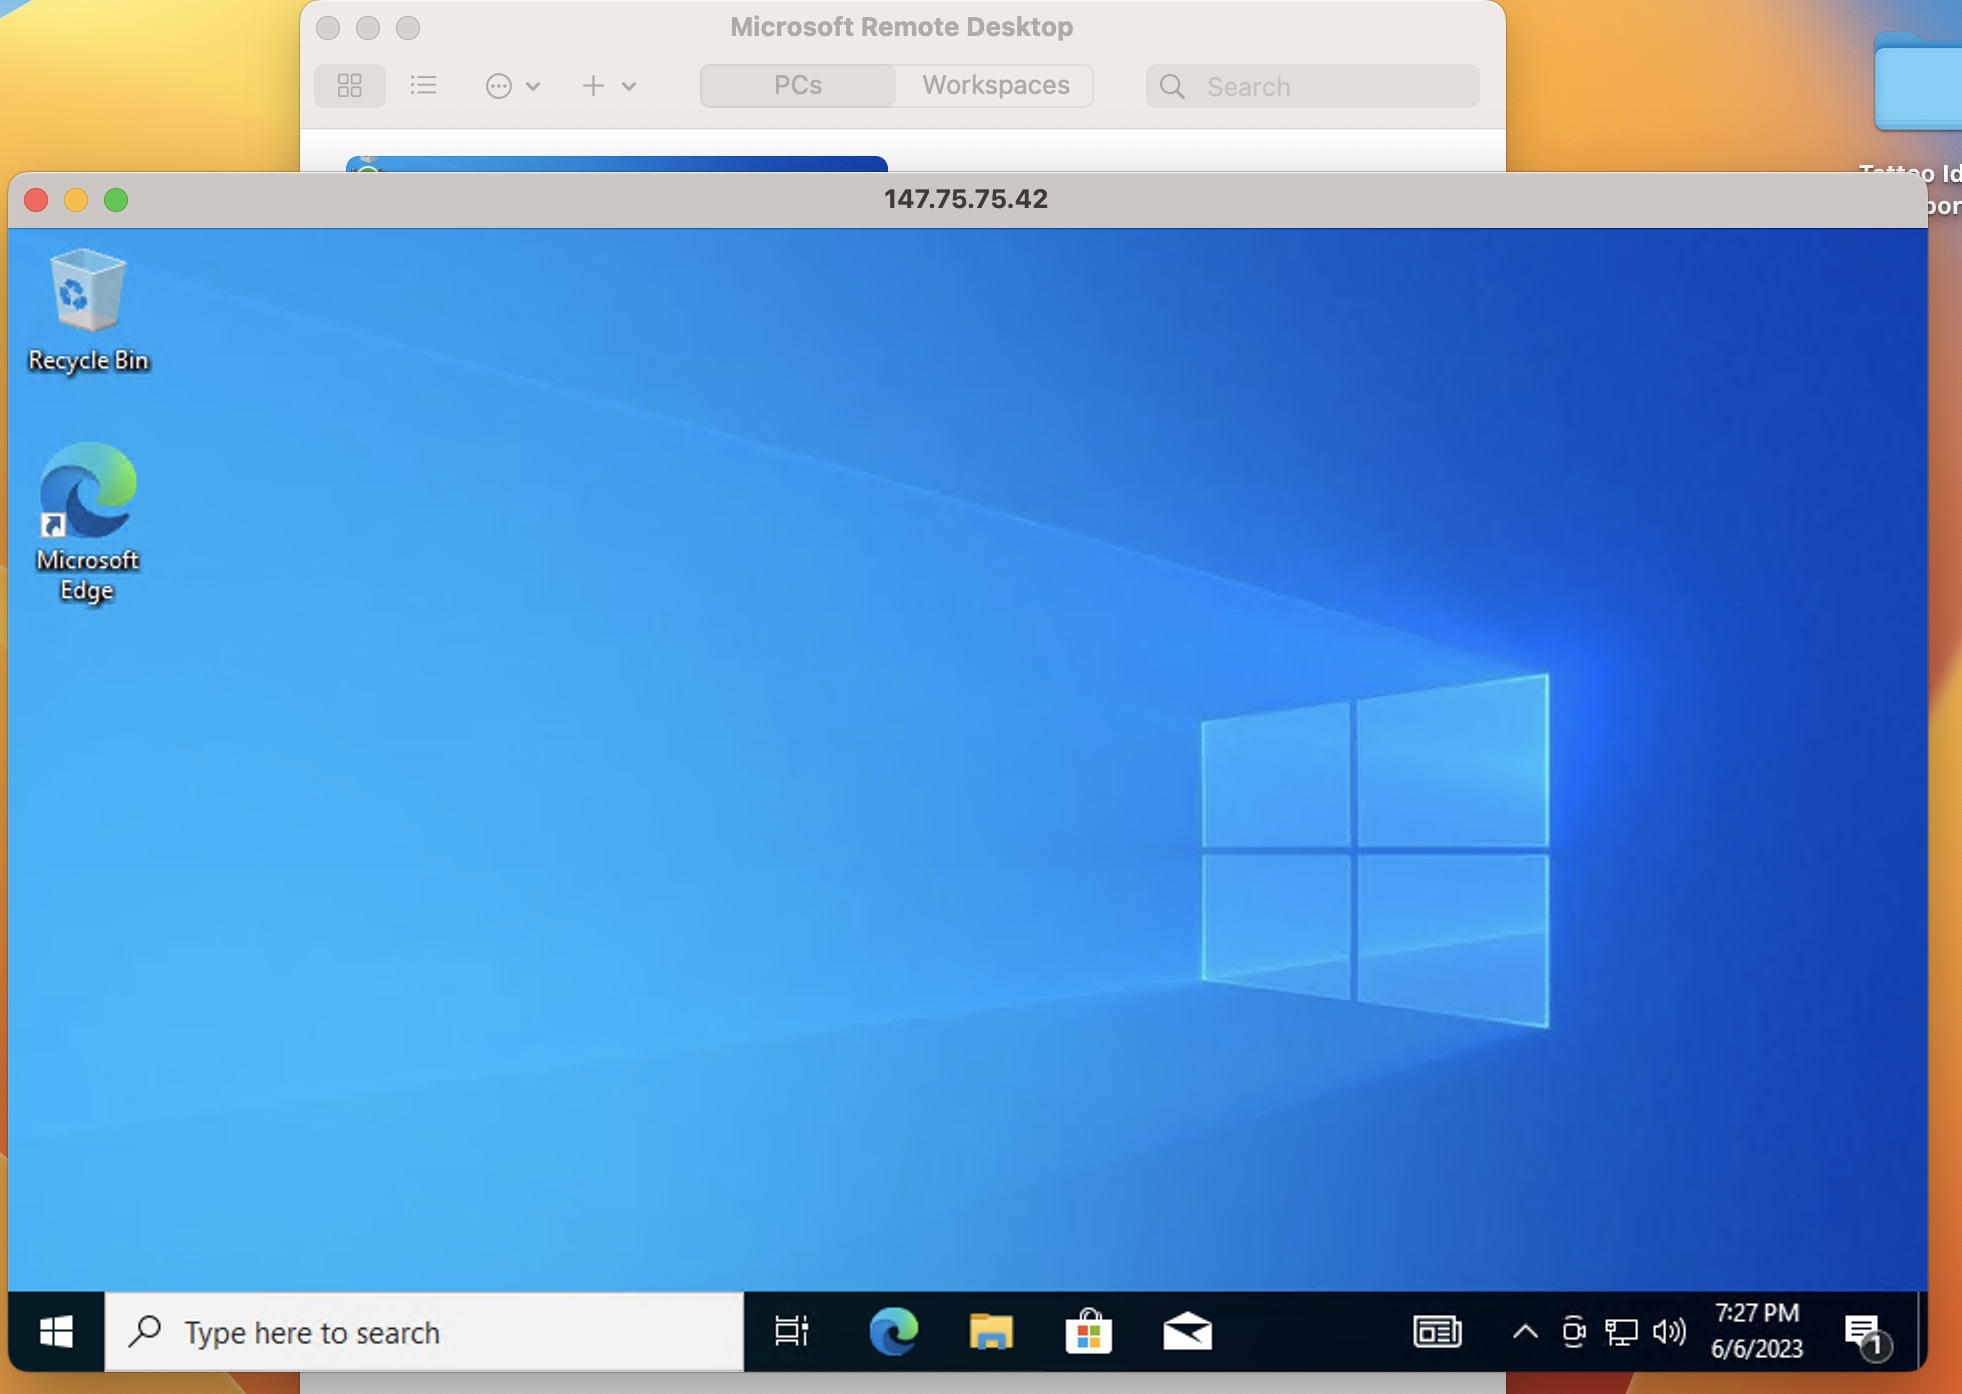
Once the system is rebooted, you will be able to access the instance remotely as normal, in this case, thorugh Microsoft Remote Desktop:
In many cases the operating system will automatically configure the network through DHCP for the first network interface only. It's recommended to configure LACP bonding for the server's network interfaces if the operating system supports it.
Conclusion
In this guide we covered how to install an OS with an ISO source by using the Rescue Mode available in Equinix Metal and common utilities such as KVM, libvirtd, and VNC. It's worth repeating that this process should not be used for a production workload, but rather for experimentation and proofs of concept.
You may also like
Digger deeper into similar topics in our archives
Configuring BGP with BIRD 1.6 on an Equinix Metal Server
Set up BGP on your Equinix Metal server using BIRD 1.6, covering IP configuration, installation, and neighbor setup to ensure robust routing capabilities between your server and the Equinix...

Configuring BGP with FRR on an Equinix Metal Server
Establish a robust BGP configuration on your Equinix Metal server using FRR, including setting up network interfaces, installing and configuring FRR software, and ensuring secure and efficie...

Crosscloud VPN with Wireguard
Learn to establish secure VPN connections across cloud environments using WireGuard, including detailed setups for site-to-site tunnels and VPN gateways with NAT on Equinix Metal, enhancing...

Deploy Your First Server
Learn the essentials of deploying your first server with Equinix Metal. Set up your project & SSH keys, provision a server and connect it to the internet.

Ready to kick the tires?
Use code DEPLOYNOW for $300 credit