- Home /
- Resources /
- Learning center /
- Configuring a Redu...
Configuring a Redundant Hybrid Cloud Connection on Equinix Metal using Fabric Service Tokens
Learn how to configure your network for hybrid cloud connectivity

On this page
Configuring a Redundant Hybrid Cloud Connection on Equinix Metal using Fabric Service Tokens
One of the key features of Equinix Metal is the Equinix network and internet exchange it's built on top of. Using both the self-serve nature of Equinix Metal and the powerful connections built into Equinix Fabric, this guide will walk through connecting Metal Layer 2 networks with an AWS Virtual Interface and establishing a BGP peering relationship.
This guide assumes you have:
- An Equinix Metal Account with the ability to create devices, VLANs, and Interconnections
- An Equinix Metal Project with some device setup to do network routing
- An Equinix Fabric Account with the ability to create connections
- An AWS account with the ability to make changes to VPCs and Direct Connect
Due to the myriad ways Metal and Amazon systems could be designed and architected, connecting virtual gateways into VPCs on Amazon and configuring inter-system networking on Metal are beyond the scope of this guide.
For further reading on connecting services with AWS Direct Connect see the AWS Direct Connect User Guide.
For further reading on Metal's Layer 2 Networking, start with our Layer 2 Overview in the Metal documentation.
Preparing the Equinix Metal Environment
Since the network connection into Equinix Metal will ultimately be on Layer 2, you'll need to establish all of the following in a project where either you already have a routing device set up or you will need to configure one to two devices to do routing of remote traffic (depending on your desired level of redundancy).
The interconnections we'll be making end up connecting into a particular metro on a specific VLAN (or two for redundant connections) so you'll want to make sure you have this setup to begin with. This can be accomplished through the console under Networking > Layer 2 VLAN > + Add VLAN or using the metal cli tool:
$ metal vlan create -m <metro> -d "Metal-AWS" --vxlan 1049
+--------------------------------------+-------------+-------+-------+----------------------+
|                  ID                  | DESCRIPTION | VXLAN | METRO |       CREATED        |
+--------------------------------------+-------------+-------+-------+----------------------+
| 34105cf9-1594-47a2-8c68-2f2e170bb3f1 | Metal-AWS   | 1049  | ch    | 2022-09-30T18:07:53Z |
+--------------------------------------+-------------+-------+-------+----------------------+
You'll want to repeat this a second time to create the redundant connection VLAN:
metal vlan create -m <same-metro> -d "Metal-AWS-Secondary" --vxlan 1050
In a few minutes you should have two layer 2 VLANs set up in the same metro as a bare metal server now ready to connect up using interconnection service tokens.
Creating Fabric Interconnections
For these next steps you'll use the Equinix Metal and Fabric consoles. We'll start first in the Metal Console, because currently you cannot create interconnections through the CLI.
- After logging into the Metal Console, ensure you are in the correct organization and project that you used for creating the device and VLANs during the "Preparing the Equinix Metal Environment" section.
- In the left navigation bar, select Interconnections.

- On the Interconnections page, click the blue button labeled Request new interconnection.

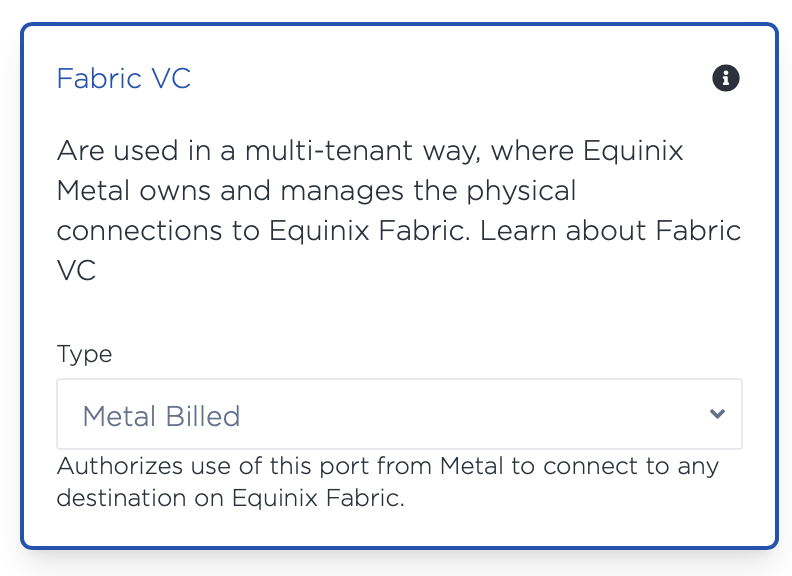
- Set the type of connection to Fabric VC and select Metal Billed from the dropdown. This will generate tokens to connect from Equinix Metal into any other service already connected into Equinix Fabric.
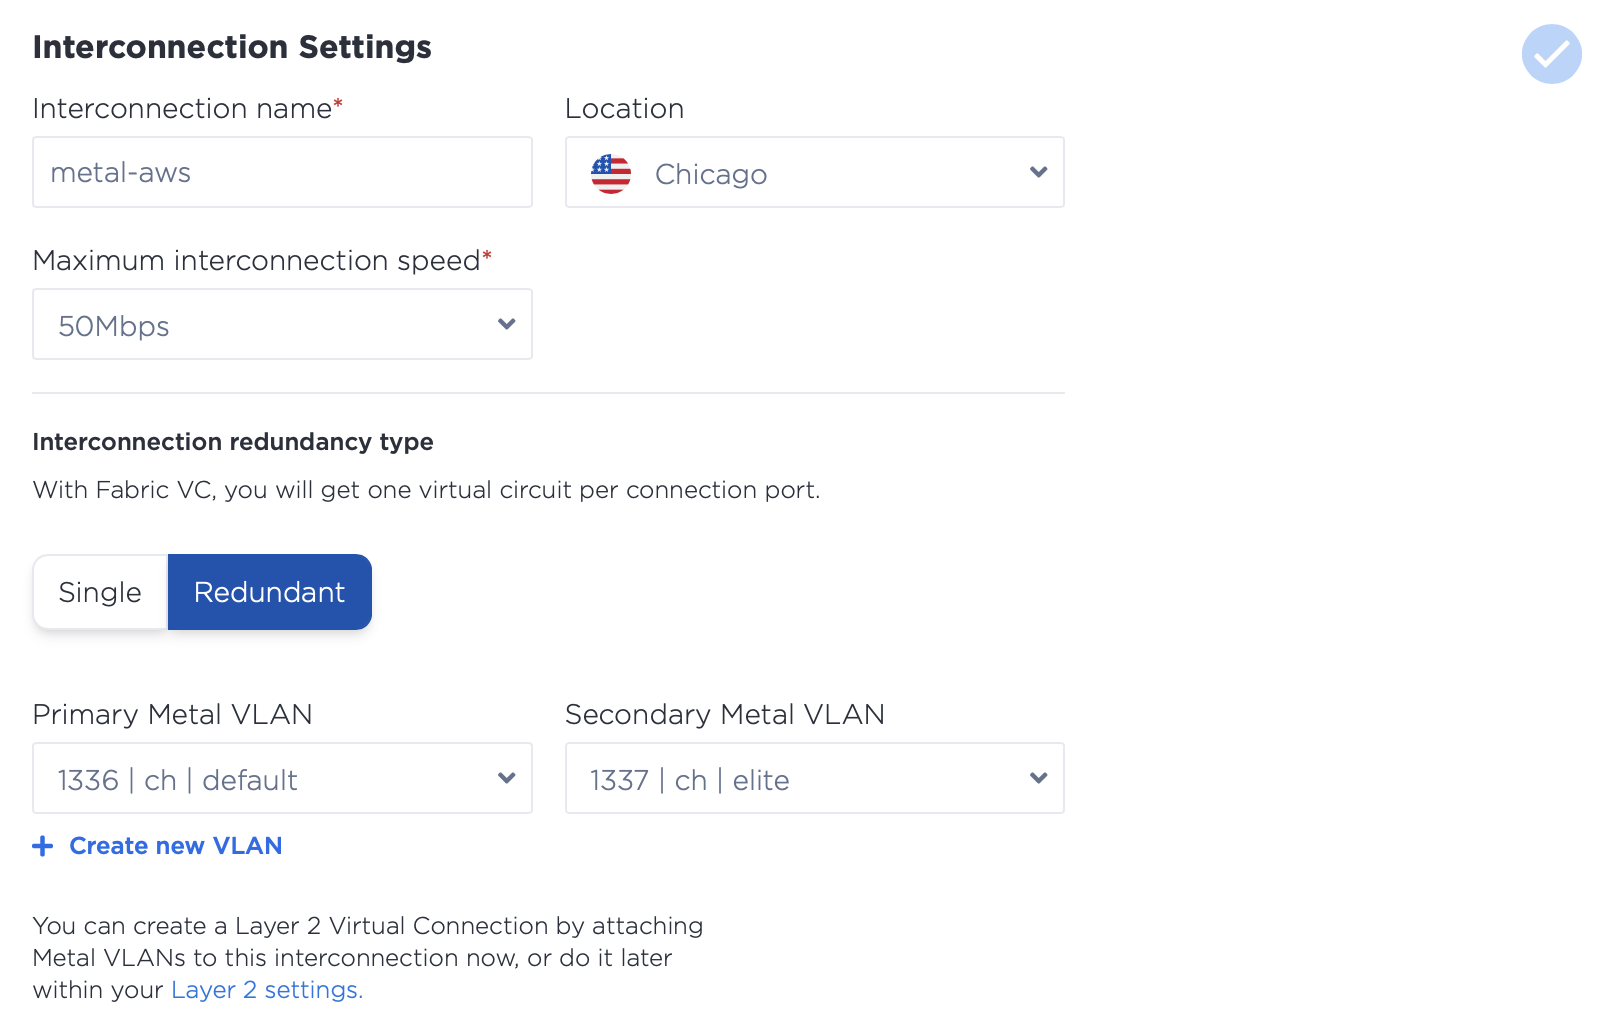
- Set the location to the metro you've been using, select a descriptive name for this connection, choose an appropriate speed/bandwidth and link it into the VLANs created during the environment setup steps above. In this example, we're creating a connection called "metal-aws" in the Chicago metro and connecting it to VLANs 1336 and 1337 for primary and secondary respectively.
- Confirm the details in the connection summary and select Submit Interconnection Request.
- The next page will provide information about setting up your connection and give you the service tokens necessary for the Primary and Secondary connections. Keep this page open for reference and open the Equinix Fabric Console.
- Once you've logged in to the Fabric Portal, under Connections select Create Connection.

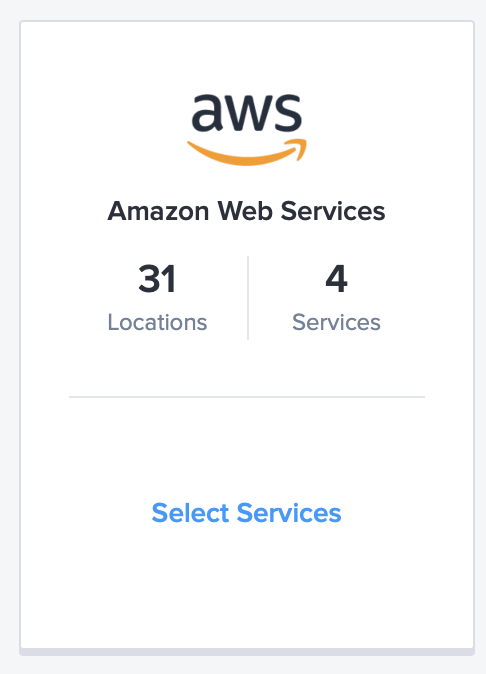
- Since AWS is a popular service, scrolling down to Frequent Connections, you should find AWS right near the top. Select that service.
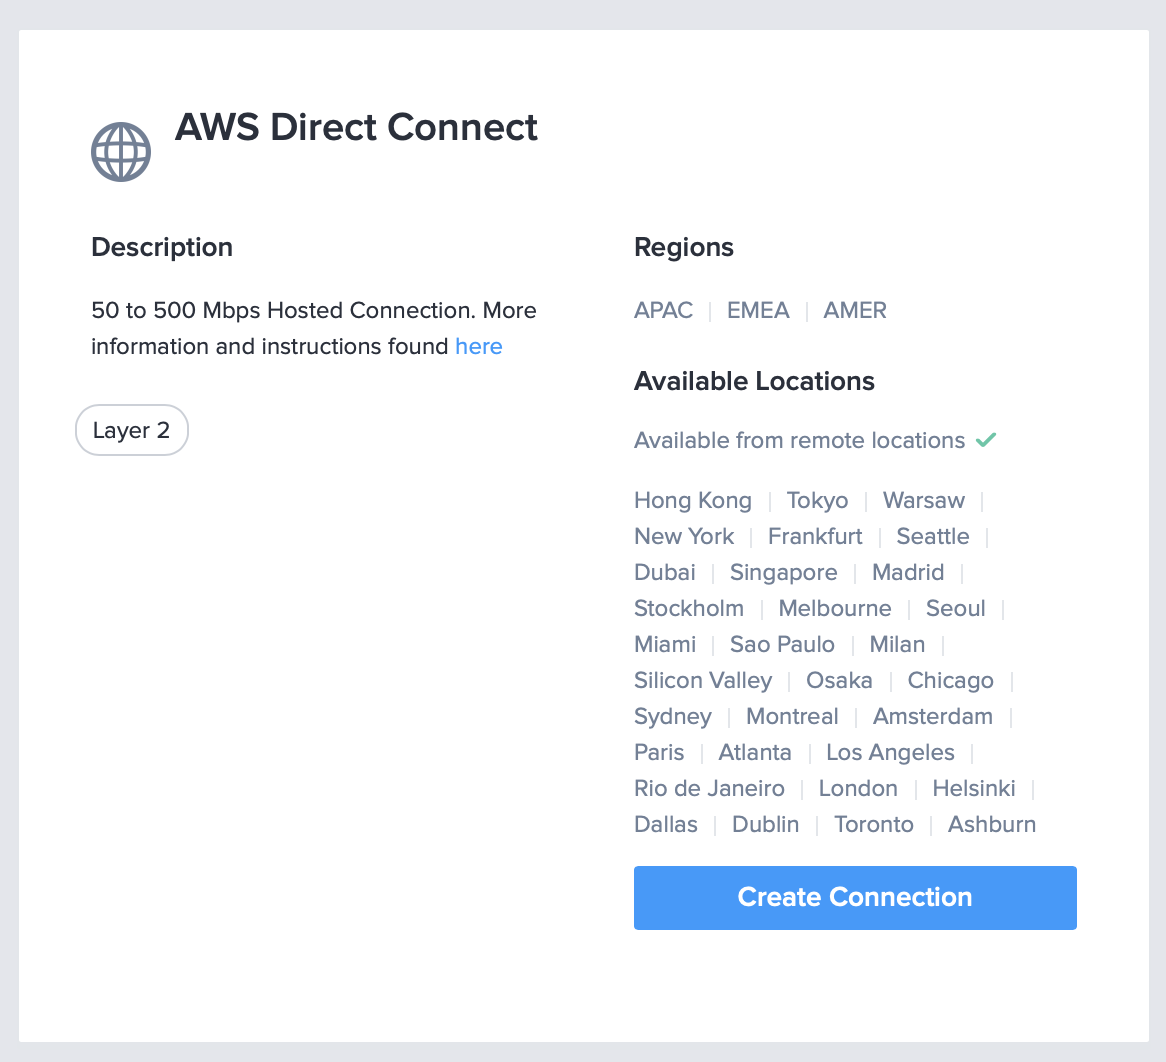
- Select Create Connection under the AWS Direct Connect service. Note: this is not the option labeled "redundant" as that configruation does not have presence in North America. You'll create two Direct Connections to establish that same redundancy.
- Ensure you have your Amazon Account ID handy, and select Create Connection.
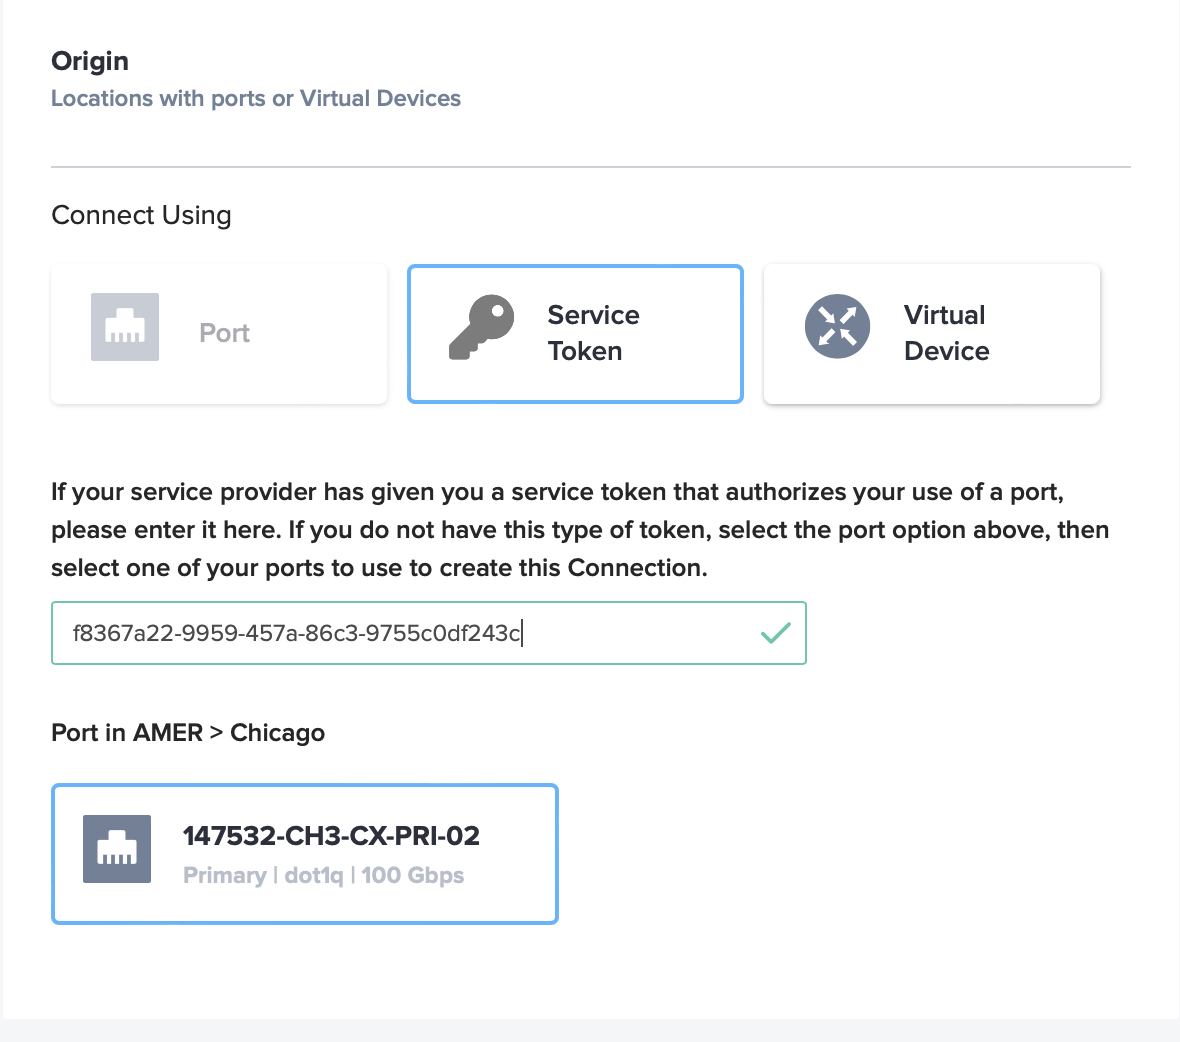
- Under the connection Origin, select Service Token and paste in your Primary Connection Service Token provided in the Equinix Metal console. Once the site checks the token, you should see your Metal connection information reflected below. In this example, we created the connections in Chicago and that is confirmed.
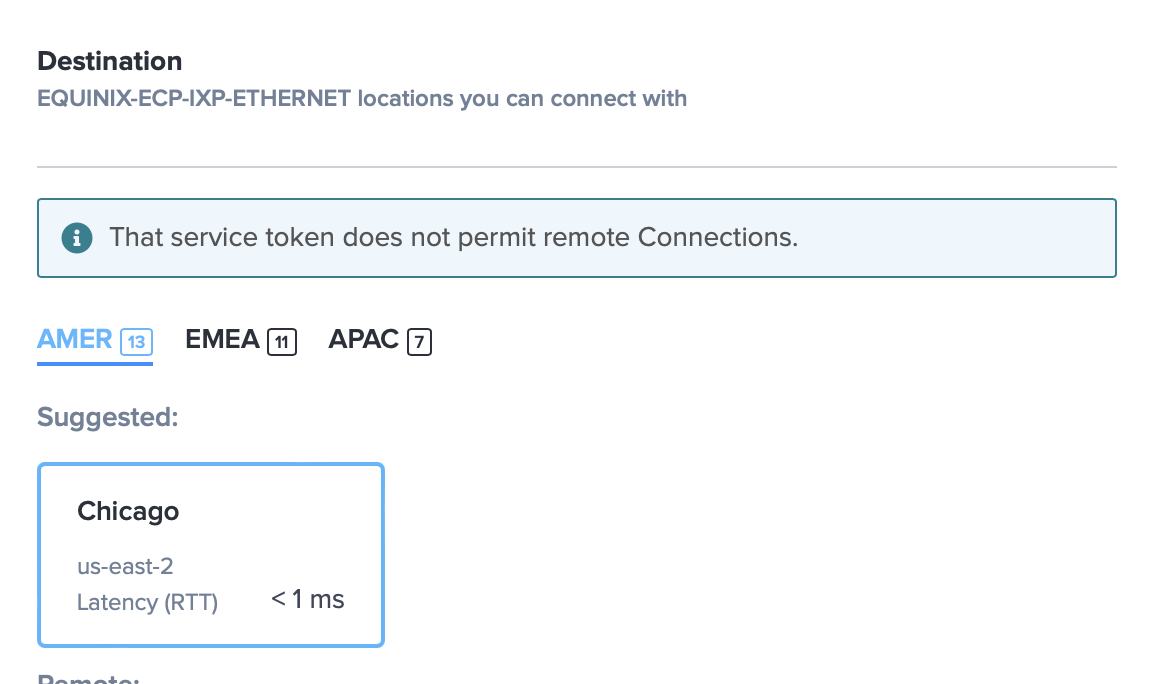
- Select the AWS destination for the Connection. Since our service tokens don't allow for remote connection, the AWS destination is going to be in the same region as your Metal Metro, in this case us-east-2 also in Chicago. You may also notice that a local connection provides the fastest round trip time with a latency of less than 1ms. Once confirmed, select Next on the bottom right.
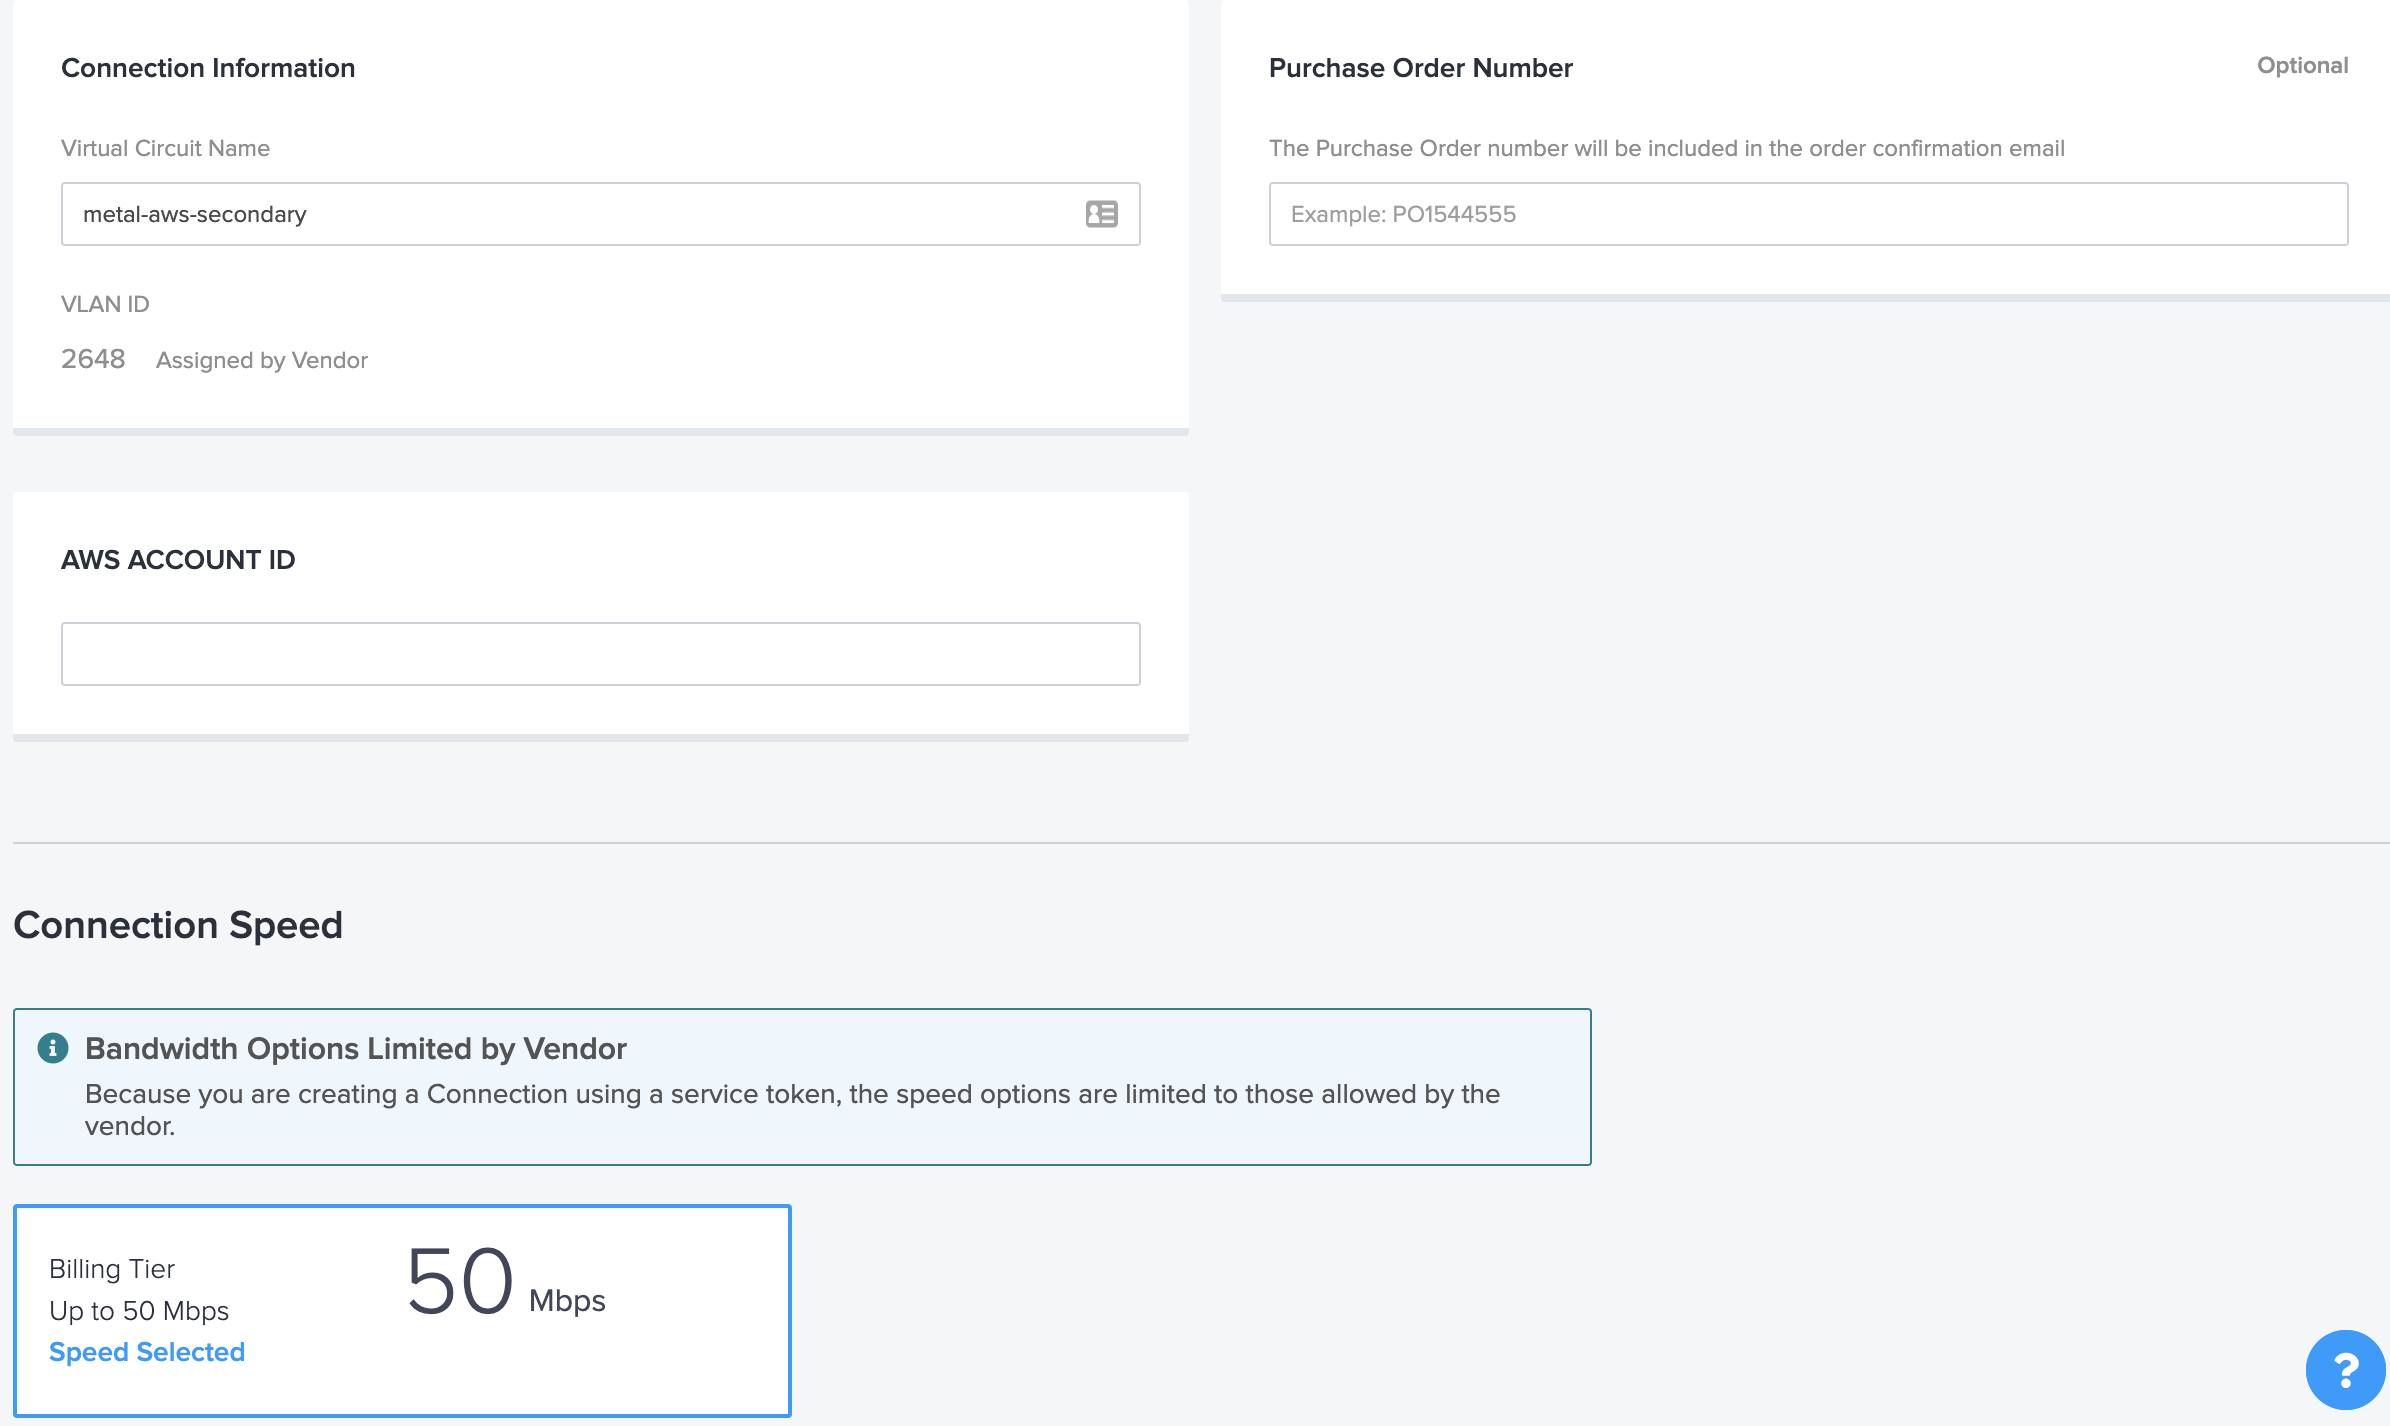
- The next screen will ask you to name the connection something meaningful (like aws-metal-primary or aws-metal-secondary), enter your Amazon Account ID, optional purchase order number for internal tracking, and select the bandwidth further down the page. The bandwidth will be limited by your choices made in the Metal portal, in this example, 50 mbps. Once all required fields are complete, select Next.
- Confirm the connection details and notifications email on the last page and Submit Order.
- Soon this connection will be created and you'll need to accept it on the AWS side of things.
Configuring AWS
Once the connections have been initiated from the Equinix side, you'll need to accept these connections in the AWS console and connect them into your existing cloud for traffic to flow through a virtual interface.
Accepting the Connections
- In the AWS console, bring up the Direct Connect service and click Connections. You should see the pending Equinix connections here in "ordering" status.
- Click the ID of the connection to bring up the details and click the Accept button in the top right.
Alternately, to accept the connection via aws-cli, use the following command:
$ aws directconnect confirm-connection --connection-id $YourConnectionID
Connecting to your AWS infrastructure
Once the connections move from "Ordering" to "Available", they're ready to be wired up to your existing AWS infrastructure. How you set up the connections will depend on your particular needs and AWS architecture. For more information on how you can configure your Direct Connection on AWS, see the AWS Direct Connect User Guide. Regardless of whether you want a Public, Private or Transit connection, the Virtual Interfaces should be able to use BGP to peer with a Metal device and advertise the networks between each other.
Interconnections and Routing
At the time of this writing, in order to get traffic to flow between your Equinix architecture and AWS, you'll need a device (virtual or physical) in the appropriate metro, connected to the appropriate Layer 2 networks (VLANs), that can be configured as a router. There are a variety of ways of accomplishing this, and your choice will vary based on your particular architecture. For this example, we'll set up a new physical device using an open source router image from VyOS in the Chicago metro.
Metal CLI:
metal device create -m ch -P c3.medium.x86 -O custom_ipxe -I "http://pxe.vyos.io/\?uid\=742e1f49-e756-4743-a293-5df768728a58\&variant\=vyos_packet" -H ch.router.01
The basic installation and setup of the router, connecting the VLANs, and establishing a BGP peering session with an AWS Virtual Interface are beyond the scope of this guide. If you're looking for an example of setting up and configuring a VyOS router on Equinix Metal, consider our Equinix Labs Github repository for deploying and edge router with IPSec VPN.
For this guide, we want to separate which physical port on the router is sending traffic to the internet and which is sending to AWS and other VLANs. So first, we'll configure bond0 to use Hybrid Unbonded networking. For more information on different network types, see the metal documentation on Layer 2 Networking.
- Navigate to the Networking tab on the Server Management page accessible by clicking on the appropriate hostname on the Manage Servers page of the Equinix Metal Portal.
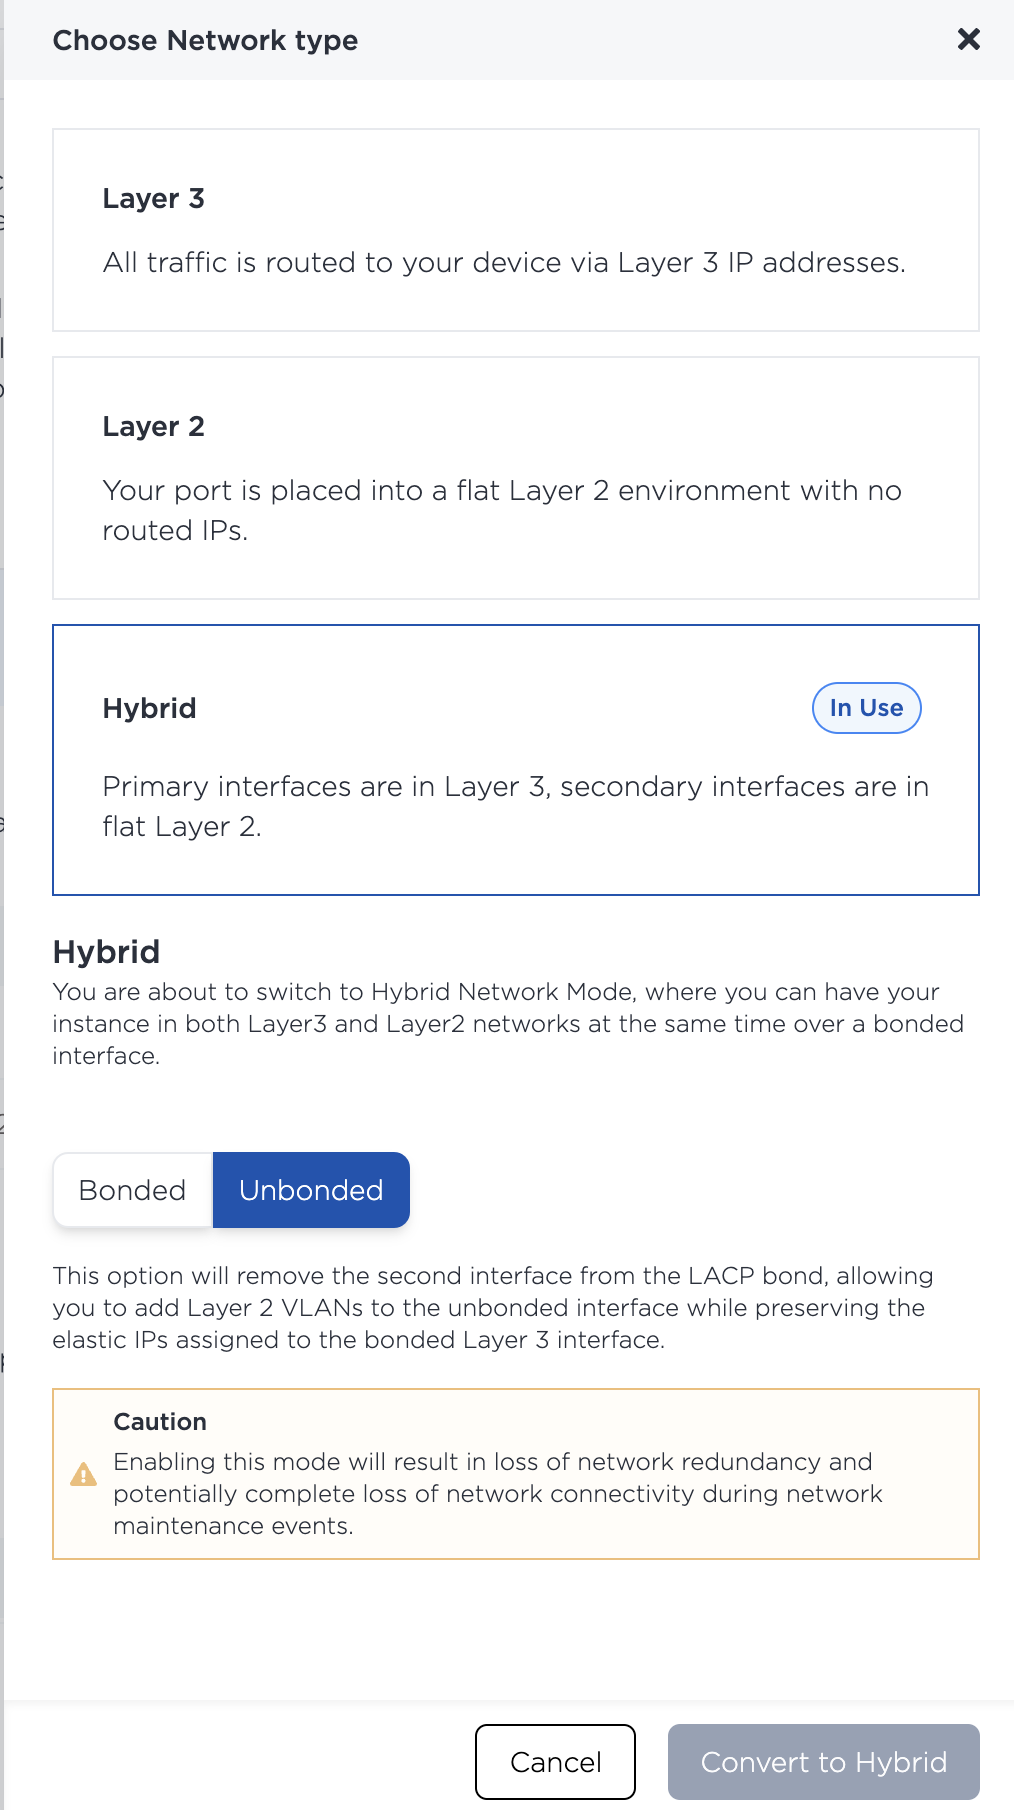
- Click + Convert to other network type and select Hybrid and Unbonded from the listed options. The console will present a warning about redundancy as it will remove the
eth1device frombond0, but that's OK for our purposes, so click Convert to Hybrid.
- Once back on the networking tab, scroll down to the Layer 2 section and select + Add New VLAN
- Select the Layer 2 interface to which you'd like to connect the Layer 2 VLANS, select the appropriate VLANs from the drop down and then select Add. In this example we're connecting a Default VLAN that might be used to connect to other Metal devices in a private network and the Metal-AWS VLAN where we'll be setting up peering.

Traffic tagged for these VLANs is now being sent to the eth1 port on our VyOS router, but we still need to configure the router's 802.1q settings to receive that traffic and to provide IP addresses and network information. In this example we're using the default IP address for the metal-aws vlan provided by the BGP Peering information in the AWS Virtual Interface. You can find this information in the Management Console or with the aws directconnect describe-virtual-interfaces command. See: View Virtual Interface Details for information.
Information like which ASN, password and IP addresses to use are largely arbitrary, but have to match both what you configured in AWS when creating the Virtual Interface and on the router. Our example uses the auto-assigned 169.254.x.x address, but this is considered poor practice for a production environment.
- Configure the
eth1interface and sub-interfaces with appropriate IP settings. In VyOS that would look like this:set interface ethernet eth1 vif 1336 address 172.16.0.1/24 set interface ethernet eth1 vif 1336 description "local-net" set interface ethernet eth1 vif 2020 address 169.254.96.6/29 set interface ethernet eth1 vif 2020 description "metal-aws-primary" - Optionally, test your current connection by pinging the AWS endpoint on the IP address provided in the BGP details:
vyos@vyos# ping 169.254.96.1 PING 169.254.96.1 (169.254.96.1) 56(84) bytes of data. 64 bytes from 169.254.96.1: icmp_seq=1 ttl=64 time=1.66 ms 64 bytes from 169.254.96.1: icmp_seq=2 ttl=64 time=1.72 ms 64 bytes from 169.254.96.1: icmp_seq=3 ttl=64 time=1.63 ms 64 bytes from 169.254.96.1: icmp_seq=4 ttl=64 time=1.72 ms 64 bytes from 169.254.96.1: icmp_seq=5 ttl=64 time=1.67 ms 64 bytes from 169.254.96.1: icmp_seq=6 ttl=64 time=4.37 ms 64 bytes from 169.254.96.1: icmp_seq=7 ttl=64 time=1.64 ms 64 bytes from 169.254.96.1: icmp_seq=8 ttl=64 time=1.62 ms ^C --- 169.254.96.1 ping statistics --- 8 packets transmitted, 8 received, 0% packet loss, time 18ms rtt min/avg/max/mdev = 1.623/2.002/4.366/0.895 ms - Configure BGP peering to share your local network route(s) with the AWS Virtual Interface. In VyOS that would look like this:
set protocol bgp 65000 neighbor 169.254.96.1 remote as 64512 set protocol bgp 65000 neighbor 169.254.96.1 password 'y0urs3cur3p4ssw0rd' set protocol bgp 65000 address-family ipv4-unicast network 192.168.1.0/24 set protocol bgp 65000 redistribute connected - Once configured, you can confirm that the peers are communicating in the AWS interface showing the BGP connection as active. If you have your Virtual Interface connected to a VPC, you should now be able to communicate between devices in that private network and the private network on Metal.

Conclusion
While it's impossible to cover every interconnection scenario, you should now have an understanding of the basics of what's required to establish such a connection between Equinix Metal and AWS or your cloud provider of choice. This basic building block is a great starting point for transferring data to where you need it using Equinix Metal as a connections broker. You could, for instance, connect devices in your colocation environment in an Equinix data center to Equinix Metal, and then again from Metal into GCP and AWS, allowing you to use the best service for whatever your needs are.
For more information on Equinix Metal Interconnections, checkout our product documentation and our API docs.
If you don't already have an account, you can get started with Equinix Metal here.
You may also like
Digger deeper into similar topics in our archives
Configuring BGP with BIRD 1.6 on an Equinix Metal Server
Set up BGP on your Equinix Metal server using BIRD 1.6, covering IP configuration, installation, and neighbor setup to ensure robust routing capabilities between your server and the Equinix...

Configuring BGP with FRR on an Equinix Metal Server
Establish a robust BGP configuration on your Equinix Metal server using FRR, including setting up network interfaces, installing and configuring FRR software, and ensuring secure and efficie...

Crosscloud VPN with Wireguard
Learn to establish secure VPN connections across cloud environments using WireGuard, including detailed setups for site-to-site tunnels and VPN gateways with NAT on Equinix Metal, enhancing...

Deploy Your First Server
Learn the essentials of deploying your first server with Equinix Metal. Set up your project & SSH keys, provision a server and connect it to the internet.

Ready to kick the tires?
Use code DEPLOYNOW for $300 credit