- Home /
- Resources /
- Learning center /
- How to expose Kube...
How to expose Kubernetes services over Equinix Fabric
Learn how to set up a direct connection between AWS and Equinix Metal to expose your Kubernetes services.

On this page
This guide provides instructions on how to make Kubernetes public services, hosted on Equinix Metal, accessible through Equinix Fabric to AWS. There are various motivations for doing this, including the need for greater bandwidth than what the internet offers, privacy concerns, improved latency, and decreased costs associated with egress bandwidth. The accompanying diagram offers a concise summary of the topics covered in this guide.
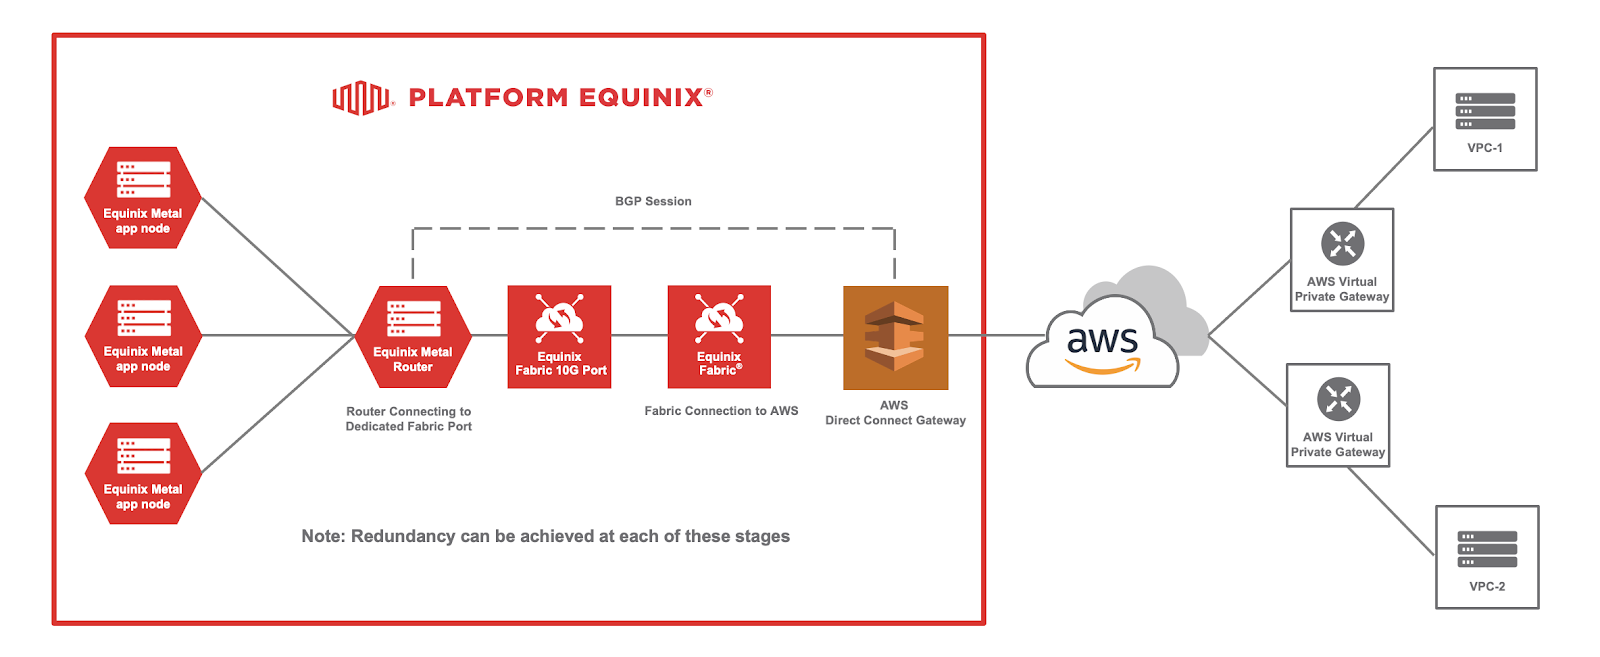
(NOTE: The screenshots of the Equinix Metal console in this guide are not up-to-date. There will be some differences in the UX as you step through the guide. However, the intention and overall strategy of the technical steps remain the same.)
Prerequisites
The following lists the infrastructure you need to follow this guide.
Equinix Metal:
- An already running Kubernetes cluster with MetalLB.
- One or more nodes that will behave as routers.
- One or more Equinix Metal dedicated ports connected to Equinix Fabric remote ports.
Equinix Fabric:
- One or more remote Fabric ports.
AWS:
- One or more VPC environment
- One or more Direct Connect Gateway
- One or more Virtual Private Gateway
- One or more NAT Gateway (not required but useful for overlapping CIDR ranges)
WARNING: Prior to initiating this procedure, it is essential to examine the subnet ranges within your various infrastructure providers and assess whether any CIDR overlaps exist. In the event of CIDR overlaps, it is crucial to meticulously strategize IP address allocations and make use of the AWS NAT Gateway.
Equinix Metal
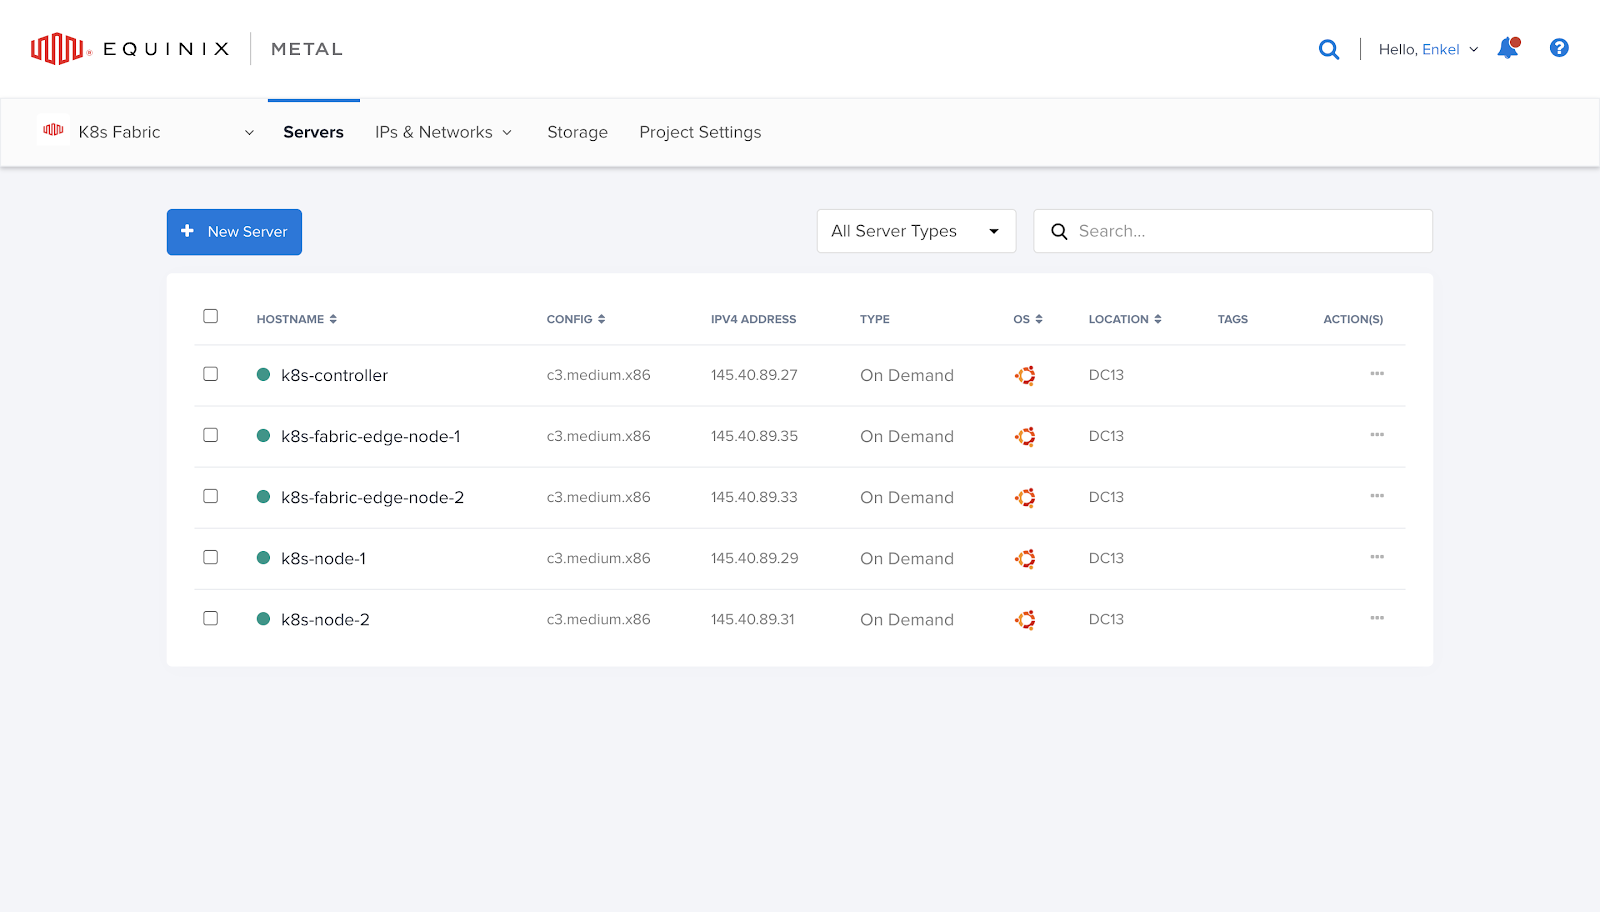
With Equinix Metal, you need to have a Kubernetes cluster up and running. Here's the cluster in Equinix DC13 - Ashburn, VA for this guide:
Router nodes
After constructing your Kubernetes cluster, the next step involves deploying one or two nodes that will act as routers, directing traffic to AWS via the Equinix Fabric. These router nodes should be deployed and incorporated into the cluster. Once they are part of the cluster, you can make use of Kubernetes taints or labels along with nodeselector to prevent application workloads from running on these router nodes.
The router nodes that defined in this example are k8s-fabric-edge-node-1
and k8s-fabric-edge-node-2.
The subnets that we will be using for this direct connection are
169.254.100.0/30 and 169.254.200.0/30. Below is the subnet breakdown:
Virtual Circuit 1:
169.254.100.0/30 - Network address
169.254.100.1/30 - AWS router address (ASN 65100)
169.254.100.2/30 - Equinix Metal router address (ASN 65000)
169.254.100.3/30 - Broadcast address

Virtual Circuit 2:
169.254.200.0/30 - Network address
169.254.200.1/30 - AWS router address (ASN 65100)
169.254.200.2/30 - Equinix Metal router address (ASN 65000)
169.254.200.3/30 - Broadcast address
VLANs
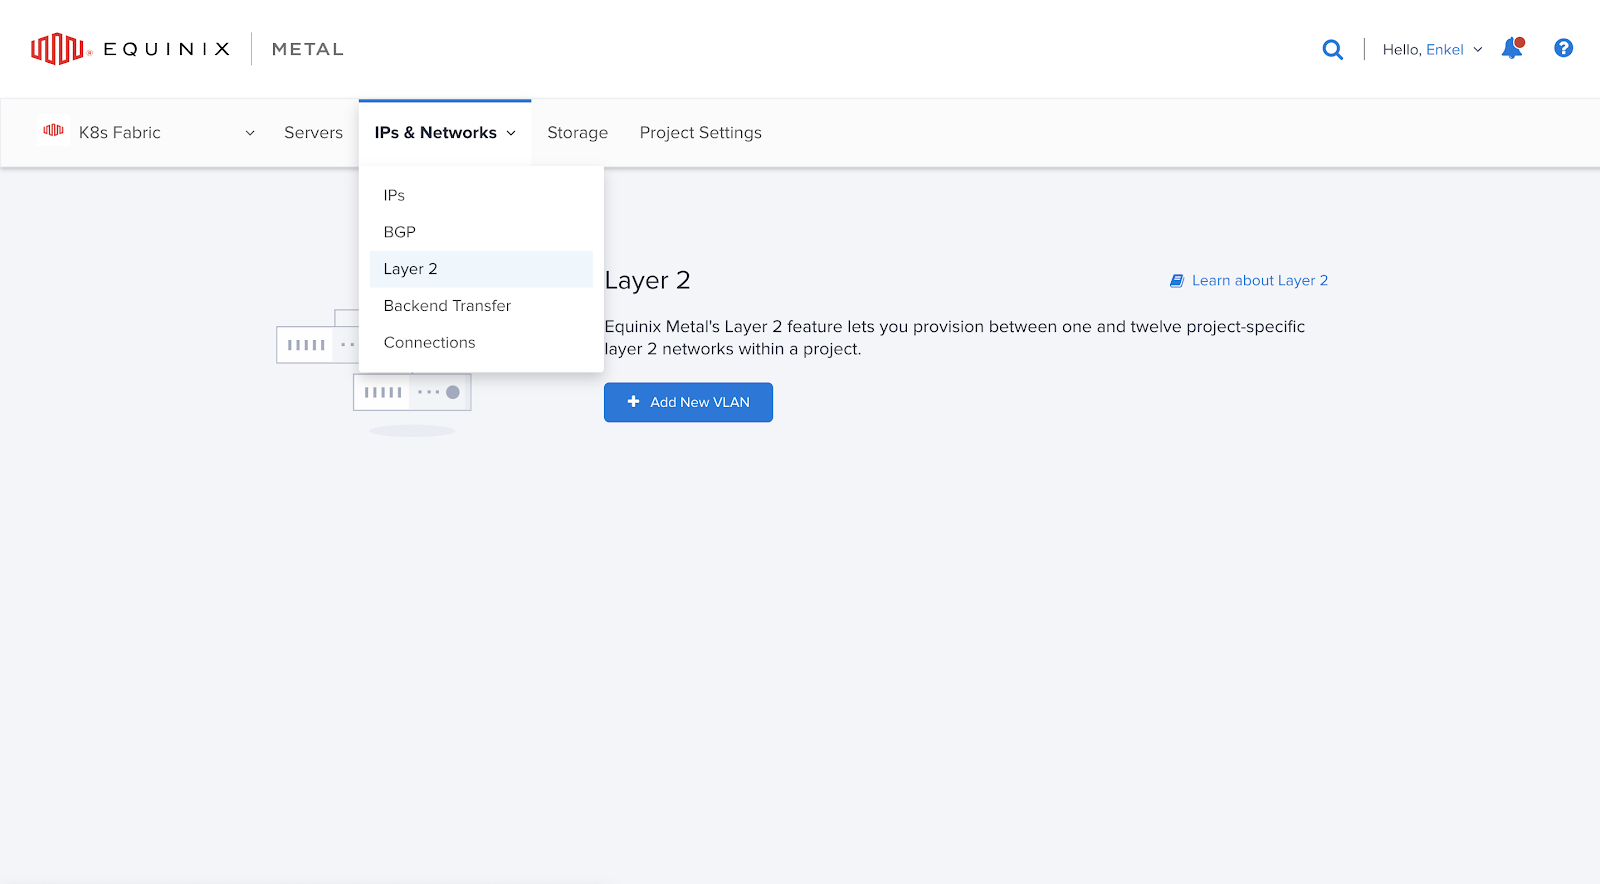
Equinix Fabric functions at the Layer 2 of the OSI model, which necessitates the use of Equinix Metal VLANs for establishing connectivity with AWS via the Equinix Fabric. To create a VLAN, navigate to the IPs & Networks tab on the Equinix Metal console and select the Layer 2 option.
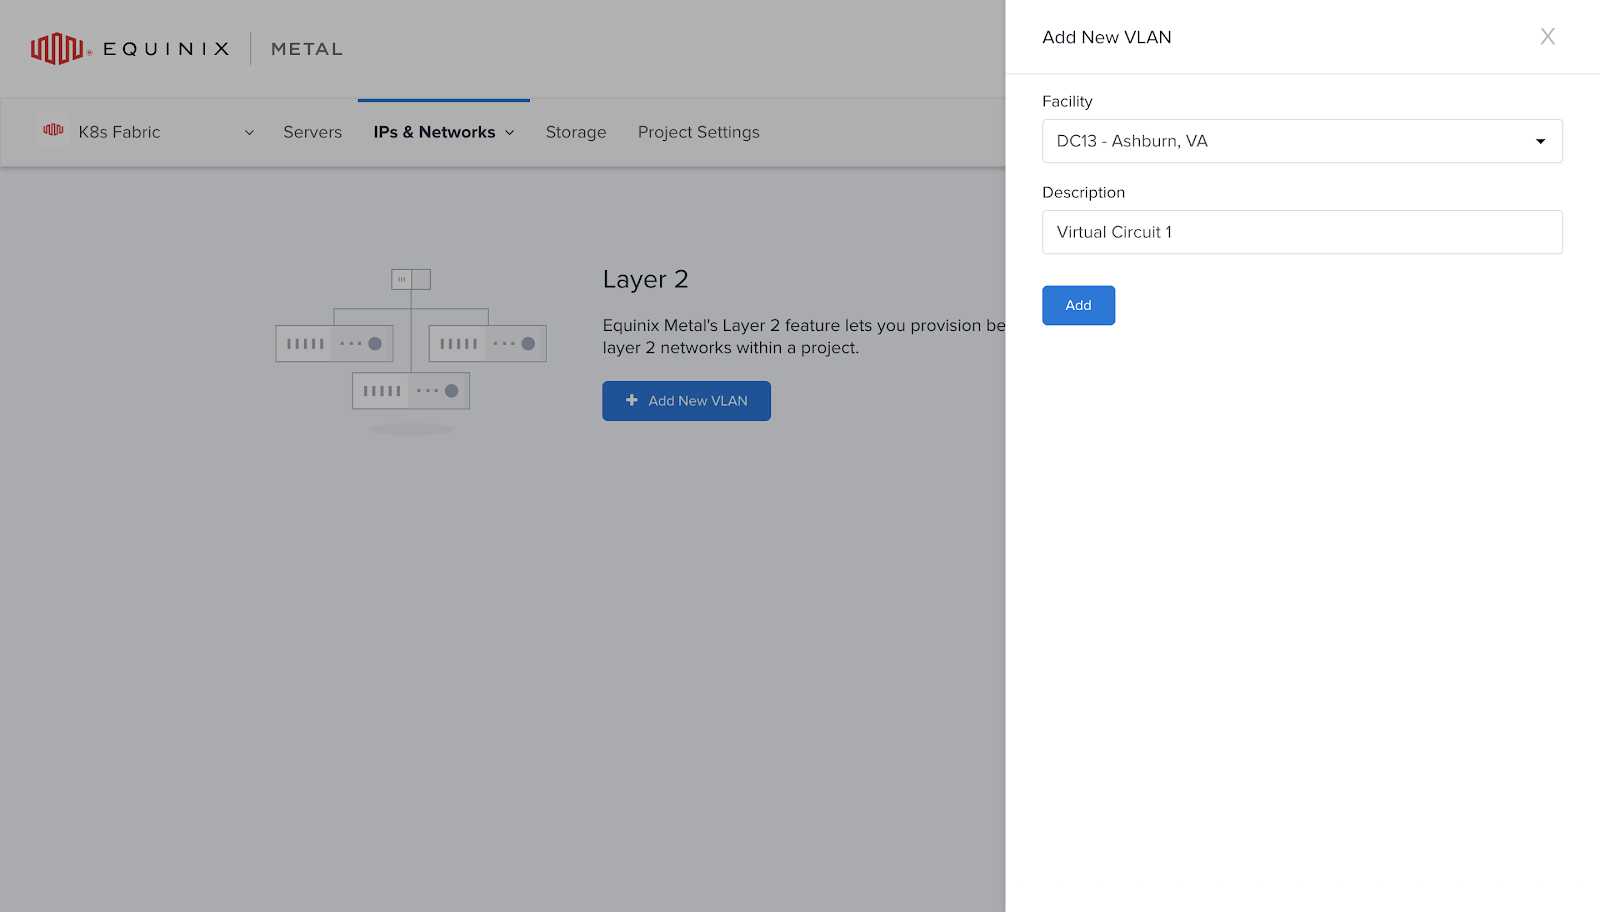
To proceed, click on the "Add New VLAN" button and choose the Facility where your router nodes are situated. In this case, as my nodes are in DC13 - Ashburn, VA, I will select that option. Assign a descriptive name to the VLAN, such as "Virtual Circuit 1" (you can choose any name you prefer). If you are establishing additional connections for redundancy purposes, you will need to repeat this procedure and generate a new VLAN for each connection. For the purposes of this demonstration, I will create a second connection and a second VLAN.
Here are the two VLANs I have generated:
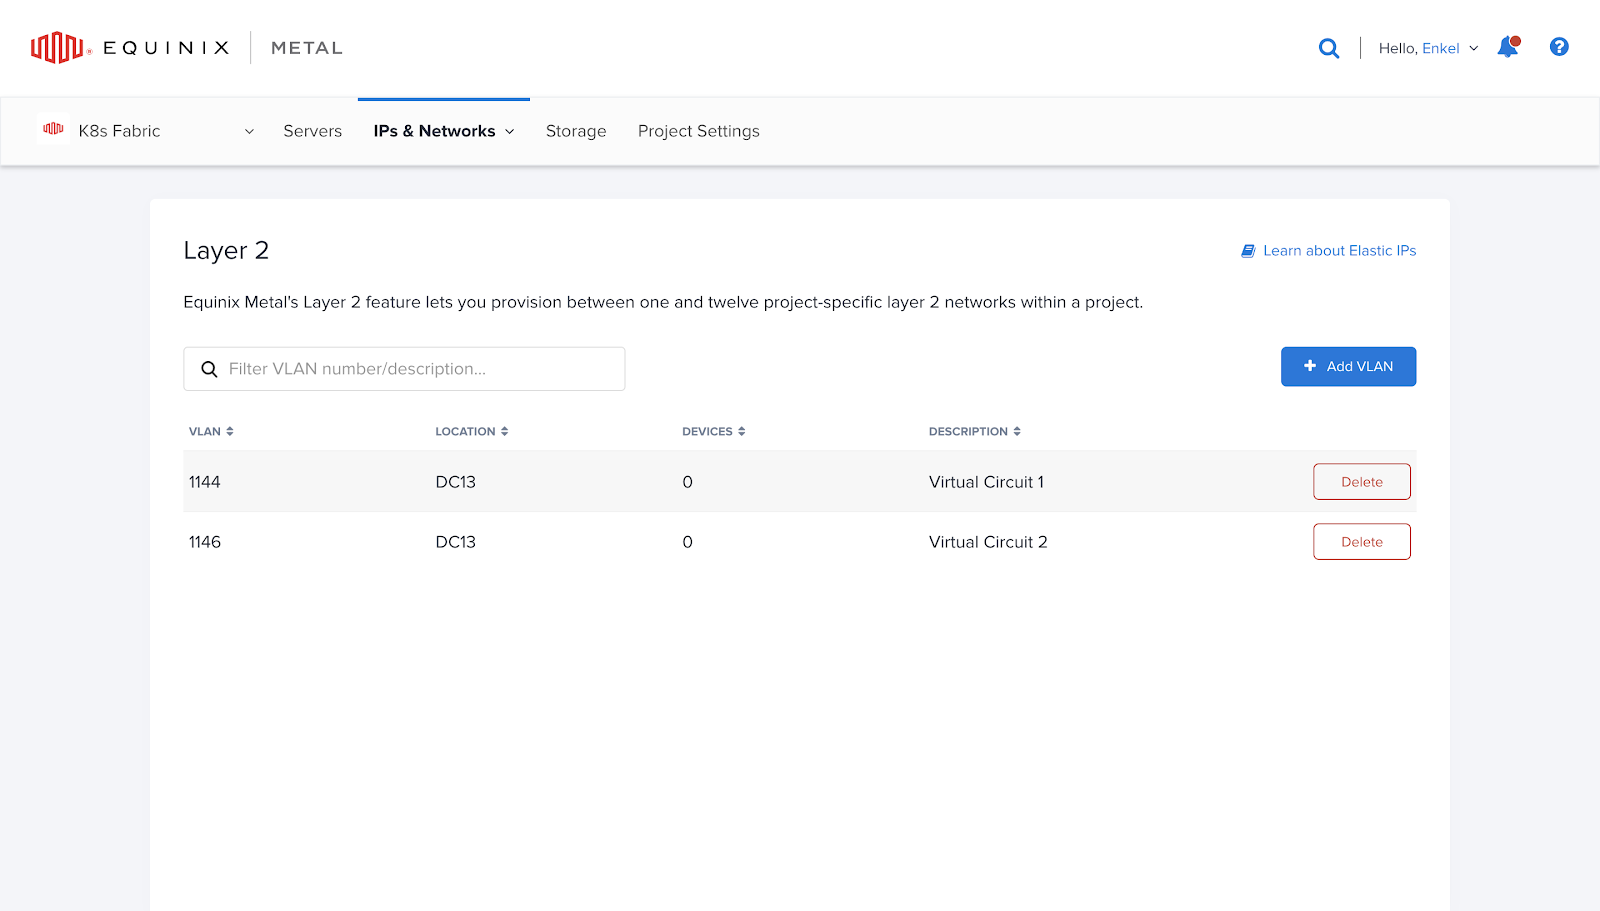
After creating the VLANs, the next step is to include your router nodes
in the respective VLANs. In this demonstration, I will utilize VLAN
1144, named "Virtual Circuit 1," on the k8s-fabric-edge-node-1, and
VLAN 1146, labeled "Virtual Circuit 2," on the k8s-fabric-edge-node-2
for redundancy purposes.
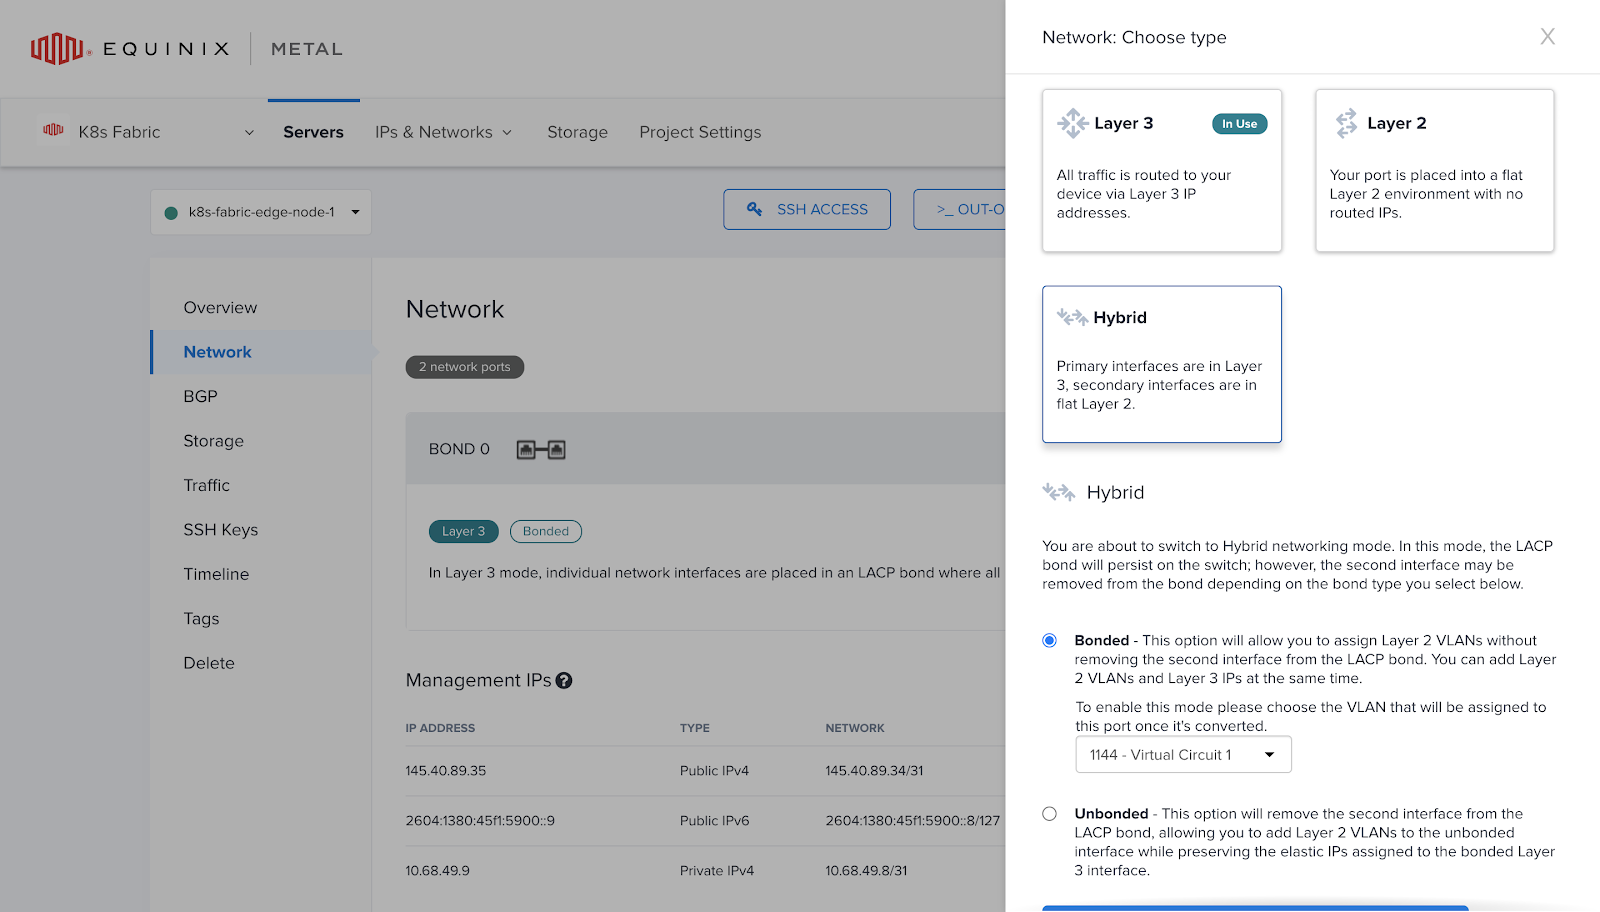
To include the router/edge nodes in their respective VLANs, follow these steps:
- Access the Equinix Metal console and navigate to the nodes section.
- On the left sidebar, select "Network."
- On the right side, click the "Convert to Other Network Type" button.
- Choose the "Hybrid" networking mode.
- Select "Bonded" as the networking mode.
- Choose the VLAN you wish to add the router node to. In this case, I will add k8s-fabric-edge-node-1 to VLAN 1144, named "Virtual Circuit 1."
- Finally, click the "Assign New VLAN & Convert to Hybrid Networking" button located at the bottom of the page.
Repeat these steps for any additional connections or router nodes. For instance, I will add k8s-fabric-edge-node-2 to VLAN 1146, labeled "Virtual Circuit 2."
After successfully adding the nodes to their respective VLANs, the next step is to configure the operating system to accept VLAN traffic. This involves adding a new tagged interface to the default bond0 interface that is already configured with Equinix Metal instances.
NOTE: The method for accomplishing this task may vary depending on the operating system being used. In my case, I am using Ubuntu 20.04 and the ip tool to configure the tagged VLAN interface. It's important to note that this configuration is not persistent across reboots, so the steps will differ if you want to make the change persistent.
MetalLB
After configuring the VLANs, the next step is to add BGP peers to the MetalLB configmap. These peers correspond to the AWS routers/VIFs that you will be announcing routes to on the AWS side.
NOTE: You will need to have a BGP password, as it is a requirement on
the AWS side. If you do not provide a BGP password on AWS, they will
generate a random password for you. In this case, I am setting the BGP
password to be "FaBr1cTeSt.
    - peer-address: 169.254.100.1
      peer-asn: 6510
      my-asn: 65000
      password: "FaBr1cTeSt"
      node-selectors:
        - match-expressions:
          - key: kubernetes.io/hostname
            operator: In
            values: [k8s-fabric-edge-node-1]

    - peer-address: 169.254.200.1
      peer-asn: 65100
      my-asn: 65000
      password: "FaBr1cTeSt"
      node-selectors:

        - match-expressions:
          - key: kubernetes.io/hostname
            operator: In
            values: [k8s-fabric-edge-node-2]
Before proceeding, it is important to verify that you have a Kubernetes service of type LoadBalancer already deployed and functioning in your cluster. This is necessary for MetalLB to announce the public IP to the AWS peering routers/VIFs. In my scenario, I have a basic nginx-deployment that is exposed with the public IP address of 145.40.89.38/32.

Virtual Circuits
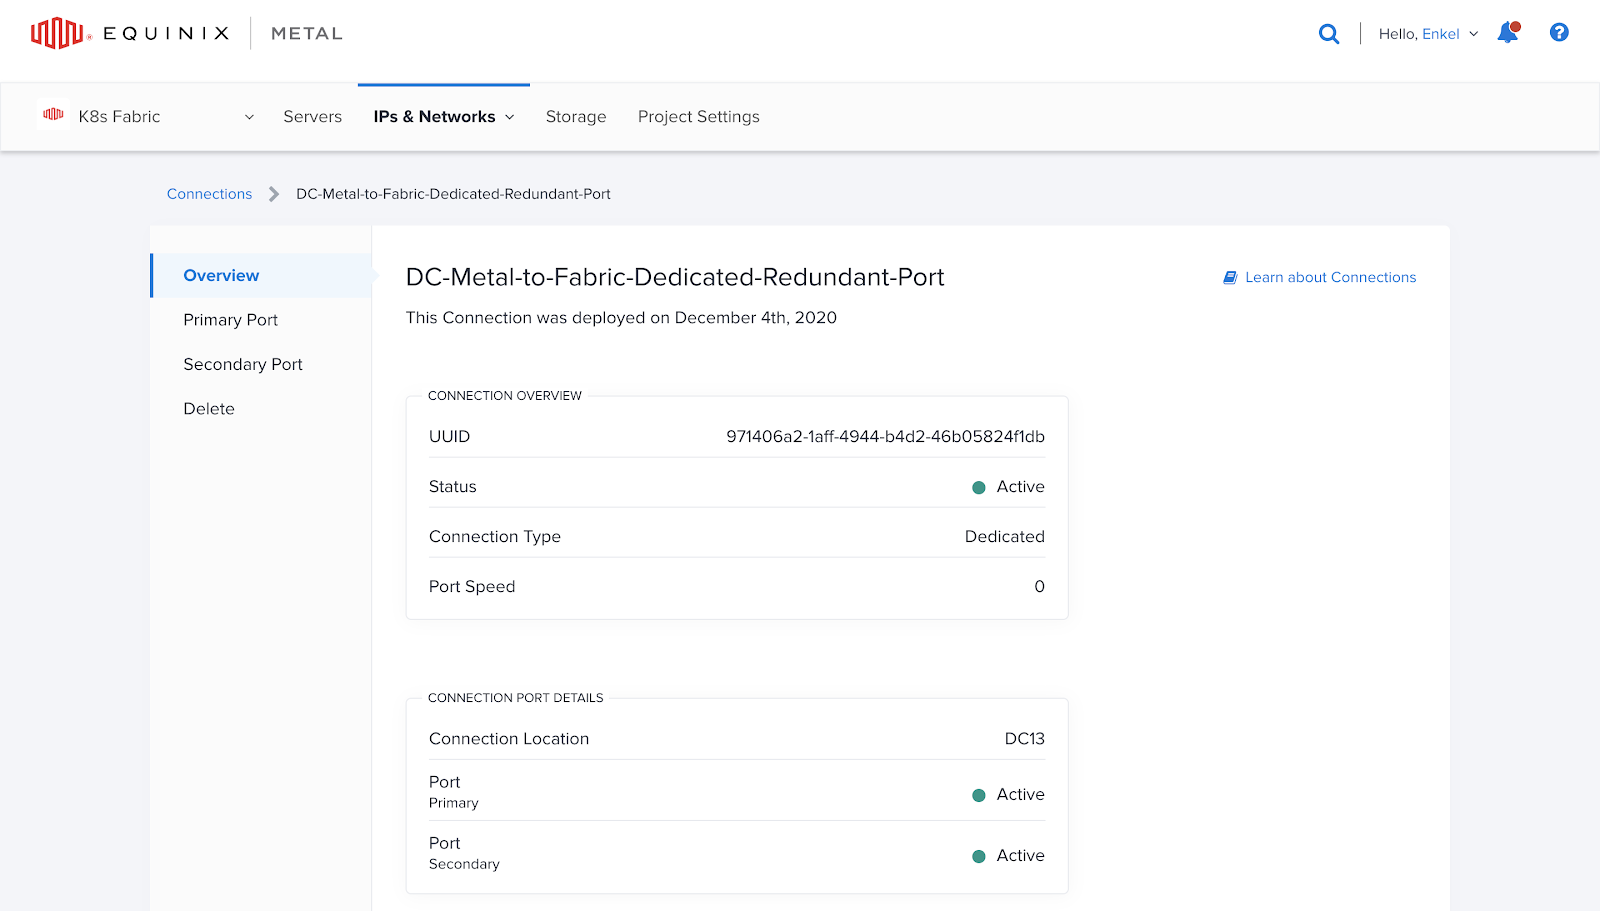
To add the virtual circuits associated with your VLANs, follow these steps:
- Access the Equinix Metal console.
- Navigate to the "IPs & Networks" tab.
- Select the "Connections" option.
- On the Connections page, choose your dedicated ports.
- For this demonstration, a pair of 10Gbps redundant ports will be used.
- Assign the primary port to the
k8s-fabric-edge-node-1router node. - Assign the secondary port to the
k8s-fabric-edge-node-2router node.
To proceed with adding virtual circuits associated with the VLANs, follow these instructions:
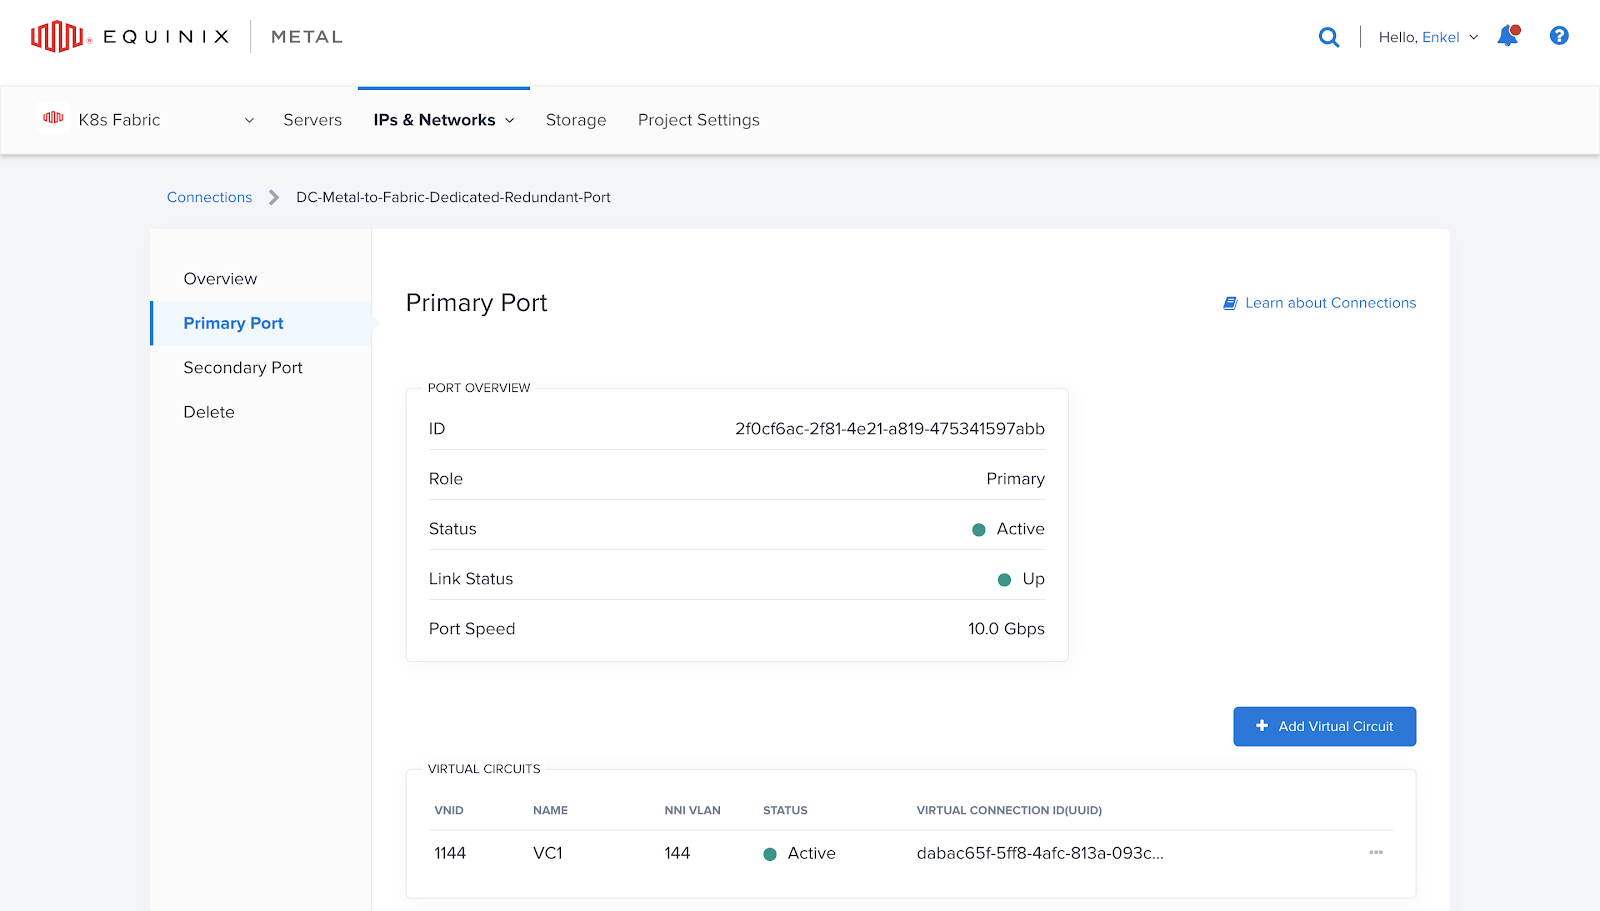
- On the left sidebar, select the "Primary Port" option.
- Next to the Virtual Circuits section, click on "Add Virtual Circuit."
A new page will appear, prompting you to select a VLAN. Choose the VLAN that was created earlier. In this case, VLAN 1144 will be used for the Primary Port virtual circuit, and VLAN 1146 will be used for the Secondary Port virtual circuit. With dedicated ports, you can create multiple virtual circuits/VLAN associations per port.
Next, you need to provide an NNI VLAN. This value can be any number within the accepted range of 2 to 4094. For simplicity, you can use the last three numbers of the VLANs created earlier. For example, set the NNI VLAN to 144 for VLAN 1144, and set it to 146 for VLAN 1146. It is important to remember the NNI VLAN, as it will be used in the Equinix Fabric console when creating the Fabric virtual circuit later in this guide.
Finally, you can assign any name to the virtual circuit. In this case, "VC1" and "VC2" were used to represent each virtual circuit created.
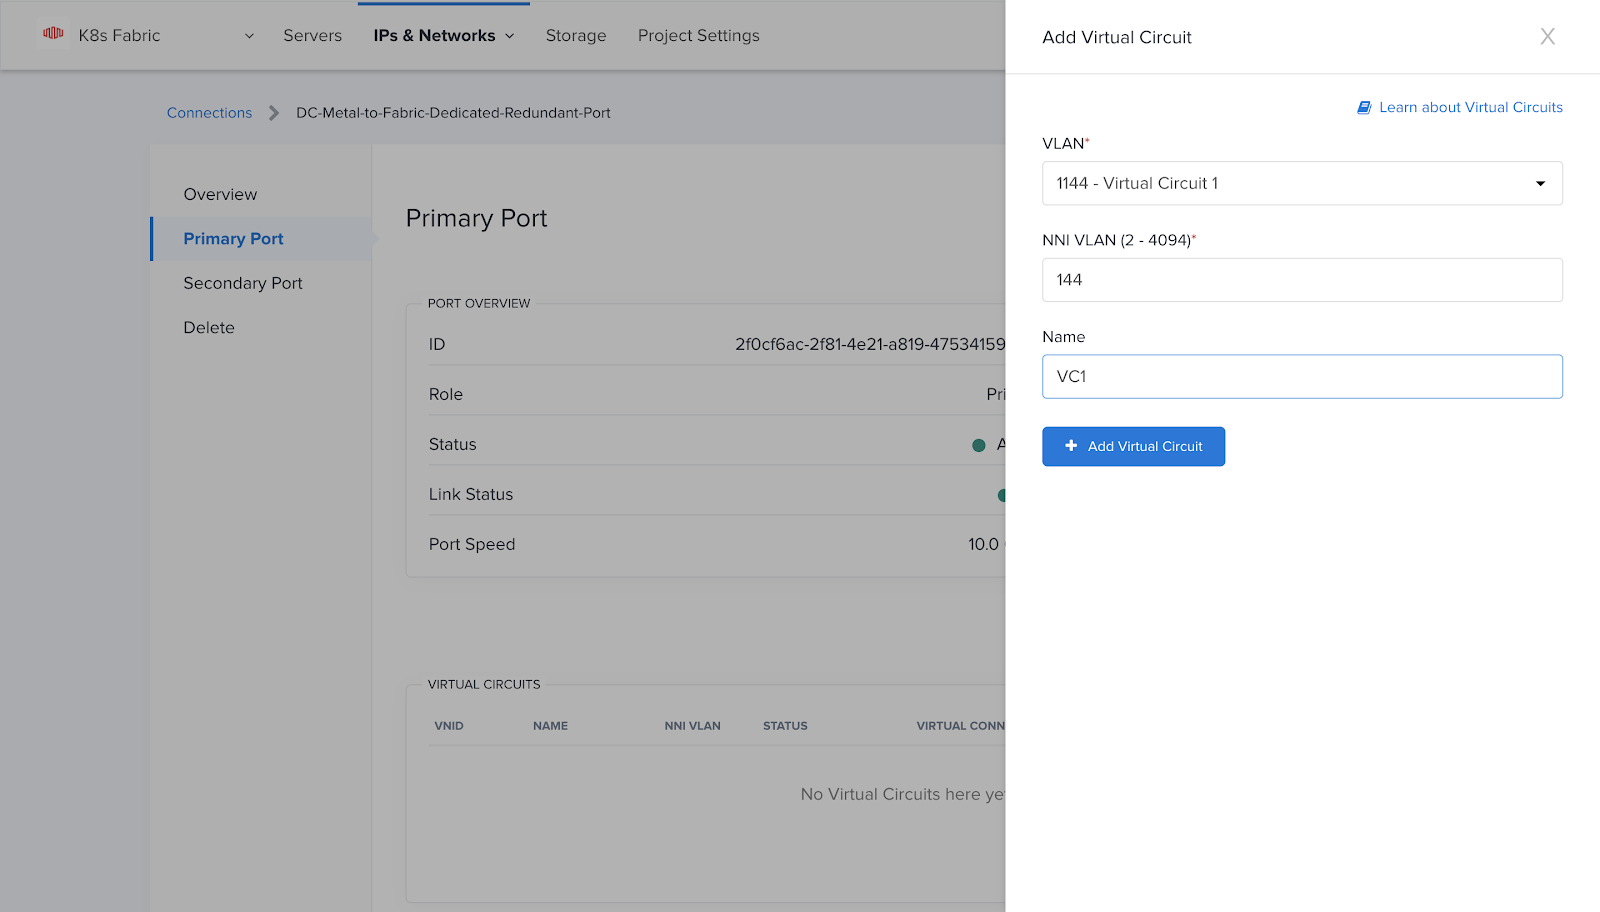
At this point, you should be able to see the Virtual Circuit associated with each port.
At this stage, we have completed all the necessary steps on the Equinix Metal side, and we can now proceed to the Equinix Fabric platform.
Equinix Fabric
Creating a Fabric Connection
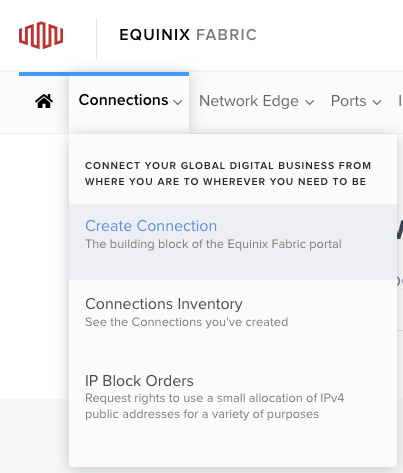
From the Equinix Fabric console select Connections -> Create Connection
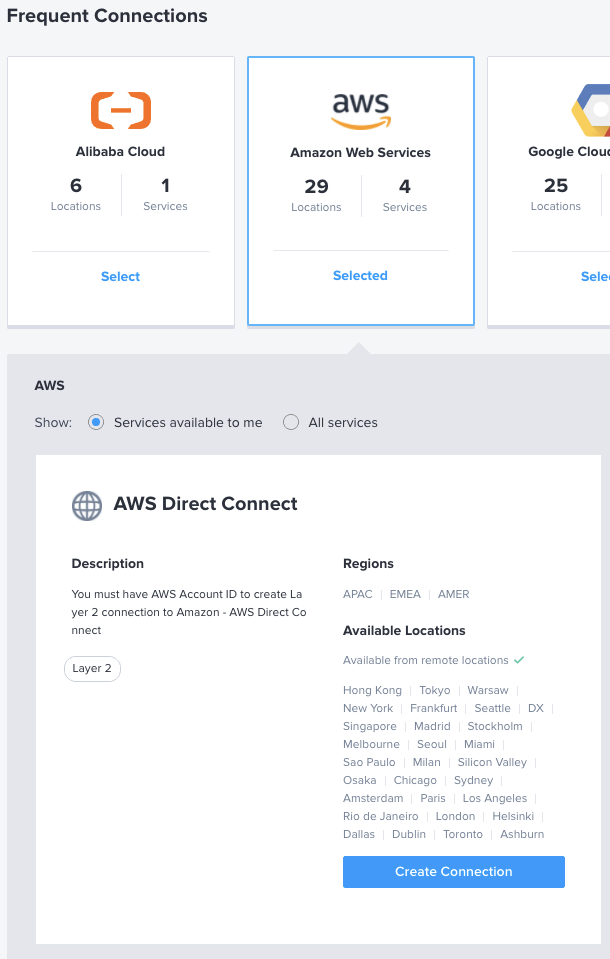
On the new screen, navigate to the Frequent Connections area and select AWS. Next, click on the Create Connection button located in the top left corner, which corresponds to the standard AWS Direct Connect option. This choice allows for connections with speeds of up to 500Mbps. However, if you require a connection speed greater than 500Mbps, opt for the AWS Direct Connect - High Capacity option.
Keep in mind that once you establish these connections with AWS, it is not possible to change the connection speed on the fly. If a speed change is necessary, you will need to create a new connection from scratch.
Before proceeding, ensure that you have the following information readily available:
- The AWS account ID/number where the Direct Connect Gateway will be located.
- A distinct name for the virtual circuit, making it easy to identify later.
- A VLAN ID to be used, which should match the NNI VLAN ID specified when adding a virtual circuit to the dedicated ports in the Equinix Metal console. This VLAN ID corresponds to the last three digits of the VLAN created on the Equinix Metal side. For example, if VLAN 1144 was created, the VLAN ID on the Equinix Fabric console will be 144 (matching the NNI VLAN on the Equinix Metal side). Similarly, for VLAN 1146, the VLAN ID on the Equinix Fabric console will be 146. This VLAN ID is also referred to as the Buyer-Side VLAN ID when viewing connection details after creation.
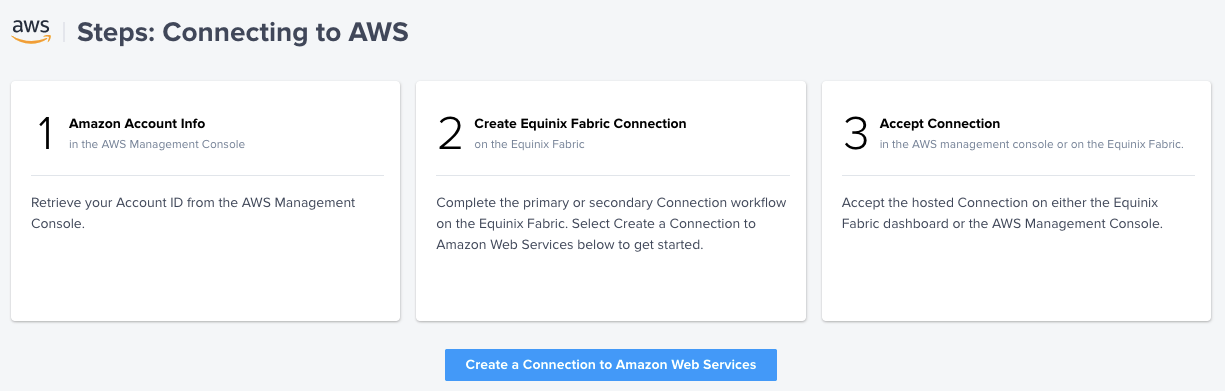
Once you have gathered all the necessary information, click on the "Create a Connection to Amazon Web Services" button to proceed.
On the left side of the screen, select "Port" as the connection type for the origin. Choose the location where your port is located. In my case, it is Ashburn, VA. Then, select the Primary port that includes "PRI-01" in its name.
NOTE: If you are unable to select "Port" as an option, it is likely that you do not have the necessary permissions. Contact the Administrator of the Equinix Fabric organization you belong to so they can adjust your permissions. Permissions can be modified through the Equinix Customer portal) under the Administration tab then User Management section.
For the Destination, select the region where the AWS Direct Connect Gateway will be located. In my example, it is Ashburn, VA, specifically the us-east-1 region.
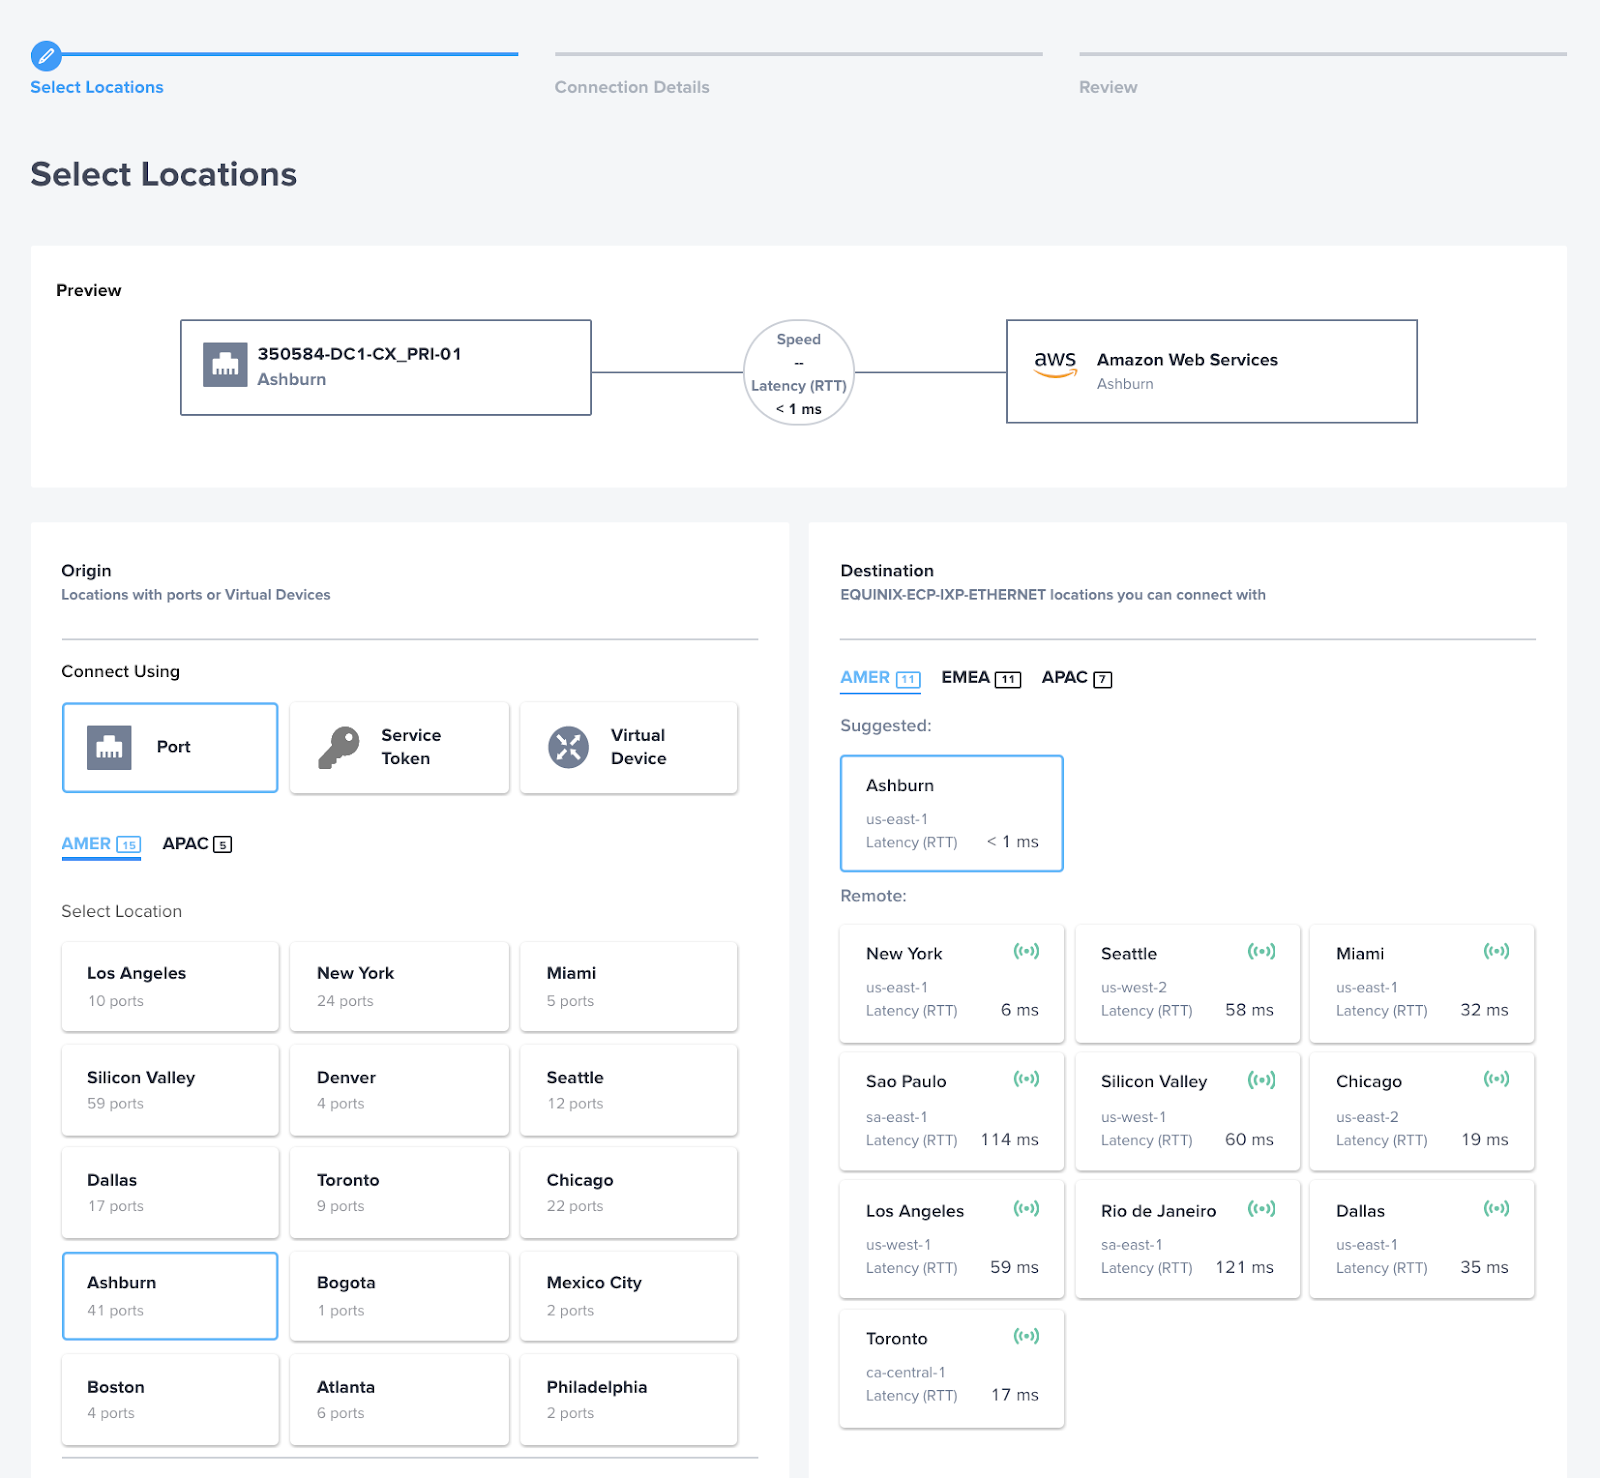
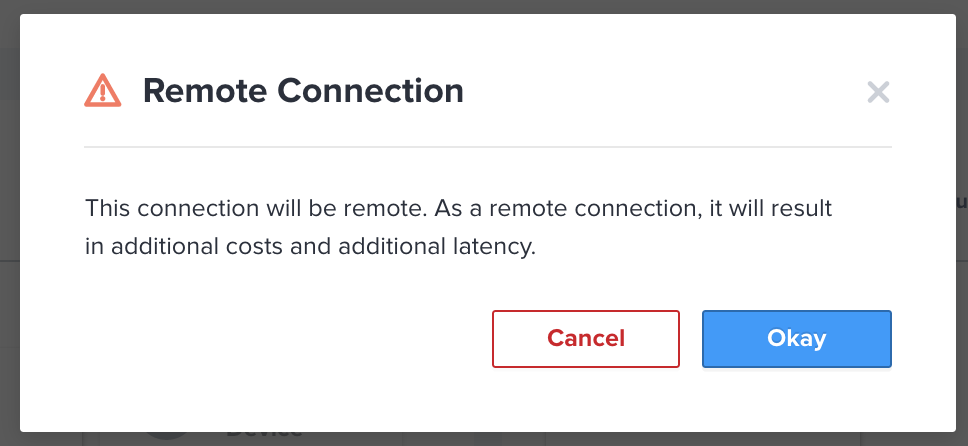
Depending on your location, you may encounter a warning message indicating that this is a Remote Connection. In the Equinix Fabric platform, a connection is categorized as "Local" when you establish a connection between an origin and destination within the same metro location, such as Ashburn. On the other hand, if you create a connection between different metro locations, such as New York and Ashburn, it is considered "Remote." This is an expected behavior, and you can proceed by selecting "Okay" to continue.
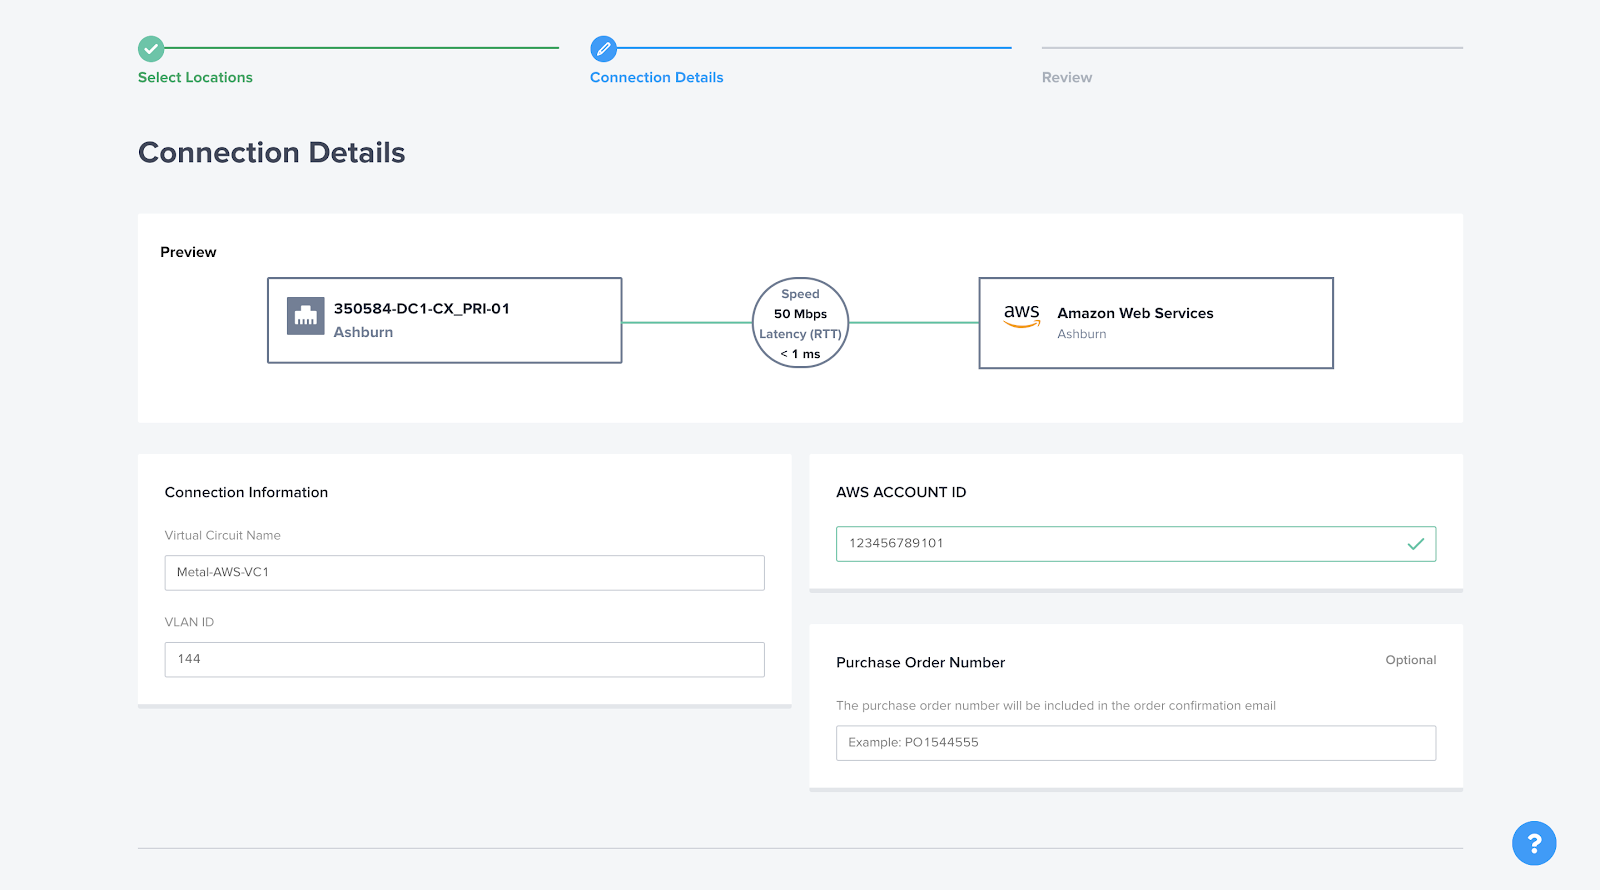
Provide a suitable name for the Fabric Virtual Circuit. In this case, it was set as "Metal-AWS-VC1." In the VLAN ID field, enter the NNI VLAN specified earlier. As we assigned the last three digits of the VLAN as the NNI VLAN, for VLAN 1144 and Virtual Circuit 1, the NNI VLAN was set to 144. This same value must be provided in the Fabric VLAN ID field.
Next, input your AWS Account ID and select the desired connection speed. It's important to note that once the speed is set, it cannot be changed without recreating the connection. The Purchase Order Number field is optional, so you can leave it blank if not applicable.
Click on the "Next" button to proceed. Review the details of your order and submit it. Once you see the message "Your Order was Submitted," you can repeat the same process for the other port or virtual circuit. If there are multiple Direct Connect Gateways, you will need to perform this step for each port connecting to each of them.
After submitting the Equinix Fabric connection order, the AWS side of
the connection will display a pending connection in the AWS Direct
Connect console. This pending connection will need to be accepted on the
AWS side. 
AWS Considerations
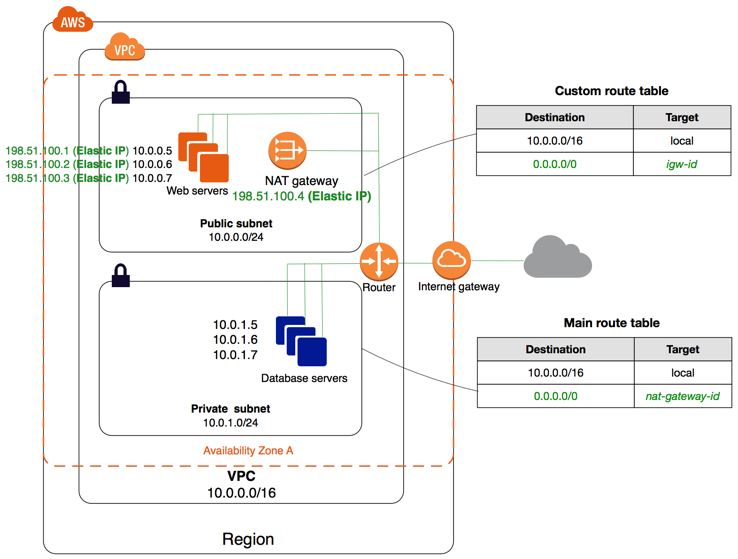
This section assumes that there is an existing VPC in place. For the purpose of this demonstration, we will use a VPC named "test-vpc" with a CIDR of 172.0.0.0/16. Within the VPC, the following subnets have been created:
- "nat-subnet" with a CIDR of 172.0.1.0/24
- "ec2-subnet" with a CIDR of 172.0.2.0/24
Additionally, two route tables have been set up. The "nat-route-table" is associated with the "nat-subnet" and has the following routing entries:
- 172.0.0.0/16 routed through the local VPC router
- 0.0.0.0/0 routed through an internet gateway attached to the VPC
The "ec2-route-table" is associated with the "ec2-subnet" and has the following routing entries:
- 172.0.0.0/16 routed through the local VPC router
- 0.0.0.0/0 routed through a NAT gateway located within the "nat-subnet"
Please ensure that the security groups assigned to your instances allow the necessary traffic for your specific use case. {#please-ensure-that-the-security-groups-assigned-to-your-instances-allow-the-necessary-traffic-for-your-specific-use-case. .unnumbered}
Connection Acceptance
Now, navigate to the AWS Direct Connect page.
On the Connections page, you will find a pending connection request in an "ordering" state. This request will bear the same name as the one used on the Equinix Fabric order form.
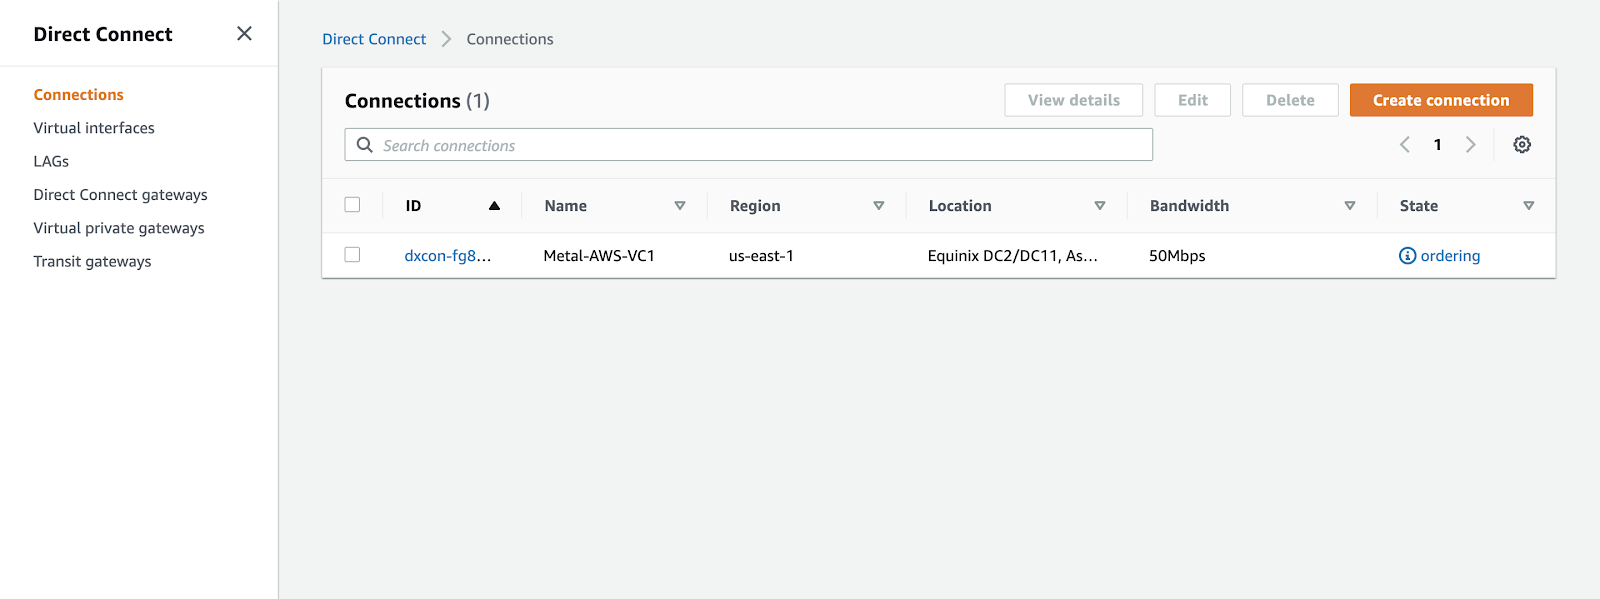
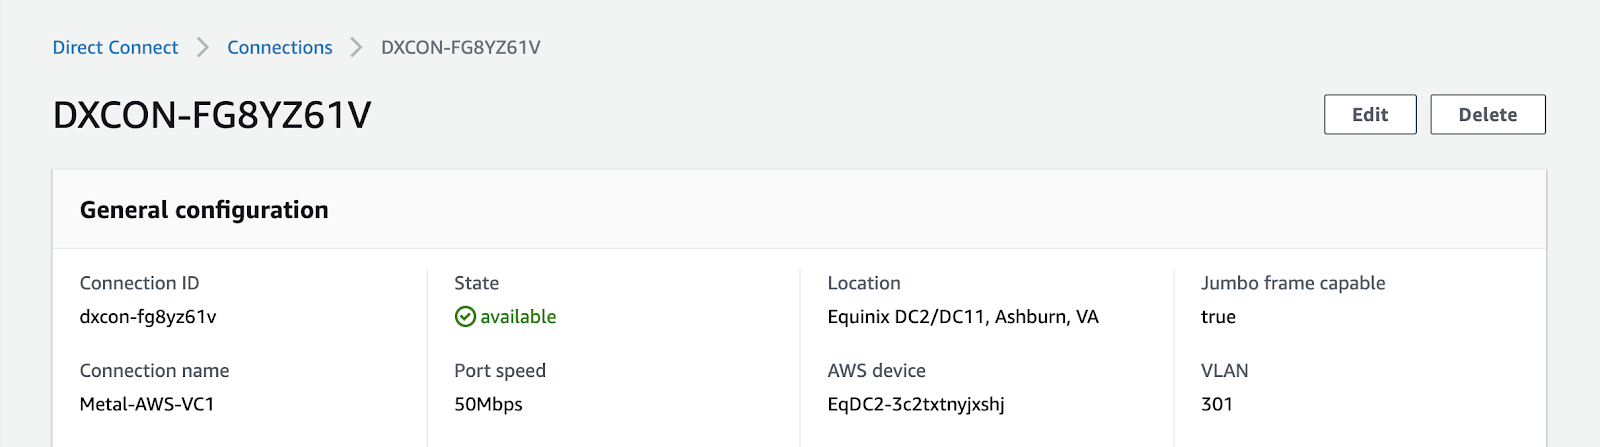
Select the pending connection that is in the "ordering" state, and then click on the "Accept" button located in the upper right corner to accept the connection. On this page, you will find essential information about the connection, including the speed and, most importantly, the VLAN ID. Take note of the VLAN ID, as it will be used when creating a Virtual Interface in the subsequent steps. In my case, the VLAN ID is 301.
Direct Connect Gateway
To create a Direct Connect gateway, follow these steps:
- Select the "Direct Connect gateways" option from the menu on the left sidebar.
- On the right side, click on the "Create Direct Connect gateway" button to initiate the creation process for a new Direct Connect gateway.
- Assign a name to the gateway.
- Specify an Autonomous System Number (ASN). You can choose any value within the ranges of 64512-65534 and 4200000000-4294967294 for private ASNs. In our case, we are using 65100 for the AWS side of the connection. However, you have the flexibility to select any ASN within the specified ranges. If you don't provide an ASN, AWS will generate a random one for you.
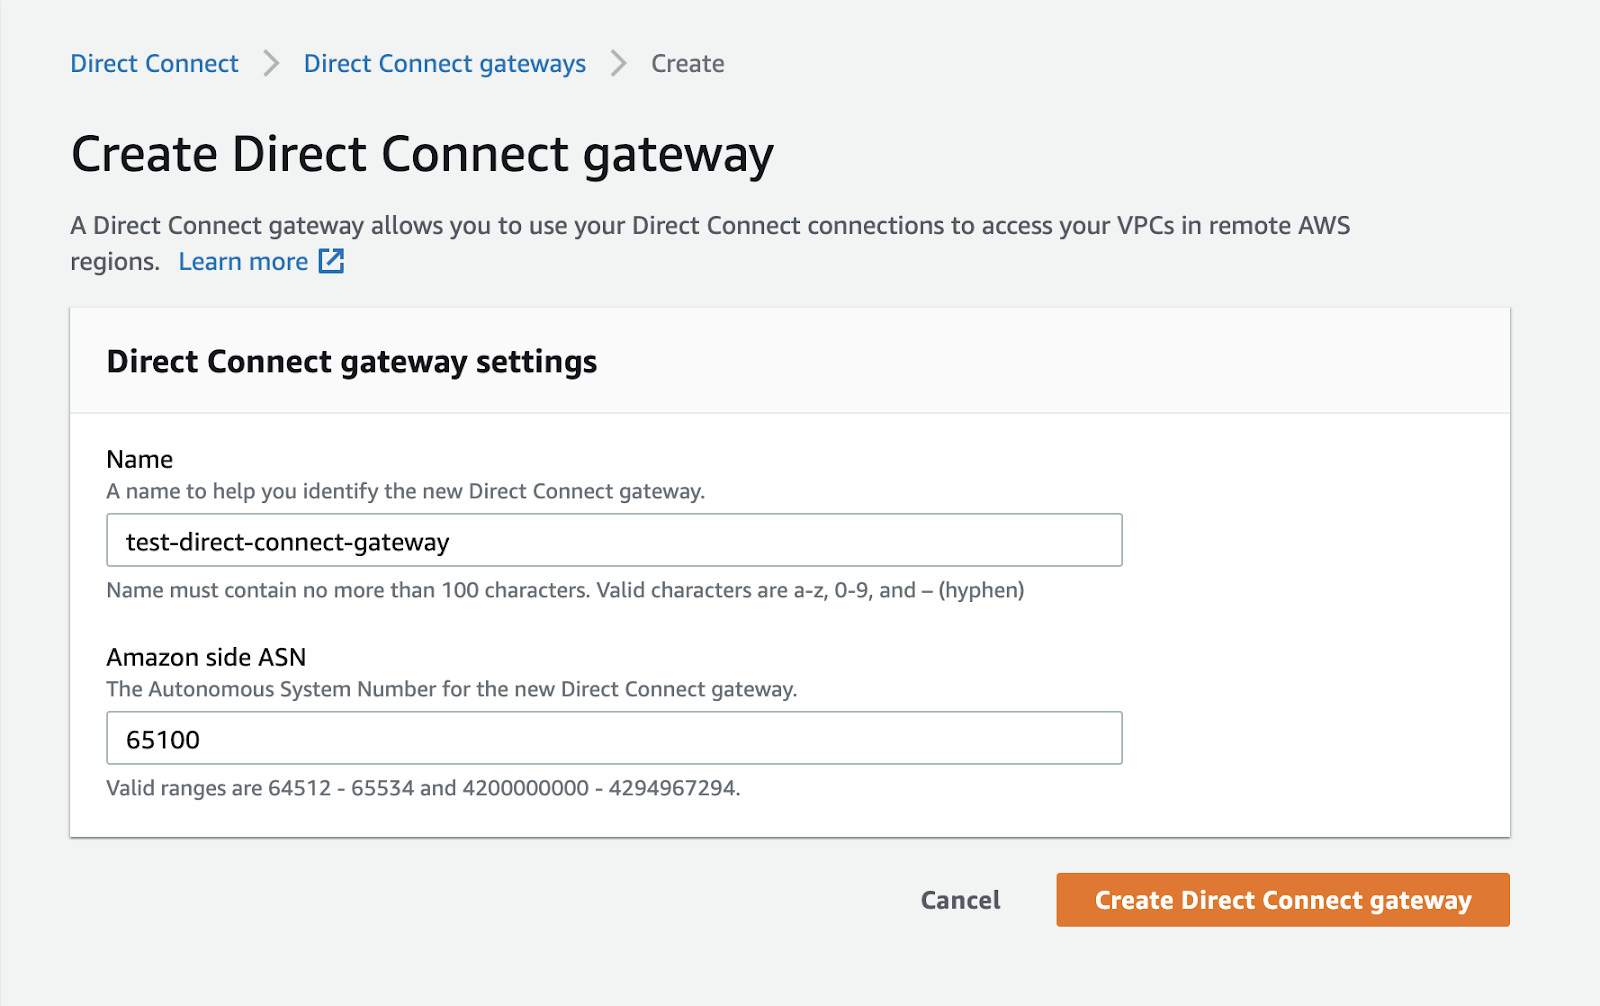
Finally, click on the "Create Direct Connect gateway" button to initiate the creation of the gateway.
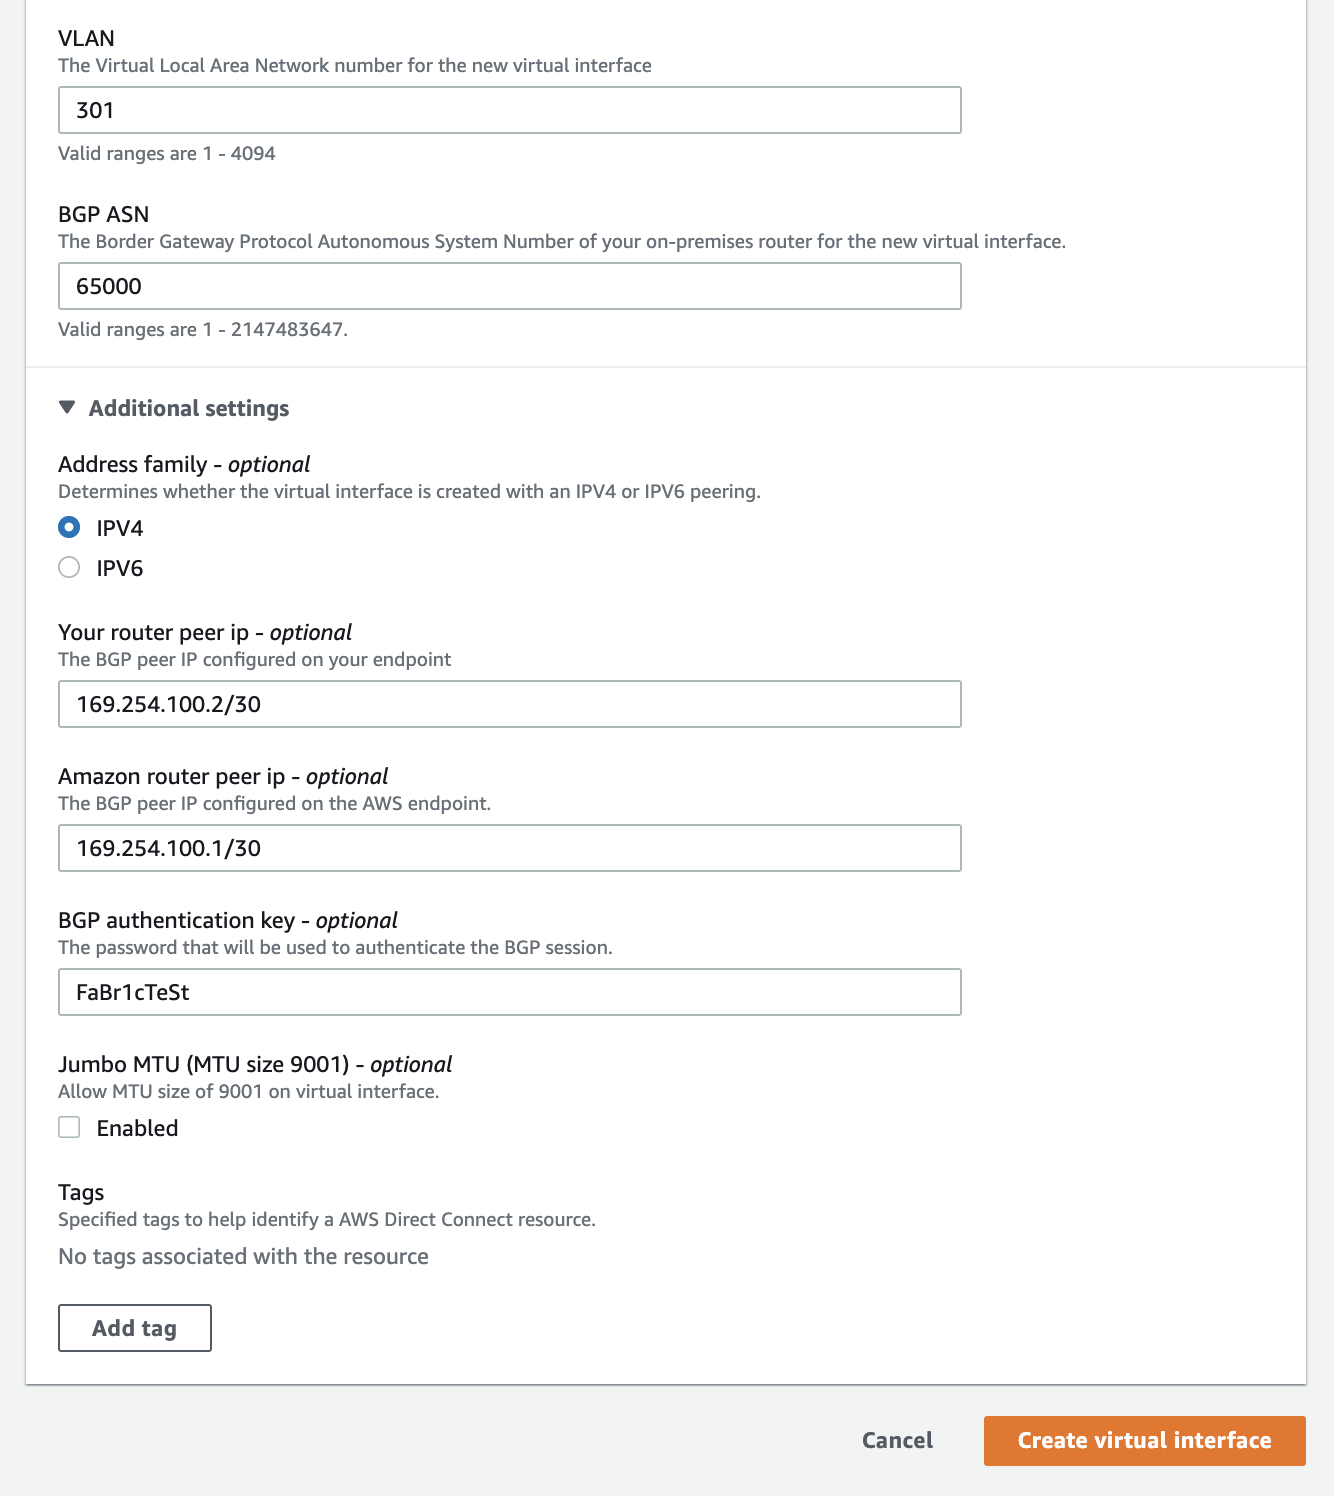
Virtual Interface
Now, let's create a virtual interface (VIF) for the connection on our Equinix Metal nodes. Follow these steps:
- Select the "Virtual interfaces" menu option from the left sidebar.
- Click on the "Create virtual interface" button.
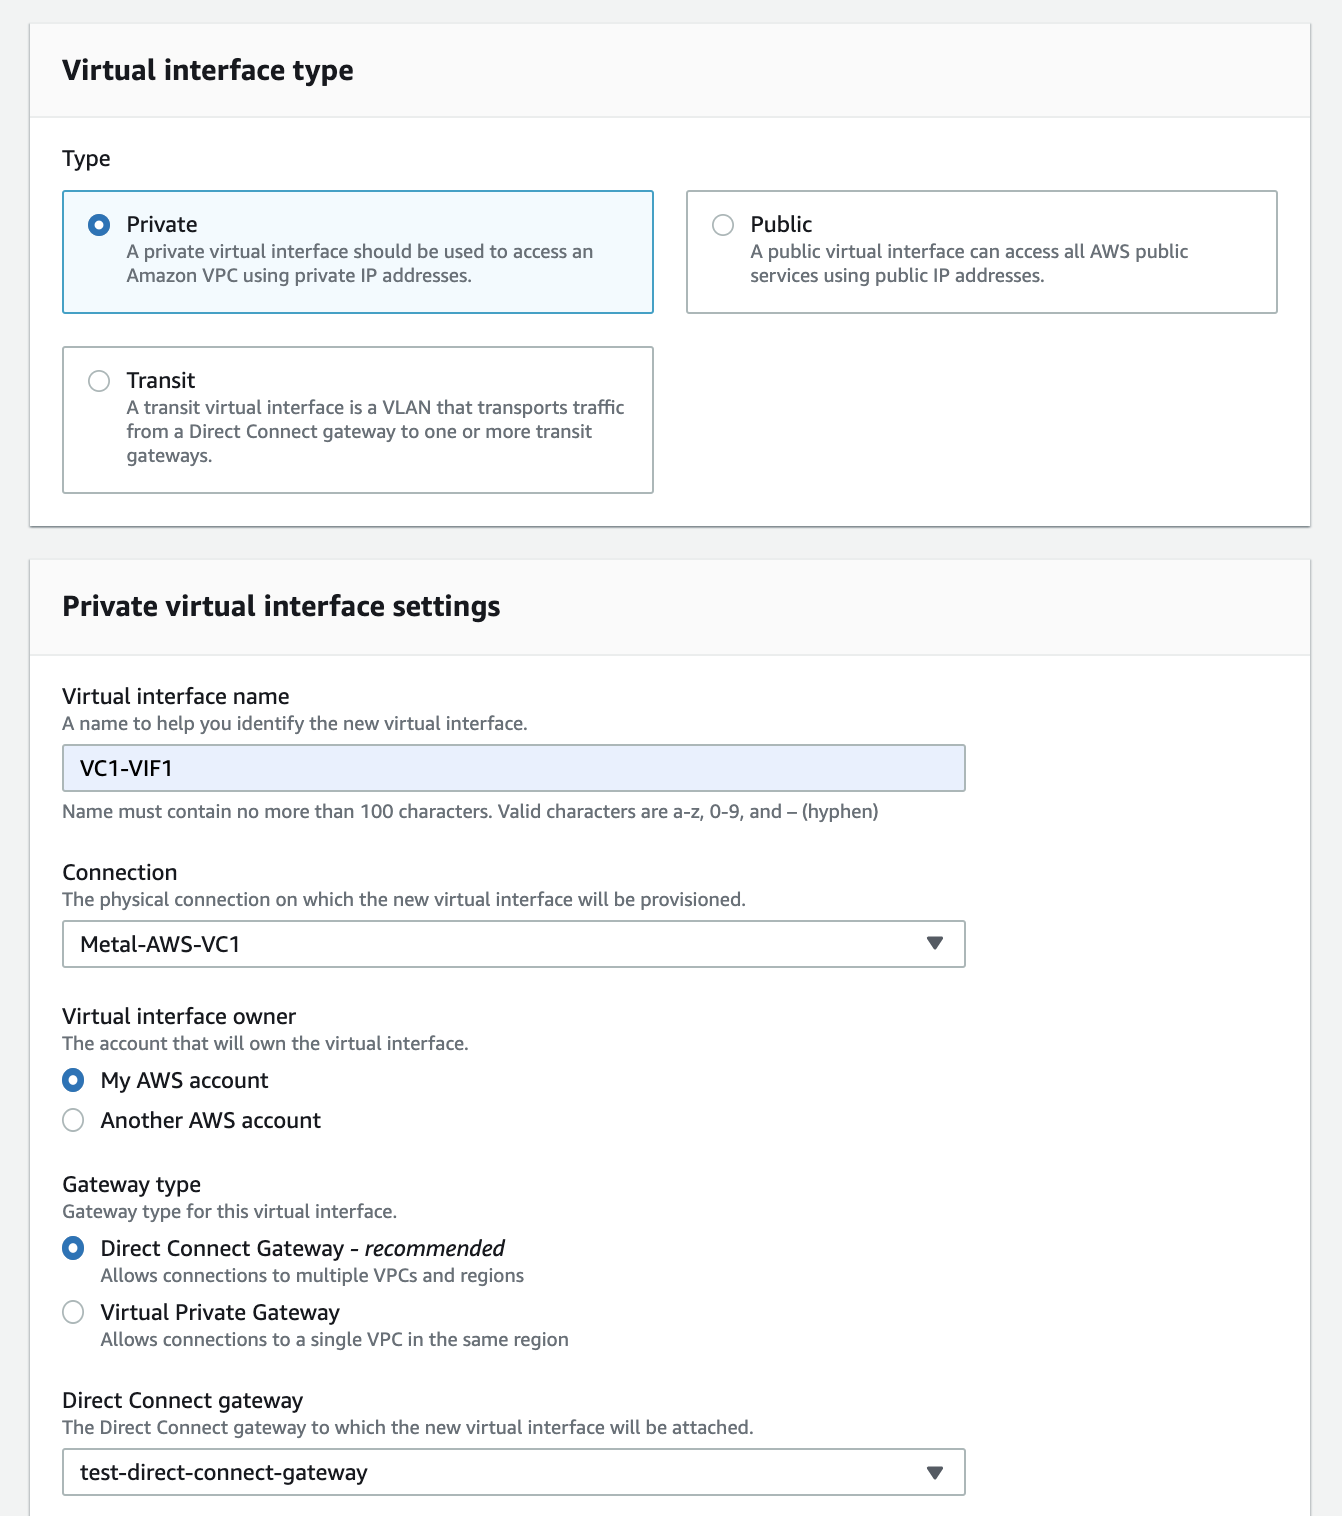
- Keep the interface type as "Private".
- Provide a name for the virtual interface. It's recommended to use the same name as the connection.
- Select the connection that you accepted earlier from the dropdown menu.
- Choose the Direct Connect gateway to which you want to attach the virtual interface.
- Specify the VLAN ID. This ID is automatically generated when you create the connection on the Equinix Fabric console. You can find the VLAN ID on the AWS console by selecting the connection you accepted earlier. It is listed on the right side under "VLAN". Alternatively, you can retrieve it from the Equinix Fabric console by viewing the connection details, where it is listed as the Seller-Side VLAN ID. Each connection will have a unique VLAN ID. For example, VLAN 301.
- Set the BGP ASN to 65000, which is the ASN for the Equinix Metal side.
In the "Additional settings" section, configure the following:
- Set the router peer IP. For the first connection, use 169.254.100.2/30. For the second connection, use 169.254.200.2/30. These are the IP addresses of the router nodes on the Equinix Metal side of the connection.
- Set the Amazon router peer IP. For the first connection, use 169.254.100.1/30. For the second connection, use 169.254.200.1/30. These are the IP addresses of the Amazon router side of the connection.
- Set a BGP password. Use
"FaBr1cTeSt"as the password for both connections. - Jumbo Frames are optional, so you can leave this setting disabled for now.
Once you have filled in the necessary details, click the "Create virtual interface" button to proceed.
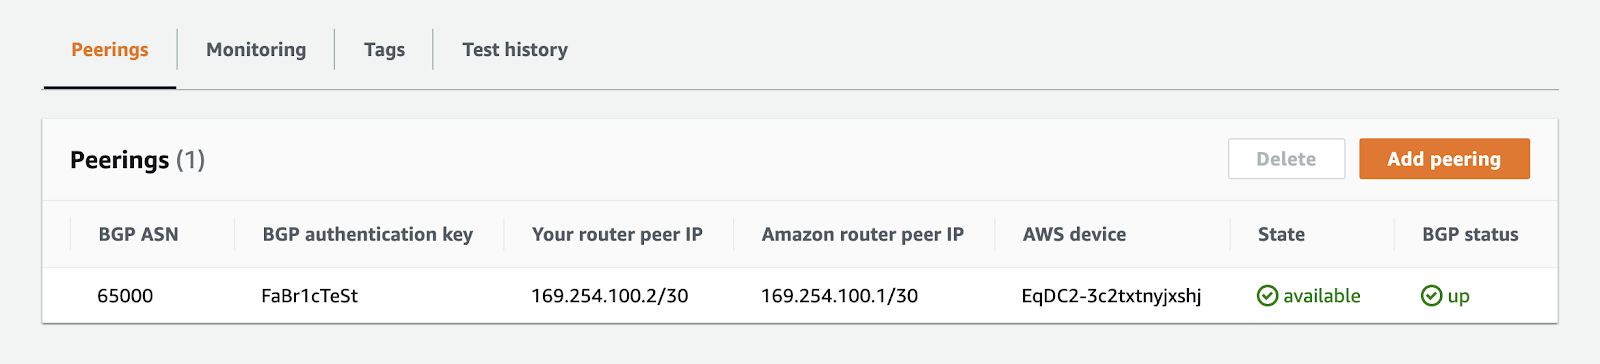
To create the virtual interface (VIF), click the "Create virtual interface" button at the bottom of the page. It may take a few minutes for the interface to be deployed and for the BGP peering session to become "Up". You can monitor the status of the virtual interface by following these steps:
- Click on the virtual interface you created.
- In the "Peerings" section, scroll to the right to view the "State" and "BGP status" columns.
- The "State" column will show the current state of the virtual interface, indicating whether it is active or undergoing any changes.
- The "BGP status" column will provide information about the BGP peering status, indicating whether the BGP session is established and functioning properly.
By checking these status indicators, you can track the progress of the virtual interface deployment and ensure that the BGP peering session is successfully established.
If you are experiencing issues with establishing the BGP session, AWS provides a comprehensive troubleshooting document that can assist you in identifying and resolving the problem. You can access the document at the following guide: AWS Direct Connect Troubleshooting Guide
In general, when troubleshooting BGP session establishment, it is crucial to verify the accuracy of the information provided during the creation of gateways and virtual interfaces. Additionally, double-check the VLAN IDs used in both the Equinix Metal console and Equinix Fabric console, ensuring they are correctly configured. Confirm that virtual circuits are in place on both platforms.
Furthermore, ensure that your router nodes in Equinix Metal are properly attached to their respective VLANs and that you have correctly configured the network interfaces on the host operating system.
By following these steps and referring to the troubleshooting guide, you can effectively diagnose and resolve any issues that may arise during the BGP session establishment process.
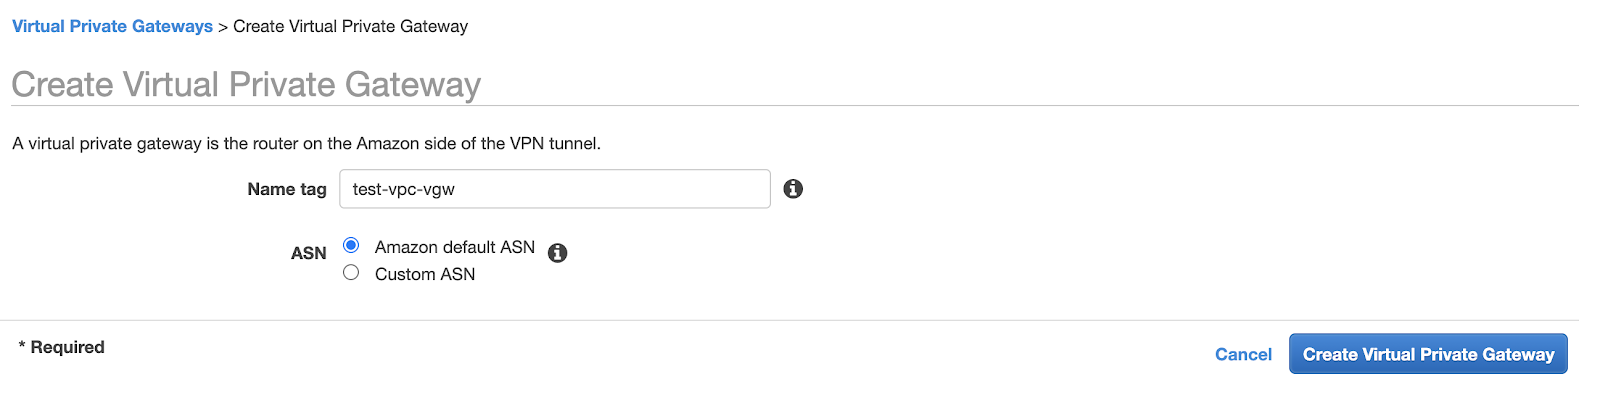
Virtual Private Gateway
To establish connectivity between VPCs and the Direct Connect Gateway, each VPC should have a Virtual Private Gateway associated with it. Follow these steps to create a Virtual Private Gateway:
- Access the Virtual private gateway menu and click on the Create virtual private gateway button.
- Provide a name for the virtual private gateway to easily identify it.
- You can leave the Autonomous System Number (ASN) as the "Amazon default ASN" unless you have specific requirements that necessitate a custom ASN.
By creating a Virtual Private Gateway for each VPC, you can facilitate the connection between the VPCs and the Direct Connect Gateway.
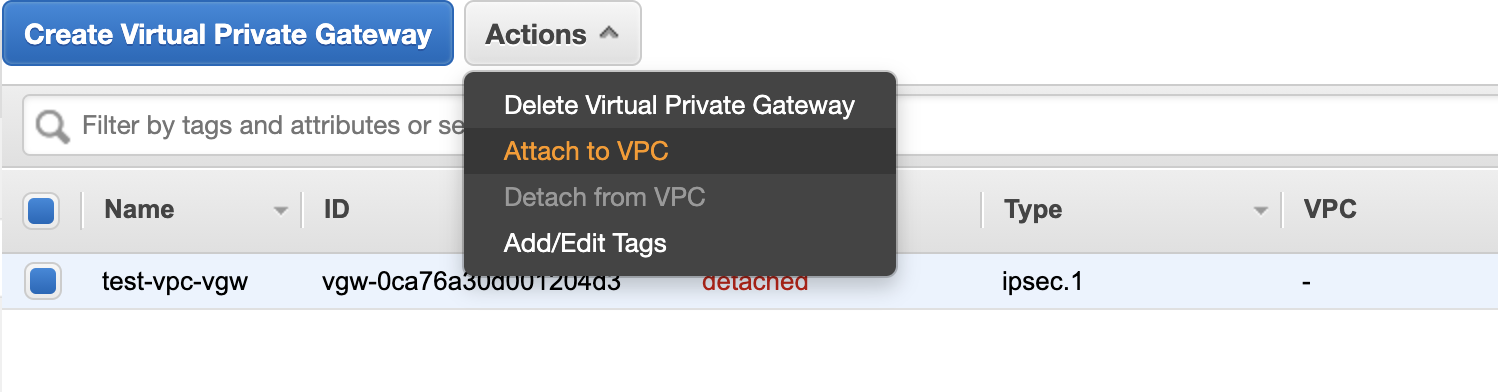
To attach the Virtual Private Gateway (VGW) that you just created to your VPC, follow these steps:
- Select the recently created VGW from the list.
- Click on the "Actions" button.
- Choose the "Attach to VPC" option.
By performing these steps, you will associate the VGW with your VPC, enabling connectivity between the VPC and the Direct Connect Gateway. NOTE: The virtual private gateway will be in a "detached" state.
Select the VPC for the attachment and then attach the Virtual Private gateway.
Navigate back to the Direct Connect Gateways menu in the AWS Direct Connect console. Locate and select the Direct Connect gateway that you created earlier. In the Gateway Associations tab, click on the "Associate Gateway" button.
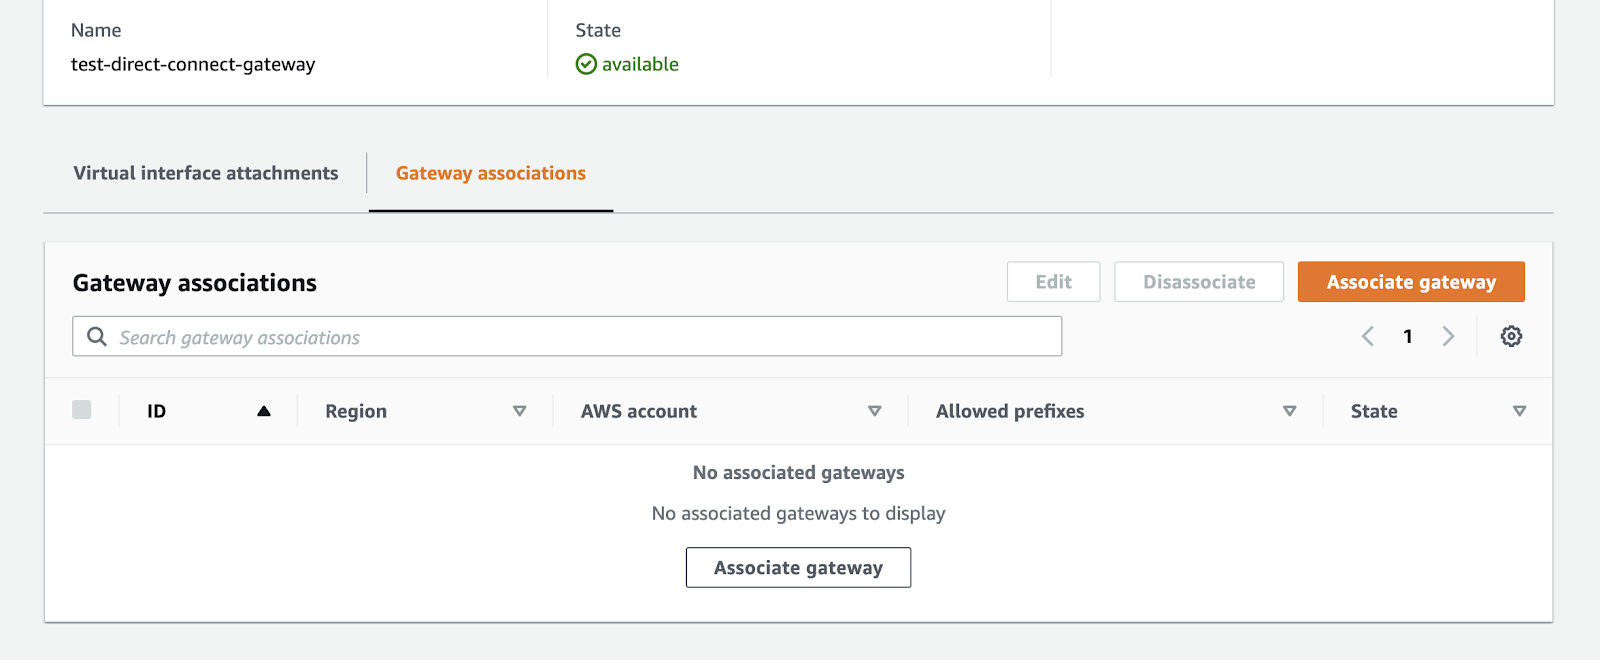
Choose your virtual private gateway from the available options. You can leave the "Allowed Prefixes" field empty, and then click on the "Associate Gateway" button to proceed.

If you have multiple VPCs, you will need a separate Virtual Private Gateway for each VPC. It is important to associate each Virtual Private Gateway with the appropriate Direct Connect gateway. This association ensures that the routes learned by the Direct Connect gateway's BGP peering session with Equinix Metal routers are propagated to the respective VPC route table through the Virtual Private Gateway.
NAT Gateway
To handle CIDR collisions between a VPC and Equinix Metal, it is recommended to set up a NAT Gateway. Start by creating a separate small subnet dedicated to the NAT gateway. Once the NAT gateway is created, it will receive a private IP address from the designated nat-subnet. This private IP address will be used for NATing traffic through the Direct Connect, while the NAT gateway will also be assigned a public IP address for NATing internet traffic from other instances in a private subnet.
To enable traffic flow through the AWS virtual interface that Equinix Metal nodes are peering with, it is necessary to add a static route on the Equinix Metal router nodes for the NAT gateway's private IP address. In my case, the NAT gateway's private IP address is 172.0.1.68. Therefore, I am adding a static route on each router node on the Equinix Metal side, pointing to the virtual interface peering IPs assigned during the creation of Direct Connect virtual interfaces. The command follows the format:
ip route add <AWS-NAT-Gateway-Private-IP> via <Virtual-Interface-IP
On k8s-fabric-edge-node-1:
ip route add 172.0.1.68 via 169.254.100.1
On k8s-fabric-edge-node-2:
ip route add 172.0.1.68 via 169.254.200.1
Please be aware that the commands are not persistent and will not persist across reboots. You will need to explore options to make these changes persistent, as the method can vary depending on the operating system you are utilizing.
Route Tables
In this section, we will be referring to the information provided in the "Considerations" section of this guide, where we assume the presence of a VPC named test-vpc.
NAT subnet
In our test environment, we have set up a subnet called nat-subnet specifically for the NAT gateway. This subnet is associated with the nat-route-table. To ensure proper routing, we need to enable Route Propagation on the nat-route-table from the previously created Virtual Private Gateway. This allows dynamic addition of routes to the route table.
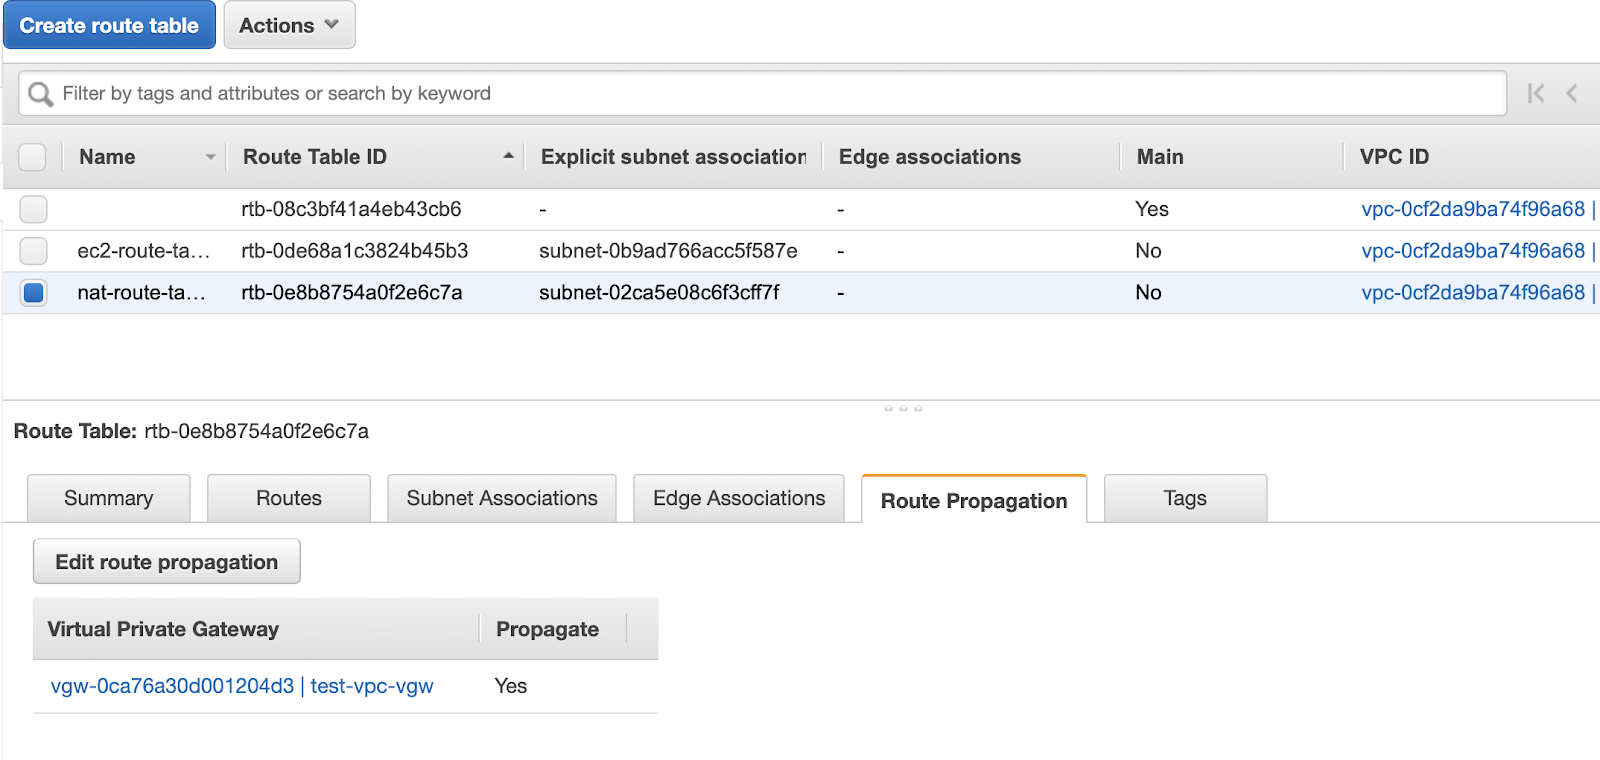
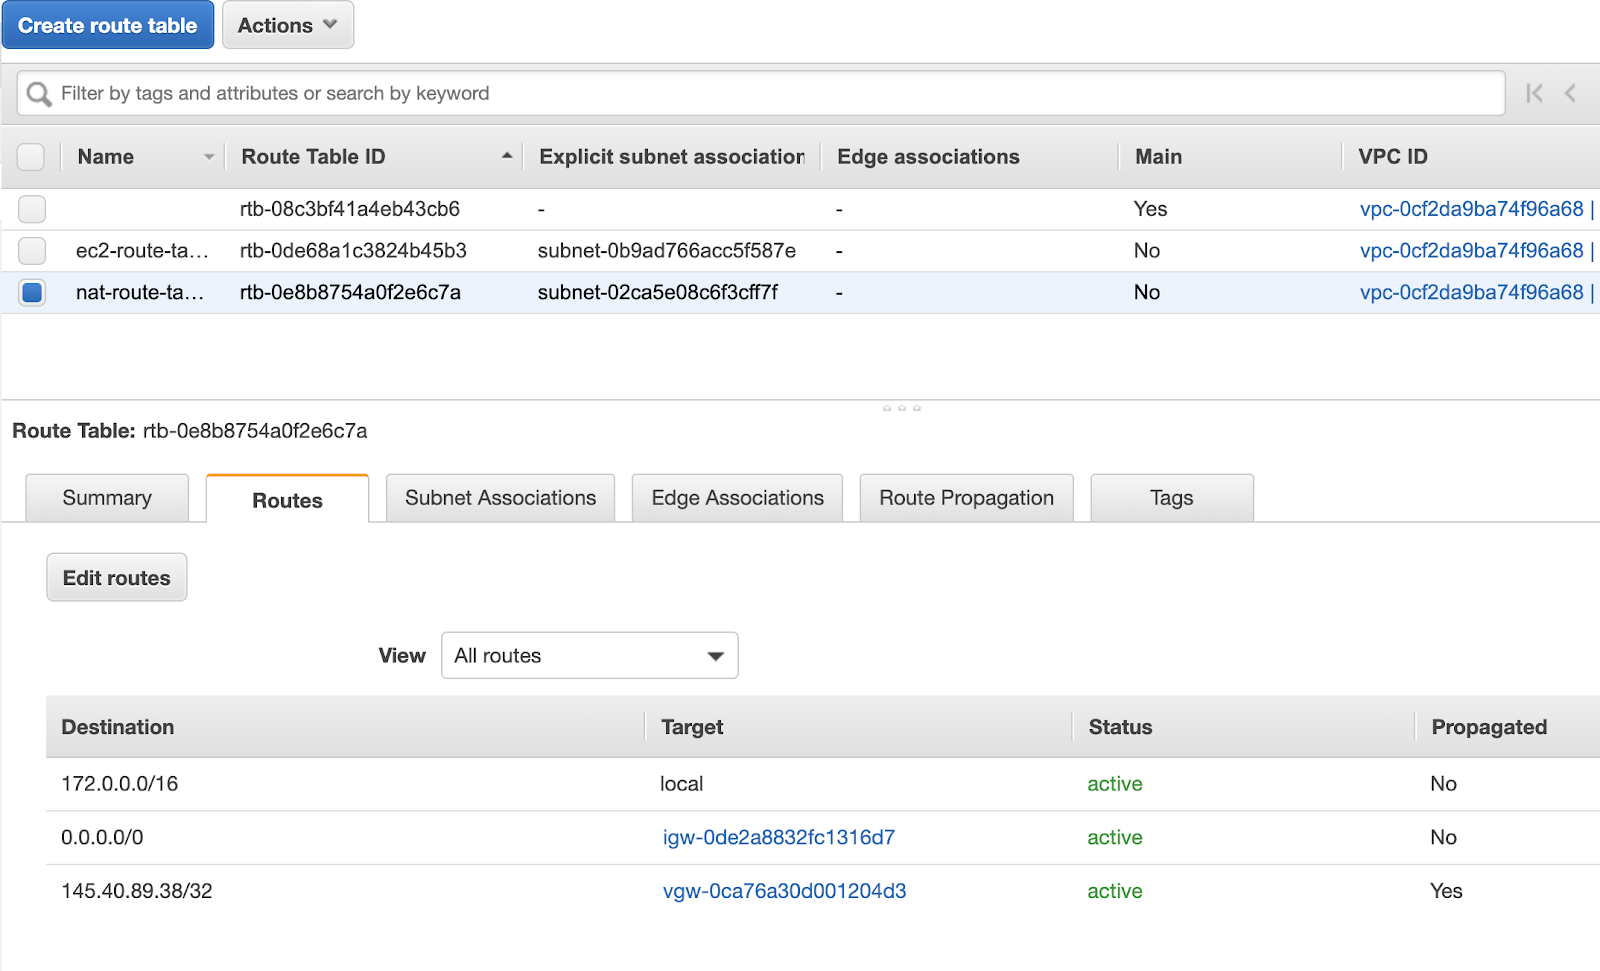
Once you have enabled Route Propagation from the virtual private gateway for the nat-route-table, you will notice new routes appearing in the route table. These routes correspond to the public IP addresses of Kubernetes services of type LoadBalancer, which are announced by MetalLB through BGP. In my setup, I have exposed a nginx-deployment on the Equinix Metal Kubernetes cluster with the IP address 145.40.89.38/32. You can observe this IP address listed in the route table as propagated by the virtual private gateway.
NOTE: you only need to enable Route Propagation for the subnet where the NAT gateway is located. There is no need to enable it for other subnets where your EC2 instances reside.
Optional: Instead of relying on automatic route propagation by the virtual private gateway, you have the option to manually add these routes as static routes that point to the virtual private gateway as the target. This can be useful if you prefer not to enable route propagation. By adding static routes, you have more control over the routing configuration and can explicitly define the routes that should be directed through the virtual private gateway.
EC2 instances in a public subnet
In AWS, a public subnet refers to a subnet that includes an internet gateway, allowing instances within that subnet to access the internet using their public IP addresses. If you have a public subnet, you need to configure the routing appropriately. Set the destination 0.0.0.0/0 to be routed through the Internet Gateway, which enables internet access for instances in that subnet. Additionally, you will need to add static routes for each of the Kubernetes service IPs to route through the NAT Gateway. This ensures that traffic destined for the Kubernetes services goes through the NAT Gateway for outbound communication.
EC2 instances in a private subnet
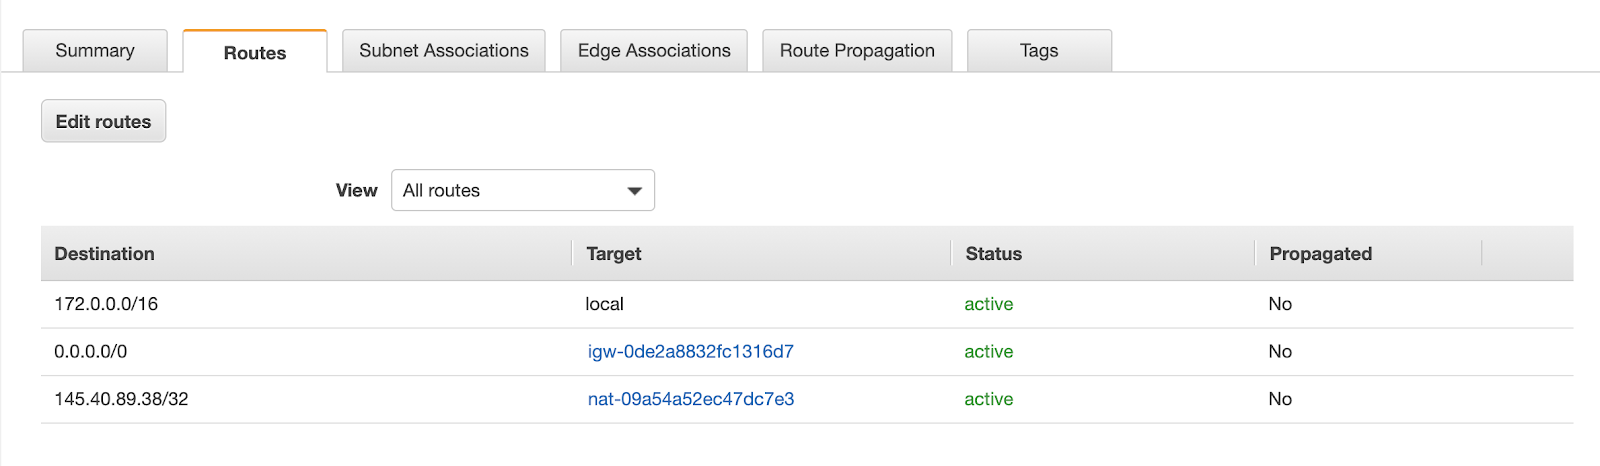
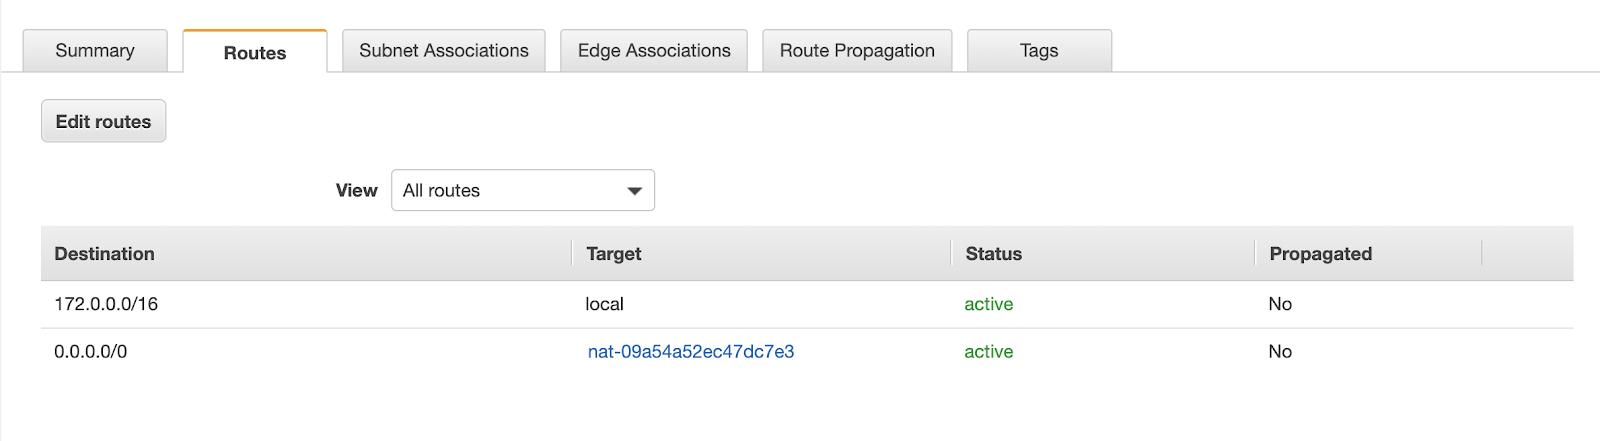
A private subnet is a subnet where outbound instance traffic is routed through a NAT gateway rather than an internet gateway. In such cases, you need to configure a route for the destination 0.0.0.0/0 to direct all traffic through the NAT Gateway. In my test setup, the ec2-subnet is a private subnet that is associated with the ec2-route-table.
In this setup, the route for 0.0.0.0/0 points to the NAT gateway as the target, indicating that all outbound traffic should be routed through the NAT gateway. The route 172.0.0.0/16 is configured to be routed locally within the VPC.
Please note that the actual values for the destination and target would depend on your specific configuration and network setup.
EC2 subnets where NAT is not needed
In case you don't require a NAT gateway and want to enable route propagation for the subnets where your EC2 instances are located, similar to what was done for the nat-route-table, follow these steps. This configuration allows your EC2 instances to use the propagated routes to access the Kubernetes service IP endpoints through the private Direct Connect connection instead of routing through the internet.
Additionally, you'll need to add static routes in the Equinix Metal router nodes to allow traffic destined for these subnets that don't use NAT. This is like the static route we added earlier for the NAT gateway. For example, if you have a different VPC with the CIDR 172.20.0.0/16 and an EC2 subnet with the CIDR 172.20.3.0/24, you will add the following static route on both router nodes in the Equinix Metal environment. The command format is as follows:
ip route add <AWS-EC2-Subnet> via <Virtual-Interface-IP>
On k8s-fabric-edge-node-1:
ip route add 172.20.3.0/24 via 169.254.100.1
On k8s-fabric-edge-node-2:
ip route add 172.20.3.0/24 via 169.254.200.1
NOTE: The exact command and syntax may vary depending on the operating system running on the Equinix Metal router nodes. Make sure to use the appropriate commands for your specific setup.
This approach offers several benefits:
- Source IP preservation: By using the private IP address of the EC2 instance as the source IP header, incoming traffic on the Equinix Metal side will accurately reflect the originating EC2 instance, rather than showing the IP of the AWS NAT gateway. This can be beneficial for various networking and security purposes.
- Cost-effectiveness: By avoiding routing traffic through the AWS NAT gateway, you can potentially reduce costs associated with data transfer and NAT gateway usage. Directly routing traffic through the private Direct Connect connection can be more cost-effective, especially for large data transfers or high-traffic scenarios.
- Efficient network architecture: This setup allows for a more streamlined network architecture, leveraging the private Direct Connect connection to directly communicate between the Equinix Metal environment and the EC2 instances. It eliminates the need for traffic detours through the AWS NAT gateway, resulting in improved network efficiency.
By leveraging these advantages, you can optimize your network setup for improved performance, cost savings, and more accurate source IP identification.
Load Balancing
When you add multiple Virtual Interfaces to the Direct Connect gateway, AWS employs load balancing techniques to distribute traffic across these interfaces. The load balancing is based on flow and utilizes Border Gateway Protocol (BGP) Equal Cost Multipath (ECMP) in an active/active mode.
This means that traffic will be balanced across the available Virtual Interfaces, ensuring efficient utilization of the connections. The load balancing algorithm takes into account factors such as flow characteristics and network conditions to distribute traffic optimally.
To observe and test this behavior, you can refer to the "Testing the connection" section below. Additionally, AWS provides more detailed information about this load balancing behavior in their documentation, which can be found at the following link: Load Balancing Traffic Across Direct Connect Virtual Interfaces
By understanding and leveraging this load balancing mechanism, you can optimize your network connectivity and achieve efficient utilization of multiple Virtual Interfaces in your Direct Connect setup.
Diagrams
Essentially this is what we are creating end to end:

The setup described here is based on the AWS documentation available at the following link: NAT gateways
Testing the connection
Now that the connection has been established end-to-end, you can proceed to test its functionality using various methods. {#now-that-the-connection-has-been-established-end-to-end-you-can-proceed-to-test-its-functionality-using-various-methods. .unnumbered}
From the AWS EC2 instances
Running an http call towards the kubernetes service IP endpoint:
curl 145.40.89.38
If you want to run a loop 10 times with a 1 second interval:
for i in {1..10}; do curl 145.40.89.38; sleep 1; done
Running a traceroute test towards the kubernetes service IP endpoint to confirm that we are using the Equinix Fabric connection instead of the internet:
mtr 145.40.89.38
On the Equinix Metal side
To verify the functionality of the virtual circuit, you can perform a ping test to the AWS Direct Connect gateway VIF. This will help confirm that the connection is operational.
From k8s-fabric-edge-node-1:
ping 169.254.100.1
From k8s-fabric-edge-node-2:
ping 169.254.200.1
To analyze incoming and outgoing traffic through the Equinix Fabric, you can conduct a tcpdump test. This test allows you to capture and examine network packets to gain insights into the traffic flowing through the Equinix Fabric.
From k8s-fabric-edge-node-1:
tcpdump -i bond0.1144
From k8s-fabric-edge-node-2:
tcpdump -i bond0.1146
To check the traffic load balancing across multiple Equinix Fabric connections and monitor tcpdump on the Equinix Metal router nodes, you can run a curl loop on the AWS side towards the Kubernetes service IP endpoint. This will allow you to observe the traffic flow and distribution between the Equinix Metal router nodes.
You can also filter the tcpdump traffic to only show http packets or packets related to the kubernetes service IP for example.
tcpdump -i bond0.1144 | grep http

tcpdump -i bond0.1144 | grep 145.40.89.38
Conclusion
In conclusion, setting up a direct connection between AWS and Equinix Metal provides a reliable and high-performance networking solution. By leveraging Equinix Fabric and AWS Direct Connect, you can establish private and dedicated connections that bypass the public internet, resulting in improved security, lower latency, and reduced data transfer costs.
Throughout the process, we covered various steps, including creating a direct connection, configuring virtual interfaces, associating virtual private gateways, and setting up NAT gateways when necessary. We also explored options for routing traffic and load balancing across multiple Equinix Fabric connections.
By following the guidelines provided in this guide, you can establish a robust and efficient connection between AWS and Equinix Metal, enabling seamless integration of your cloud resources with your Equinix Metal infrastructure.
Remember to consult the official AWS and Equinix Metal documentation for detailed instructions and troubleshooting tips, as the network configurations and settings may vary based on your specific requirements and environment.
By leveraging the power of Equinix Metal and AWS Direct Connect, you can unlock new possibilities for hybrid cloud deployments, data-intensive workloads, and seamless connectivity between your on-premises infrastructure and the AWS cloud.
You may also like
Digger deeper into similar topics in our archives
Configuring BGP with BIRD 1.6 on an Equinix Metal Server
Set up BGP on your Equinix Metal server using BIRD 1.6, covering IP configuration, installation, and neighbor setup to ensure robust routing capabilities between your server and the Equinix...

Configuring BGP with FRR on an Equinix Metal Server
Establish a robust BGP configuration on your Equinix Metal server using FRR, including setting up network interfaces, installing and configuring FRR software, and ensuring secure and efficie...

Crosscloud VPN with Wireguard
Learn to establish secure VPN connections across cloud environments using WireGuard, including detailed setups for site-to-site tunnels and VPN gateways with NAT on Equinix Metal, enhancing...

Deploy Your First Server
Learn the essentials of deploying your first server with Equinix Metal. Set up your project & SSH keys, provision a server and connect it to the internet.

Ready to kick the tires?
Use code DEPLOYNOW for $300 credit