- Home /
- Resources /
- Learning center /
- CI/CD Guide - Depl...
CI/CD Guide - Deploy ephemeral GitHub Actions runners on Equinix Metal servers
This guide covers how to deploy ephemeral GitHub Action Runners on Equinix Metal.

On this page
In this guide, you are going to set up a pool of Equinix Metal servers on which you will run containers as ephemeral GitHub Actions runners. This will allow you to run your CI/CD workflows on your own infrastructure, providing you with more control and flexibility, while ensuring each job run gets a brand-new clean environment. Each Equinix Metal device will join a Kubernetes cluster as a worker node, on which containers will be deployed as runners.
In the introduction, we described how you need to decide the following in advance:
- Quantity of worker nodes: the more you have, the more jobs you can execute in parallel. These are not 1:1, as you can launch multiple containers on a single Equinix Metal device. However, you are bound by the resources required by each container.
- Location of runners: this may not matter for simple jobs, but can be very important if you need to access other resources as part of the job runs, especially at Equinix Metal's global locations.
- Size of runners: the more resources you allocate, the more jobs each worker node can run in parallel.
- Runner operating system: which operating system you will run, whether one of the standard ready-to-run Equinix-managed OSes, or one of your own.
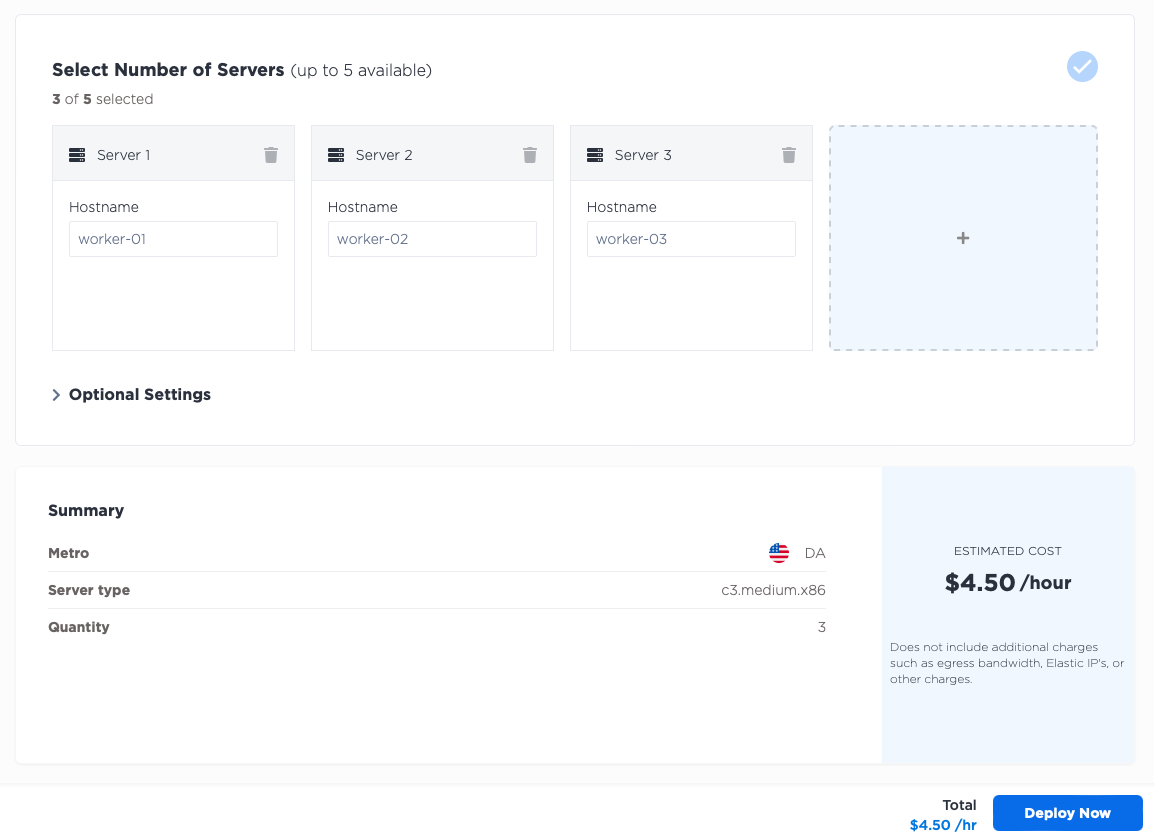
For this guide, you will deploy:
- three worker nodes...
- each of size
c3.medium.x86... - and three control plane nodes...
- each of size
c3.small.x86... - all running Ubuntu 20.04
ubuntu_20_04... - all in the Dallas (
da) metro.
Start by deciding if your runners will be used for a GitHub organization, or just a repository. In this guide, you will use them for just a single repository. However, the approach is the same for an organization. The only difference in process is the actual start command you run on each runner.
For this guide, you will deploy to a single repository.
The first step is to create your repository, if you don't already have one. You can do this on GitHub's website.
Deploy the Equinix Metal servers
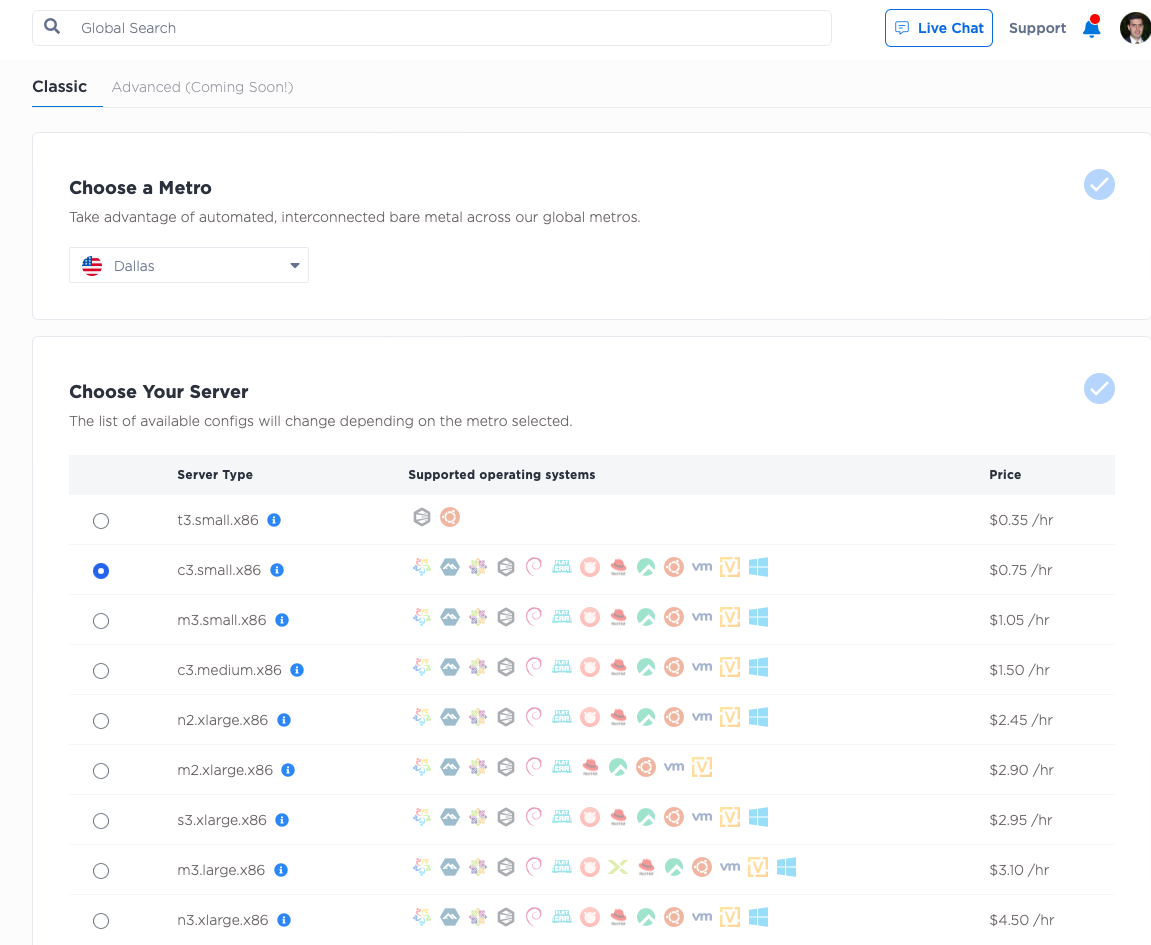
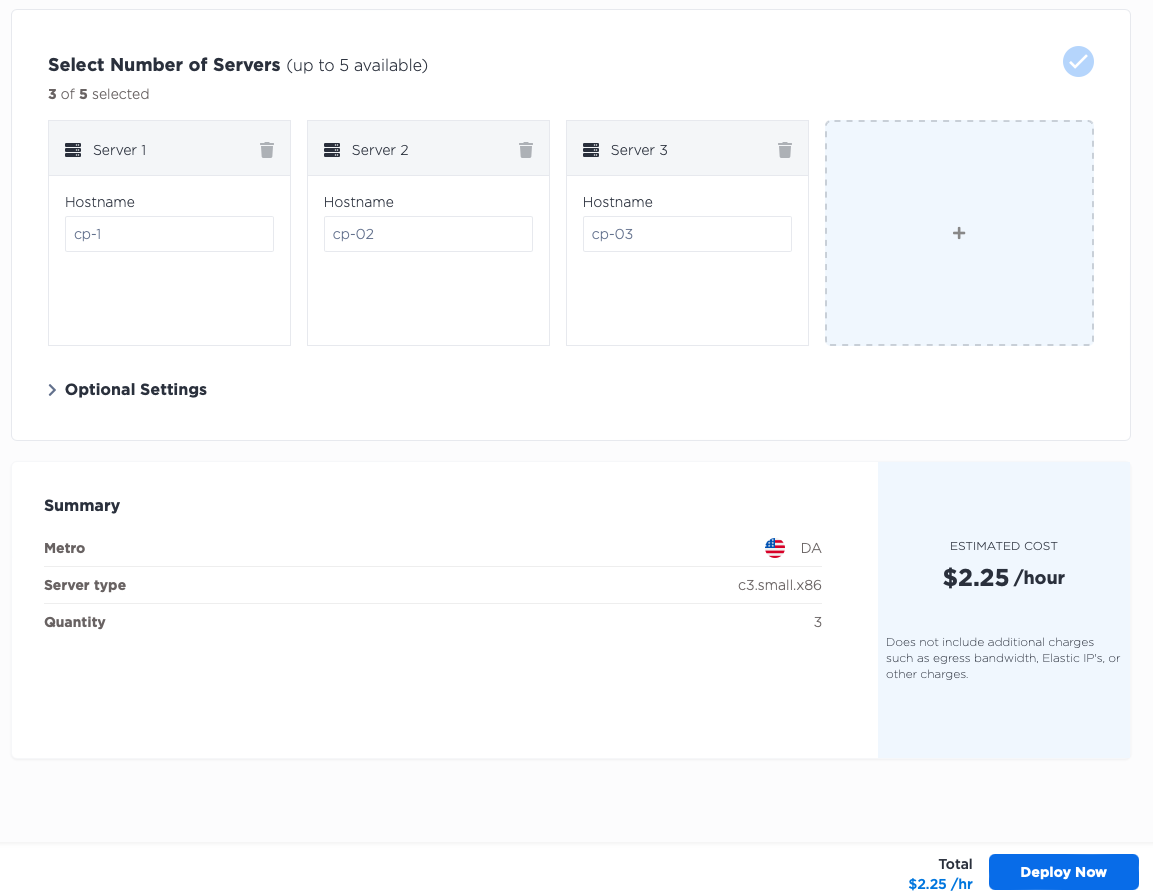
Log into the Equinix Metal Console, create or select a project,
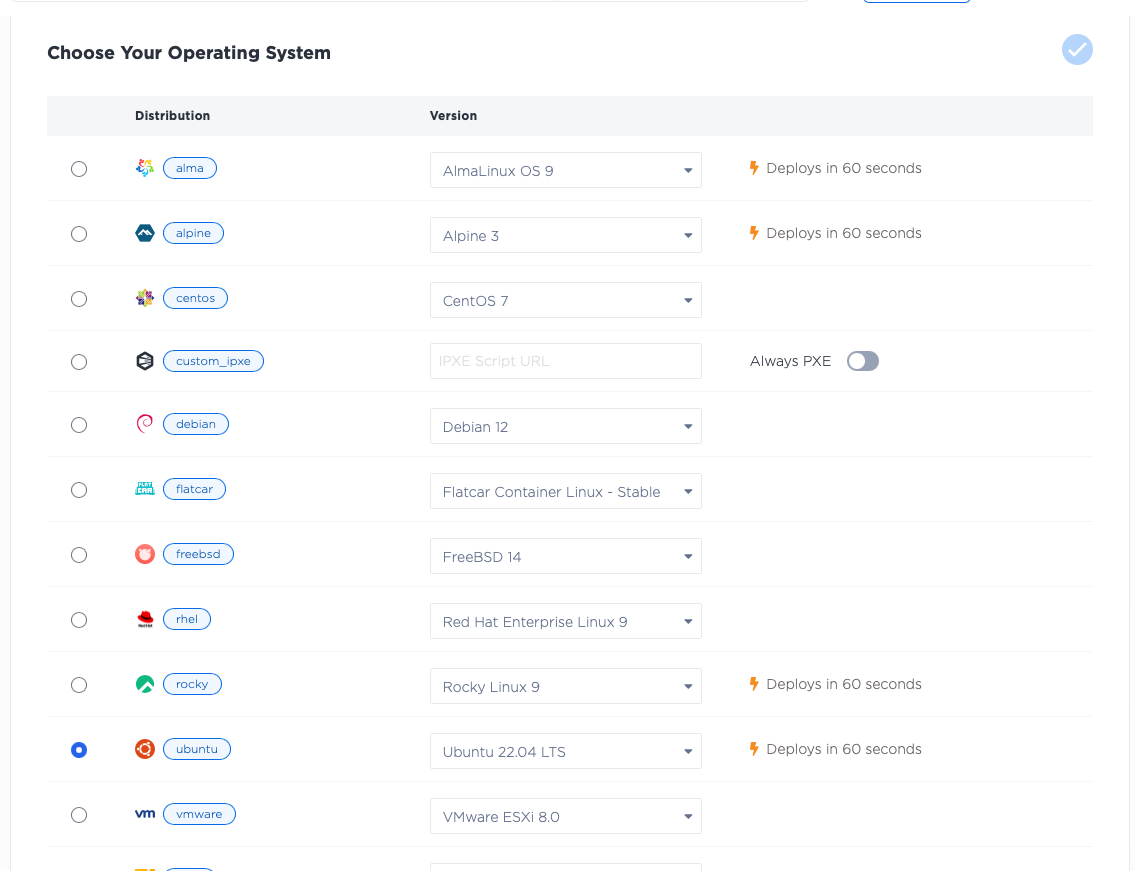
and deploy three servers for the control plane. Add these servers in the Dallas metro, select the c3.small.x86 size
and select Ubuntu 20.04 as the operating system. If you want more control plane nodes for higher redundancy,
or of different sizes, by all means do so.

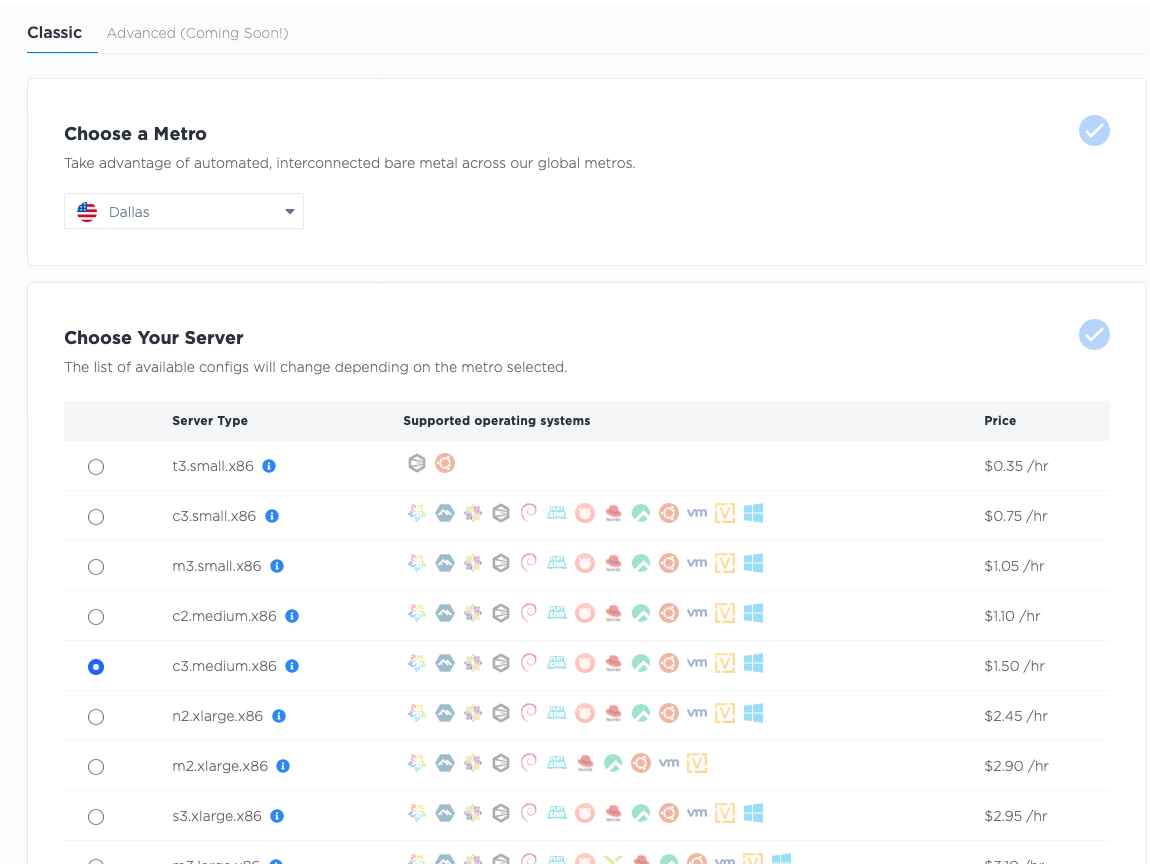
Next, deploy three servers for your workers. As with the control plane, deploy three c3.medium.x86
workers in the Dallas metro, selecting Ubuntu 20.04 as the operating system. If your use case requires more workers,
of different sizes, or you prefer a different operating system, by all means do so.
Set up the Kubernetes cluster
Once your servers are ready, you can set up a k3s Kubernetes cluster on them.
The process is as follows:
- SSH into the first node.
- Set the configuration and start it as a control plane node.
- Retrieve the token for other nodes.
- SSH into the other control plane nodes.
- Set the configuration and have them join the cluster as control plane nodes.
Here's how the process looks, each step in detail.
SSH into the first node.
Install jq so you can parse the JSON output from the Equinix Metal metadata API, and then get the private IP address.
This is the address to which the k3s apiserver will bind, so you will save it to the variable BIND_IP.
apt install -y jq
BIND_IP=$(curl -fsSL https://metadata.platformequinix.com/metadata | jq -r '.network.addresses | map(select(.public==false and .management==true)) | first | .address')
Now, set the install information for k3s:
export INSTALL_K3S_EXEC="\
    --bind-address ${BIND_IP} \
    --advertise-address ${BIND_IP} \
    --node-ip ${BIND_IP} \
    --tls-san ${BIND_IP} \
    --disable servicelb \
    --disable-cloud-controller \
    --cluster-init"
Next, install k3s:
curl -sfL https://get.k3s.io | sh -
This step sometimes takes a little while to finish. Once it is done, you will need to retrieve a few things from the server before you can move on to the others:
- IP where the first node is listening, which you saved as
BIND_IP
echo $BIND_IP
- Token for servers to join the cluster
cat /var/lib/rancher/k3s/server/token
- Token for agents to join the cluster; this might be the same as the server one, or it might be unique
cat /var/lib/rancher/k3s/server/agent-token
With those in hand, exit the shell on the first node, and ssh into each of the other nodes. Repeat the process, with the variants for the other nodes.
Install jq so you can retrieve information, and then get the node's private IP and save it as BIND_IP:
apt install -y jq
BIND_IP=$(curl -fsSL https://metadata.platformequinix.com/metadata | jq -r '.network.addresses | map(select(.public==false and .management==true)) | first | .address')
Save the token from the first node as TOKEN:
TOKEN=<token retrieved from the first server>
Recall that BIND_IP from the first node, where the first server is listening. The second and third nodes
will use that to join the cluster. For them it is the API_IP. Save that:
API_IP=<BIND_IP from the first node>
Set the install information for k3s. It is similar, but not quite identical, to the first node.
export INSTALL_K3S_EXEC="server \
    --server https://${API_IP}:6443 \
    --bind-address ${BIND_IP} \
    --advertise-address ${BIND_IP} \
    --node-ip ${BIND_IP} \
    --tls-san ${BIND_IP} \
    --disable-cloud-controller \
    --token ${TOKEN}"
And install k3s:
curl -sfL https://get.k3s.io | sh -
Once this is done on all three nodes, you will be able to see all three of the nodes, on any one of them:
$ kubectl get node
NAME       STATUS   ROLES                       AGE     VERSION
cp-1       Ready    control-plane,etcd,master   3h17m   v1.28.7+k3s1
cp-2       Ready    control-plane,etcd,master   149m    v1.28.7+k3s1
cp-3       Ready    control-plane,etcd,master   27m     v1.28.7+k3s1
The control plane is up and running, so have the workers join the cluster as well, this time as worker nodes:
- SSH into each worker node.
- Set configuration and have them join the cluster as worker nodes.
SSH into each worker node, and configure it to join the cluster.
API_IP=<BIND_IP from the first node>
TOKEN=<agent-token retrieved from the first server>
curl -sfL https://get.k3s.io | K3S_URL=https://${API_IP}:6443 K3S_TOKEN=${TOKEN} sh -
Once this is done, you can return to any of the control plane nodes and check the status:
$ kubectl get node
NAME       STATUS   ROLES                       AGE     VERSION
cp-1       Ready    control-plane,etcd,master   3h17m   v1.28.7+k3s1
cp-2       Ready    control-plane,etcd,master   149m    v1.28.7+k3s1
cp-3       Ready    control-plane,etcd,master   27m     v1.28.7+k3s1
worker-1   Ready    <none>                      68s     v1.28.7+k3s1
worker-2   Ready    <none>                      30s     v1.28.7+k3s1
worker-3   Ready    <none>                      4s      v1.28.7+k3s1
Deploy GitHub Runner management software
With the Kubernetes cluster in place, move on to installing the Kubernetes software that manages ephemeral runners, Actions Runner Controller (ARC).
SSH back into one of the control plane nodes. Once you are in, you need one more piece of software, helm, to install Actions Runner Controller. You can install helm in multiple ways; you will use the package installer process recommended on the official helm site.
curl https://baltocdn.com/helm/signing.asc | gpg --dearmor | sudo tee /usr/share/keyrings/helm.gpg > /dev/null
sudo apt-get install apt-transport-https --yes
echo "deb [arch=$(dpkg --print-architecture) signed-by=/usr/share/keyrings/helm.gpg] https://baltocdn.com/helm/stable/debian/ all main" | sudo tee /etc/apt/sources.list.d/helm-stable-debian.list
sudo apt-get update
sudo apt-get install helm
There are two steps to installing ARC:
- Install the ARC system itself.
- Install one or more
ScaleSets. AScaleSetis a group of runners that can be scaled up or down as needed. Each one can have different labels, and can be used for a repository, organization or enterprise.
Before installing ARC, set the KUBECONFIG to the one that k3s uses:
export KUBECONFIG=/etc/rancher/k3s/k3s.yaml
The above only works for your current shell. If you want to make it permanent, you can add it to your shell's profile so it is set every time you log in.
echo "export KUBECONFIG=/etc/rancher/k3s/k3s.yaml" >> ~/.bashrc
Install ARC with the following command:
NAMESPACE="arc-systems"
helm install arc \
    --namespace "${NAMESPACE}" \
    --create-namespace \
    oci://ghcr.io/actions/actions-runner-controller-charts/gha-runner-scale-set-controller
This will create the arc-systems namespace and install the ARC system into it. You can use a different Kubernetes
namespace, if you prefer.
Next, you will install a ScaleSet. This is a group of runners that can be scaled up or down as needed. For each
ScaleSet, you need some advance information:
- Name: This is a unique identifying name that will be used to identify the runners.
- Namespace: The namespace where these runner containers will be deployed. For security reasons, this should be distinct from the namespace in which you deployed the ARC system.
- Target: The URL of the repository or organization or enterprise where the runners will be used.
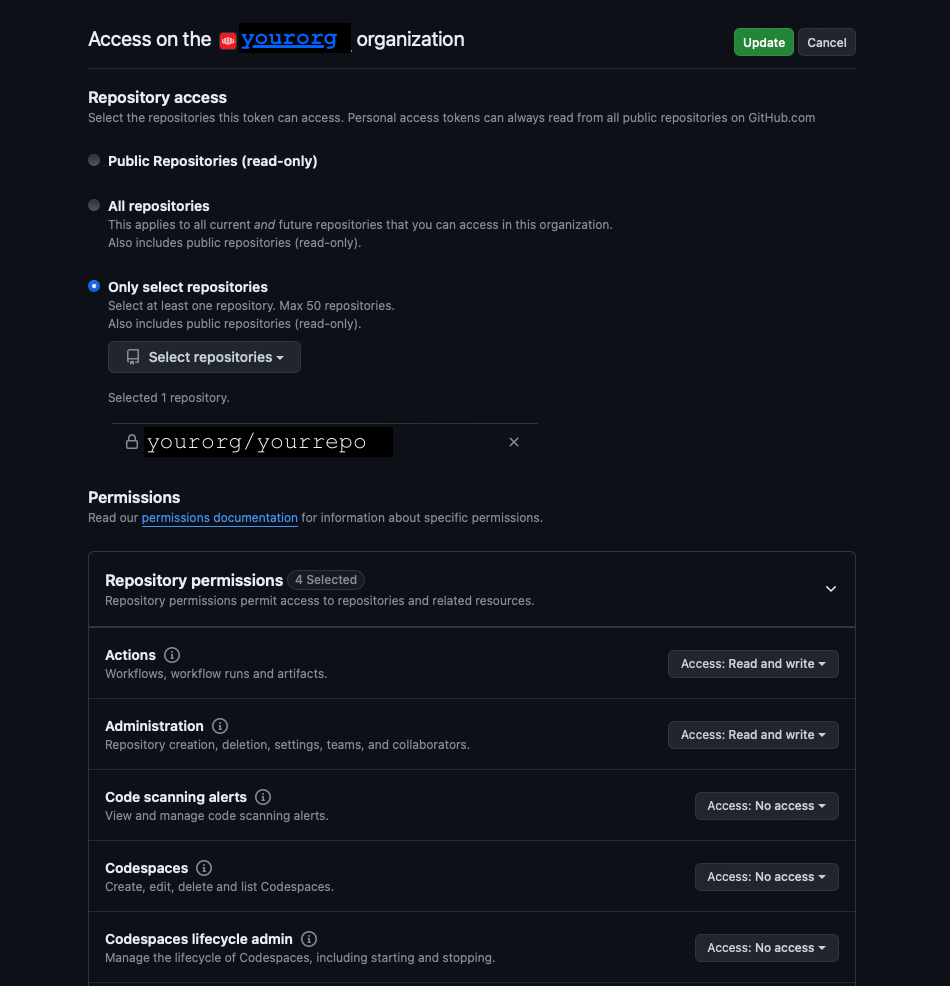
- Token: The security token that allows the runners to register with GitHub. In this example, you will use a personal access token (PAT).
When you set up a PAT, you need to give it the minimum permissions needed. GitHub has two kinds of tokens: classic tokens and fine-grained tokens.
If you are using a classic token, you need to give it the following scopes:
-
repo: for a repository runner -
admin:orgoradmin:enterprise: for an organization or enterprise runner
If you are using a fine-grained token, you need to give it the following permissions:
- access to the specific repository or repositories you want to use, or, if an organization or enterprise, all of the repositories in that organization or enterprise
- within that repository:
- Read access to metadata
- Read/Write access to actions
- Read/Write access to pull requests
- Read/Write access to repository administration
Create a ScaleSet for the repository, call it metal-runners, and use the arc-runner-set
namespace. This guide's screenshots use the equinixmetal/runners-samples repository, and a
PAT we generated for this purpose.
Obviously, you should use a repository or organization to which you have access, and your own PAT. Note that the PAT generated here was created just for the setup of this guide, and no longer is valid.
NAME="metal-runners"
NAMESPACE="arc-runner-set"
GITHUB_CONFIG_URL="https://github.com/equinixmetal/runners-samples"
GITHUB_TOKEN="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"
With that information in hand, you can install the ScaleSet:
helm install "${NAME}" \
    --namespace "${NAMESPACE}" \
    --create-namespace \
    --set githubConfigUrl="${GITHUB_CONFIG_URL}" \
    --set githubConfigSecret.github_token="${GITHUB_TOKEN}" \
    oci://ghcr.io/actions/actions-runner-controller-charts/gha-runner-scale-set
Use the runners in a workflow
Finally, create a workflow for the repository that uses these runners. It won't do anything too fancy; your actual workflows will be more complex. You will just check operating system information and IP addresses.
Create a file .github/workflows/ephemeral-runner-info.yml with the following content:
name: Ephemeral Runner Info
on:
  workflow_dispatch:

jobs:
    runner-info:
        runs-on: metal-runners
        steps:
        - name: Check OS
          run: |
            cat /etc/os-release
            uname -a
        - name: Check IP
          run: |
            sudo apt update
            sudo apt install -y iproute2
            ip a
This workflow will run on the metal-runners group of runners, which is the name you gave to the ScaleSet.
It will execute two steps: one to check the operating
system, and one to check the IP address. Because it launches on: workflow_dispatch, it will only run when you
launch it explicitly.
Check this file into your repository, and go to the "Actions" tab to execute it.
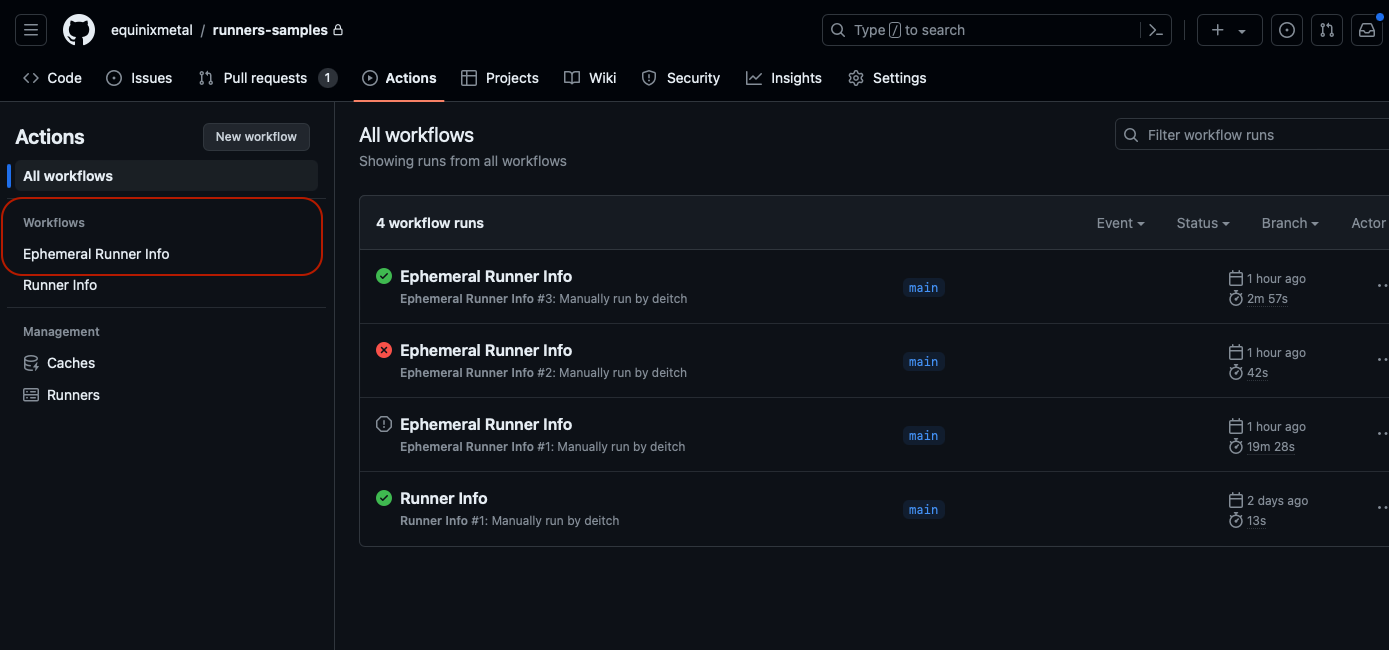
Click the name of the workflow, "Ephemeral Runner Info", then "Run workflow" and then "Run workflow" again.

In the list of workflows, click on the name of the workflow - "Ephemeral Runner Info" - again to see it running.
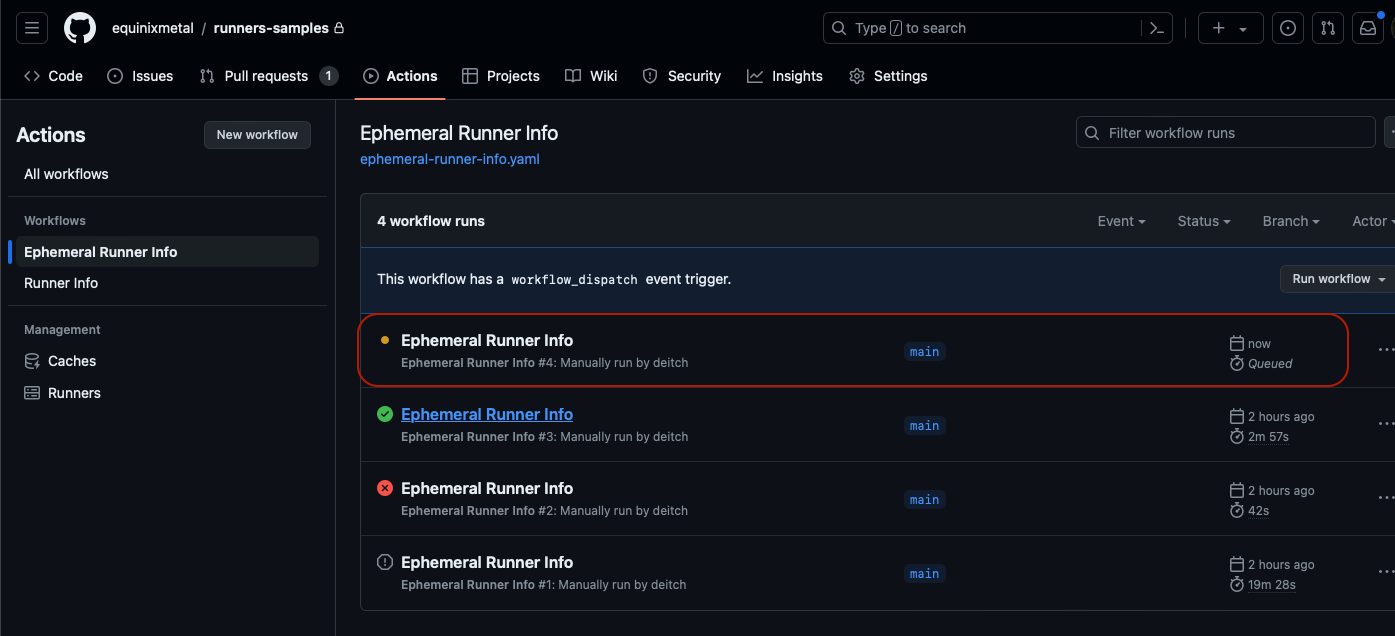
When the workflow is complete, it displays a green mark if successful, or red if there are errors.
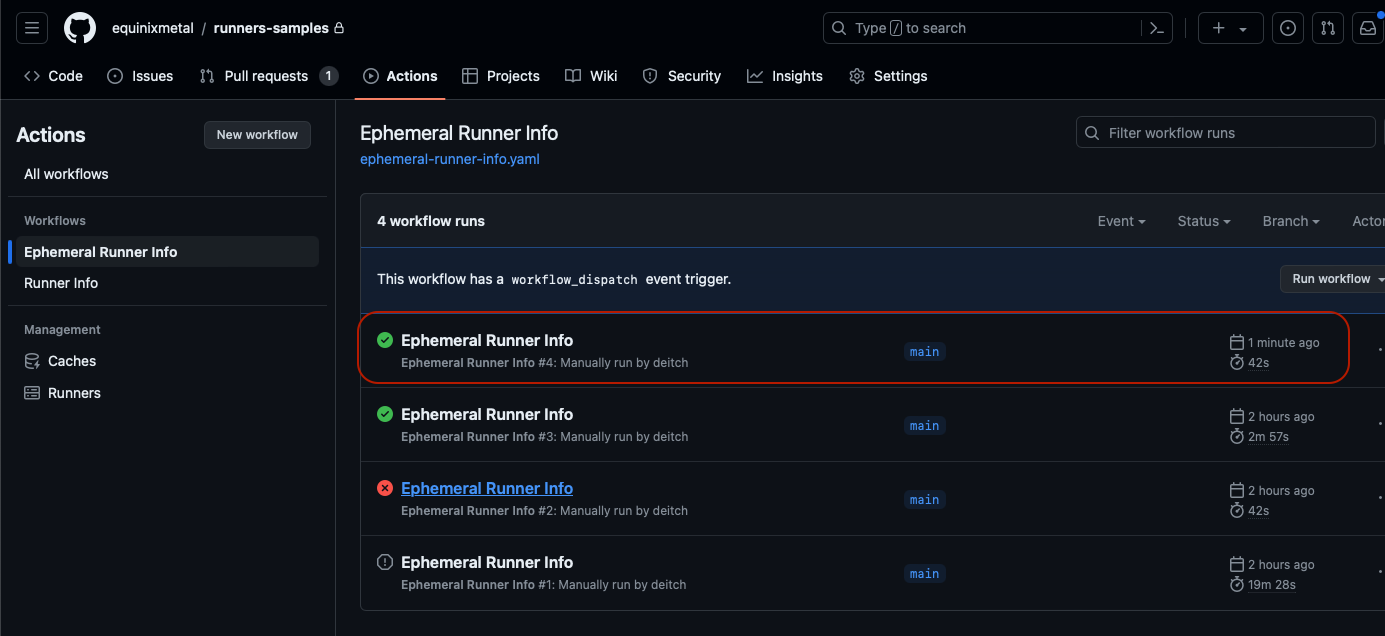
Click the workflow, in the list of workflows, to see the output.
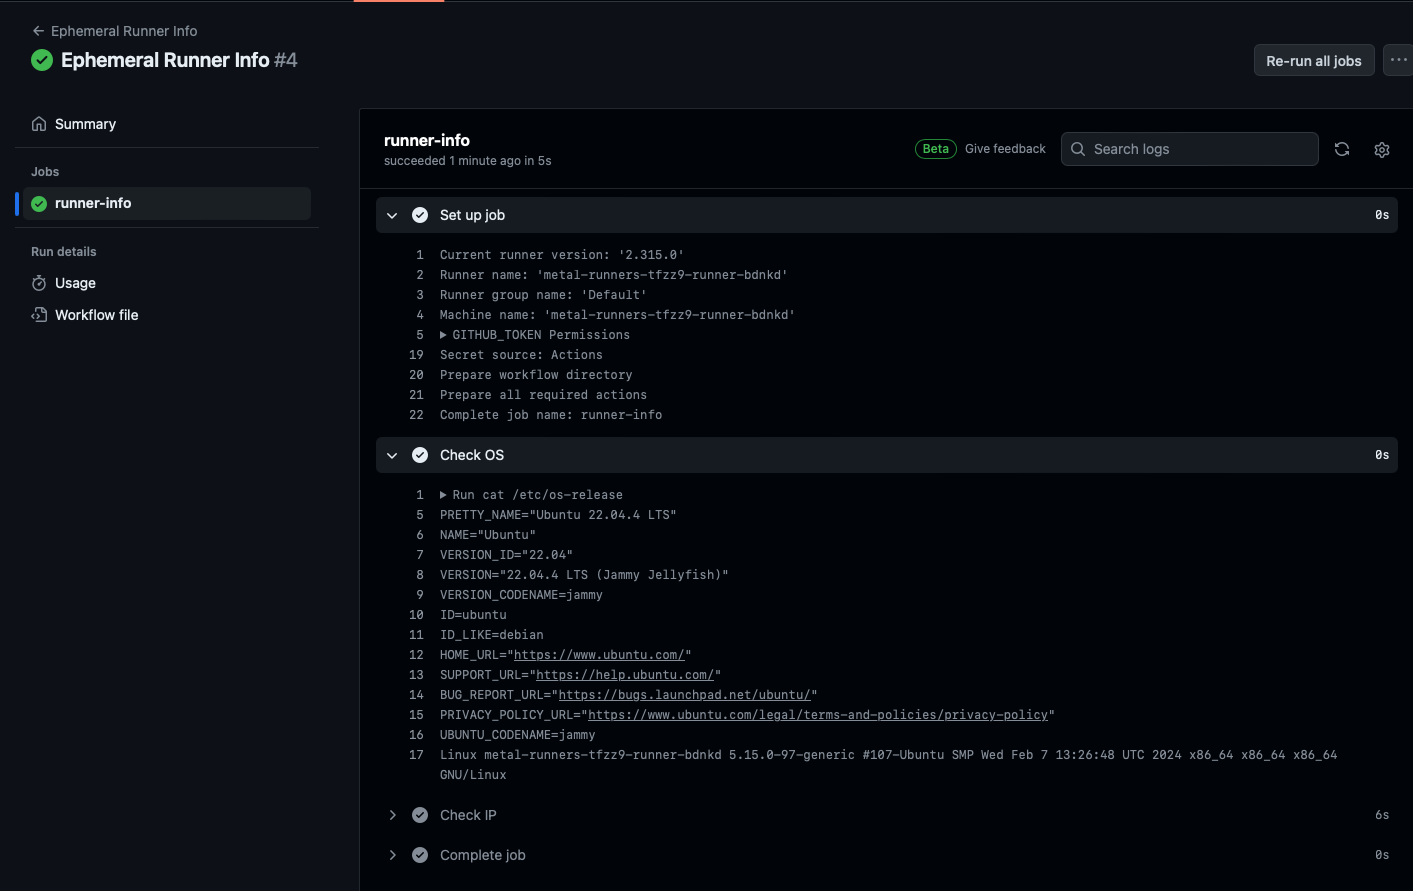
The name of the runner is highlighted in the output, so you can see which container runner executed it.
There are two more advanced scenarios you could deploy. These are not covered these in this guide, but may in future follow-ups:
- VMs instead of containers. Rather than launching containers on Kubernetes as runners, you could launch VMs. These would be almost as quick as containers, depending on the specific operating system start-up time, while providing complete isolation of the jobs.
- Bare-metal servers. Rather than launching containers on Kubernetes as runners, you could deploy Equinix Metal devices as runners, newly launched for each job run. This would take much longer, as the servers would need to be provisioned and booted, but would provide isolation and control while giving the job complete access to the hardware.
You have now set up a pool of Equinix Metal servers on which you will run containers as ephemeral GitHub Actions runners. You can add and modify the Actions as needed to manage your CI/CD workflows
Last updated
25 June, 2024Category
Tagged
ArticleYou may also like
Digger deeper into similar topics in our archives
Configuring BGP with BIRD 1.6 on an Equinix Metal Server
Set up BGP on your Equinix Metal server using BIRD 1.6, covering IP configuration, installation, and neighbor setup to ensure robust routing capabilities between your server and the Equinix...

Configuring BGP with FRR on an Equinix Metal Server
Establish a robust BGP configuration on your Equinix Metal server using FRR, including setting up network interfaces, installing and configuring FRR software, and ensuring secure and efficie...

Crosscloud VPN with Wireguard
Learn to establish secure VPN connections across cloud environments using WireGuard, including detailed setups for site-to-site tunnels and VPN gateways with NAT on Equinix Metal, enhancing...

Deploy Your First Server
Learn the essentials of deploying your first server with Equinix Metal. Set up your project & SSH keys, provision a server and connect it to the internet.

Ready to kick the tires?
Use code DEPLOYNOW for $300 credit