What You Need to Know About Kubernetes Autoscaling
How to select the right autoscaling mechanism, configure it and use it to its full potential.

Autoscaling is a powerful feature in Kubernetes that enables applications to adjust to changes in demand automatically, helping maintain the right amount of resources, without overprovisioning or underprovisioning. Even as demand fluctuates, applications continue running optimally, responding to changing traffic patterns to ensure a seamless user experience and to control costs.
The process of autoscaling starts with obtaining pod metrics using Container Advisor (cAdvisor), a monitoring tool that collects and exposes them via a REST API. Using the API, autoscaling mechanisms get the data they need to decide whether to increase or decrease the number of pods in a deployment or replica set.
In this article, you'll learn about the different types of autoscaling techniques in Kubernetes and the pros and cons of each.
More on using Kubernetes:
- Understanding Kubernetes Network Policies
- Installing and Deploying Kubernetes on Ubuntu
- Unleashing the Power of Multi-Cloud Kubernetes—a Tutorial
- So You Want to Run Kubernetes On Bare Metal
Types of Autoscaling in Kubernetes
There are three primary types of autoscaling mechanisms in Kubernetes: horizontal pod autoscaling (HPA), vertical pod autoscaling (VPA) and cluster autoscaling (CA). Each operates differently and fits a different set of scenarios.
Horizontal Pod Autoscaler
HPA adjusts the number of replicas of a deployment or replica set based on pod resource utilization. HorizontalPodAutoscaler automatically changes the number of replicas in response to changes in traffic or demand.
It’s particularly useful when the degree of a workload’s demand fluctuation is unpredictable (such as holiday traffic spikes to e-commerce websites, popular video broadcasts and so on). HorizontalPodAutoscaler adds more pods when demand rises to ensure a cluster can handle the load and deletes unnecessary pods when demand is down to optimize capacity utilization.
How to Configure HPA
To configure the HorizontalPodAutoscaler, you need a YAML file that describes all its features. Create a file named nginx-hpa.yml to hold the configuration details and populate it with the YAML code below (which describes a deployment and HorizontalPodAutoscaler resources):
apiVersion: apps/v1
kind: Deployment
metadata:
  name: nginx-deployment
spec:
  replicas: 3
  selector:
    matchLabels:
      app: nginx
  template:
    metadata:
      labels:
        app: nginx
    spec:
      containers:
      - name: nginx
        image: nginx:latest
        ports:
        - containerPort: 80
        resources:
          requests:
            cpu: "100m"
---
apiVersion: autoscaling/v1
kind: HorizontalPodAutoscaler
metadata:
  name: nginx-hpa
spec:
  scaleTargetRef:
    apiVersion: apps/v1
    kind: Deployment
    name: nginx-deployment
  minReplicas: 1
  maxReplicas: 6
  targetCPUUtilizationPercentage: 50
This configuration file defines an Nginx deployment and a corresponding HorizontalPodAutoscaler. The deployment definition is straightforward except the resources field, which is used to specify resource requirements of the Nginx container running in the pod.
resources.requests specifies the minimum amount of resources the container requests from the cluster in order to run. Here, it's set to 100m, or 10 percent of the CPU (1000m = 1 CPU).
Next, the code specifies that the autoscaler should scale the nginx-deployment deployment with a minimum of one replica, a maximum of six replicas and target CPU utilization of 50 percent. targetCPUUtilizationPercentage indicates that HorizontalPodAutoscaler tries to maintain CPU utilization of the Nginx deployment at 50 percent by adjusting the number of replicas up or down as needed.
Save this file as nginx-hpa.yml, then open your terminal and type the following command to create the nginx-hpa resource:
kubectl create -f nginx-hpa.yml
Check your Kubernetes dashboard to confirm the resource was created successfully:
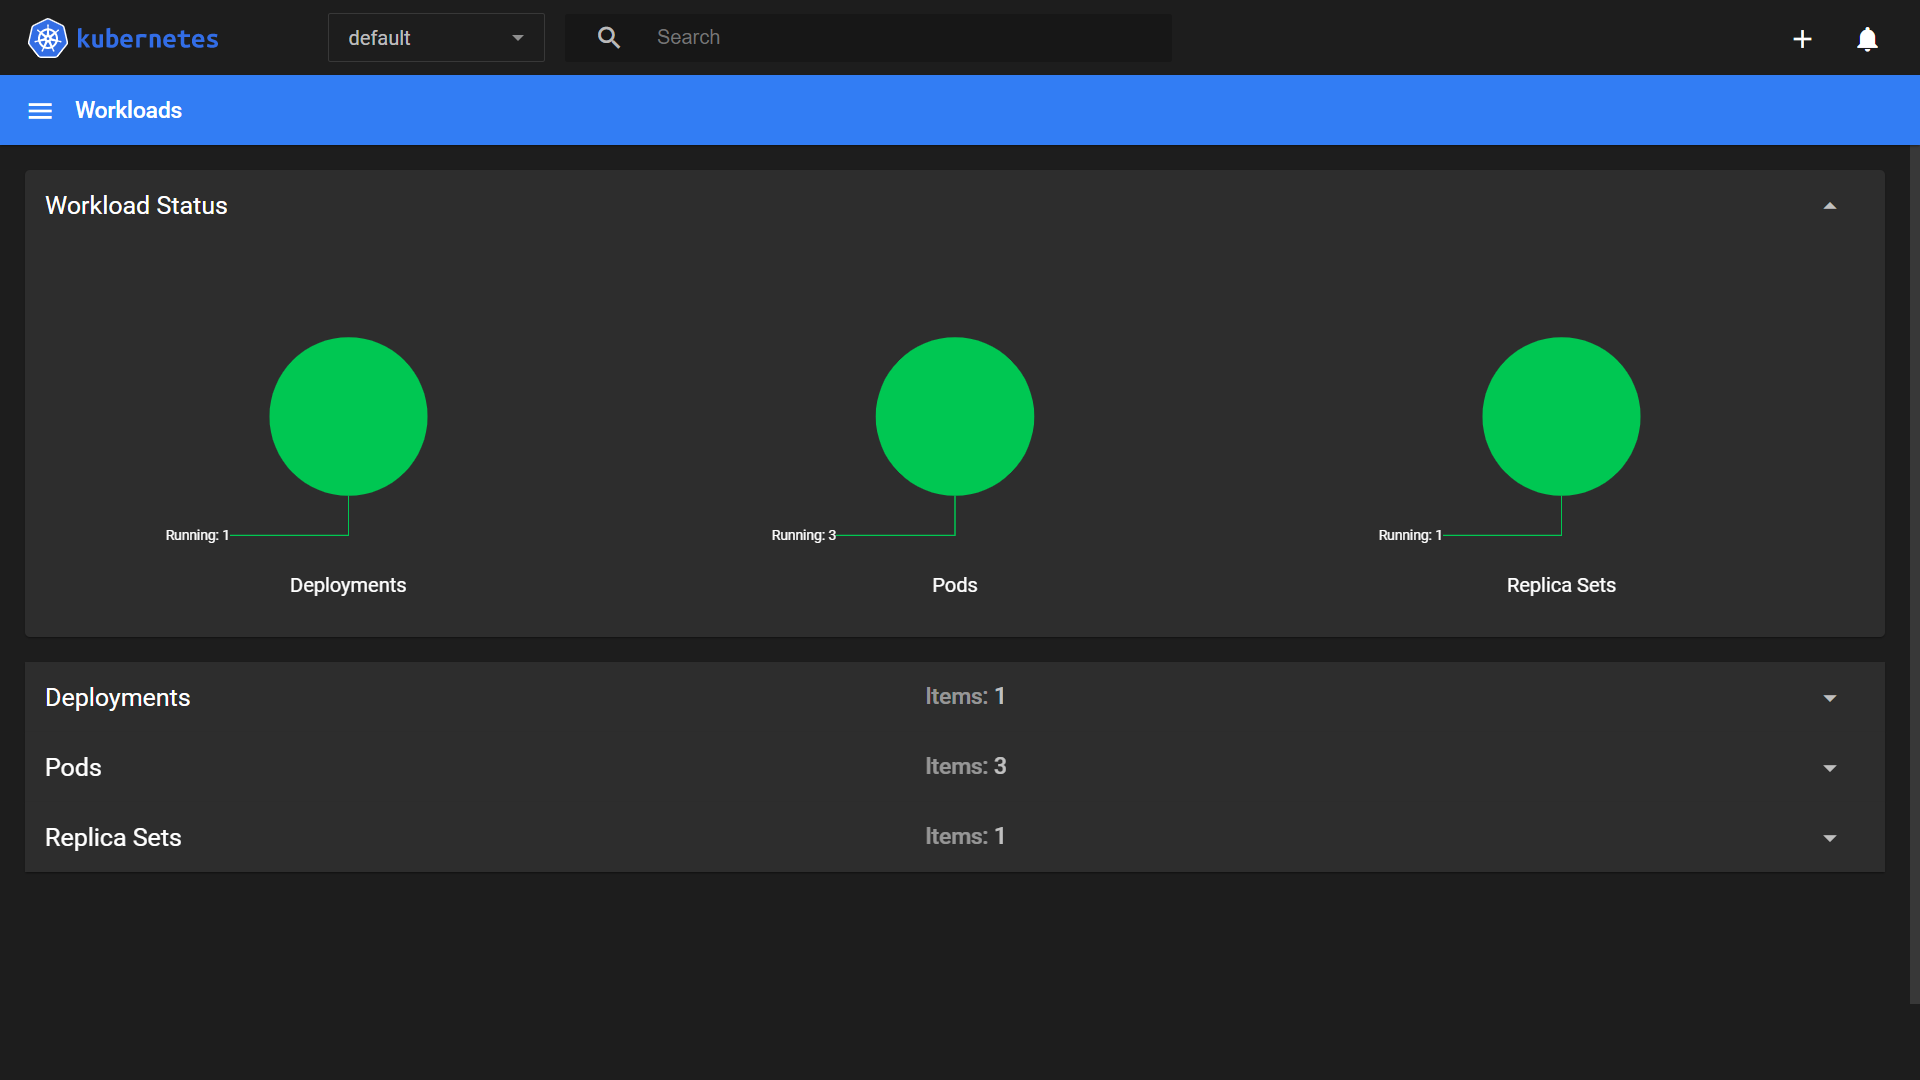
In this image, you can see that the deployment, replica sets and pods have been created; however, there's no information about HorizontalPodAutoscaler. To see it, run the following command:
kubectl get hpa
The output should look like this:
| NAME | REFERENCE | TARGETS | MINPODS | MAXPODS | REPLICAS | AGE |
|---|---|---|---|---|---|---|
| nginx-hpa | deployment/nginx-deployment | <unknown>/50% | 1 | 6 | 3 | 17m |
As you can see, you've successfully configured a deployment with the HorizontalPodAutoscaler. Now, if any production system CPU utilization reaches 50 percent, the number of pods will increase automatically.
Pros of HPA
One advantage of HPA is that it can optimize resource utilization by adjusting the number of replicas in response to demand, reducing waste. However, optimally achieving the desired balance between resource utilization and application performance requires carefully defined scaling decisions.
HPA offers flexible scaling policies, supporting metrics such as CPU utilization, memory usage and custom metrics. This enables custom scaling behavior based on your application's individual requirements.
Finally, it prevents overprovisioning during low-demand periods, helping save infrastructure costs.
Cons of HPA
Because HPA relies on metrics such as CPU and memory usage to determine when to scale pods, there may be a delay between the time demand increases and the time additional pods are up to meet it. This delay can potentially slow down response times, temporarily reducing performance for end users.
It may also degrade performance as a result of resource contention. If multiple pods are scaling up simultaneously, they may compete for those CPU and memory resources.
And, HPA is not suitable for stateful applications, which require data to be replicated correctly. It may not be able to perform this complex task, which can lead to data loss and unreliability. Stateless applications on the other hand don't rely on maintaining a state within individual pods, making them ideal for scaling with HPA.
Vertical Pod Autoscaler
VPA automatically adjusts container resource requests and limits within a pod based on the containers’ actual resource utilization. It's a powerful feature because it optimizes resource utilization based on application usage patterns. This can reduce waste and improve application availability and responsiveness with little manual intervention.
How to Configure VPA
To create a VPA resource, create a YAML file with the following configuration:
apiVersion: apps/v1
kind: Deployment
metadata:
  name: nginx-deployment
spec:
  replicas: 3
  selector:
    matchLabels:
      app: nginx
  template:
    metadata:
      labels:
        app: nginx
    spec:
      containers:
      - name: nginx
        image: nginx:latest
        ports:
        - containerPort: 80
        resources:
          requests:
            cpu: "100m"
            memory: "50Mi"
          limits:
            cpu: "100m"
            memory: "50Mi"
---
apiVersion: autoscaling.k8s.io/v1beta2
kind: VerticalPodAutoscaler
metadata:
  name: nginx-vpa
spec:
  scaleTargetRef:
    apiVersion: apps/v1
    kind: Deployment
    name: nginx-deployment
  resourcePolicy:
    containerPolicies:
    - containerName: "*"
      minAllowed:
        cpu: "100m"
        memory: "50Mi"
      maxAllowed:
        cpu: 1
        memory: 500Mi
      controlledResources: ["cpu", "memory"]
  updatePolicy:
    updateMode: Recreate
This Nginx deployment is the same as in the previous HPA configuration except the resources section, which specifies that the Nginx container requires a minimum of 100 milliCPU and 50 MiB memory (requests field) to run. It's allowed to consume up to 100 milliCPU and 50 MiB memory (limits field).
VerticalPodAutoscaler is defined in the following resource. The main thing to focus on here is the resourcePolicy section, which specifies VerticalPodAutoscaler resource policies, including minimum and maximum allowed resource requests and limits for the containers managed by the deployment and the resources VerticalPodAutoscaler controls.
The updatePolicy section defines how VerticalPodAutoscaler should update the containers' resource requests and limits. Here it's set to Recreate, which means that the containers will be recreated.
Run VerticalPodAutoscaler with the following command:
kubectl create -f nginx-vpa.yml
The terminal should now display a confirmation saying the resources have been created successfully. View VPA status by running the following:
kubctl get vpa
Your output should look like this:
| NAME | TARGET REF | MIN SCALE | MAX SCALE | TARGETS | AGE |
|---|---|---|---|---|---|
| nginx-vpa | deployment/nginx-deployment | 1 | 3 | 1/3 | 23m |
This shows that VPA is targeting the Nginx deployment. VPA can scale the deployment to a minimum of one pod and a maximum of three pods. The TARGETS field specifies the number of pods VPA is currently targeting.
Pros of VPA
We’ve already stated its main advantage, which is keeping an optimal amount of resources running based on actual usage patterns. Additionally, unlike HPA, `VerticalPodAutoscaler` can be used to scale stateful applications, since it adds more resources to the same pod instead of creating multiple replicas of it.
Because VPA operates at the pod level and doesn’t create replicas based on scaling policies, it also provides better resource utilization.
VPA simplifies resource management by adjusting container resource requests and limits based on actual usage. This is much better than the time-consuming and error-prone practice of estimating usage and adjusting them manually.
Cons of VPA
Unfortunately, VPA in Kubernetes is too slow to be suitable for applications with highly variable resource requirements. It works by analyzing usage patterns and then computing resource requests and limits, which takes time.
VPA can also increase overhead and complexity in a Kubernetes cluster, since it continuously monitors and adjusts pod resource allocation based on current utilization. In contrast, HPA scales the number of pod replicas based on predefined metrics, so it's relatively simple to configure.
Cluster Autoscaler
CA adjusts the size of a Kubernetes cluster automatically by adding or removing compute nodes based on the demand for resources by the workloads running on the cluster. Its goal is to keep a sufficient amount of resources running and to keep idle resources to a minimum.
Because it reduces idle resources, one of CA’s key benefits is cost savings. It can also help improve cluster scalability by ensuring there’s enough capacity to handle sudden demand spikes.
Find the details of configuring and using the Kubernetes Cluster Autoscaler in our guide.
Pros of Cluster Autoscaling
CA redistributes workloads across the cluster by adding or removing nodes as needed. This ensures that each node operates at its optimal capacity, reducing the risk of overloading or underutilizing servers.
CA enhances fault tolerance by automatically adding new nodes to a cluster when existing nodes fail or become unresponsive.
In scenarios where workload patterns are unpredictable or exhibit significant variations, CA can scale a cluster effectively to rightsize capacity on the fly.
CA is generally better in these scenarios than HPA and VPA, because the latter two scaling mechanisms cannot make global adjustments in the cluster, and the adjustments they do make must be propagated throughout the system, which means they need longer to take effect.
Additionally, since CA is supported by major public cloud providers, such as Azure Kubernetes Service (AKS), Amazon Elastic Kubernetes Service (Amazon EKS) and Google Kubernetes Engine (GKE), cloud architects can design multicloud and hybrid cloud solutions that include this powerful autoscaling feature.
There are scenarios, however, in which CA cannot do its job of keeping the minimum necessary number of nodes running and may lead to additional costs.
Cons of Cluster Autoscaling
While CA can adjust cluster size, it cannot adjust the resources allocated to individual nodes. This means it cannot guarantee that each node has the resources necessary to run the workload effectively. Additionally, under certain conditions CA may not scale down the cluster, even with very few pods running on a node, leading to inefficient utilization and spend.
CA can also add overhead and complexity to a cluster, which may impact performance and resource utilization. For instance, provisioning a new node involves downloading dependencies, joining the cluster and synchronizing data, which can all reduce performance. In contrast, the HPA and VPA pod operations are generally faster.
This is not the case in HPA and VPA as they work at the pod level, and pod operations are generally less time consuming than node operations.
Simply put, although CA’s default behavior is to scale up the cluster within 10 seconds of a pod being marked unschedulable, depending on the cloud provider and infrastructure specs (network bandwidth, storage type, computing power, etc.), spinning up a new node can take a couple of minutes.
The opposite is also true. CA scales a cluster down ten minutes after a node becomes unnecessary, so a configuration that doesn't take this into account can result in erratic behavior during sudden demand spikes.
This is why it's crucial to be especially careful when configuring CA. Following best practices and guidelines provided by the Kubernetes project and the specific cloud provider can help prevent and resolve potential issues.
Best Practices for Kubernetes Autoscaling
Autoscaling is an essential feature of Kubernetes that helps manage resources efficiently, but making the most of it requires following a few best practices:
Select the Right Autoscaler
To choose the right autoscaler for a workload, you need to understand the workload’s characteristics and specific requirements. For example, HPA is ideal for CPU- and memory-bound workloads, whereas VPA is suitable for workloads that need fine-grained control over resource allocation.
If your application experiences sudden spikes in traffic, HPA may be the better choice. If it has stable traffic but varying resource requirements, you should probably go with VPA.
The Cluster Autoscaler should be used for workloads with highly variable and unpredictable resource demand.
Set Resource Requests and Limits
When setting allowed resource requests, analyze historical usage data to estimate the appropriate amount. Set reasonable resource limits for your pods to avoid excessive usage.
Set Up Proper Monitoring
After selecting the autoscaler, it's important to set up proper monitoring and alerts to ensure it can make informed decisions. With open source observability tools like Grafana your team can create custom dashboards where they can monitor relevant metrics and set alerts for when threshold values are reached.
Create Autoscaling Policies and Thresholds
Autoscaling policies and thresholds determine the autoscaler’s behavior, and it’s important to define them correctly to make sure it responds as desired. Also key to ensuring it responds as desired are testing and validation prior to deployment.
Pay Attention to Costs
Monitor expenses and fine-tune your Kubernetes autoscaling strategy to strike the right balance between resource usage and cost effectiveness. Your ability to take full advantage of HPA, VPA and CA depends heavily on how well they're configured and monitored. Misconfiguring or overlooking crucial parameters can lead to inefficient resource allocation, causing an unexpected surge in operating costs.
If CA scale-down settings are wrong (or a certain type of pods is running), you may end up paying for too many nodes you don’t use; if the upper and lower thresholds for scaling instances are set incorrectly in your HPA configuration, you may see too many or too few pods being deployed, leading to higher costs or performance issues, respectively; misconfigured VPA may allocate too much CPU or RAM to an instance, increasing cost without improving application performance.
Additional Tools for Kubernetes Scaling
There are third-party scaling tools for Kubernetes that extend the functionality and customization options of the built-in autoscaling mechanisms. Here are a few examples:
Custom Metrics API
The Custom Metrics API is a Kubernetes extension API that enables `HorizontalPodAutoscaler` to scale based on, well, custom metrics. It enables you to define and expose your own metrics, be they business-specific or application-level, and make them available to the autoscaling mechanism. This enables fine-grained control for more precise and tailored scaling behavior.
Prometheus and Grafana
Prometheus is an open source monitoring system that collects and stores time series data, while Grafana is a popular open source platform for visualizing and analyzing data. Together, these tools can be used to monitor and analyze Kubernetes clusters and applications, as well as for autoscaling.
Prometheus can be used to collect metrics from Kubernetes and applications running on a Kubernetes cluster, enabling deep insights into infrastructure health and performance. Meanwhile, Grafana can be used to visualize the data and set up alerts, creating informative and visually appealing representations of the metrics.
Third-Party Autoscaling Solutions
Yet other third-party autoscaling solutions, such as KEDA and Datadog, offer features and functionality beyond built-in Kubernetes autoscaling capabilities. They can provide advanced functionality like autoscaling based on business metrics or ML algorithms. Organizations should evaluate these solutions carefully to ensure they meet their requirements and integrate well with their infrastructure prior to incorporating them.
Conclusion
Autoscaling is a core Kubernetes capability, automating resource allocation so that there is always an optimal amount of resources running. In this article we went over the different autoscaling options in Kubernetes and when to use each. It's crucial to select the right autoscaler for your application. It’s then important to set up proper container resource requests and limits and define suitable autoscaling policies and thresholds, all while carefully monitoring your metrics and adjusting the configurations as necessary.

Ready to kick the tires?
Use code DEPLOYNOW for $300 credit