Installing and Deploying Kubernetes on Ubuntu
From configuring the OS to hardening security of your shiny new cluster, step by step.

As the leading container orchestration system, Kubernetes automates deployment of containerized workloads in distributed environments. Applications can span multiple physical nodes in a cluster for redundancy and scalability.
In this tutorial, you'll learn how to start a Kubernetes cluster on an Ubuntu host. First, you’ll set up the Kubernetes master node, which runs your cluster's central components. Then, you’ll learn how to join extra worker nodes to add redundancy to your applications.
More about infrastructure and tooling for Kubernetes:
- So You Want to Run Kubernetes On Bare Metal
- Making the Right Choice: Kubernetes on Virtual Machines vs. Bare Metal
- Kubernetes Management Tools for Bare Metal Deployments
Prerequisites
Before you can follow the steps below, you'll need access to a machine running an updated Ubuntu OS (this guide uses 22.04).
Two or more hosts is preferable to ensure that there are multiple worker nodes for your cluster. A basic Kubernetes installation only requires one host, but that wouldn’t be a resilient configuration.
You can get an Ubuntu box from any major cloud provider. If you want it running on a bare metal server (as opposed to a VM, which is what you would get from a traditional cloud) you can spin one up using Equinix Metal, which gives you a $250 credit to get started. You can also manually install the OS on your own hardware.
Each of your machines should have at least two CPU cores and a minimum of 2 GB of RAM. Here is an on-demand server that meets these requirements. The more RAM the more headroom you will have for your container deployments.
OS Configuration
Kubernetes requires adjusting a few OS settings before your cluster will work properly. Make sure you carry out these steps on every machine in your cluster, including master and worker nodes.
Disable Swap
The cluster setup process can get stuck when swap is enabled on your system. Disable swap by running the swapoff command before you start your cluster:
$ sudo swapoff -a
Make this change persist after reboots by removing any swap entries from your /etc/fstab file.
Enable the br_netfilter Kernel Module
Kubernetes requires that you load the br_netfilter module. This allows the iptables packet filtering tool to access bridged network traffic flowing to your cluster.
Activate the module:
$ sudo modprobe br_netfilter
Make it persist after reboots by including it in your system's modules-load list:
$ echo br_netfilter | sudo tee /etc/modules-load.d/kubernetes.conf
Installing Kubernetes
The modern Kubernetes installation experience is largely automated by kubeadm, the official cluster setup tool. Just follow these steps:
- Install the containerd container runtime on each of your nodes
- Download and install kubeadm, kubelet and kubectl on your master node
- Use kubeadm to initialize the Kubernetes control plane on your master node
- Download and install kubeadm and kubelet on your worker nodes
- Use kubeadm to start the kubelet agent process on each worker node to connect the node to your cluster
Now you can start installing Kubernetes on Ubuntu.
Installing containerd
Kubernetes requires you to separately install a CRI-compatible container runtime, so the cluster can start and run your containers.
Historically, it required using Docker for this purpose. That’s no longer the case, and containerd is the preferred runtime for most modern Kubernetes deployments. You can install containerd from Docker's package repositories, but the project is maintained independently of Docker.
(You can find instructions for alternative containerd installations on GitHub.)
Adding Dependencies
First, update your package lists and install some dependencies that you'll use later in the installation:
$ sudo apt update

$ sudo apt install -y \

  ca-certificates \

  curl \

  gnupg \

  lsb-release
Adding Docker's Apt Repository
Create the /etc/apt/keyrings directory (if it doesn't already exist). You'll download the repository's GPG signing key to this location in a little bit.
$ sudo mkdir -p /etc/apt/keyrings
Use curl to fetch the key that signs Docker's Ubuntu packages. Pipe the key through gpg --dearmor to unpack it and save it to the created keyring directory.
$ curl -fsSL https://download.docker.com/linux/ubuntu/gpg | sudo gpg --dearmor -o /etc/apt/keyrings/docker.gpg
Next, add Docker's package list to your Apt sources. The following command selects the correct list for your Ubuntu version and inserts it as a new entry in Apt's sources directory. This allows Apt to discover the repository's packages for you to install them.
$  echo \

  "deb [arch=$(dpkg --print-architecture) signed-by=/etc/apt/keyrings/docker.gpg] https://download.docker.com/linux/ubuntu \

  $(lsb_release -cs) stable" | sudo tee /etc/apt/sources.list.d/docker.list > /dev/null
Update your package lists to make the repository's content known to Apt:
$ sudo apt update
Install containerd
Now you can install containerd by selecting the containerd.io package:
$ sudo apt install -y containerd.io
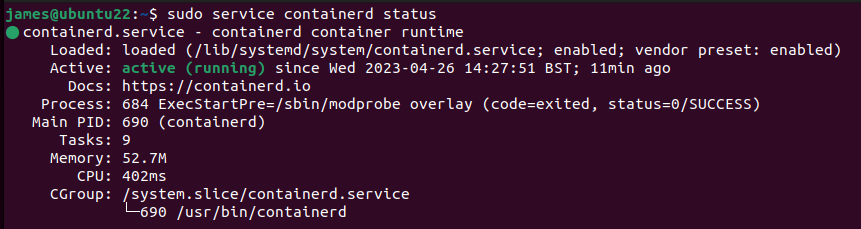
Use the service command to check that containerd is now running. You should see active (running) displayed in green. If the service isn't active, review the debug logs shown at the end of the command's output to identify the problem.
Configuring containerd
Default configurations of containerd, Kubernetes and recent Ubuntu versions have some incompatibilities. These can prevent Kubernetes from starting or cause system containers to randomly restart.
To fix these problems, first replace your containerd config file with the default version. This alters some fields that are incorrectly configured on new installs.
$ containerd config default | sudo tee /etc/containerd/config.toml
Open the config file in your favorite editor and find the following line:
SystemdCgroup = false
Change the value to true:
SystemdCgroup = true
This modification enables systemd cgroup management for containerd. Save the file, then restart the containerd service to apply your changes:
$ sudo service containerd restart
Installing kubeadm, kubectl and kubelet
Next, prepare to install and use Kubernetes by adding its three essential CLIs:
- kubeadm This is the tool you'll use to create your cluster and manage its node configuration.
- kubectl This lets you interact with your cluster once it's running.
- kubelet This is the agent process that runs on all the nodes in your cluster; it applies actions requested by the control plane, such as starting a container.
The Kubernetes packages are available from a dedicated Apt repository.
First, download the signing key to the Apt keyring directory you created earlier:
$ sudo curl -fsSLo /etc/apt/keyrings/kubernetes.gpg https://packages.cloud.google.com/apt/doc/apt-key.gpg
Next, add the repository to your package lists and update your local indexes again:
$ echo "deb [signed-by=/etc/apt/keyrings/kubernetes.gpg] https://apt.kubernetes.io/ kubernetes-xenial main" | sudo tee /etc/apt/sources.list.d/kubernetes.list

$ sudo apt update
Now you can install the three Kubernetes packages:
$ sudo apt install -y kubeadm kubectl kubelet
Next, use the apt-mark command to set a hold on the packages. This prevents apt upgrade from automatically upgrading them when new versions are released. Otherwise, you could cause an inadvertent upgrade of your cluster.
$ sudo apt-mark hold kubeadm kubectl kubelet
Follow the notes in the kubeadm documentation to upgrade your cluster to new Kubernetes releases in the future.
Setting Up the Kubernetes Master Node
You can now create your Kubernetes master node. You can do this with a single kubeadm command:
$ sudo kubeadm init --pod-network-cidr=10.244.0.0/16
The --pod-network-cidr flag configures the CIDR IP address range available to your cluster's network. The default value of 10.244.0.0/16 is appropriate for most situations, but you might need to change it if your existing network configuration conflicts with that. Setting the CIDR range is required for networking to work correctly in the next step.
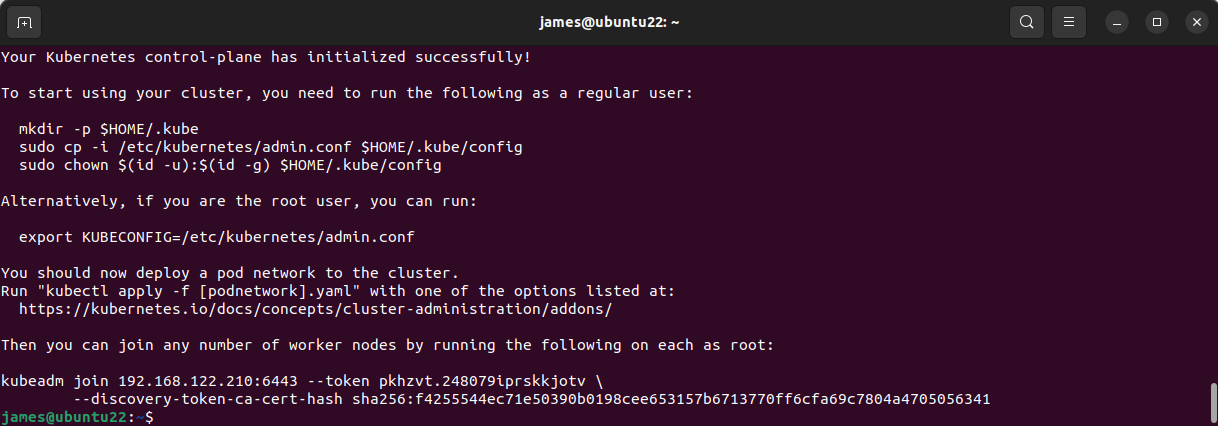
The kubeadm init command could take several minutes to complete. It will pull the required container images and configure your current host to run the Kubernetes control plane. Your cluster starts automatically once all the components have been acquired.
EMPH: Wait until you see the success message in your terminal before you continue!
Configuring kubectl
Run the commands suggested in the kubeadm init command's output to copy the kubeconfig file generated by the installation process into your .kube directory. This file configures kubectl to connect to your cluster.
$ mkdir -p $HOME/.kube

$ sudo cp -i /etc/kubernetes/admin.conf $HOME/.kube/config

$ sudo chown $(id -u):$(id -g) $HOME/.kube/config
Installing a Networking Plugin
Before you can start using your cluster normally, you need to install a networking plugin to provide full network support. Flannel is a popular option you can install with a single command:
$ kubectl apply -f https://raw.githubusercontent.com/flannel-io/flannel/master/Documentation/kube-flannel.yml
Wait a minute or so to give Flannel time to start up, then your cluster should be ready to use. Try kubectl's get nodes command to check that your control plane node is Ready:
$ kubectl get nodes

NAME        STATUS   ROLES           AGE     VERSION

ubuntu-2204 Ready    control-plane   7m19s   v1.27.1
Adding Worker Nodes
Now you can start adding more worker nodes to the cluster. Repeat the steps described above to configure each node's operating system and install containerd, kubeadm, kubectl and kubelet.
Before you can add a node, you have to extract your cluster's registration token and certificate hash from the master. Find the token with the following command:
$ kubeadm token list

TOKEN                       TTL     EXPIRES                   USAGES               DESCRIPTION                  EXTRA GROUPS

pkhzvt.248079iprskkjotv     22h     2023-04-27T14:59:06Z      authentication,signing
The token's value is displayed in the first column.
Next, retrieve the token's CA certificate hash:
$ openssl x509 -pubkey -in /etc/kubernetes/pki/ca.crt | openssl rsa -pubin -outform der 2>/dev/null | \

   openssl dgst -sha256 -hex | sed 's/^.* //'
Note down both these values—you'll need them shortly.
Joining Worker Nodes to Your Cluster
Now it’s time to switch to your worker node. After substituting the placeholders with your master node's IP address and your token and hash values, run the following command to join the node to the cluster running on your master:
$ kubeadm join <master-ip-address>:6443 \

  --node-name $HOSTNAME

  --token <token>

  --discovery-token-ca-cert-hash sha256:<token-ca-cert-hash>

[kubelet-start] Starting the kubelet

[kubelet-start] Waiting for the kubelet to perform the TLS Bootstrap...

This node has joined the cluster:

* Certificate signing request was sent to apiserver and a response was received.

* The Kubelet was informed of the new secure connection details.

Run 'kubectl get nodes' on the control-plane to see this node join the cluster.
Now you can switch back to your master node to confirm that the new worker has joined:
$ kubectl get nodes

NAME        STATUS   ROLES          AGE   VERSION

demo-node   Ready    <none>         35s   v1.27.1

ubuntu-2204 Ready    control-plane  7m19s v1.27.1
Repeat this procedure on each worker node you want to add.
Securing Your Kubernetes Cluster
Your cluster is now ready to use, but there are still things to do to improve its security. Let’s go over three essential procedures to follow.
Kubernetes Network Security Measures
Basic network security hygiene measures apply to Kubernetes clusters, just as they do to any other kind of infrastructure. This affects the integrity of your cluster and the applications you run within it.
Avoid binding ports and exposing services, unless they actually need to be reached externally. You can use network policies to isolate containers that don't need network access.
Tighten your cluster's security by enabling full authentication and authorization for the kubelet process that runs on your worker nodes. Blocking anonymous requests prevents any unauthenticated access to kubelet's APIs, creating a smaller attack surface.
Setting Up a Firewall
It's good practice to isolate critical control plane components such as the etcd datastore behind a node-level firewall.
Enable and use UFW, Ubuntu's system firewall, to restrict network access to the specific ports and protocols you require. Only port 6443 is required for the Kubernetes control plane and worker nodes to communicate with each other. Locking down other ports prevents external traffic from directly reaching sensitive components capable of exposing cluster data.
Use HTTPS for Everything
kubeadm configures HTTPS automatically and distributes the required certificates to each component in your cluster. However, some components can be configured to use HTTP-only ports, which could expose traffic.
Take care when changing settings related to Kubernetes control plane components, such as the API server. Misconfigured TLS will affect the security of your entire cluster.
In most cases, you won't need to manually alter TLS settings for clusters provisioned by kubeadm, but it's possible to customize TLS certificates and take control of rotation in situations that call for it.
You’re All Set!
By now, you should be able to deploy your own Kubernetes cluster on Ubuntu using the official kubeadm installation tool. You can now grow your cluster with additional nodes, so you can efficiently respond to changes in your application's utilization.
Kubernetes cluster performance depends on the hardware that runs your nodes. Equinix provides remote bare metal servers with native support for Ubuntu and many other operating systems to power your critical infrastructure, such as Kubernetes clusters. Provision an Ubuntu machine and start using high-performance Kubernetes!

Ready to kick the tires?
Use code DEPLOYNOW for $300 credit