It Isn’t Magic, It’s TCP: Demystifying Networking for Developers
How the Transmission Control Protocol works in the OS kernel to push packets to the right place and in the right order.

Engineering teams here at Equinix occupy an interesting space: the products and tools we build for other developers draw much of their power from the capabilities of Equinix’s vast network infrastructure. Our goal and challenge as networking experts is to expose our platform’s capabilities to developers through the tools and processes they are familiar with. Alas, the superpower that is Equinix’s network can easily go unnoticed by software engineers who haven’t much delved into the world of networking.
Our hope is that with articles like this one we can demystify networking for more developers out there and inspire more people to use this uniquely capable platform in ways they hadn’t thought of—perhaps simply for the lack of relevant vocabulary.
In this article, we will take a closer look at what happens behind the scenes for an application that uses a TCP-based protocol to serve data to clients. We will focus on the network subsystem for Linux operating systems, since Linux is the predominant OS used in our stack. Other OSes (such as Windows, MacOS and FreeBSD) have their own implementation for such things, but the actual TCP semantics are very similar across the board. It is a standardized protocol after all, and we need all these different operating systems to play nicely with each other.
More on networking:
- How Not to Lose (Most of) Your Packets
- How to Build Network Services in the User Space
- Locking Down Your Cloud Network: The Basics
Understanding TCP
If you’re a developer, you’re usually sitting at the highest layer of abstraction from the network. You may think of networking as something along the lines of listening on a port, processing a request, sending a response or connecting to a server. Although not wrong, these higher-level definitions leave many of the ideas behind networking out of the picture and make it easy to forget that a lot of stuff needs to happen in order for your application to happily accept connections and serve cat pictures. TCP is a transport layer protocol that implements reliable delivery of data. It is the protocol of choice for many of the most common application protocols, such as HTTP, SSH, gRPC and others.
When we say that TCP is a reliable protocol, we mean that it is up to the TCP protocol implementation (which usually happens in the operating system’s kernel) to ensure that the data arrives and, crucially, that it arrives in the right order. In addition, there is the concept of a “connection.” TCP requires both sides of the connection to agree on some parameters (through a process usually referred to as a three-way handshake) before constructing a virtual “pipe” over which any data sent on one side makes it to the other, in order and complete. In other words, if an HTTP server sends a message like BEEF CAFE to a client, the client should read BEEF CAFE and not ABEE CEFF. And both sides can only ensure such ordering and completeness if they keep track of the state of that connection. That is why we say that TCP is a “stateful” protocol.
Now that we have a rough idea on what we need TCP for, let’s jump to the code.
A Simple TCP Server
Let’s say you just wrote a web server with the goal of serving cat pictures. You put this code in your favorite editor, and it compiled successfully:
package main

import (
	"fmt"
	"net/http"
)

const (
	port    = 80
	address = "192.168.1.10"
)

func main() {
	http.HandleFunc("/", func(w http.ResponseWriter, r *http.Request) {
		fmt.Fprintf(w, "Hello kitty!")
	})

	addr := fmt.Sprintf("%s:%d", address, port)
	fmt.Printf("Starting server at port %s\n", addr)
	if err := http.ListenAndServe(addr, nil); err != nil {
		panic(err)
	}
}
When you run your binary, the ListenAndServe() method (from the Go standard library http package) performs a series of steps in order to prepare the system to receive HTTP connections. The HandleFunc() method takes care of formulating a response and sending it back to the client. In the background, when these two functions are called from our code, they will end up communicating with the kernel through system calls, since it is the kernel that will do the hard work of dealing with the TCP protocol details. All we really care about is the payload data, where to read from and where to write to. If you examine the system calls made from the application using a tool like strace, you’ll see that the application calls the kernel, which does the following:
- Associate the application with a network address
- Listen for new connections
- Accept connections
- Serve clients
- Close connection
Now let’s pop the hood to see what each of these steps really entails:
1. Associate the Application With a Network Address
When a TCP client wants to connect to a server, the client’s TCP stack will send the initial TCP handshake packet (a SYN packet, as in “SYNchronisation”) to establish a connection. This packet will have a certain destination IP address (IPv4 or IPv6) in its IP header and a destination port in its TCP header. Before the application can actually serve connections on behalf of that network address (combination of IP address and port) it needs to make sure that the layers underneath it (the kernel protocol stack, in this case) are made aware that we want such packets. The process of setting up the system to listen on that address is also known as “binding” to an address. It is also possible to bind to all addresses on the system, for a specific port, but in this example we’re specifying an address (defined in line 10), so that’s the one the clients should be using to connect.
First, the application talks to the kernel using a socket system call. This call creates a file descriptor, which is the location in the system where the packet’s data payload will be placed. This is what the application’s socket system call to the kernel looks like:
socket(AF_INET, SOCK_STREAM|SOCK_CLOEXEC|SOCK_NONBLOCK, IPPROTO_IP) = 3
The app passed in the AF_INET parameter as the first argument, which means that this socket is for the IPv4 protocol stack. The second argument specifies the socket type. For TCP, you will almost always encounter the SOCK_STREAM flag (that is, a connection-oriented socket) in the second argument. The other flags (SOCK_CLOEXEC and SOCK_NONBLOCK) specify how the file descriptor should behave. Lastly, there is the protocol argument, IPPROTO_IP. The IPPROTO_IP argument actually tells the kernel to pick up the protocol automatically, based on the socket type passed in. Since we passed SOCK_STREAM, it will automatically pick TCP. However, if we had specified SOCK_DGRAM, we would be getting a UDP socket instead. To learn more about all the possible options, refer to the man page.
Now we have successfully opened our socket and got a file descriptor ID (3, as shown in the return code of the system call) where the data will be sent. But the kernel doesn’t know yet what kind of data we want to put on that socket. The application should now tell the kernel to bind this socket to a network address. The bind call essentially tells the kernel, “ for network packets with headers matching this local address, put their data in this one file descriptor for me to read.” This call also ensures there are no conflicts regarding which socket can receive data for which network addresses.
If the call to bind succeeds (that is, returns 0) , it means that there is no other application in the system using that address and we are free to use it. Any subsequent attempts to bind to that same address in the same network namespace will fail.
bind(3, {sa_family=AF_INET, sin_port=htons(80), sin_addr=inet_addr("192.168.1.10")}, 16) = 0
Oops, I just started another instance of that app! Luckily the kernel won’t let this new one hijack the address. It tells us the address is already in use:
bind(3, {sa_family=AF_INET, sin_port=htons(80), sin_addr=inet_addr("192.168.1.10")}, 16) = -1 EADDRINUSE (Address already in use)
close(3)
2. Listen for New Connections
Once the socket is bound to that network address, the app can receive connection requests from clients. This is achieved by issuing the listen system call.
listen(3, 4096)                         = 0
epoll_ctl(5, EPOLL_CTL_ADD, 3, {events=EPOLLIN|EPOLLOUT|EPOLLRDHUP|EPOLLET, data={u32=4271898626, u64=9220810217688662018}}) = 0
You can also see that the file descriptor gets registered in the epoll instance with the epoll_ctl call. This basically means that the application will get notified when there is data on the descriptor.
Now that the little server has started listening for connections, we are almost ready to serve the clients.
Our application can’t accept any connections until we get a connection request from a client. This is just how traditional HTTP works. For the moment, we can use curl as the client to interact with our server:
$ curl 192.168.1.10
Hello kitty!
That is our response right there. But let’s have a look at what exactly happened for us to get here.
3. Accept Connections
Once the application gets notified about a connection attempt it can accept it. This can be achieved by running the accept system call to the kernel. The result will be a new, unique file descriptor that represents this one connection:
accept4(3, {sa_family=AF_INET, sin_port=htons(55402), sin_addr=inet_addr("192.168.1.10")}, [112 => 16], SOCK_CLOEXEC|SOCK_NONBLOCK) = 4
epoll_ctl(5, EPOLL_CTL_ADD, 4, {events=EPOLLIN|EPOLLOUT|EPOLLRDHUP|EPOLLET, data={u32=4255645697, u64=9220810217672409089}}) = 0
setsockopt(4, SOL_TCP, TCP_NODELAY, [1], 4) = 0
setsockopt(4, SOL_SOCKET, SO_KEEPALIVE, [1], 4) = 0
setsockopt(4, SOL_TCP, TCP_KEEPINTVL, [15], 4 <unfinished ...>
A file descriptor is created for every accepted connection, so the server can keep track of individual transactions for multiple different clients. This descriptor ID is also added to the notification list, ensuring the application will wake up whenever there is incoming data to process. In addition, you can see that some options are set after we create the socket. There are many different options to choose from, and in our example these were the ones our library wanted to have set. For a more complete list of the available options, have a look at the man page.
4. Serve Clients
Now that we have accepted the connection and know which file descriptor ID corresponds to that connection, we are ready to serve the clients. In our setup, all we do is wait until the client sends us an HTTP GET request so we can serve them what they ask for. Once the connection is set up, our client sends us the GET request, which we read from that file descriptor (after being notified that data came in):
read(4, "GET / HTTP/1.1\r\nHost: 192.168.1.10\r\nUser-Agent: curl/7.87.0\r\nAccept: */*\r\n\r\n", 4096) = 76
That request will be handled by our HandleFunc() based on the URL requested by the client (we simply hit the root entry point here, - or /, which is the one our function serves requests for).
The fmt.Fprintf command writes our response to the http.ResponseWriter, and it results in the http library writing that serialized data into the file descriptor for that connection:
write(4, "HTTP/1.1 200 OK\r\nDate: Tue, 26 Sep 2023 11:43:47 GMT\r\nContent-Length: 12\r\nContent-Type: text/plain; charset=utf-8\r\n\r\nHello kitty!", 129 <unfinished ...>
Once we issue that call, the kernel takes over and performs all the subsequent steps (formatting the headers, performing route lookups, computing checksums, passing the packet down to the driver and so on) until the data gets sent out toward the client.
5. Close Connection
If the client wishes to keep the connection open for subsequent requests, it is allowed to do so. In that case, we would see many calls to read and write on that same descriptor, depending on what the client wants from our server. That is not the case here, since we simply invoked curl to get a single entry point. Once it is done, it gracefully closes its side of the connection and our TCP stack should receive a simple TCP packet with the FIN flag set (as in FINish the connection). When our server receives this packet, the connection state is discarded and our server closes its descriptor:
close(4) = 0
If the connection isn’t properly closed, we can end up with stale state, which can pile up over time and cause some weirdness in the system due to excessive state. To prevent that we have the option of configuring the sockets to monitor the connection state through something called “keepalives.” This basically means that we want to probe the connection every so often to make sure it is still valid on the other side. If you scroll up to number 3, you should see that our library added these options for us (SO_KEEPALIVE, TCP_KEEPINTVL).
Looking at the Kernel State
You saw the process of establishing a TCP connection from the application’s perspective. Now we’ll take a look at how it works from the kernel perspective.
Once an application is bound to a local address, it is said that now the system is listening on that address. We can see our app’s “listen” socket using the netstat command. We know it is a “listen” socket because of the state column.
~ $ netstat -tln
Active Internet connections (only servers)
Proto Recv-Q Send-Q Local Address           Foreign Address         State
tcp        0      0 192.168.1.10:80         0.0.0.0:*               LISTEN
Once a connection is established, you can see a separate entry. Note that this step is specific to connection-oriented sockets (often TCP), and the behavior will be different if you are using UDP as the underlying transport on the application. The client sits on the same system, which is why you see two sockets in the following code: one that belongs to the client application and the other being the server application.
~ $ netstat -atn | grep 192.168
tcp        0      0 192.168.1.10:80         0.0.0.0:*               LISTEN
tcp        0      0 192.168.1.10:42636      192.168.1.10:80         ESTABLISHED
tcp        0      0 192.168.1.10:80         192.168.1.10:42636      ESTABLISHED
Using the lsof command, we see that the socket belongs to our application:
~ $ sudo lsof -p 2478510 -n
COMMAND     PID USER   FD      TYPE   DEVICE SIZE/OFF     NODE NAME
...
example 2478510 root    3u     IPv4 18845797      0t0      TCP 192.168.1.10:http (LISTEN)
example 2478510 root    4u     IPv4 18910104      0t0      TCP 192.168.1.10:http->192.168.1.10:49420 (ESTABLISHED)
example 2478510 root    5u  a_inode     0,13        0    11297 [eventpoll:3,4,6]
example 2478510 root    6r     FIFO     0,12      0t0 18845798 pipe
example 2478510 root    7w     FIFO     0,12      0t0 18845798 pipe
Now we know that the kernel should be delivering all these packets to our application. But before we can listen on an address, we need to make sure that the kernel has to deliver such packets locally (that is, these matching packets are destined to the local system). There are alternative ways to work around this requirement, but that is not something you should expect to see in the majority of running apps. Often we will see the server’s IP address living somewhere on our host.
In order to distinguish local (this system) from remote (other systems) destinations, Linux keeps track of local addresses on its local routing table. This table is the first one it looks up for matches on incoming packets. If no match is found, it proceeds to the next table in a linear fashion.
ip ru sh
0: from all lookup local <<<<<
32766: from all lookup main
32767: from all lookup default
And if we examine the contents of that table, we see that our address is there, since it was configured on a local interface:
ip ro sh table local
local 127.0.0.0/8 dev lo proto kernel scope host src 127.0.0.1
local 127.0.0.1 dev lo proto kernel scope host src 127.0.0.1
broadcast 127.255.255.255 dev lo proto kernel scope link src 127.0.0.1
local 192.168.1.10 dev lo proto kernel scope host src 192.168.1.10 <<<
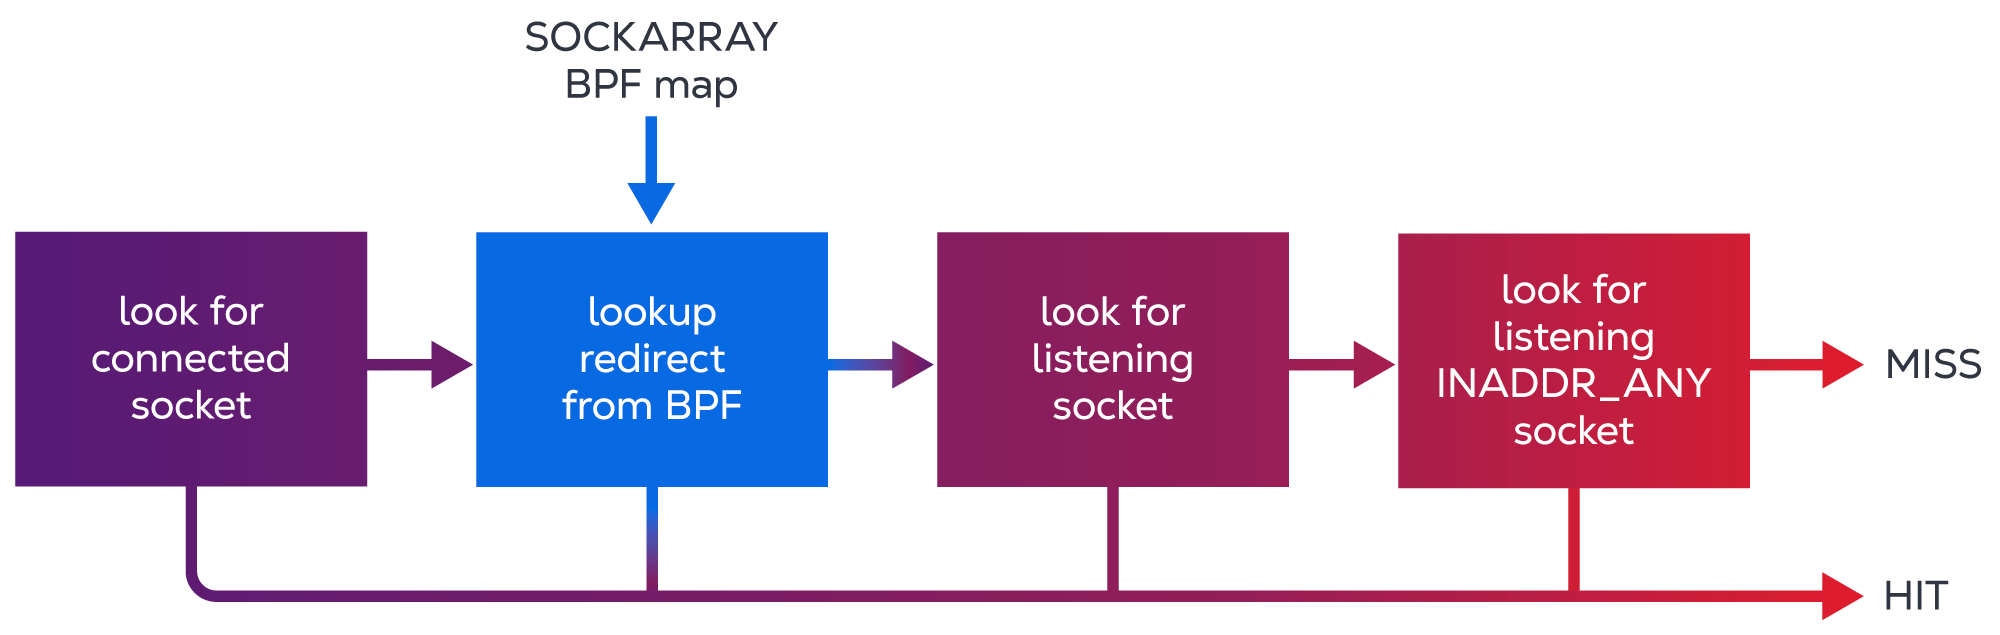
The local route table contains the routes meant to mark packets for local delivery, which will then cause the kernel to perform a socket lookup on them. First, it tries to find an exact match for that socket (a socket in an ESTABLISHED state) and, if it can’t find one, a less specific socket will be picked. Here’s what typical socket lookup logic looks like:
Conclusion
This article covered the fundamentals of networking from a client/server application perspective. As a developer, you should now have a good idea of the main steps in the process of transferring data between two applications over a network:
- How applications claim an address on a node.
- How applications set up the kernel for receiving data.
- How the kernel handles received packets.
- How the kernel finds the right place for received data on a system.
- How the kernel handles packets for known and unknown connections.

Ready to kick the tires?
Use code DEPLOYNOW for $300 credit