- Home /
- Resources /
- Learning center /
- Deploying iSCSI on...
Deploying iSCSI on Dell storage via Equinix Metal
Step-by-step instructions for using Dell Storage with the iSCSI protocol on Equinix Metal

On this page
This guide covers how to set up and use Dell Storage with the iSCSI protocol on Equinix Metal. We'll also guide you through key tasks such as adding volumes and managing initiator groups.
Before you can serve data over iSCSI, you'll need to complete some initial configuration steps. For detailed setup instructions, please refer to our Getting Started: Initial Setup of Dell Storage on Equinix Metal guide.
iSCSI Prerequisites
To successfully serve data with iSCSI from the Dell Storage, there are some things you will need to keep in mind for configuration. Here are the perquisites for a successful deployment:
Two VLANs for iSCSI traffic in Equinix Metal. In a Dell deployment, it is typical to use two iSCSI data networks on different VLANs. If you need to add additional VLANs to the Dell Storage cluster, you can find the detailed instructions on how to add it in the Metal Console and the Dell interface in the getting started guide. In this example, we will be using VLANs 1001 and 1002.
An iSCSI Host. You will need a host in Equinix Metal to connect the Dell storage to. The iSCSI host, whether Windows or Linux, should be properly set up. If you haven't deployed a server in Equinix Metal before, refer to the Deploying Your First Server guide for assistance.
IP Addresses. You will need the following IP addresses:
- Two IP addresses per Dell Node, one on each VLAN
- Two IP addresses per iSCSI host, one on each VLAN
NOTE: The Dell Storage system is a unified storage system. You can use multiple storage protocols on the same hardware, with the same network links.
Configuring iSCSI Networking on the Dell Appliance
Before data can be served using iSCSI, Network IPs for iSCSI must be configured on the Dell storage appliance in PowerStore Manager. We will be configuring two IP addresses for each VLAN on the Dell storage appliance. You will repeat this process twice, once for each VLAN.
To begin, log into PowerStore manager using the IP address and user credentials given to you by the Equinix team during the handover process.
From the Dashboard, click Settings in the upper right corner.
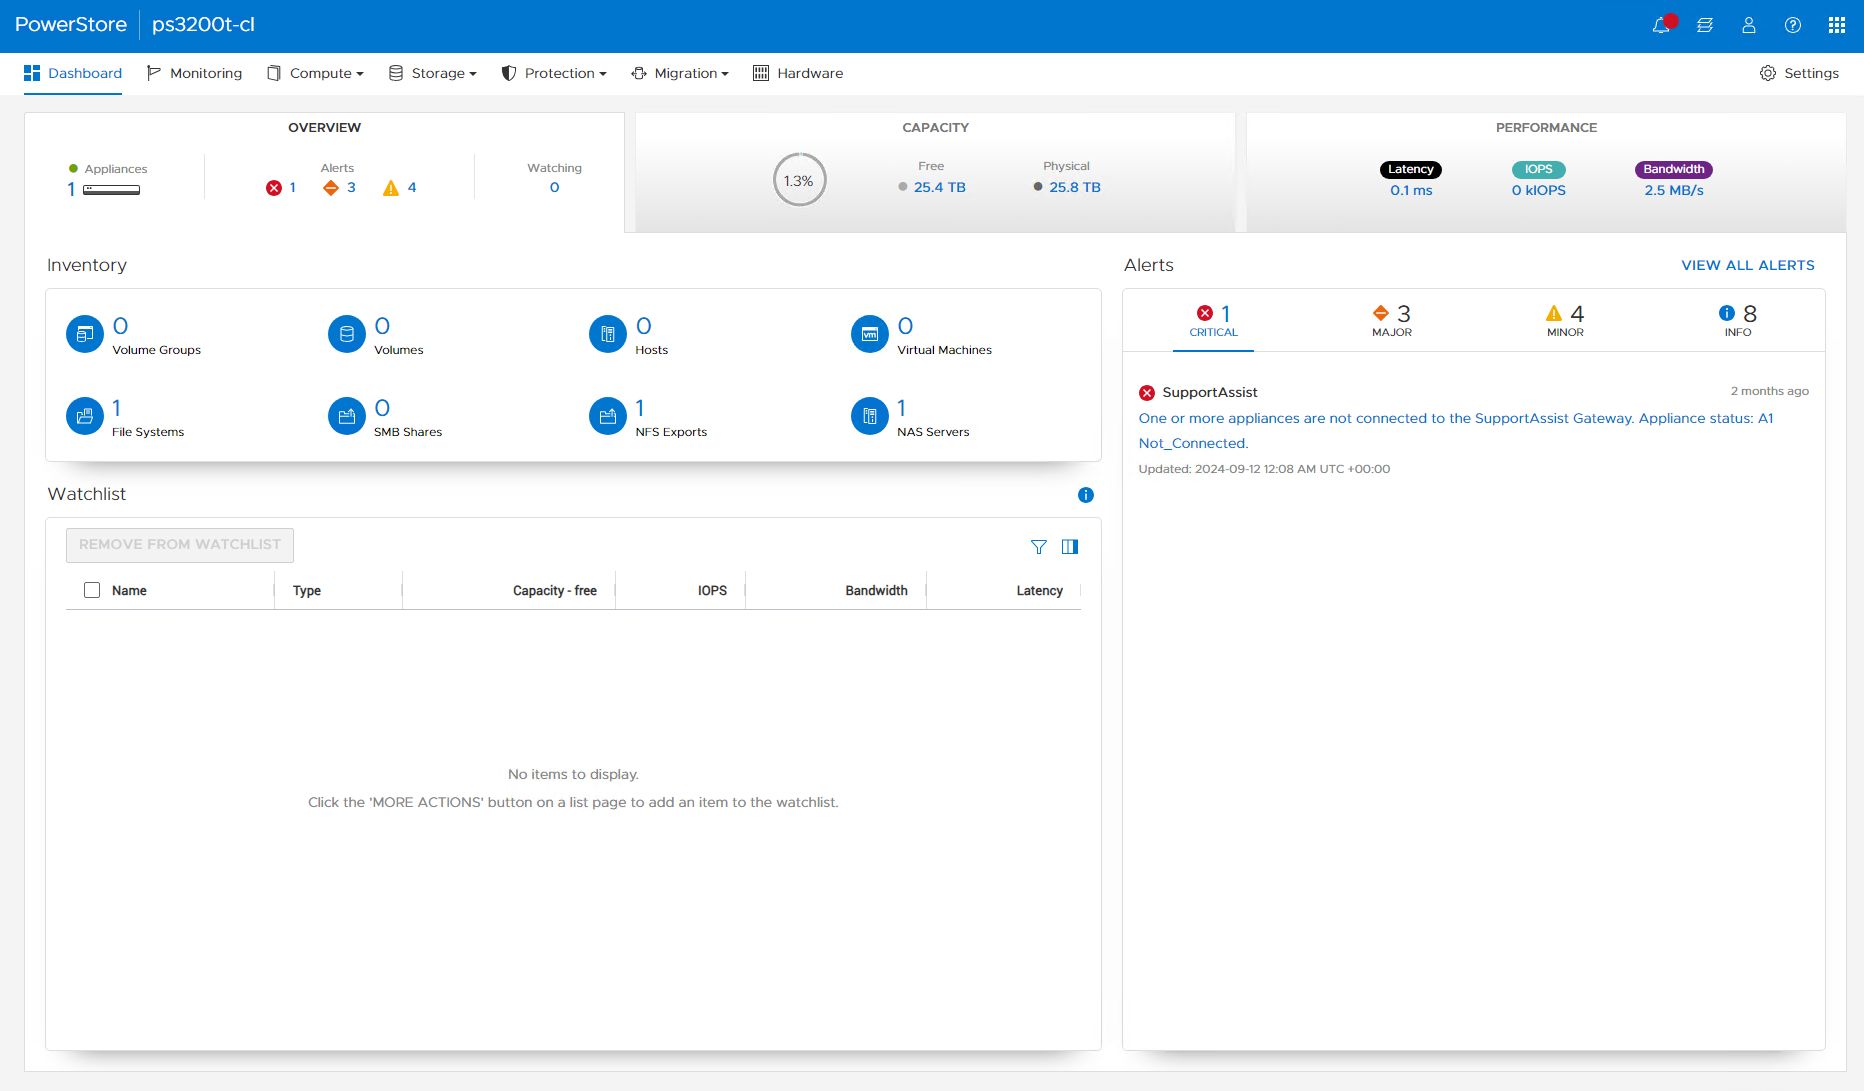
After clicking settings, click Network IPs under Networking in the left navigation pane. Then, click the blue +Create button.
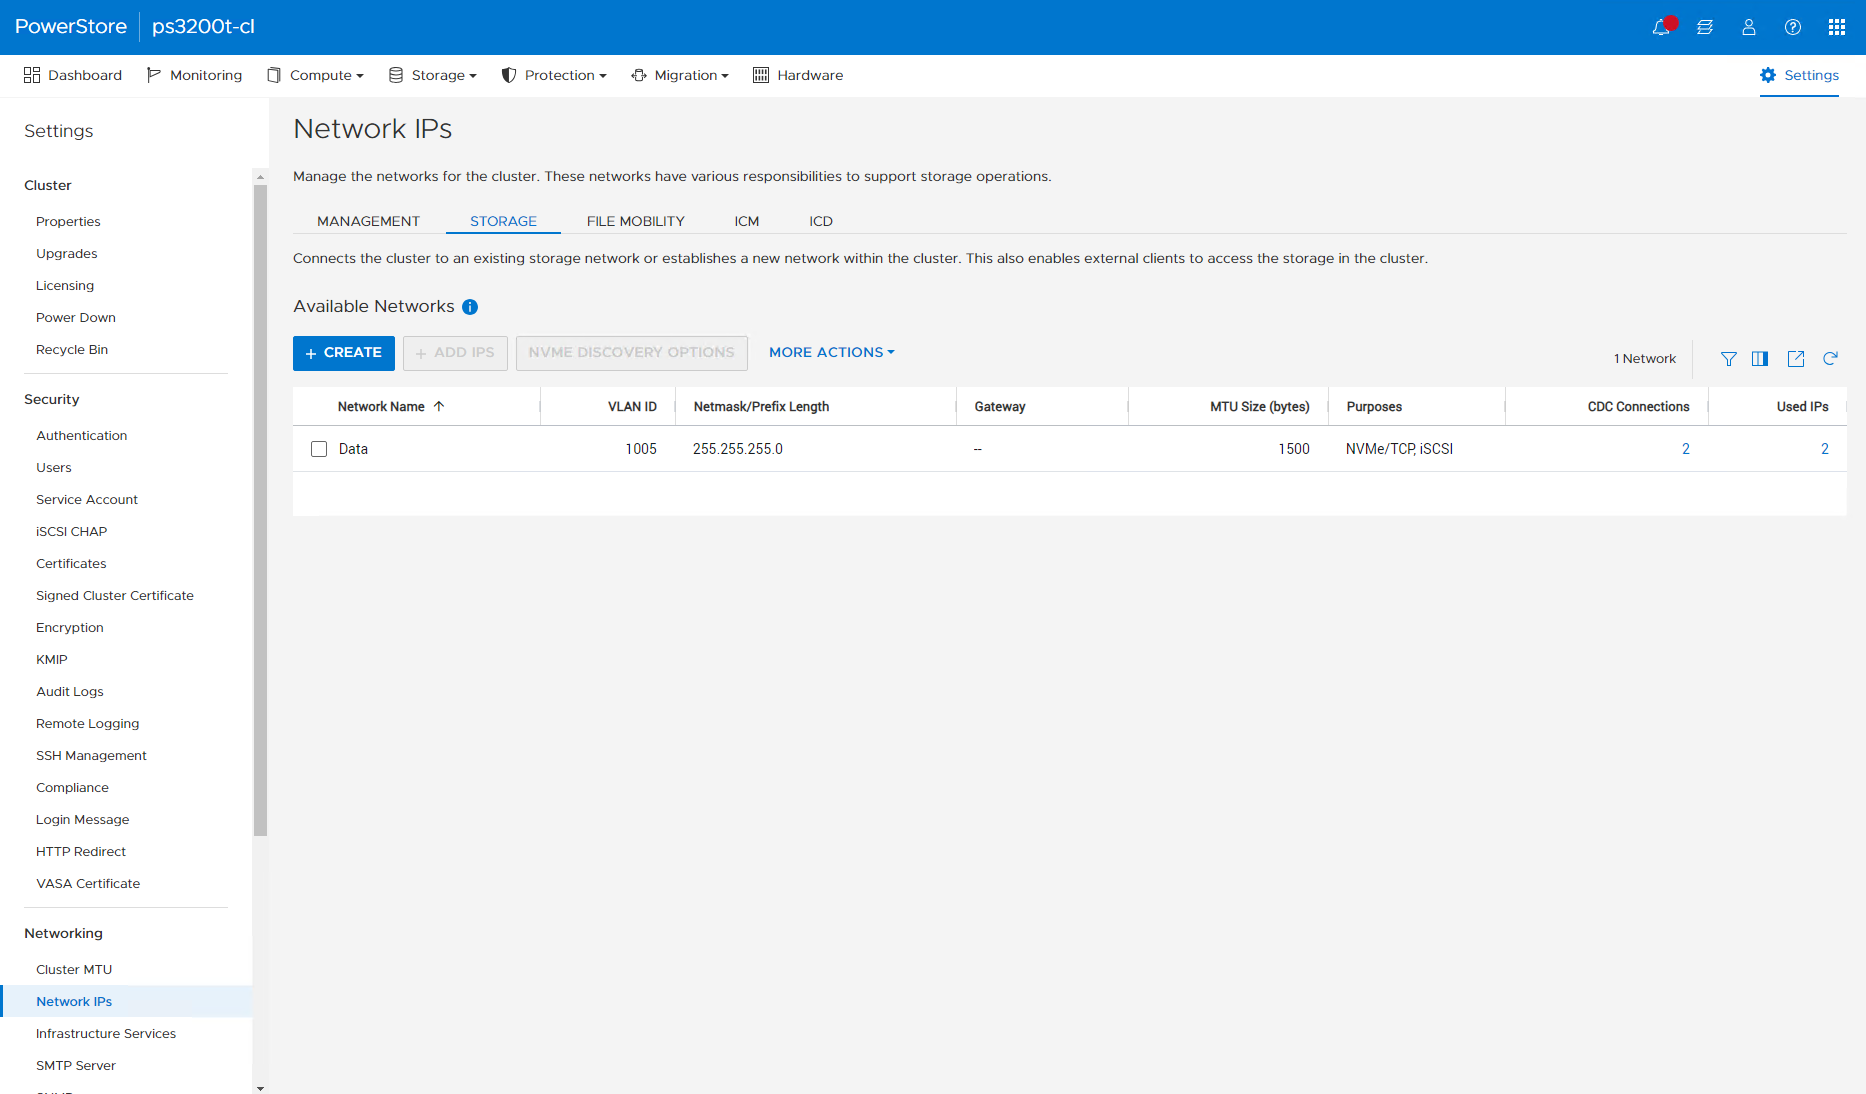
To create the storage network, enter the information required in the Create Storage Network wizard.
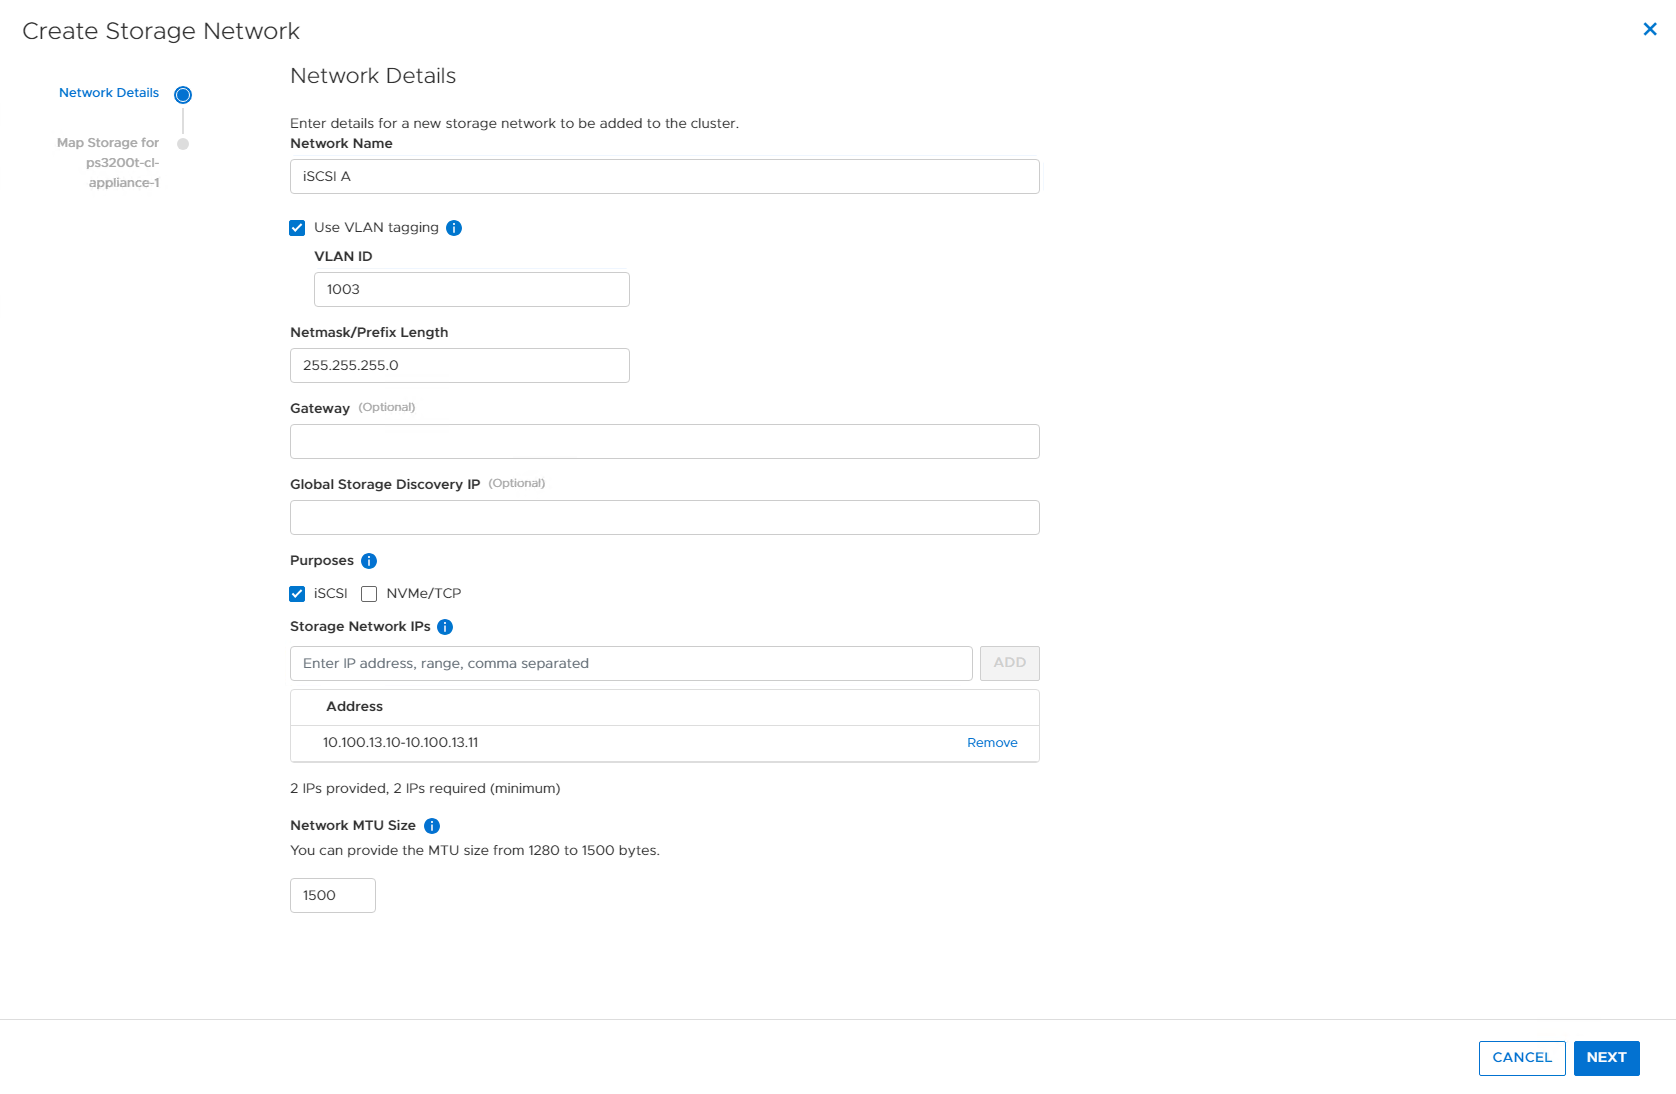
Be sure to click the checkbox next to Use VLAN Tagging, and enter the VLAN, in this case, 1003.
Enter the subnet mask. Optionally, you may enter a gateway and Global Storage Discovery IP. You can find more information in the PowerStore Storage Networks Guide.
Ensure the checkbox next to iSCSI is clicked.
Enter the IP addresses. Type the addresses in the Storage Network IPs box, and be sure to click the ADD button.
Then, click Next.
Now the storage networks need to be mapped to a network interface. Check the box next to bond0 to select it.
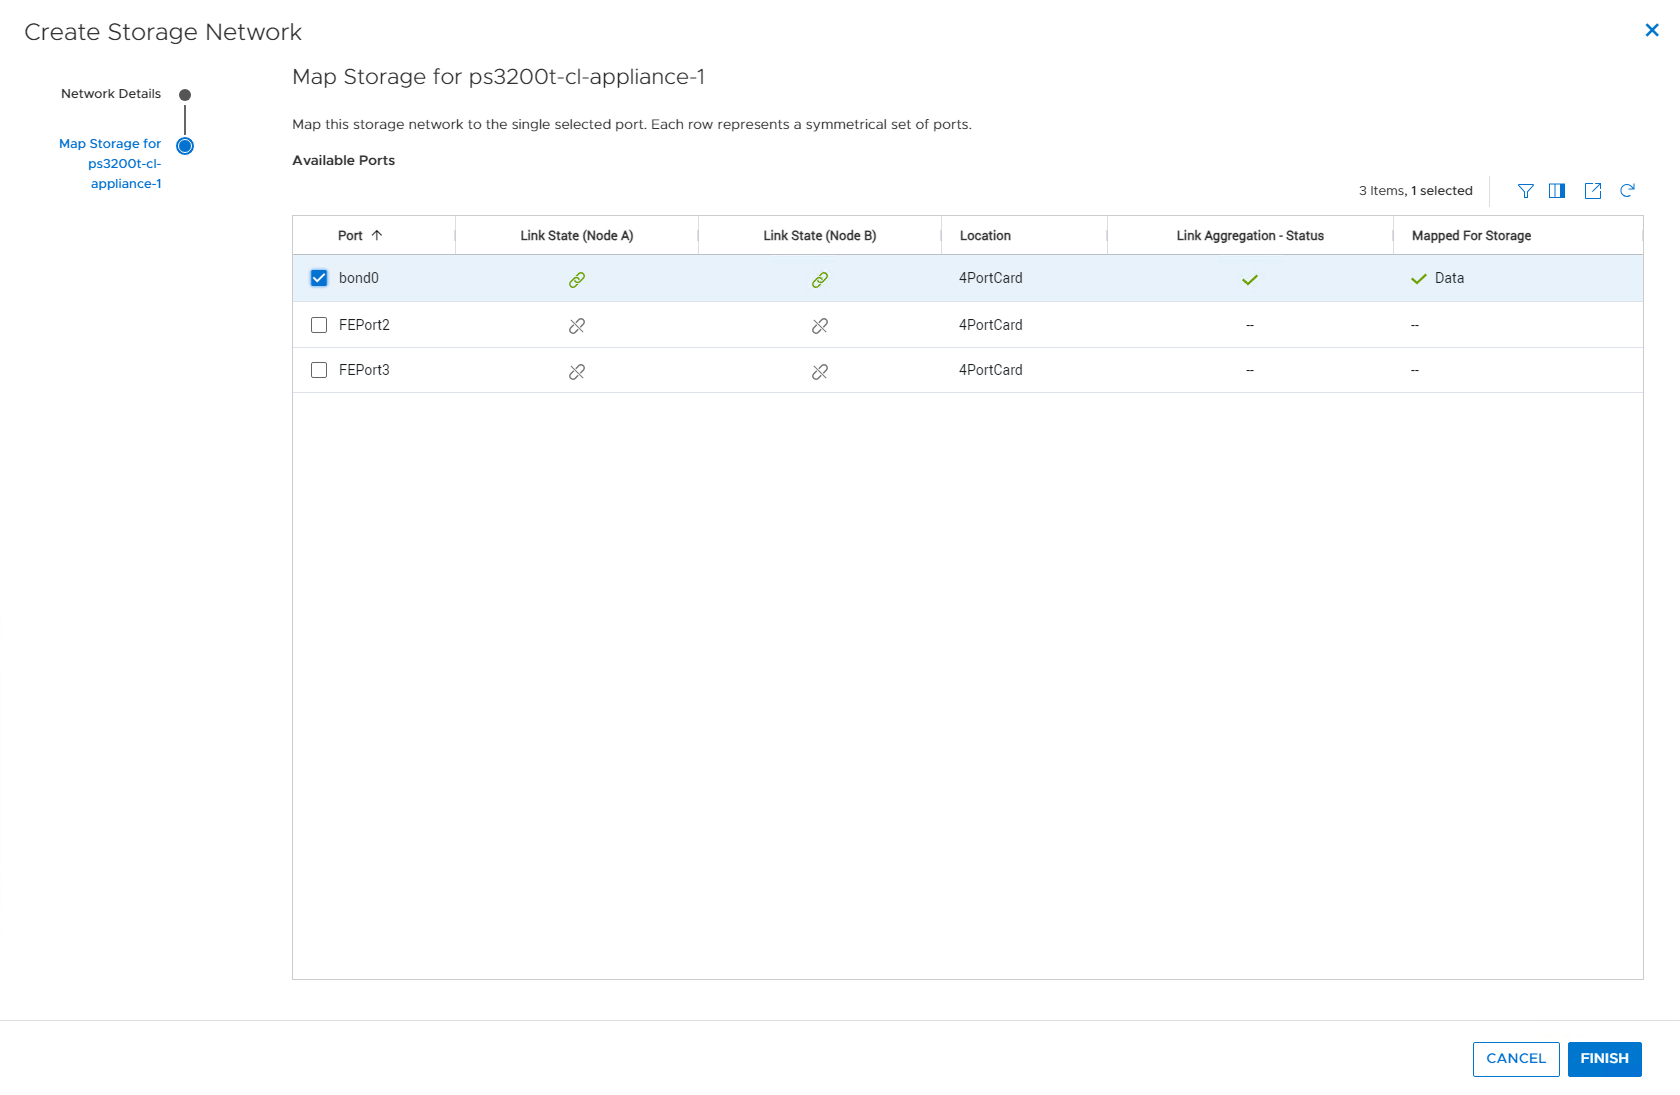
The storage network will be created.
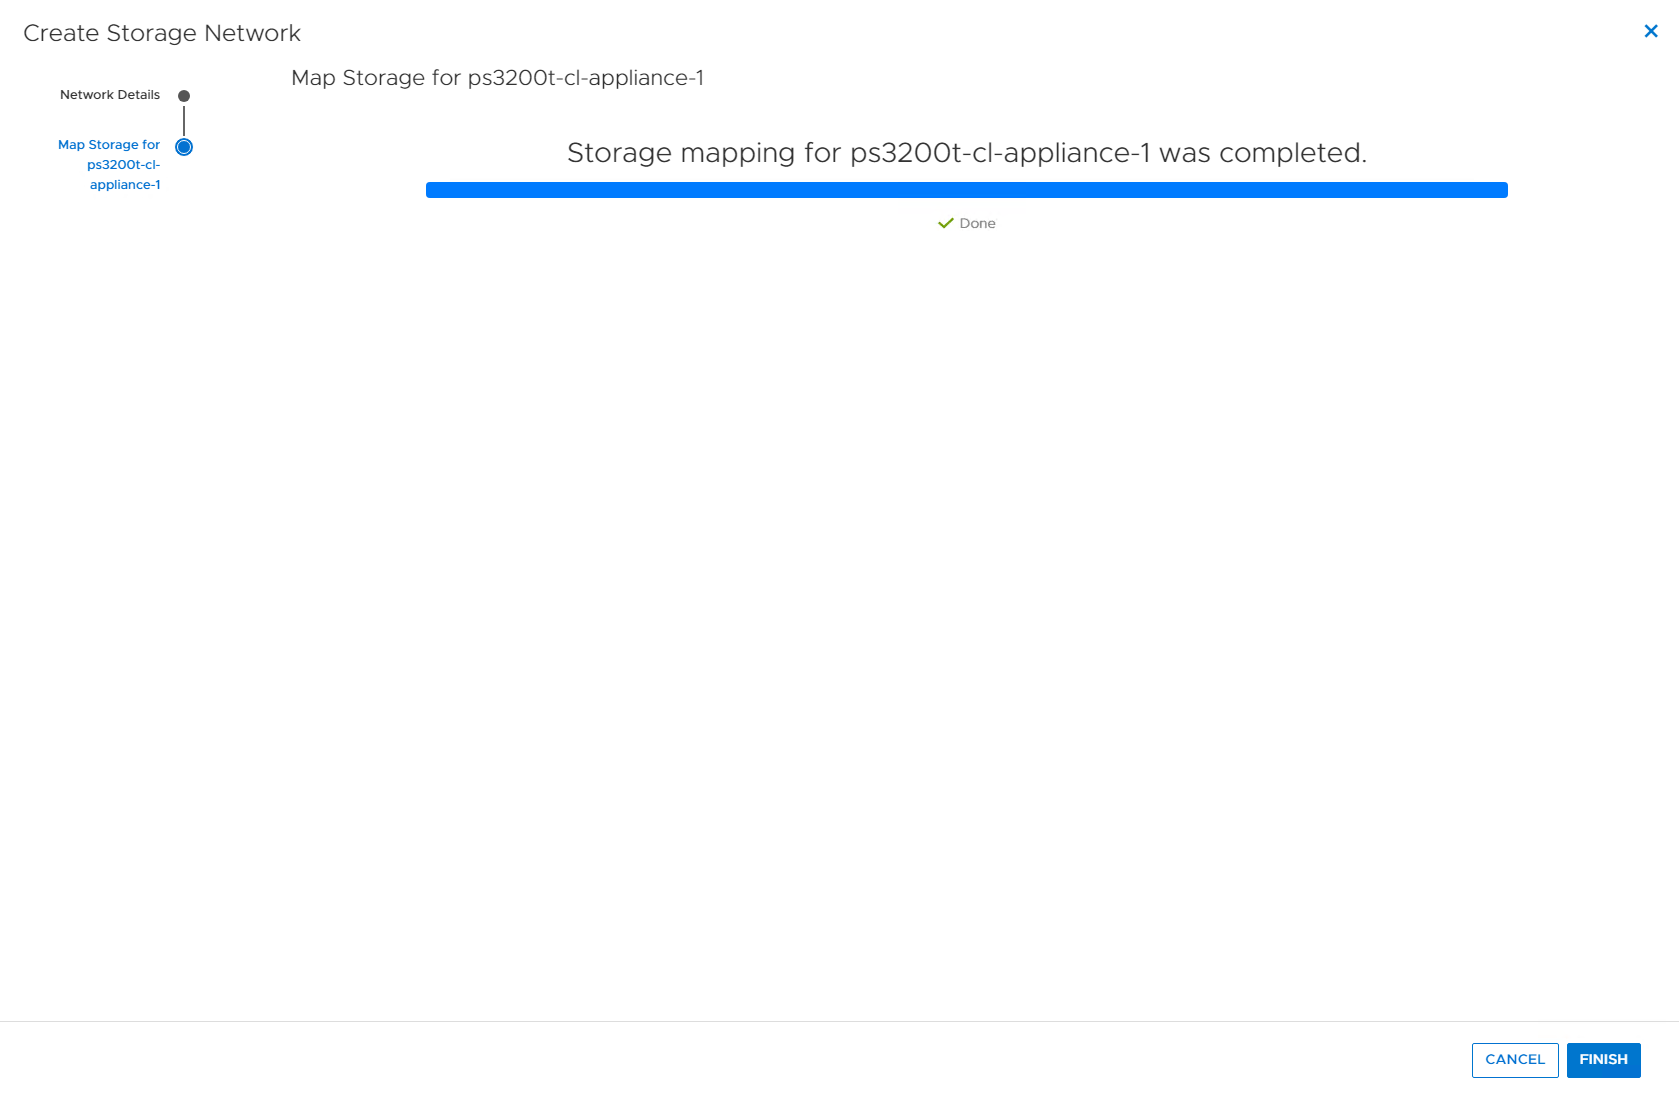
Repeat this process for a second time for the second VLAN, in this case, 1004. Once again, you will connec the storage network to the bond0 interface.
For more information, please reference the Dell PowerStore Networking Guide for Storage Services.
Create Hosts and/or Host Groups
Adding Hosts and/or Host Groups to the Dell PowerStore appliance is required to access storage resources. You may add individual hosts, and also create host groups.
Host groups are helpful if you plan on performing volume level operations across all the hosts in a group. For example, a virtualization cluster where you would like all hosts to have access to the same volumes. Host groups are optional. To learn more about host groups, please see Add a host group in the DellPowerStore Configuring Volumes guide.
To add hosts to the PowerStore Appliance, you will need their iSCSI Qualified Name also known as the IQN.
Finding the IQN for Windows Hosts
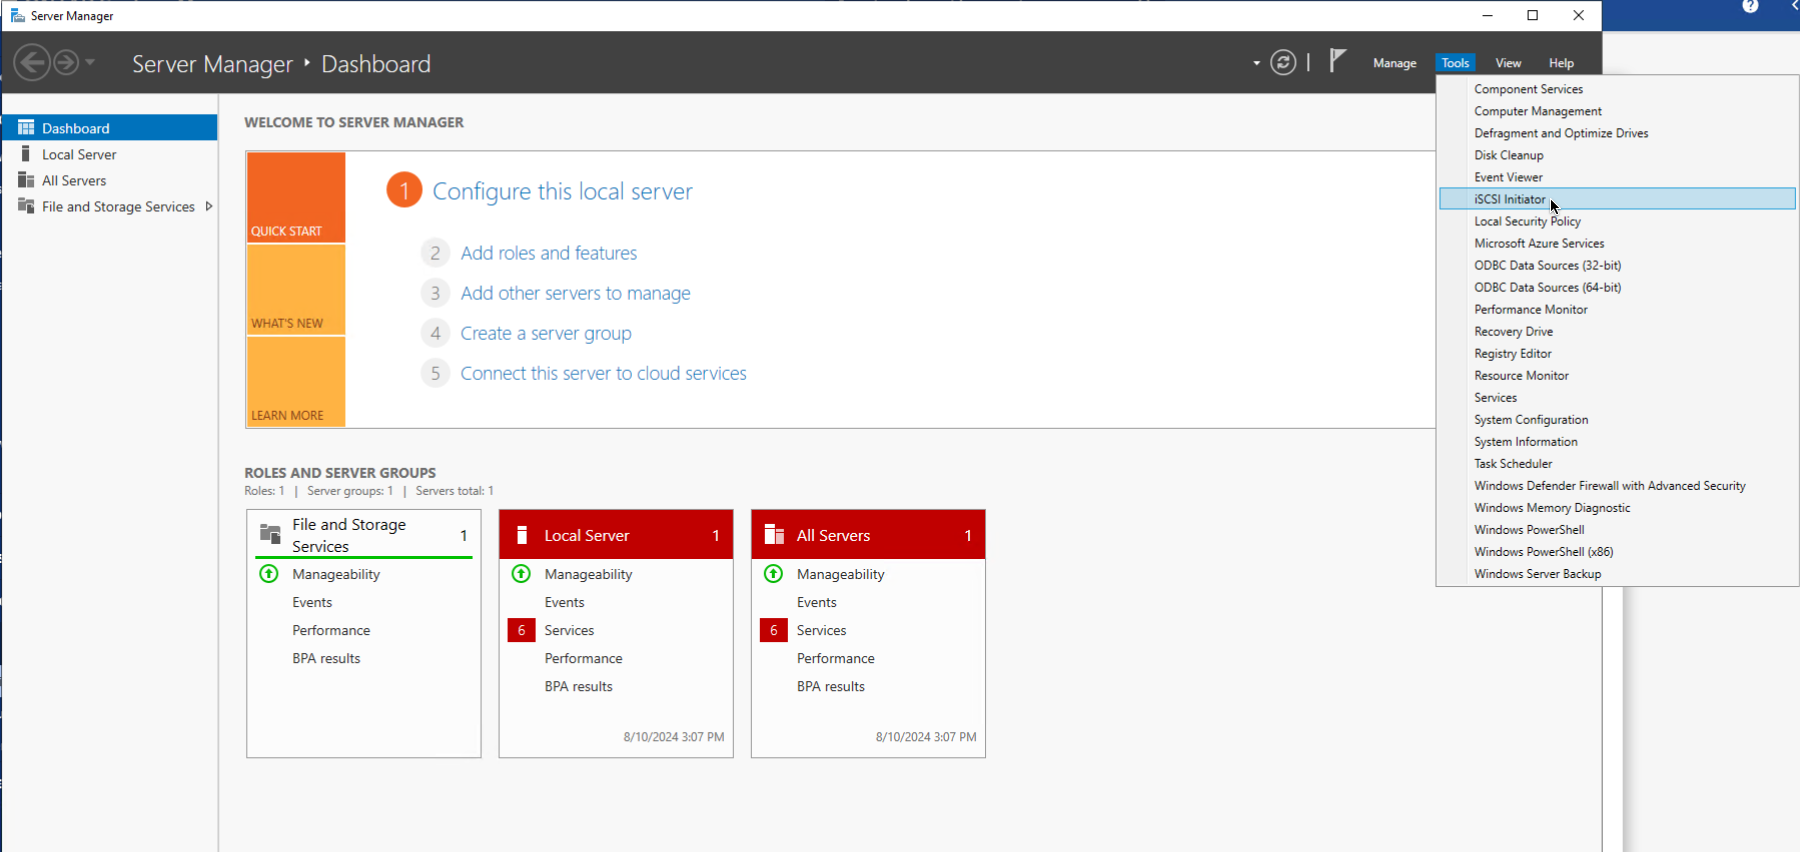
One common way to find the iSCSI initiator name is to use Sever Manager. Click Tools, and select iSCSI initiator from the dropdown menu.
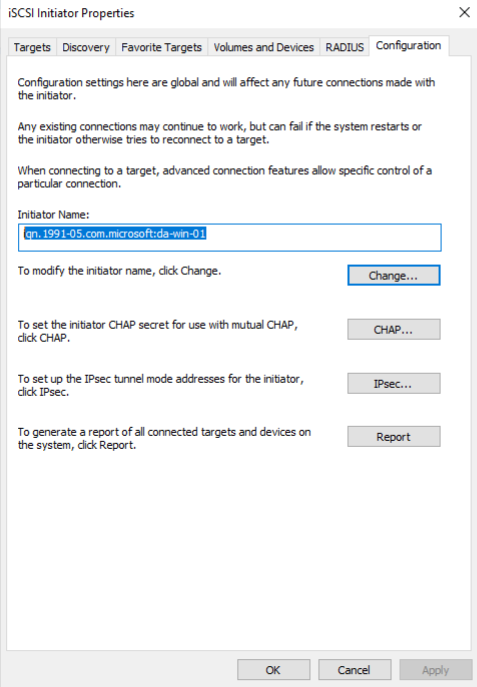
Click on the configuration tab, and copy the Initiator Name:
Finding the IQN for Linux Hosts
Please note, this step should be done after configuring the network interfaces.
If you have not already, iSCSI service with the following command:
systemctl restart iscsid
Now you will be able to see the initiator name. To find the initiator name, use the following command:
cat /etc/iscsi/initiatorname.iscsi

Host Configuration for the Dell Storage
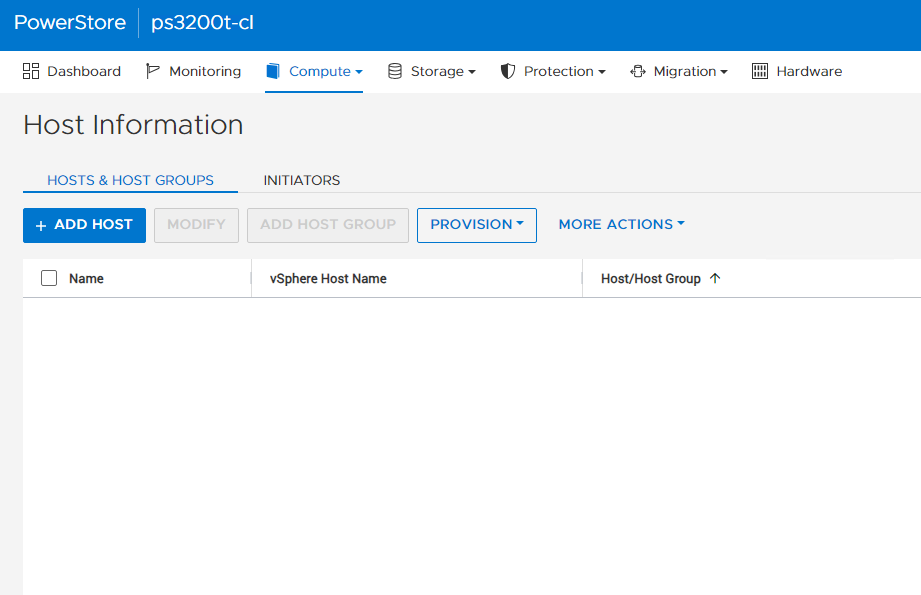
Click Compute, and select Host Information from the drop down menu.
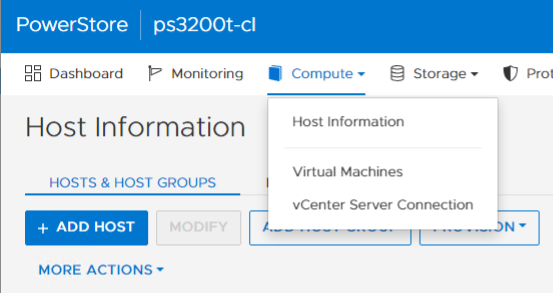
Now that you are in the Host Information menu, you can add hosts, then a host group if desired. Click the Blue + ADD HOST button to begin.
Enter the details for the host. Enter a name for the host, and select the operating system. Optionally, you may also add a description.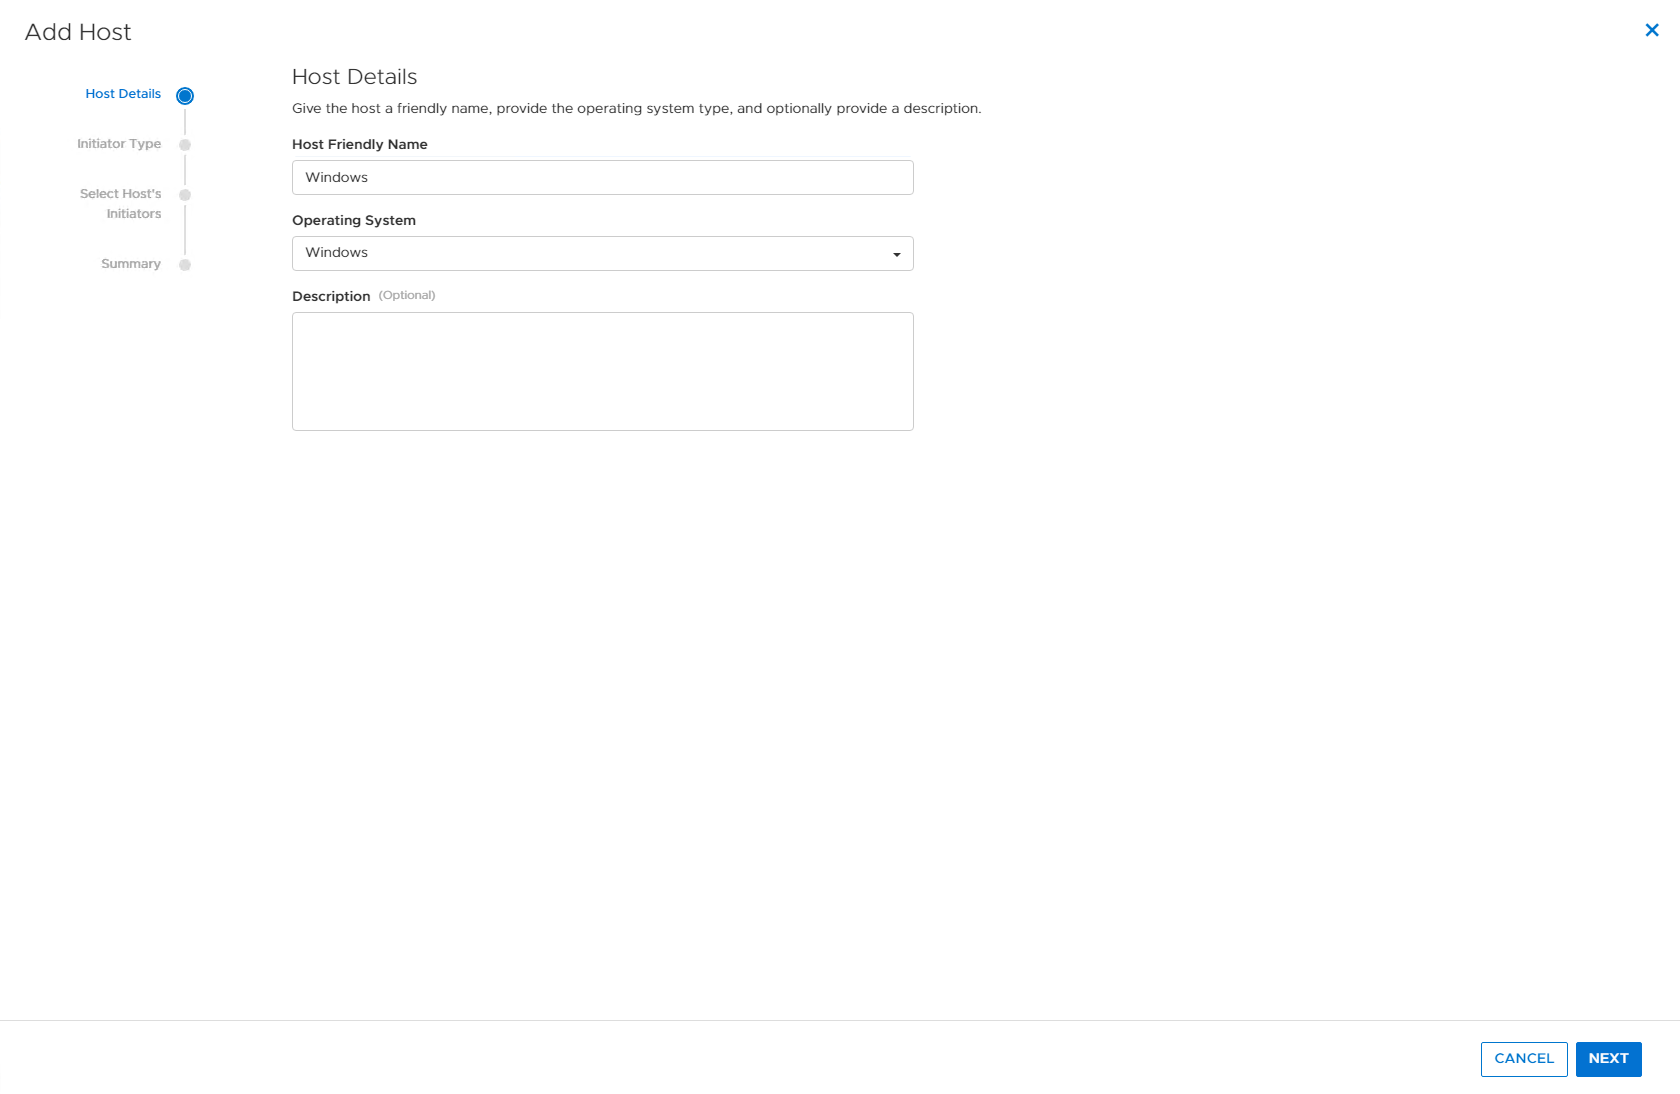
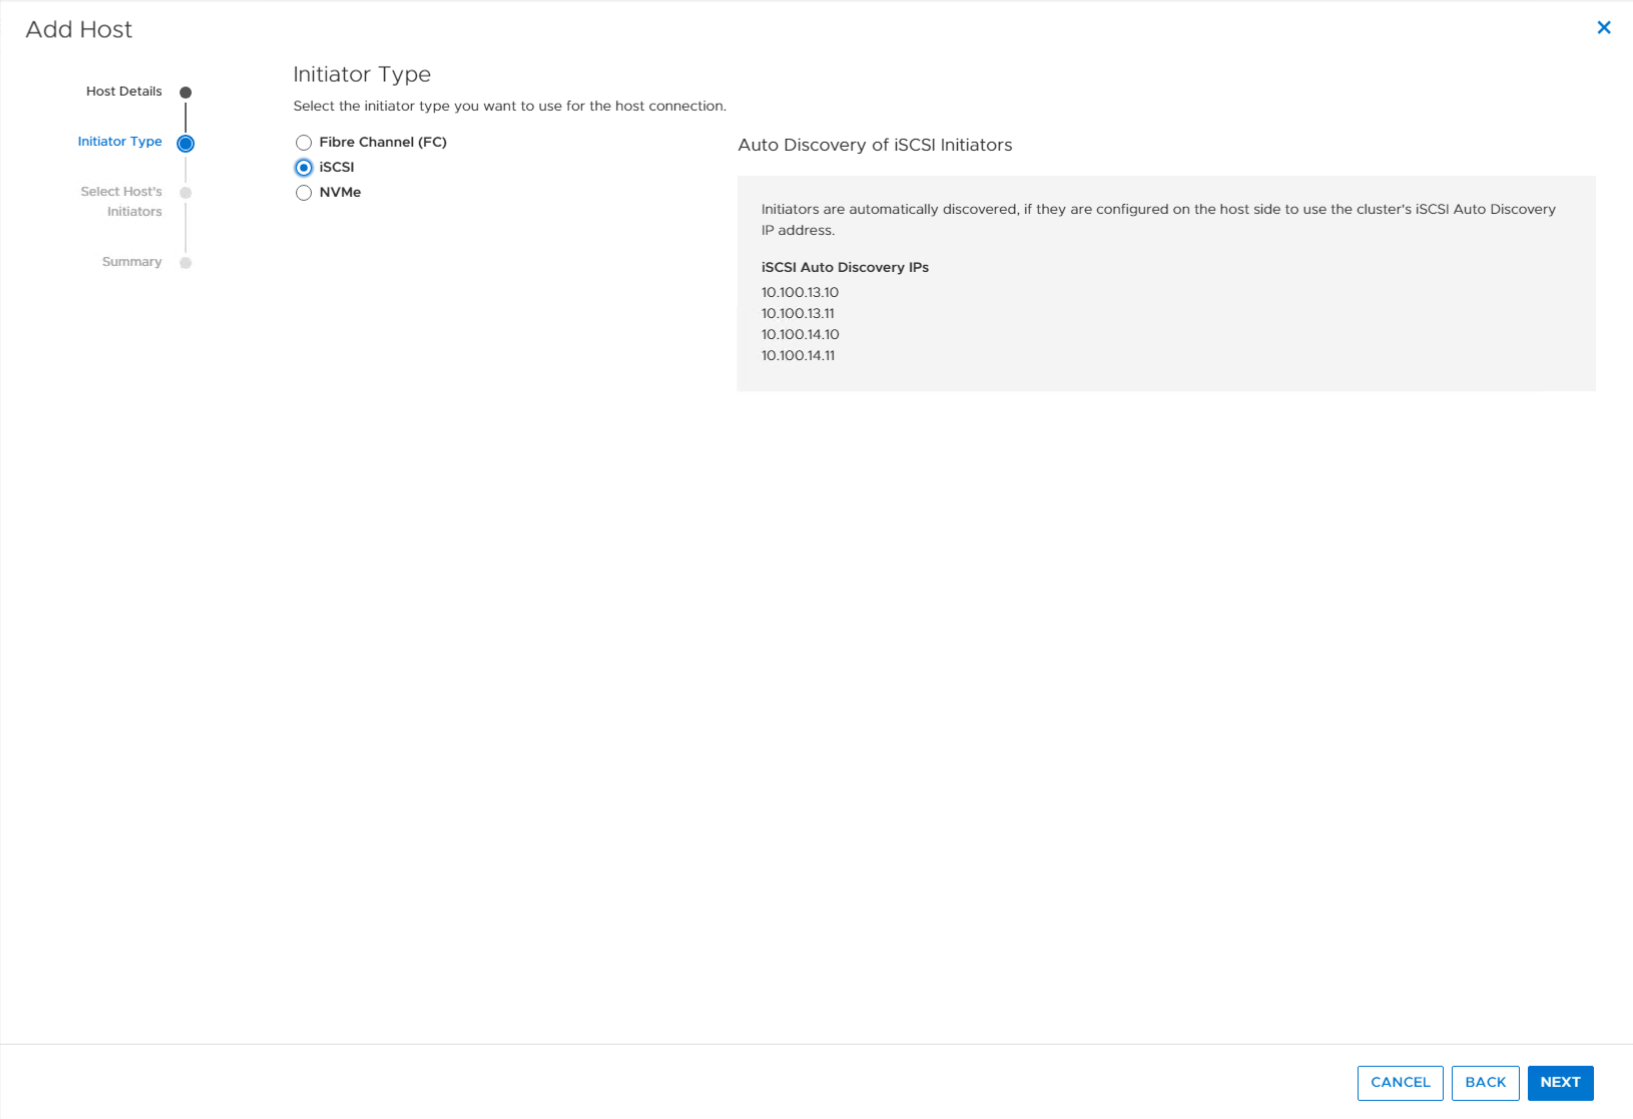
Select iSCSI as the initiator type. The IPs you see listed in this step of the wizard are the IP addresses you have previously configured for iSCSI.
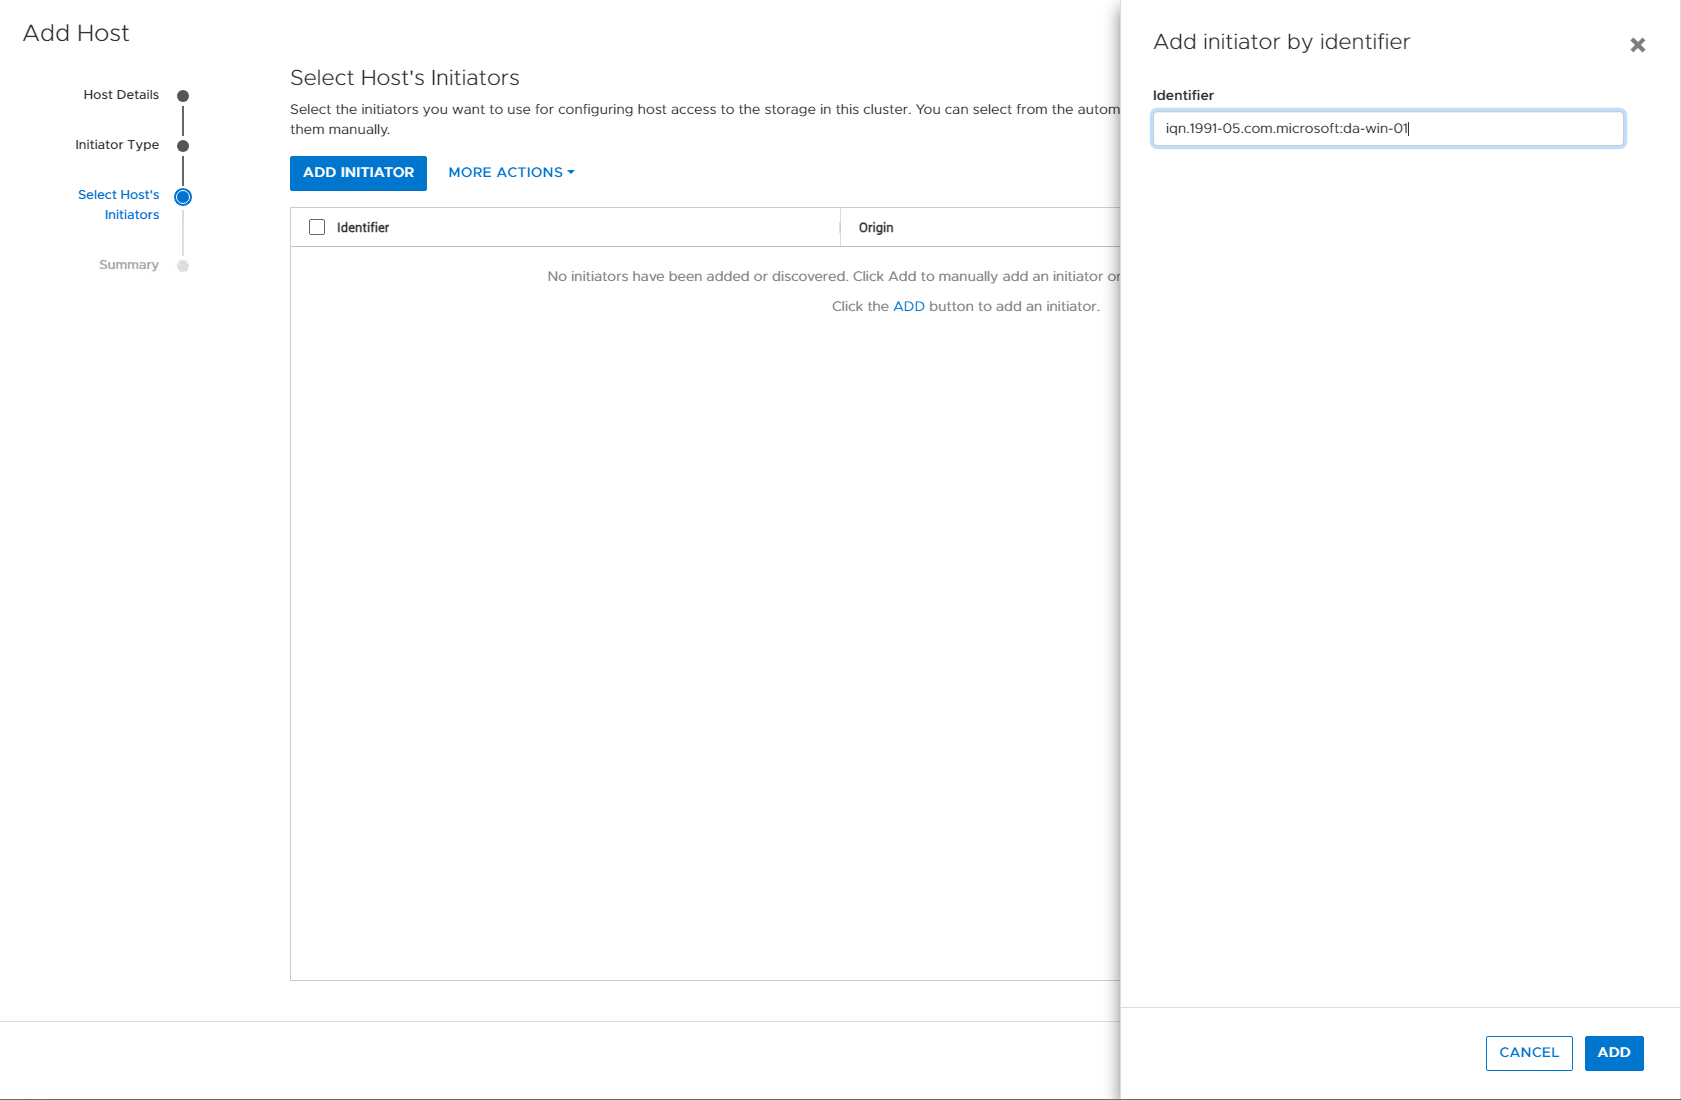
Click the blue ADD INITIATOR button, and enter the IQN of the host. Click ADD to add the host.
Now that the initiator has been added, you will see it listed. Click NEXT.
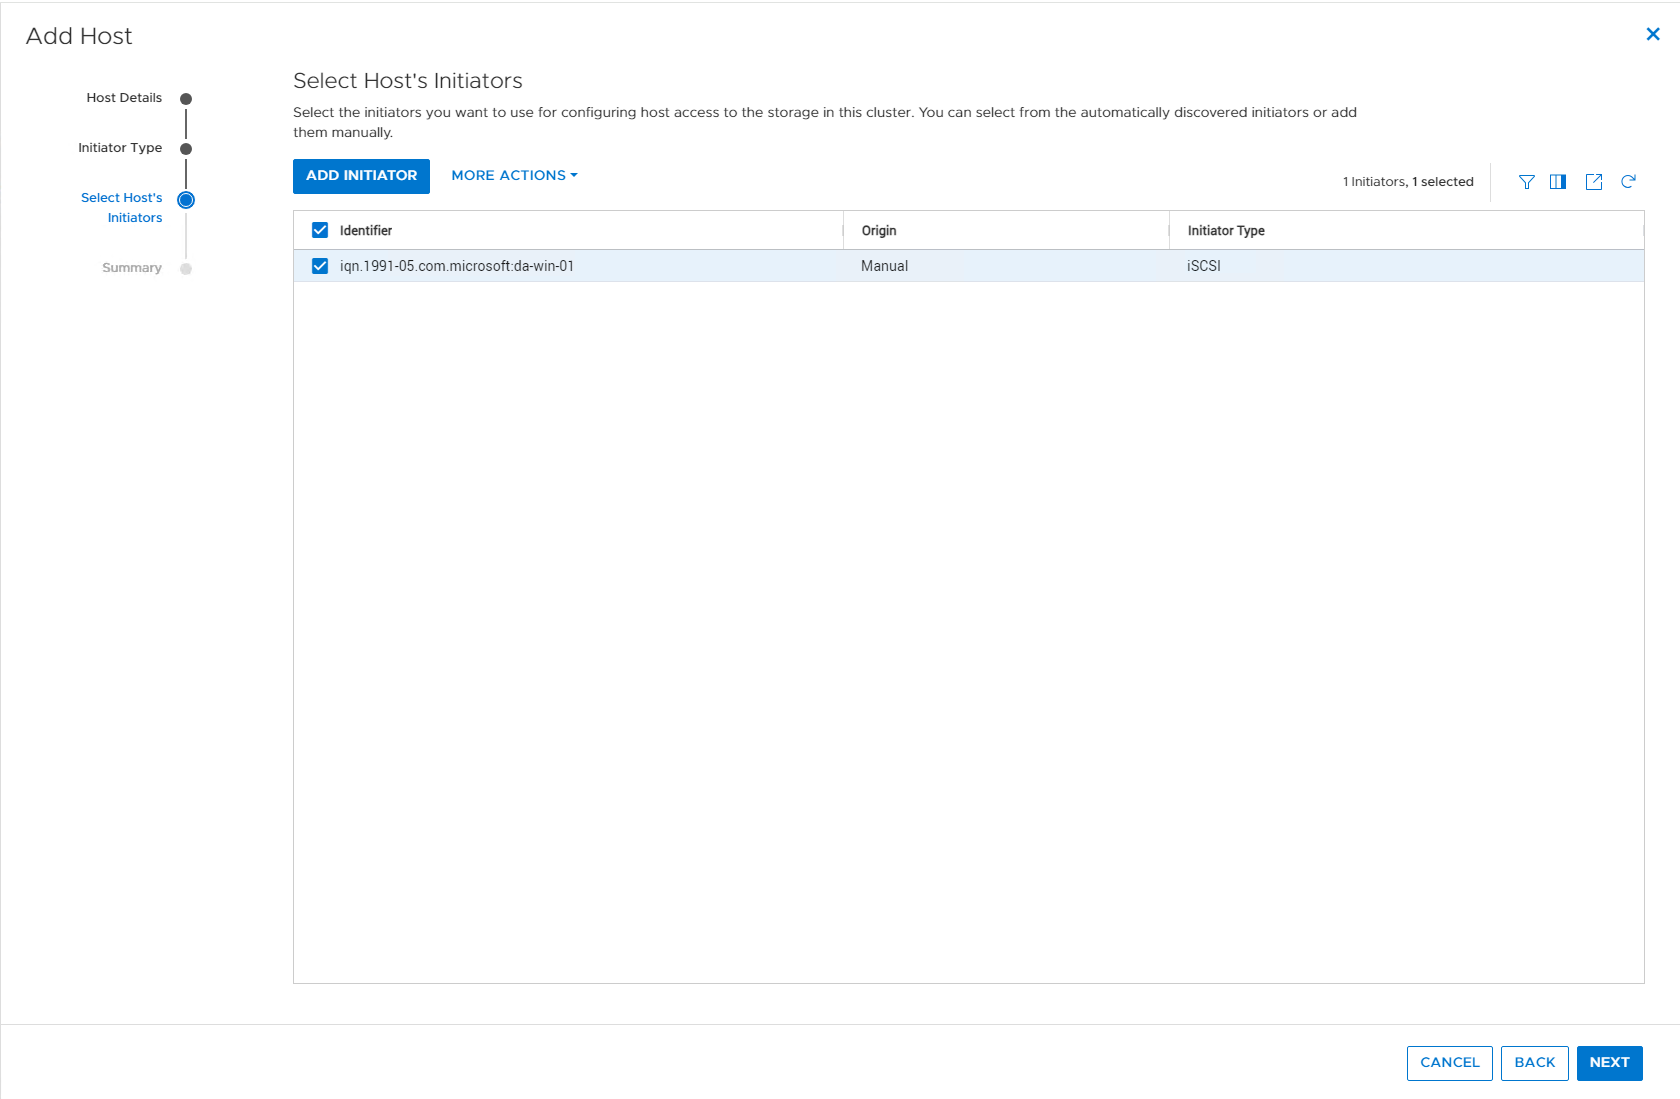
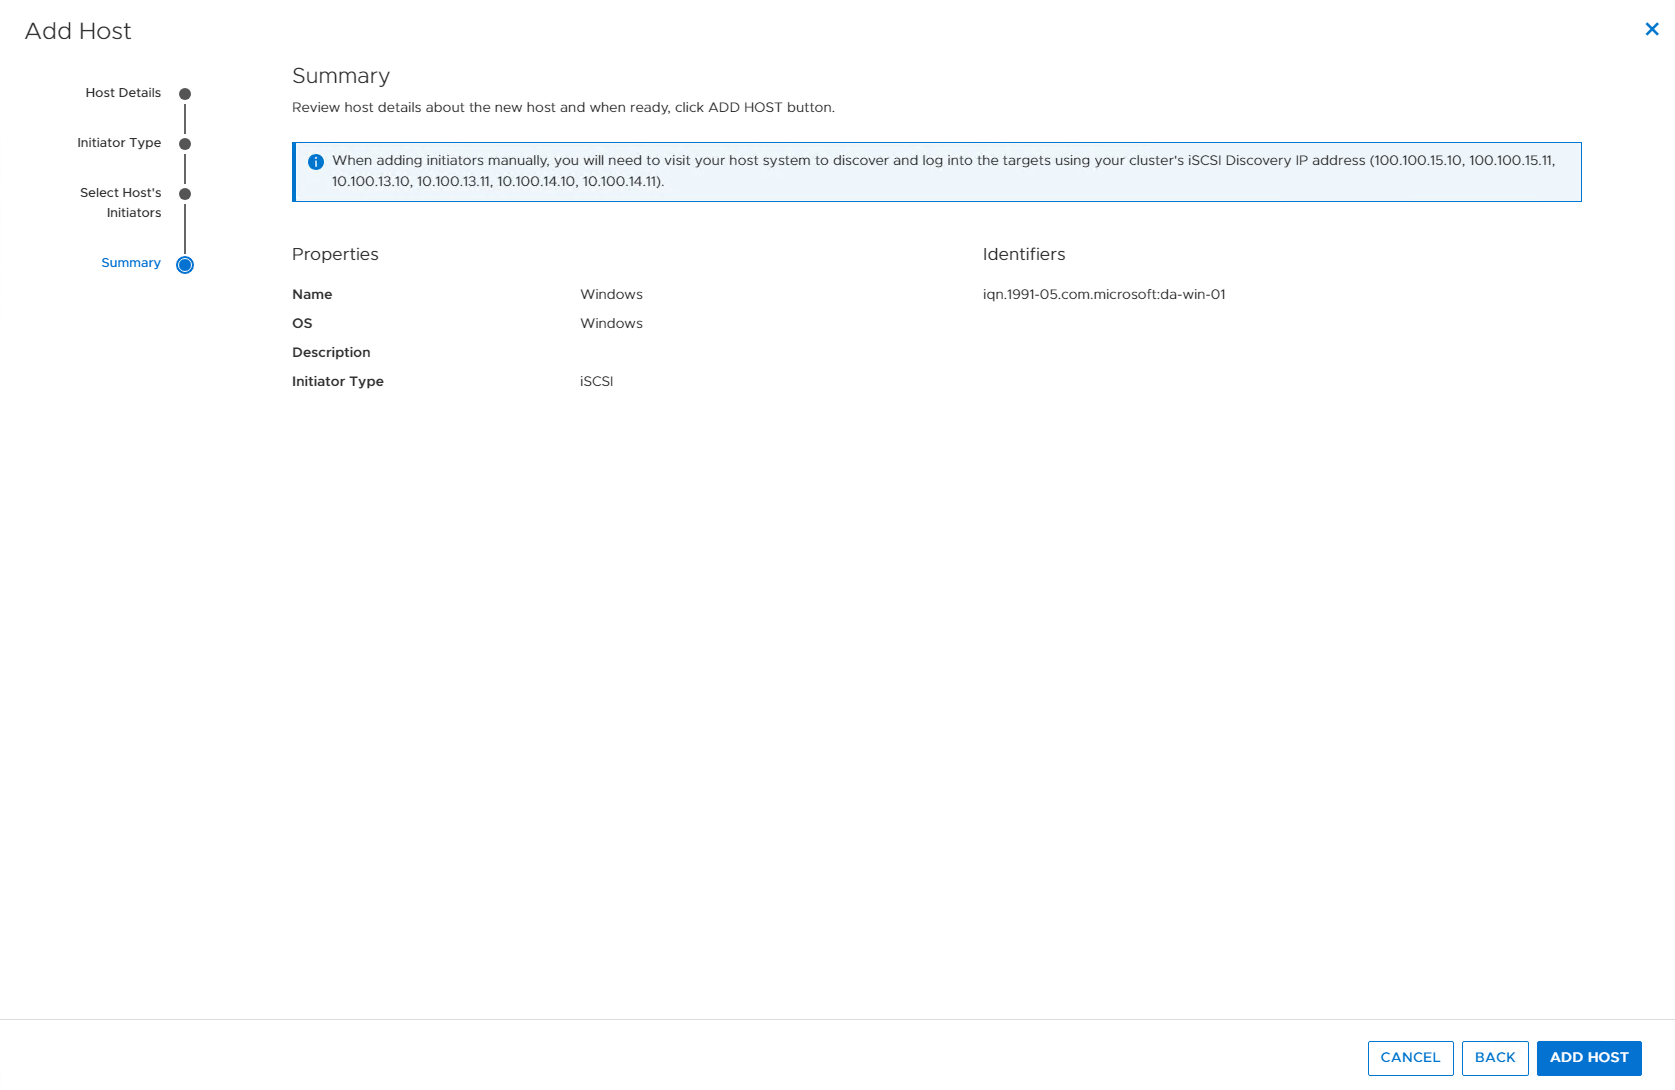
At the summary screen you will see the summary of the information you have entered, including the host name, initiator type, and IQN. Click the blue ADD HOST button.
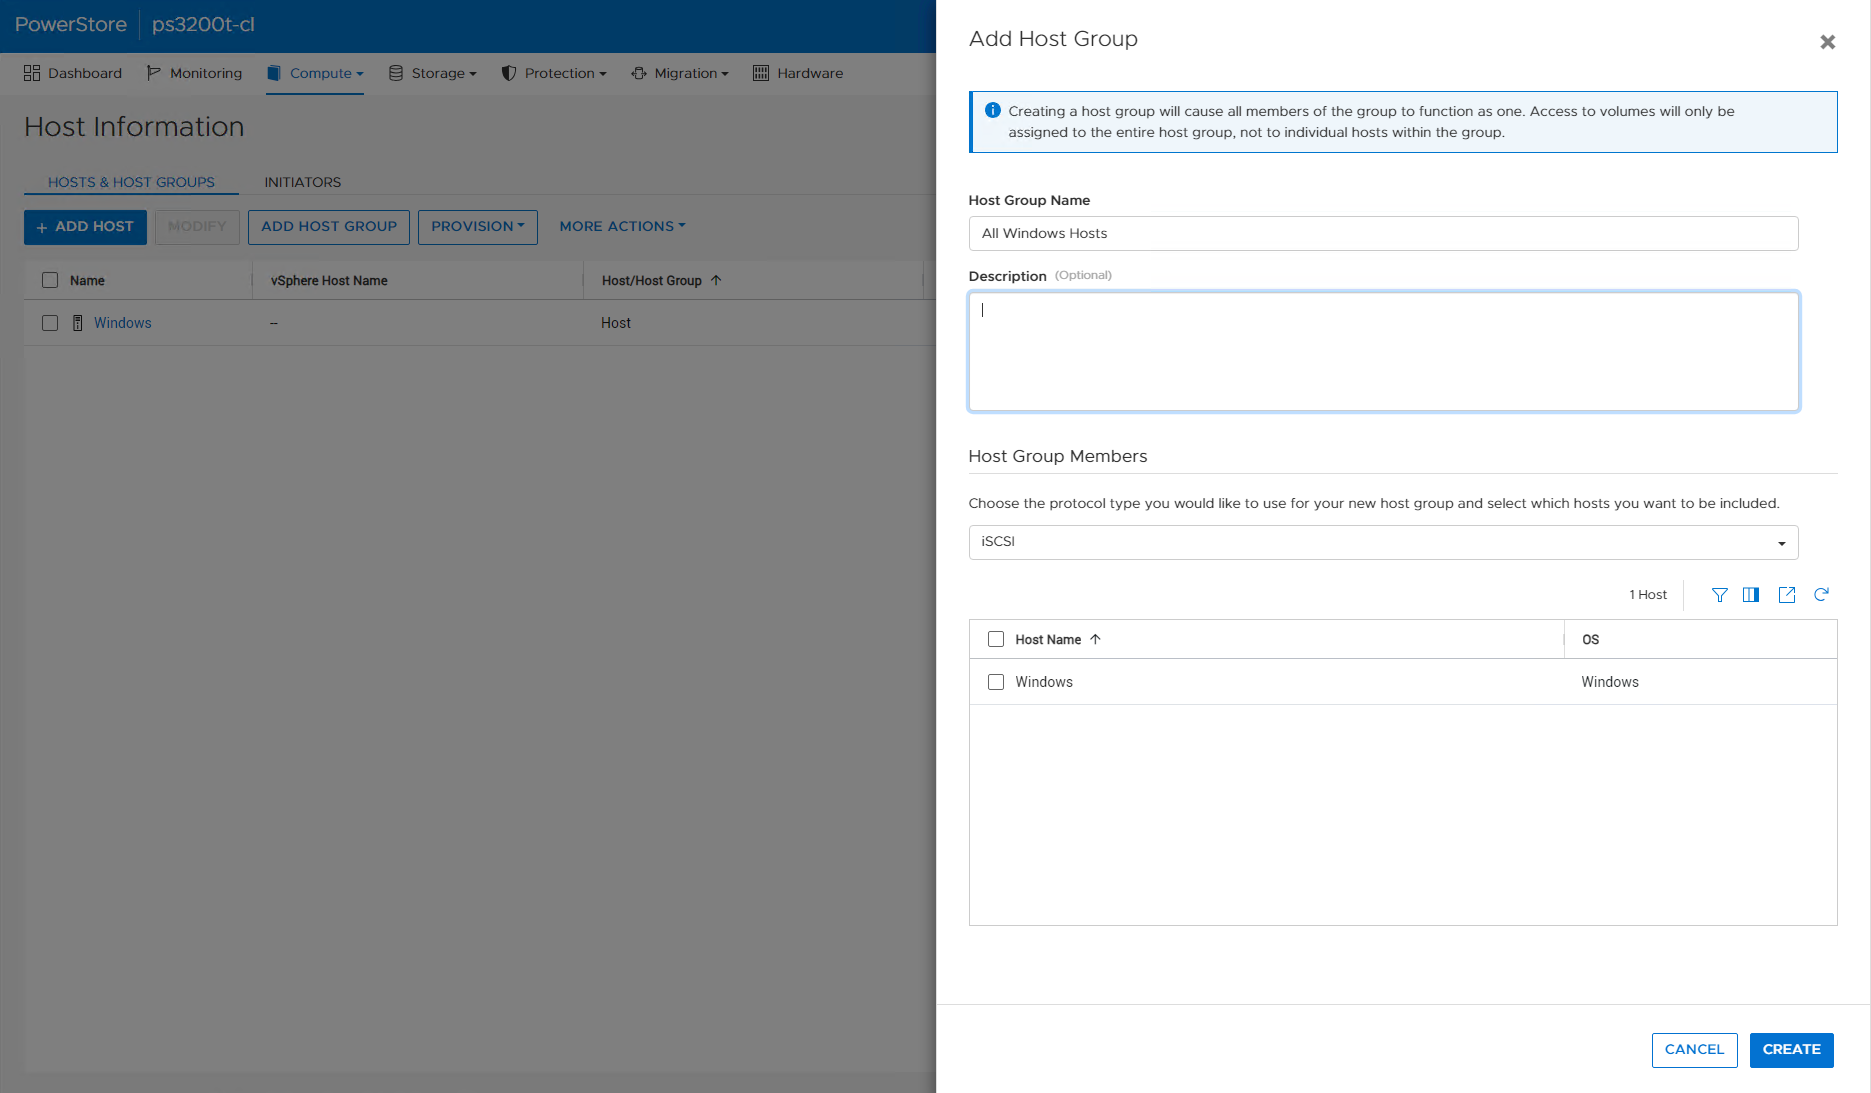
Optionally, you may also add a Host Group to group hosts together. Once you have added hosts, the ADD HOST GROUP button will be available in the Host Information pane. Click the button, and you may enter a Host Group Name, a description, and select the hosts you have previously entered.
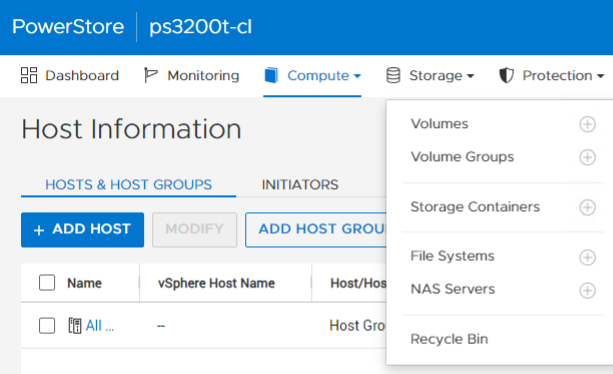
Once you have entered a host group, you will see the host group in the Host Information pane.

For more information, please see Hosts and host group configurations in the Dell PowerStore documentaiton.
Creating a Volume and Volume Group
After hosts have been entered, a volume can then be created. Volume groups can also be created, which logically group volumes together, such as for a specific application.
To begin, click Storage in the top menu, and select Volumes from the drop down menu.
Click + CREATE in the Volumes pane.
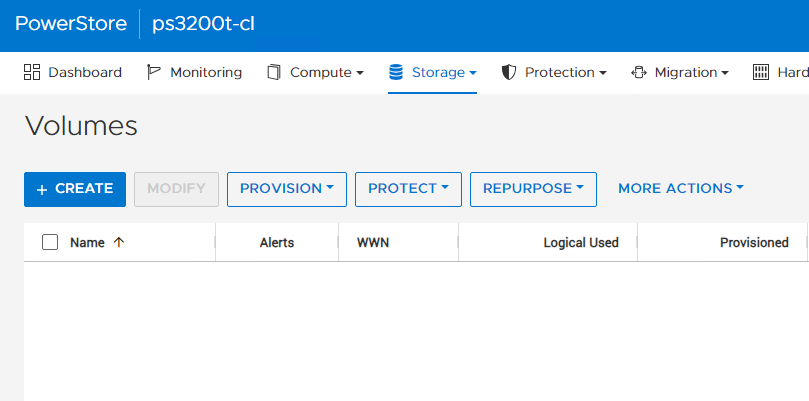
Enter the required information for the volume.
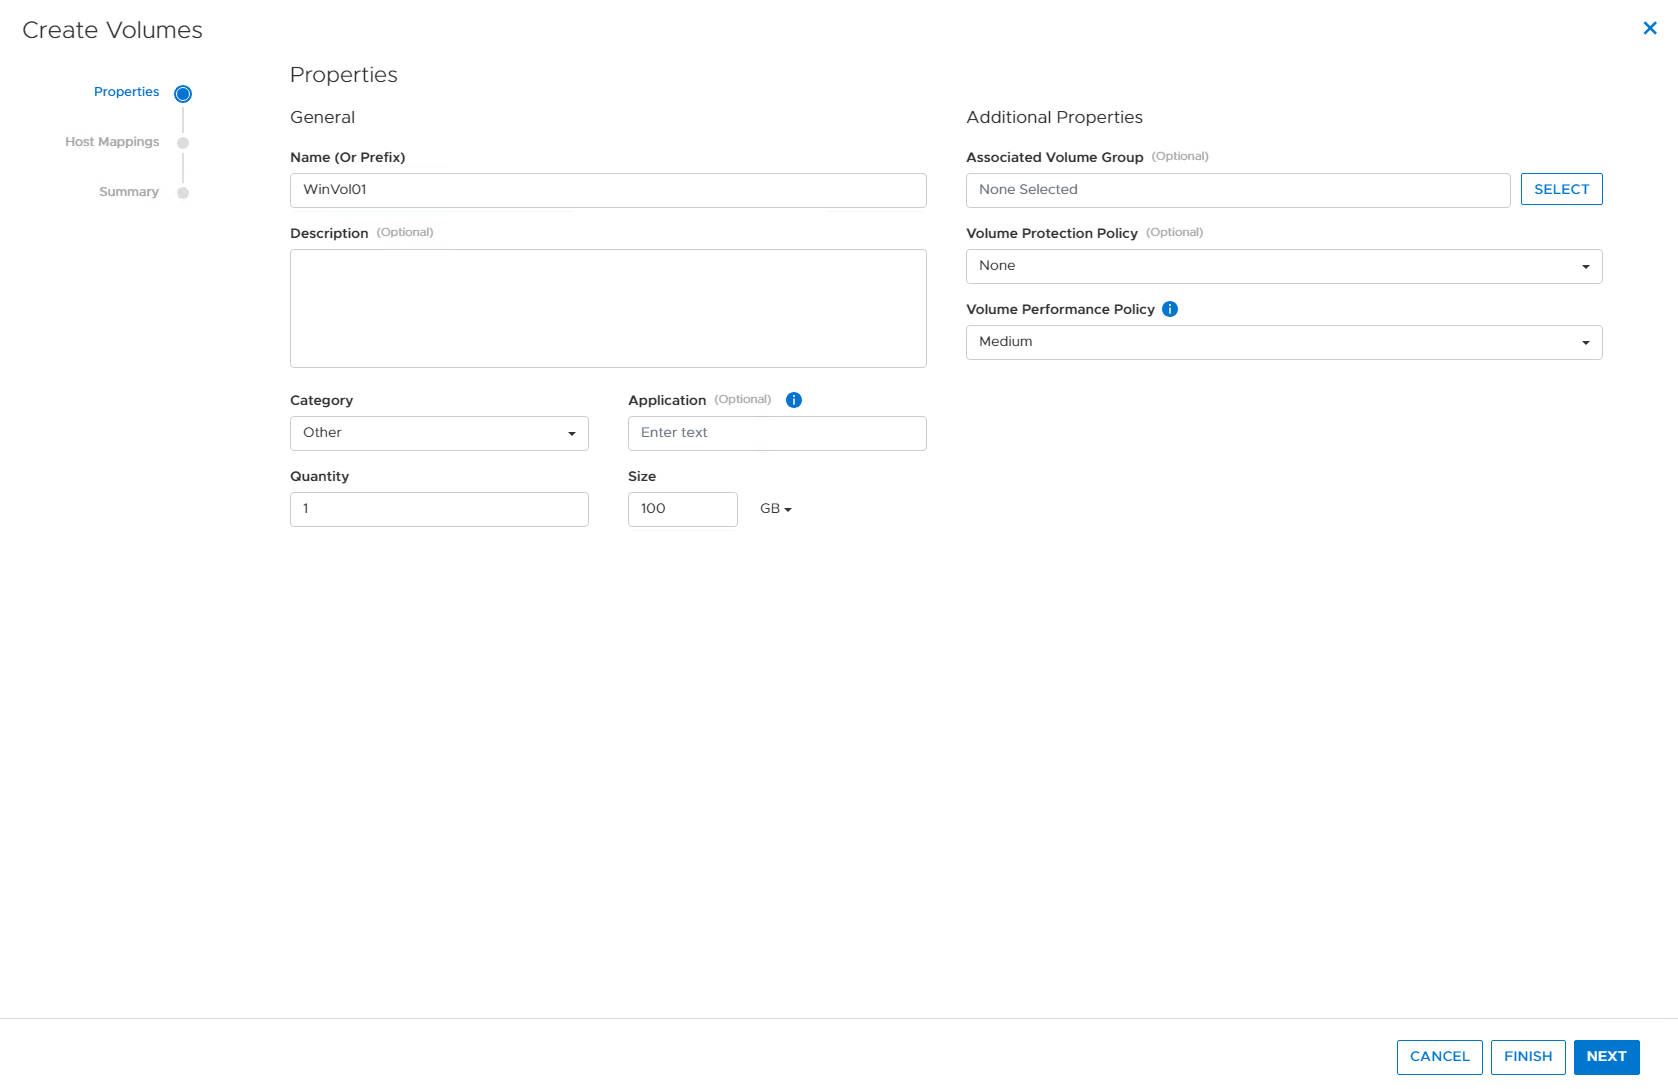
Start with giving your volume a name or prefix, the prefix is used if you are creating multiple volumes at the same time.
You may enter a description for the volume.
Select a category for your volume, the categories are Relational Databases, Big Data & Analytics, Business Applications, Healthcare, Virtualization, and Other. If nothing fits your use case, simply select others. This is for categorization purposes and has no impact on the function of the volume. Based on the Category you select, you will see a list of common applications in the Application field. Select one that fits your use case, or simply leave it blank if you have selected Other. Click Next.
If you have created a volume group, you may associate the volume with it in this screen.
You may also select a Volume Protection Policy if you have created one.
The Volume Performance Policy has the option of High, Medium, or Low and is set to Medium by default. This is a share based system to help determine the performance of the volume. Select the appropriate value for your use case. For more information on Volume Performance Policies as well as the volume creation process, please see the Dell PowerStore Configuring Volumes documentation. Click Next when you have finished.
The next step in the process is to perform the Host Mappings. Select the Hosts or Host Groups you have previously configured. You may also set the Logical Unit Number or LUN identifier to Generate Automatically which is the default, or to provide a specific LUN number. Click Next
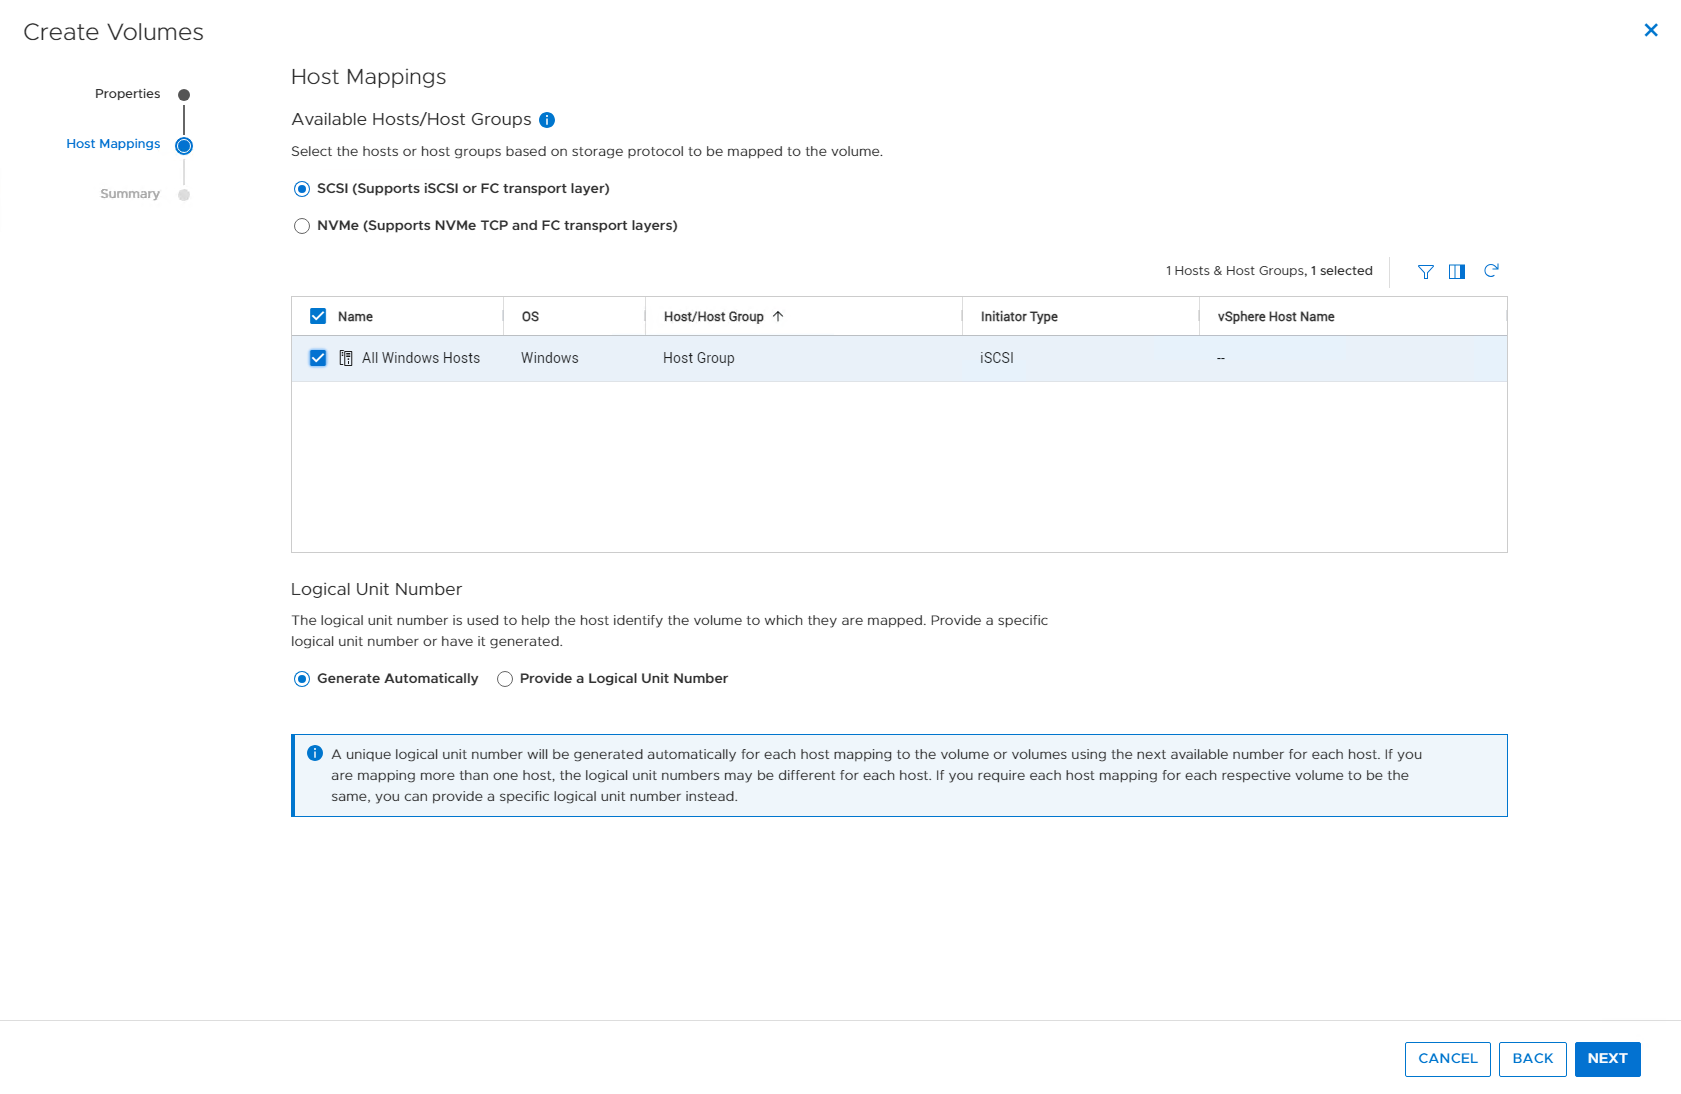
NOTE: If you are using the Dell PowerStore cluster for the first time, and performing the initial configuration you may see the following message.
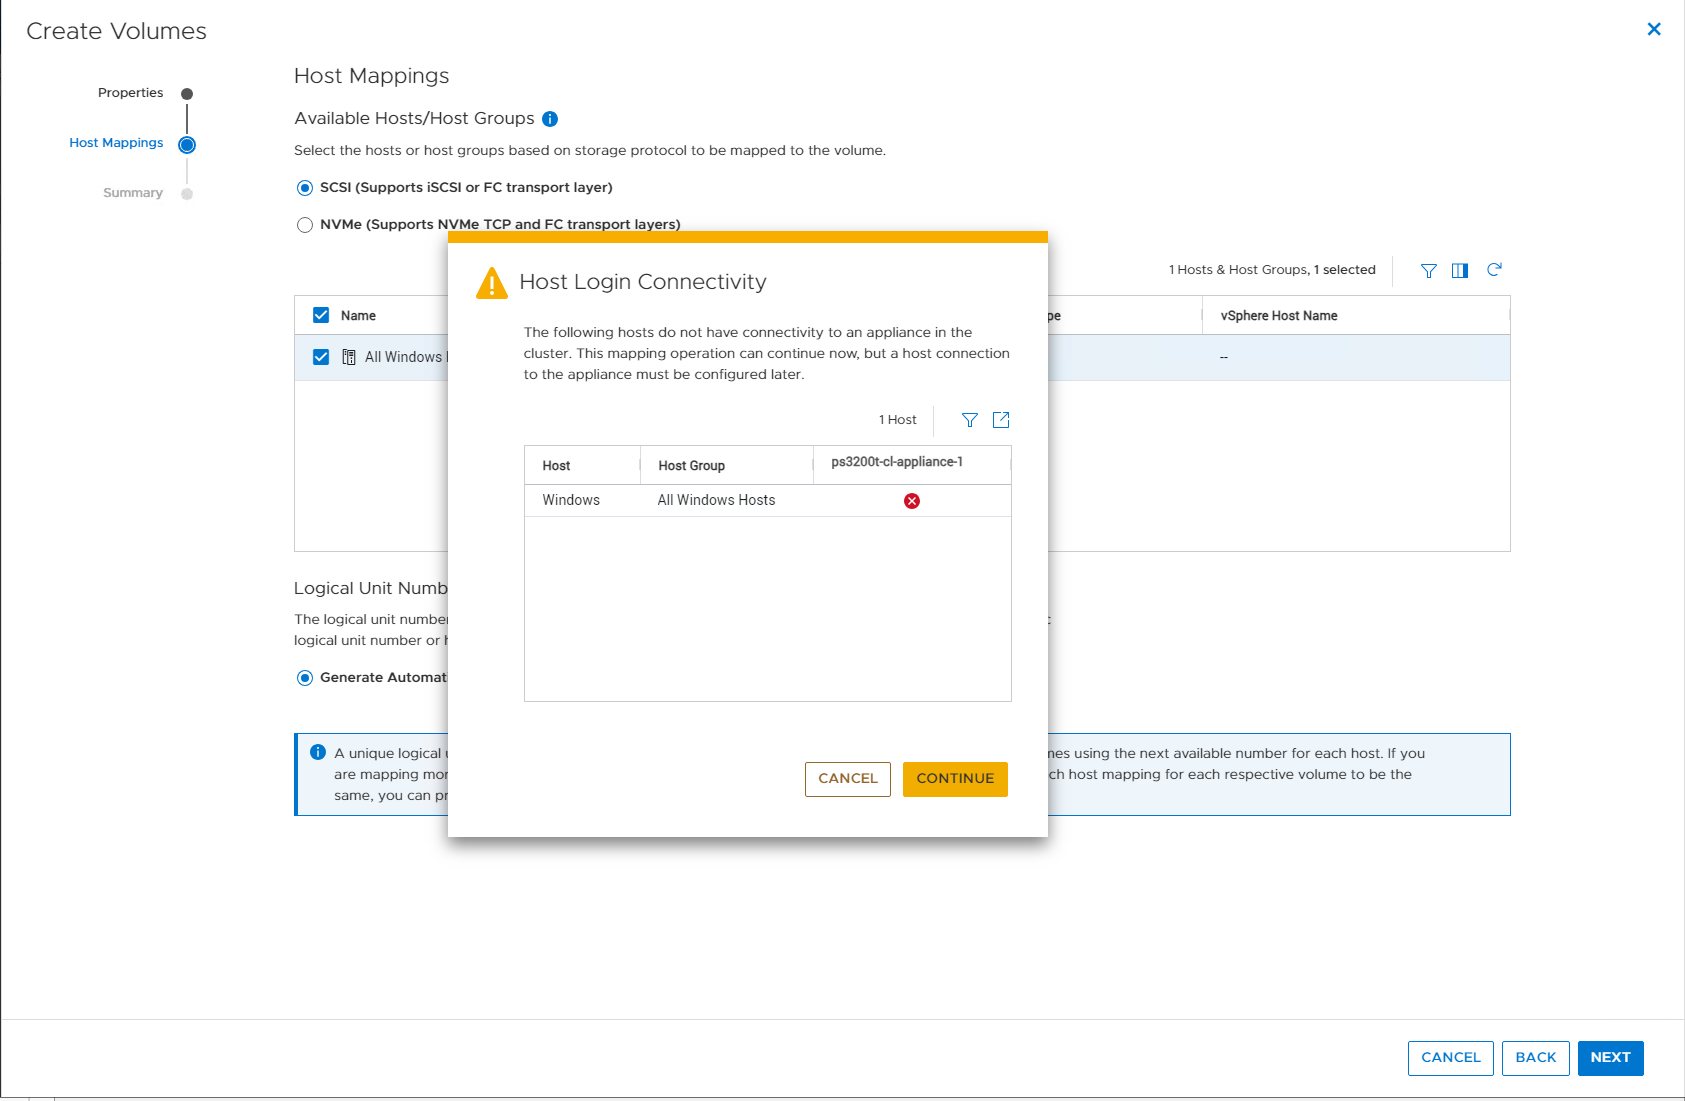
This message is simply because the host has not logged into the system yet, since the storage has not yet been presented to the host. It is not a cause for concern. Click Continue, then Next after the pop up box has closed.
You will now see the volume you have created.

Optionally, you may also create a Volume Group. Under Storage in the top menu bar, click Volume Groups. Click the blue +Create button to create a new volume group, if desired.
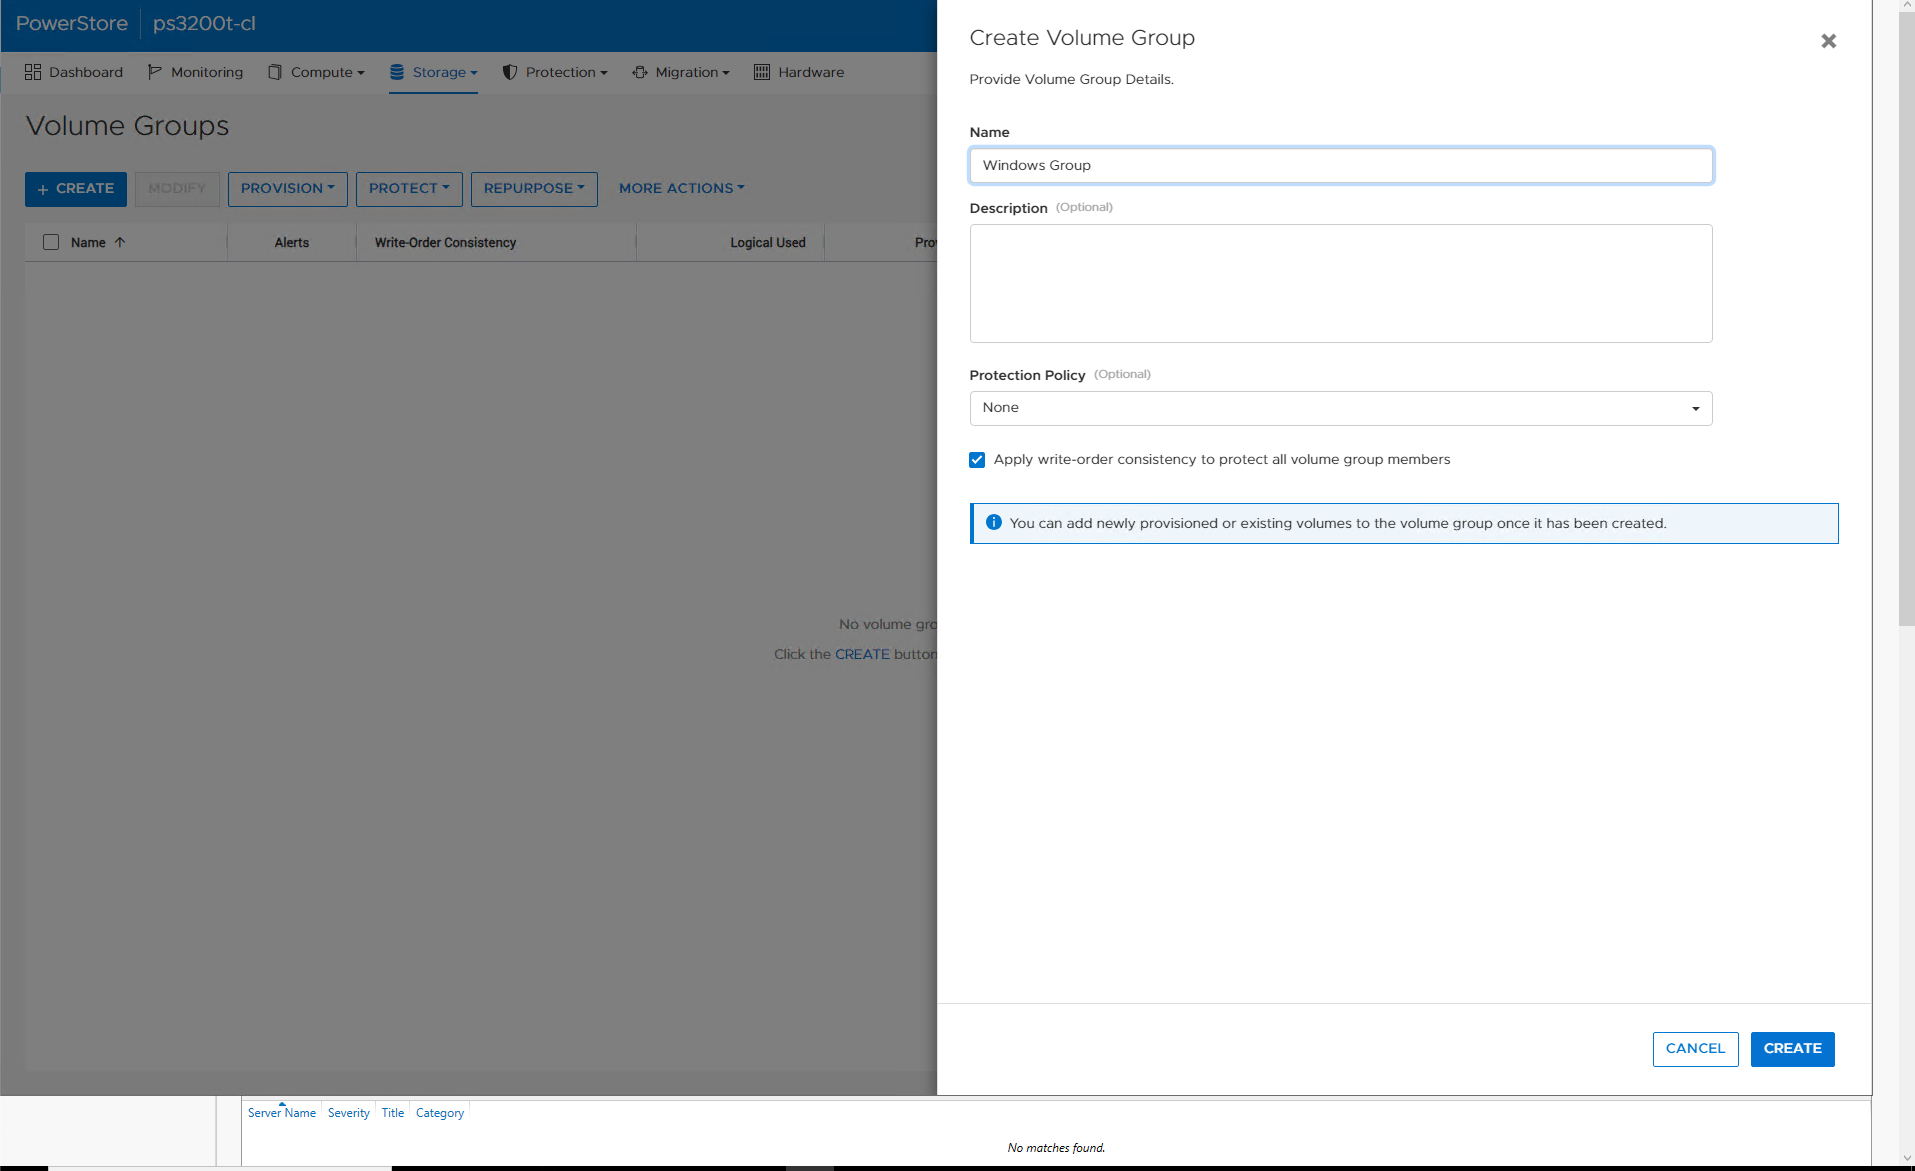
You will now see the Volume Group that has been created.

For more information, please see the Dell PowerStore Configuring Volumes documentation.
Configuring Dell Storage for Windows Hosts
We will now connect to the Dell storage cluster from a Windows 2022 host.
Before proceeding, the following steps should be completed:
- The iSCSI VLANs should be added to the Dell Storage devices in the Metal Console (See Getting Started: Initial Setup of Dell Storage on Equinix Metal for how to do this.)
- iSCSI Network IPs for each VLAN should be added to the Dell cluster, as illustrated earlier in this guide.
- The iSCSI VLANs should be added to the Windows host(s) in the Metal Console (See See Equinix Metal Layer 2 Networking Documentation)
- Hosts should be configured with an IP address on both VLANs for storage access (See Setting Up A Windows Server in Equinix Metal for more information)
- Hosts should be added to the Dell cluster, as illustrated earlier in this guide.
- Hosts should be configured for multipahthing. You may need to add the MPIO feature to the Windows server if you have not already. You can find instructions on how to do this here.
- A Volume should be created, as illustrated earlier in this guide.
Connect Your Windows Host
Now that the LUN has been created, you can now connect to the Dell Storage from the Windows 2022 host.
From the Windows 2022 host, launch Server Manager. click Tools in the upper right corner and select iSCSI initiator.

Click the Discovery tab, then click Discover Portal. Enter one of the iSCSI IP addresses from the Dell Storage system, then click OK.
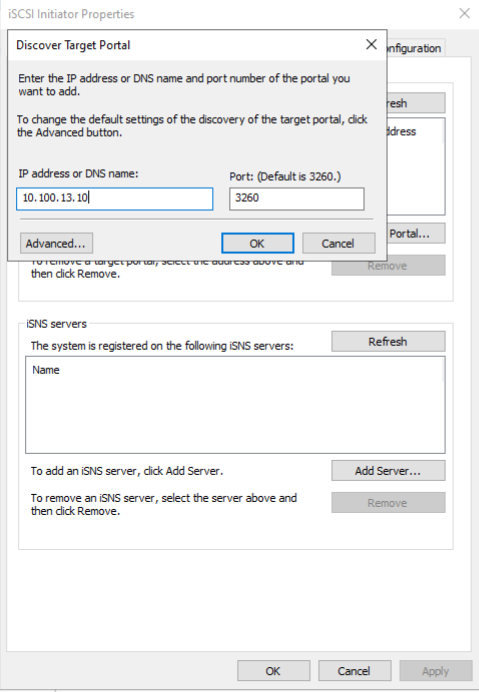
Now, click Targets. You will see the IQN of the Dell Storage systems.
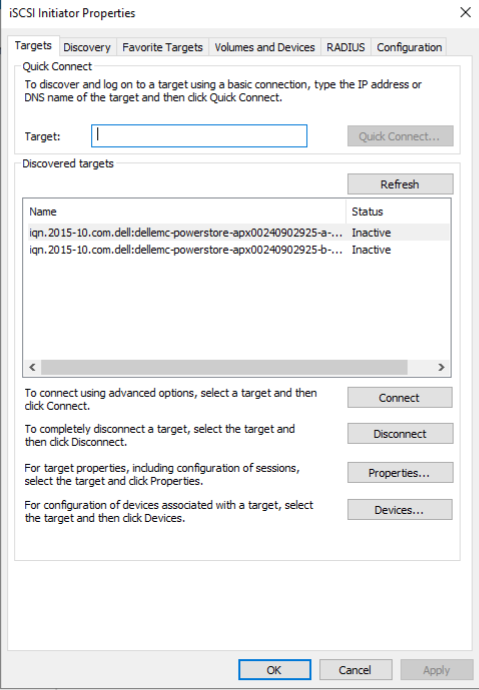
The Status is Inactive. Click on the target, then click Connect button. After clicking Connect, you will see the Connect to Target window. Be sure to click Enable muti-path, then click OK.
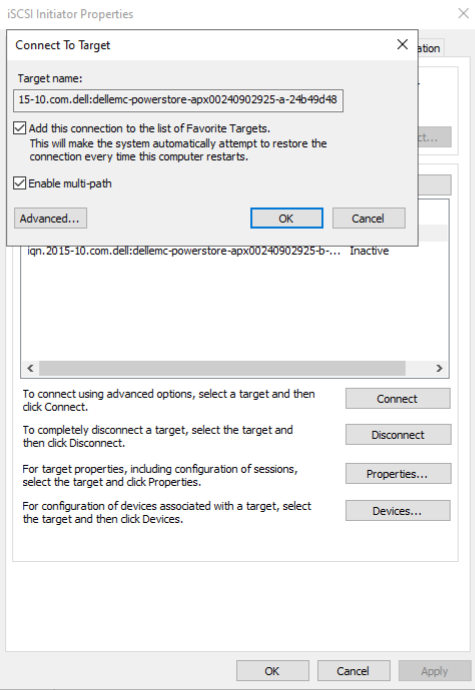
You will now see the Status is Connected. Repeat this process for the second target. You will now see both targets connected.
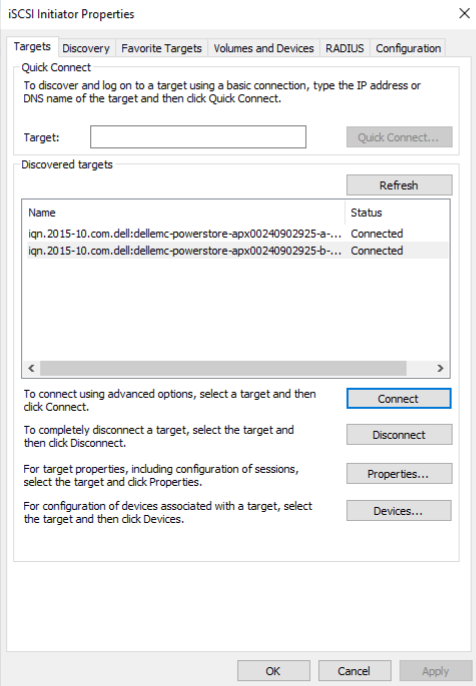
At this point, the Windows host can see the Dell storage. You will now see the LUN as unallocated storage in the Storage section of Computer Management, under Disk Management. The disk will now need to be initialized, right click the Disk pane and select Initialize Disk.
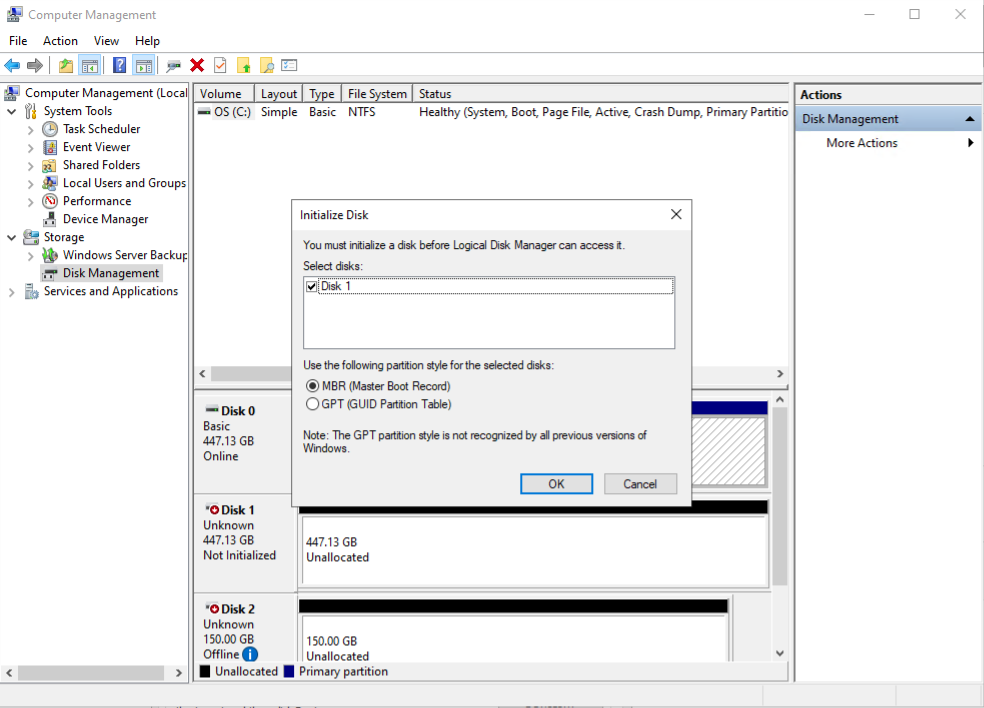
After the disk is initialized, a new volume must be created. Right click on the Unallocated space, and follow the wizard to create a volume of your choosing.
To further verify the host is connected to the Dell storage array, right click the disk pane, and select Properties. Click the MPIO tab. You will see a connection to each of the Dell storage nodes.
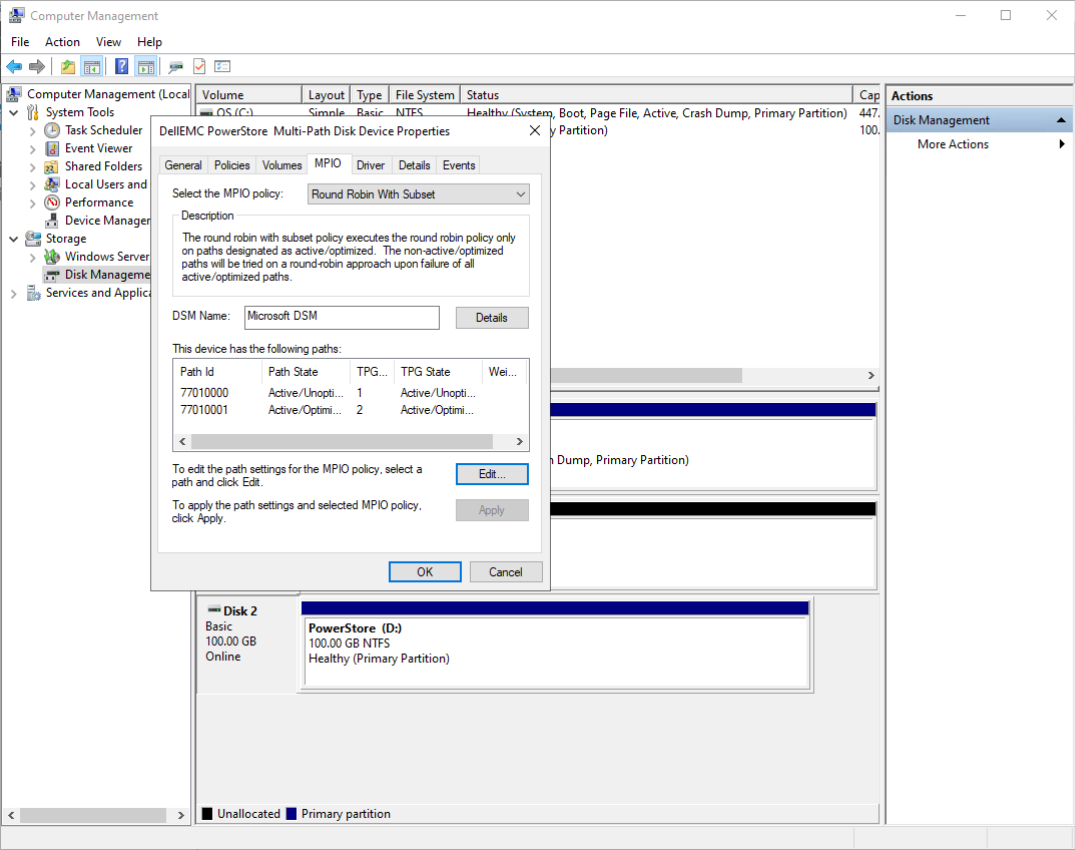
You may now begin to use the storage connected to your Windows host. You may also follow this process to add additional LUNs to your Windows host.
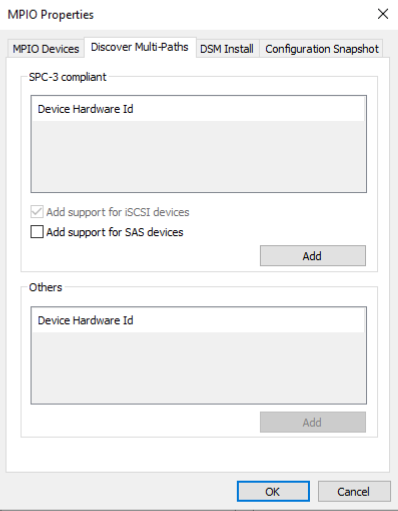
NOTE: If you see multiple disks after connecting to the Dell PowerStore, ensure the Add support for iSCSI devices box is checked in MPIO properties. If not, check the box, and you should see one disk after the setting has been applied.
Configuring Dell Storage for Linux Hosts
We will now connect to the Dell storage cluster from a Ubuntu 22.04 LTS host.
Before proceeding, the following steps should be completed:
- The iSCSI VLANs should be added to the Dell Storage devices in the Metal Console (See Getting Started: Initial Setup of Dell Storage on Equinix Metal)
- iSCSI Network IPs for each VLAN should be added to the Dell cluster, as illustrated earlier in this guide.
- The iSCSI VLANs should be added to the host(s) in the Metal Console
- Hosts should be configured with an IP address on both VLANs for storage access (See Equinix Metal Layer 2 Networking Documentation)
- Hosts should be added to the Dell cluster, as illustrated earlier in this guide.
- Hosts should be configured for multipahthing with
multipath-tools - A Volume should be created, as illustrated earlier in this guide.
There are two software packages that must be installed to use iSCSI. When you deploy a Ubuntu host from Equinix Metal, they are installed by default. They are open-iscsi and multipath-tools.
To install them, you can use the following commands
apt-get install open-iscsi
apt-get install multipath-tools
Now we are ready to connect the Linux host to the Dell storage. To do this, you will need one of the iSCSI IP addresses you have configured on the Dell storage system.
The iscsiadm command is the command that we will be using.
When using the command, the -m switch is used to specify the mode we are operating under. The mode will change throughout the process based on what we are doing.
Use the following command to begin the connection process to the Dell Storage. First, we will discover the storage system, using discovery mode.
iscsiadm -m discovery -t st -p <target-ip>
You will see output similar to the following:

You can see all four iSCSI IP addresses on the Dell, as well as the IQNs of each node.
Next, we will connect to the storage system with the following command:
iscsiadm -m node --login

Verify the connection by using the following command:
sudo iscsiadm -m session -o show

We can see we are connected to all of the configured iSCSI interfaces on the Dell.
Next, we want to verify that we can see the LUN we configured, and that multipathing is working as expected. To do this, issue the following command:
multipath -ll

This confirms multipathing is working.
Conclusion
With this guide, we have taken a closer look at how to set up Dell Storage using the iSCSI. We've taken a closer look at managing hosts, LUNs, and connecting the hosts to the storage. For more advanced configurations and additional resources, you can see the Dell documentation we have linked here or check out one of our other storage guides.
Additional Resources from Dell
Here are additional resources from the Dell documentation that have been consulted during the creation of this guide.
Dell PowerStore Networking Guide for Storage Services
Hosts and host group configurations
Dell PowerStore Configuring Volumes
Additional Equinix Resources
Getting Started: Initial Setup of Dell Storage on Equinix Metal
Last updated
07 January, 2025Category
You may also like
Dig deeper into similar topics in our archives
Crosscloud VPN with WireGuard
Learn to establish secure VPN connections across cloud environments using WireGuard, including detailed setups for site-to-site tunnels and VPN gateways with NAT on Equinix Metal, enhancing...

Kubernetes Cluster API
Learn how to provision a Kubernetes cluster with Cluster API

Kubernetes with kubeadm
Learn how to deploy Kubernetes with kubeadm using userdata

OpenStack DevStack
Use DevStack to install and test OpenStack on an Equinix Metal server.