Make It Go Faster! How We Sped Up OS Provisioning On Bare Metal at Scale
Here’s how adding a few bits of simple logic in the OS provisioning process can eliminate tons of network and time overhead and prolong the life of your storage.

Over the last few months we got to take a break from ongoing projects and spend some time looking into possible changes to the current technologies for bare metal provisioning, deploying operating systems on servers at scale. We focused largely on three main areas:
- Operating System delivery
- Operating System provisioning
- Operating System instantiation
The delivery section looks at how the OS is delivered to whatever is actually going to provision to a bare metal system. Provisioning explores options and techniques for placing the OS within persistent storage on the destination machine. The instantiation section will look at ways to get the newly provisioned OS into the hands of people that need it.
The Delivery Part of Bare Metal Provisioning
Installing
Tooling that gets you an OS today typically relies on “installing” and generally follows the following steps:
- A machine boots and reads from installation media (presented locally or over the network).
- The target disks are prepared, which typically involves creating partitions or HA technologies, such as disk mirroring, and “formatting” the partitions so that they contain a file system.
- Either a minimal set or a custom selection of packages is installed to the new file system. Most operating systems or distributions have their own concept of “packages,” but ultimately, a package contains binaries and libraries an application requires, along with some logic that dictates where the files should be written and some versioning information for the package manager to use.
- There may be some final customization, such as setting users, network configuration, etc.
- A Boot loader is written to the target disk, so that the machine can boot the newly provisioned operating system when it is next powered on.
The order of the steps may differ, but all major operating systems (Linux, Windows, MacOS) pretty much follow the same pattern to deploy on target hardware.
The above is a simplified overview. Each of the steps involves running 10s, 100s, or in the case of step 3 (package installation), 1000s of scripts, installers, and other binaries. Numerous errors are more than likely silently ignored in the process, but, given the sheer number of individual steps, there’s a good chance a “blip” may lead to a failed or hung OS installation. Because of the huge amount of different operations taking place, debugging installation misconfiguration is going to be slow and painful. The process of delivering an OS in this manner is going to be relatively slow, as all these scripts run and in many cases repeat the same sorts of operations.
Automating the Installation
If you want installation to be a repeatable process, it needs to be automated. OS vendors have solved this need with scripted installers, which allow system administrators to create their “gold standard” OS builds that installation programs can repeat throughout the infrastructure.
- preseed
- answer file(s)
- kickstart
- jumpstart
Once a member of the operations team has designed the set of responses for their chosen OS, that configuration can be reused as many times as required. This removes the potential for human error, such as accidentally entering the wrong data or clicking the wrong button during OS installation, and ensures that installation is standardized and documented.
Away With Endless Installs
Unfortunately, we can’t move away from the installation process completely, however, we can reduce it down to something that we only need to run once, or at least rarely. The idea is to go through the installation process once and then take the result and turn it into something we can deploy on other machines: a machine image. If we blow the dust off some archives, we can see that back in the day a 1960s IBM Manual this is how an OS was actually distributed. This was when a hardware vendor also created the operating system, and there was no variance between what the OS and the hardware expected from each other. The OS didn’t need customization. It always lived in the same place and interacted with the same hardware, so it didn’t need “installing.” It just needed to be written to some persistent storage.
In the mid-to-late 90s this was a popular procedure for servers, where there was minimal hardware variance. But its popularity waned for consumer machines. I attribute this mainly to the fact that in the late 90s and early 2000s no two consumer machines looked alike, driver support was “lols,” and success in taking an OS image from one machine and trying it elsewhere was as likely as winning the lottery.
Today, a conversation with an ops team is far less likely to include concepts like BSOD (Blue Screen of Death) or “recompiling Linux kernels to support {x}.” Server, or enterprise, operating systems tend to be far more stable and in most cases (especially Linux) come with a large subset of drivers to support most varieties of consumer or enterprise server. In the case of VMware’s ESXi hypervisor, the stance is largely that it will only run (and be supported) on valid hardware.
These operating systems being more stable across most machines makes OS images an attractive mechanism for OS distribution to many machines. The velocity of the packer project at first made it a great way for virtual machine images to be created (a VM hardware configuration is largely standard). However, because these OS images are so stable across so many additional hardware varieties, they are now also an option for bare metal provisioning!
Anatomy of an OS Image
Simply put, an OS image is a byte-for-byte copy of a persistent storage device that has an OS deployed on it. To explain what this means let’s break down the relationship between the persistent storage device and the underlying architecture of the OS image.
Storage Device
A storage device (an SD card, a hard disk, an SSD, and so on) is typically presented to all machines in the same way: as a large sequential storage device. Regardless of the medium, bytes can be written at any position on the storage until you reach the capacity of the disk. Under most circumstances an end user will never interact with the storage device directly, as its contents would be largely meaningless. Trying to read a file would be like trying to find a specific book in a library by randomly walking around the building with your eyes closed.
Partition Table/Boot Record
A Partition Table is the first “logical” layout structure written to persistent storage to make its contents easier to organize. The boot record that’s always at the very beginning (first sector) of the disk points to this partition table. Because the boot record is always in the same place, a machine, when booting, always knows to look at the beginning of the disk to find the structure that details the partitions present on the disk.
The partitions divide the disk up into smaller logical segments, each of which would appear as a smaller storage device to the end user. An end user still isn’t interacting with a partition directly at this stage, but we’re getting closer to having organized data! We now have an index system in our library telling us where in the library we can find our book.
File System
A file system is the final piece of the puzzle that turns a large unusable pile of data into something that is more user friendly. We typically “format” a partition with a file system that adds structure to a storage device, giving us a table of contents (TOC), folders, and files. This allows end users to easily organize their files and navigate around their content within the file system structure. It also allows people and programs to access a file directly through its file path on the file system. We can finally find the book we’re looking for in the library, read its table of contents, and find the chapter we are after.
Conclusion
Leveraging tools like packer (or in-house tooling) to effectively “slurp” an installed operating system from a persistent disk to create an OS image allows us to move away from slow and error-prone installation procedures and starts to move us towards an operating system delivery process that is:
- Largely immutable
- Reproducible
- Automated
- Simpler
- Faster to deploy
Bare Metal Provisioning as a Simple Data Transfer
If previously the steps of delivery and provisioning were intertwined (the operating system was installed and delivered during the provisioning), now OS images enable us to disaggregate the two tasks. Without the OS image, each operating system was delivered and provisioned through completely unique methods, requiring many more inefficiencies, operational overhead, and a ton of troubleshooting. With all operating systems now delivered as OS images we can focus on the next task: getting the OS onto a device!
The key difference to appreciate is that provisioning is now simply a data transfer. We are effectively writing the OS image from byte 0 to the final byte directly to a machine’s persistent storage. No other actions are necessary.
To execute this we need some code that can interact with a data source over the network, read that data into a buffer, and then write it to a device within the machine. We’re in a position where we can add a lot of different technologies to improve the flexibility and efficiency of the provisioning operation:
Support for a Variety of Sources
Our code can be written to read data over the network from largely any data store in operation today, the most popular being HTTP/HTTP(s) and OCI registries. With OCI registry support we immediately inherit a lot of the registry benefits, such as RBAC, data propagation, and ease of deployment.
On-the-Fly Decompression
By default an OS image is the size of the virtual disk it was installed on with Packer. If the original disk was 20GB, the OS image is exactly 20GB. Some of these disk sizes are mandated by the OS installers. VMware ESXi, for example, will refuse to install on a disk smaller than 4GB, and Microsoft Windows will refuse to install on a disk smaller than 20GB. These 20GB images will contain all the operating system files and underlying disk structure that make up the OS image, however, there is a lot of “blank” space, represented within the OS image as a large amounts of zeros. All of this is sent over the network, resulting in a lot of traffic that’s simply moving blank space.
Using a streaming compression algorithm, such as gzip, we can shrink 20GB to 7GB or 8GB, which is the total amount of data we will need to send over the network. Our code can then decompress this 7GB on the fly to return it back to its original representation and write that back to disk. Sending 7GB instead of 20GB over the network is pretty good!
Efficient Zero-Skipping
Here’s how we can address the problem of using zeros to work around the installer-mandated virtual disk sizes. We can simply add some code into our algorithm to inspect a block (32KB) data on the fly to determine if the data is all zeros. It it is, we don’t write it to the persistent storage and move the pointer on the disk ahead the size of the block inspected. This may sound like a lot of extra processing for the CPU, but in reality it’s not. To understand how much time these actions take, we can look to the excellent Systems Performance - Enterprise and the Cloud by Brendan Gregg.
Here’s an excerpt from Chapter 2, which explains these timescales and applies real numbers to them:
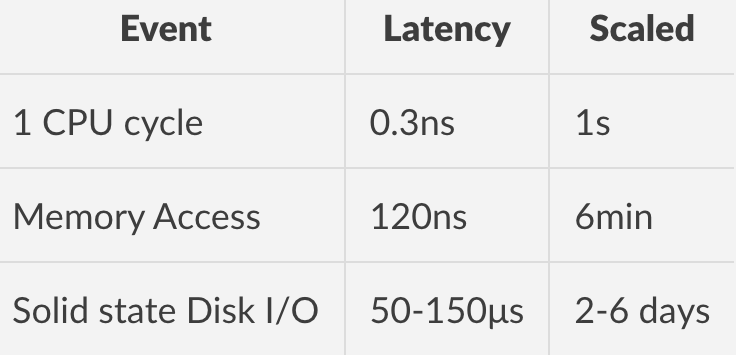
It becomes clear that writing the zeros to disk and engaging all three tiers of latency introduces a lot of overhead, while implementing a zero-skipping algorithm limits the amount of SSD I/O, resulting in huge savings of provisioning time.
We can see these gains immediately when streaming from a web server to a persistent block device:
Writing zeros
$ sudo ZEROWRITE=FALSE COMPRESSED=TRUE IMG_URL=http://192.168.0.20:8080/tink-esxi7.0.raw.gz DEST_DISK=/dev/sdb ./image2disk
IMAGE2DISK - Cloud image streamer
------------------------
INFO[0000] Parsing Kernel Command line
INFO[0000] Streaming Gzipped content
INFO[0000] Beginning write of image [tink-esxi7.0.raw.gz] to disk [/dev/sdb]
Downloading... 4.2 GB complete
INFO[0011] Successfully written [http://192.168.0.20:8080/tink-esxi7.0.raw.gz] to [/dev/sdb]
Skipping zeros
$ sudo ZEROWRITE=TRUE COMPRESSED=TRUE IMG_URL=http://192.168.0.20:8080/tink-esxi7.0.raw.gz DEST_DISK=/dev/sdb ./image2disk
IMAGE2DISK - Cloud image streamer
------------------------
INFO[0000] Parsing Kernel Command line
INFO[0000] Streaming Gzipped content
INFO[0000] Beginning write of image [tink-esxi7.0.raw.gz] to disk [/dev/sdb]
Downloading... 4.2 GB complete
INFO[0004] Saved [3.9 GB] of zero writes
INFO[0004] Successfully written [http://192.168.0.20:8080/tink-esxi7.0.raw.gz] to [/dev/sdb]
Finally, by skipping the zeros we are also reducing wear and tear on the storage devices themselves. This is especially important for devices like Raspberry Pis, which store data on SD cards. These storage devices are highly prone to wear and tear and reducing this repetitive action should increase their lifespan.
Conclusion
Adding various bits of simple logic into the bare metal provisioning process has the following benefits:
- Images at rest consume less space.
- Images can reside in numerous network-accessible places, such as web servers or OCI-compliant container registries.
- Data can be compressed and decompressed at the source, reducing network overhead.
- Implementing some logic to watch for blank data can improve the speed of provisioning while increasing the lifespan of the persistent storage device.
OS Instantiation
At this point we can provide all our Operating Systems as simple compressed images, efficiently transmit them to the recipients, and quickly write them to the persistent storage within target devices. Our final task is to turn these into a running system, and there are two main options for instantiating our provisioned operating system.
Reboot
With our OS image written to disk, the most obvious option is to initiate a reboot syscall, which is done through the following code:
err = syscall.Reboot(syscall.LINUX_REBOOT_CMD_RESTART)
if err != nil {
    // We shouldn't get here
	log.Errorf("Reboot has failed, something has gone very wrong")
}
The above snippet of code will tell the running kernel to finish what it’s doing and restart the machine. This is a relatively time-consuming operation, but it’s a surefire way to get the machine into a clean state, so it can boot from the newly provisioned operating system.
Kexec
The kexec (Kernel Execute) functionality within the Linux kernel provides us with an alternative to the simplicity of the “turn it off/turn it on” behavior of a full system reboot. The kexec function allows the Linux kernel to load another kernel into memory and at a certain point stop the existing kernel from running and immediately pivot to the new kernel in memory. One key point is that the kexec functionality is only possible on kernels that the existing Linux kernel understands (must be an ELF binary type). This means that operating systems like Windows would still require a reboot in order to start the newly provisioned OS.
A few additional steps are required for this to work:
- Mount our newly provisioned OS disk (so that we can find the kernel inside the OS)
- Find the kernel and load it into memory in preparation for the kexec
- Execute the kexec syscall and immediately pivot into this new operating system
Example code would look like the following:
// Mount filesystem
err = syscall.Mount("/dev/sda1", "/mnt", "ext4", 0, "")
if err != nil {
	// Something is wrong with the filesystem
	log.Fatalf("Mouting the filesystem has failed -> %v", err)
}

// Open kexec kernel
err = kexec.LoadKernel("/mnt/boot/vmlinuz")
if err != nil {
	// Something is wrong with the Kernel
	log.Fatalf("Loading the Kernel into memory has failed -> %v", err)
}

err = syscall.Reboot(syscall.LINUX_REBOOT_CMD_KEXEC)
if err != nil {
	// We shouldn't get here
	log.Errorf("Kexec has failed, something has gone very wrong -> ", err)
}
Conclusion
There are only so many ways to bring up our newly provisioned OS. But whenever we can pivot directly to a new OS with 'kexec', we save a lot of time. To help us visualize these savings, we can again go to the great book Systems Performance - Enterprise and the Cloud by Brendan Gregg:

Now take a look at a case study of this provisioning method, where we accelerate deployment of VMware ESXi on bare metal.

Ready to kick the tires?
Use code DEPLOYNOW for $300 credit