Make It Go Faster! (Part 2) Accelerating VMware vSphere Deployment On Bare Metal
How we collapsed, reduced, and deduplicated the deployment, replacing many fragile processes with a much simpler and less error-prone one.

In a previous blog post I detailed one of the experiments that we’ve been conducting within Equinix Metal. That experiment led to the discovery of the fastest possible deployment of operating systems on bare metal, and we hope it will come in handy for both our customers and the tinkerbell project community.
This second post is a deep dive into deploying VMware vSphere and covers the following:
- The default installation process
- “Some” of the underlying installation technologies
- Taking the installation process to the next level
- Findings
Disclaimer: I’m by no means a vSphere expert. My findings come largely from the somewhat sparse documentation around the installer and generally hacking around inside the vSphere OS during installation. There is a big chance that I misunderstood something, or that the findings are somewhat off the mark, so any corrections will be welcomed with open arms!
Let’s crack on!
The VMware vSphere Installation Process
We will start by examining the steps that occur during the default process and how the process can be automated.
The default process
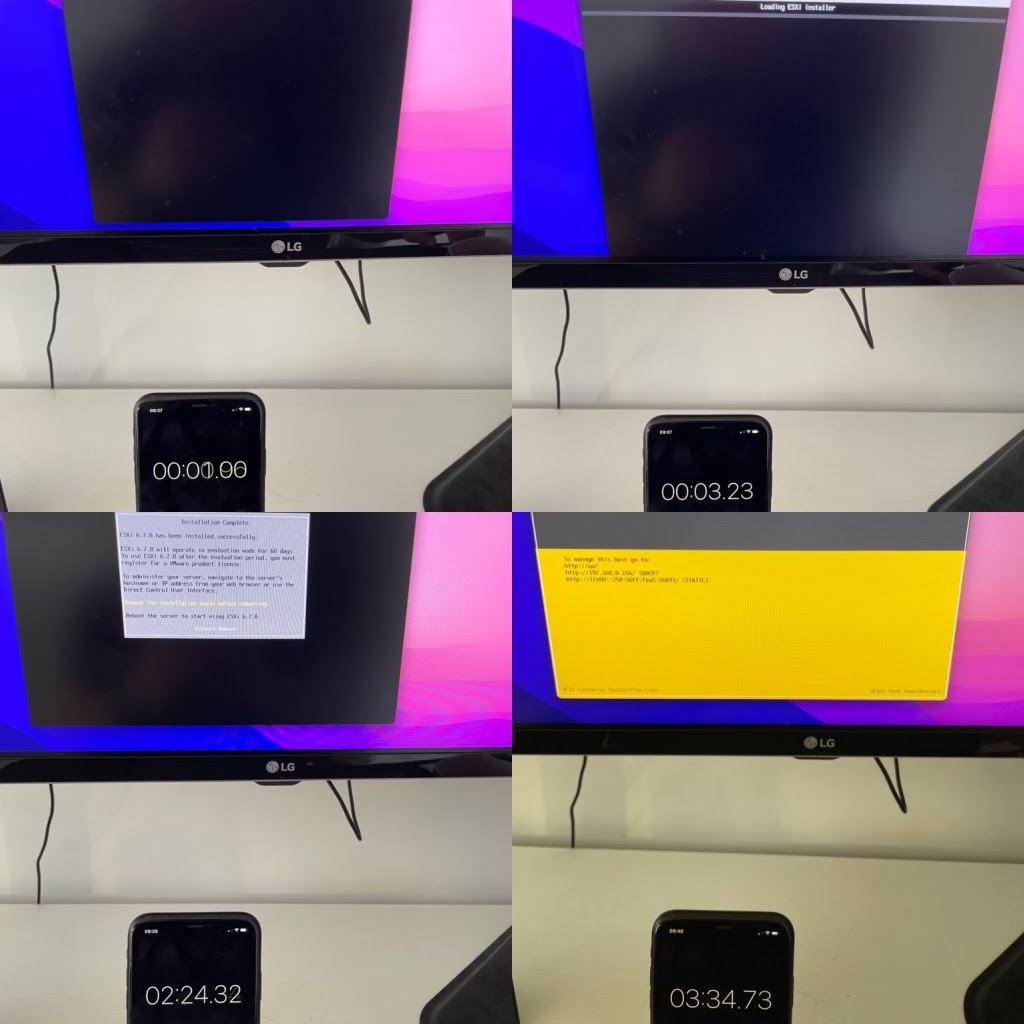
Time to bring in some “science”… in that we’re going to use a VM and an iPhone stopwatch to break down the installation.
1. Power machine on
As this is a virtual machine we don’t really have the same POST (power-on self-test) that we would have on a physical piece of hardware, so this skips a multi-minute process. We’ve also instructed the machine to either boot from a remote ISO (CD image) or from an actual CD-ROM we would have inserted into the machine.
2. Machine boots from installation medium 00:00.00
At this point the machine finds the boot loader and starts syslinux.
Specifically, the following occurs:
- ISOLINUX starts, parsing
/ISOLINUX.CFG - This configuration boots
/MBOOT.C32as the kernel - This multiboot module parses
/BOOT.CFG - This configuration loads
/B.B00(the vSphere kernel) and all of the additional modules (or drivers) - Finally, the
kerneloptpasses additional configuration for what happens once the hypervisor is up and running. - By default, the installer starts. (
kernelopt=cdromBoot runweasel)
Simple! ?
All of this can be viewed by opening a vSphere ISO locally and inspecting the files mentioned.
3. Installer UI (weasel) starts 01:12.43
At this point the hypervisor and all drivers/modules are started, and the installation UI waits for user input. An operator is expected to select the persistent storage device to write the hypervisor to and to input a root password, which provides a mechanism to log in and perform post-installation tasks. Once these are inputted and end user licenses are agreed to, the installation process begins.
4. Reboot into hypervisor 02:24.32
As mentioned above, we’re doing this in a virtual machine so we skip the multi-minute hardware POST process. At this point the installer finishes, performs shutdown tasks, and asks the machine to perform a reboot action. Once the reboot has completed, it uses the SYSLINUX boot loader in the same process as mentioned above. However, instead of starting the installer process, it starts the installed hypervisor, leaving the system in a state where the end user can begin using the deployed system.
5. System ready for usage/post configuration 03:34.73
The system is installed and the user is now presented with the DCUI (Direct Console User Interface), where they can log in using the root password. At this point they can configure the network settings or enable services such as ssh(for remote configuration/control). Once these steps are completed, they can use a web browser to connect to the hypervisor over the network and begin to provision their virtual machines.
Overview
science
The above example uses a virtual machine to make it easier to understand what is transpiring. It also gives us a much quicker end-to-end hypervisor installation experience. A lot more time will sneak into this process if we use actual hardware:
- Physical hardware will cause the modules to take longer to initialise as they discover these devices.
- Each device can cause delays as it comes up to a ready state, such as a network device being ready for use, or a disk being ready to provision to.
- Each reboot can add over 5 minutes to the deployment time.
In practice, with physical machines you are more likely to see a deployment time of 10 to 15 minutes, sometimes longer.
Automating the Installation Process
Currently, the only real way to automate ESXi deployments is to dothe following:
- Network boot into the ESXi installer
- Automate the installer with kickstart
- SSH into the installed hypervisor and do some post-install “fiddling”
We’re not going to delve deep into these processes. There are blog posts and docs that detail them, although your mileage may vary, so “buyer beware!” ?
Network booting the installer
This is where things get complicated… very complicated.
Creating a network booting environment from scratch is a rather involved process, but in summary:
- Take a deep breath.
- Create a provisioning network separated either physically (cables/switch ports) or logically (vlans).
- Build a provisioning server that sits on this provisioning network (consider security implications at this point).
- Deploy DHCP server, decide network ranges, and start the service. At this point regret starts to set in.
- Deploy TFTP server, deploy HTTP server. Configure both and start. Begin to question why in decade three of the 21st century this is still THE WAY.
- Acquire iPXE (this may or may not involve having to compile it yourself), put results in the TFTP folder. At this point you may also consider a career change.
- Create an account, validate that account, log in, and find the vSphere ISO. Once downloaded, you’ll need to mount it and extract the contents to the HTTP directory.
- Create a DHCP configuration file that tells a machine where it can download the vSphere kernel and boot configuration.
- Boot the machine and watch it boot from the network! Get a brief moment of happiness before…
- Realize that firewall rules don’t allow the machine to access TFTP or HTTP. Mutter that computers were a bad idea in the first place whilst fixing firewall rules.
- Reboot the machine, again.
- SUCCESS ?
The documentation, in all its gory detail, is provided ?? here.
Luckily there are alternatives to having to roll your own installation environment (cough, tinkerbell).
Kickstart
The above will have created an environment that will allow bare metal machines to boot remotely into the installer. However, we really would like this installation process to be automated. In order to do this we will need to pass a kickstart script. The job of this kickstart script is largely to answer the questions that the installer is expecting, so that it can just get on with installing the hypervisor.
To do this we need to modify the /BOOT.CFG that we talked about earlier. More specifically, we will need to change the kernelopts, so that instead of starting the installer it points to our kickstart file. This kickstart file is usually hosted on an HTTP folder, so the change would look like the following:
kernelopt=ks=http://XXX.XXX.XXX.XXX/esxi_ksFiles/ks.cfg
But what actually goes into a kickstart file?
vmaccepteula
rootpw T!nkerb3ll
install --firstdisk --overwritevmfs

reboot
Above is the simplest example that I could come up with and it simply:
- Accepts end user licenses
- Sets a root password (that fits the requirements)
- Installs on the first disk and overwrites any existing VMware data
- Reboots into the provisioned OS
Additionally, we may want to be able to further configure our hypervisor as part of this kickstart and perform actions such as:
- Set default network adapter (so networking comes up correctly after reboot)
- Enable SSH for post-install configuration
- Run an additional set of commands (done through the
%firstbootdirective)
More vSphere kickstart information is available here.
Post-install config with SSH
There are a number of configuration steps that can only be performed on an installed operating system. Ideally they would also need automating, and the most common method is remote execution, which is commonly performed over SSH.
For this process to work we need to ensure that the installation has completed successfully, that the networking has been configured correctly, and that we can successfully identify the correct server over the network in order to connect and run the remote commands.
Overview
Putting together all of the requirements to have automated deployments is no mean feat. It requires knowledge across multiple disciplines and technologies to deploy and configure a hypervisor.
The complex nature of these components and processes can very easily lead to fragility and mistakes, resulting in broken or failed installations. (Accompanied by grumpy system administrators and angry end users, all shaking their fists.)

So, is there a better way?
Taking It to the Next Level
Now that you have some insight into the complex series of events involved in getting vSphere up and running, let’s invoke more modern methods of OS distribution, namely a simplified stack and cleaner provisioning.
Reduce the complexity
The normal method involves booting, configuring, installing, booting, further configuring, booting. etc. ? We can collapse much of that long, inefficient, and failure-prone process by moving to an OS image that has the required capability to handle post-configuration itself.
Install once, provision many
We use packer along with qemu to do the vSphere installation process once. This produces our golden image that we can then easily write to all bare metal servers. So, instead of running that installation process every time, we now simply write a chunk of data to a disk. However, each deployment has a machine-specific configuration that is needed in order for the provisioning to be successful.
Adopt “some” immutable principles
A mutable OS deployment can be thought of as a completely unique OS instance that is modified and written for one particular provision. An immutable OS, however, is largely the opposite, where the OS shouldn’t be modified, and lends itself well to using OS images. This is a regular pattern (especially in the cloud), where the same OS is deployed in numerous places and a tool like cloud-init is then used to give that particular instance its identity.
For the same sort of functionality to exist with our vSphere OS image we inject some code via the “install once, provision many” process. This code is run during startup to parse the metadata endpoint and perform the customization of our OS based upon the provisioned instance.
At this point we have a single vSphere image that can be deployed anywhere within the infrastructure. Upon boot, our OS will take care of the configuration steps and result in a ready-to-use hypervisor! ?
Simplify the stack
The OS and the startup logic now living with the OS image, we can simplify the provisioning stack. At this point we only need to do two things:
- Boot the machine into something that will write the OS image.
- Write the OS image and reboot into it.
Tinkerbell and image2disk
Using tinkerbell, we can easily tie pieces of hardware to a particular set of actions (known as a template). The template for vSphere does the following:
- Use the
image2diskaction to stream a compressed OS image to a persistent disk within a machine. - Use a
rebootorkexecaction to start our provisioned vSphere.
What looks like a reboot, smells like a reboot, but doesn’t actually reboot?
Here are two lines of code ?:
err = syscall.Reboot(0x1234567)

err = syscall.Reboot(0x45584543)
Trivia?: To protect a system from “accidentally rebooting,” the syscall for rebooting requires two additional pieces of data to be passed which are two pieces of magic. The first magic value is 0xfee1dead, and the second can be either the birth date of Linux Torvalds (0x28121969 / 28th December, 1969) or the birth date of one of his three daughters. To make life easier for end users Go automatically adds these additional pieces of data to the syscall for rebooting.
The difference between the two reboot syscalls is that the first (as its name implies) performs a full OS shutdown followed by a system reset. This brings the system back to the very beginning, where it will again perform a POST and then attempt to boot an operating system.
The second “reboot” doesn’t reboot at all! In fact, the reboot syscall with that value performs a kexec, which effectively means that our running OS jumps directly into the beginning of a different OS without performing a full hardware reset.
Overview
Collapsing, reducing, deduplicating, and simplifying… The removal of large amounts of fragile and needless operations move us away from many complex processes to what amounts to a simple “stamping” operation of the operating system to a physical device. We have much more control of what and how things are being deployed and can always ensure that we know exactly what software was deployed on our physical machines and how.
Findings
It was fun to spend a few weeks cracking open the vSphere installation experience to see how we might get the hypervisor into the hands of both Equinix Metal customers and the tinkerbell project community.
In the initial proof of concept, it took 37 seconds to provision VMware vSphere before it would start the kexec process. See the video embedded in a tweet from yours truly:
Today I managed to get a PoC of kexec working with @vmware ESXi and @tinkerbell_oss from boot it’s 37 seconds before ESXi is provisioned and booting (On big METAL??) pic.twitter.com/VxP7oWdOiO
— Dan (@thebsdbox) September 21, 2021
We then took this even further by tweaking what is sent over the wire to the device being provisioned. With these improvements, on the largest Equinix Metal machines, it takes less than 19.5 seconds to provision VMware vSphere before we boot directly into the hypervisor via kexec.
This proof of concept code will be finding its way into the tinkerbell actions soon (PRs already exist ?), and hopefully one day, with enough testing, into our customers’ hands.
We look forward to learning what we can hack together next!

Ready to kick the tires?
Use code DEPLOYNOW for $300 credit