- Home /
- Resources /
- Learning center /
- Connecting your Me...
Connecting your Metal VLAN to Multiple Cloud Service Providers
Connect your VLAN to AWS, Azure and Google Cloud concurrently via Equinix Fabric and layer 3 routing
On this page
In this guide you will learn how to connect your private layer 2 VLAN on Equinix Metal with multiple cloud providers. You will connect an Equinix Metal VLAN to all of the following, communicating with them at the same time:
- a Virtual Private Cloud (VPC) that you own on AWS
- a Virtual Private Cloud (VPC) that you own on Google Cloud
- a Virtual Network (vnet) that you own on Azure
When complete, you will be able to communicate from your VLAN directly to any and all of them, and vice-versa.
You will not be able to communicate directly between the cloud providers, for example, between AWS and Azure. This requires separate communication channels and routing between each of them. A better approach is Equinix Fabric Cloud Router, which will be covered in a separate guide.
Architecture
Before we get started, take a look at the architecture of the completed connection:
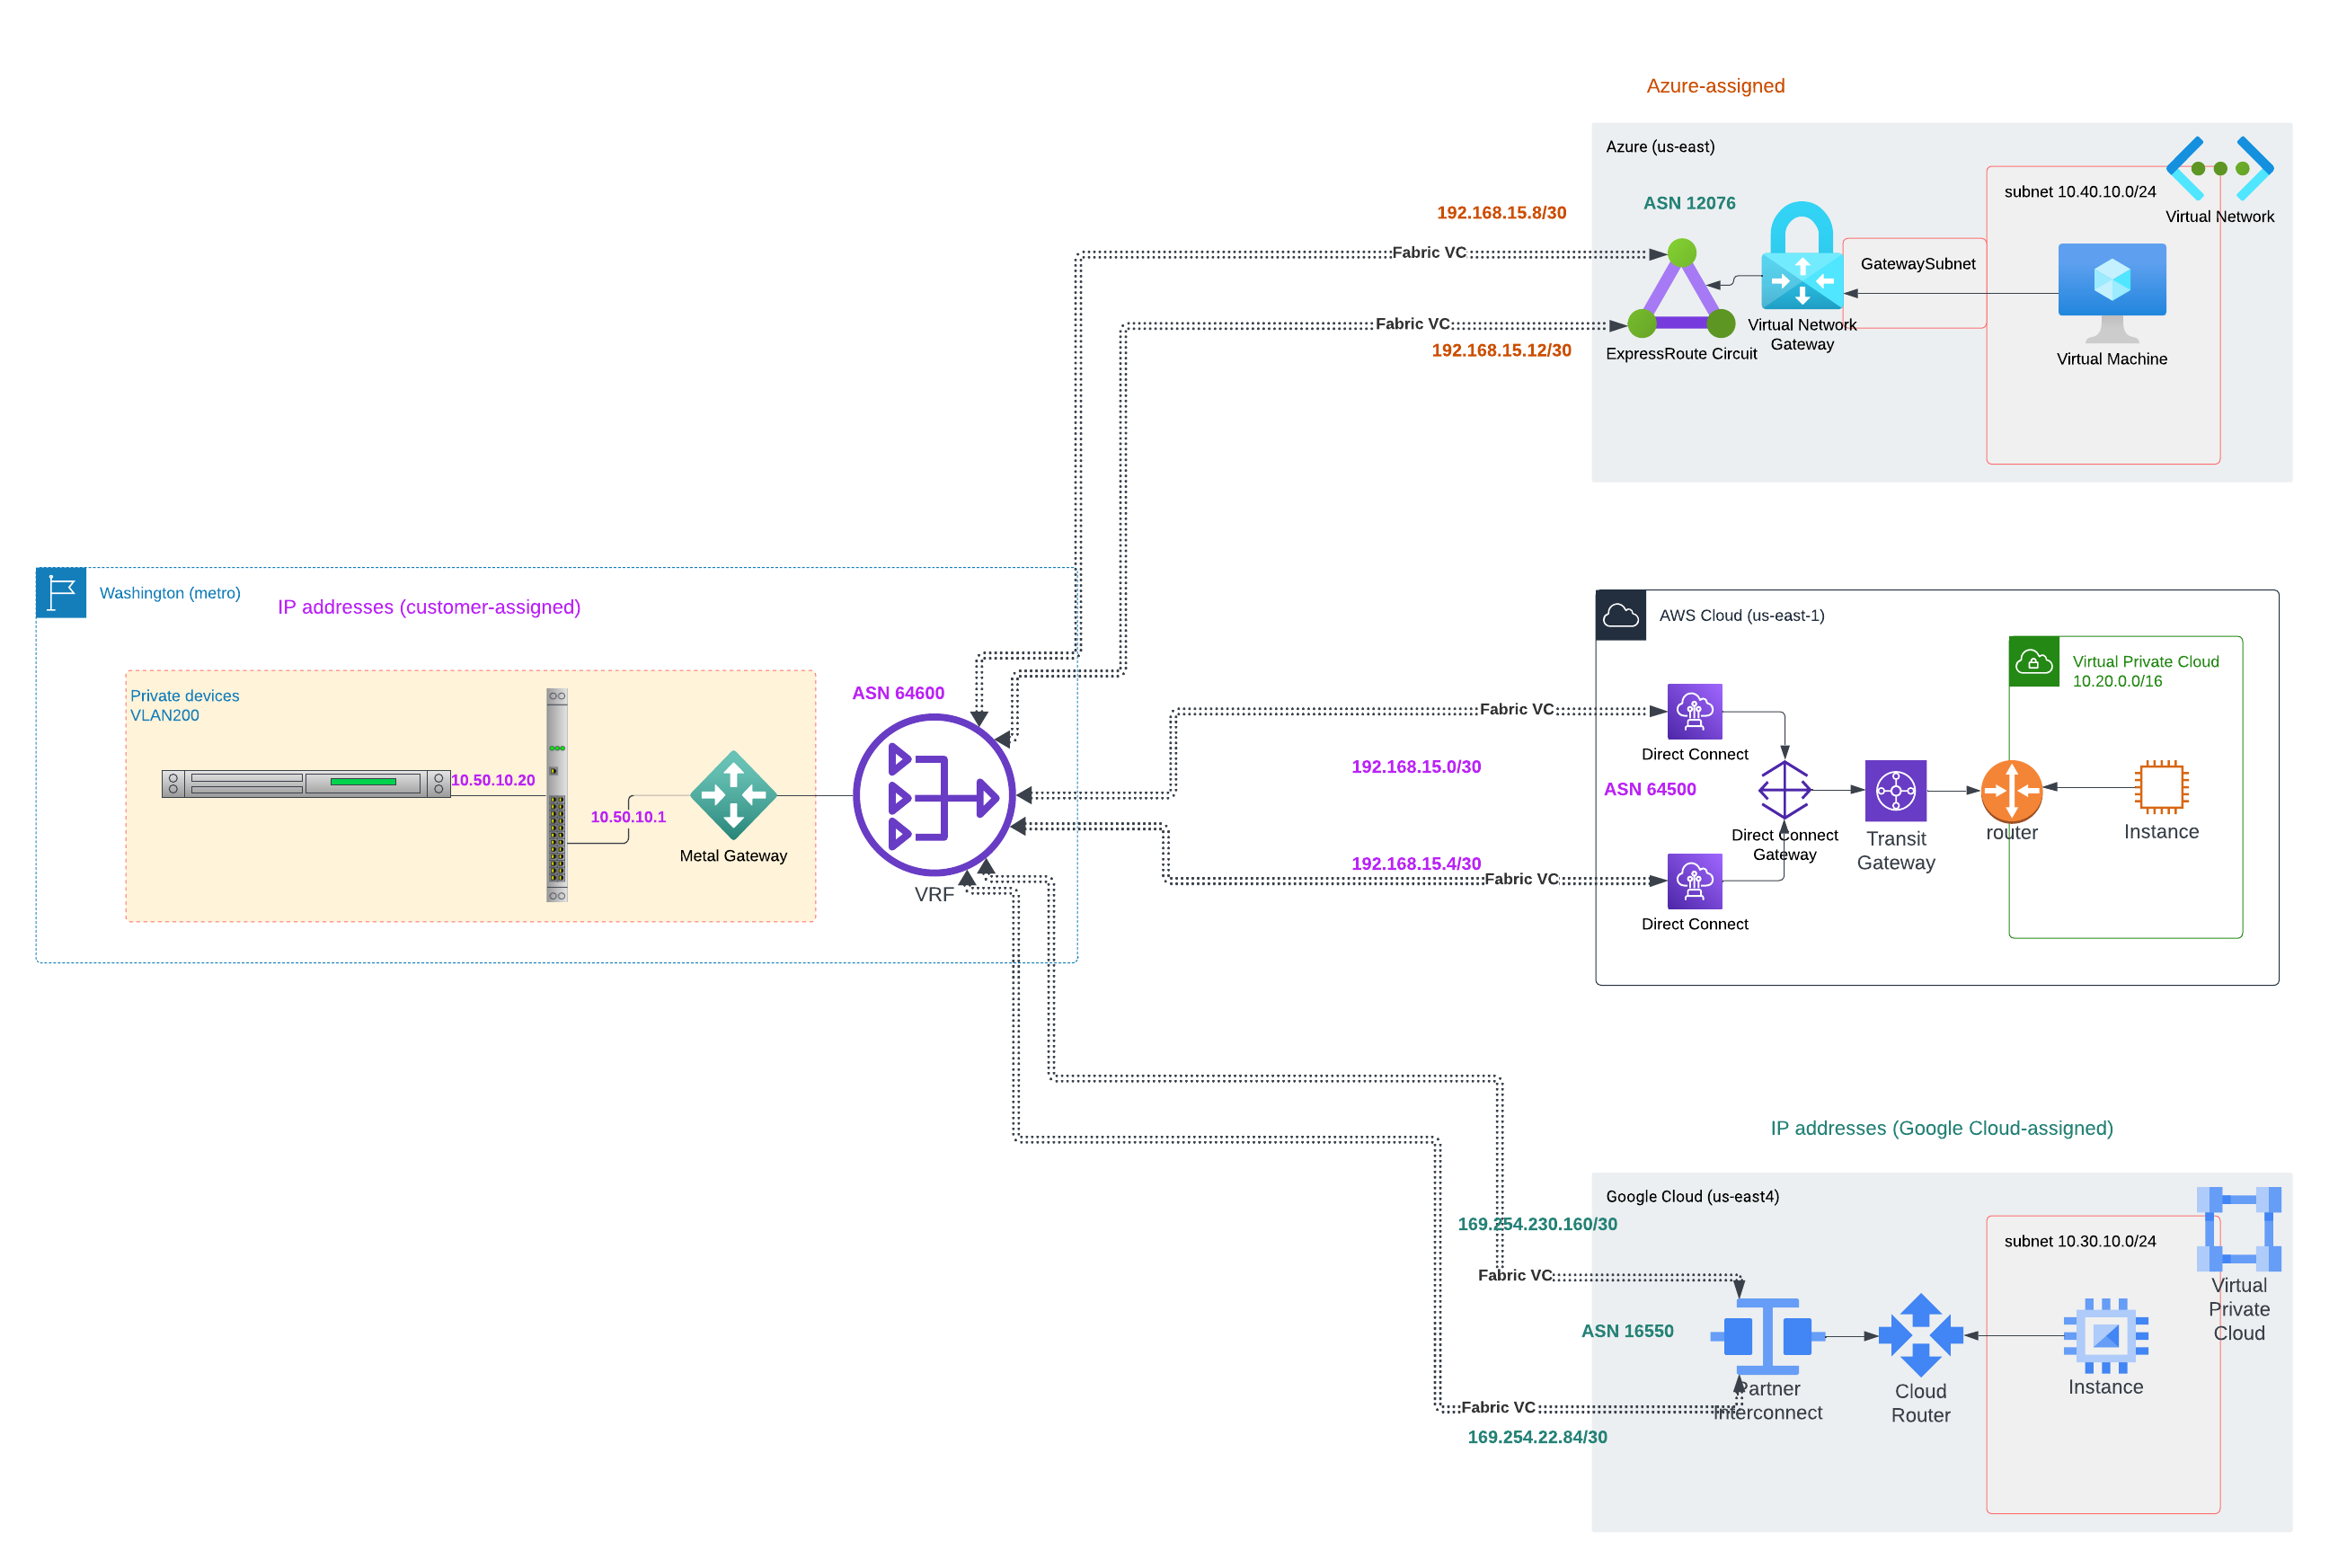
On the Equinix Metal side is a VLAN, with IP addresses assigned by you. The VLAN may or may not connect to standard Equinix Metal Layer 3 networking via an Equinix Metal Gateway.
On the cloud provider sides:
- On the AWS side is a VPC with multiple subnets. The IP address range for the VPC and for each of the subnets is as assigned by you. The VPC connects with the rest of the world via a standard AWS Transit Gateway.
- On the GCP side is a VPC with multiple subnets. The IP address range for the VPC and for each of the subnets is as assigned by you. The VPC connects with the rest of the world via the VPC Cloud Router.
- On the Azure side is a vnet with multiple subnets. The IP address range for the vnet and for each of the subnets is assigned by you. The vnet connects with the rest of the world via a Virtual Network Gateway.
The Equinix Metal VLAN is connected to an Equinix Metal Gateway, which is connected to an instance of Equinix Metal Virtual Routing and Forwarding (VRF). VRF is connected to multiple Equinix Fabric Virtual Connections (VCs), one redundant pair of VCs for each cloud provider.
- One VC is connected on the Metal end to the VRF, and on the AWS end to Direct Connect, then Direct Connect Gateway, then the VPC Gateway.
- One VC is connected on the Metal end to the VRF, and on the GCP end to VLAN Attachments, then to the VPC Cloud Router.
- One VC is connected on the Metal end to the VRF, and on the Azure end to an ExpressRoute circuit, then to the Virtual Network Gateway.
Prerequisites
The prerequisites for connecting your VLAN to multiple cloud providers are:
- GCP:
- A GCP account
- A VPC created in your GCP account
- AWS:
- Azure:
- An Equinix Metal account, with a project in it
- A VLAN deployed to your Equinix Metal project
- Configuration information
The configuration information is the following:
| Provider | Item | Purpose | Example Values |
|---|---|---|---|
| Metal | VRF | CIDR range for the VRF | 10.50.0.0/16 |
| Metal | VLAN | CIDR range for the VLAN, which must be within the VRF range | 10.50.10.0/24 |
| Metal | ASN | The Autonomous System Number for the Metal side | 64600 |
| GCP | Subnets | CIDR ranges for the subnets | 10.30.10.0/24, 10.30.20.0/24, 10.30.30.0/24 |
| GCP | ASN | The Autonomous System Number for the GCP side; this is fixed by Google | 16550 |
| GCP | Primary VC IP | IPs within the primary Metal-GCP VC subnet to assign to each side, assigned by Google Cloud upon VLAN attachment creation | |
| GCP | Secondary VC IP | IPs within the secondary Metal-GCP VC subnet to assign to each side, assigned by Google Cloud upon VLAN attachment creation | |
| GCP | MD5 password | A password to use for BGP peering, MD5-hashed | Clear text of "What A Great Guide!" hashed to dbc29529874661f92e089593c8adc10b |
| AWS | VPC | CIDR range for the VPC | 10.20.0.0/16 |
| AWS | Subnets | CIDR ranges for the subnets | 10.20.10.0/24, 10.20.11.0/24, 10.20.12.0/24 |
| AWS | ASN | The Autonomous System Number for the AWS side | 64550 |
| AWS | Primary VC subnet | Subnet for the Metal-AWS primary virtual connection, should be very small, as we will use just 2 addresses | 192.168.15.0/30 |
| AWS | Primary VC IP | IPs within the Metal-AWS primary VC subnet to assign to each side | 192.168.15.1 Metal and 192.168.15.2 AWS |
| AWS | Secondary VC subnet | Subnet for the Metal-AWS secondary virtual connection; this should be small, as it will use just two addresses | 192.168.15.4/30 |
| AWS | Secondary VC IP | IPs within the Metal-AWS secondary VC subnet to assign to each side | 192.168.15.5 Metal and 192.168.15.6 AWS |
| AWS | MD5 password | A password to use for Metal-AWS BGP peering, MD5-hashed | Clear text of "What A Great Guide!", hashed to dbc29529874661f92e089593c8adc10b |
| Azure | vnet | CIDR ranges for the vnet | 10.40.0.0/16 |
| Azure | Subnets | CIDR ranges for the vnet subnets | 10.40.10.0/24, 10.40.20.0/24, 10.40.30.0/24 |
| Azure | ASN | The Autonomous System Number for the Azure side, fixed by Microsoft | 12076 |
| Azure | Primary VC subnet | Subnet for the Metal-Azure primary virtual connection, should be very small, as we will use just 2 addresses | 192.168.15.8/30 |
| Azure | Primary VC IP | IPs within the Metal-Azure primary VC subnet to assign to each side | 192.168.15.9 Metal and 192.168.15.10 Azure |
| Azure | Secondary VC subnet | Subnet for the Metal-Azure secondary virtual connection; this should be small, as it will use just two addresses | 192.168.15.12/30 |
| Azure | Secondary VC IP | IPs within the Metal-Azure secondary VC subnet to assign to each side | 192.168.15.13 Metal and 192.168.15.14 Azure |
| Azure | MD5 password | A password to use for Metal-Azure BGP peering, MD5-hashed | Clear text of "WhatAGreatGuide" hashed to 8cfe43d779a9096c0ecc901ad0649a0f |
Since this is not a users' guide for each of the cloud providers, we will not walk through setting up the GCP, AWS or Azure components here. When complete, you should have your accounts, the proper networks and subnets, as well as networking components with each cloud provider.
Equinix Metal has guides to help with setting up your account, organization and project, including deploying your first server and an introduction to the Equinix Metal console.
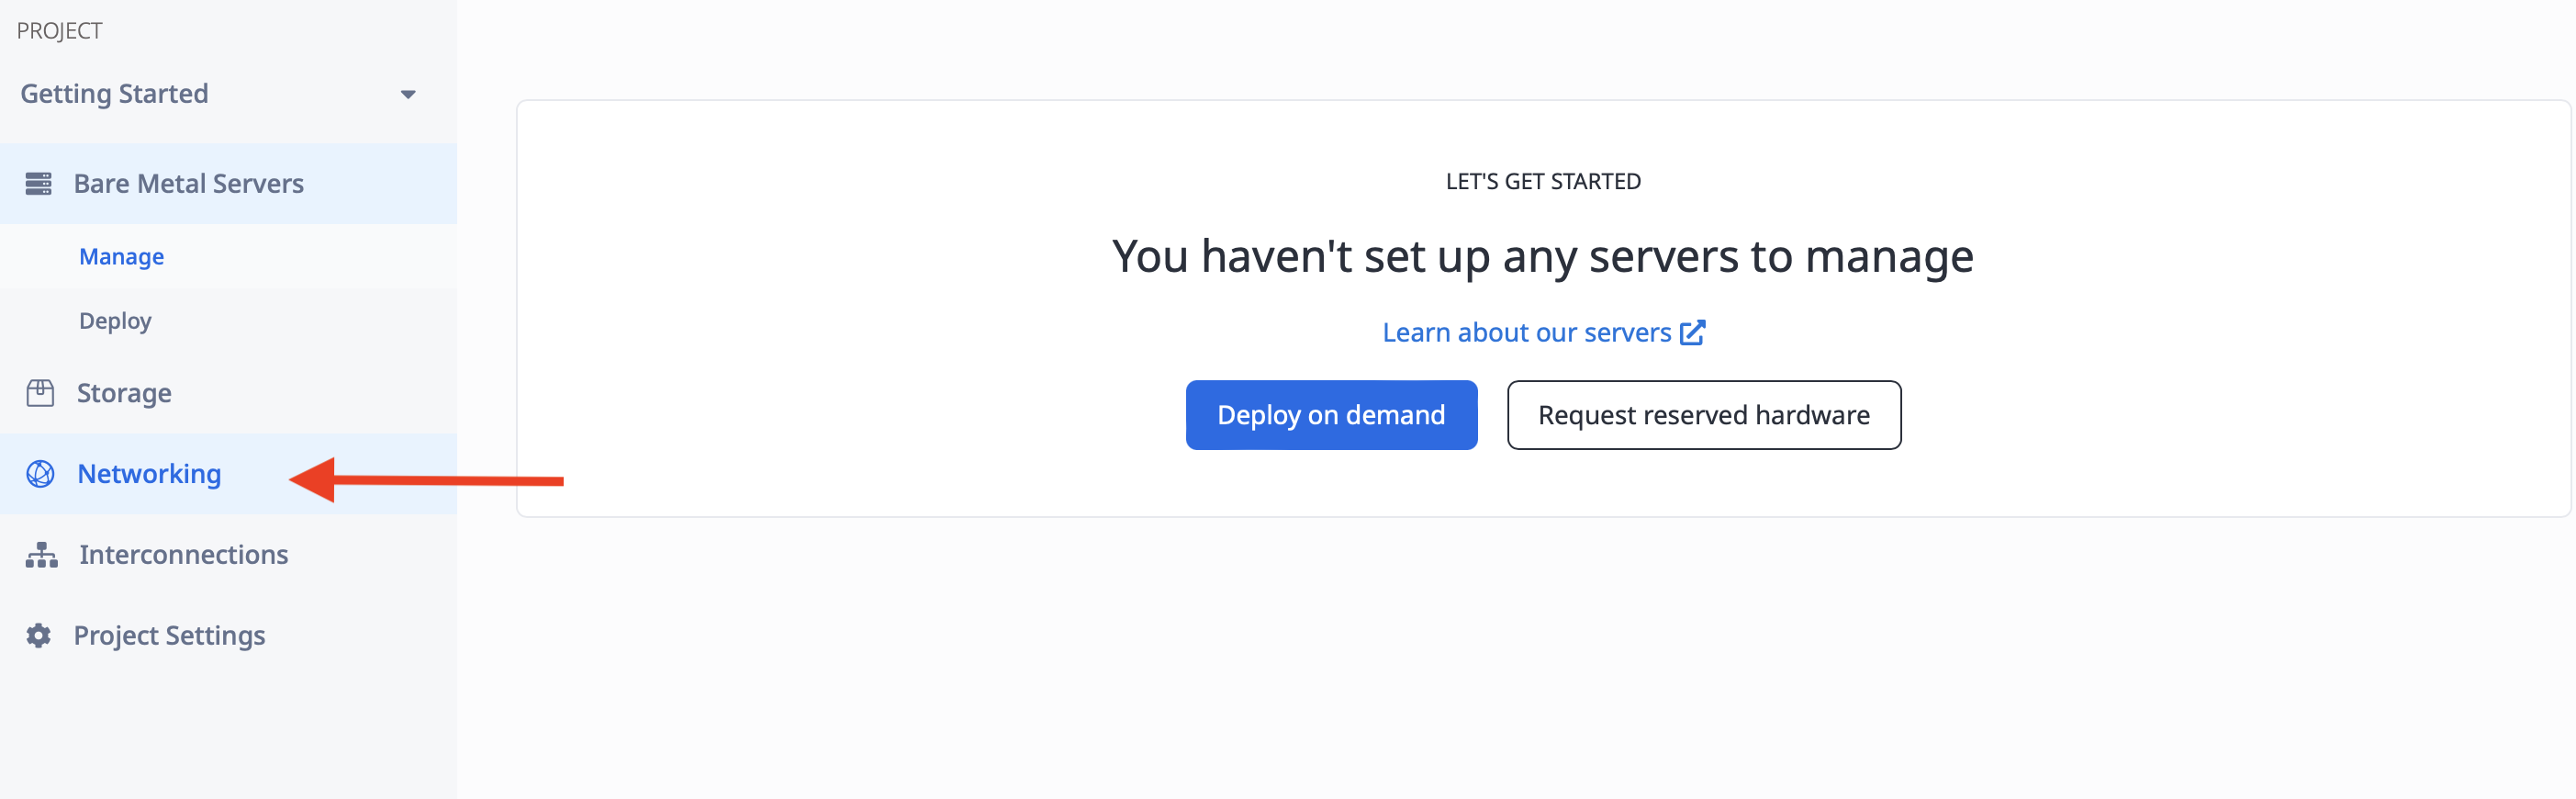
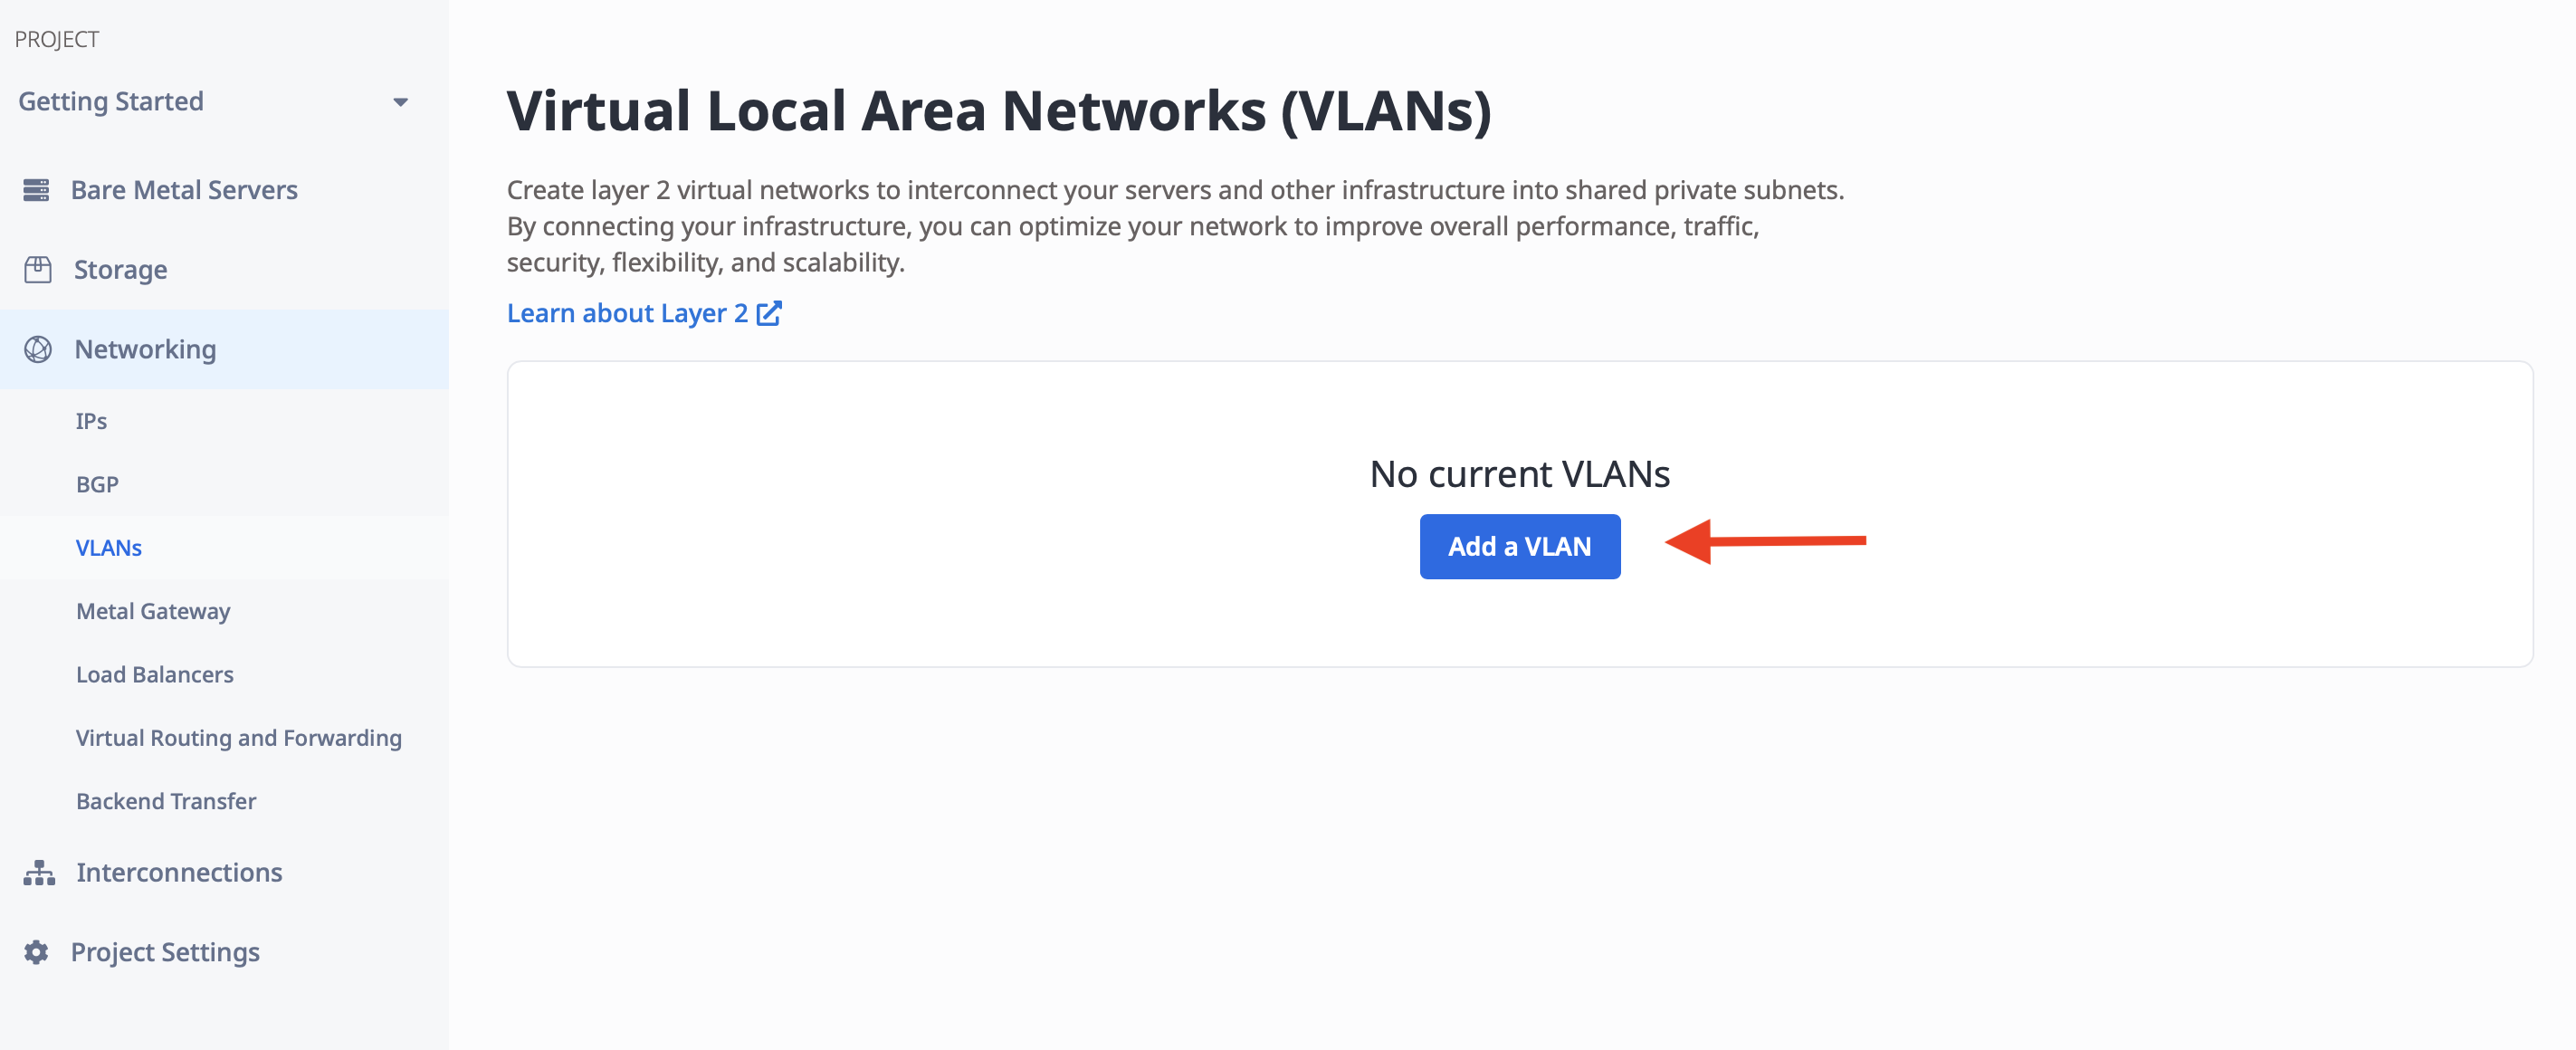
Once you have your project, in the Console, select Networking:
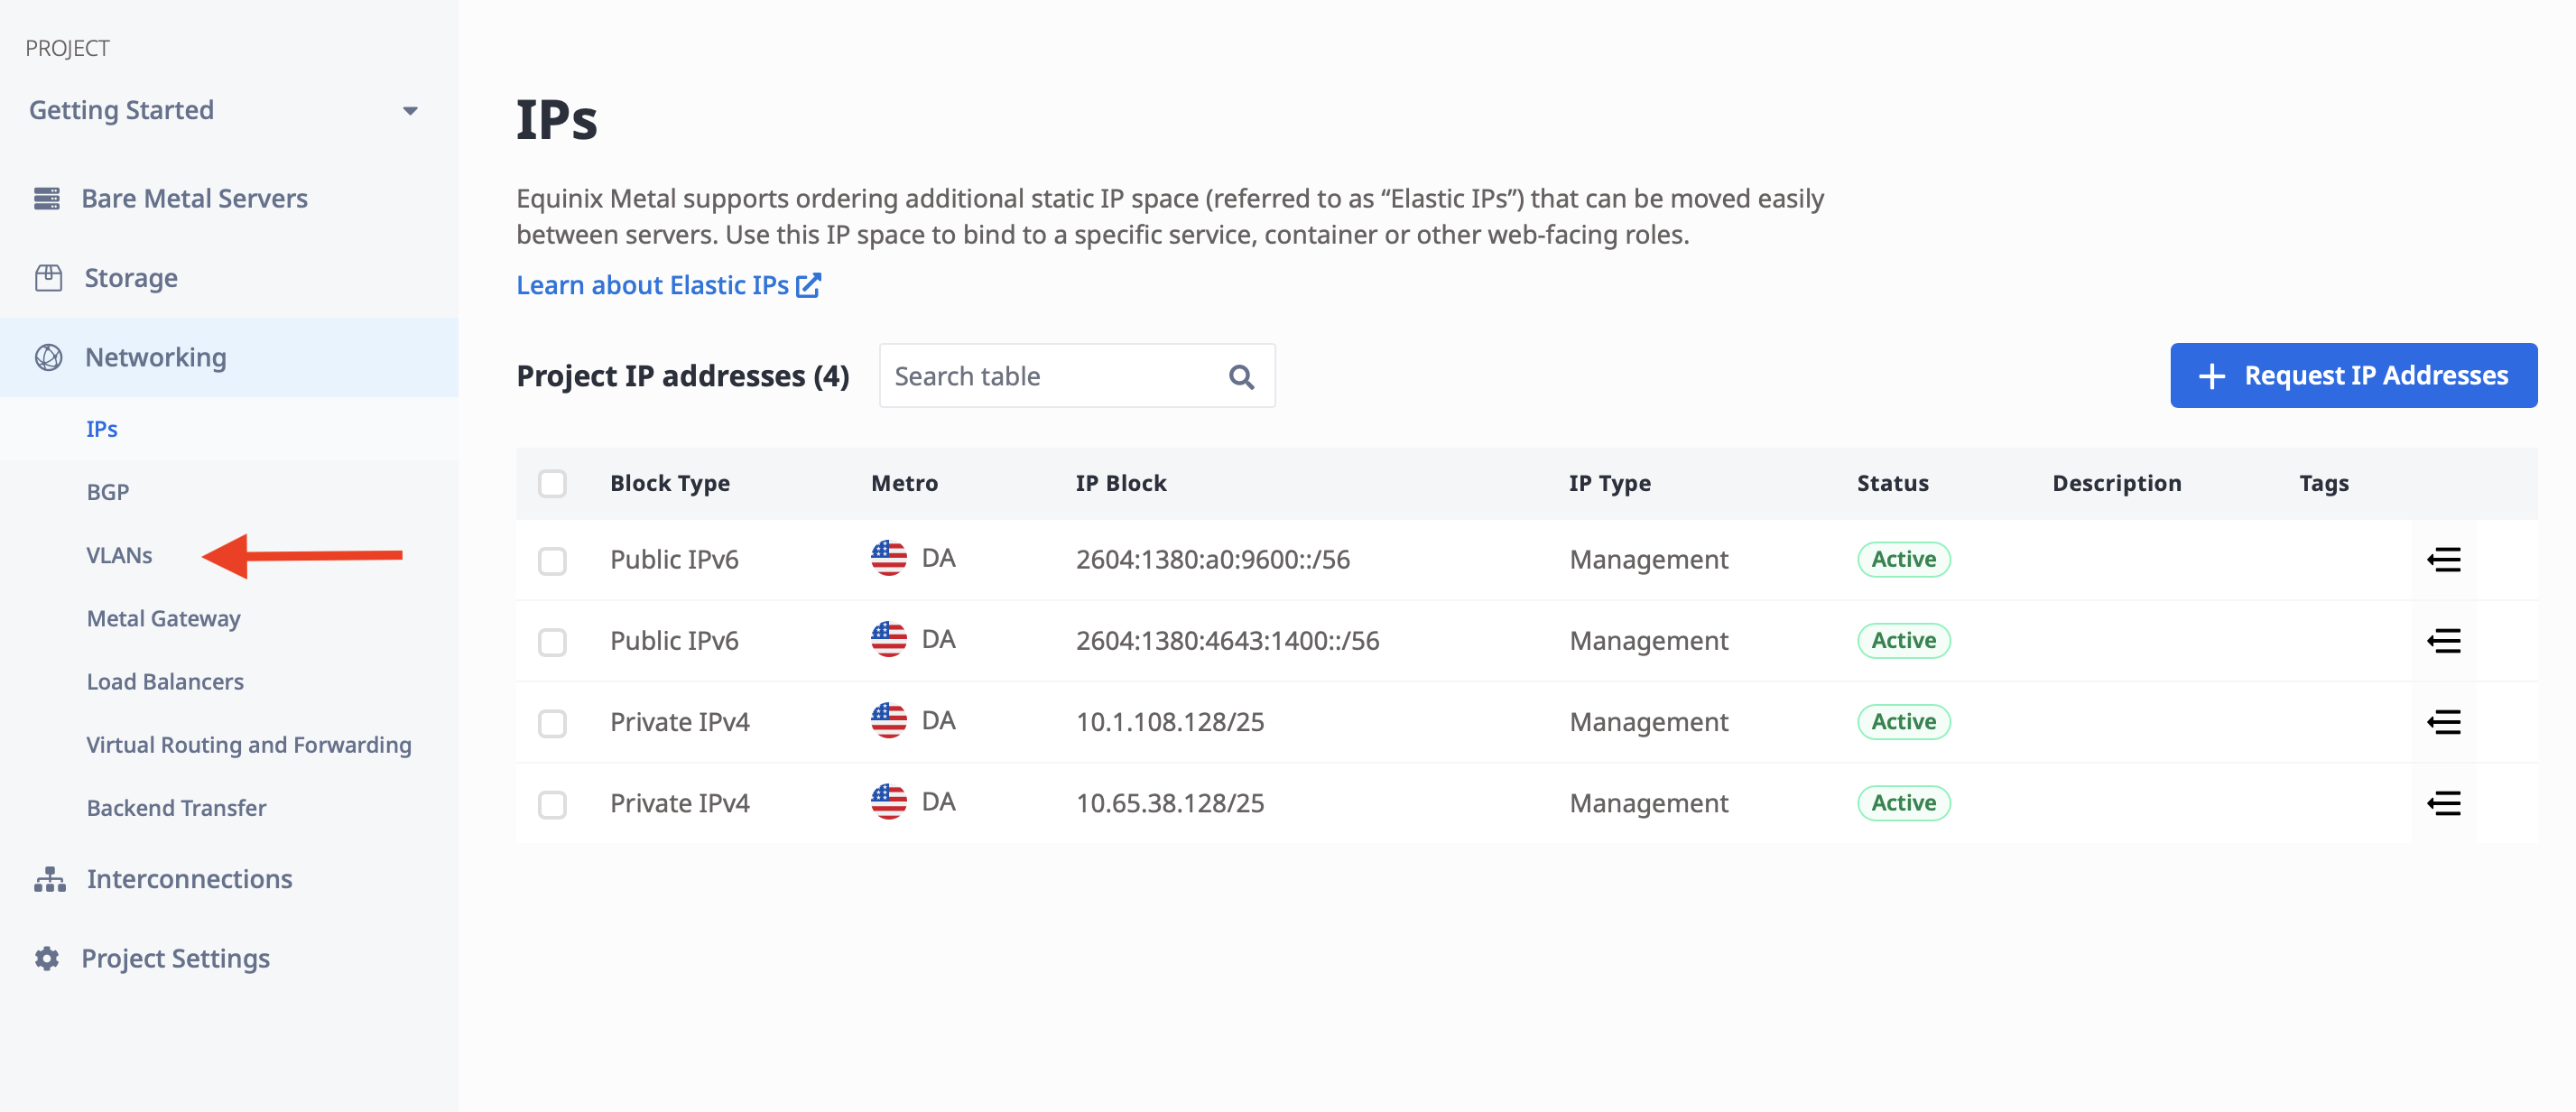
Then Select VLANs:
Then click the "Add a VLAN" button:
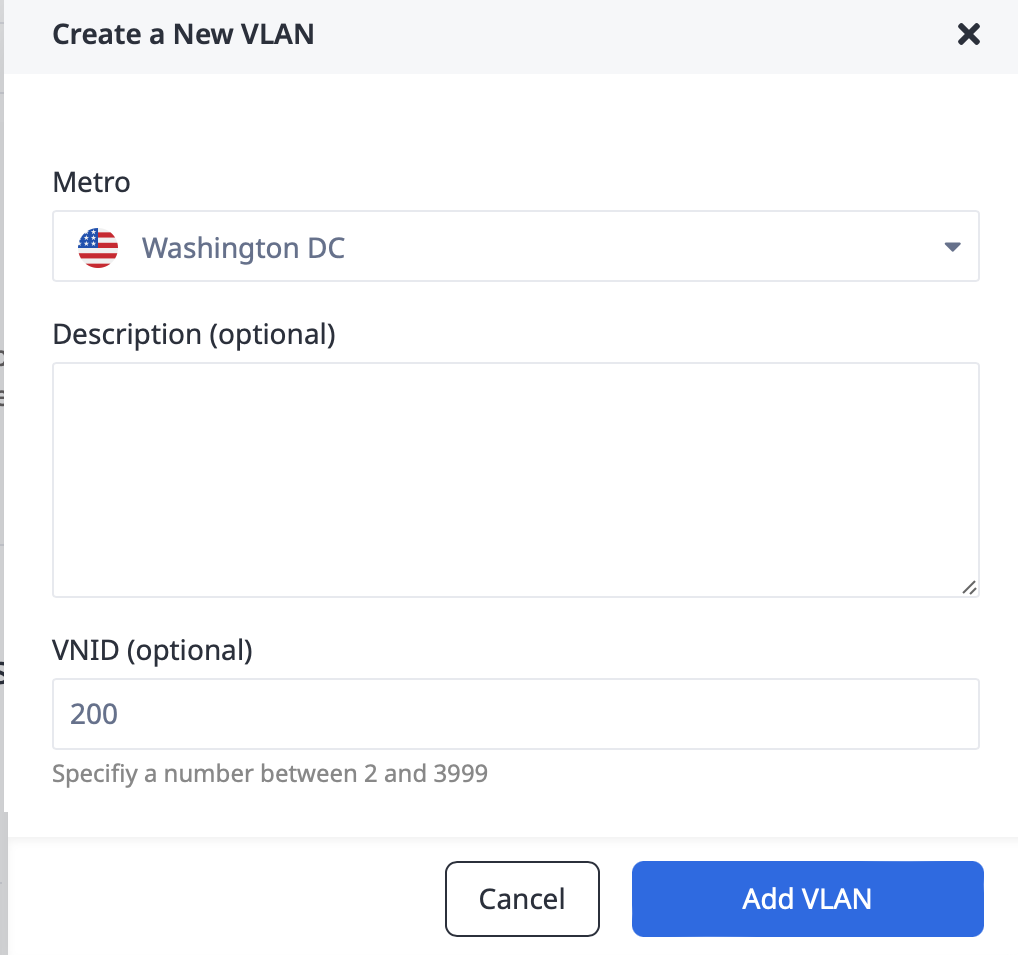
In the dialog that appears, pick a Metro, and any VLAN ID that is convenient for you, or let Metal pick it automatically. For our example, we will use VLAN ID 200 in Washington, because it is the same metro where:
- GCP's
us-east4region is located. - AWS's
us-east-1region is located. - Azure's
East USregion is located.
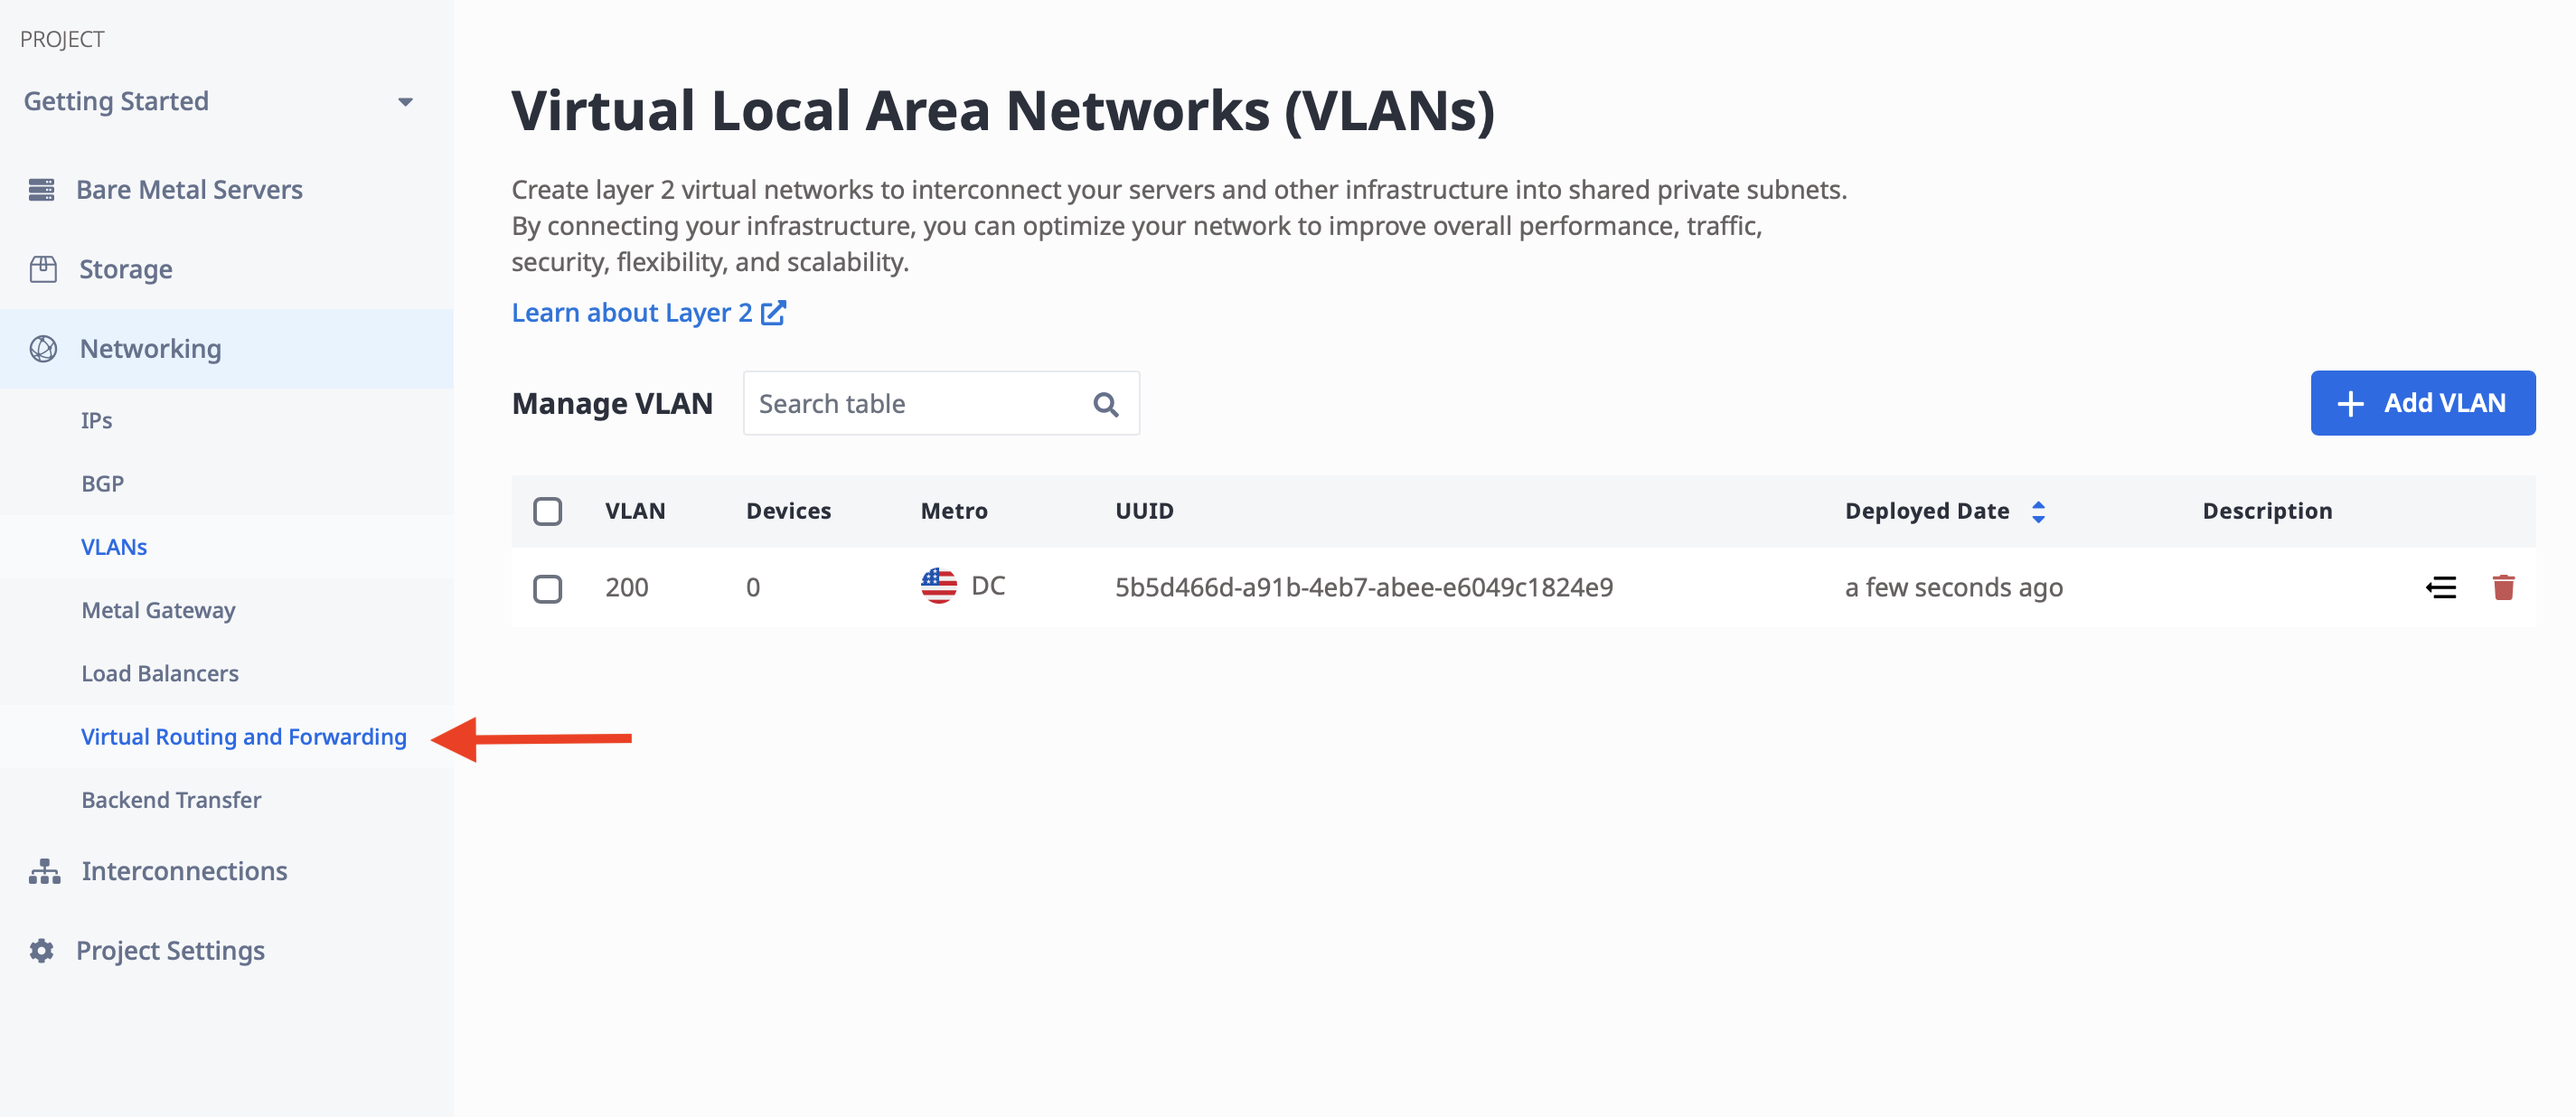
Deploy VRF
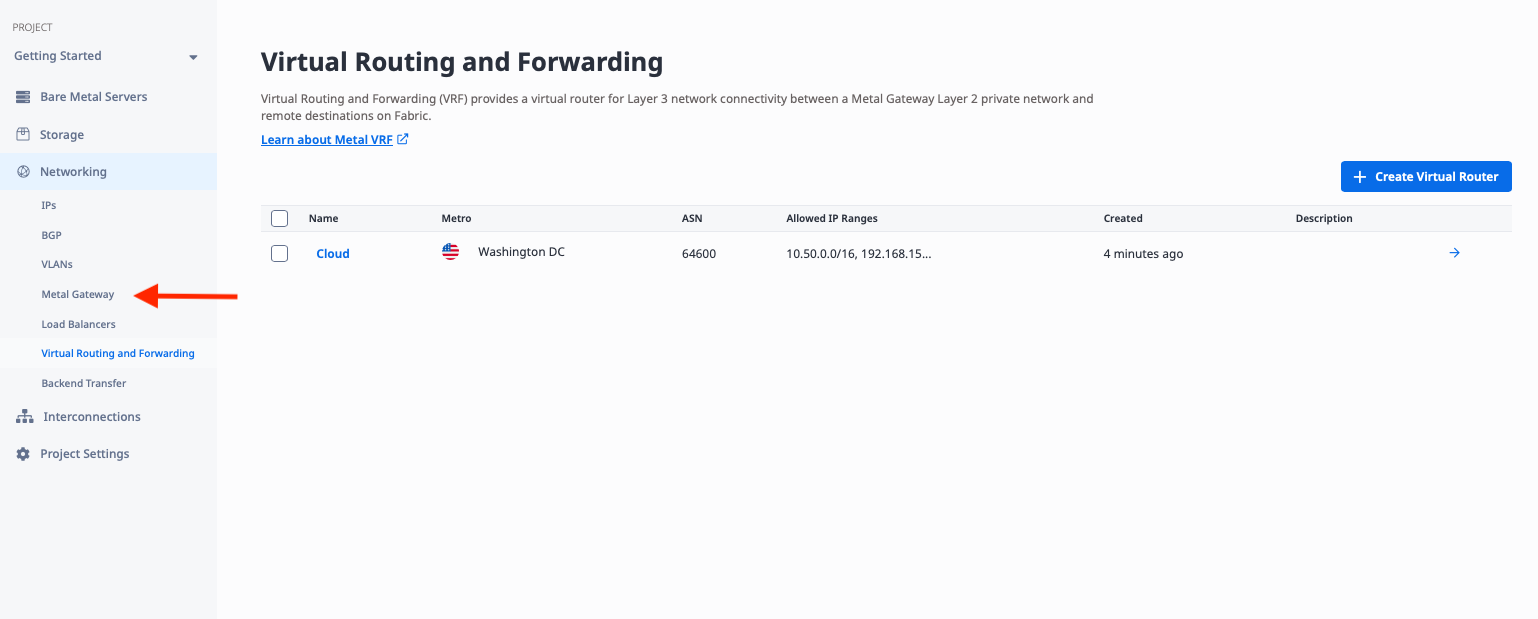
With the VLAN in place, you now need a VRF that will be used to connect to Equinix Fabric. The VRF is under "Networking," like "VLANs." Select "Virtual Routing and Forwarding":
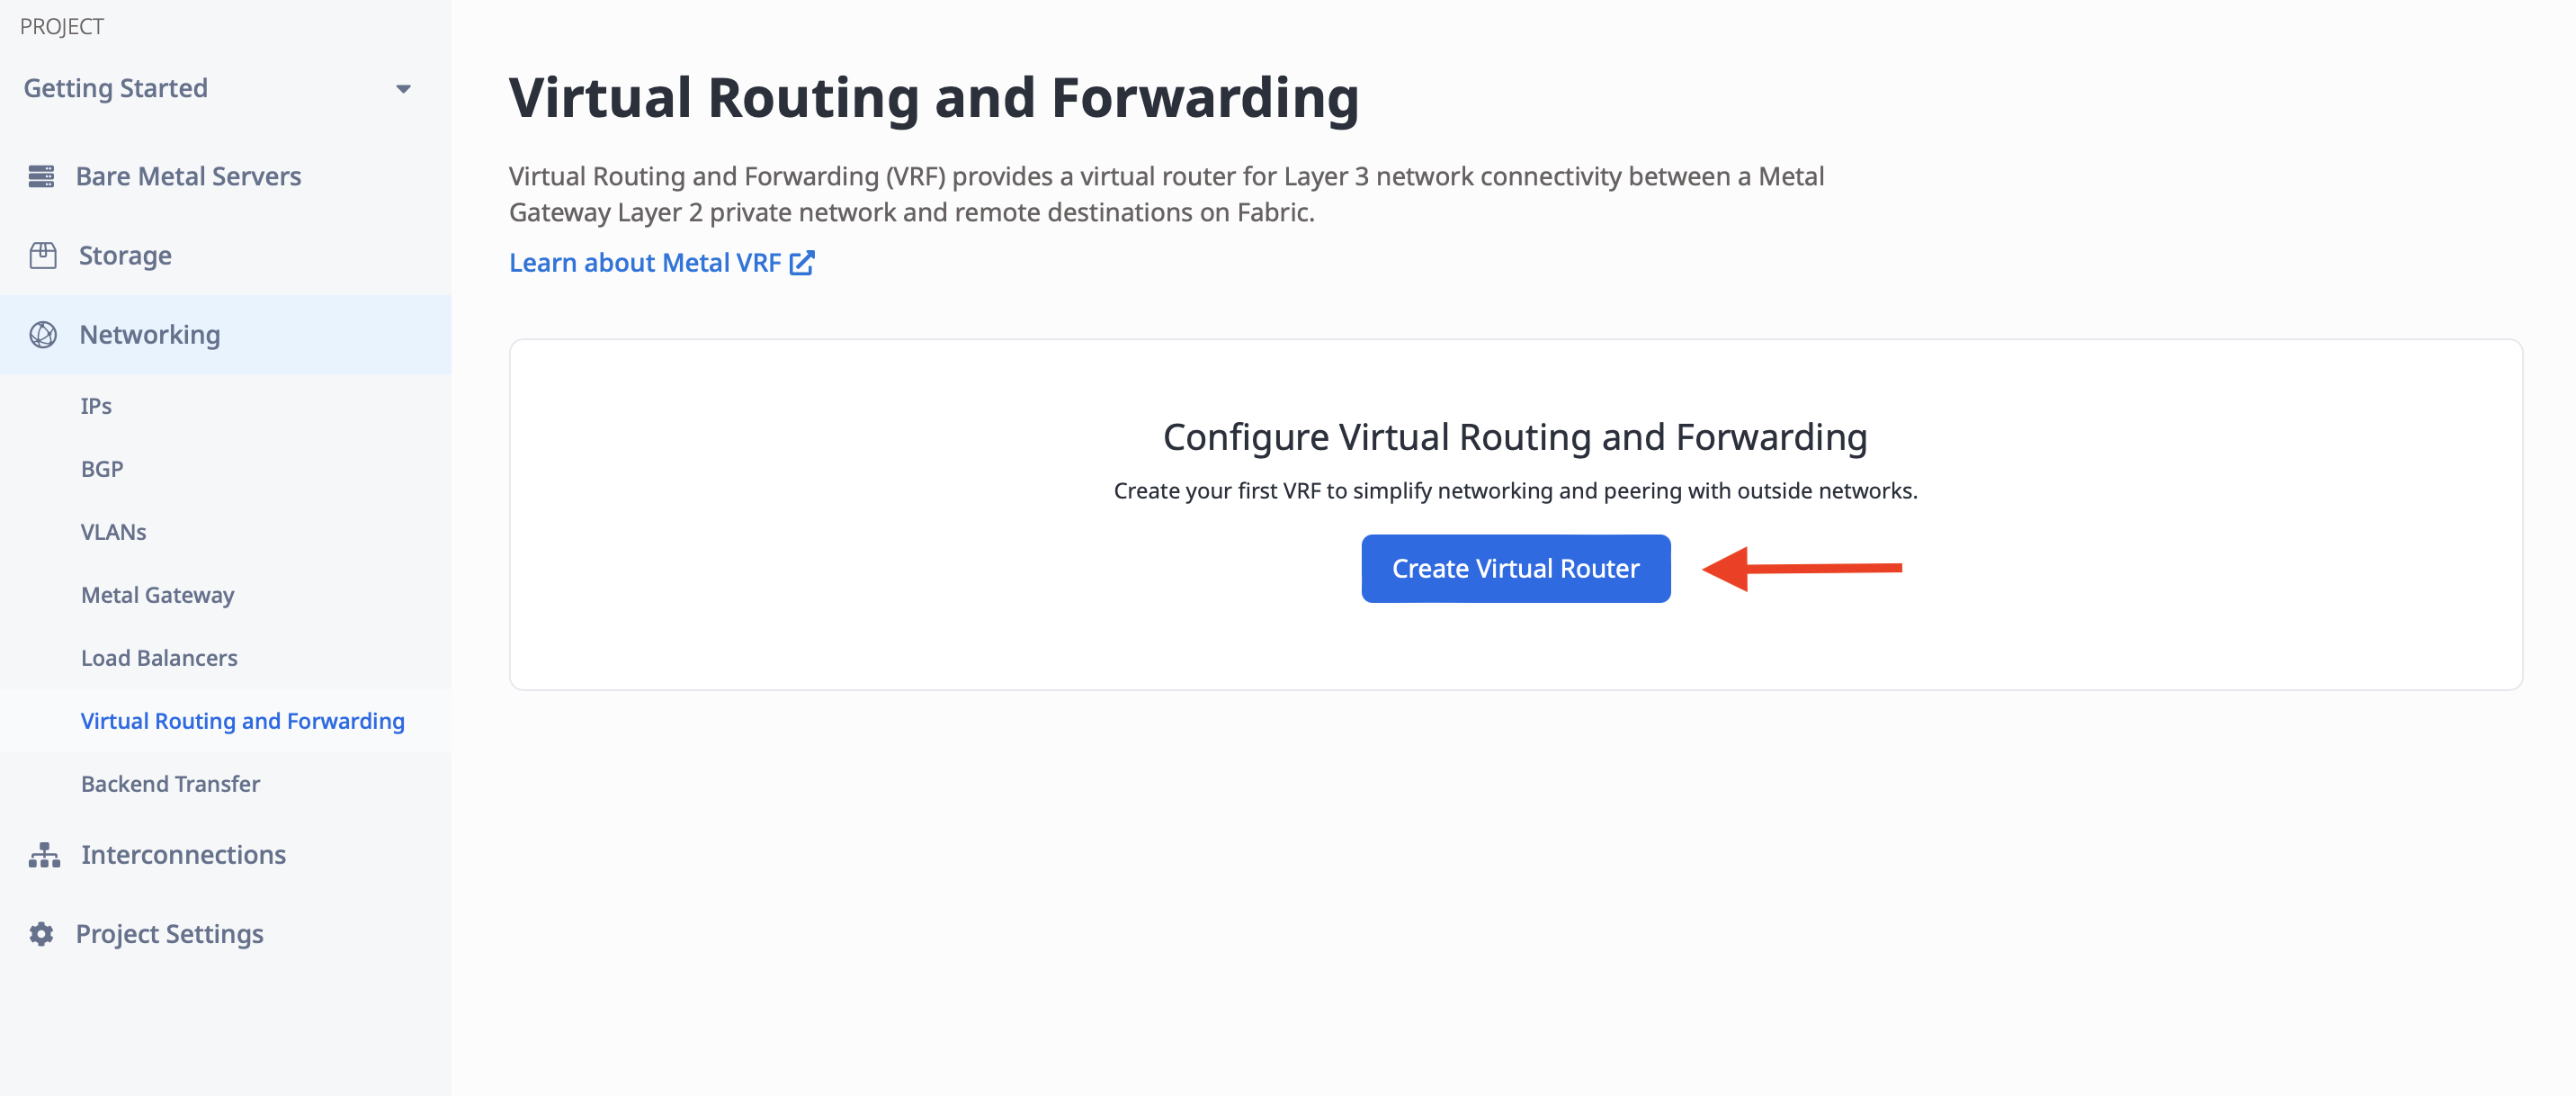
Then click "Create Virtual Router":
To create the Virtual Router, you need a few pieces of information:
- A name for the VRF. It doesn't have any inherent meaning; it just needs to be useful to you. We will call it "Cloud".
- The Metro. This must be the same metro as the VLAN you are connecting to. In our case, it is Washington.
- The ASN. This is the Metal-side ASN selected earlier,
64600. - The allowed IP ranges. These are CIDR ranges that will be "behind" the VRF on the Metal side. Whatever ranges you pick here, these are the ranges that the VRF will tell Fabric, "send those addresses to me, I can handle them." This must include:
- CIDRs used for Metal Gateways; we use the range reserved earlier:
10.50.0.0/16 - CIDRs used for subnets for the Fabric VCs. You need the primary and secondary ranges for all of the cloud provider connections:
- AWS:
192.168.15.0/30and192.168.15.4/30, but VRF only allows up to/29, so use192.168.15.0/29, which covers both. - Azure:
192.168.15.8/30and192.168.15.12/30, but VRF only allows up to/29, so use192.168.15.8/29, which covers both. - GCP: You won't know these until deploying in Google, so you will have to go back and update this later.
- AWS:
- CIDRs used for Metal Gateways; we use the range reserved earlier:
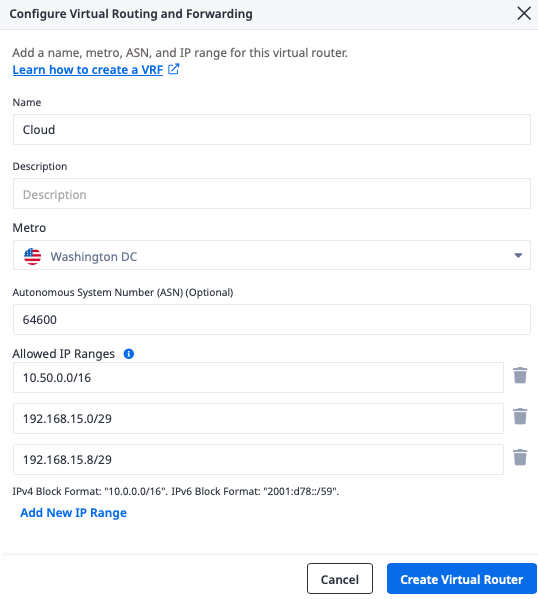
Click the "Create Virtual Router" button when you're finished.
Once the VRF is created, you need to reserve IP ranges to use from within the allowed IP ranges.
For this particular VLAN you'll use the range described above, 10.50.10.0/24, which is within the
larger VRF allowed IP ranges.
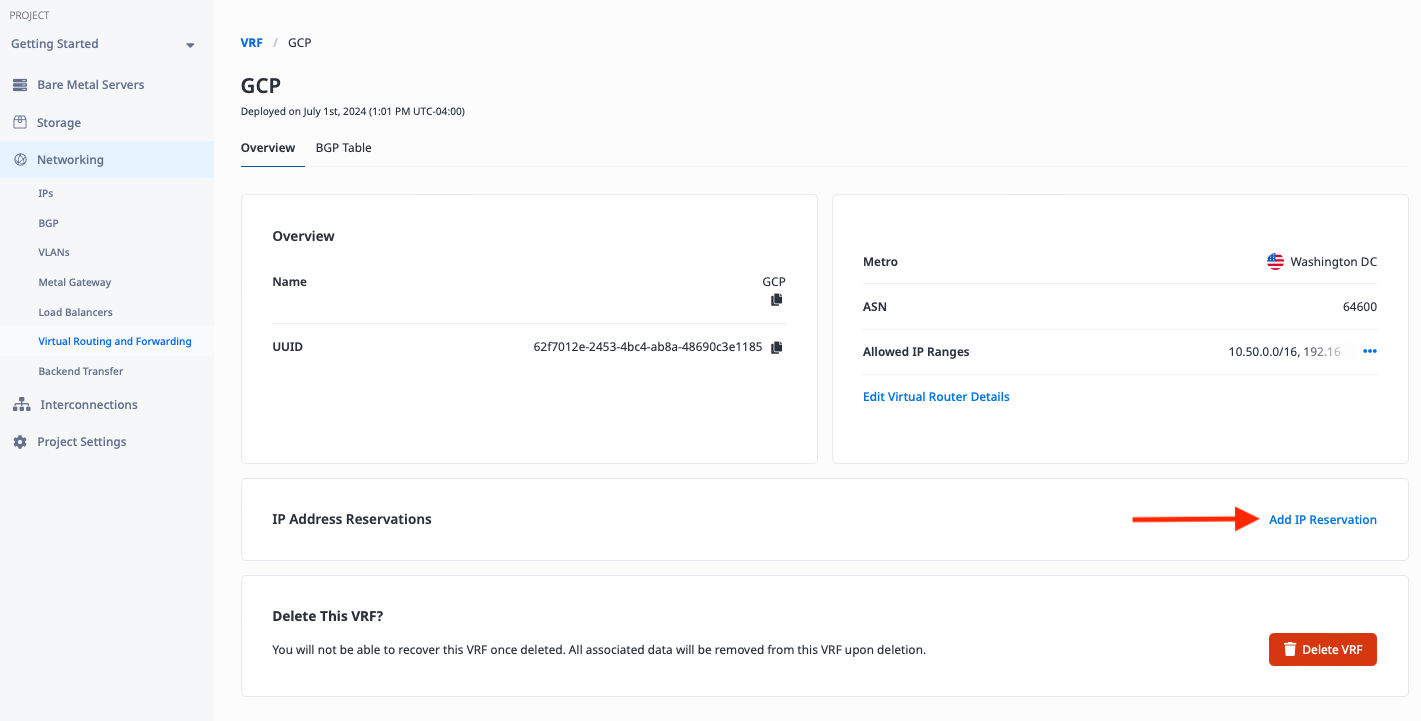
In the Console, click on the VRF:
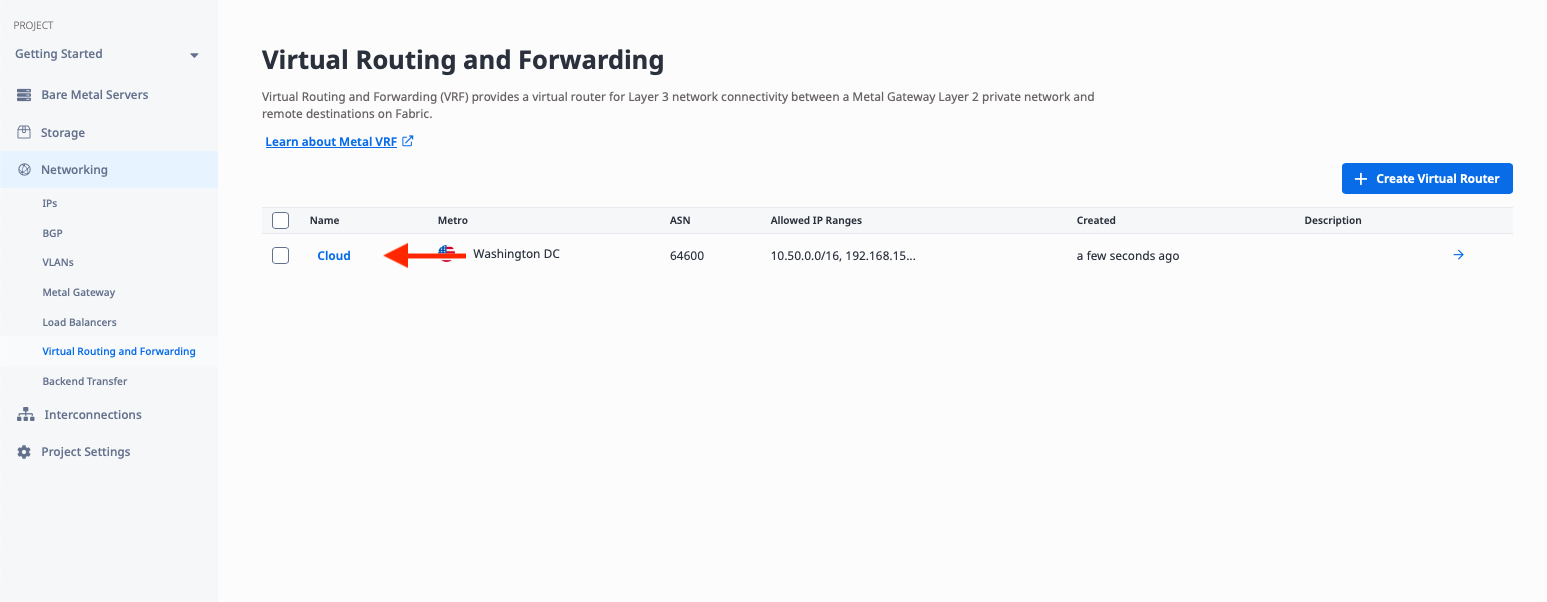
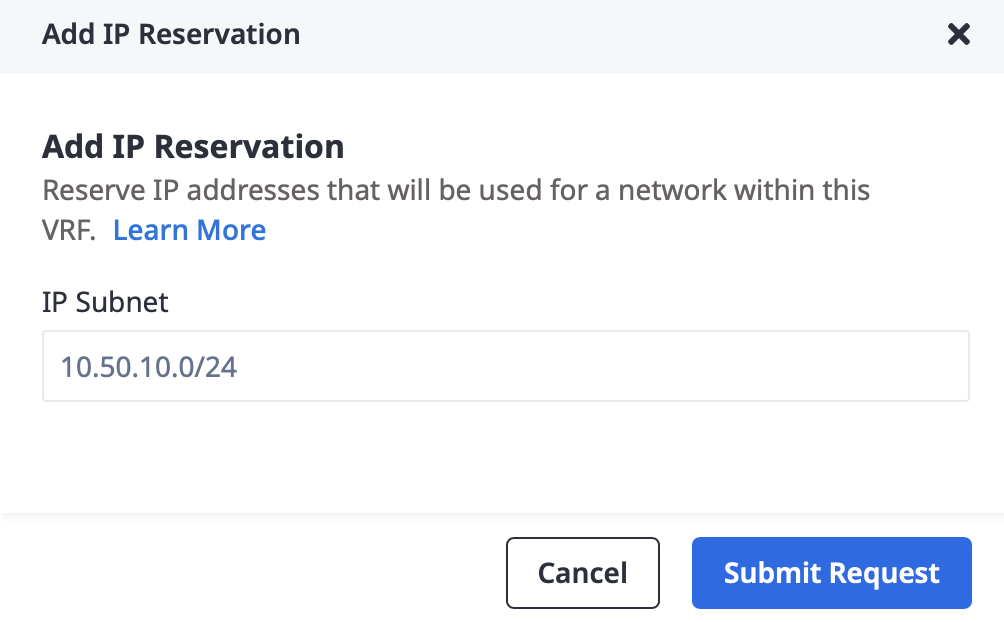
This brings up the VRF details. Click on "Add IP Reservation":
Then enter the range 10.50.10.0/24 and click "Submit Request":
Deploy Equinix Metal Gateway
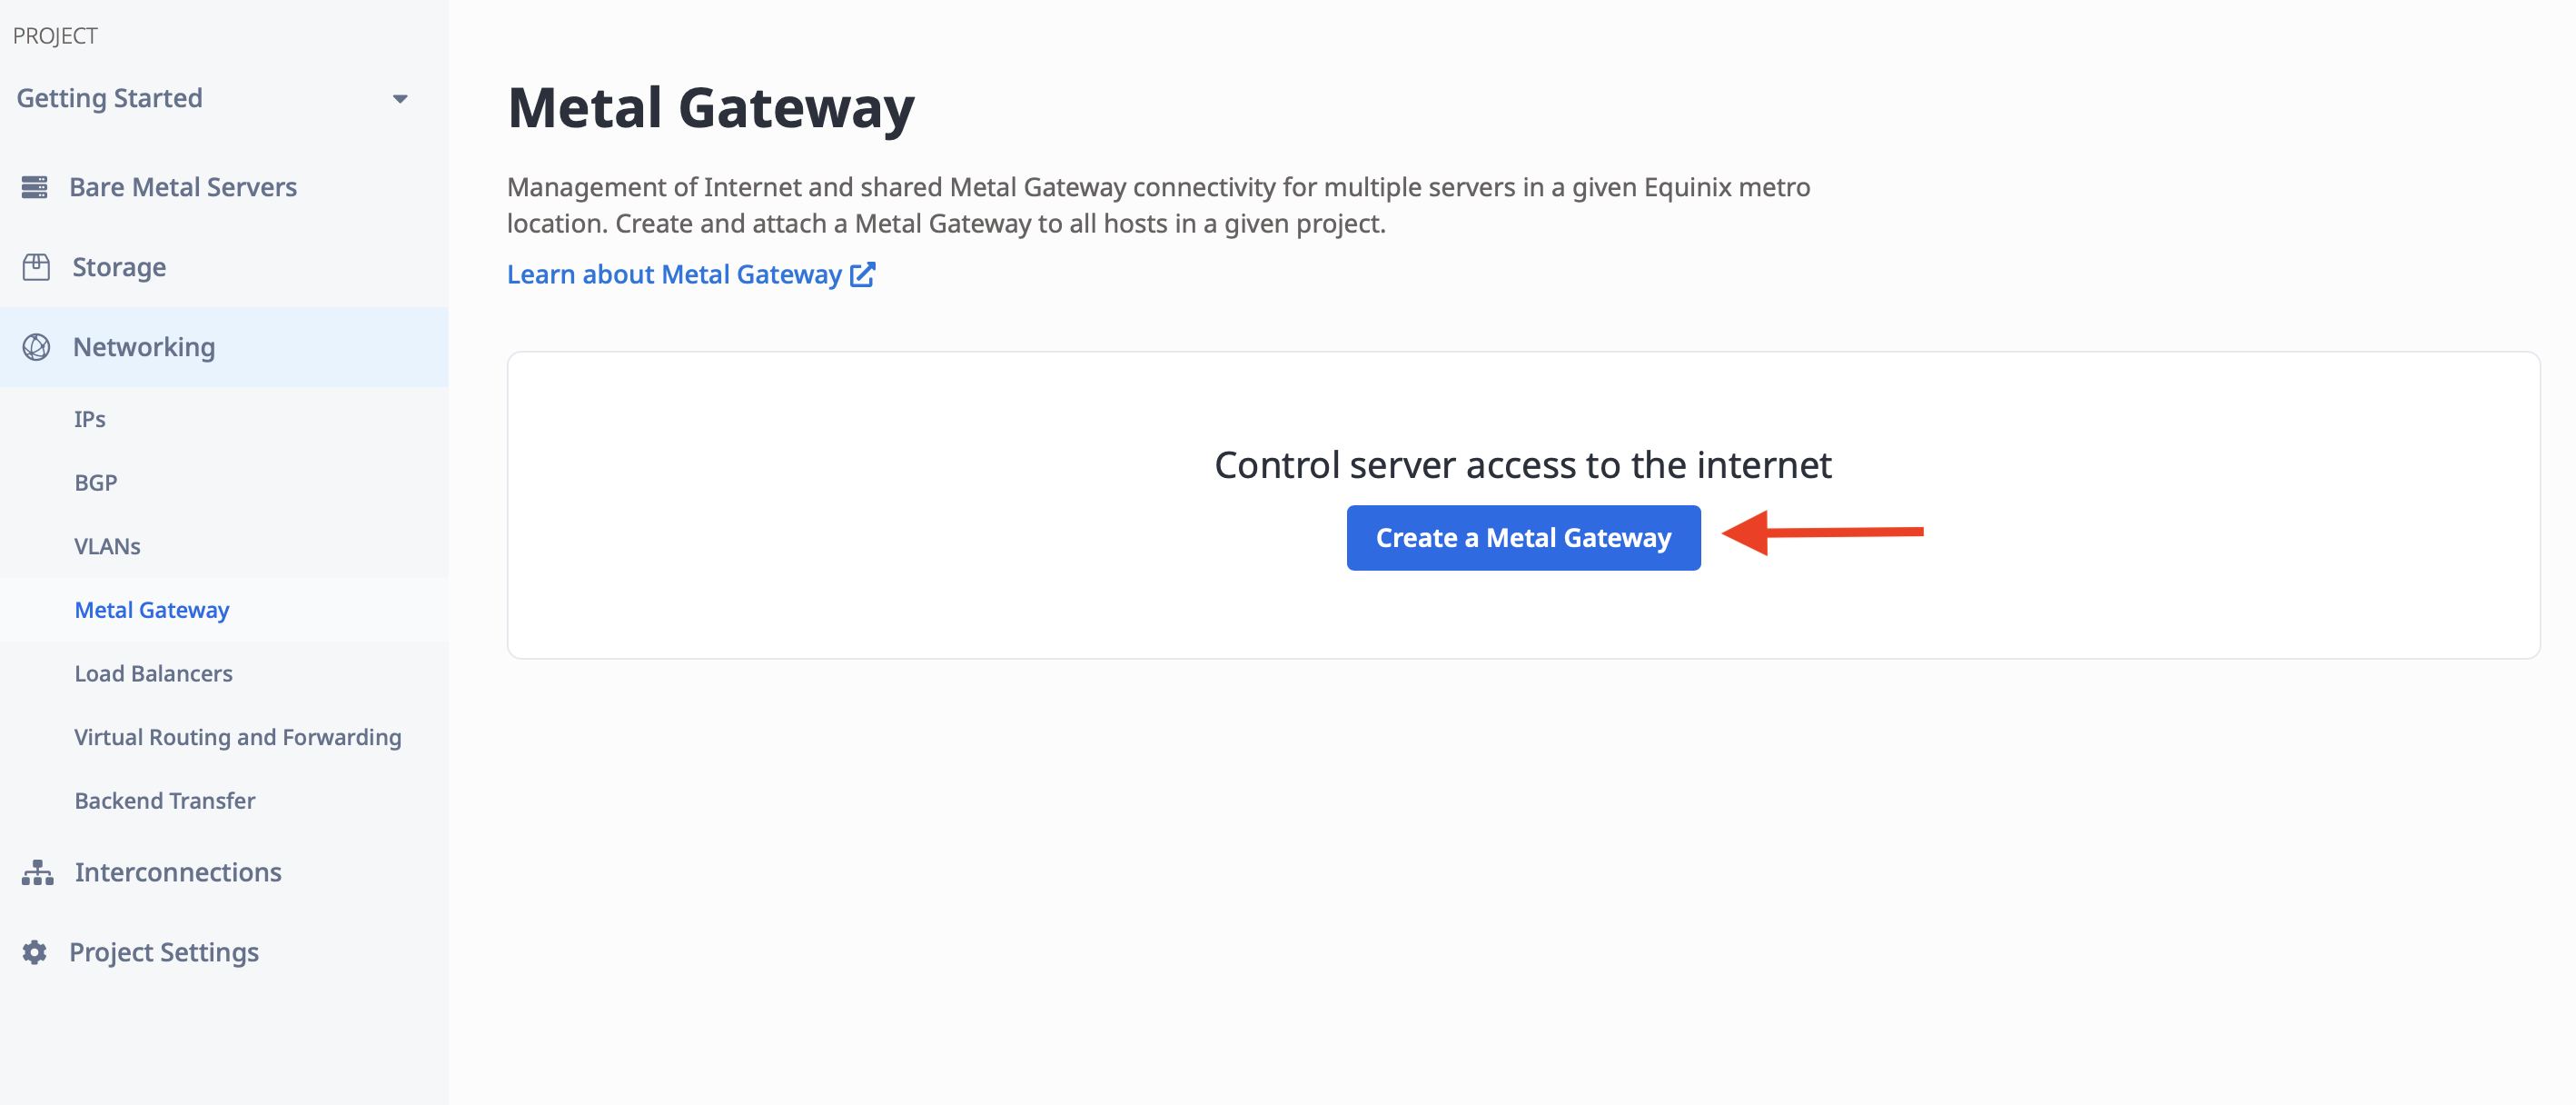
The VLAN and VRF are created, so the next step is to create a Metal Gateway to link them together. "Metal Gateway" is under "Networking," like "VLANs" and "Virtual Routing and Forwarding." Click on "Metal Gateways":
Then click "Create a Metal Gateway":
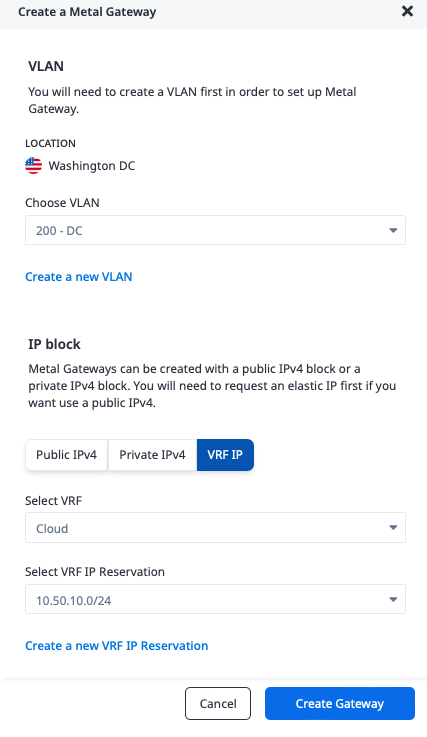
In order to create the Metal Gateway, you need a few pieces of information:
- The Metro. This must be the same metro as the VLAN you are connecting to. In our case, it is Washington.
- The VLAN. This is the VLAN that the Metal Gateway will connect to. We will use VLAN 200 which we created earlier.
- The IP block. This is one of a reserved public IPv4 range, a private IPv4 range, or a VRF IP range. Since we are connecting to a VRF, we will pick "VRF IP," and then the IP address reservation from the VRF.
Deploy Fabric Virtual Connections (VCs)
With the Metal Gateway in place, you can now create the Fabric Virtual Connections (VCs) to connect to the cloud providers.
You'll need to create a VC for each cloud provider, and each VC will have a primary and secondary connection.
Creating the GCP Connections
There are several steps to deploying the Fabric Virtual Connection (VC):
- Create the connection in Equinix Metal to Fabric for GCP
- Create the Cloud Router and VLAN attachment in GCP
- Create the Metal-GCP Fabric VC
- Update Equinix Metal with the GCP details
Create the connection in Equinix Metal to Fabric for GCP
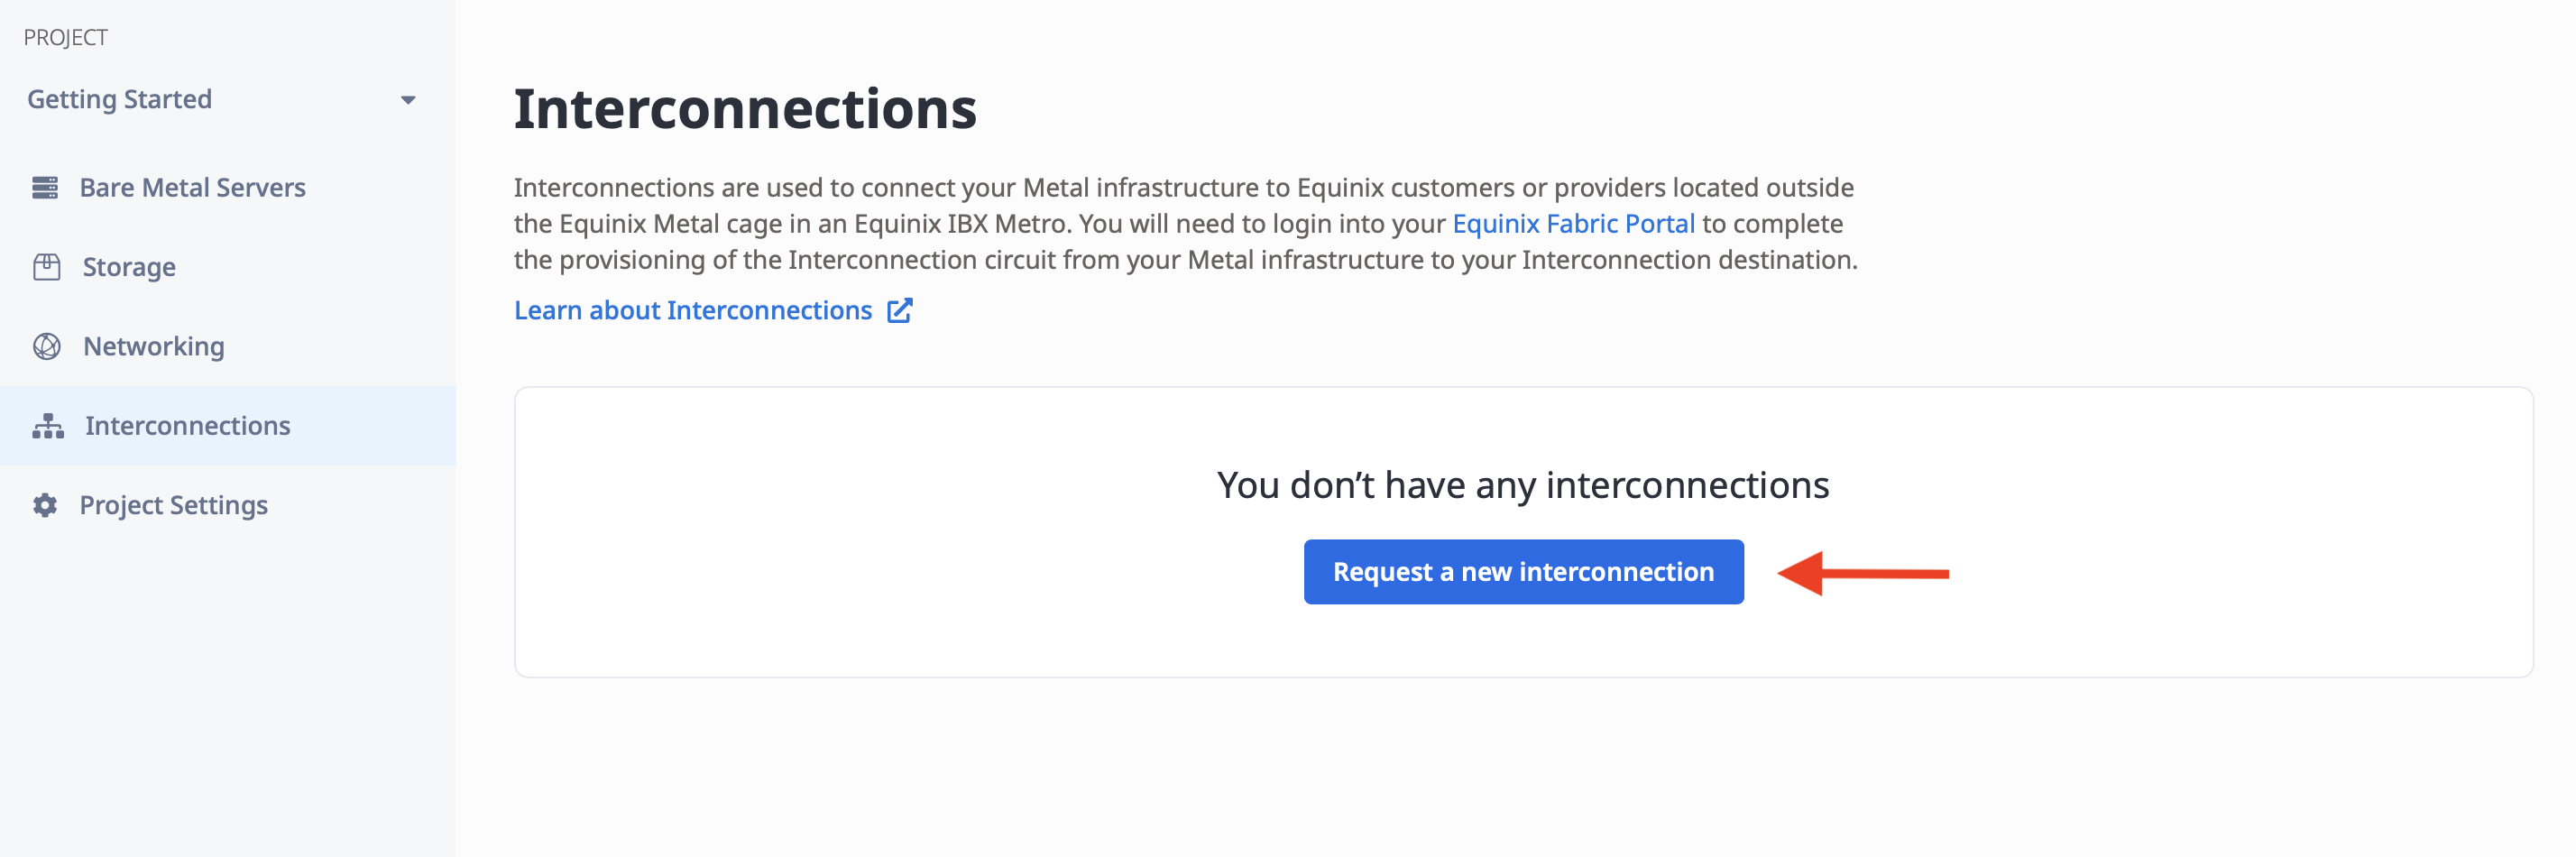
From the left navigation bar, select Interconnections:
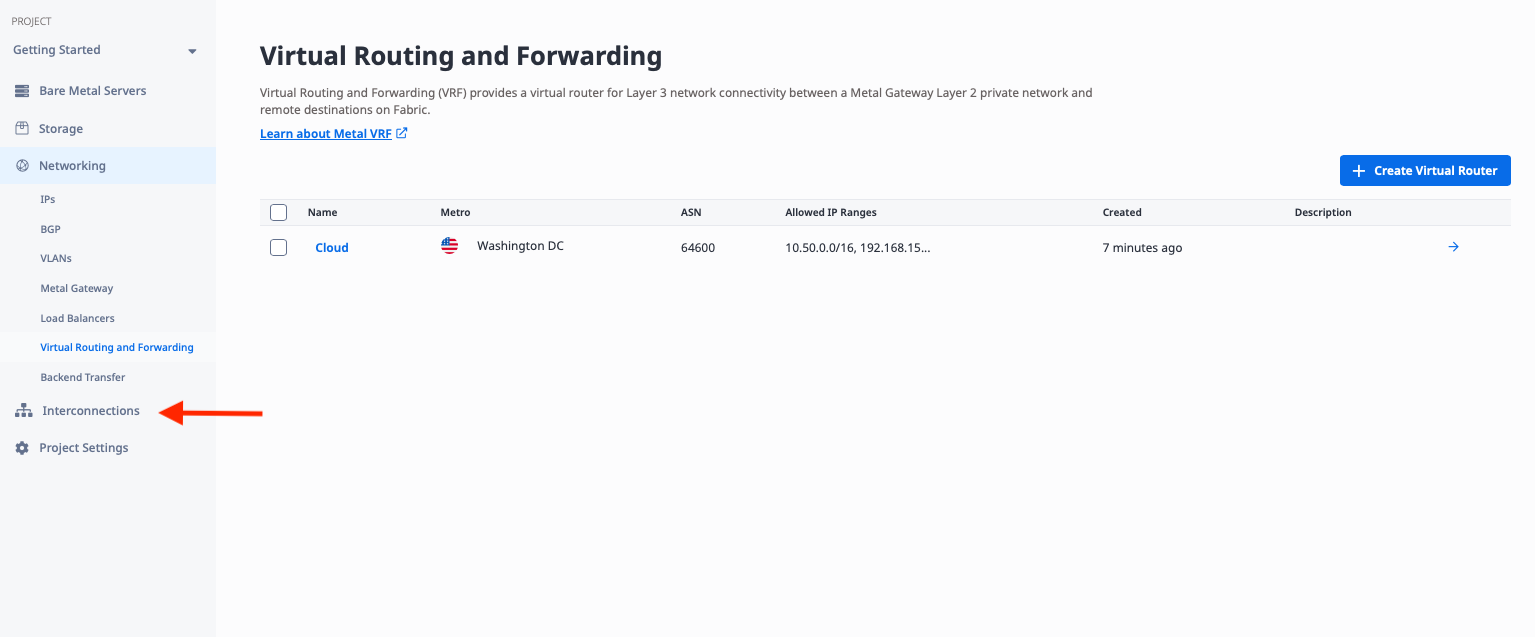
Then click the "Request a new interconnection" button:
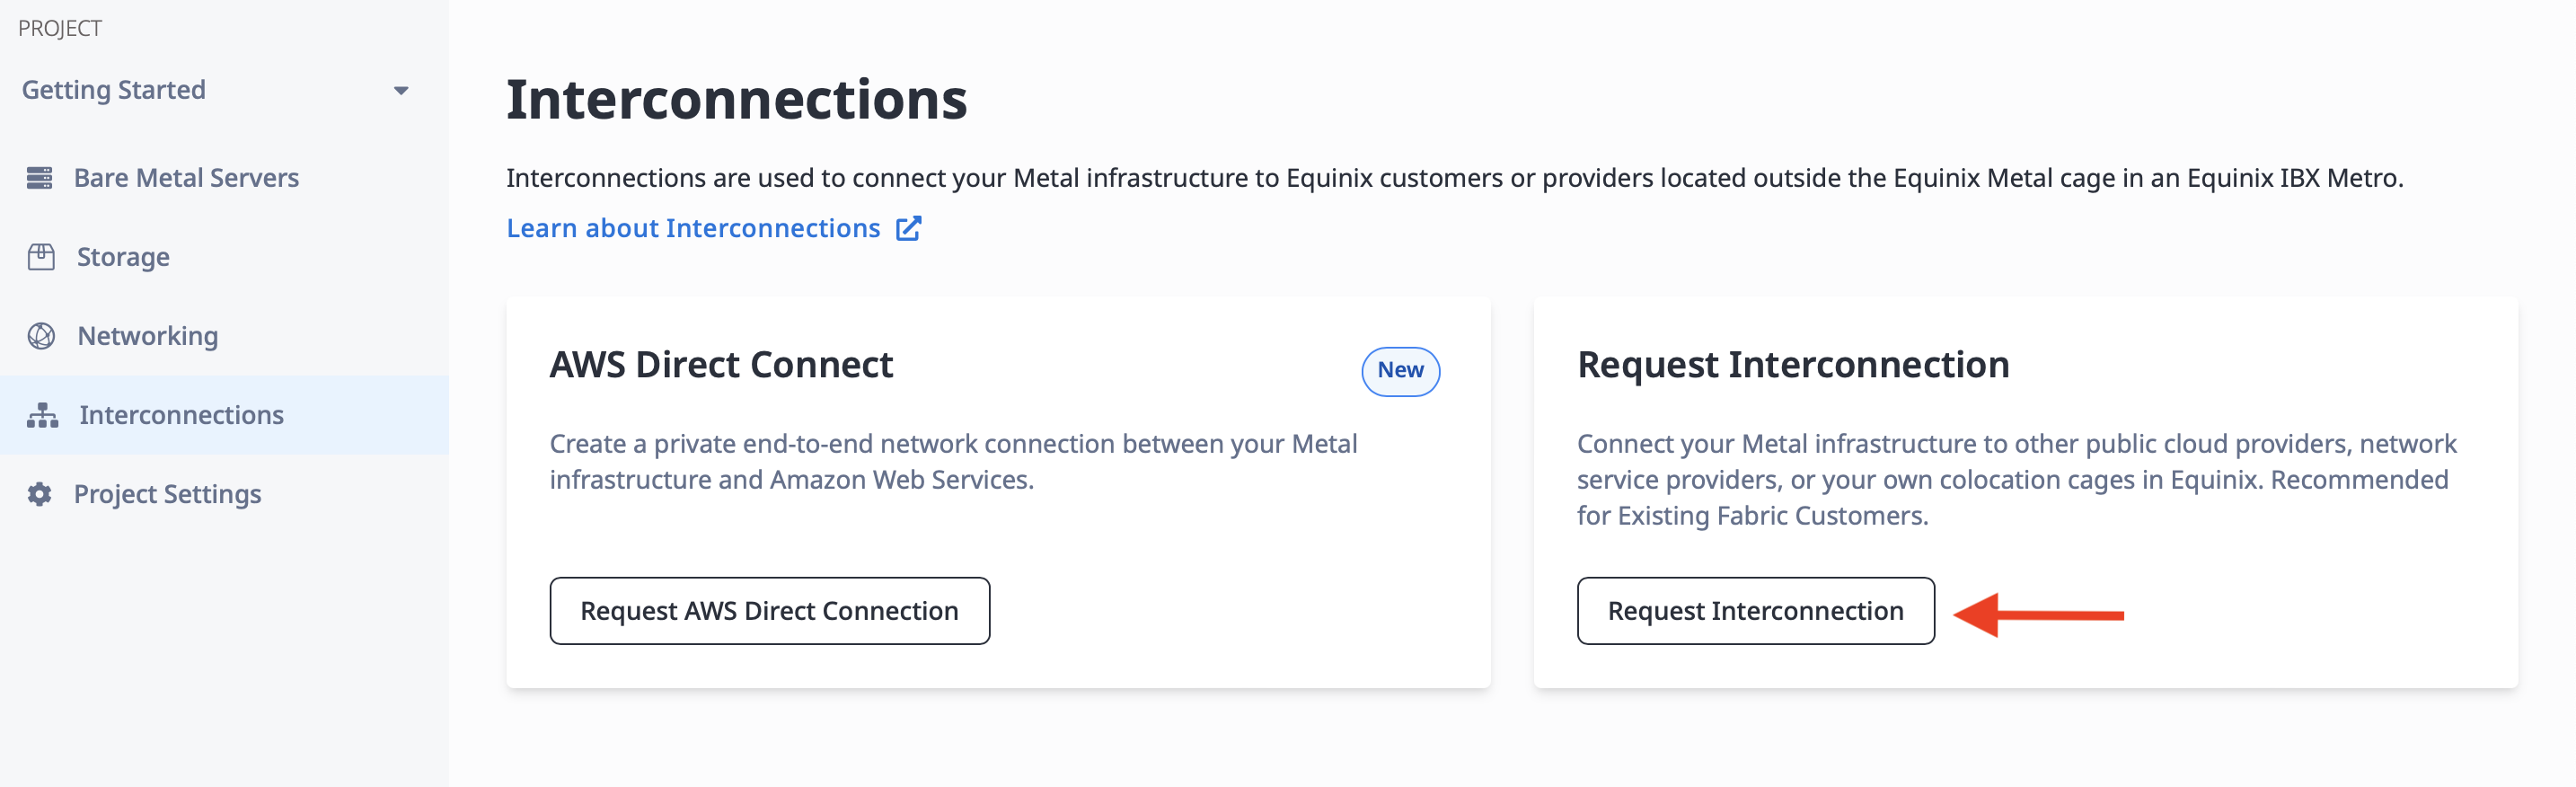
There are two kinds of interconnection you can request, AWS Direct Connect and Request Interconnection. Since we are not connecting to AWS, select the "Request Interconnection" button:
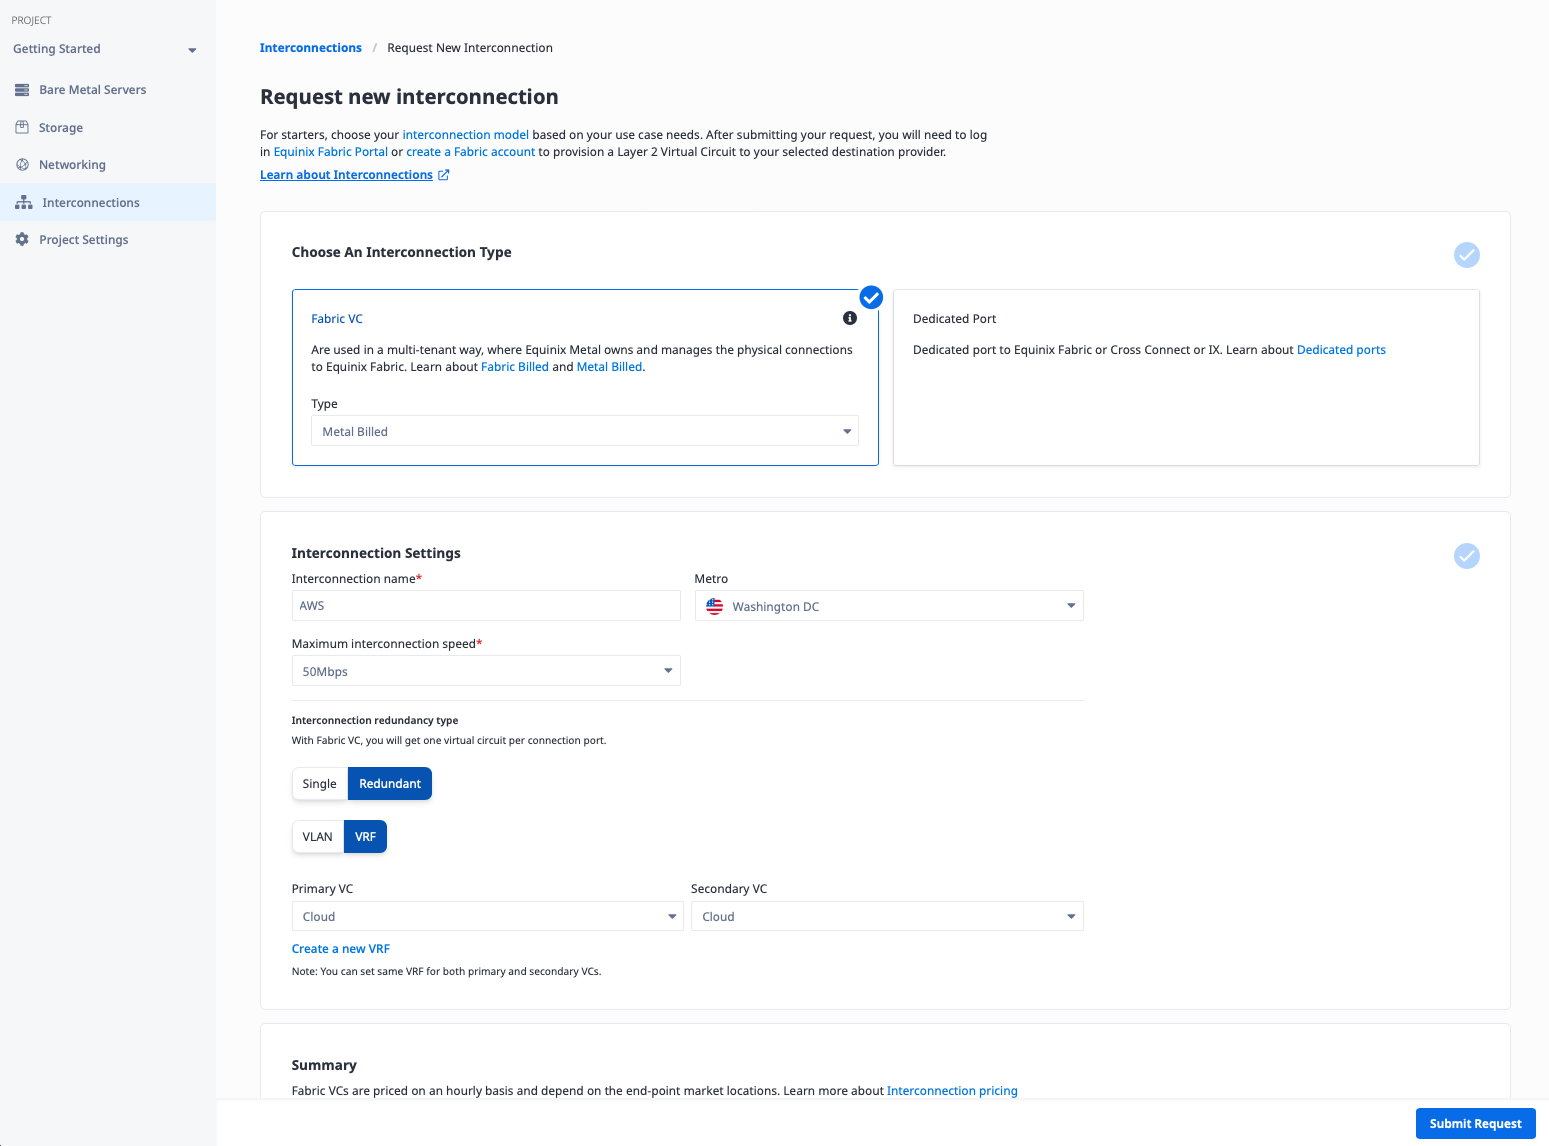
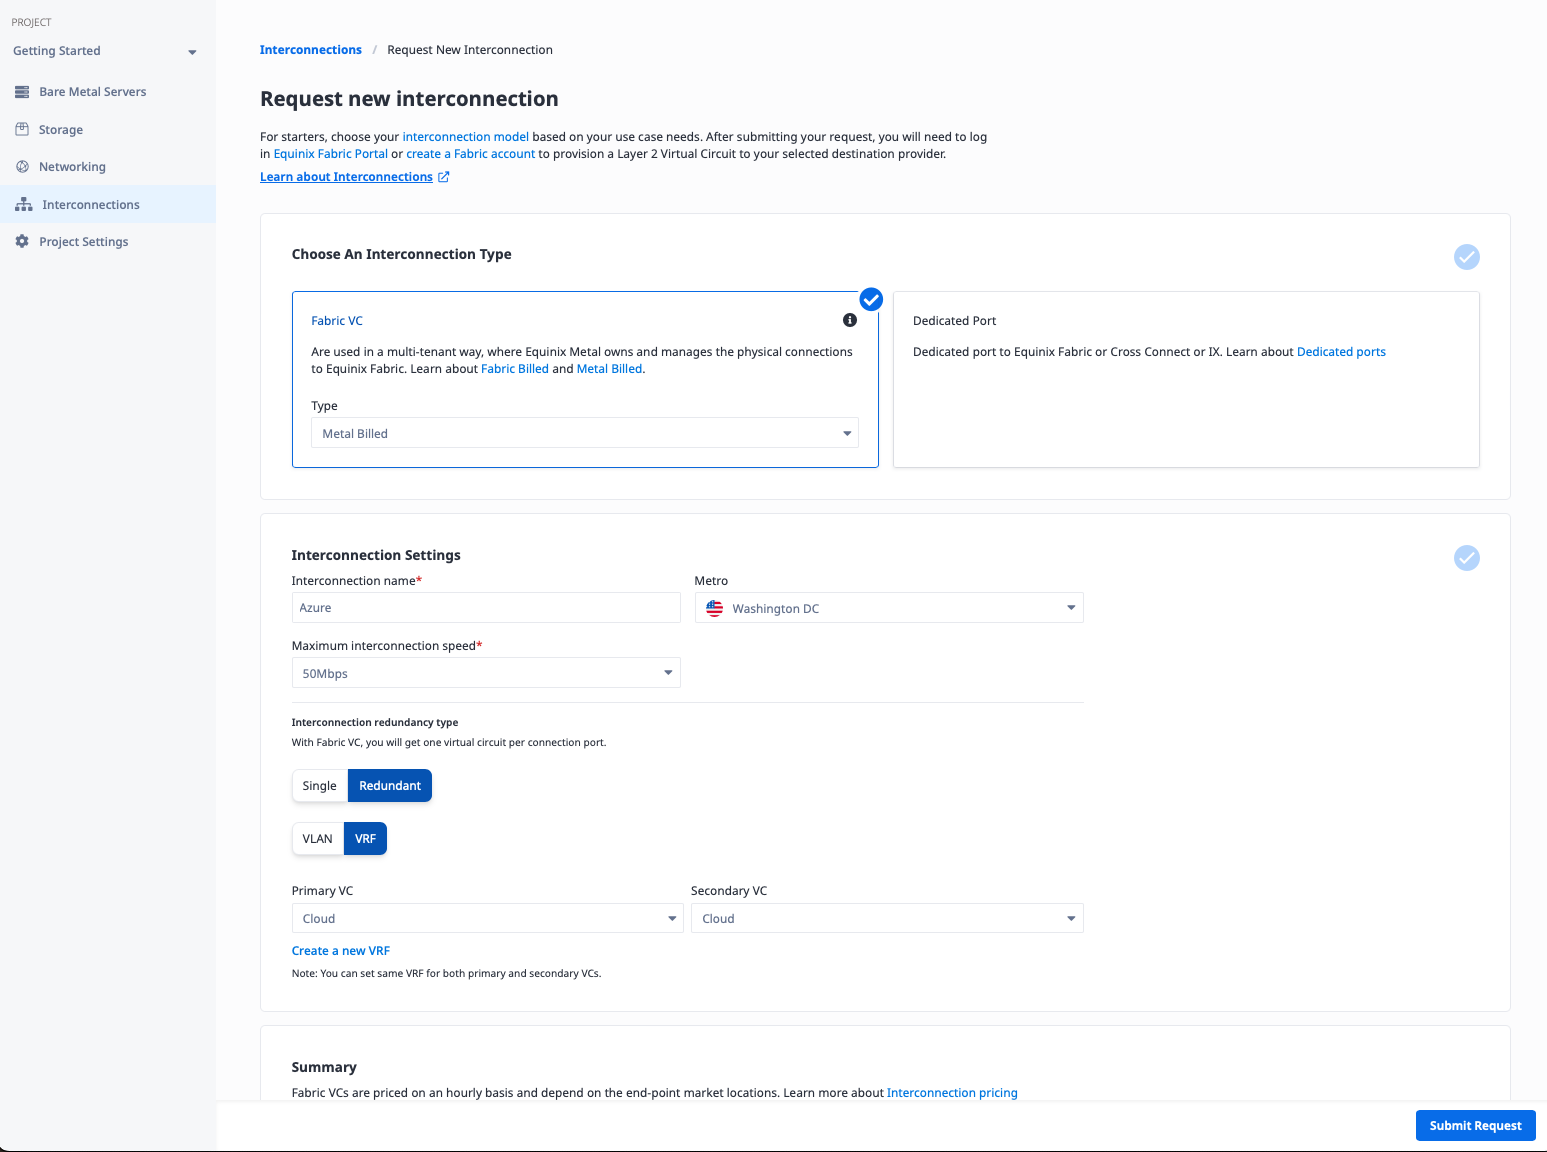
The next screen has options for interconnections: Fabric VC and Dedicated Port. We won't cover dedicated ports in this guide, as we are focused on using Equinix Fabric. If you are interested in learning more about dedicated ports, please see the dedicated ports documentation. Since this portion of the guide is focused on connecting to GCP, select Fabric VC.
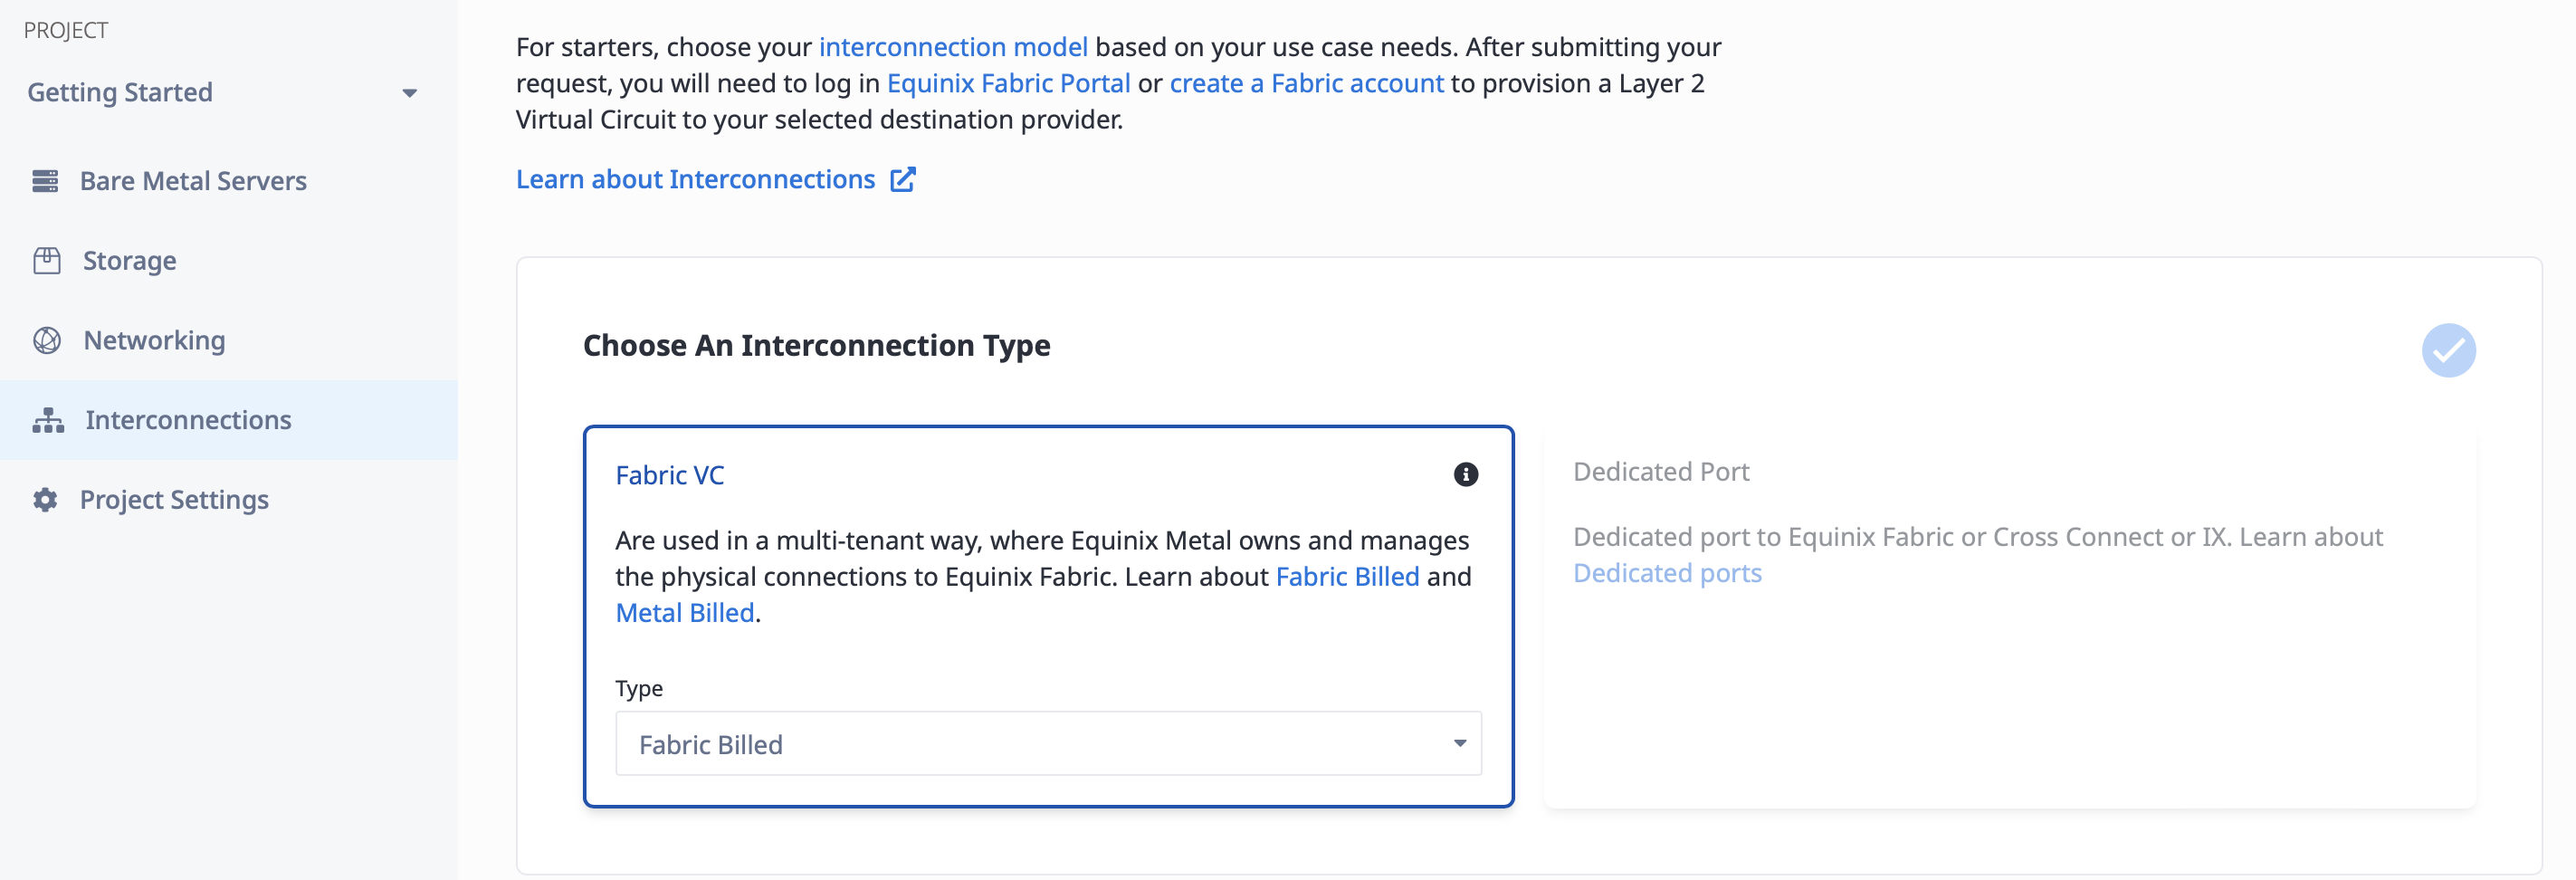
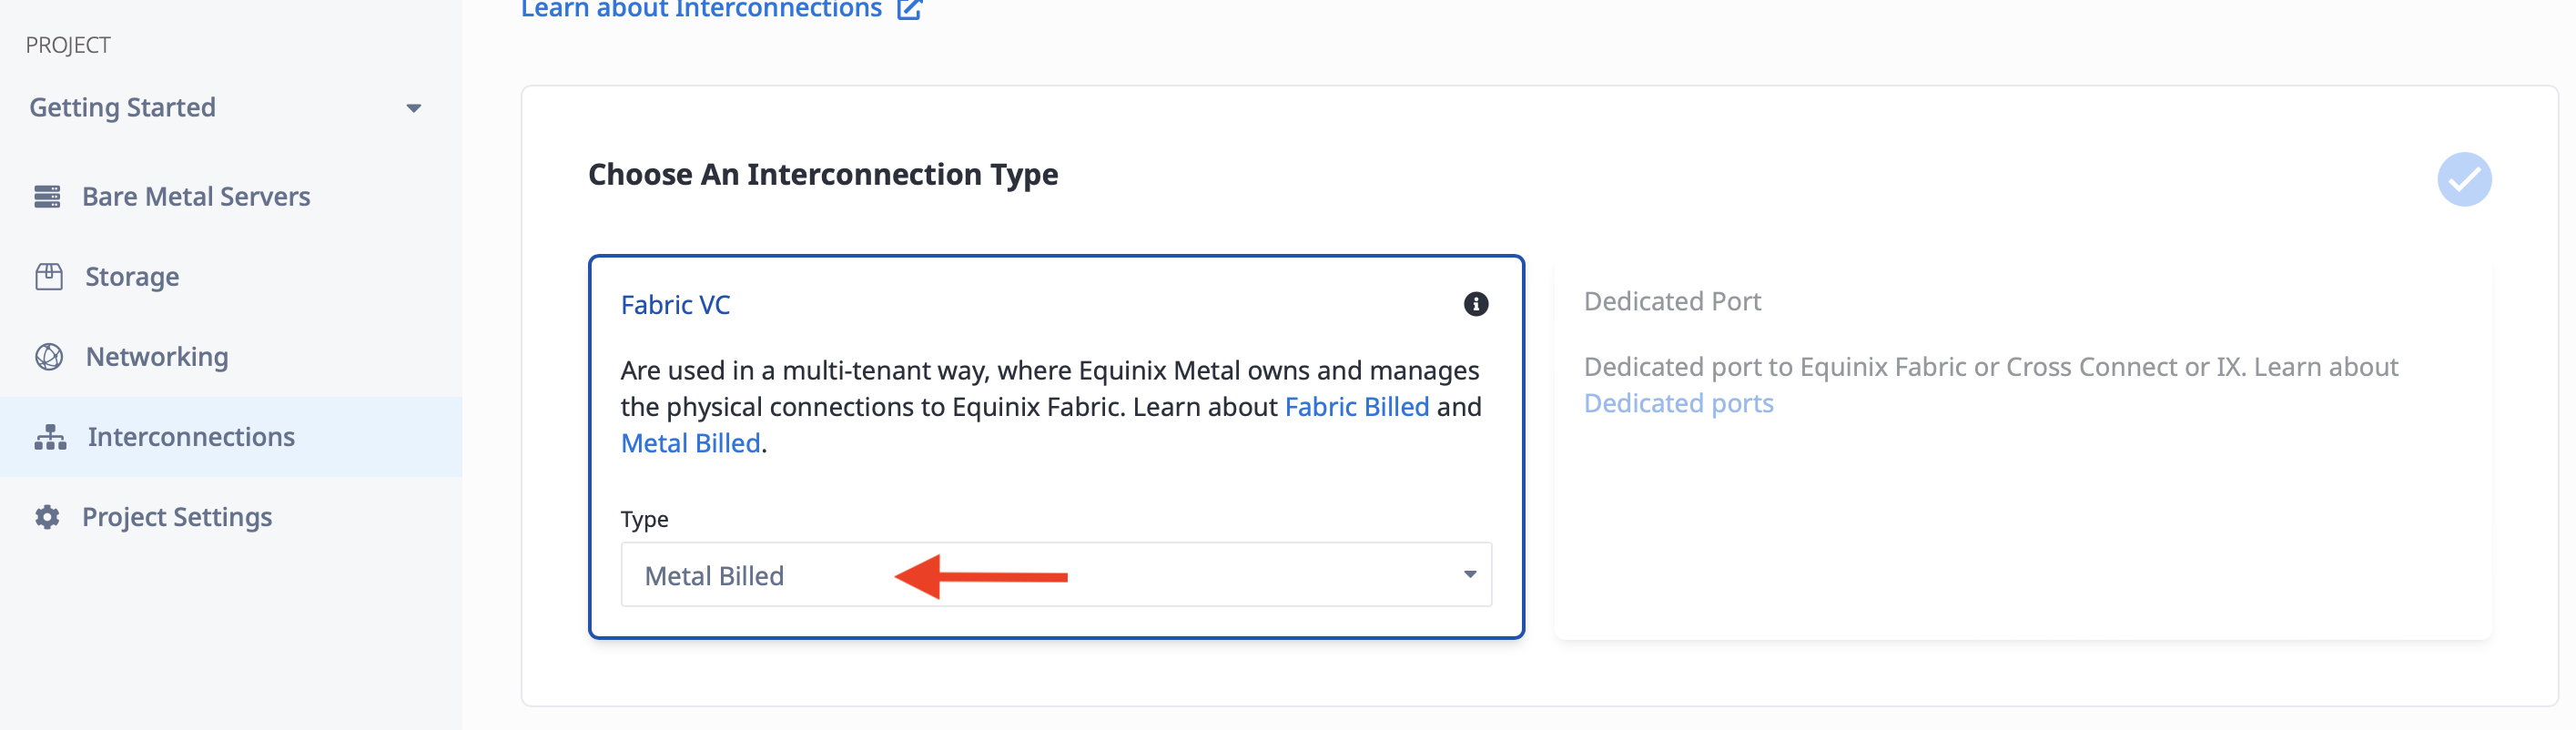
There are two kinds of Fabric VC, Metal-billed and Fabric-billed. Either can be useful for this kind of interconnection, but we will use the Metal-billed one. Read the interconnections documentation for more information on the differences.
To create the connection, you need a few pieces of information:
- A name for the connection. It doesn't have any inherent meaning; it just needs to be useful to you. We will call it "GCP."
- The Metro. This must be the same metro as the VRF you are connecting to. In our case, it is Washington.
- The connection speed. Higher speeds have a higher cost. Since we are just creating a basic connection, we will use the lowest speed, 50Mbps. You can select a higher one if you need it.
- Single vs redundant. Each connection is exactly that, a single connection. If there are issues anywhere along the line, whether hardware issues such as a port on the GCP or Equinix end, or software problems, your connection will be out of service, at least until it is fixed. Like all good networking, you should plan for redundancy. We will use a redundant connection for this example.
- Connect to VLAN or VRF. The VC is a layer 2 connection between layer 3 routers with BGP support on each size. On the cloud provider side, the layer 3 routing is provided for you. On the Metal side, you can set up the layer 3 routing and BGP manually with software on Metal devices and additional VLANs connected directly to the VC, or you can let Metal do all of that for you with a VRF. We will use a VRF connection for this example.
- Primary and secondary connections. Since we selected redundant connections, we need to specify where each of the two connections attaches on the Equinix Metal side. In the case of a VLAN, that would require two distinct VLANs. Since we are using VRF, which is Virtual Routing and Forwarding, we can use the same VRF for both connections. This is a key advantage of VRF connections over VLAN connections. We will use our "Cloud" VRF for both.
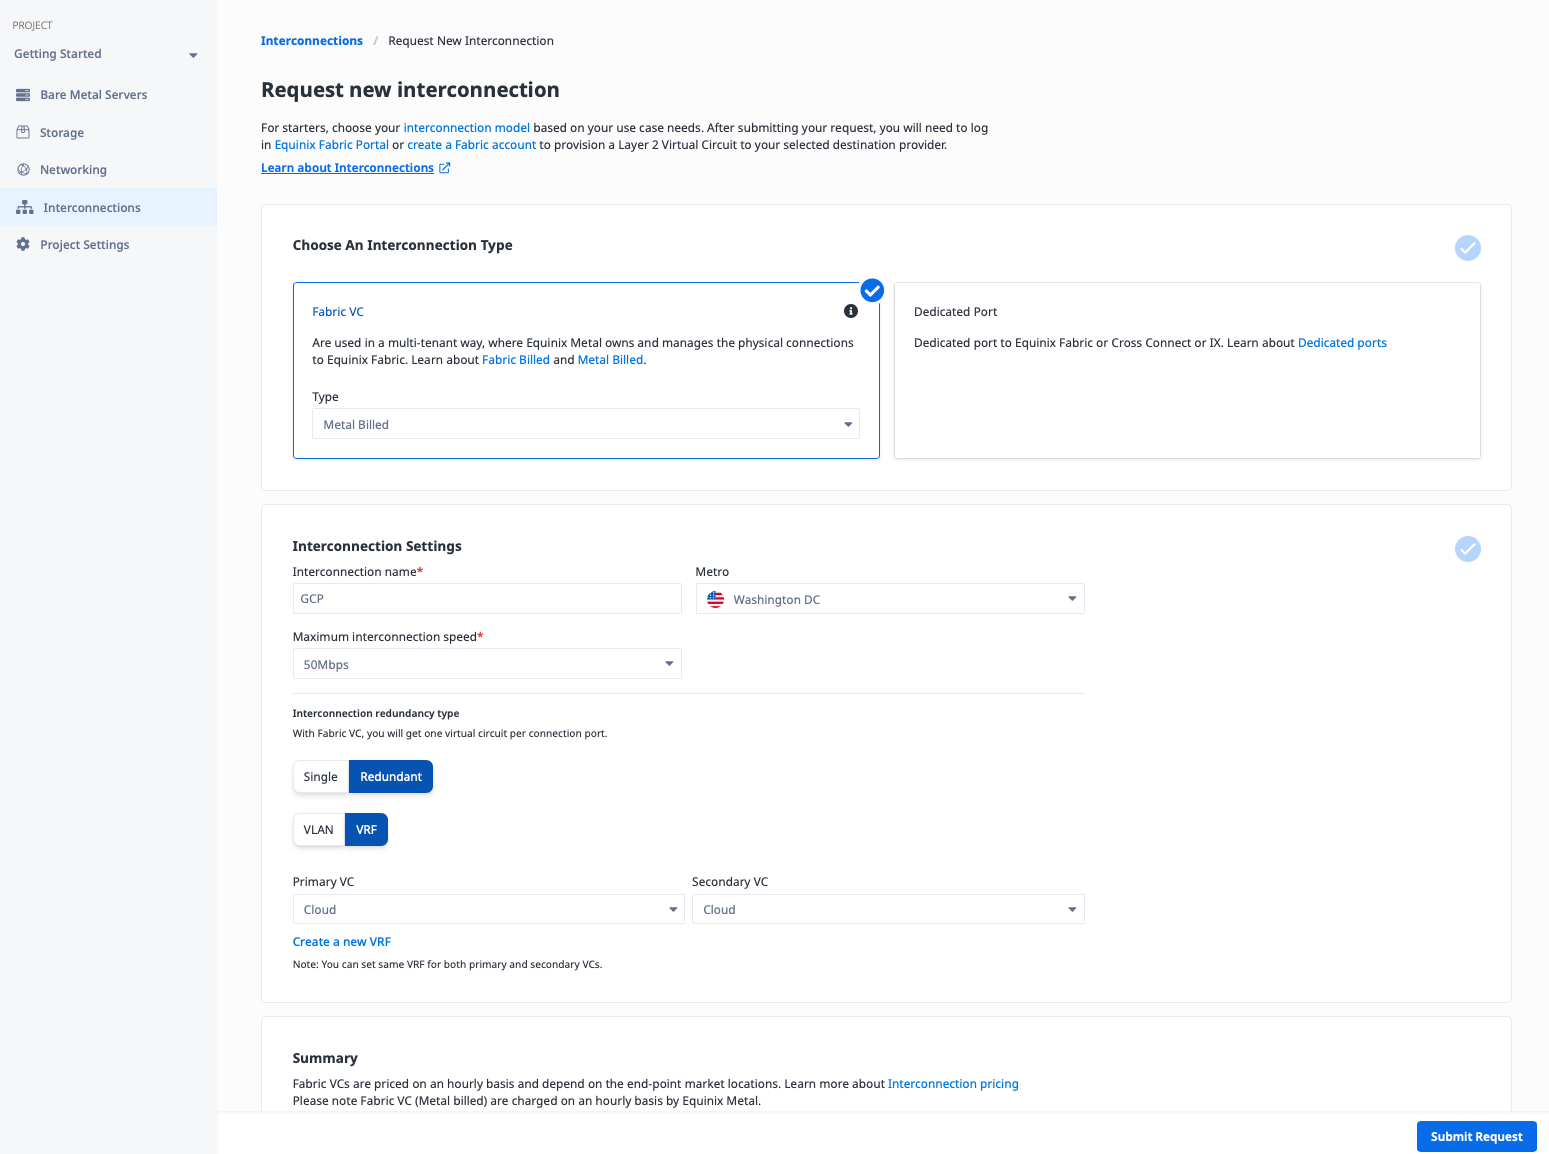
Click the "Submit the request" button.
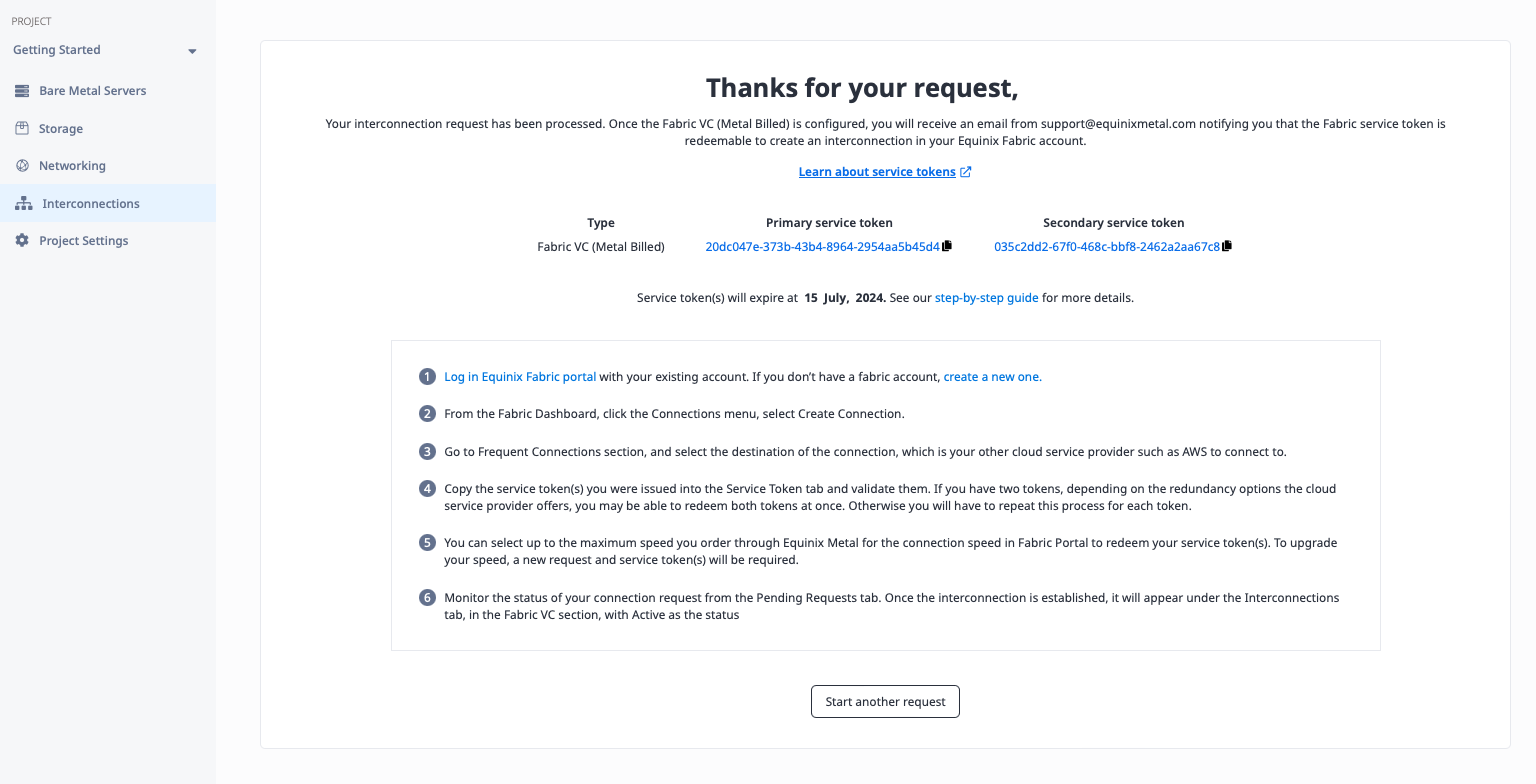
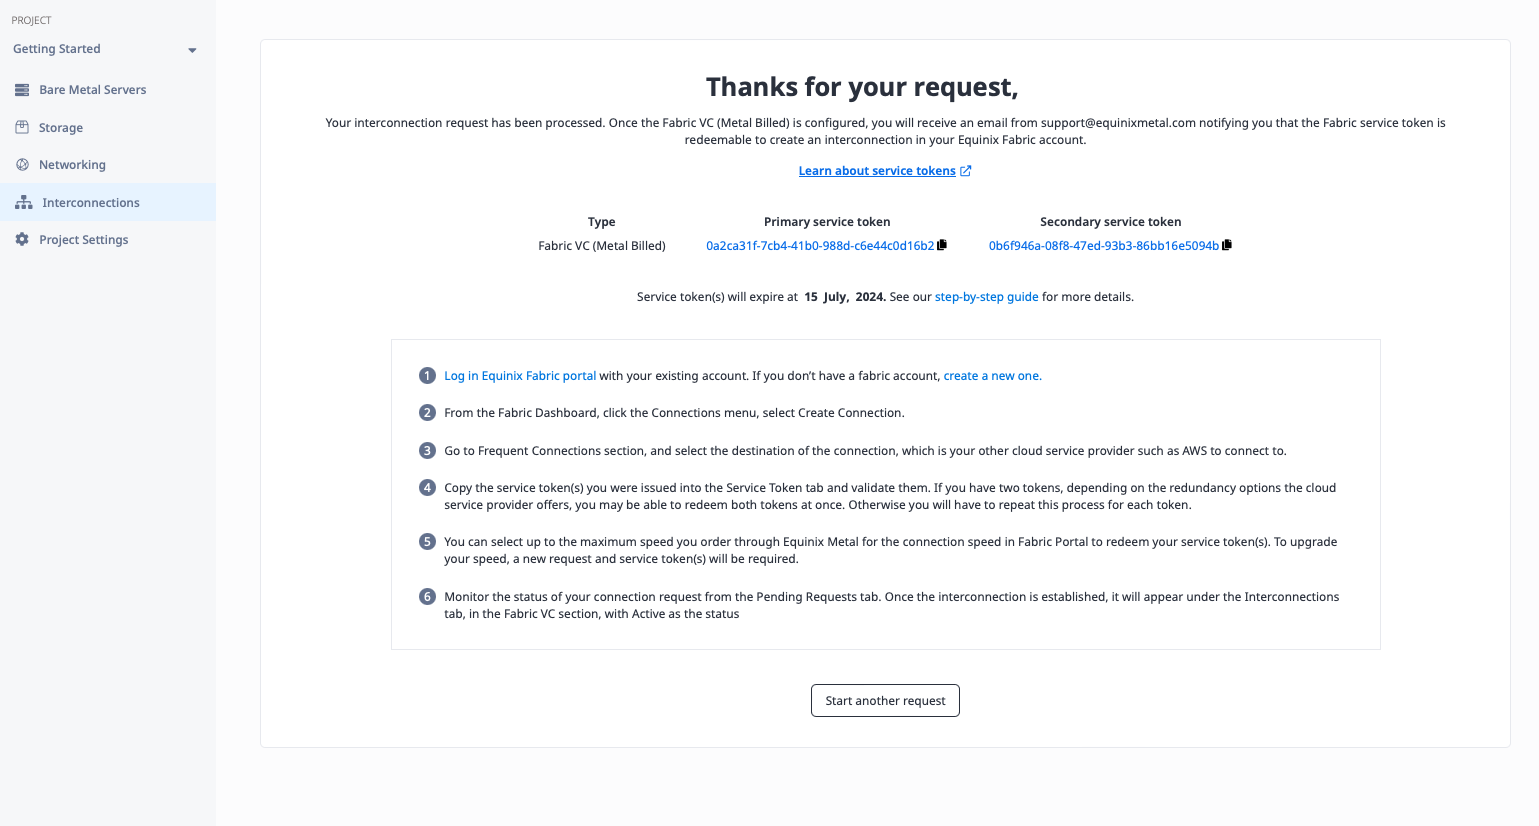
Once the request is submitted, you need two things:
- An email to your address telling you that the service token is ready to use. You should get two such emails, one for each of the redundant connections. You know it is ready by the "Service Token Status" line.
- The service token itself. This is a long string of characters that you will need to create the Fabric VC to Equinix Metal. It will appear in the emails, as well as in the console after you submit your request.
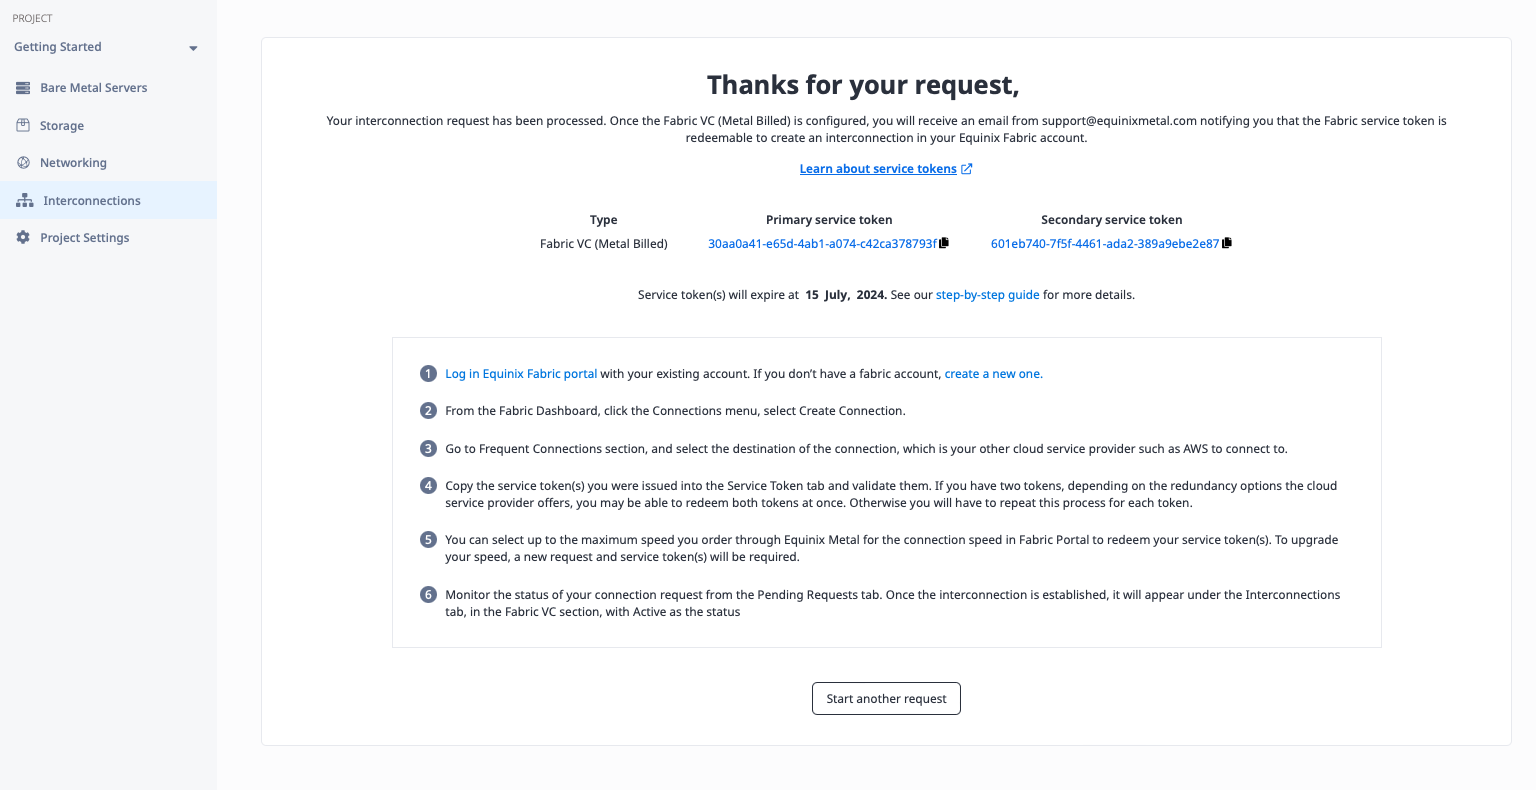
If you click Interconnections, you now will see the connection in the list under "Fabric VCs," with a status of "Pending," which eventually will change to "Ready," when all of the other steps are done.
You will need to update details of this connection. However, you do not have all of the information until the connection is complete from the Google Cloud side. We will come back to this later.
Create the Cloud Router and VLAN Attachment in GCP
In GCP, a Cloud Router is a virtual router that connects your VPC in a particular region to the rest of the world, including Interconnect connections.
You may already have a Cloud Router created for your VPC. If not, create one now.
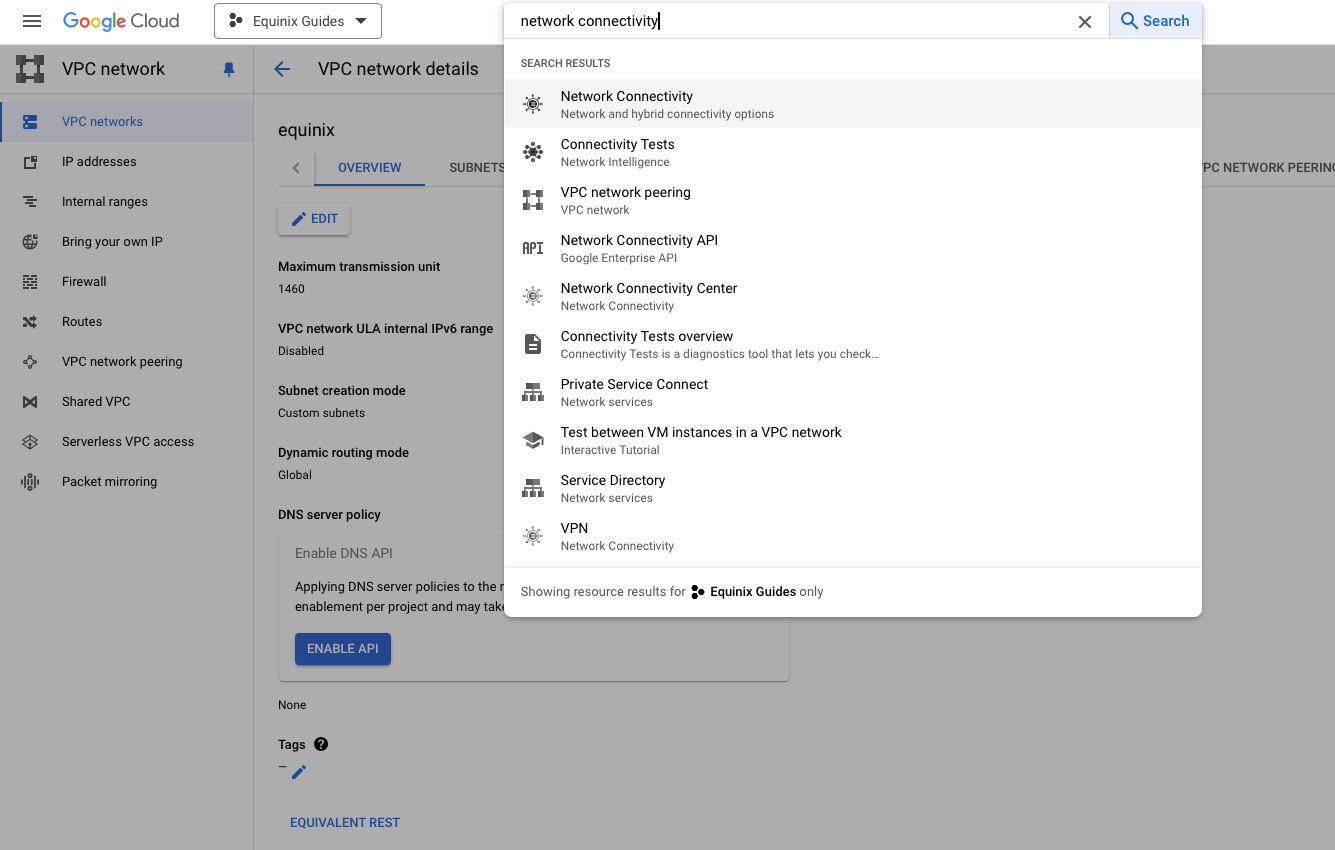
In the search box, enter "Network Connectivity Center" and select it:
Then click "Cloud Routers" in the left navigation bar:
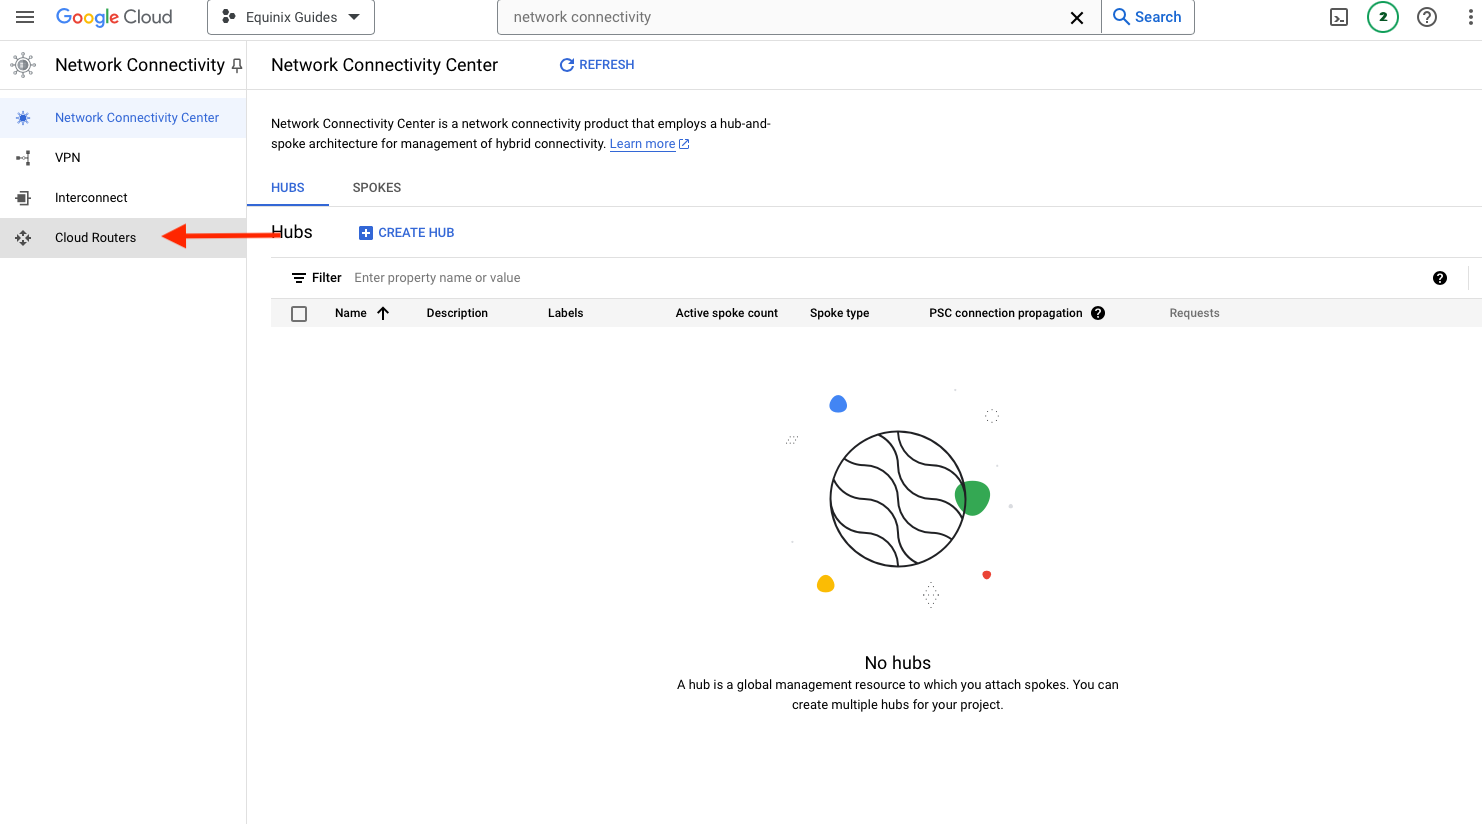
Then click the "Create Router" tab:

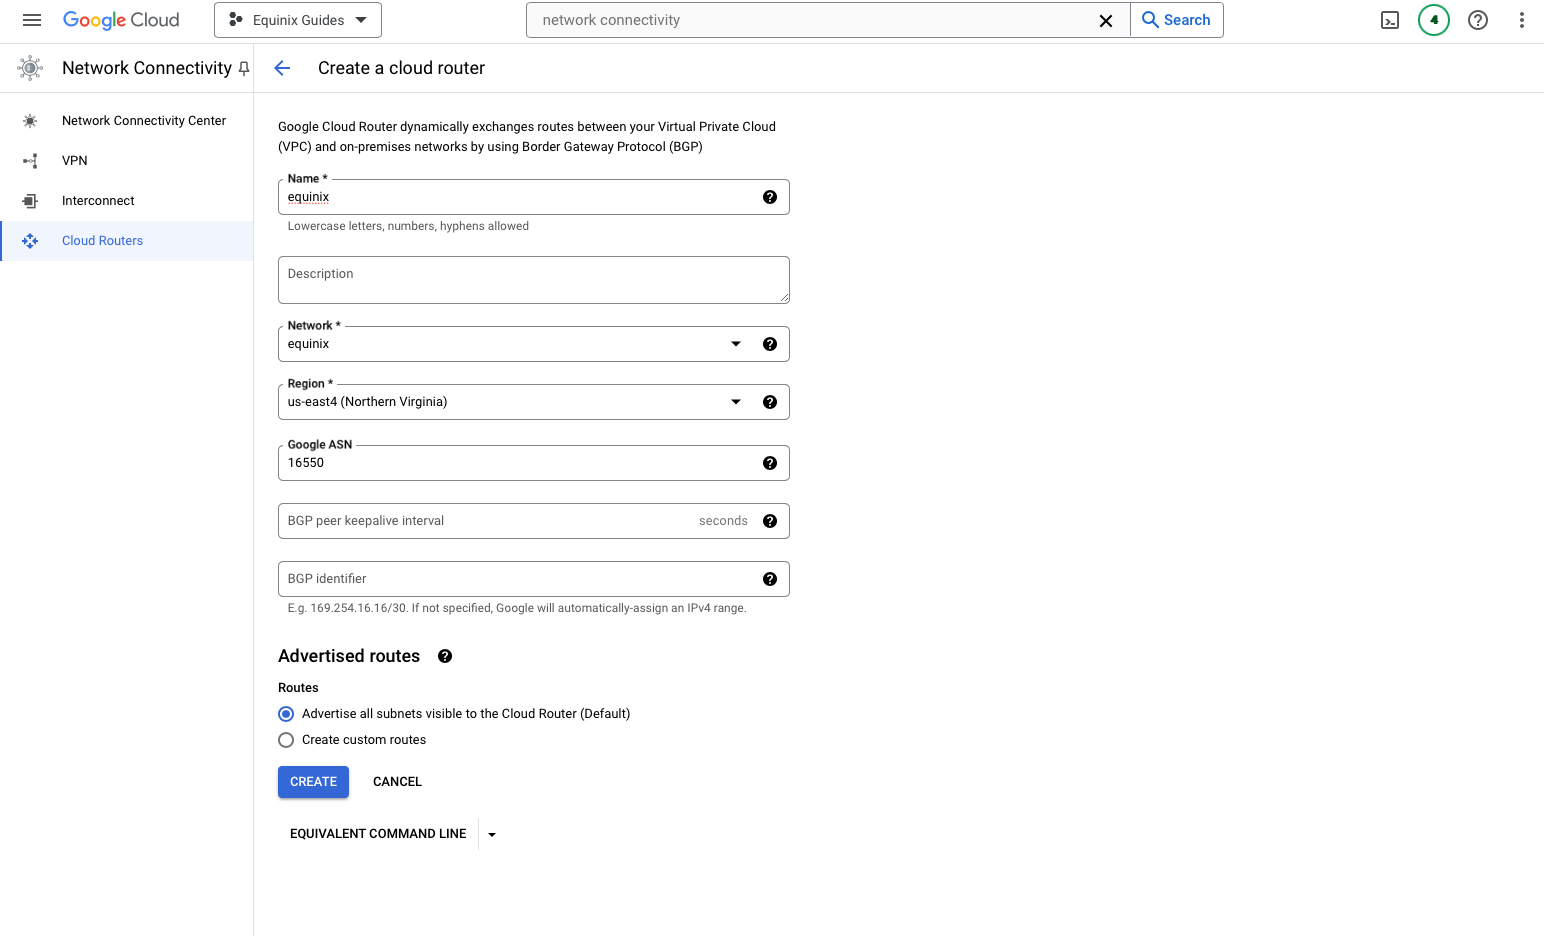
Fill in the details for the Cloud Router:
- Name: pick a representative name, such as "gcp-fabric"
- Network: select the VPC you are connecting to
- Region: select the region of the VPC, in our case,
us-east4 - Google ASN: enter the ASN for the Google side, fixed by Google,
16550. - BGP identifier: leave blank
- Advertised routes: select all subnets, which is the default
Click the "Create" button.
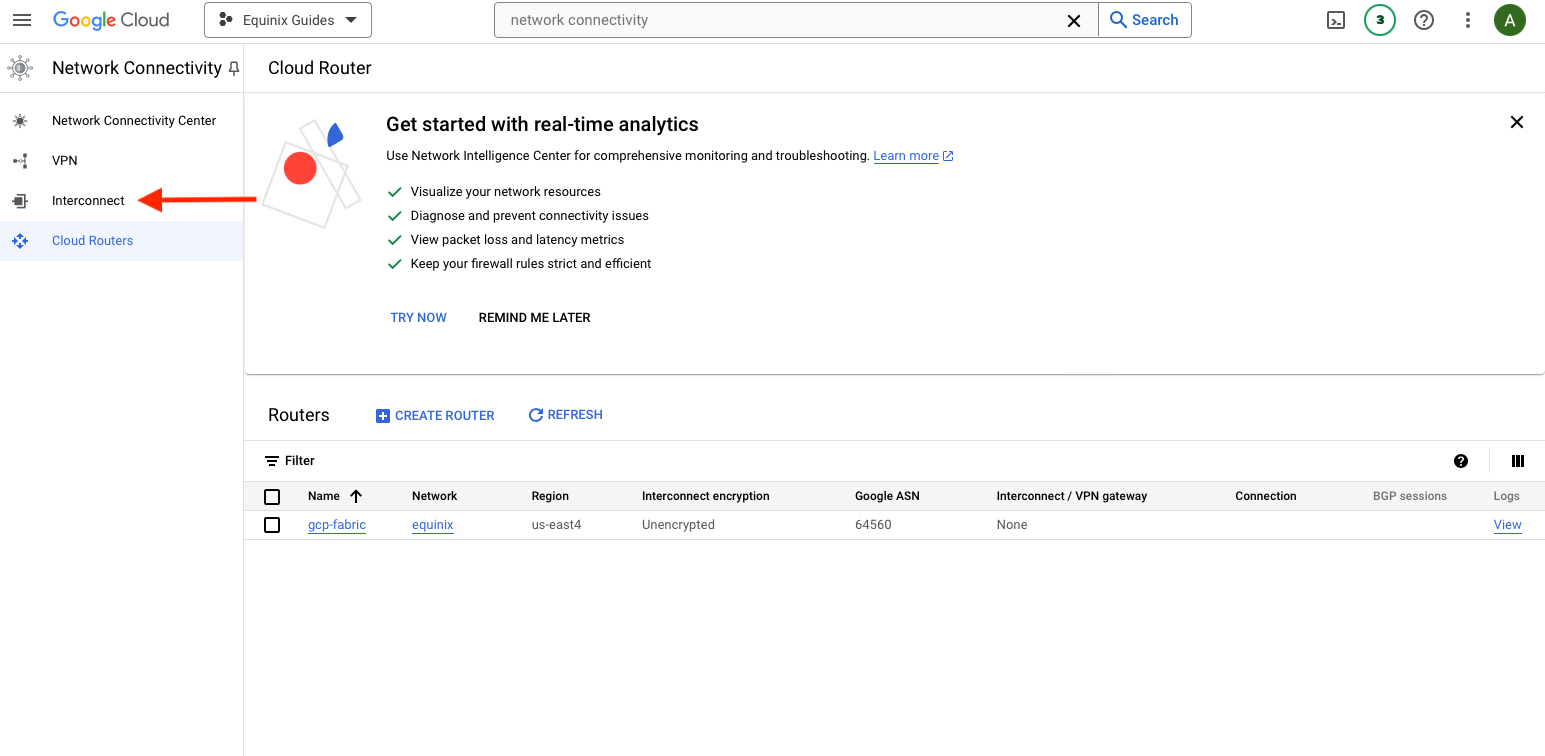
With the Cloud Router in place, you can create a VLAN attachment. VLAN attachments are part of the Interconnect section of the Network Connectivity Center.
Click "Interconnect" in the left navigation bar:
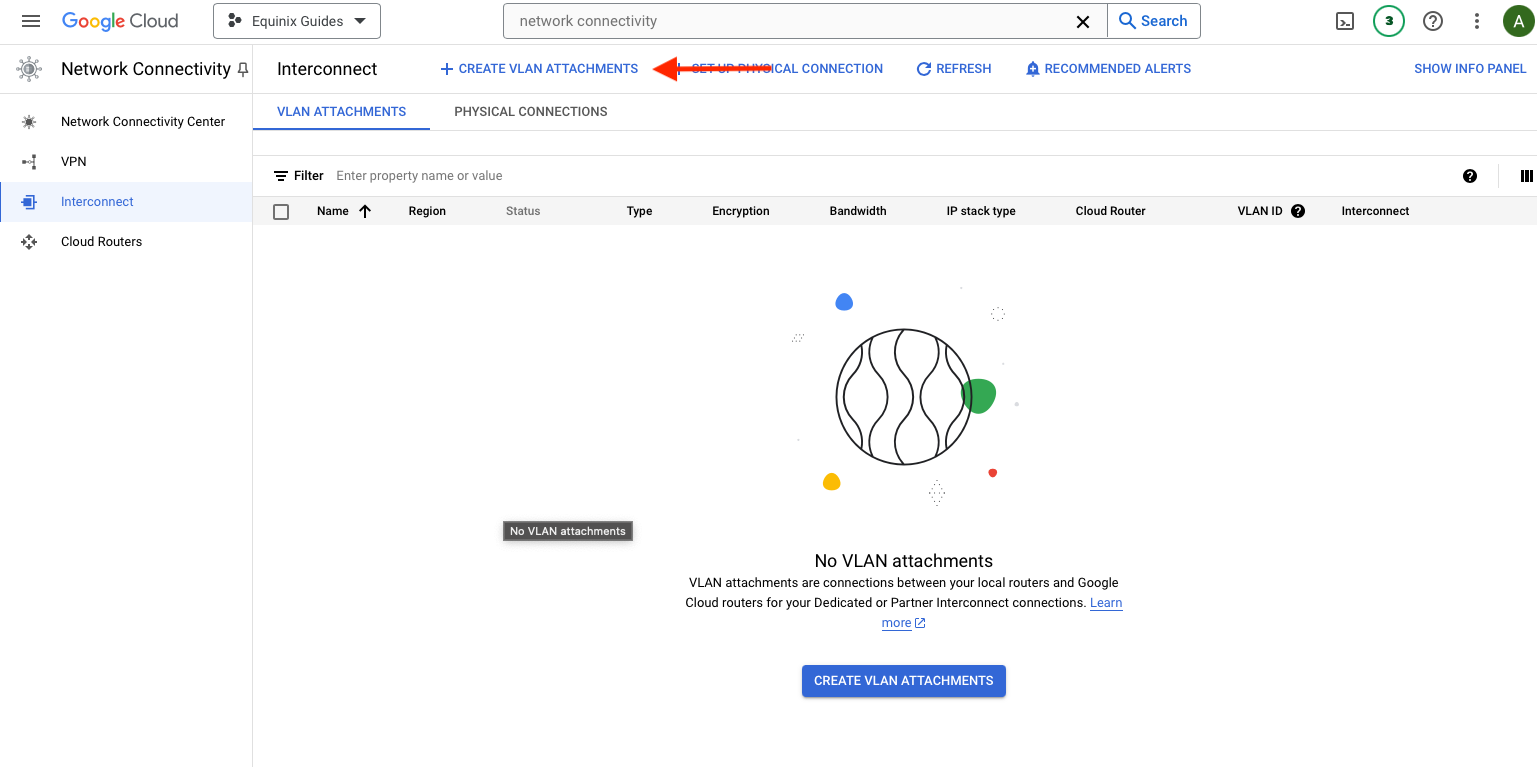
Then click the "Create VLAN Attachments" button:
There are three kinds of VLAN attachments, depending on what will be on the other end of the connection. Because Equinix and Google Cloud partner, you can use the Partner Interconnect connection, so select that.
In the Encrypt interconnect section, you can set up the interconnect with a highly-available VPN. We do not need that for this guide, so leave it as "Set up unencrypted interconnect".
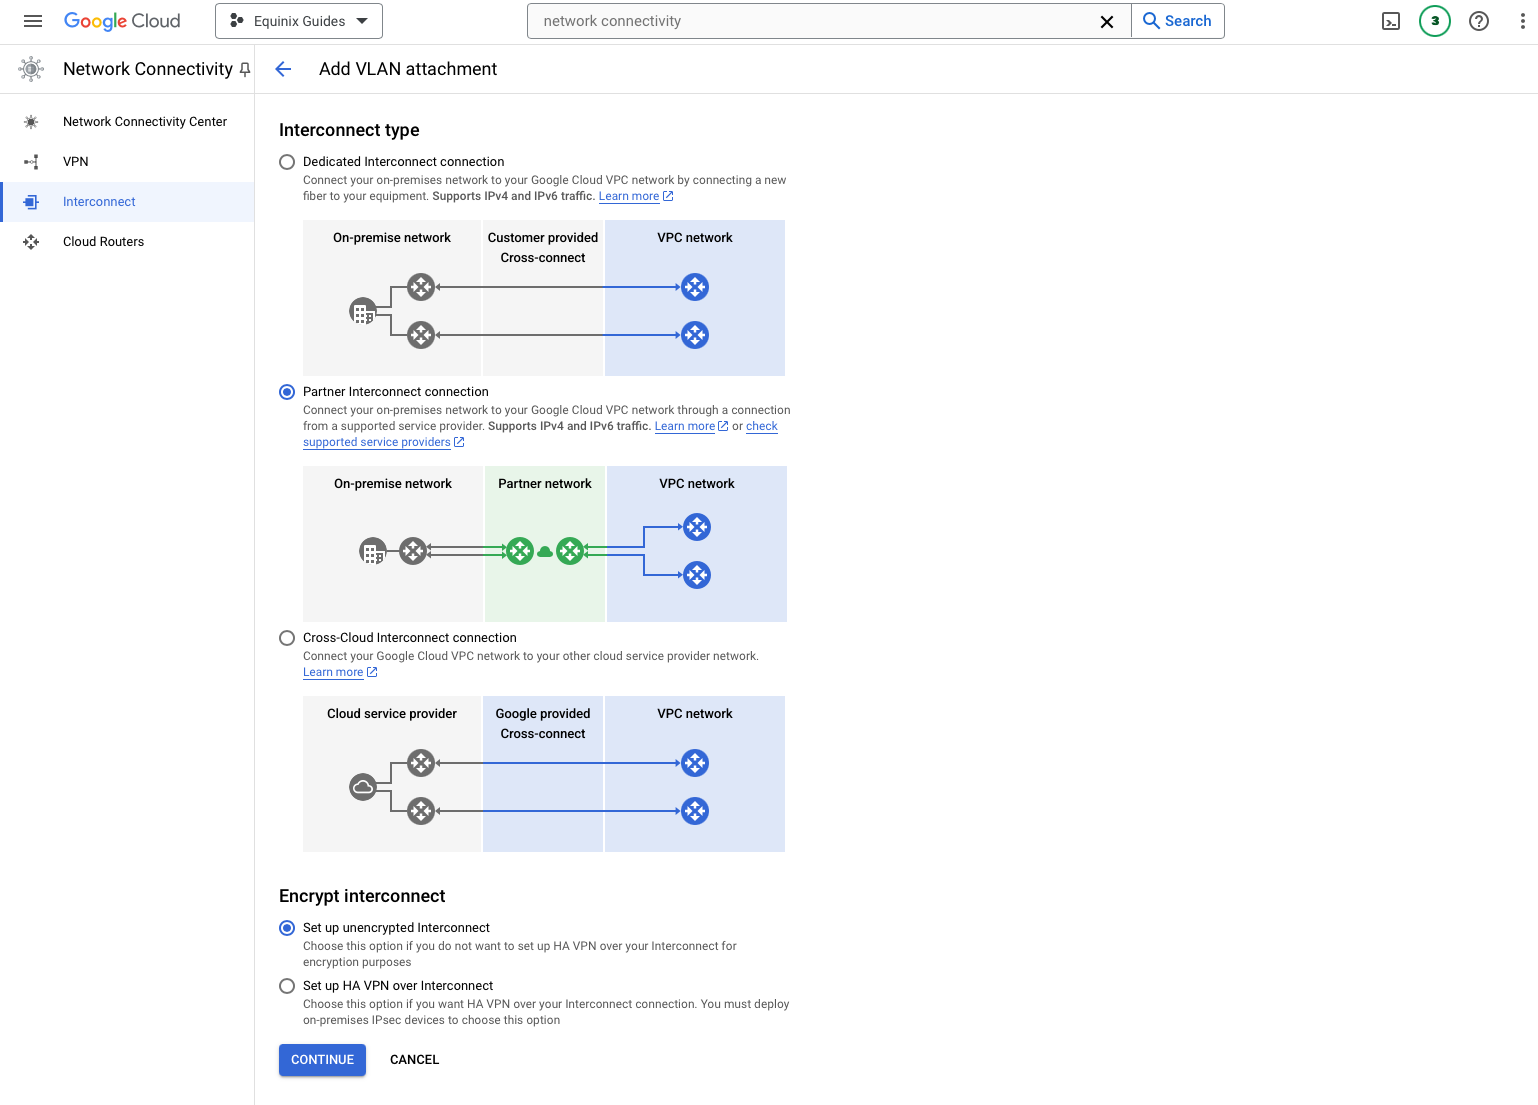
Click the "Continue" button.
You already have a service provider - Equinix Fabric - so select the "I already have a service provider" button.

Select the following options:
- "Create a redundant pair of VLAN attachments": This will open up two attachments, which will provide for redundant connections.
- Network: Select the VPC you are connecting to.
- Region: Select the region of the VPC, in our case,
us-east4. - VLAN A: this is the first of the two attachments in the redundant pair.
- Cloud Router: pick the Cloud Router you already have, or the one created above.
- VLAN attachment name: enter a name that represents VLAN A; in our case, we will use
gcp-fabric-vlan-a. - IP stack type: select either dual IPv4/IPv6, or leave as just IPv4. For the purposes of this guide, we will use IPv4 only.
- MTU: set the same as the VPC.
- VLAN B: this is the second of the two attachments in the redundant pair.
- Cloud Router: pick the Cloud Router you already have, or the one we created above.
- VLAN attachment name: enter a name that represents VLAN A; in our case, we will use
gcp-fabric-vlan-b. - IP stack type: select either dual IPv4/IPv6, or leave as just IPv4. For the purposes of this guide, we will use IPv4 only.
- MTU: set the same as the VPC.
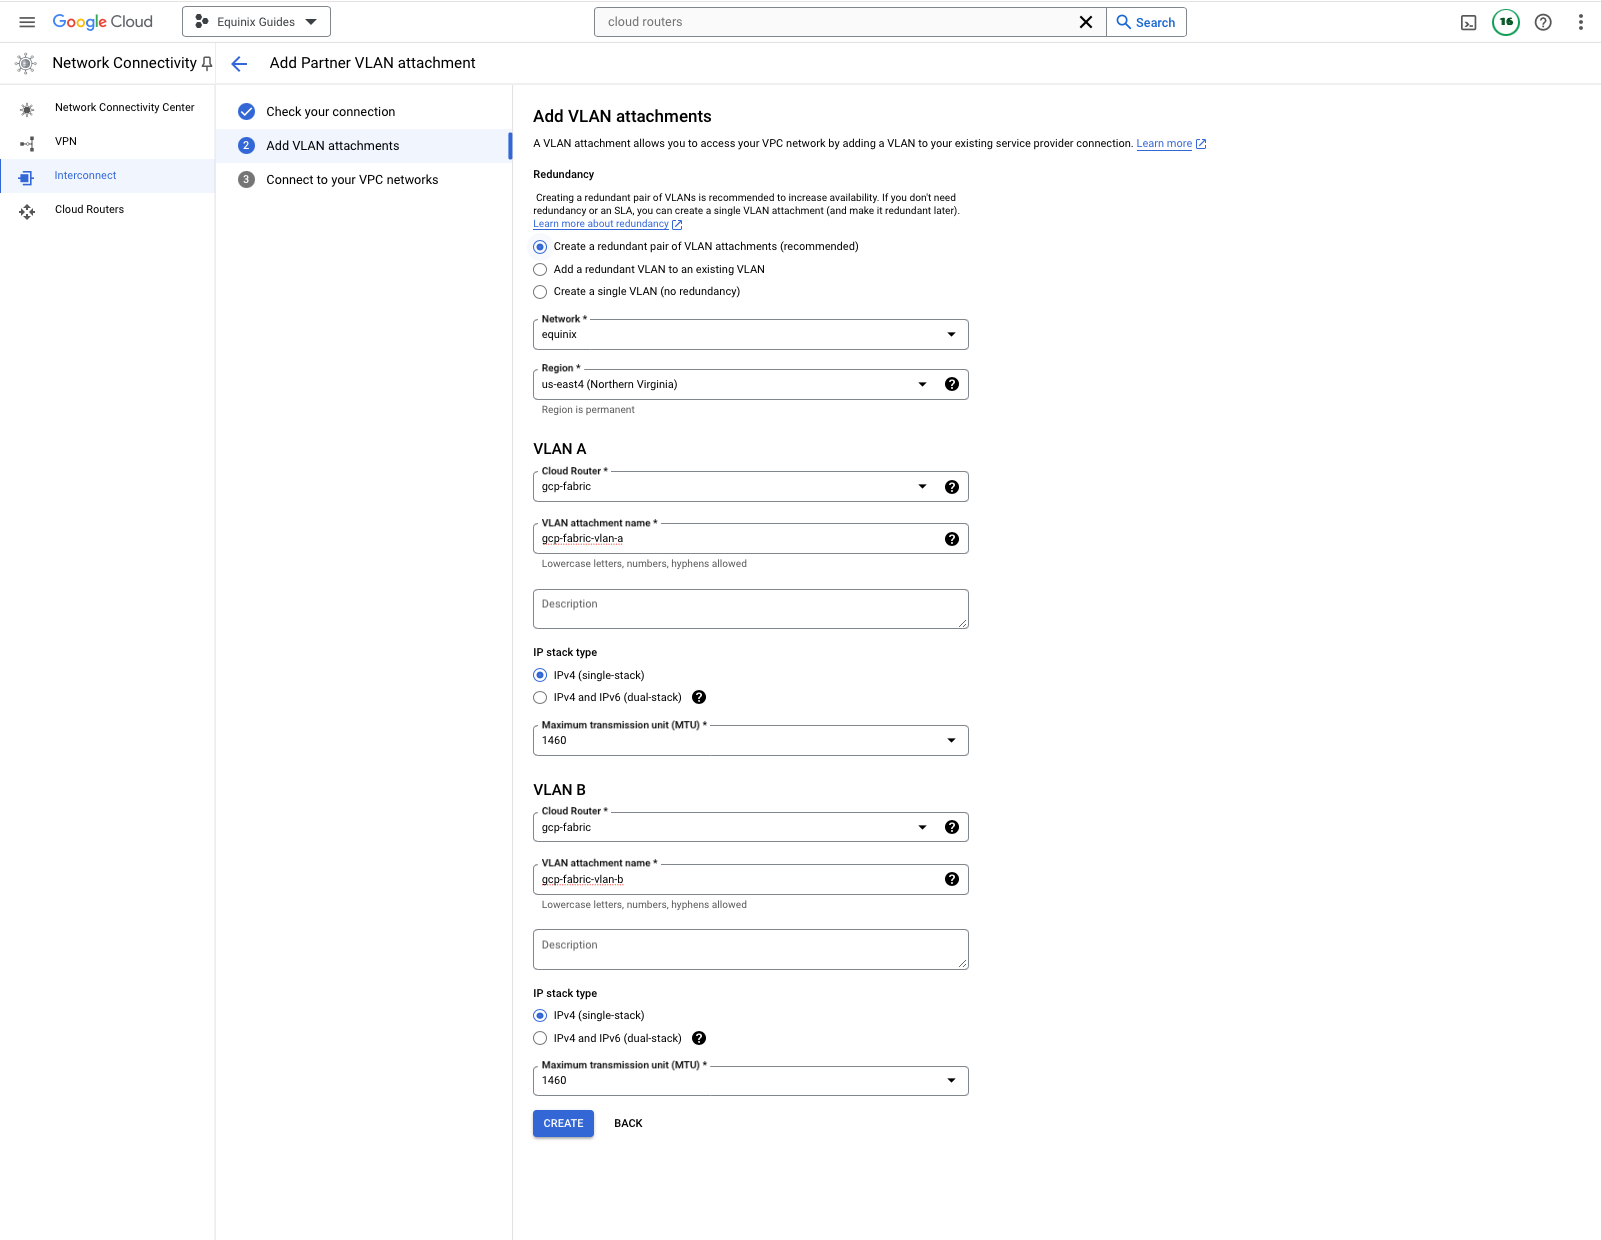
Click the "Create" button.
GCP now should give you pairing keys. These are keys that you will need to provide to Equinix Fabric to create the connections. Save both of them.
To keep things simple, we will enable pre-activation of the VLAN attachments. This means that the attachments will be ready to use as soon as the connections are created. You may choose to do otherwise. Check the box for "Enable pre-activation".
Click OK.
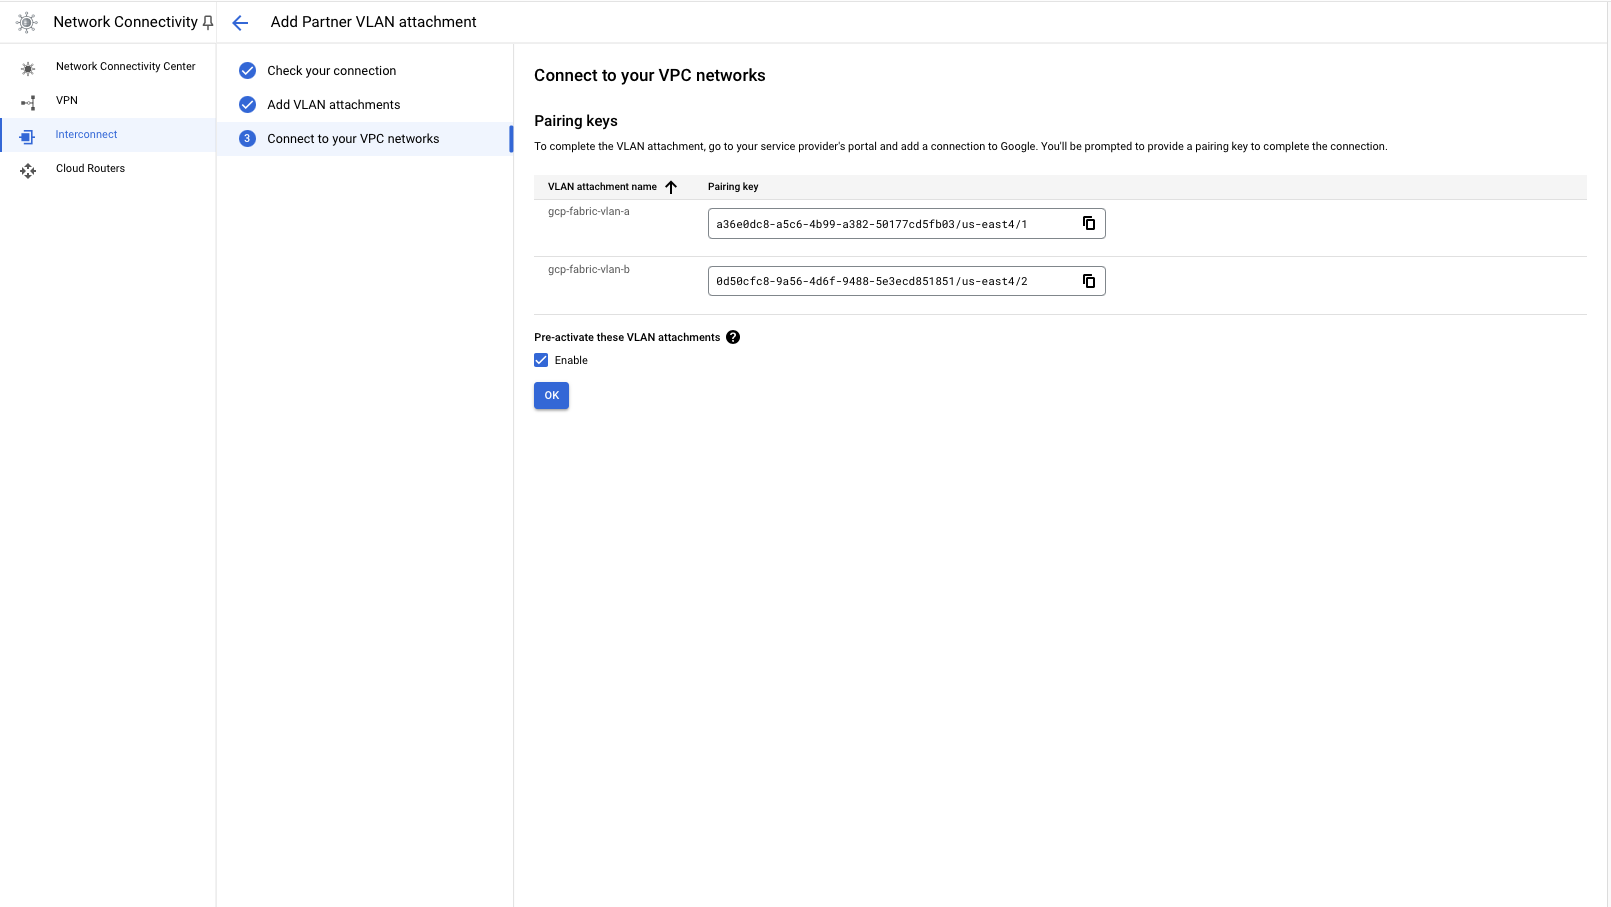
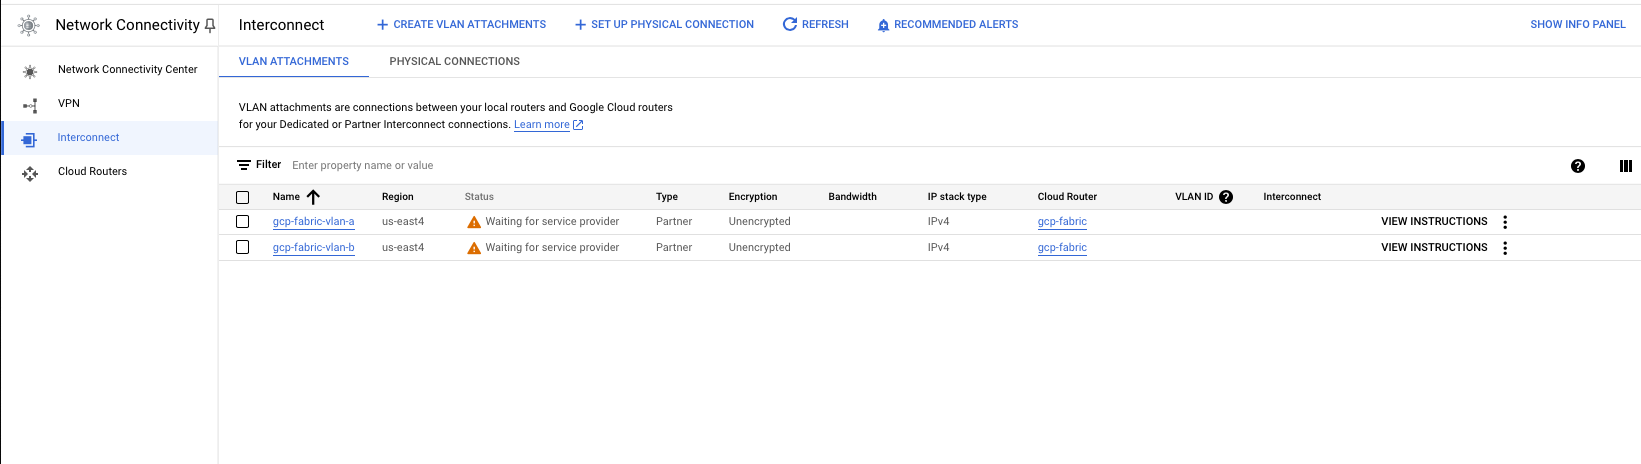
You now have a pair of VLAN attachments, ready to be connected to Equinix Fabric.
Create the Metal-GCP Fabric VC
In this section, you'll create a Fabric VC between the VRF on Metal and the ExpressRoute circuit VPC at GCP.
Log in to the Fabric console at https://fabric.equinix.com.
Once you are logged in, you will see the Equinix Fabric portal:
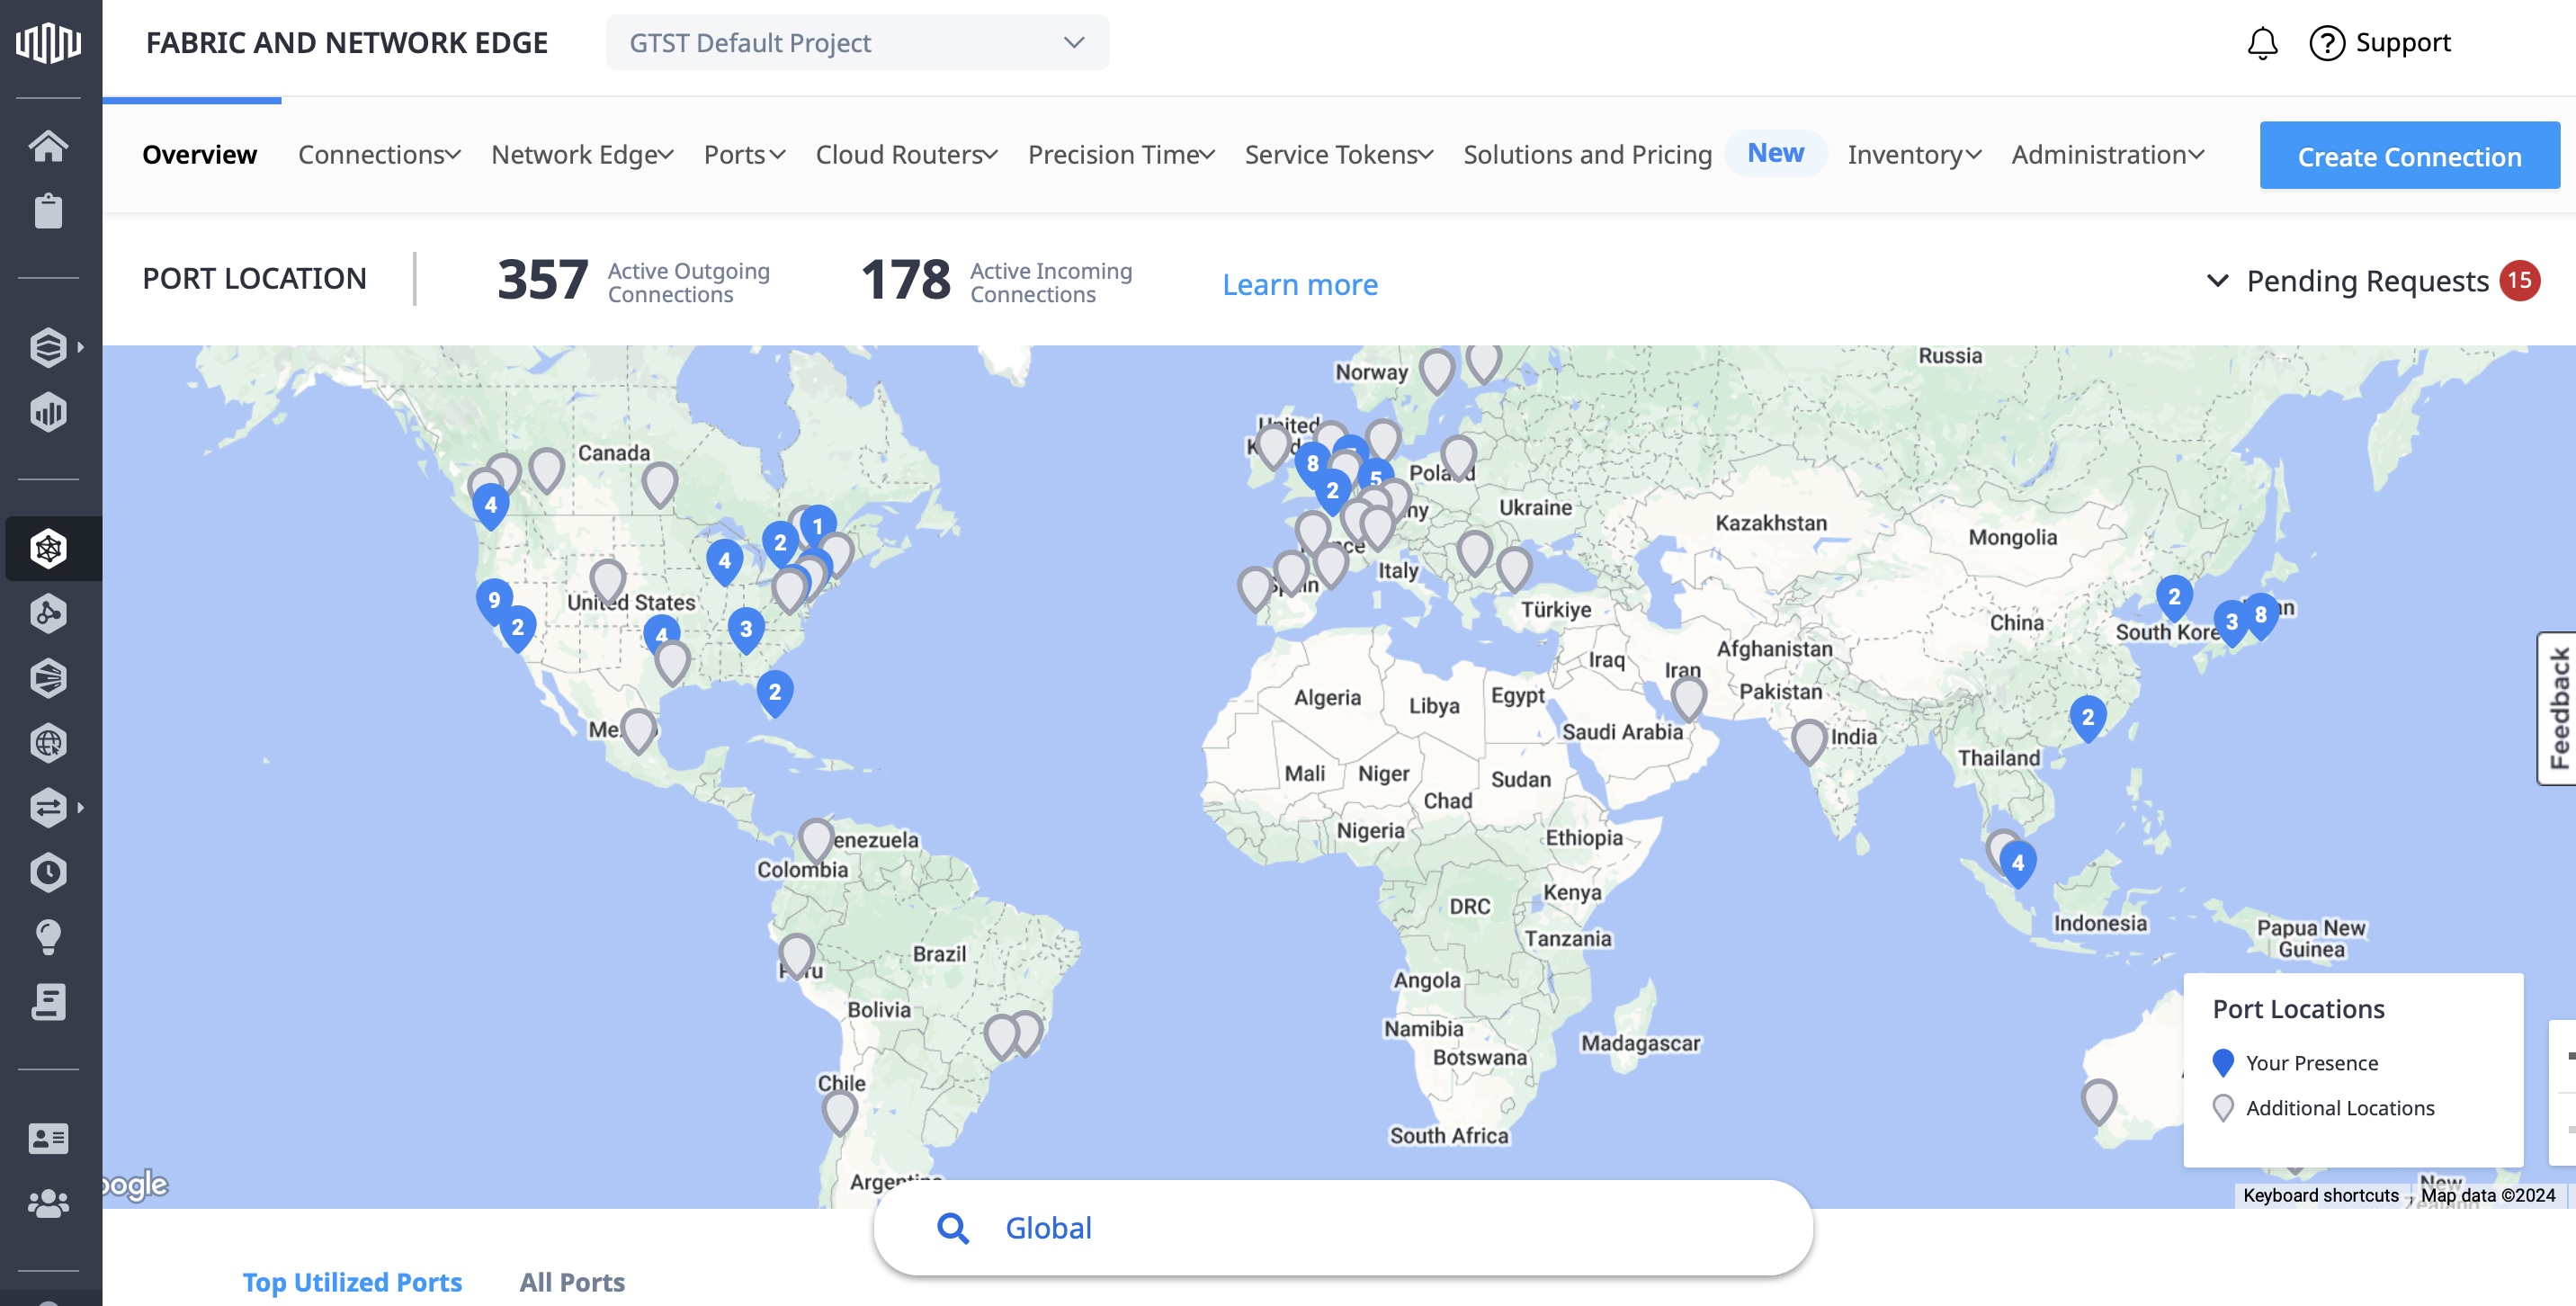
On the top menu bar, go to "Connections" and "Create Connection":
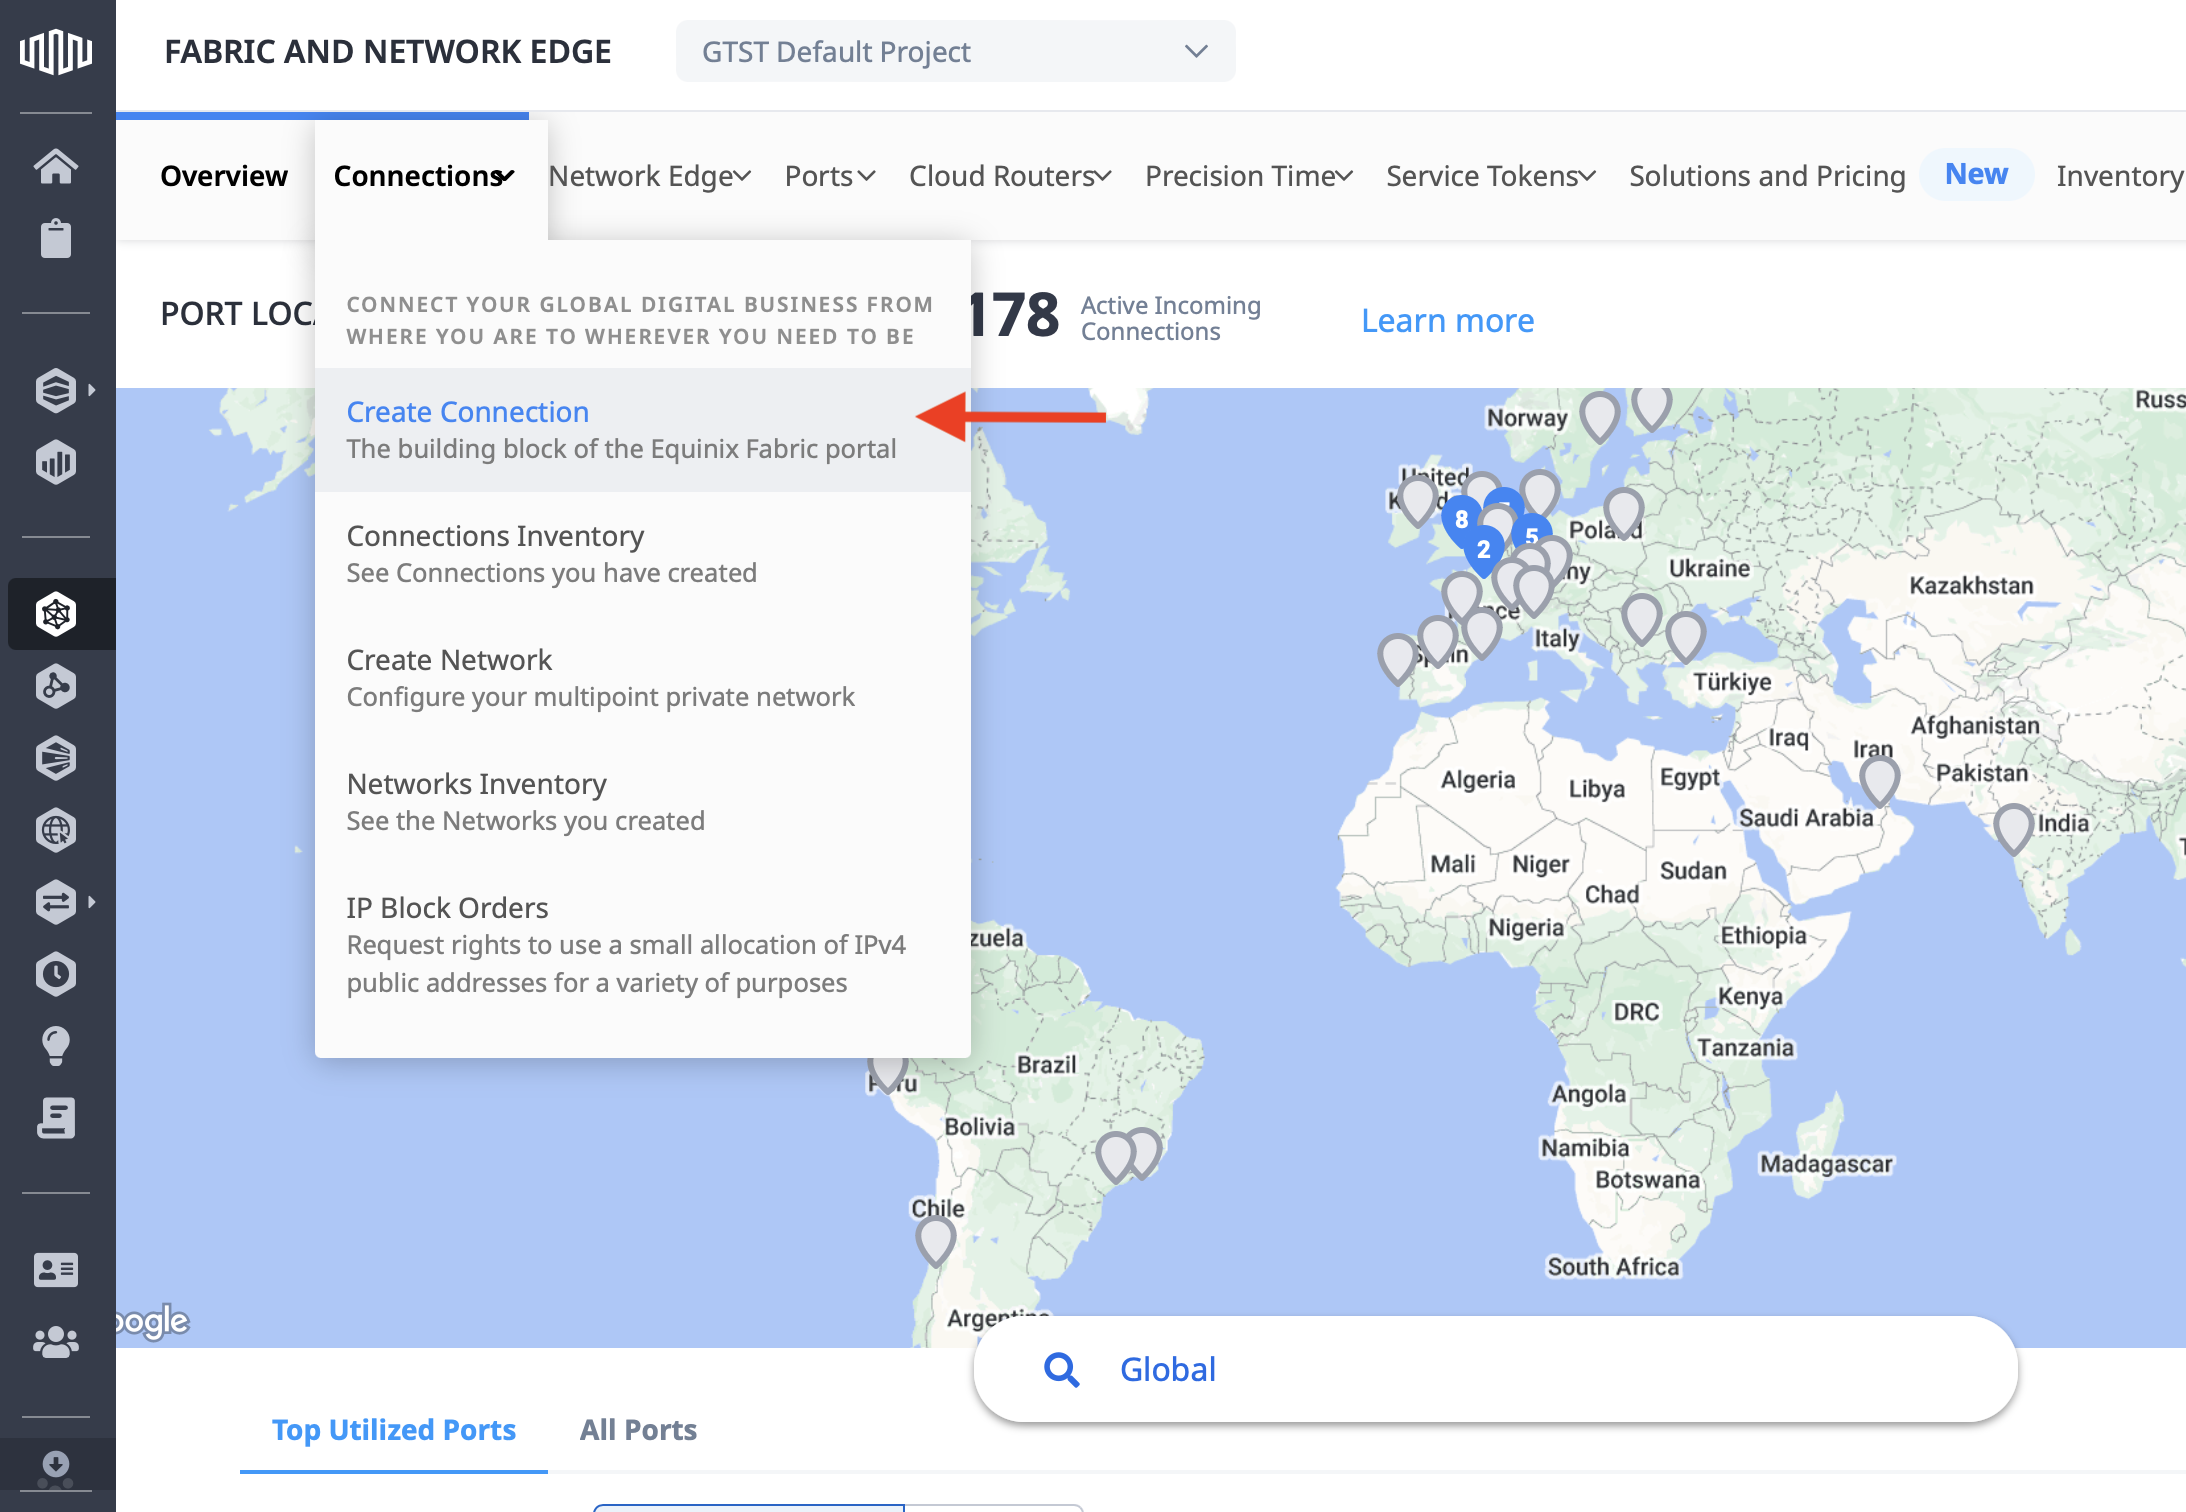
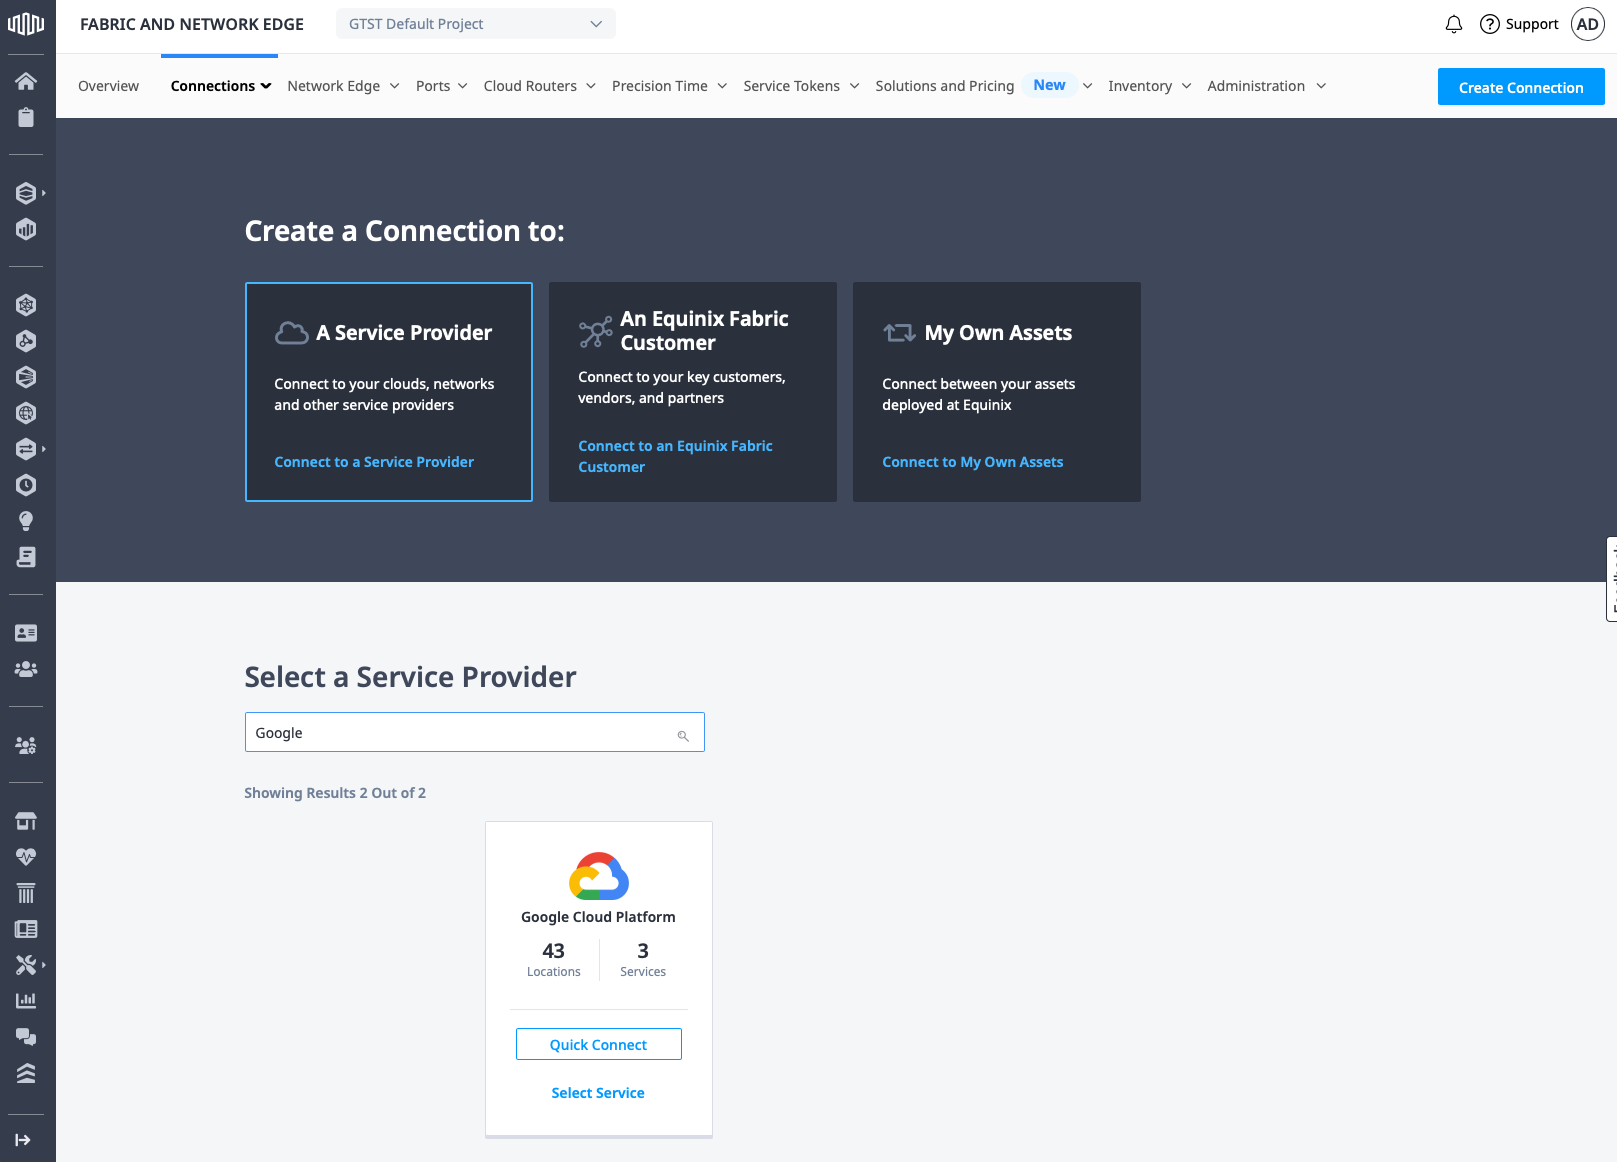
There are three main options for a connection: A Service Provider, An Equinix Fabric Customer, and My Own Assets. Click A Service Provider, then in the search box, type "Google". This will filter the options below to just a few. Select Google Cloud Platform and click Quick Connect.
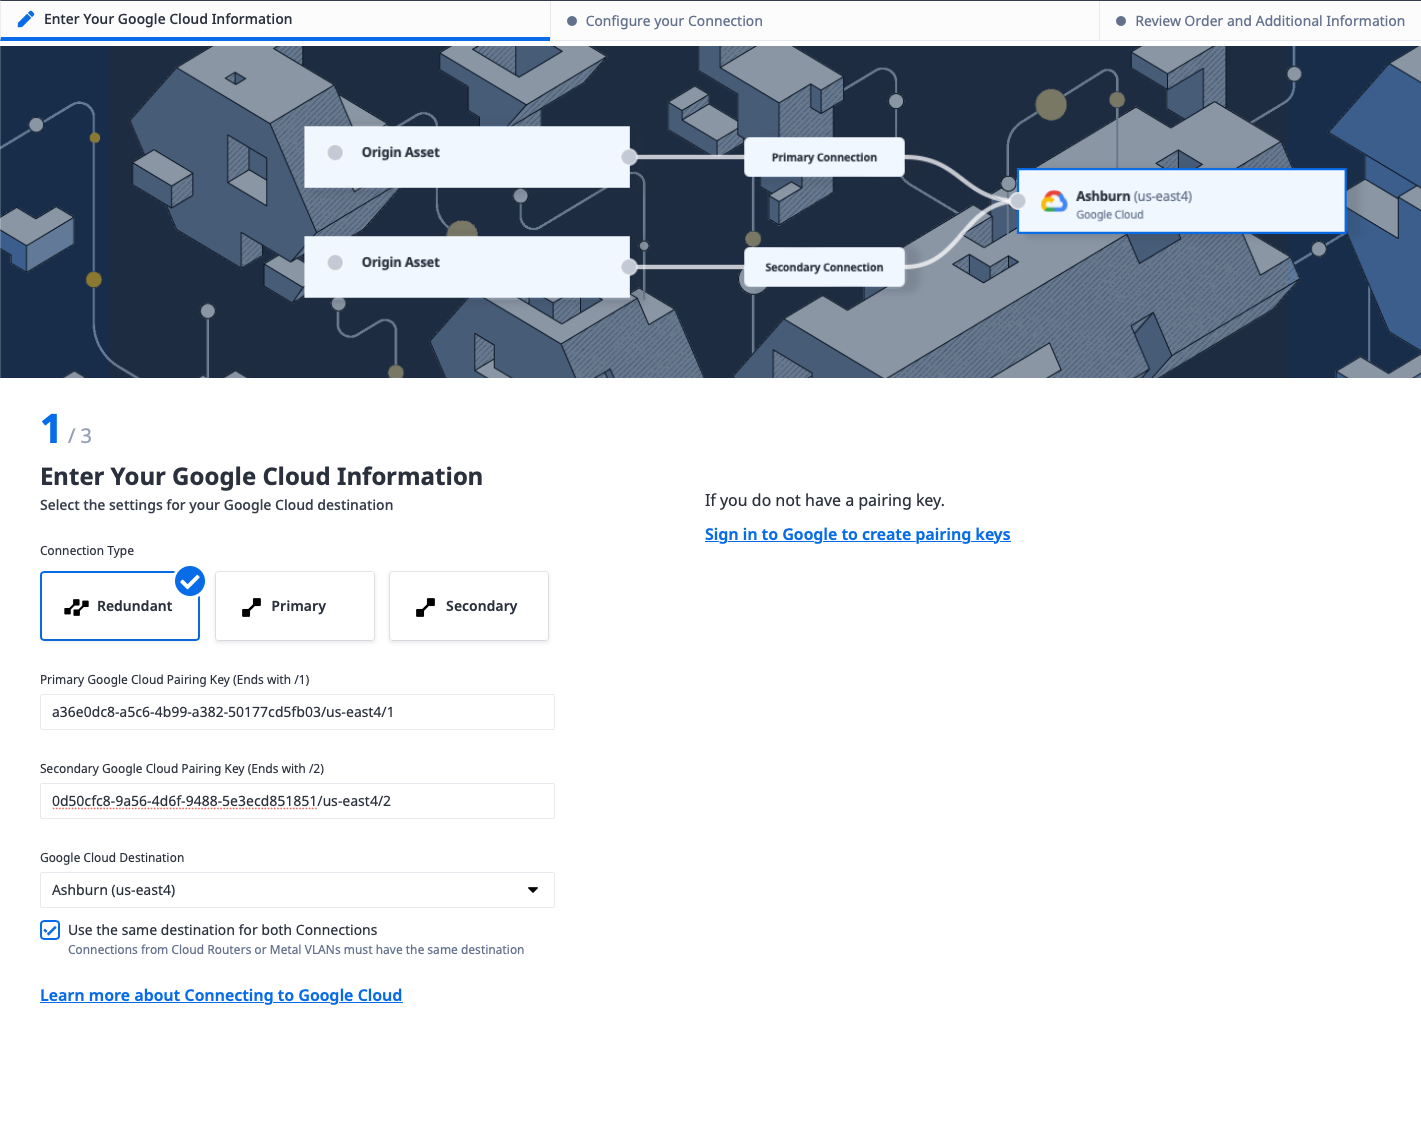
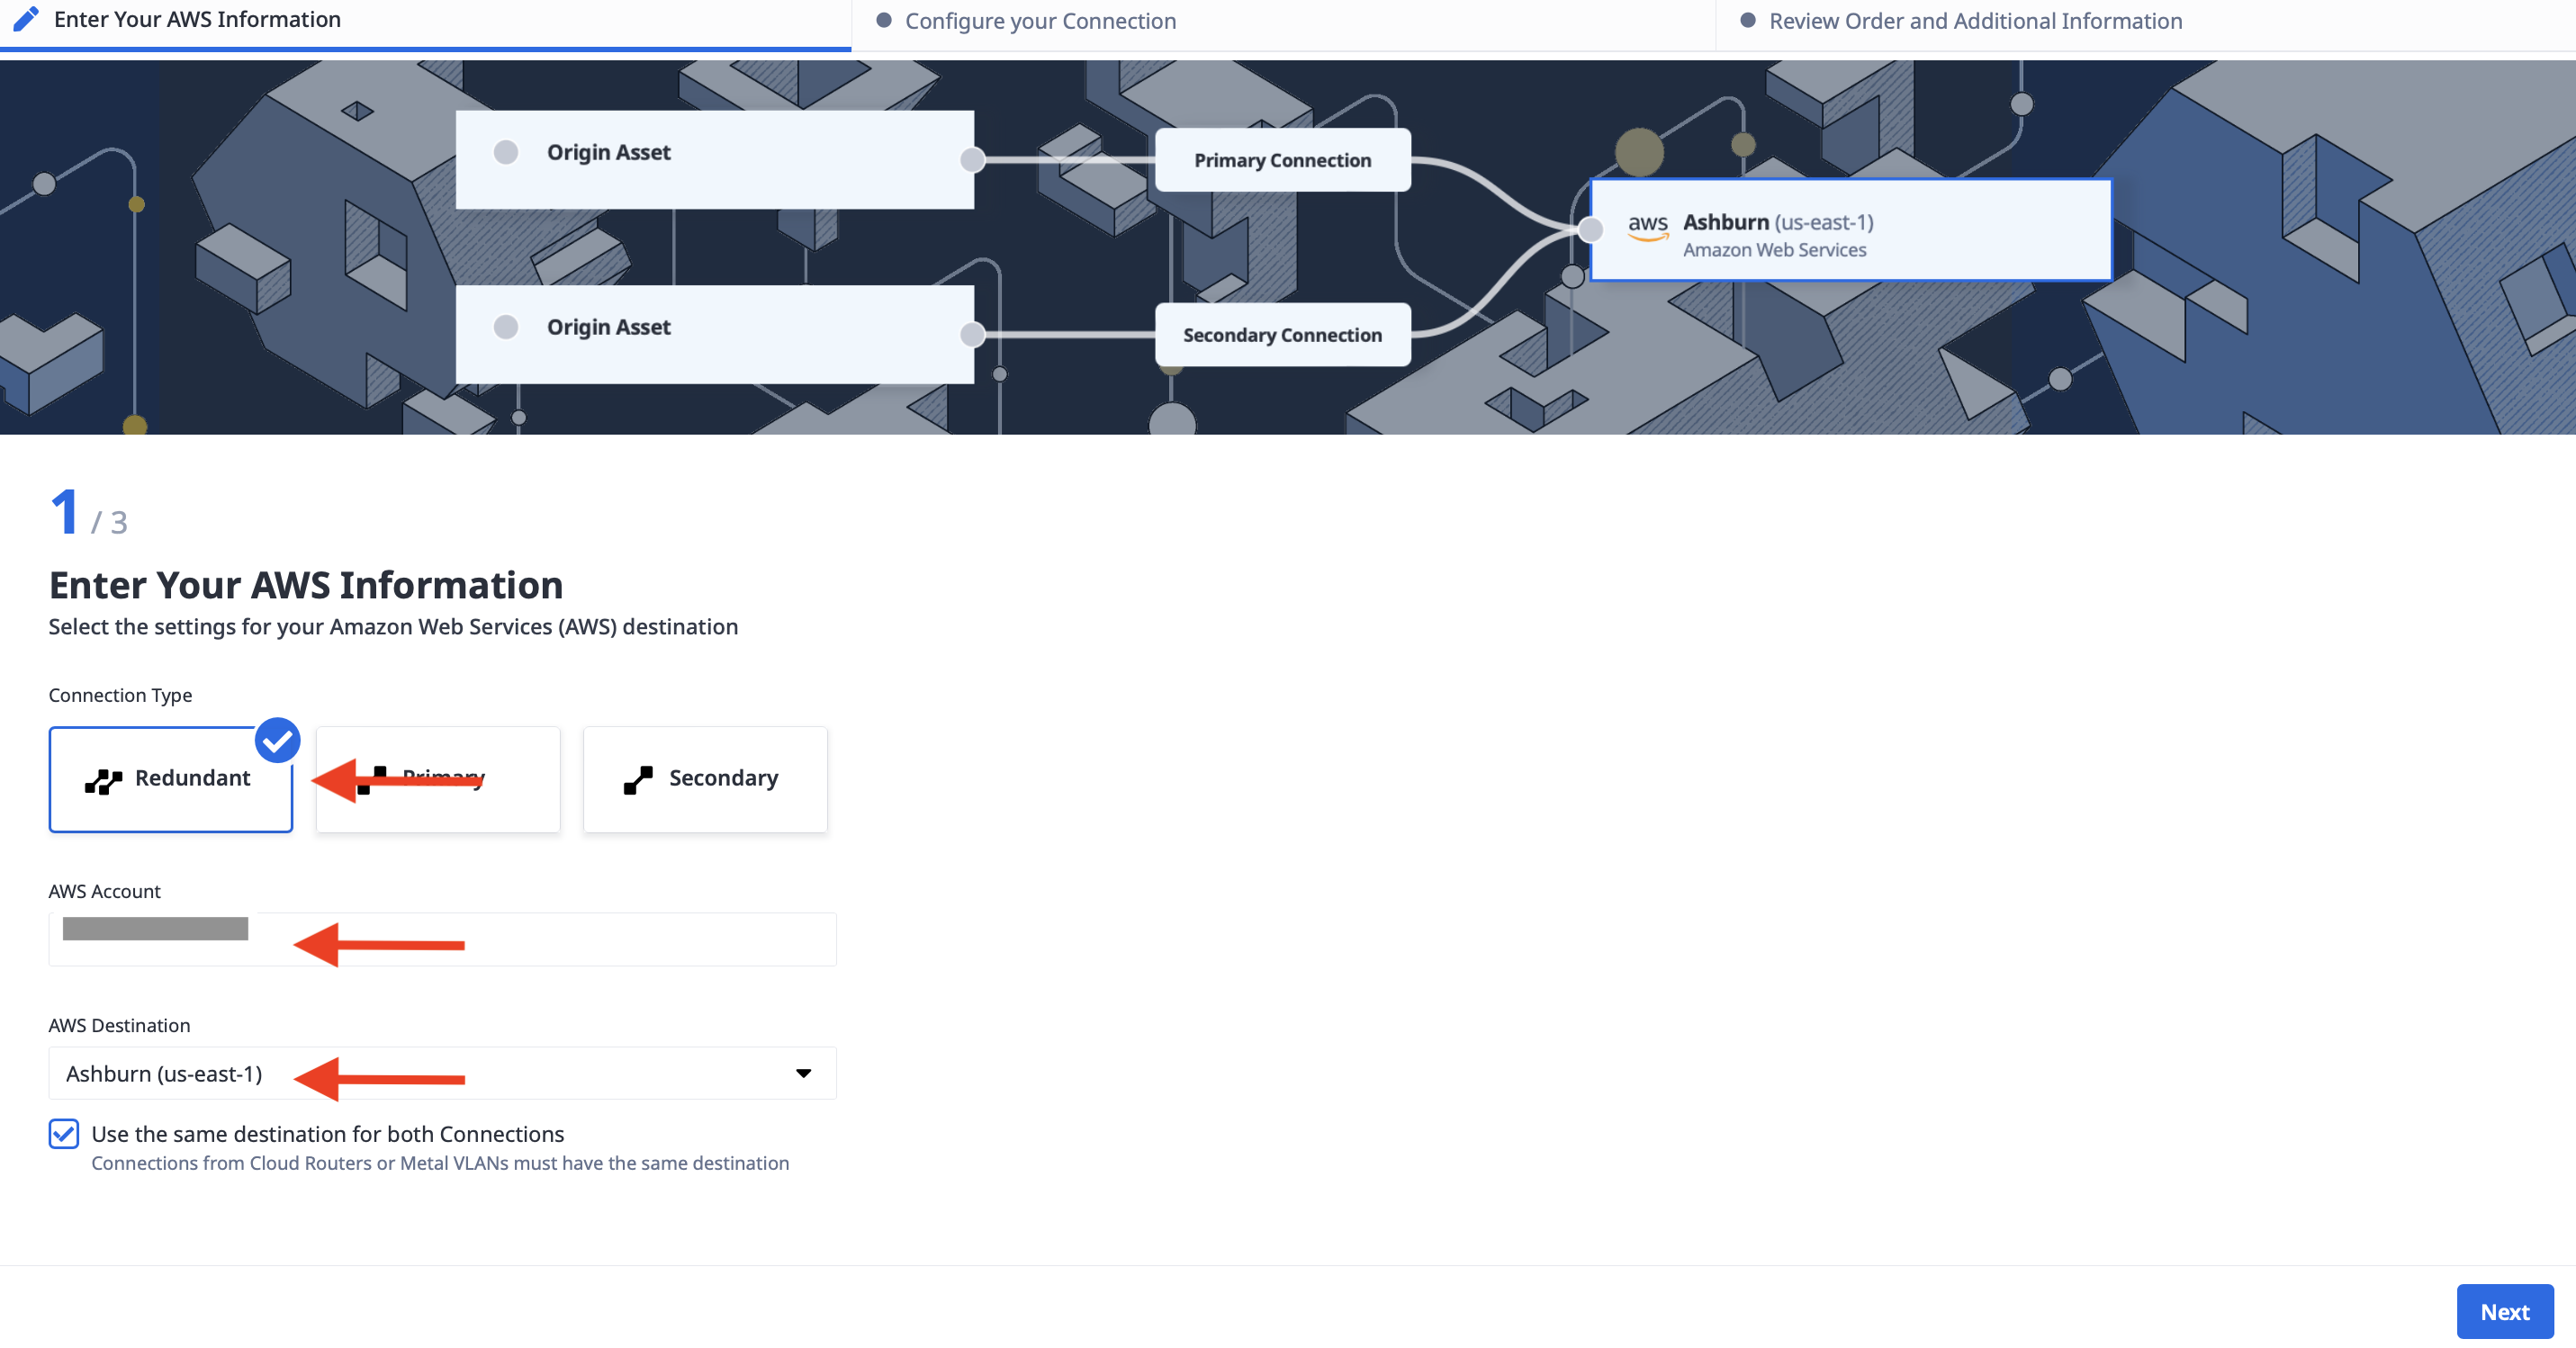
Enter the following information:
- The connection type, in our case, Redundant.
- Your primary and secondary Google Cloud pairing keys. You retrieved these from the GCP console earlier.
- The destination, which should be the same region as our Equinix Metro. Since we deployed to the Equinix Washington metro, we select "Ashburn (us-east4)".
- Check "Use the same destination for both Connections".
Click Next.
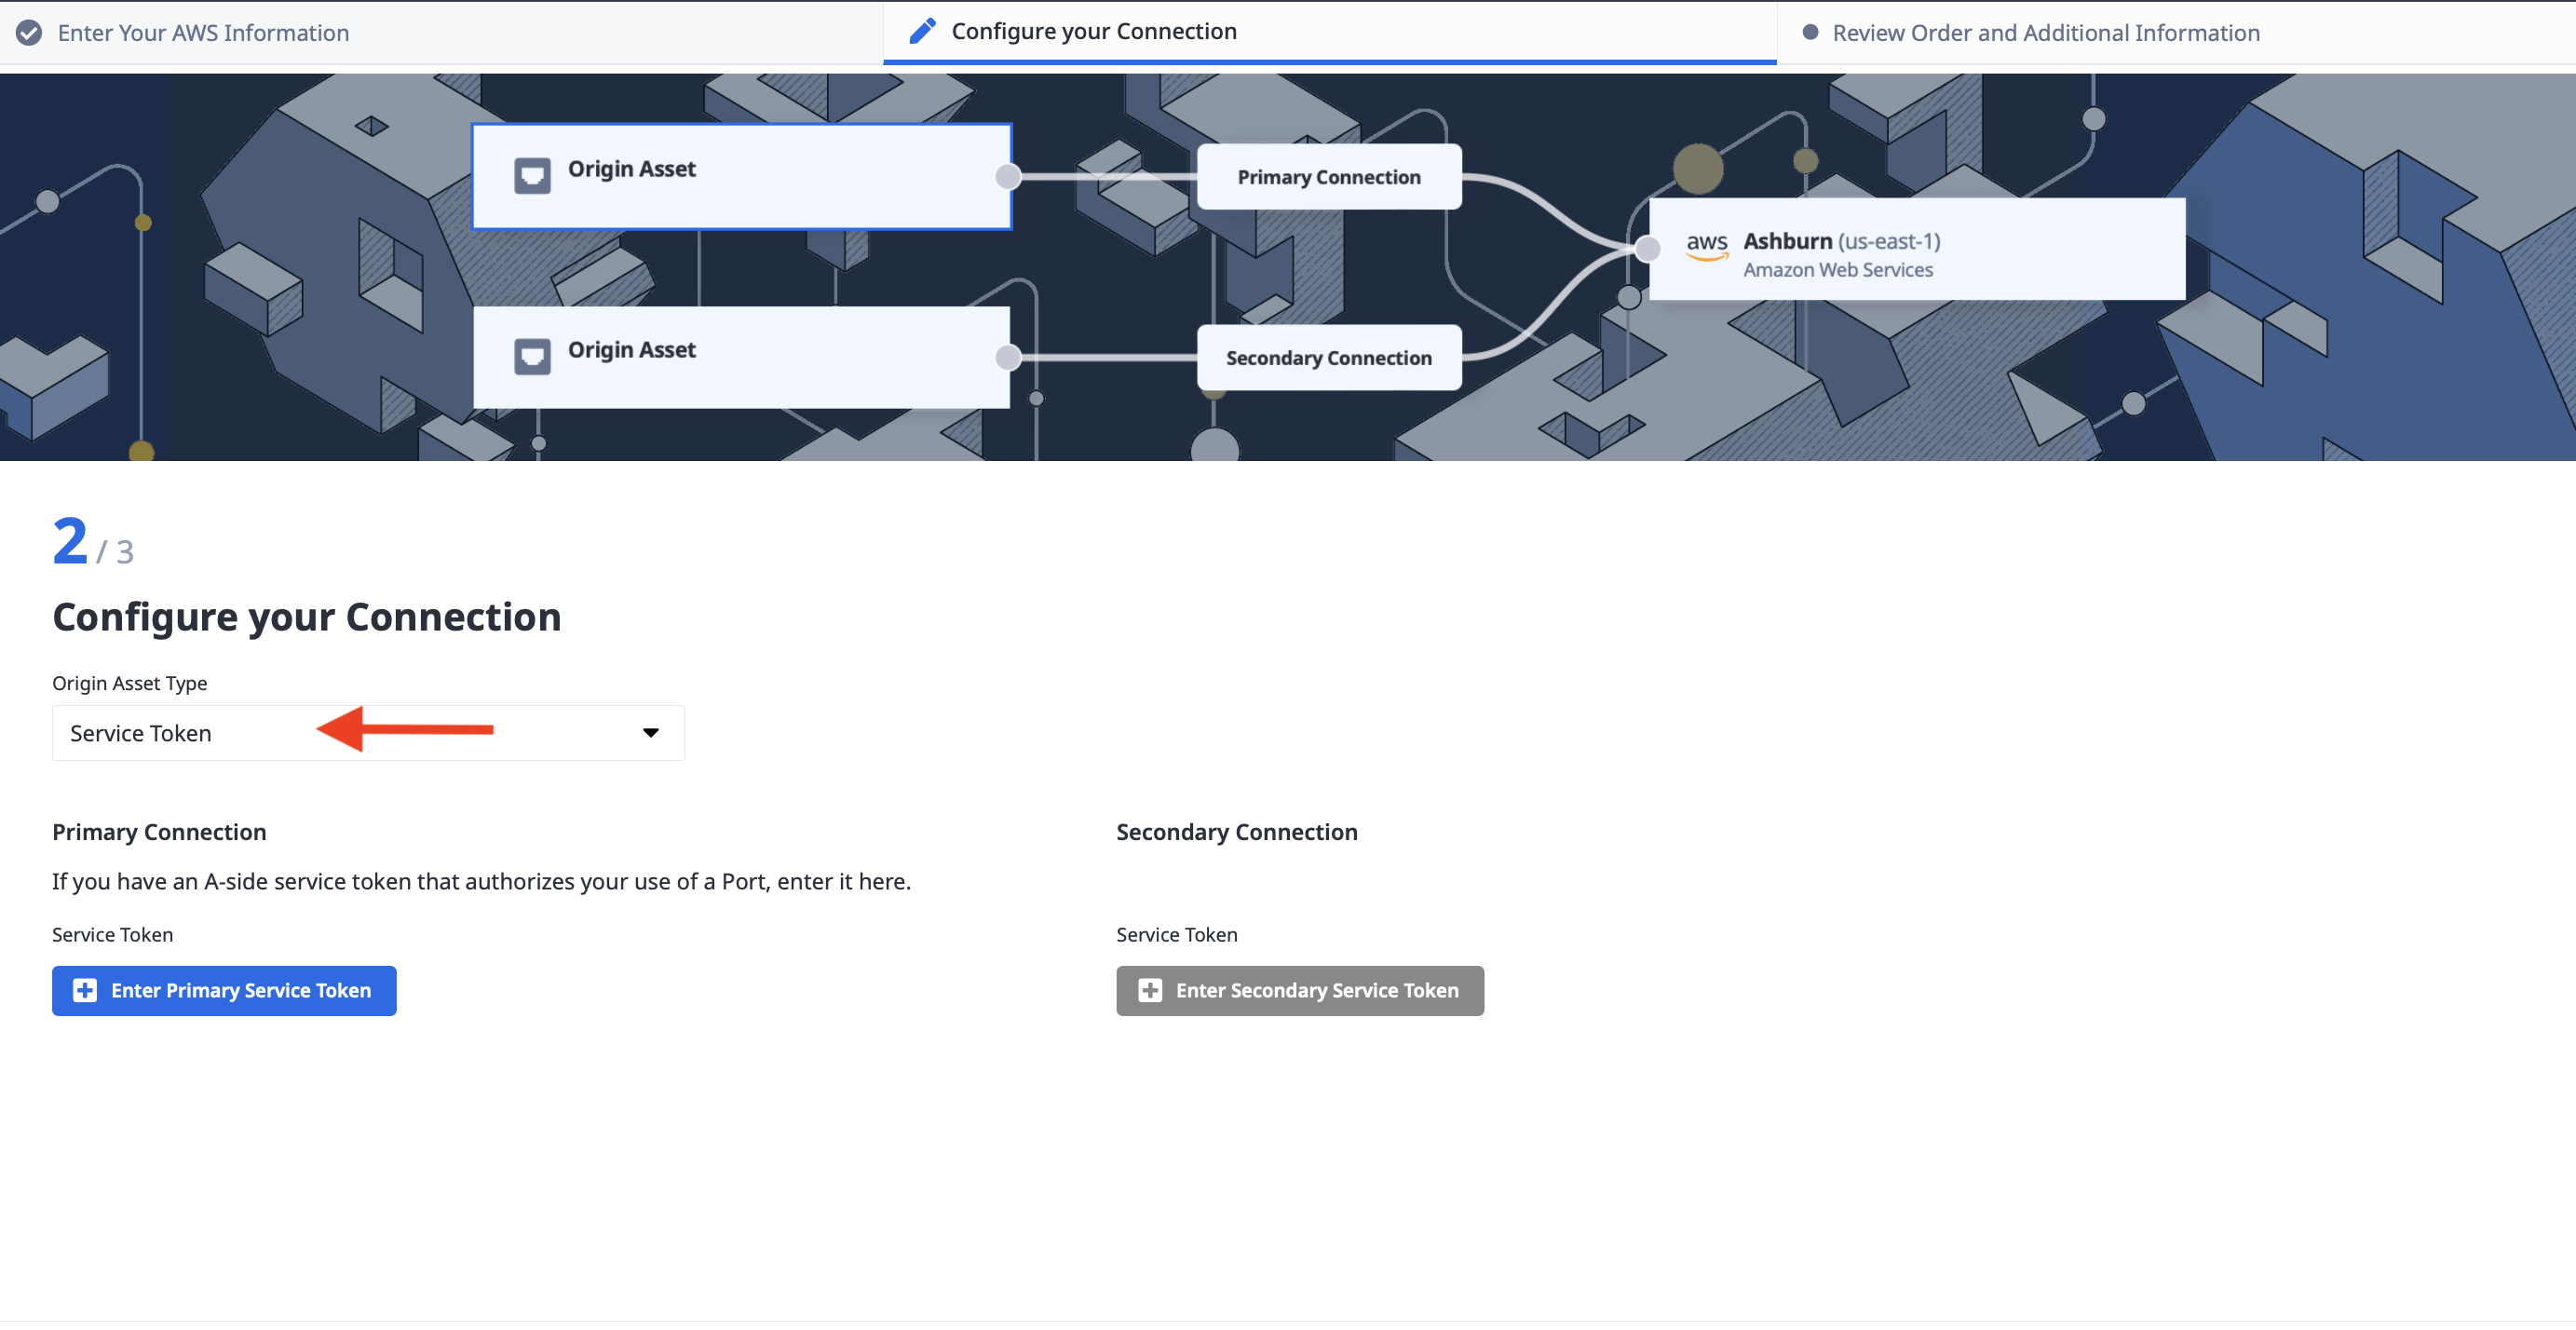
In the next step, configure the connection type. Since the Metal interconnection request gave us a pair of service tokens, under "Origin Asset Type" select "Service Token."
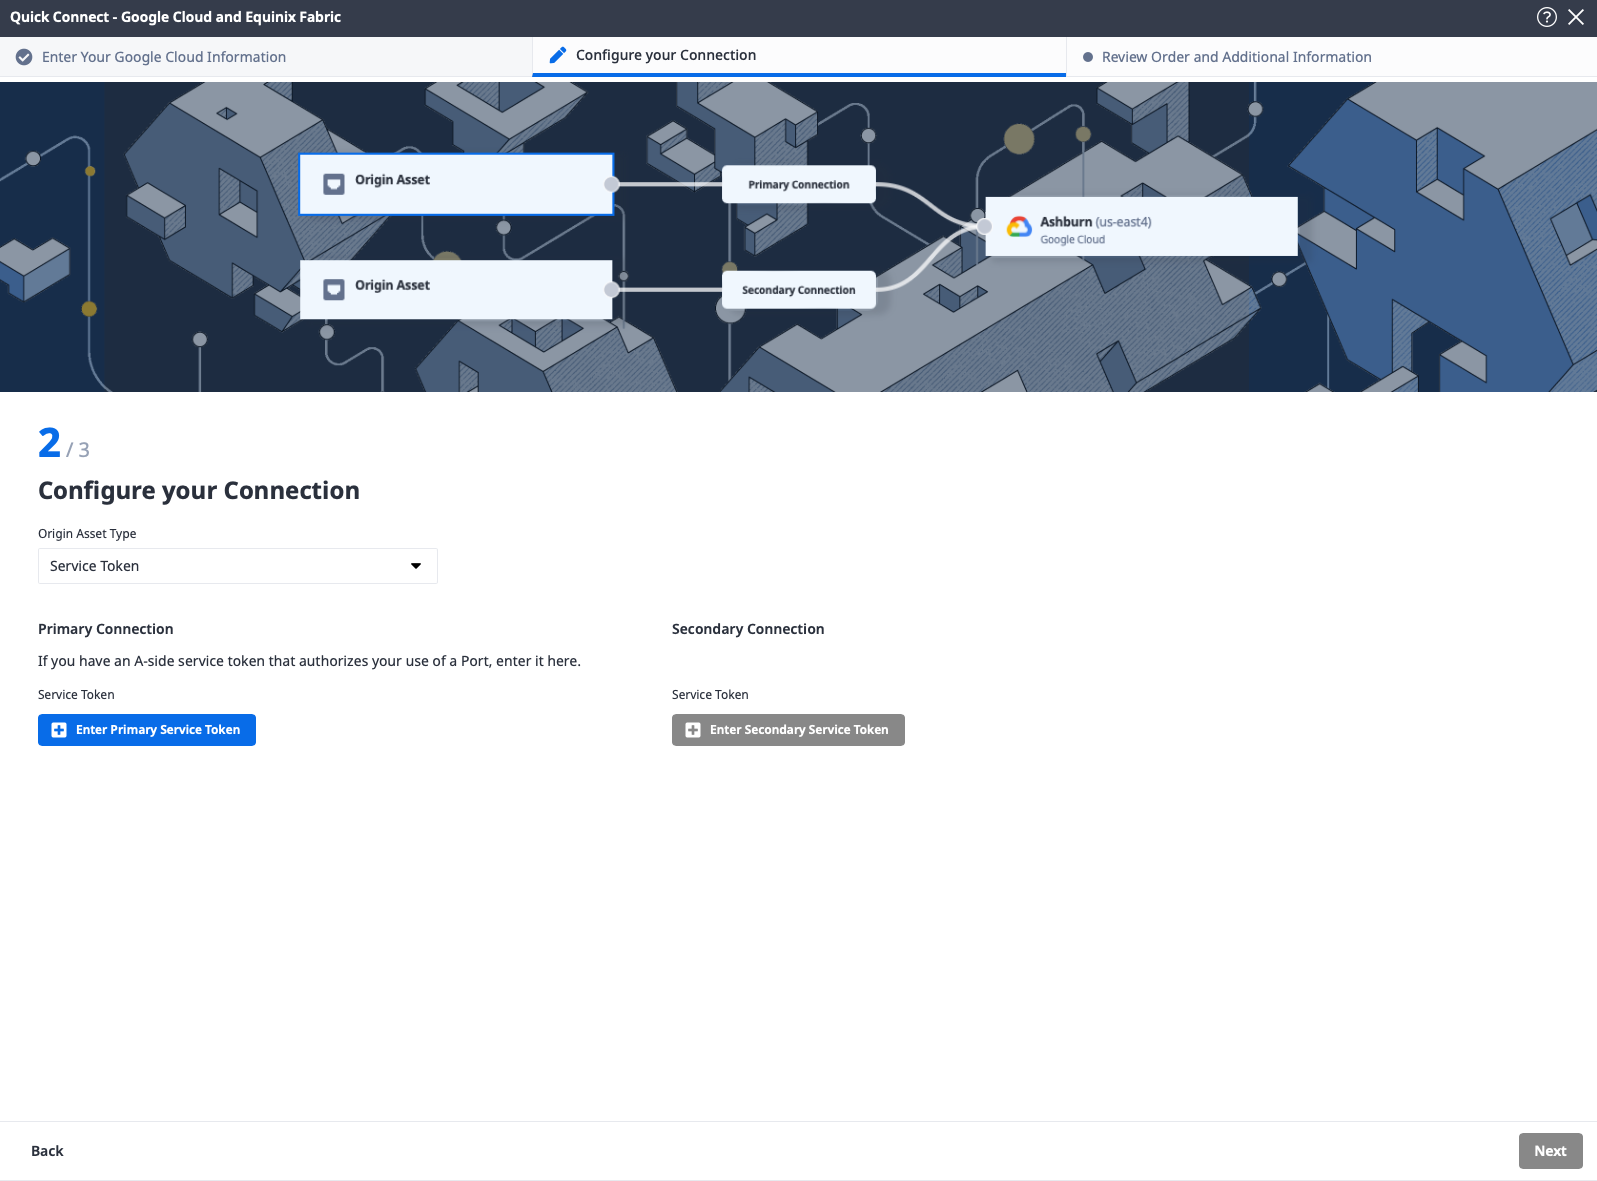
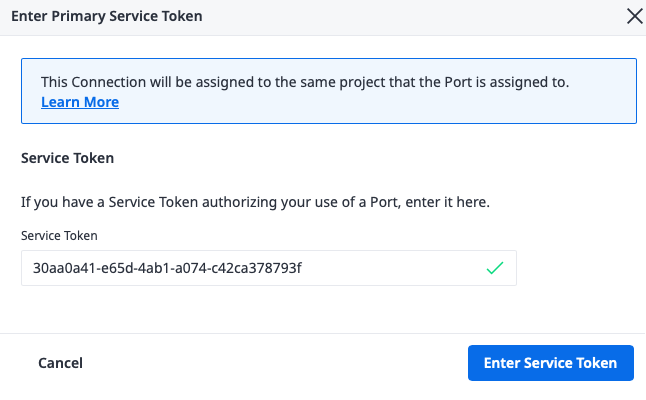
Click Enter Primary Service Token, which opens up the details window. Enter your first service token, and click "Enter Service Token."
Repeat the process for your secondary service token.
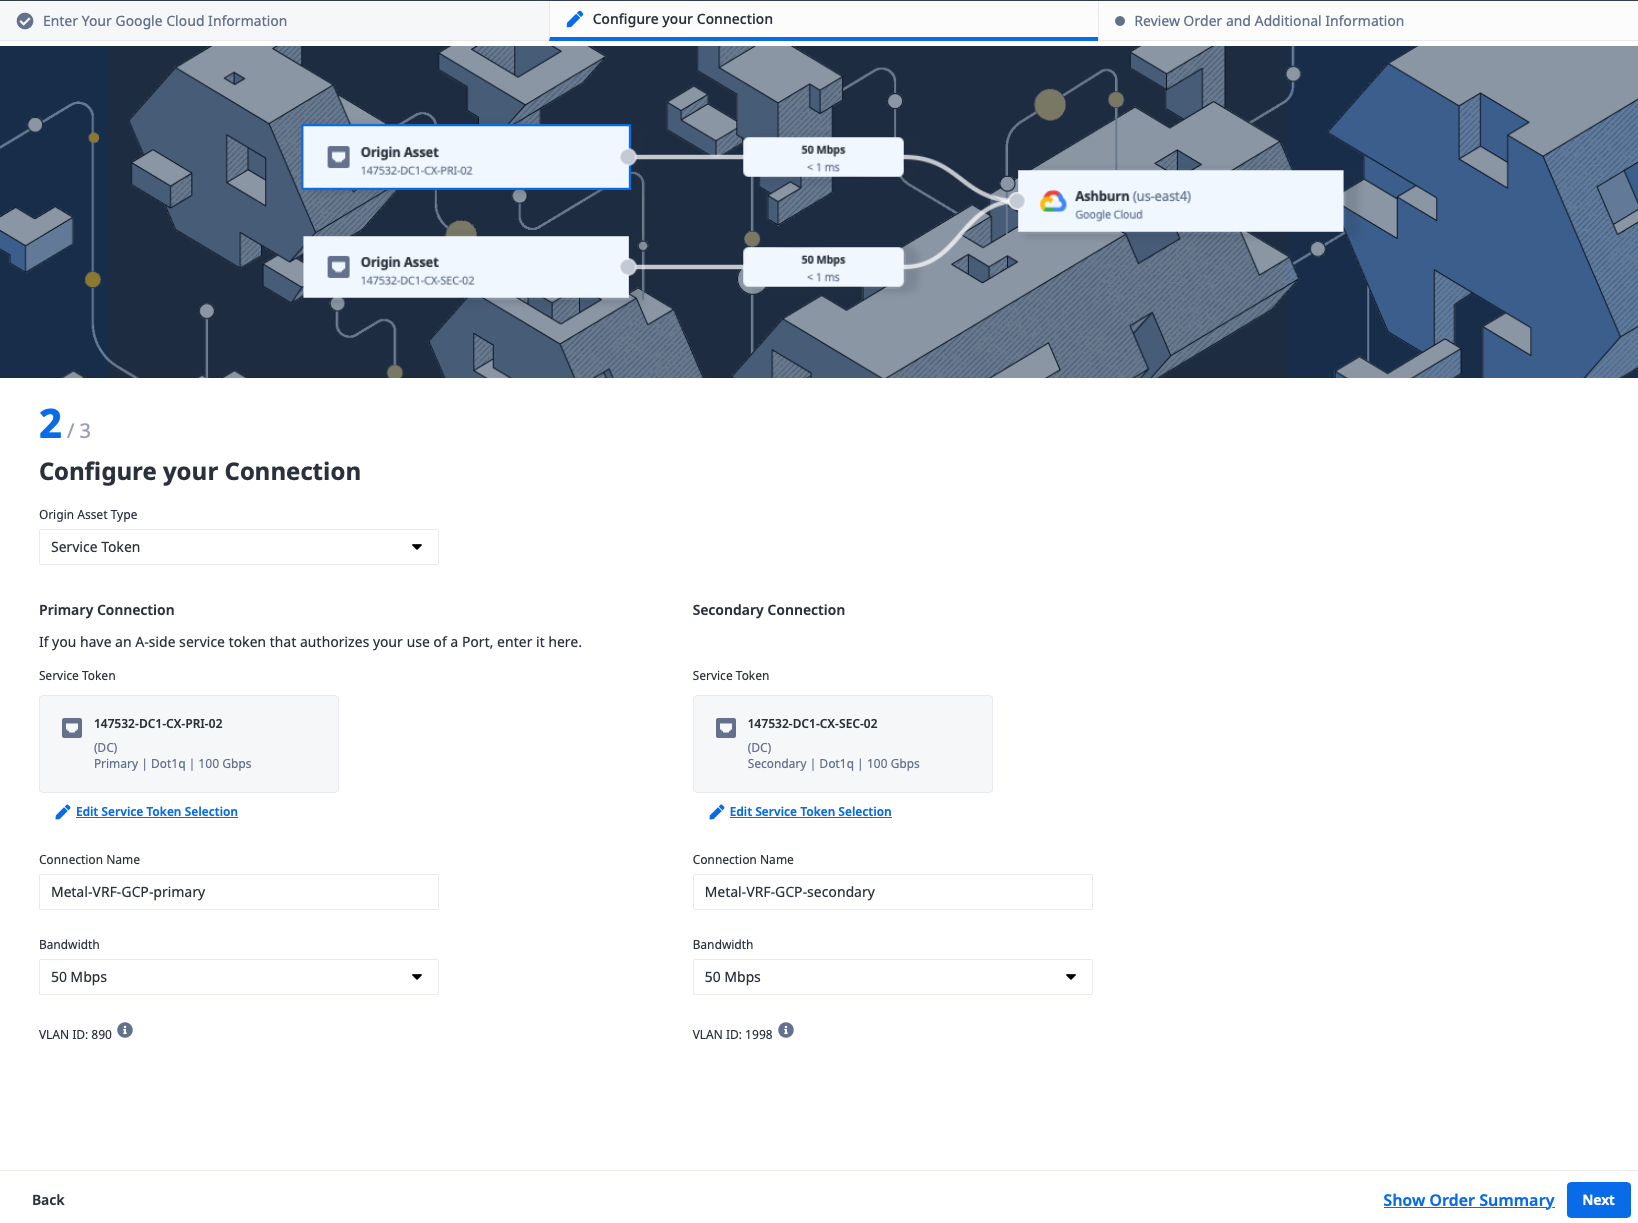
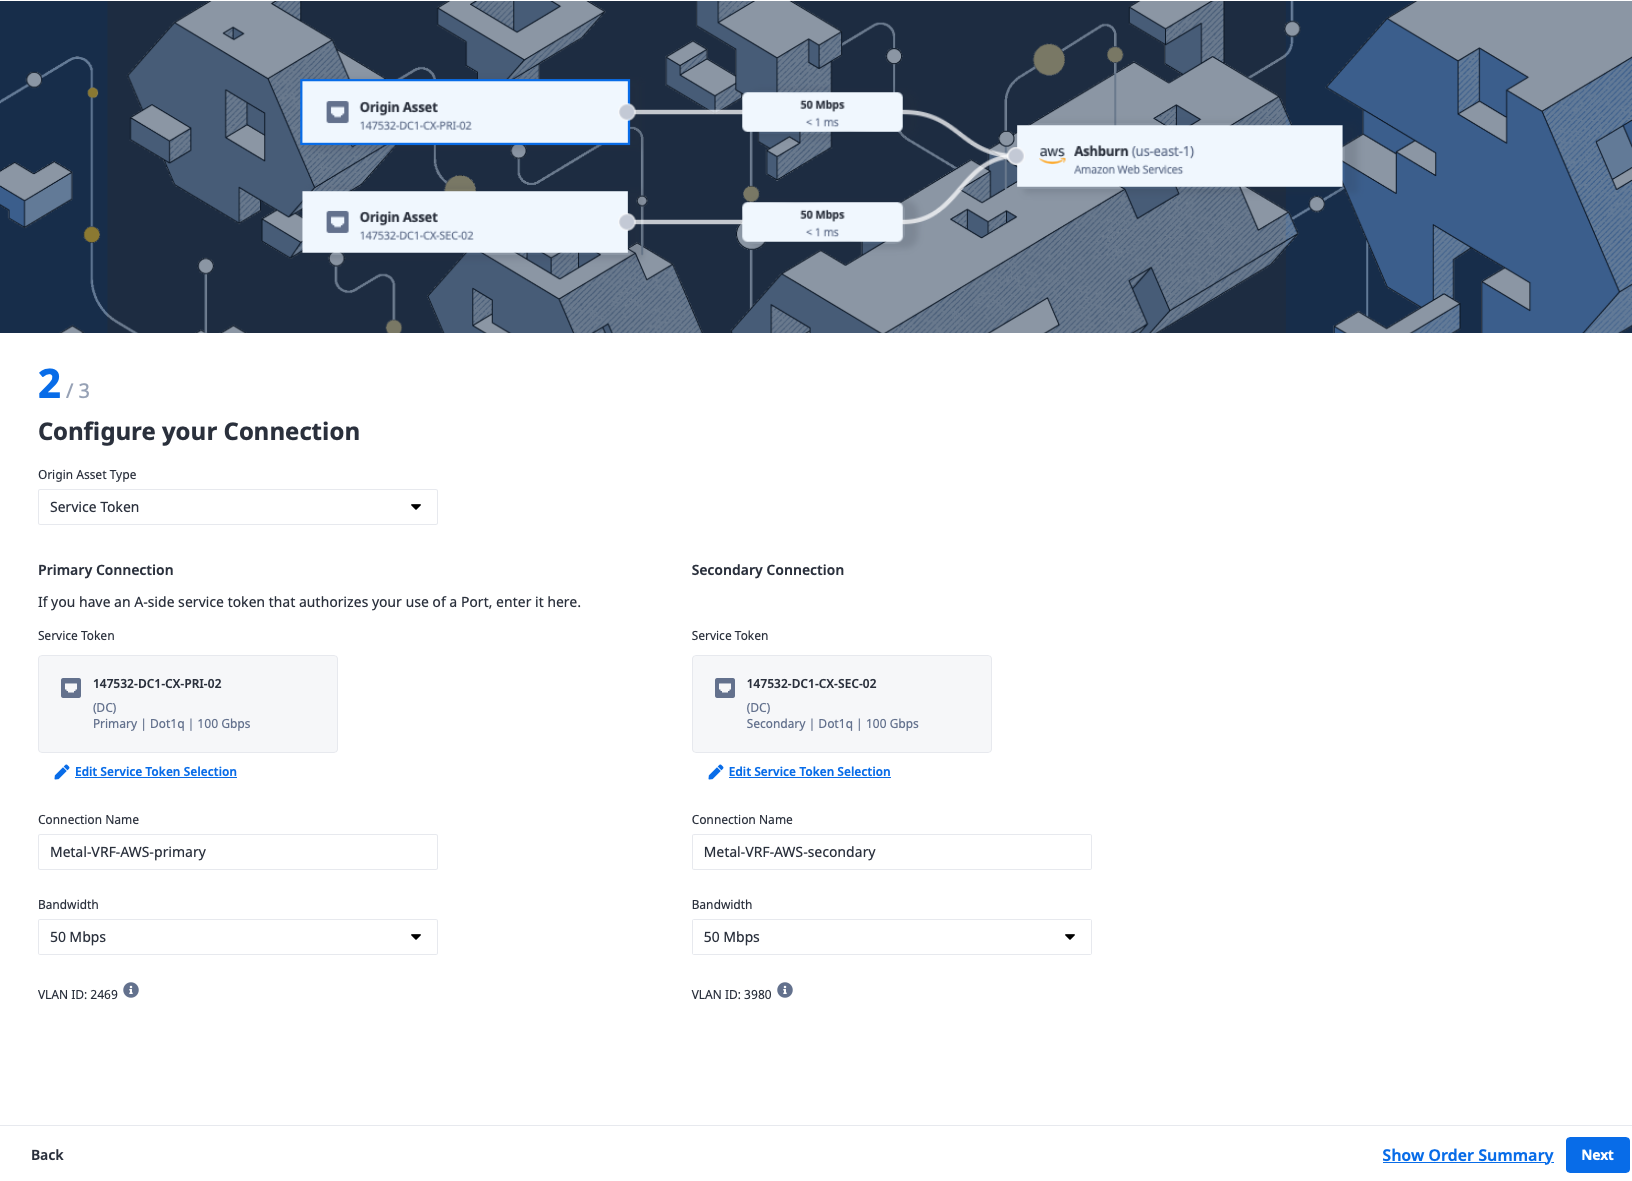
When you're done, you should have a page that looks like this:

Enter a name for each of the connections and select bandwidth to match what you selected earlier. For our example, we selected "Metal-VRF-GCP-primary" and "Metal-VRF-GCP-secondary" and 50Mbps for each.
Click Next.
Review the details and click "Create Connection."
You now should have a page showing the connections created.
If you selected "pre-approve" when setting up the VLAN Attachments in GCP, the connections should be ready to use. If not, you will need to approve them in GCP.
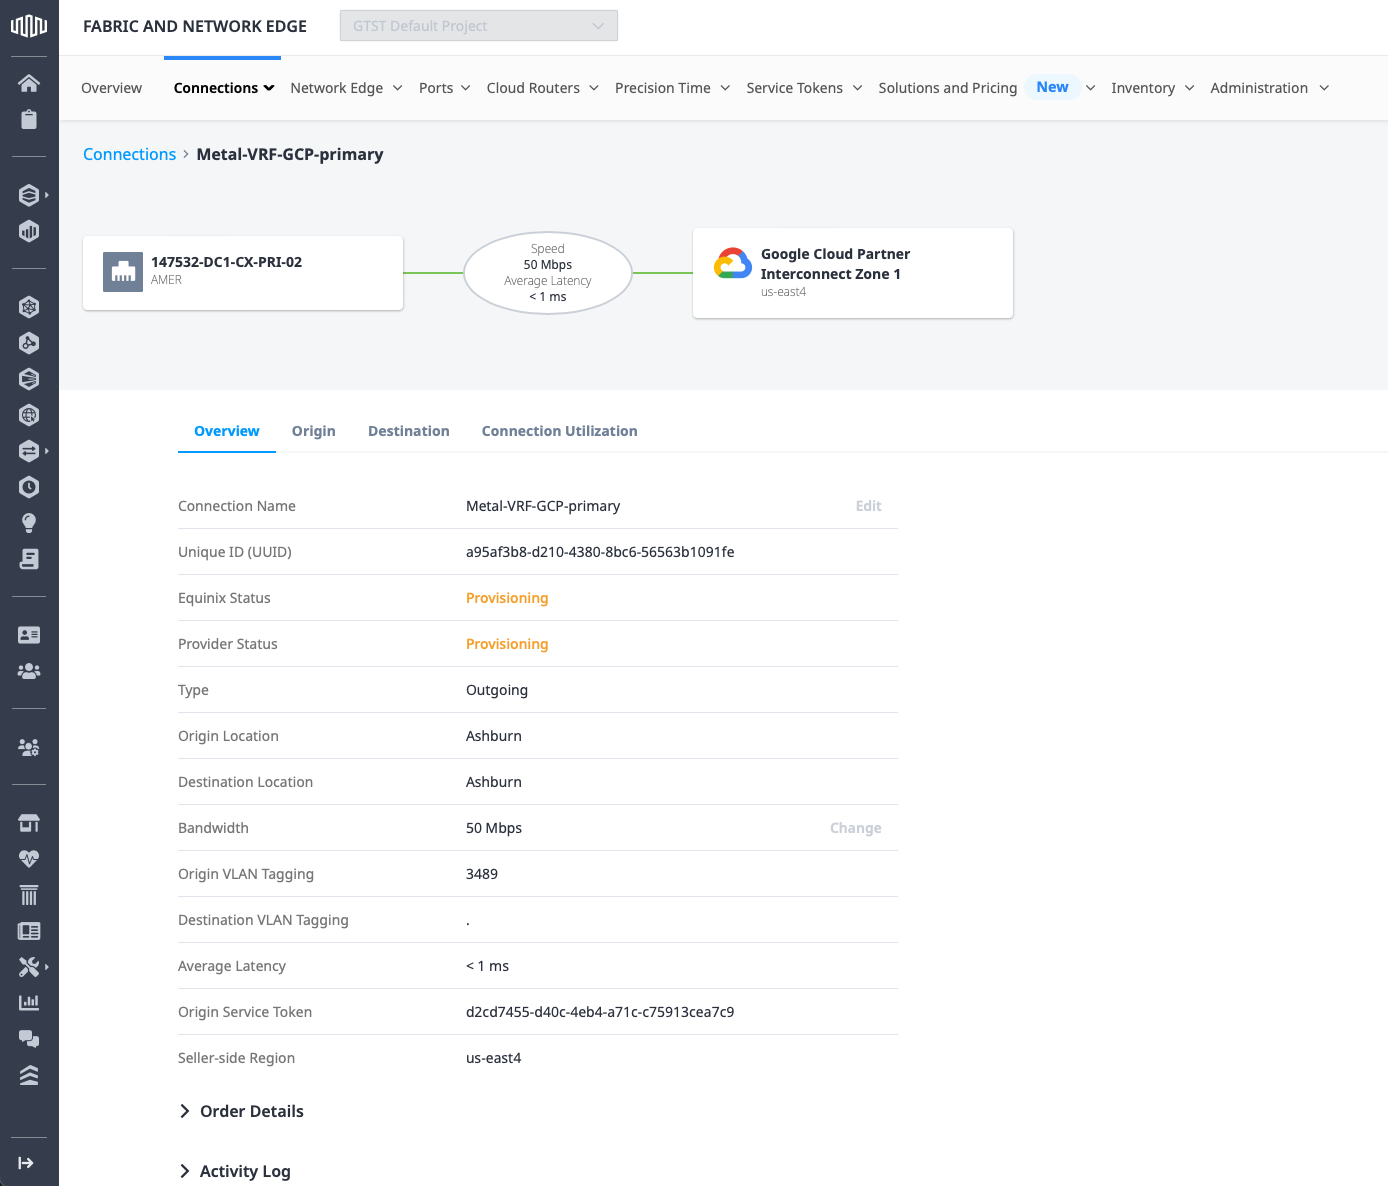
These may take a few minutes to complete. You can check the status by clicking on the connection, which shows the details:
Update Equinix Metal with the GCP details
Before you can add the GCP details in Equinix Metal, you need to retrieve the IP addresses for the VLAN attachments.
Return to the Google Cloud console, then open the Network Connectivity section. The attachments should now show a status of "BGP configuration needed". Click on the first attachment:
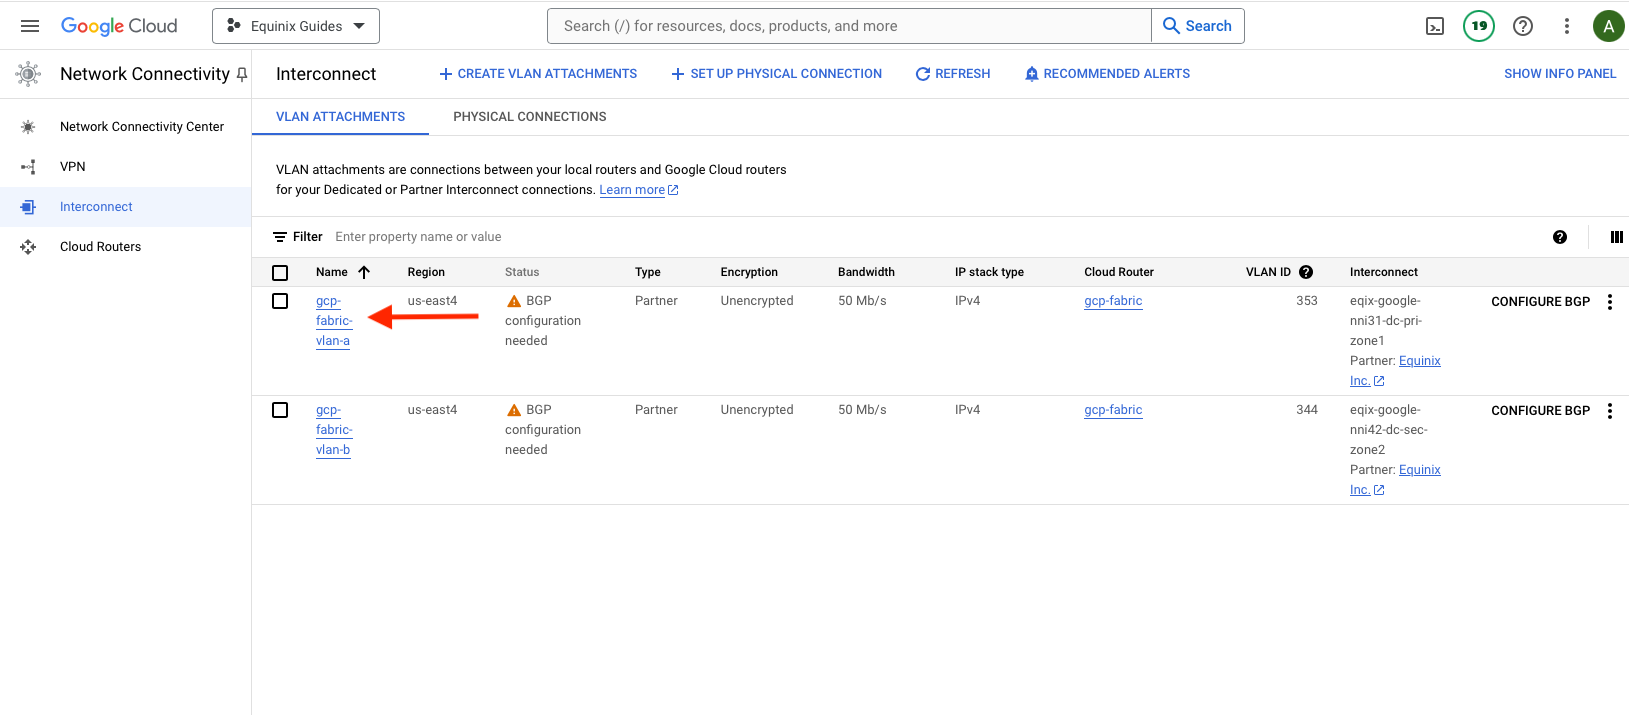
Then select Edit BGP Session:
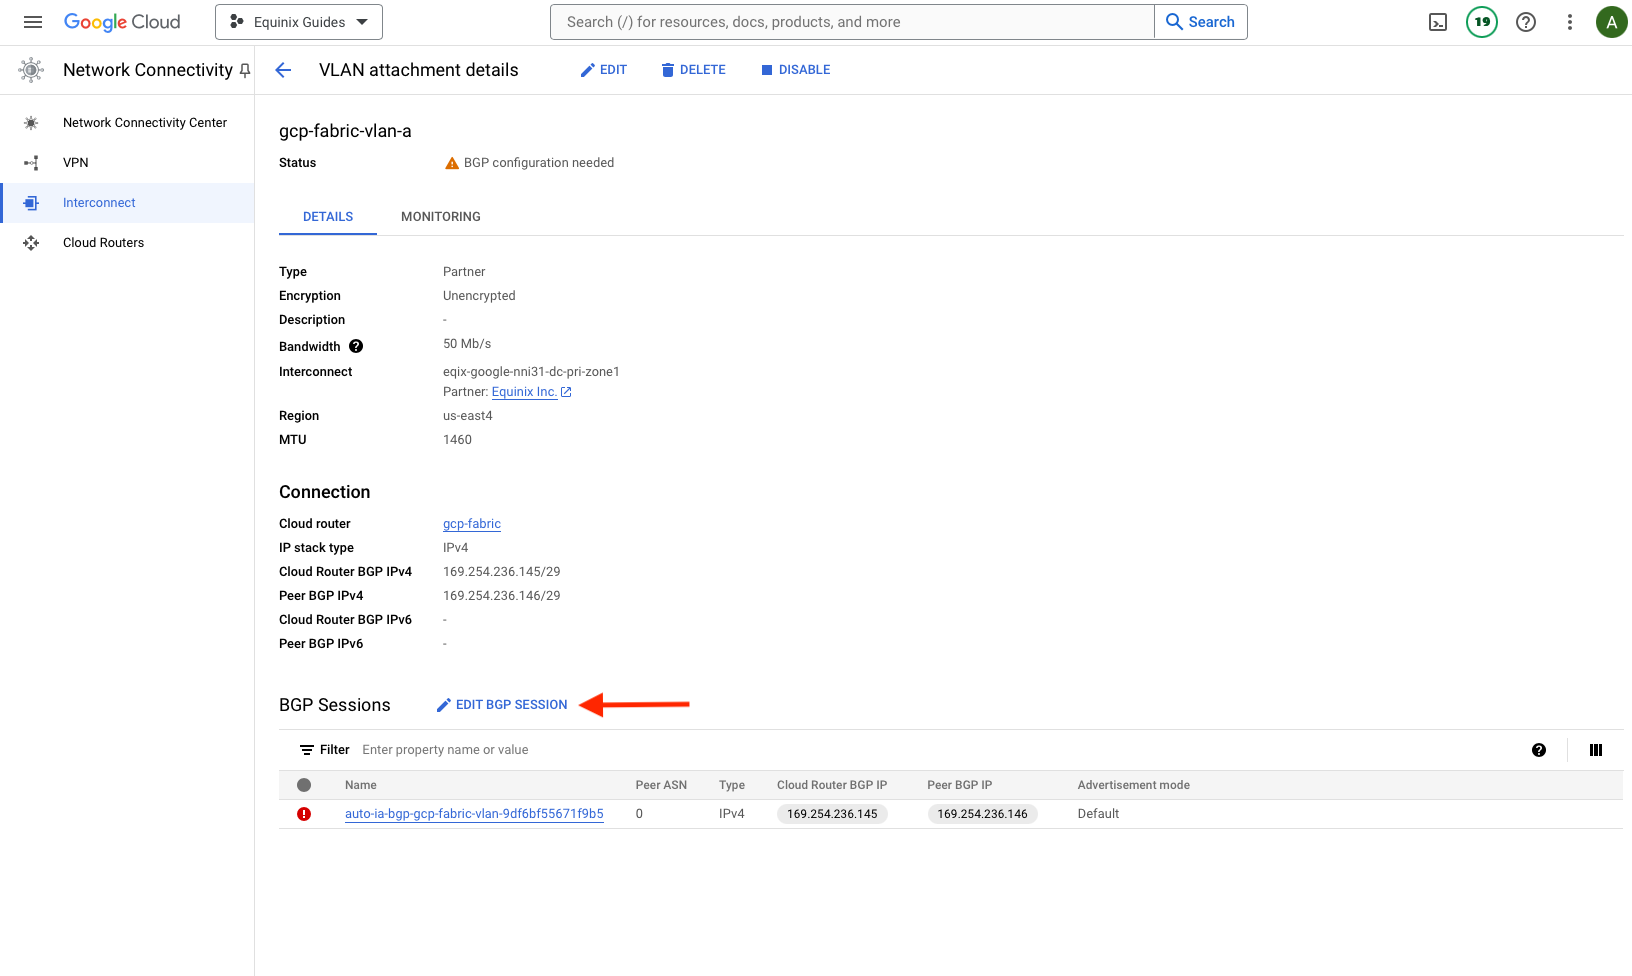
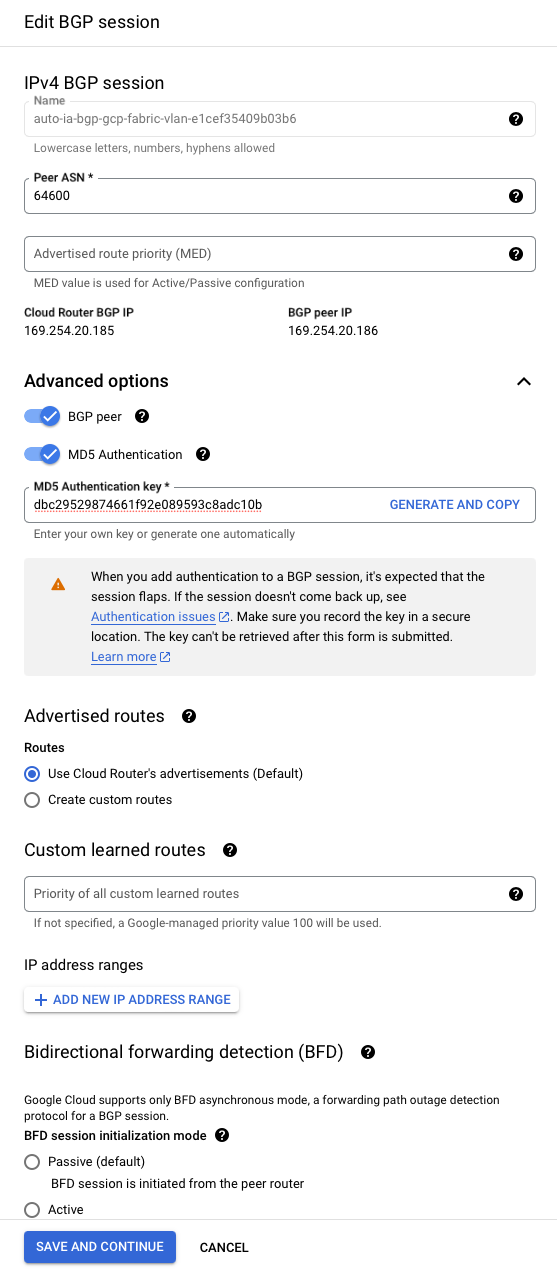
This brings up the BGP session details:
- "Peer ASN": ASN of the Equinix side, which we selected earlier:
64600. - "Cloud Router BGP IP": IP of the GCP side. Save this for later, as you will need to enter it into Equinix Metal. In our example:
169.254.236.145. - "BGP Peer IP": IP of the Equinix side. Save this for later, as you will need to enter it into Equinix Metal. In our example:
169.254.236.146. - "Advanced options": Open this section up:
- "MD5 Authentication": enable this.
- "MD5 Authentication Key": use the key we generated earlier:
dbc29529874661f92e089593c8adc10b.
Leave the rest of the options as they are, and click Save and Continue.

Repeat the process with the second VLAN attachment:
- "Peer ASN": ASN of the Equinix side, which we selected earlier:
64600. - "Cloud Router BGP IP": IP of the GCP side. Save this for later, as you will need to enter it into Equinix Metal. In our example:
169.254.20.185. - "BGP Peer IP": IP of the Equinix side. Save this for later, as you will need to enter it into Equinix Metal. In our example:
169.254.20.186. - "Advanced options": Open this section up:
- "MD5 Authentication": enable this.
- "MD5 Authentication Key": use the key we generated earlier:
dbc29529874661f92e089593c8adc10b.
Leave the rest of the options as they are, and click Save and Continue.
With the information from Google Cloud, specifically the IP address information, you can now update the Metal Interconnection with the details. Before you do, you need to include the IP address range in Metal VRF.
The IP address ranges are the primary and secondary VC IPs, which you retrieved from the VLAN attachments in GCP. In our example, the IPs are:
- Primary:
169.254.236.145and169.254.236.146 - Secondary:
169.254.20.185and169.254.20.186
The smallest IP ranges that include each of those are:
- Primary:
169.254.236.145/30 - Secondary:
169.254.20.184/30
However, the minimum allowed range is /29; both of those are smaller than a /29 at /30.
So take the next biggest size up.
- Primary:
169.254.236.145/29 - Secondary:
169.254.20.184/29
In the Equinix Metal console, select Networking and then Virtual Routing and Forwarding:
Click on the VRF created earlier:
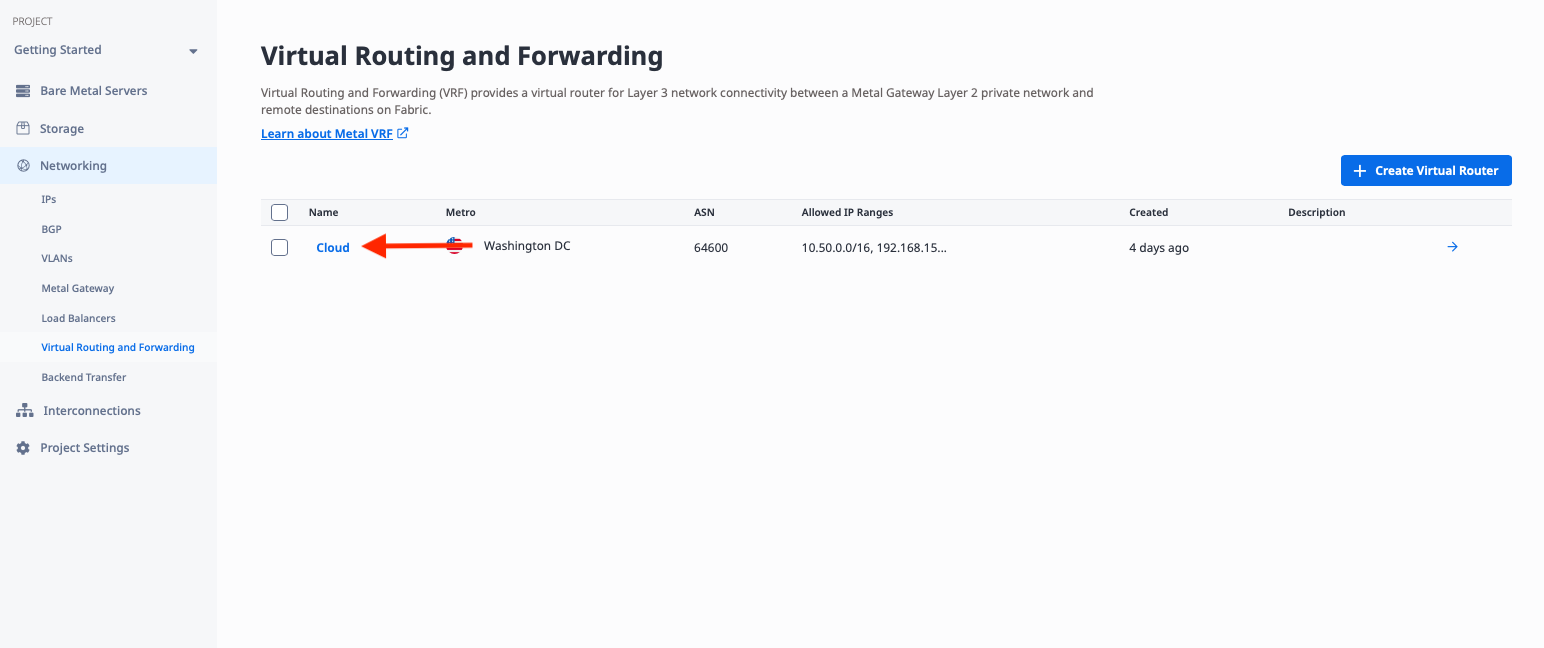
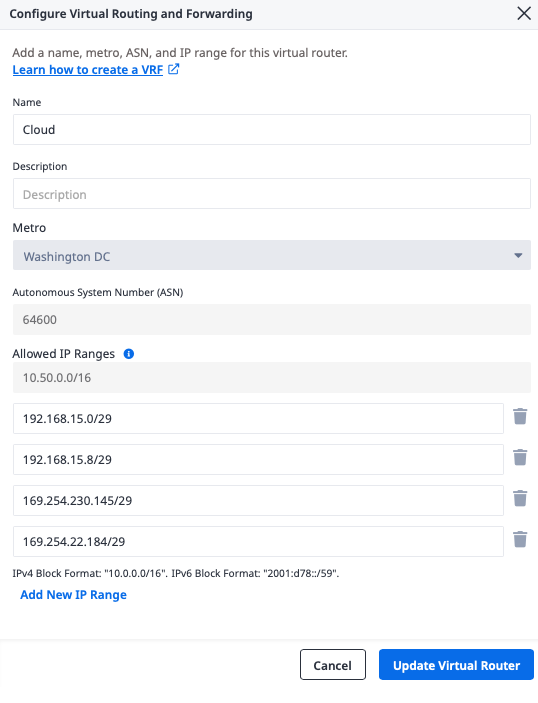
This brings up the details of the VRF. Click Edit Virtual Router Details:
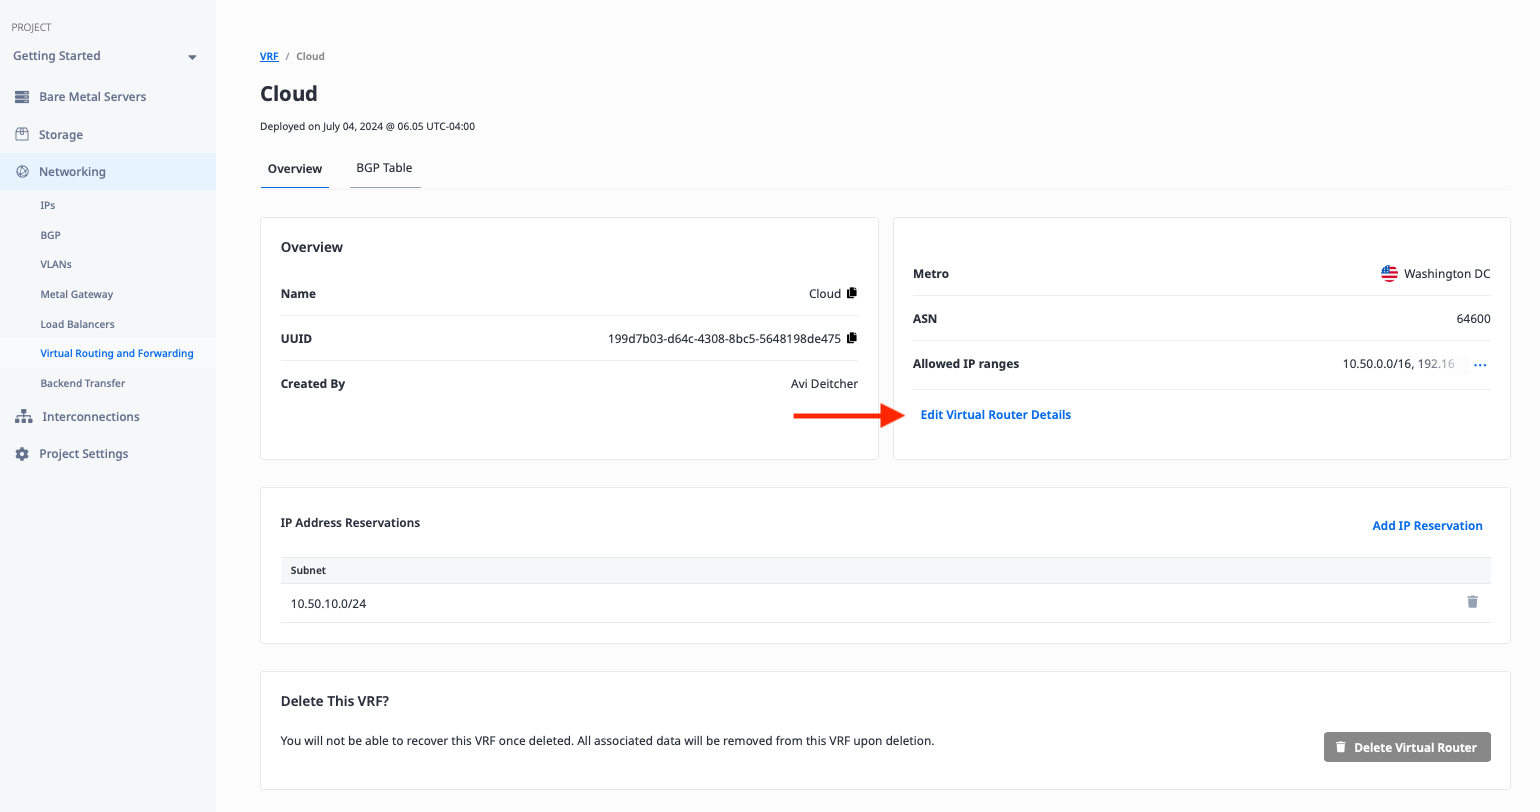
Now add 2 new IP ranges, the larger /29 ones we identified above:
-
169.254.236.145/29 -
169.254.20.184/29
Click Update Virtual Router.
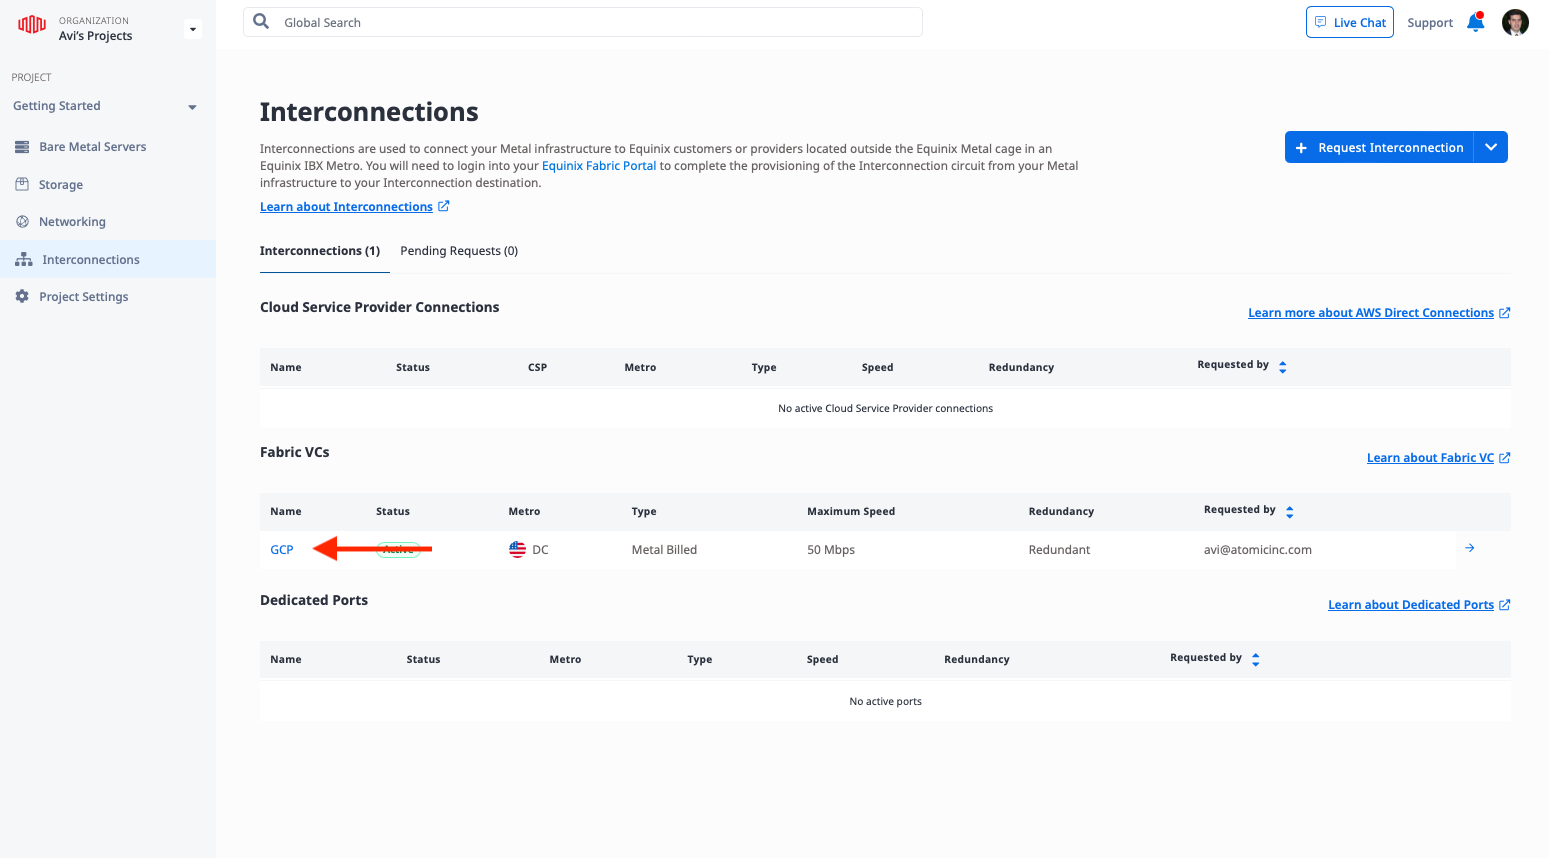
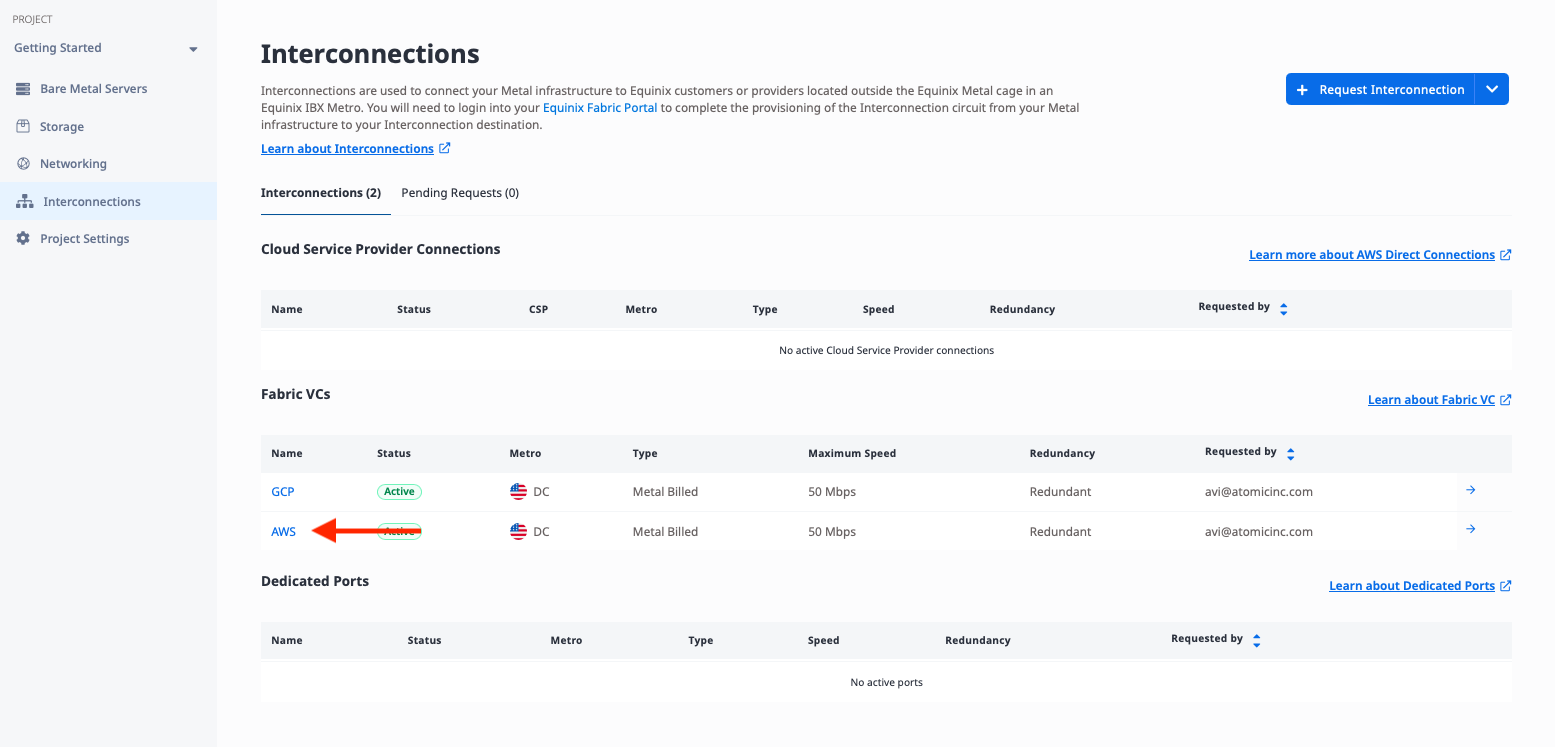
In the Metal console, select Interconnections:
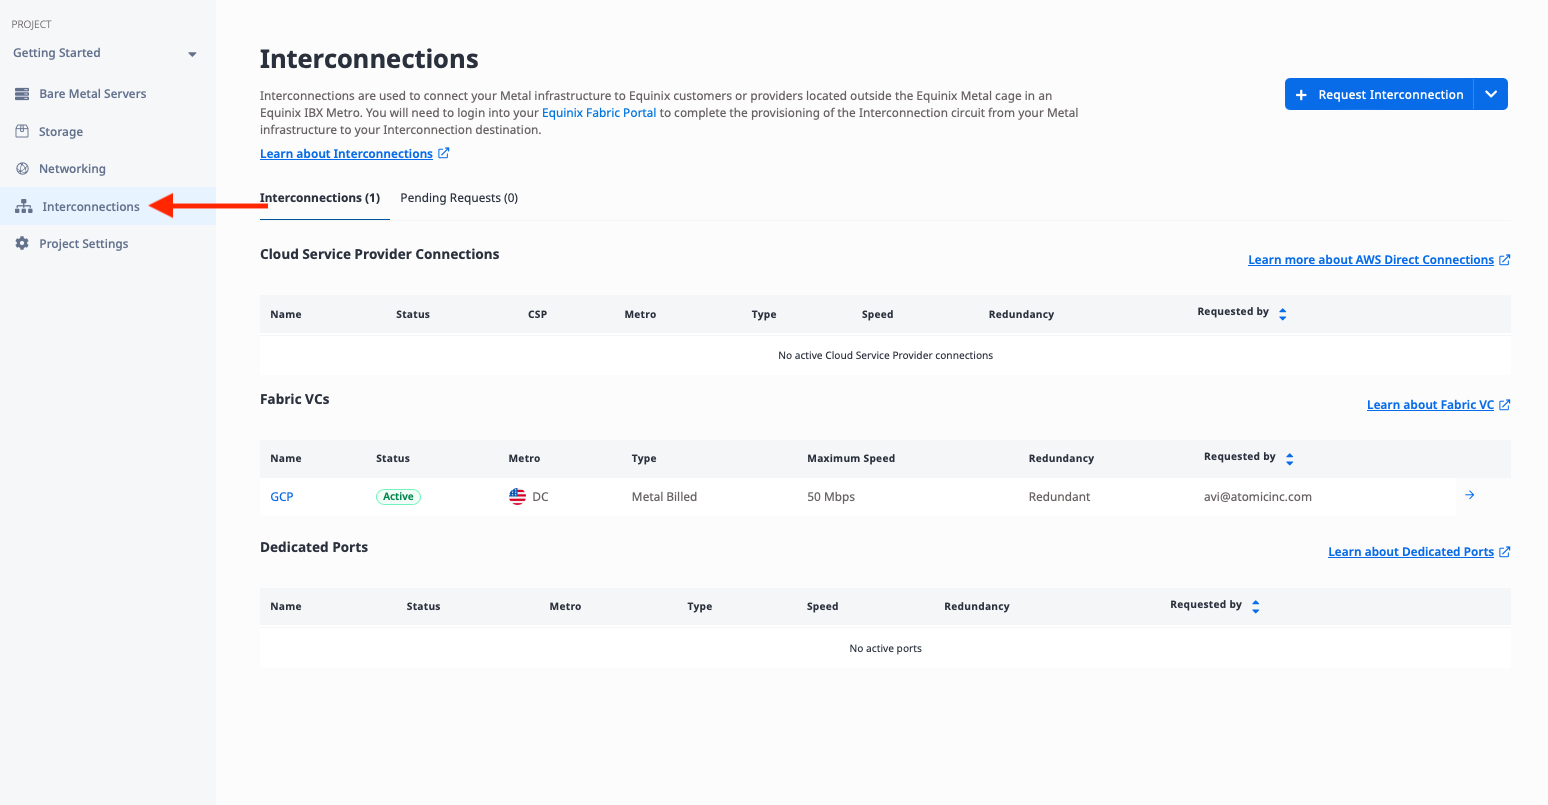
Click the specific connection created earlier:
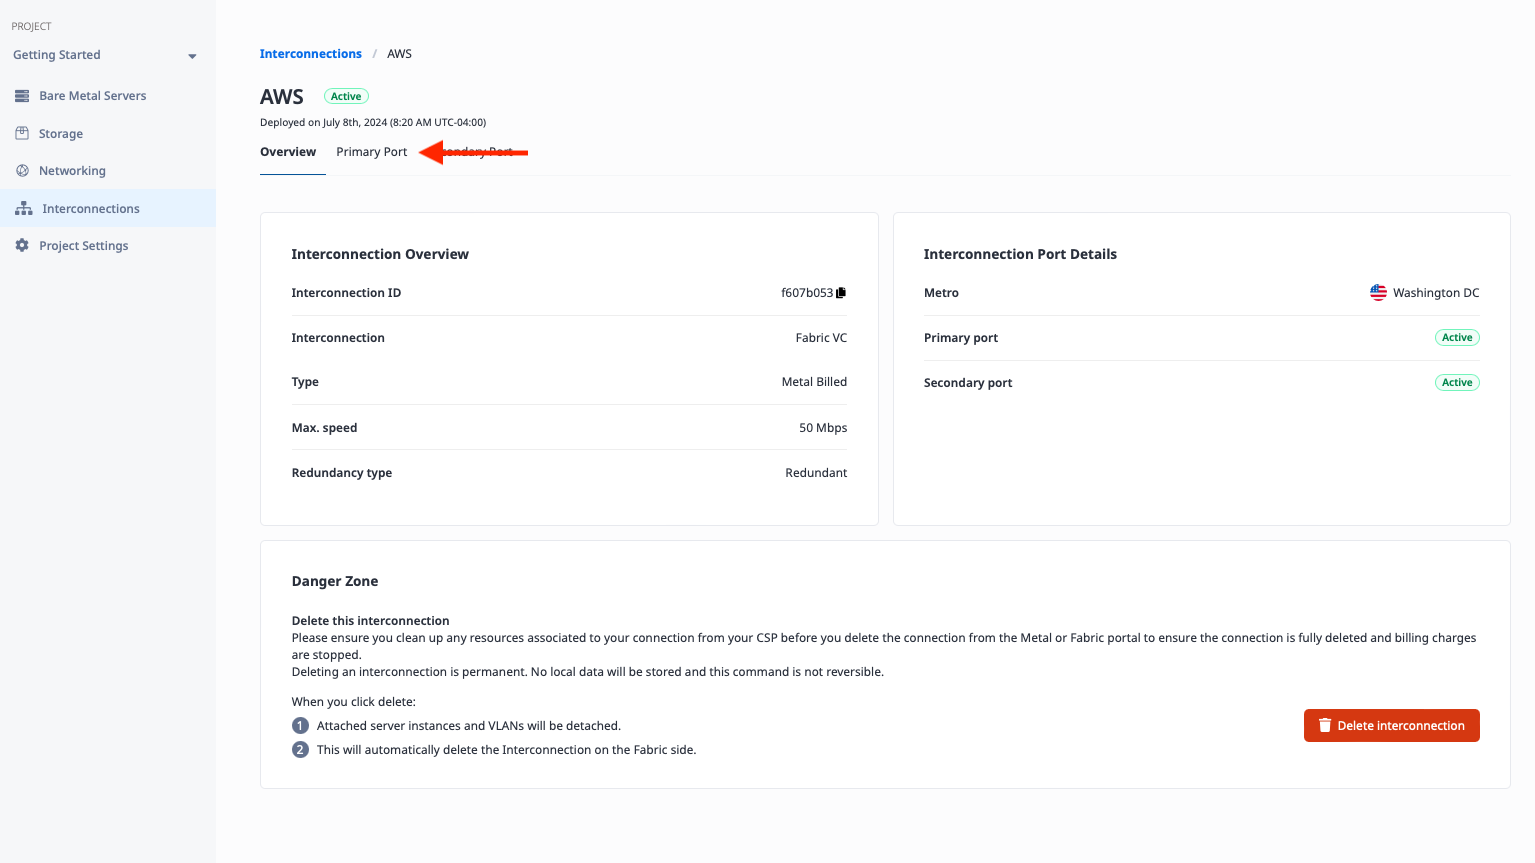
Select the Primary Port tab:

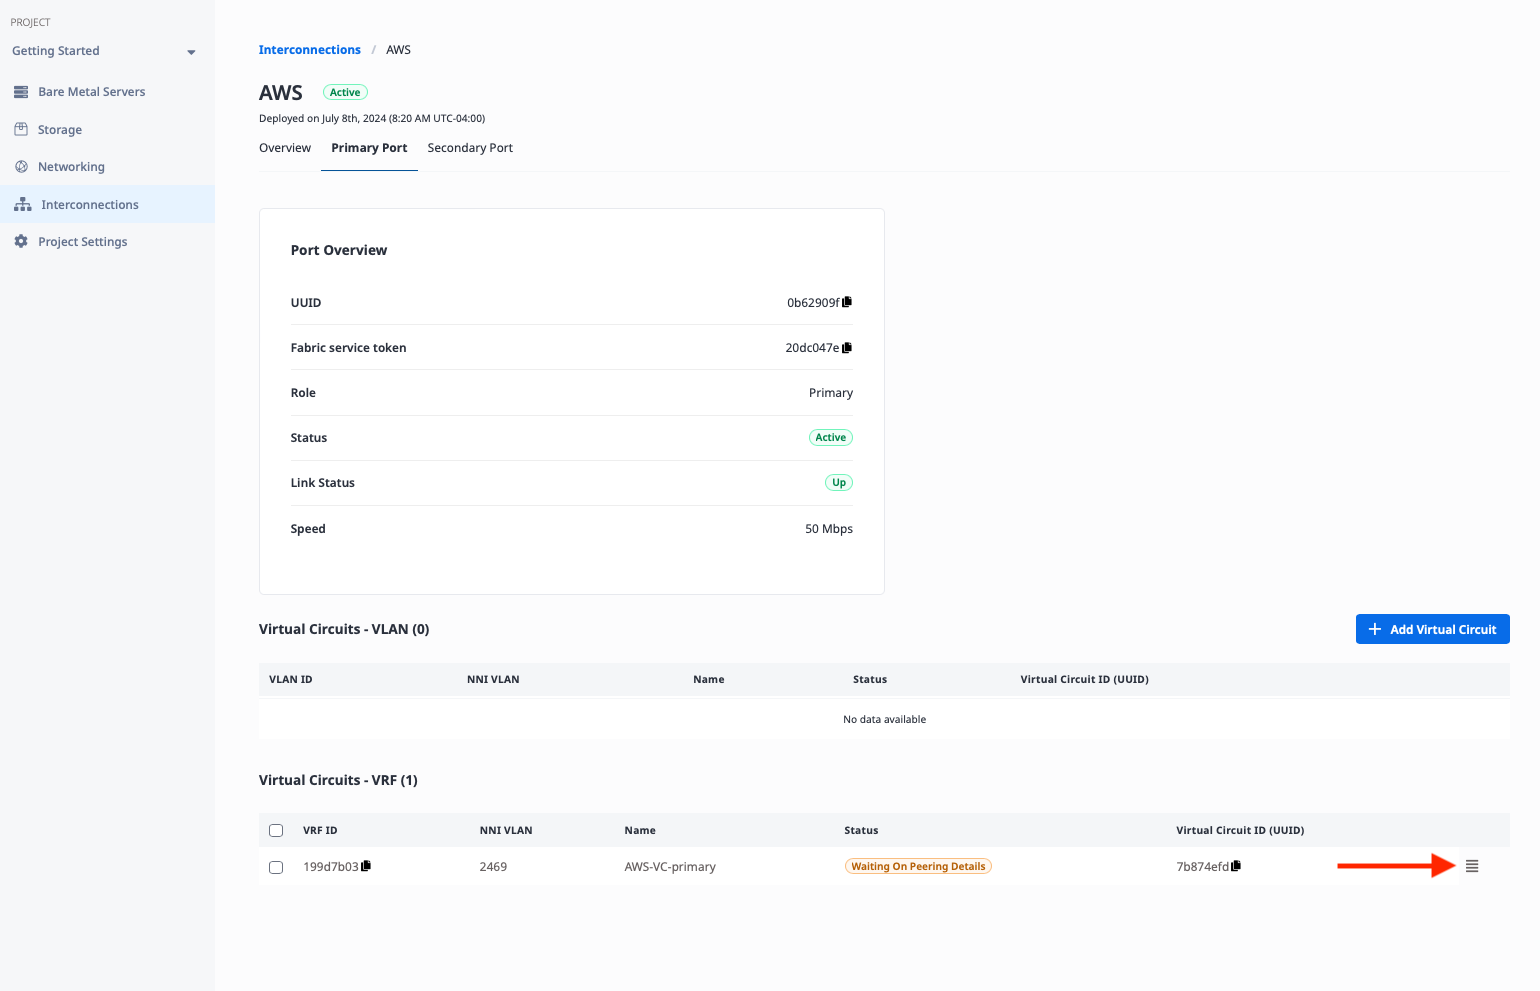
At the bottom of the page, you will see the Virtual Circuits listed. Click the three bars button on the right to edit it:

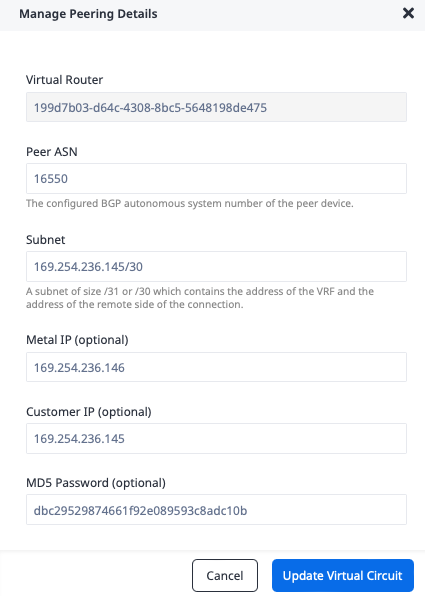
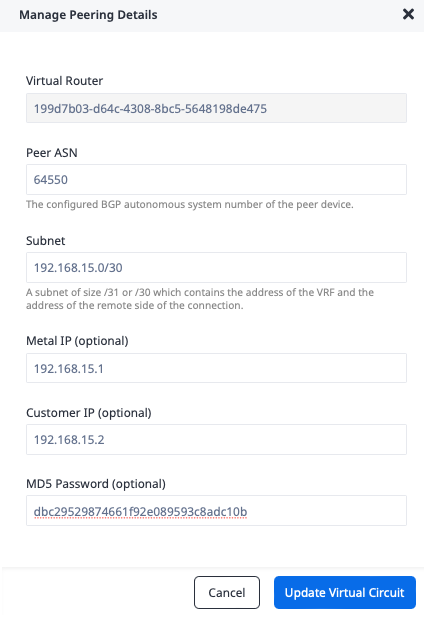
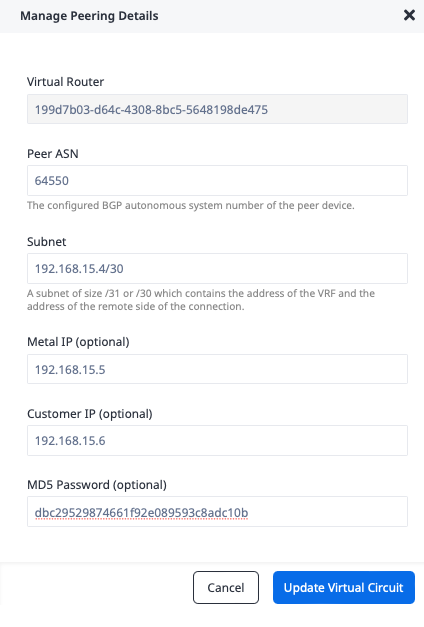
This opens the Manage Peering Details window. Enter the following information. The ASN and MD5 Password are from the configuration table above. The Metal IP and Customer IP are from the VLAN Attachment information retrieved from Google Cloud. The Subnet is the smallest IP range that includes both; we calculated that at the beginning of this section.
- "Peer ASN": GCP-side ASN
16550 - "Subnet": Primary VC subnet
169.254.236.145/30 - "Metal IP": IP address of the Metal side of the connection, which we retrieved from the
169.254.236.146 - "Customer IP": IP address of the GCP side of the connection
169.254.236.145 - "MD5 Password":
dbc29529874661f92e089593c8adc10b
Click the "Update Virtual Circuit" button.
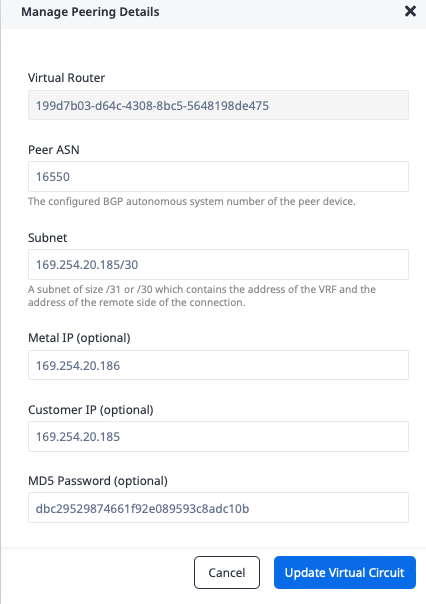
Repeat the process with Second Port, using the secondary VC subnet and IP addresses.
- "Peer ASN": GCP-side ASN
16550 - "Subnet": Secondary VC subnet
169.254.20.185/30 - "Metal IP": IP address of the Metal side of the connection
169.254.20.186 - "Customer IP": IP address of the GCP side of the connection
169.254.20.185 - "MD5 Password":
dbc29529874661f92e089593c8adc10b
Click the "Update Virtual Circuit" button again.
You can check the status of the connection on both ends.
In the Equinix Metal console, under the Interconnection details, the connection will show Active:

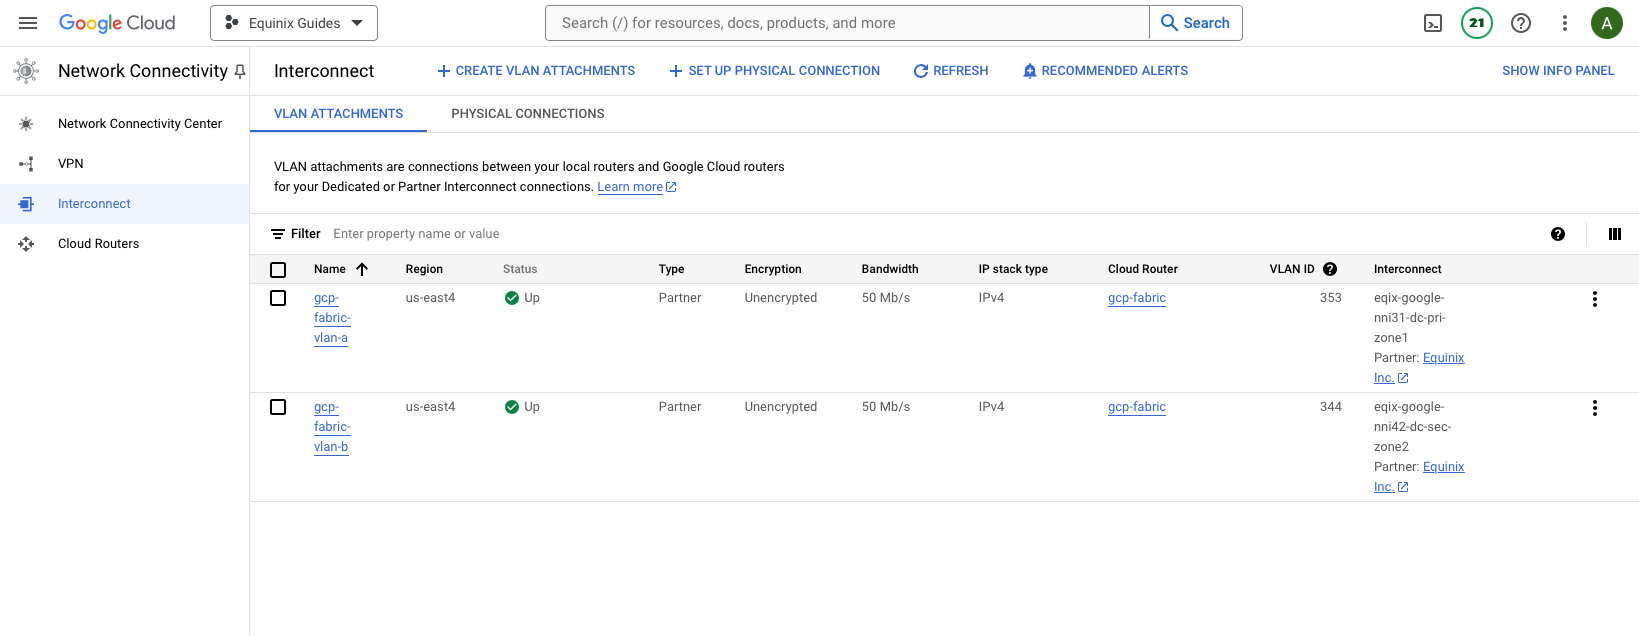
In the Google Cloud console, under VLAN Attachments, the connection will show Up:
Creating the AWS Connections
There are several steps to deploying the Metal-AWS Fabric Virtual Connection (VC):
- Create the connection in Equinix Metal to Fabric for AWS
- Create the Metal-AWS Fabric VC
- Accept the connection in AWS
- Update AWS BGP peering in Metal
Create the connection in Equinix Metal to Fabric for AWS
From the left navigation bar, select "Interconnections":
Then click the "Request a new interconnection" button:
There are two kinds of interconnection you can request, AWS Direct Connect and Request Interconnection. Although we are connecting to AWS, do not select AWS Direct Connect. That is a simplified version, easier to deploy but not as flexible. Instead, click the "Request Interconnection" button:
The next screen has two options for interconnections, Fabric VC and Dedicated Port. We won't cover dedicated ports in this guide, as we are focused on using Equinix Fabric. If you are interested in learning more about dedicated ports, see our dedicated ports documentation.
There are two kinds of Fabric VC, Metal-billed and Fabric-billed. Either can be useful for this kind of interconnection, but we will use the Metal-billed one. Read the interconnections documentation for more information on the differences.
To create the connection, you need a few pieces of information:
- A name for the connection. It doesn't have any inherent meaning; it just needs to be useful to you. We will call it "AWS."
- The Metro. This must be the same metro as the VRF you are connecting to. In our case, it is Washington.
- The connection speed. Higher speeds have a higher cost. Since we are just creating a basic connection, we will use the lowest speed, 50Mbps. You can select a higher one if you need it.
- Single vs redundant. Each connection is exactly that, a single connection. If there are issues anywhere along the line, whether hardware issues such as a port on the AWS or Equinix end, or software problems, your connection will be out of service, at least until it is fixed. Like all good networking, you should plan for redundancy. We will use a redundant connection for this example.
- Connect to VLAN or VRF. The VC is a layer 2 connection between layer 3 routers with BGP support on each size. On the cloud provider side, the layer 3 routing is provided for you. On the Metal side, you can set up the layer 3 routing and BGP manually with software on Metal devices and additional VLANs connected directly to the VC, or you can let Metal do all of that for you with a VRF. We will use a VRF connection for this example.
- Primary and secondary connections. Since we selected redundant connections, we need to specify where each of the two connections attaches on the Equinix Metal side. In the case of a VLAN, that would require two distinct VLANs. Since we are using VRF, which is Virtual Routing and Forwarding, we can use the same VRF for both connections. This is a key advantage of VRF connections over VLAN connections. We will use our "Cloud" VRF for both.
Click the "Submit Request" button.
Once the request is submitted, you need two things:
- An email to your address telling you that the service token is ready to use. You should get two such emails, one for each of the redundant connections. You know it is ready by the "Service Token Status" line.
- The service token itself. This is a long string of characters that you will need to create the Fabric VC to Equinix Metal. It will appear in the emails, as well as in the console after you submit your request.
Create the Metal-AWS Fabric VC
In this section, you'll create a Fabric VC between the VRF on Metal and our VPC at Amazon.
Log in to the Fabric console at https://fabric.equinix.com.
Once you are logged in, you will see the Equinix Fabric portal:
On the top menu bar, go to "Connections" and "Create Connection":
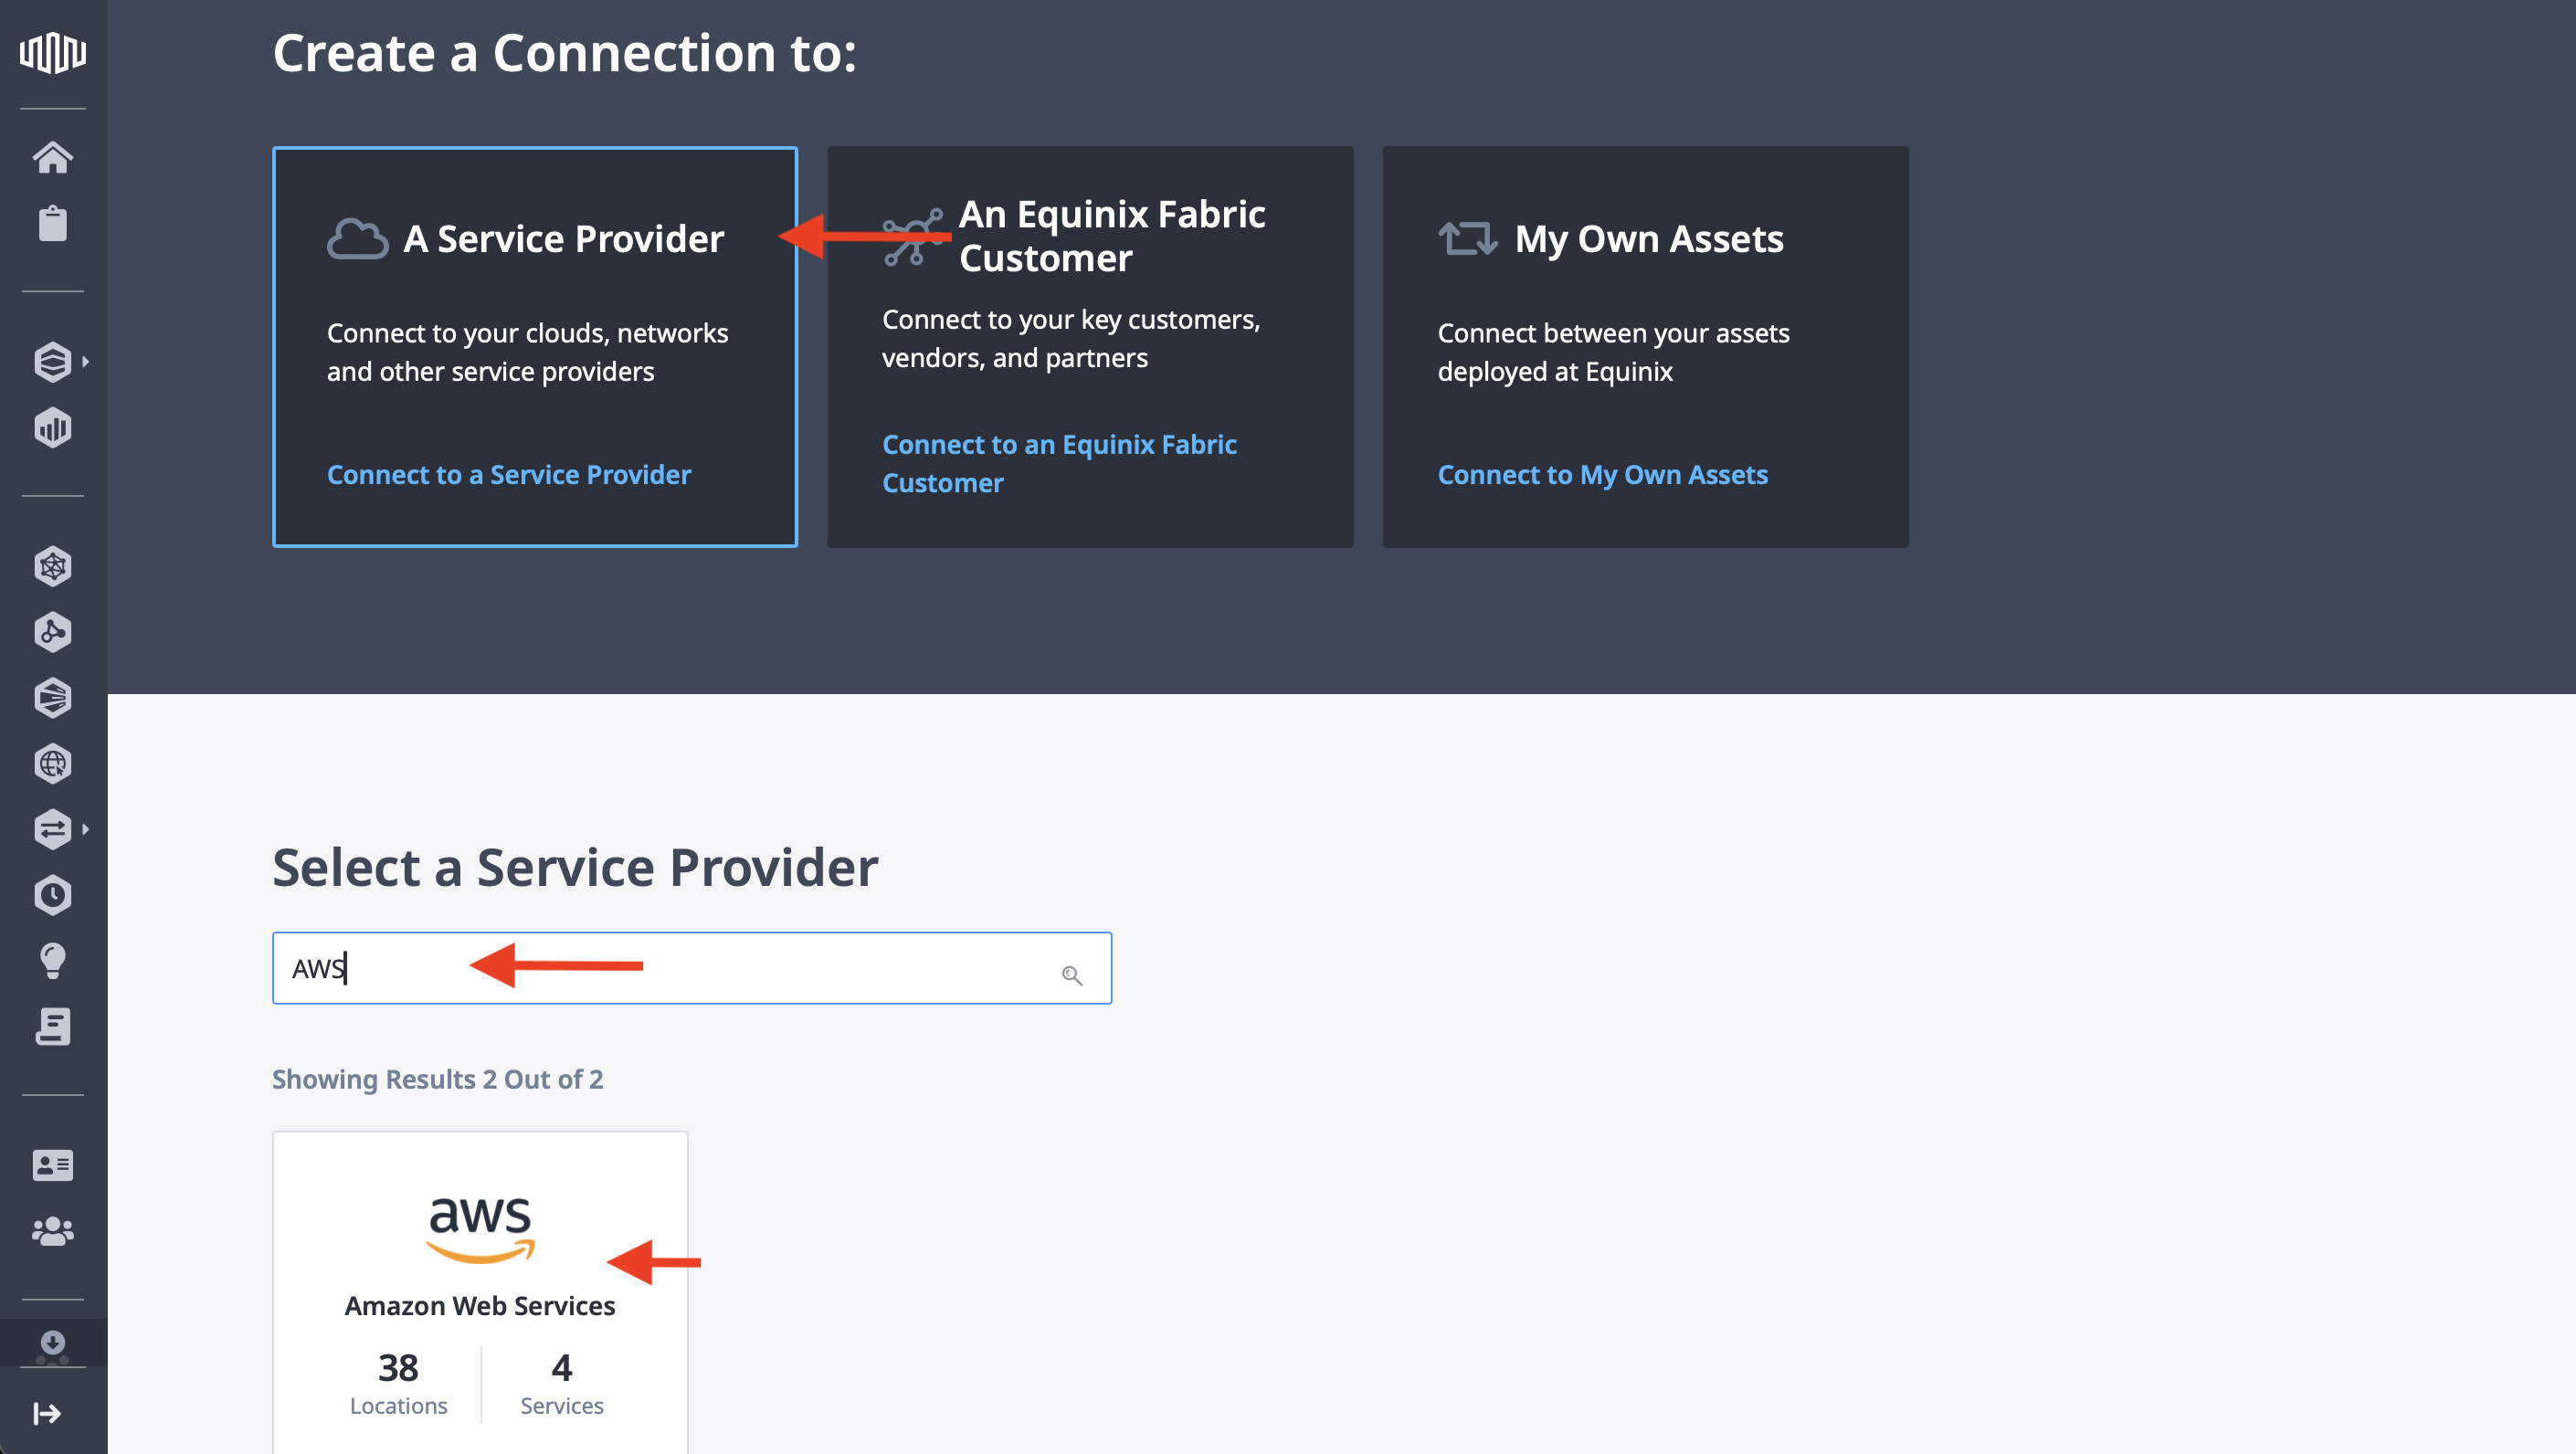
There are three main options for a connection: A Service Provider, An Equinix Fabric Customer, and My Own Assets. Click A Service Provider, then in the search box, type "AWS". This will filter the options below to just a few. Select "AWS" and click Select Service.
This opens up the connection options for AWS. There are two types of connections, normal and high capacity, and single or redundant for each.
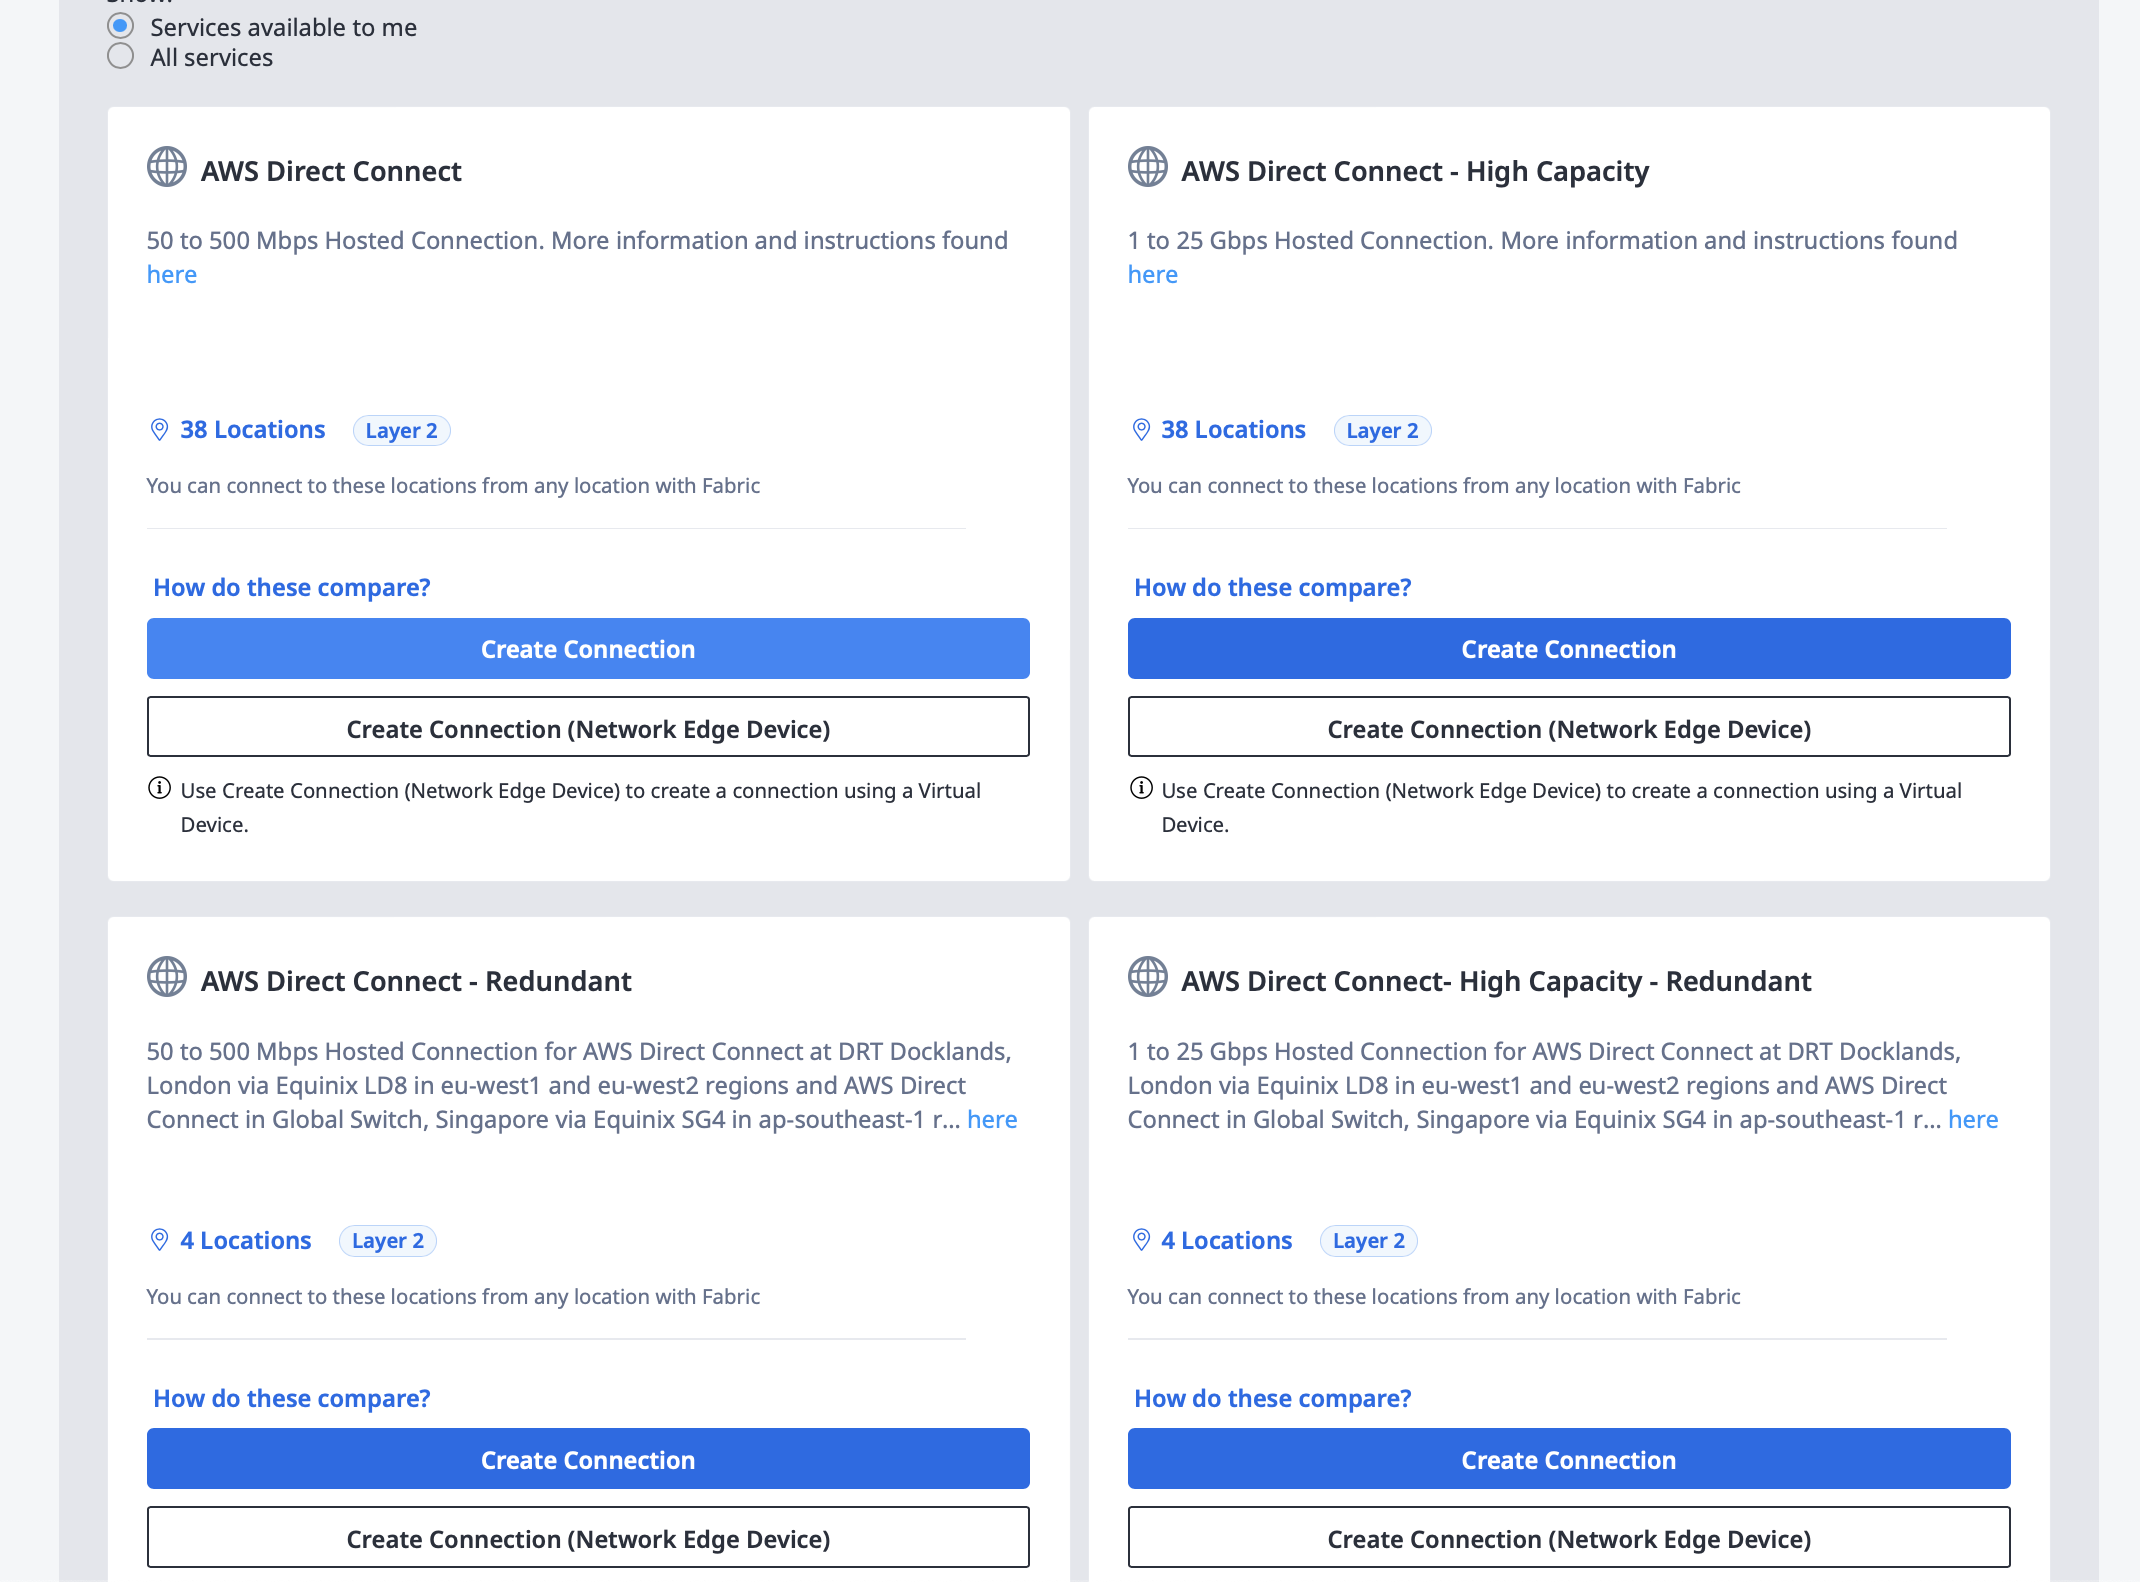
We don't need high capacity for this example, so select the normal capacity option.
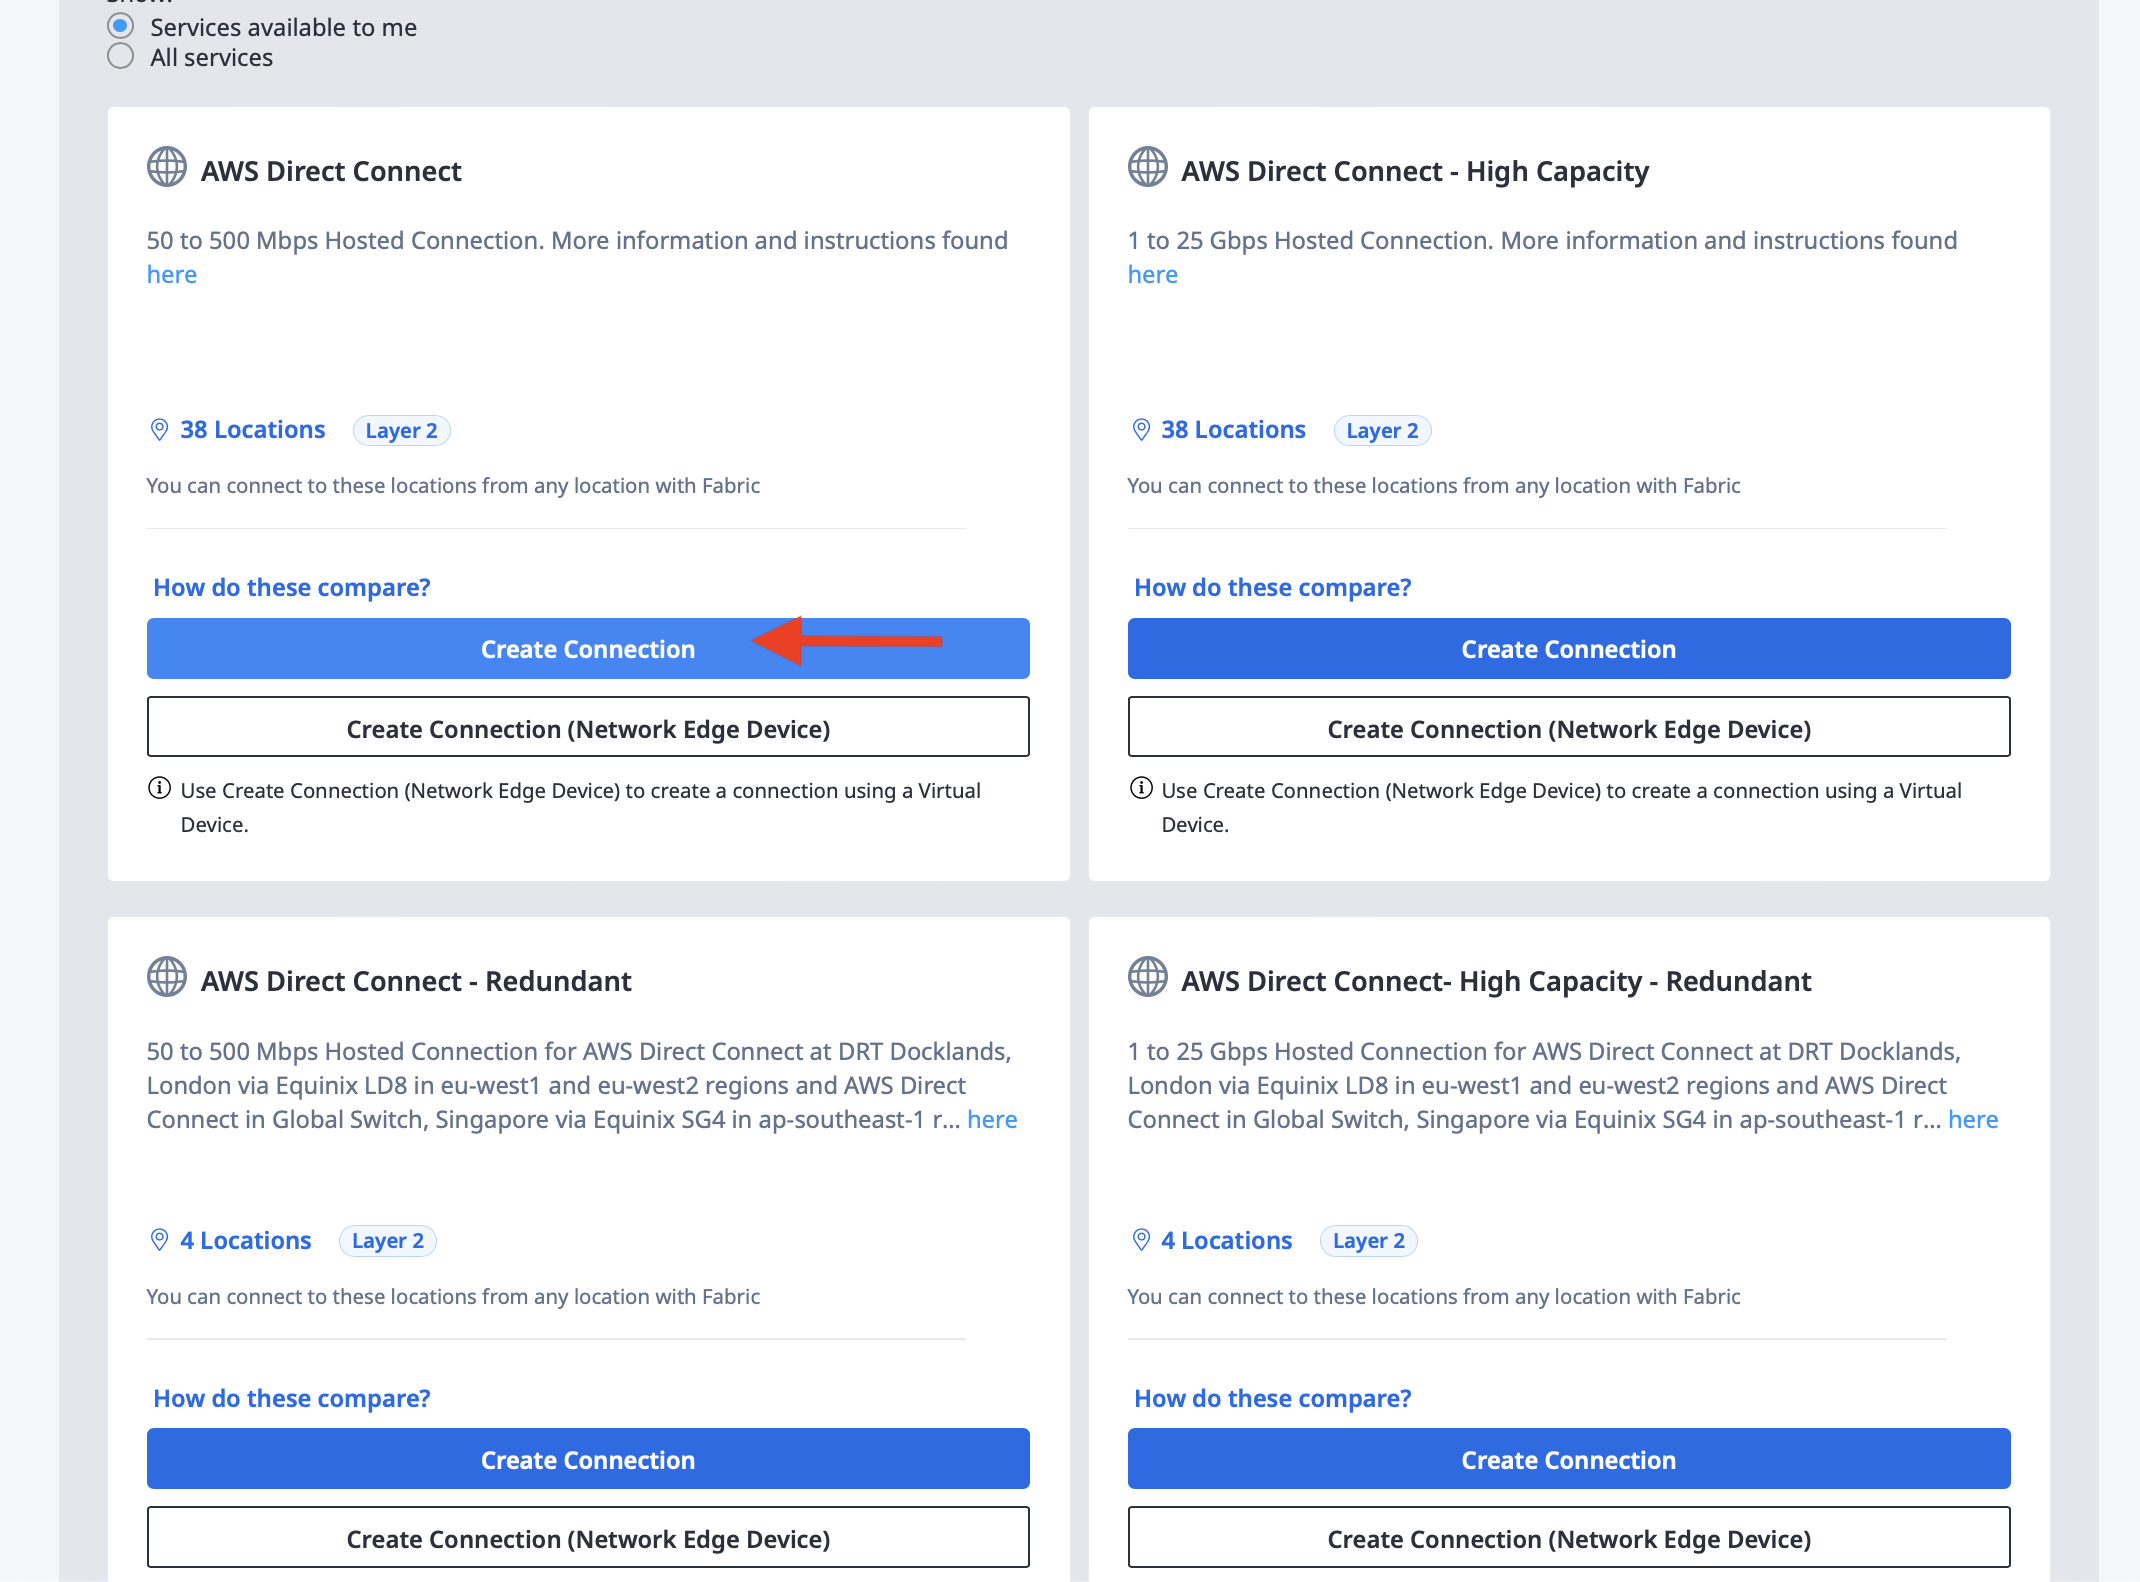
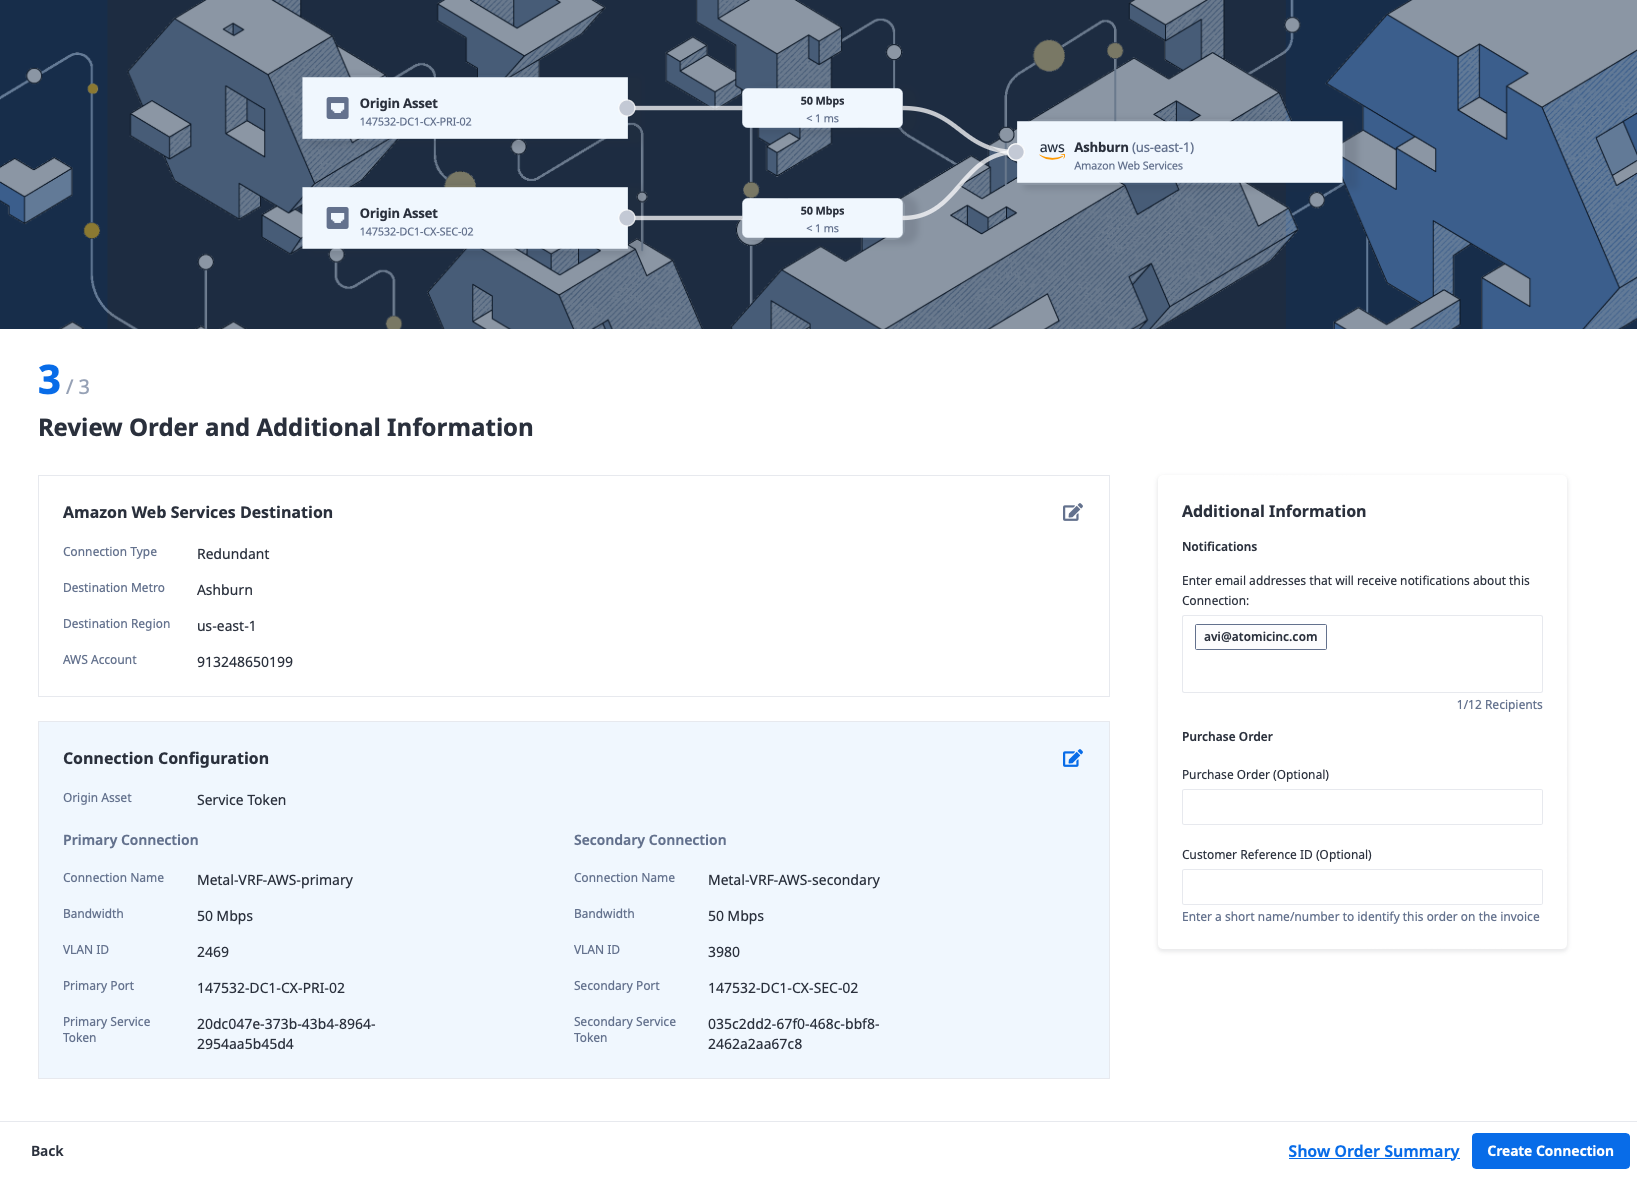
After you click Create Connection, you need to enter the following:
- The connection type, in our case, Redundant
- Your AWS account number
- The destination, which should be the same region as our Equinix Metro. Since we deployed to the Equinix Washington metro, we select "Ashburn (us-east-1)"
In the next step, configure the connection type. Since the interconnection request gave us a pair of service tokens, under "Origin Asset Type" select "Service Token."
Click the "Enter Primary Service Token" button, which opens up the details window. Enter your first service token, and click Enter Service Token.
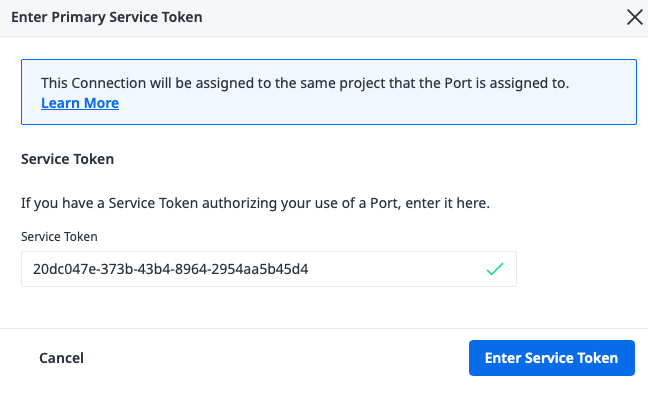
Repeat this step for your secondary service token.
When you're done, you should have a page that looks like this:

Enter a name for each of the connections, select bandwidth to match what you selected earlier, and click Next.
Review the details and click the "Create Connection" button.
You now should see a page showing the connections created:
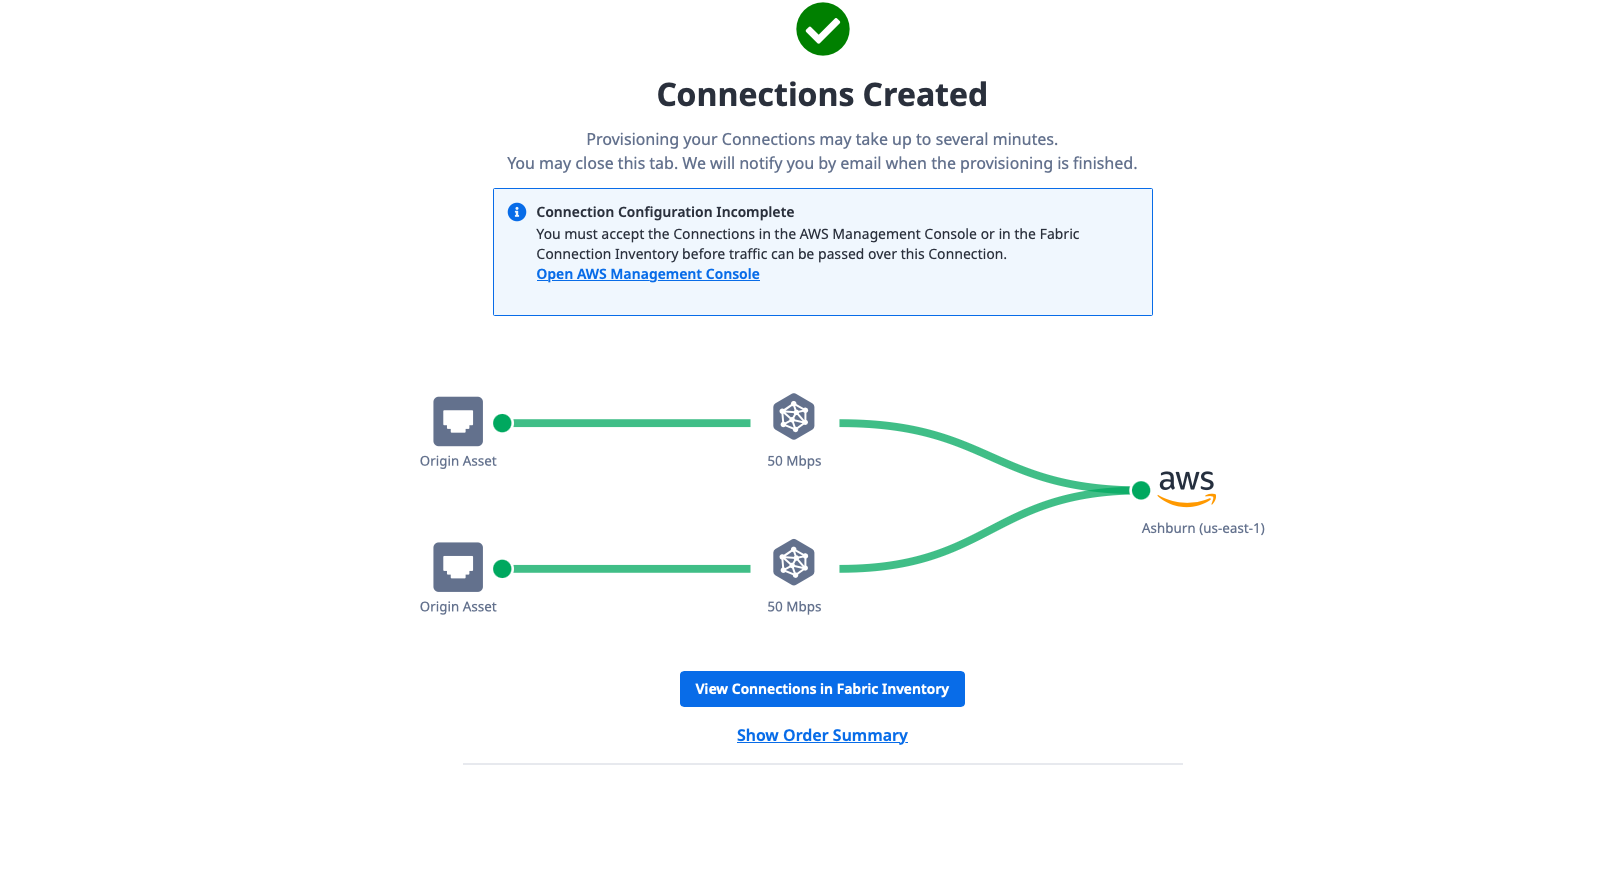
Notice how it says that the connection configuration is incomplete, and you must accept it in AWS. That will be the next step.
Accept the connection in AWS
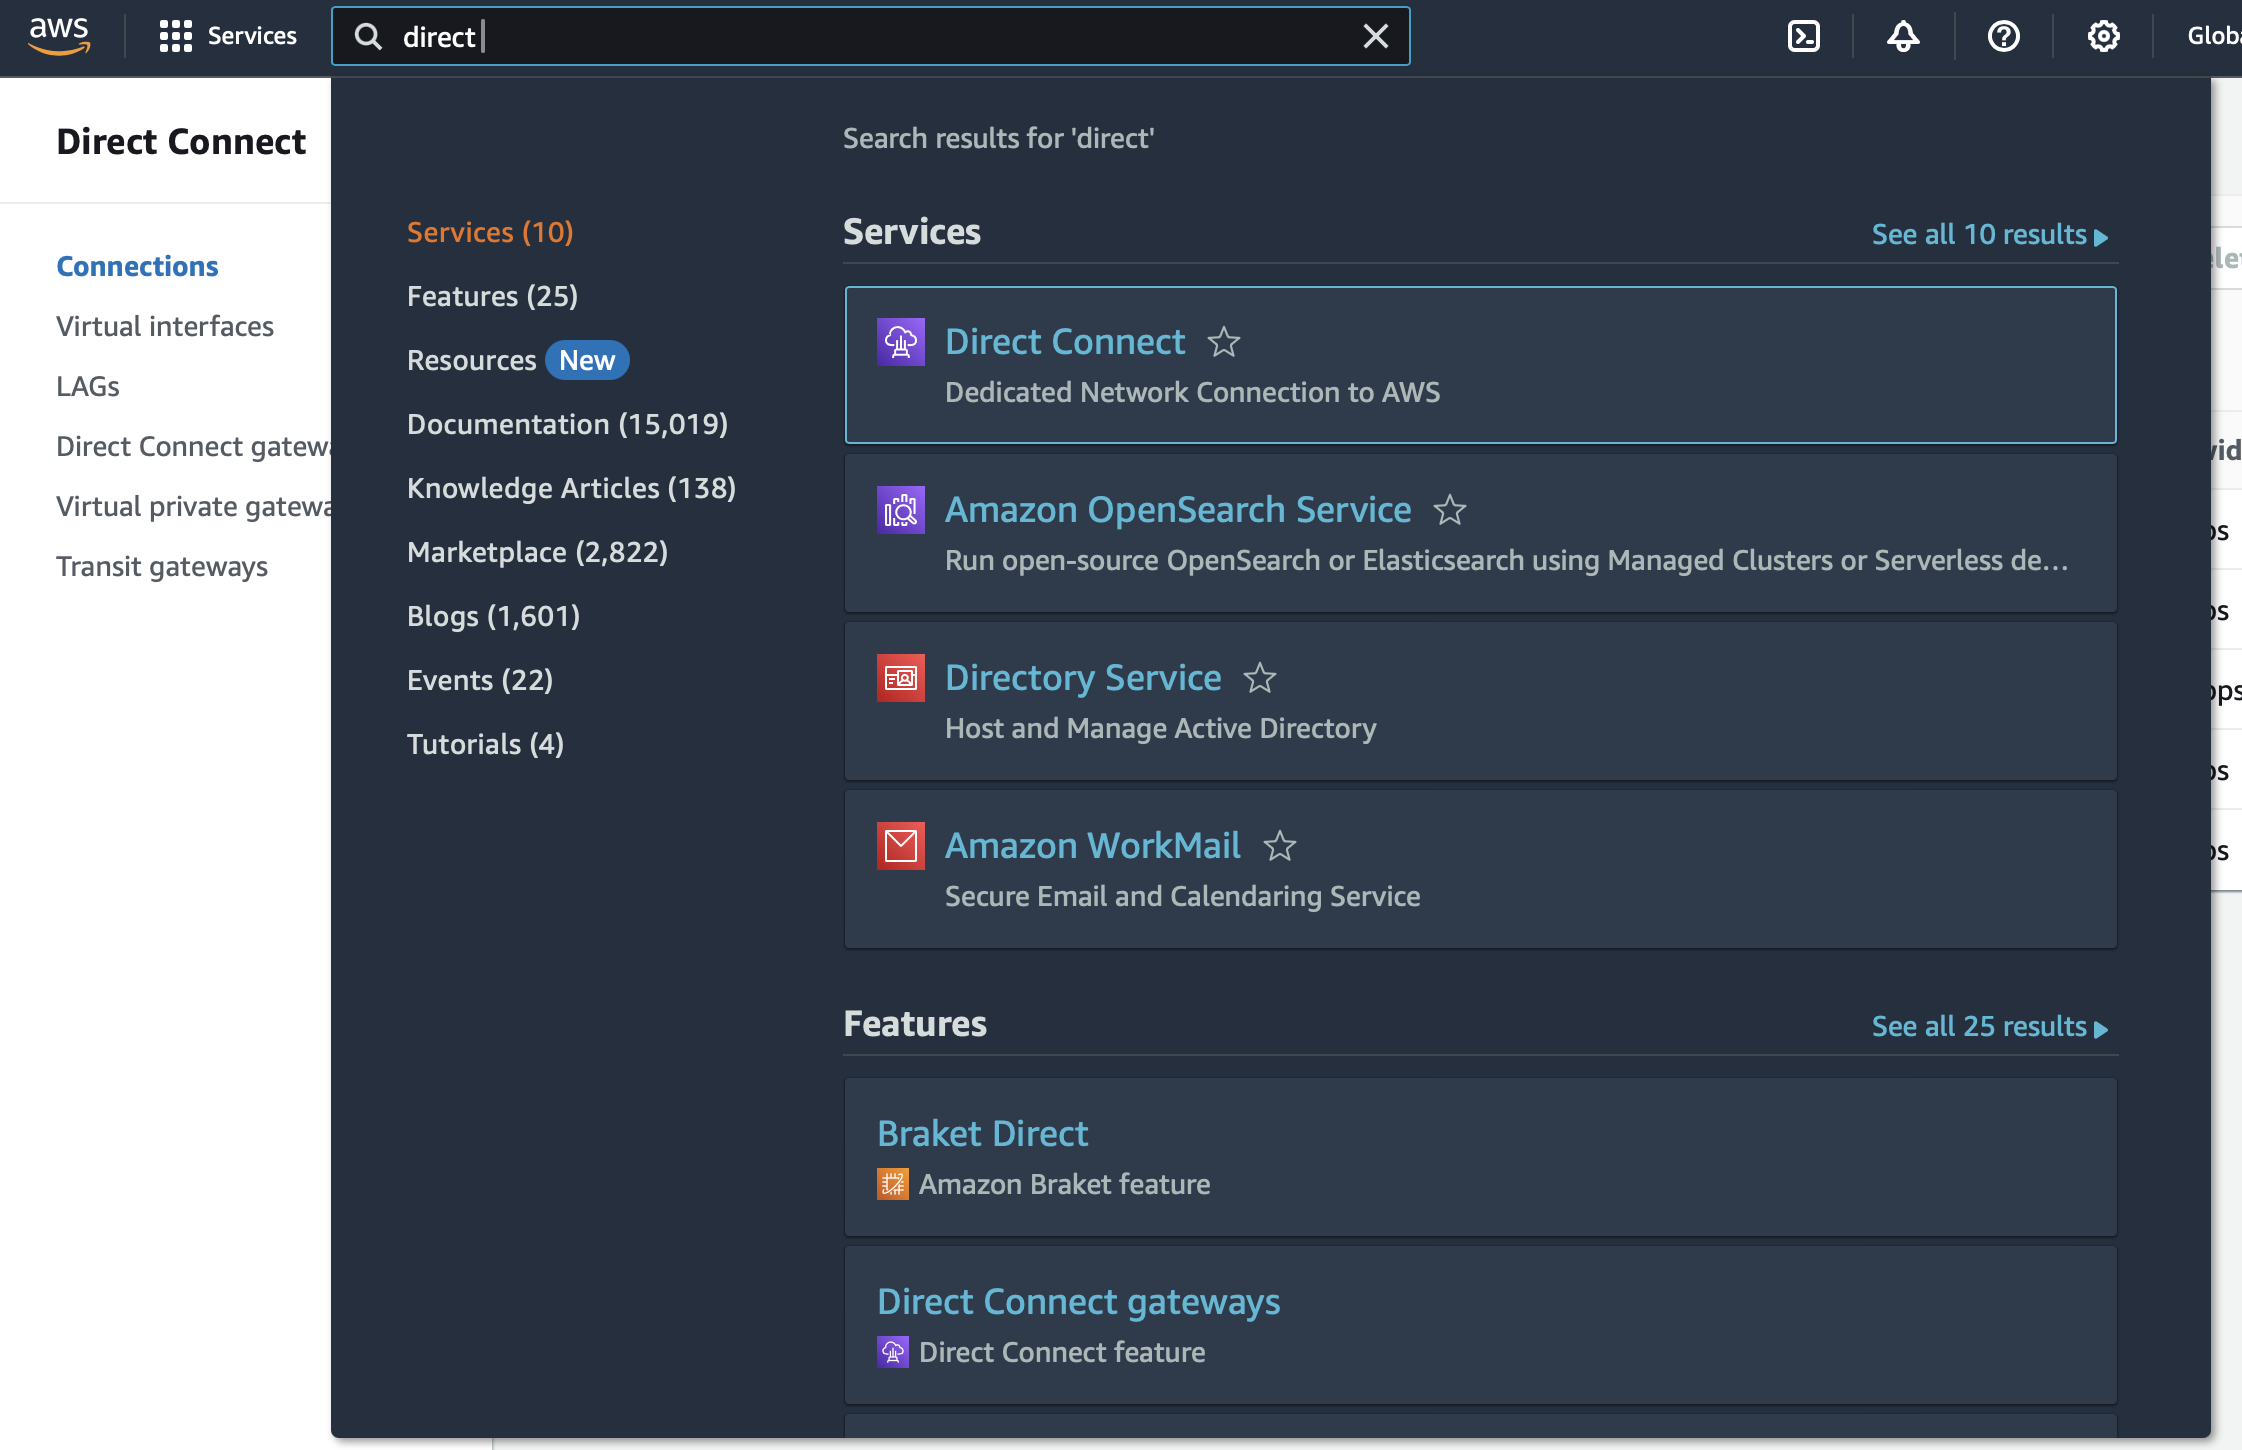
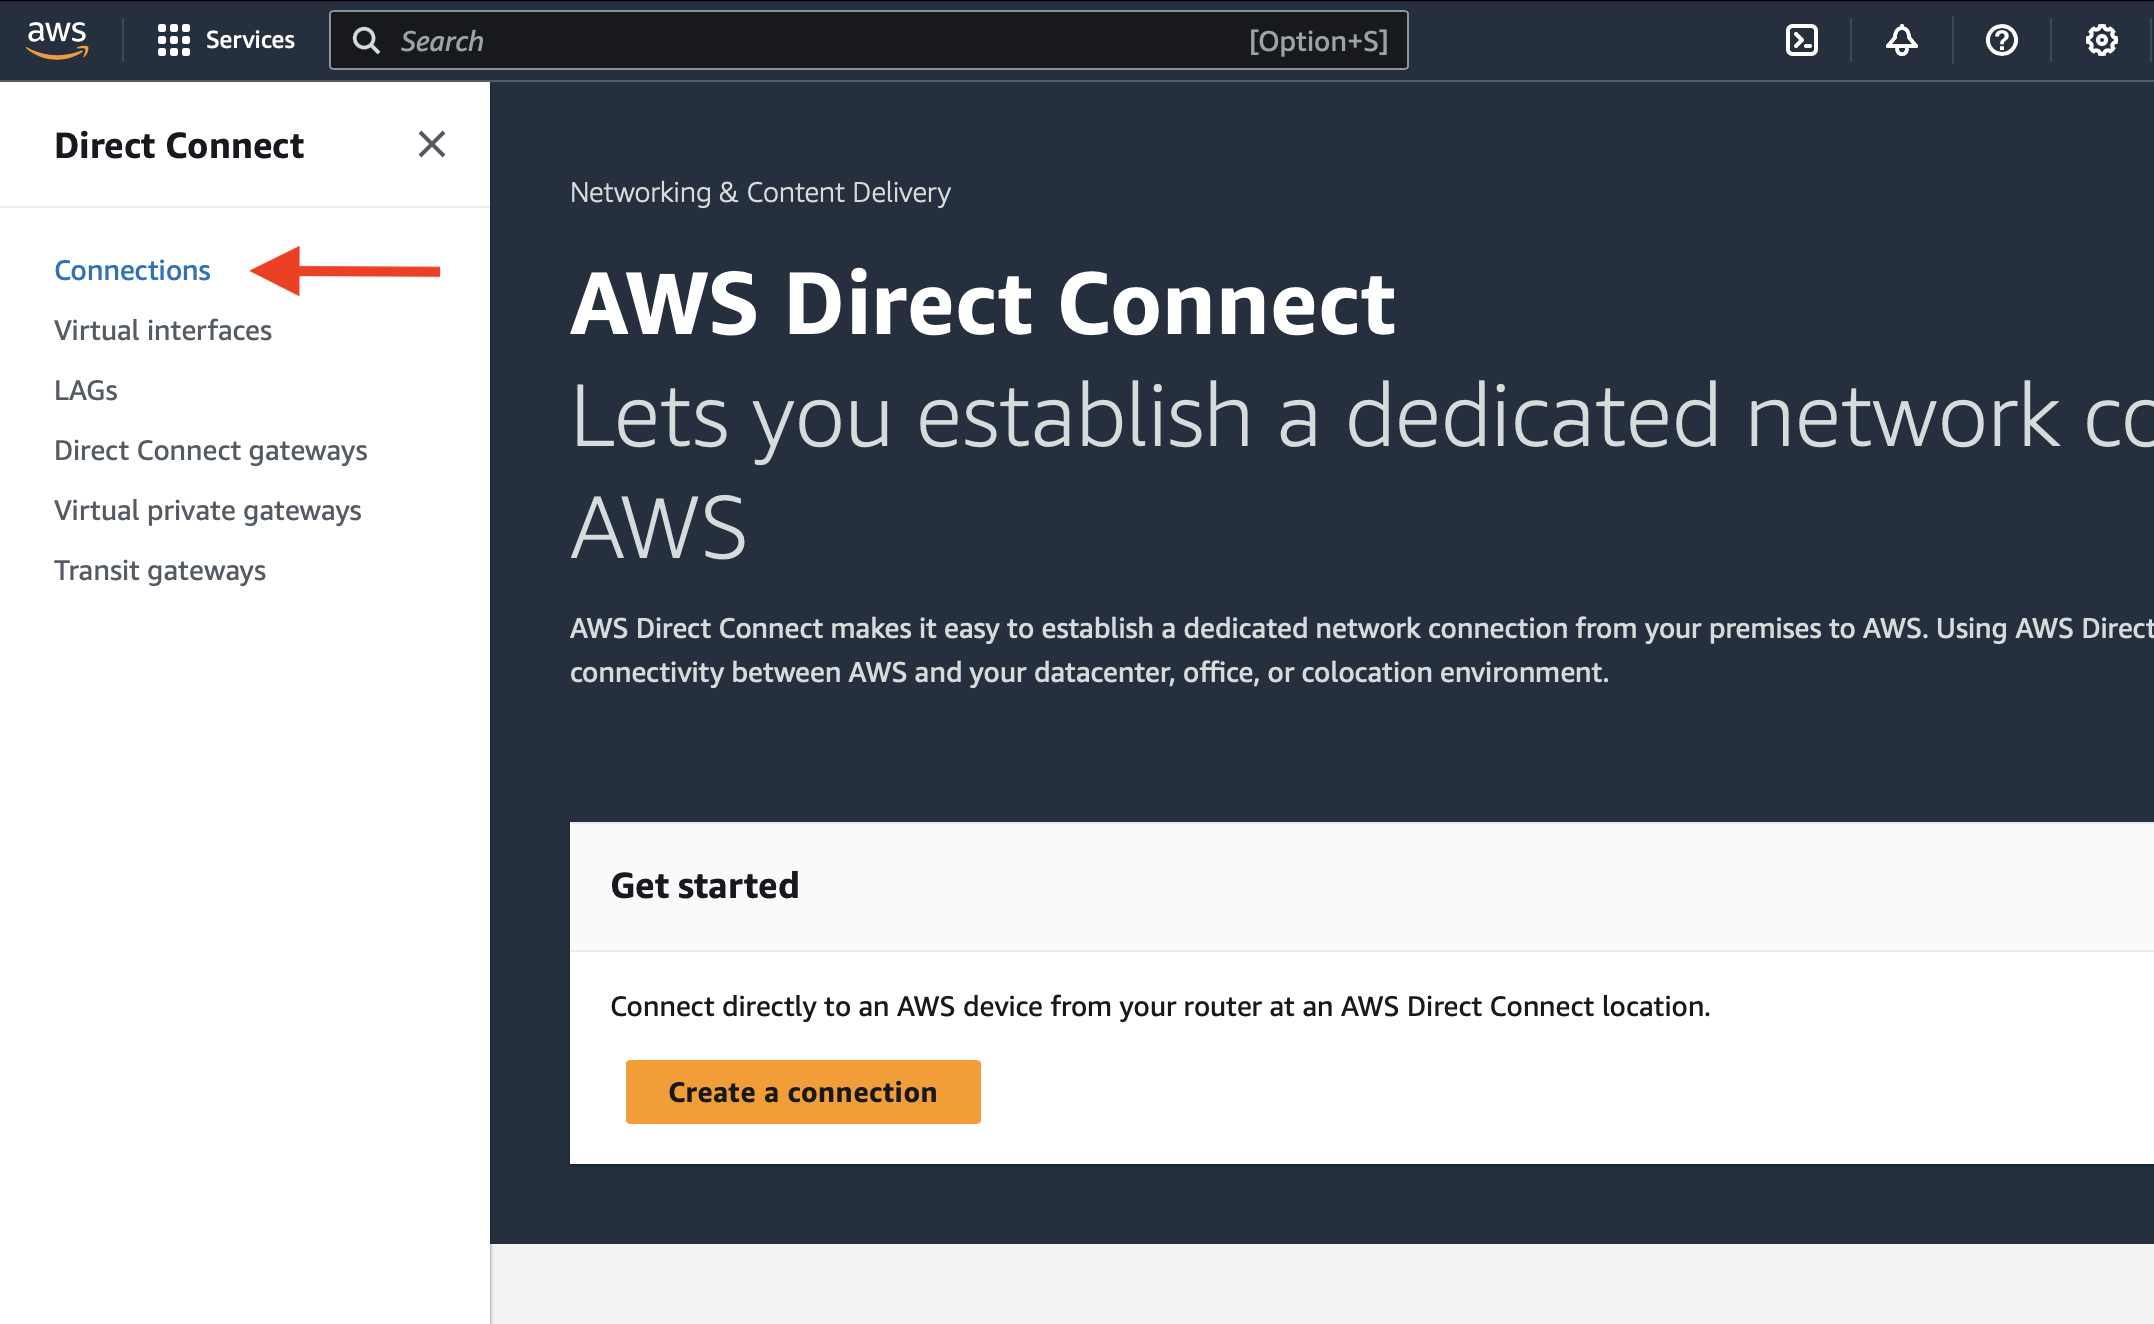
Log in to your AWS console. In the search box, type "Direct Connect" and select it when it appears in the Services list.
Once in the Direct Connect section, select Connections:
You should see a list of connections, including your new ones, named "AWS-VRF-primary" and "AWS-VRF-secondary". Both are in "ordering" state. Fabric has requested to connect to AWS, but your account must accept the connection.
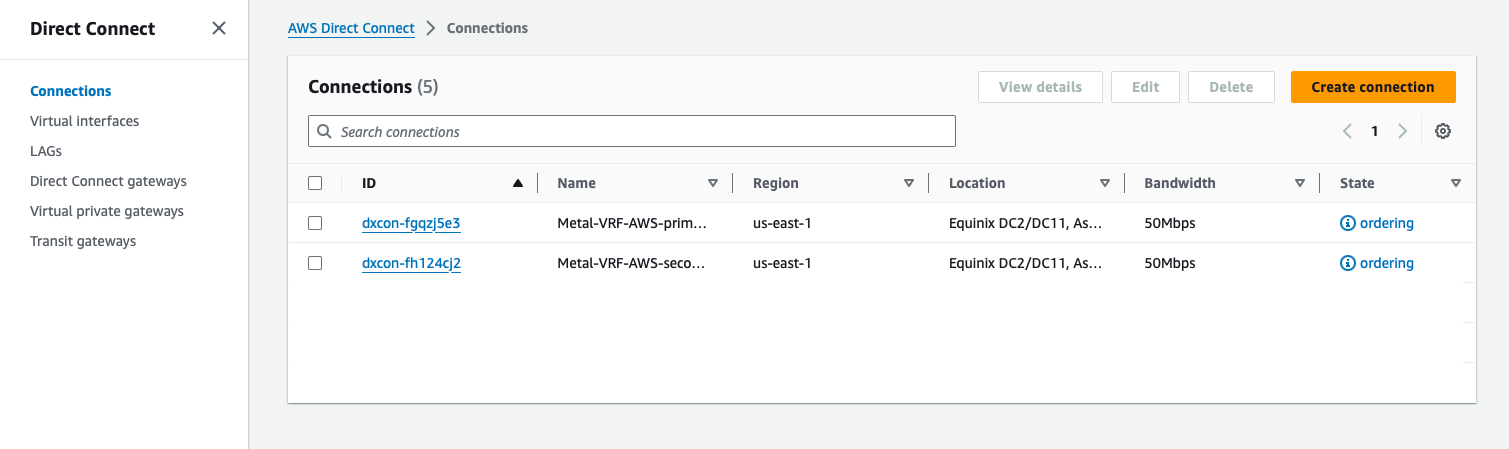
Click on the primary connection, and then click Accept:
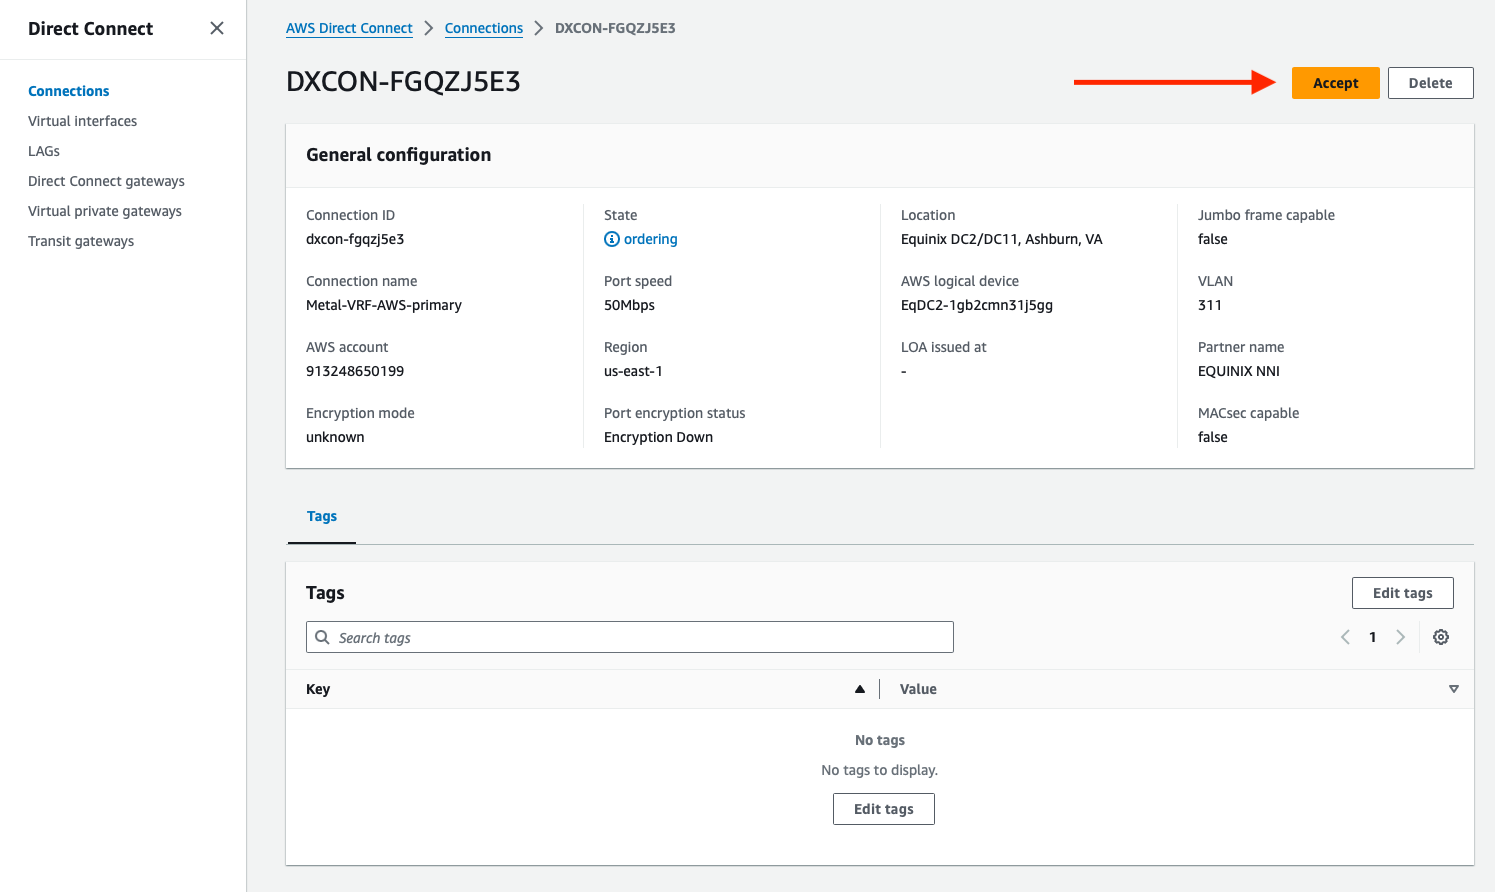
Repeat this step for the secondary connection.
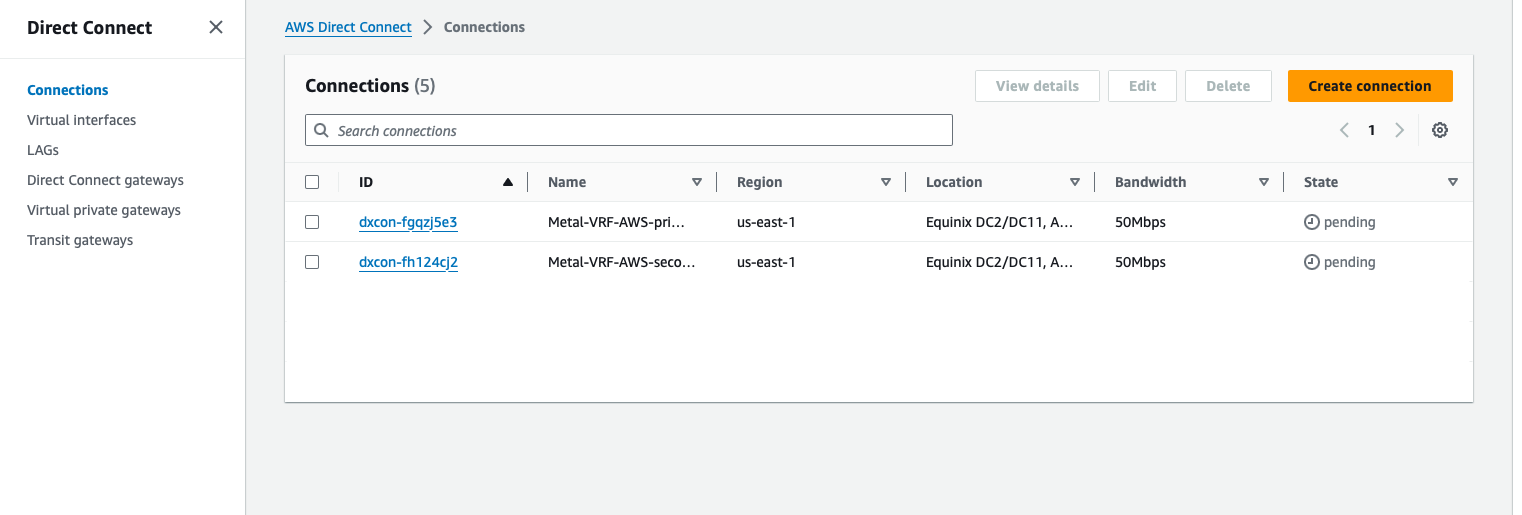
When you are done, the Connections page will show both connections as "pending," until they are finished setting up.
Once they are done, they will show as available:
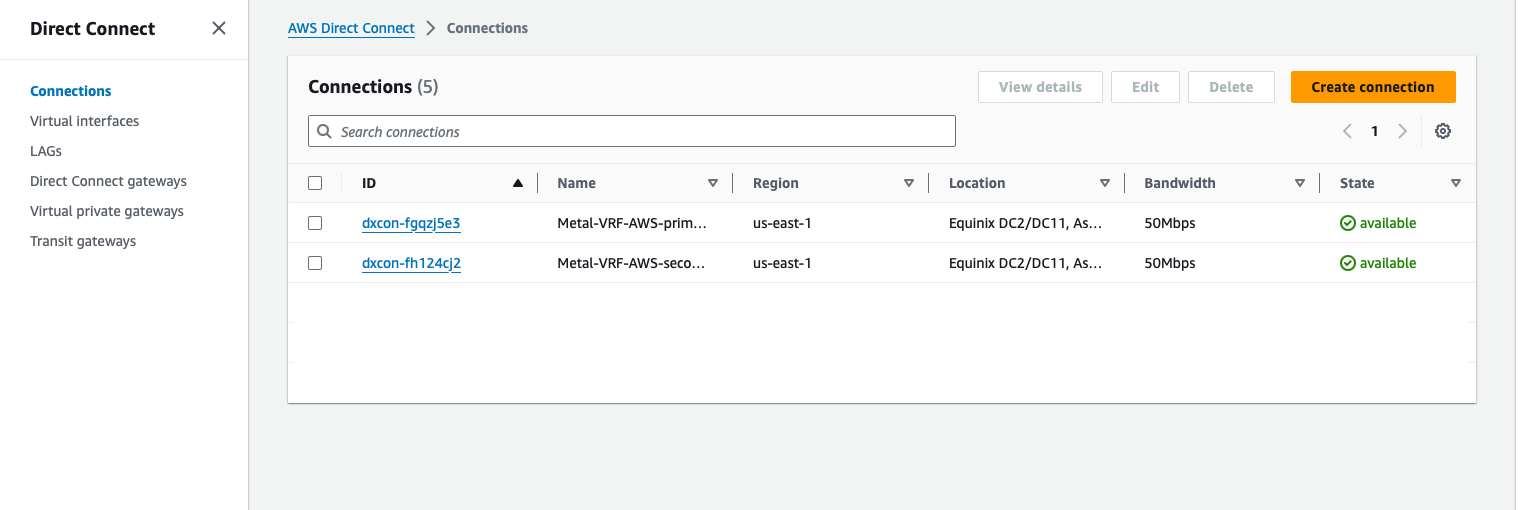
At this point, you have a connection from your VLAN, via a Metal Gateway through VRF over a Fabric VC to your AWS Direct Connect connection.
You now need to link those connections to your VPC Transit Gateway. This is a standard AWS operation.
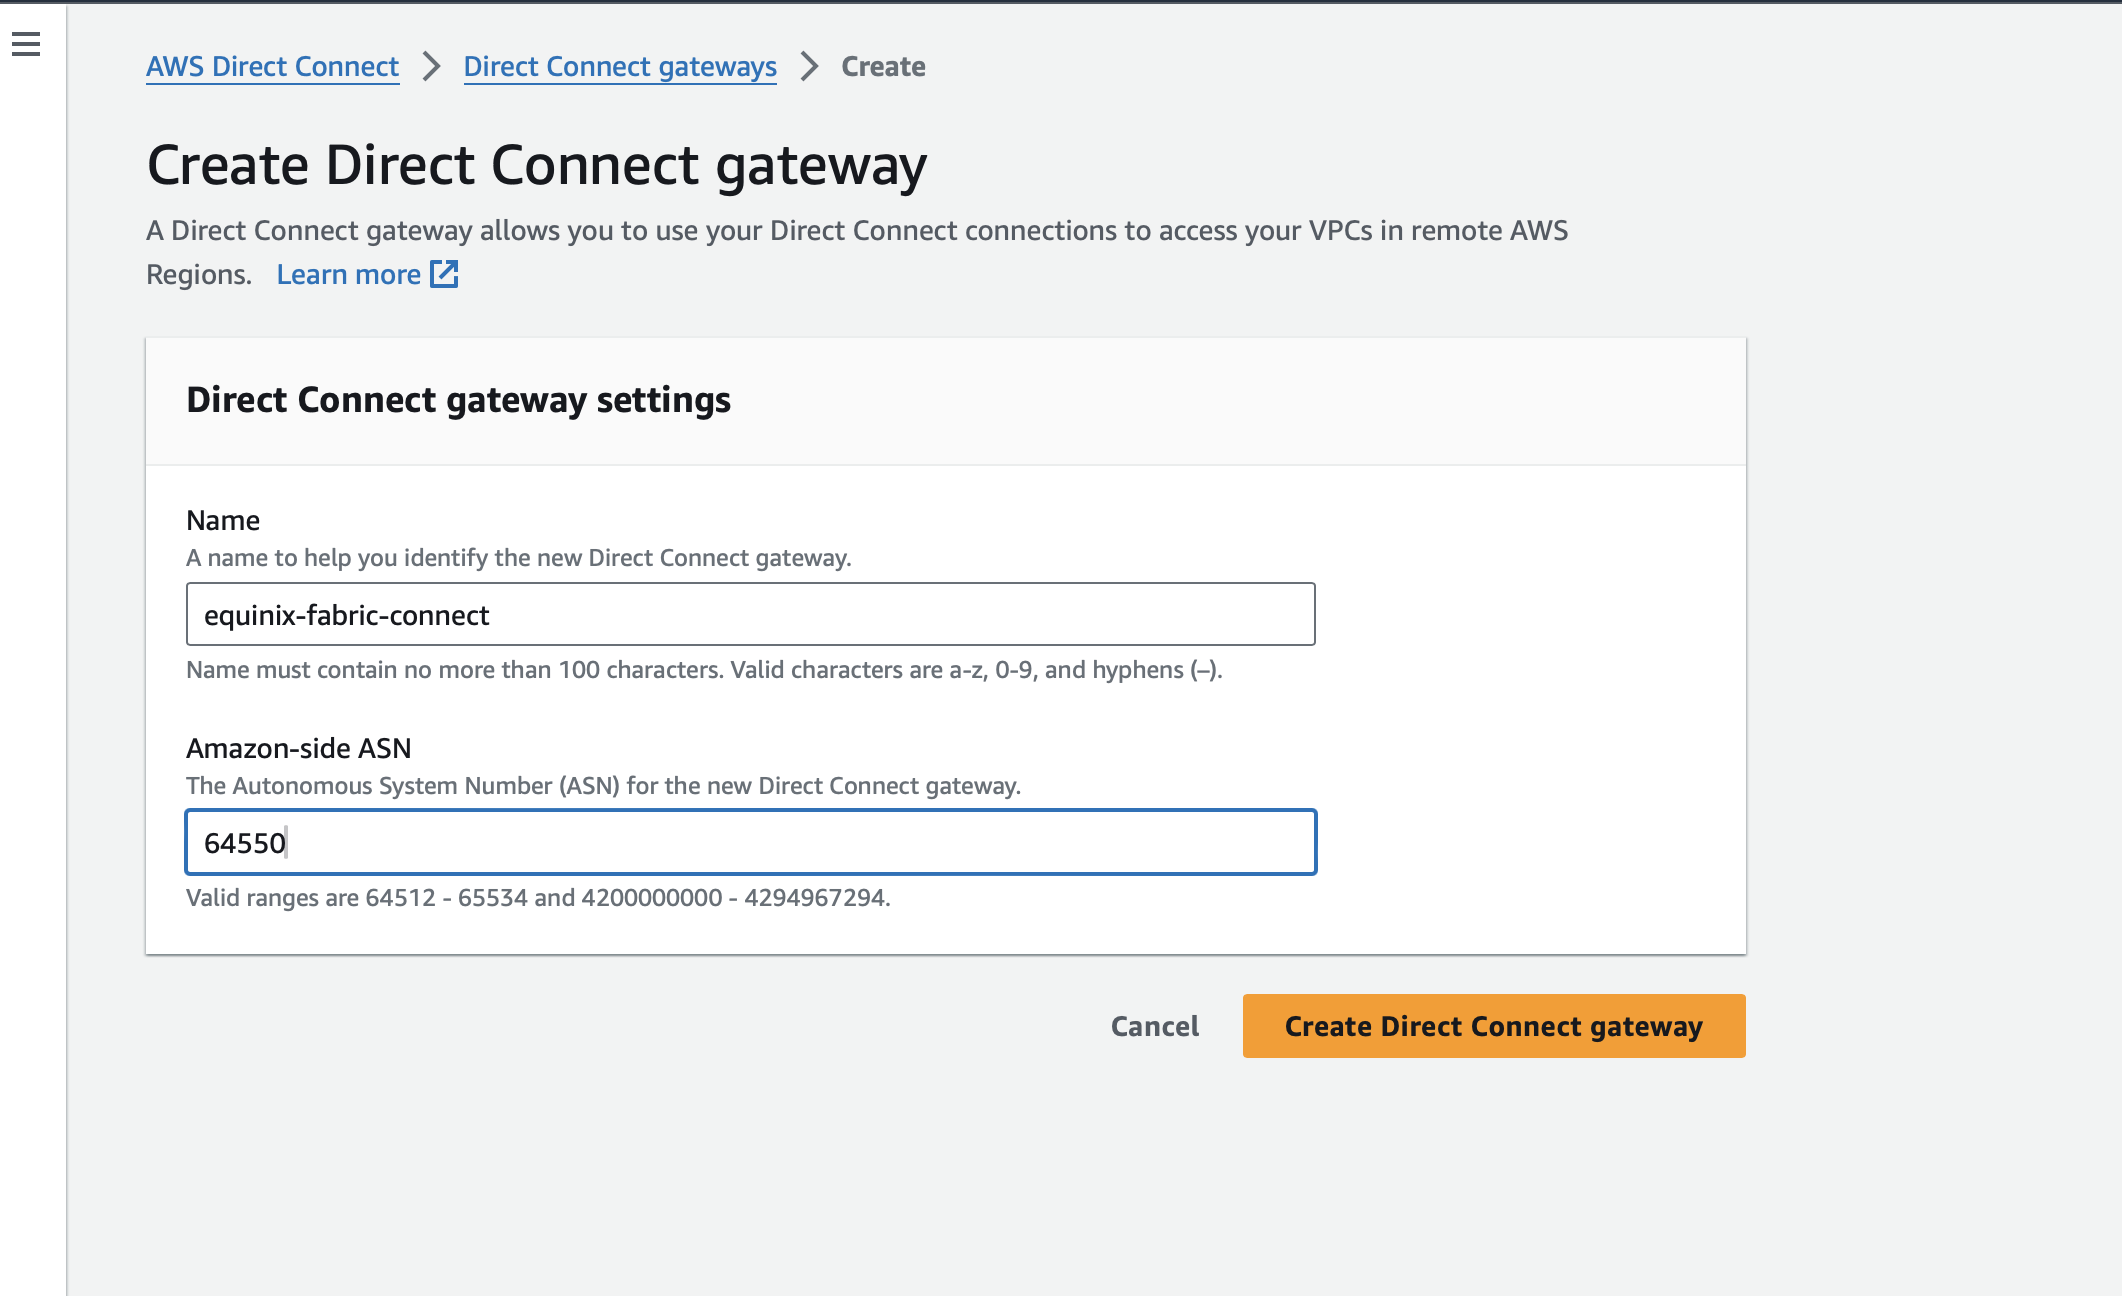
If you do not have one, create an AWS Direct Connect gateway. Note that you need to provide the Amazon-side ASN. We will use the one we listed earlier, 64550.
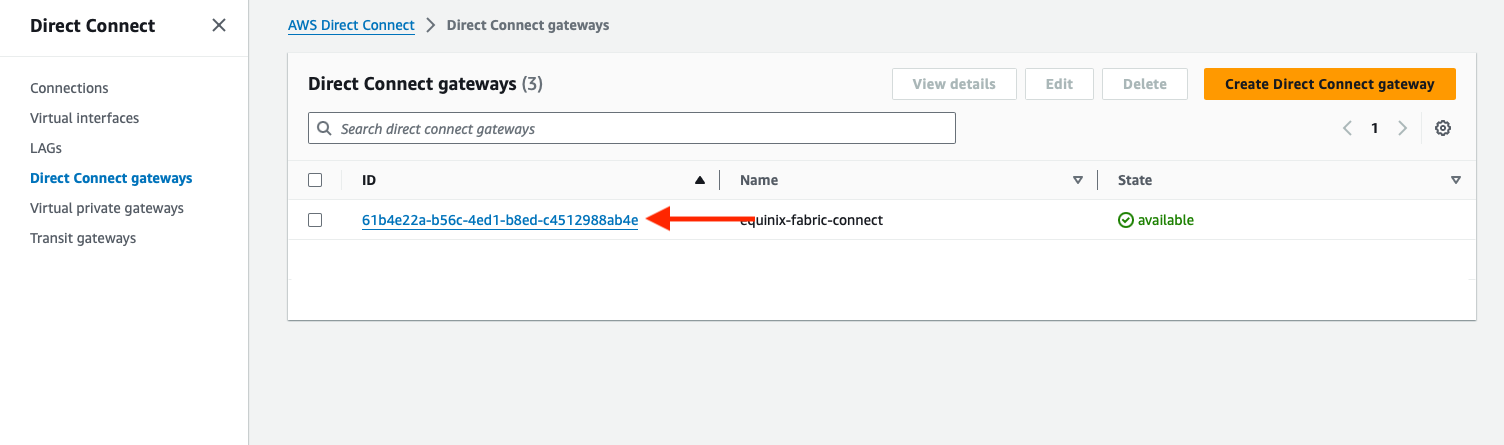
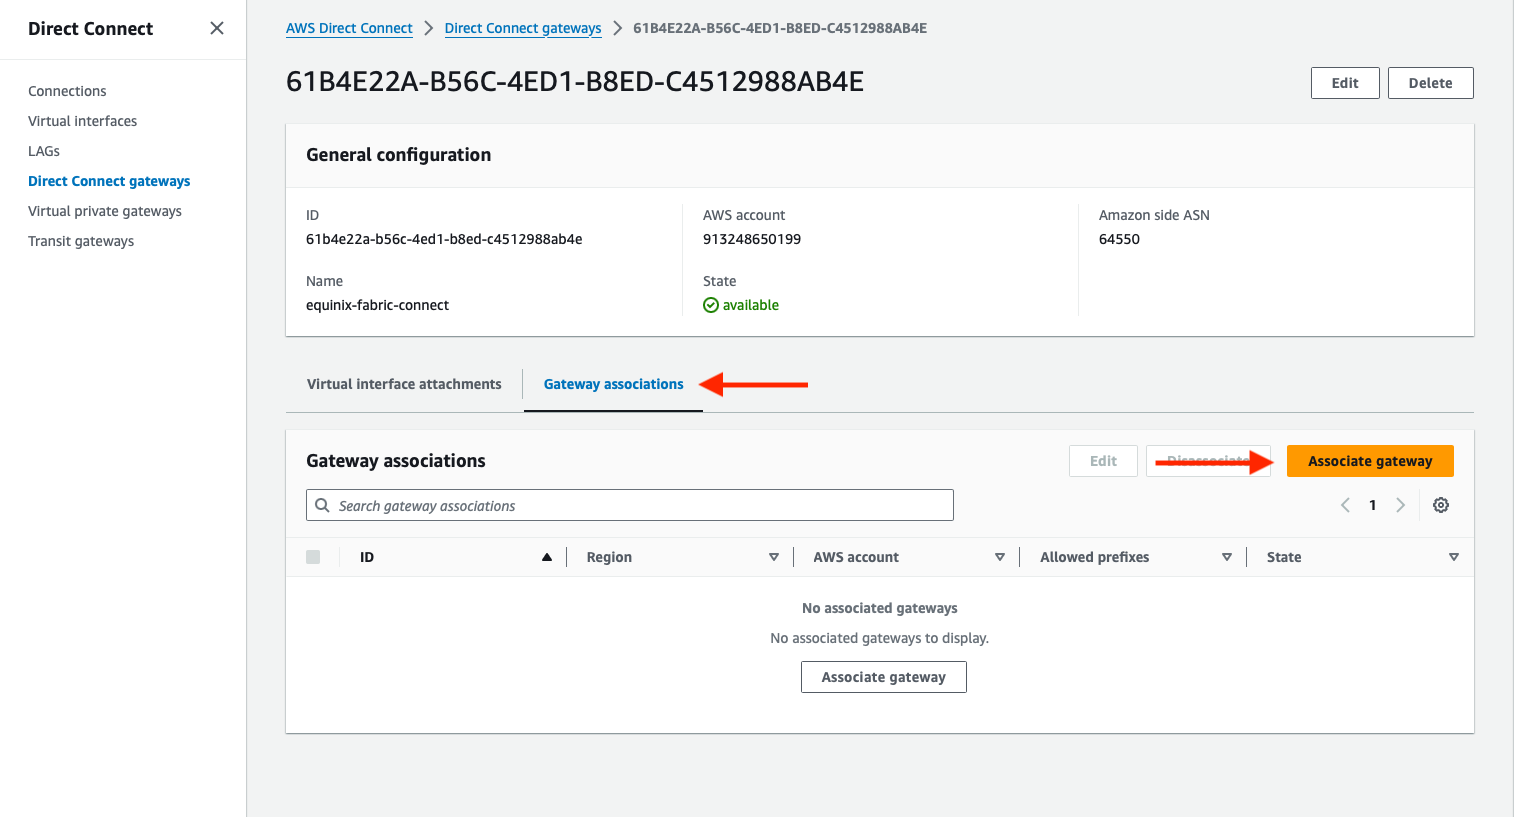
When the Direct Connect gateway is set up, it will show as available. Click on it.
There are two sections to complete the connection:
- Virtual interface attachments are the connections between the Direct Connect gateway and Direct Connect links.
- Gateway attachments are the connections between the Direct Connect gateway and AWS-side networks, in this case the Transit Gateway.
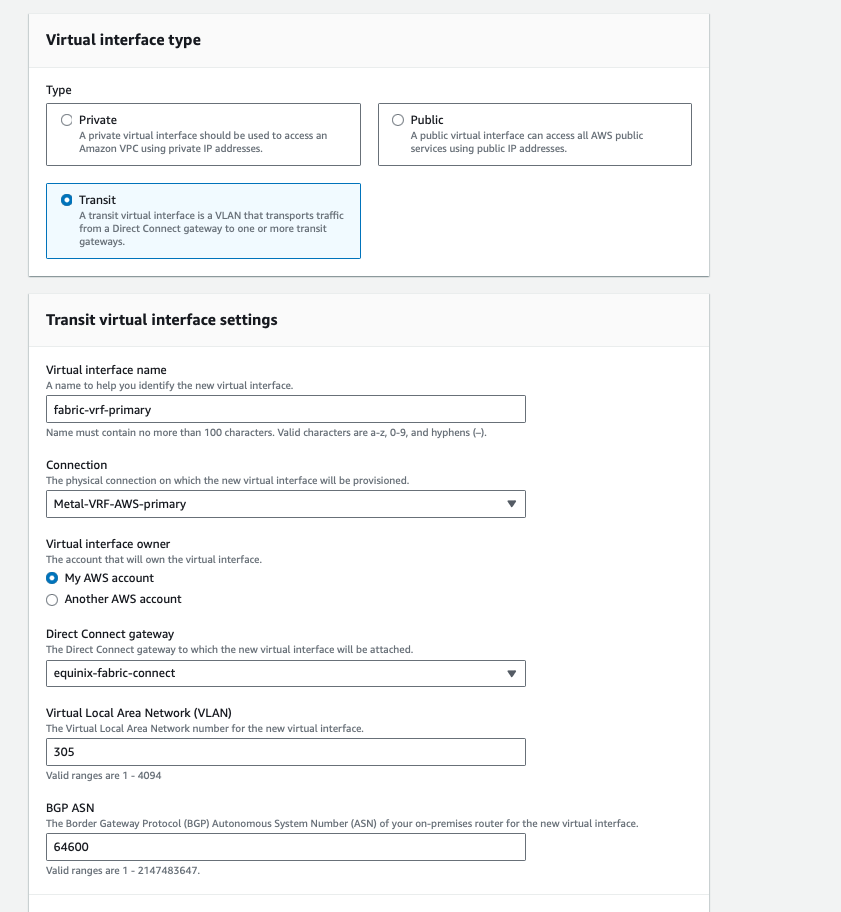
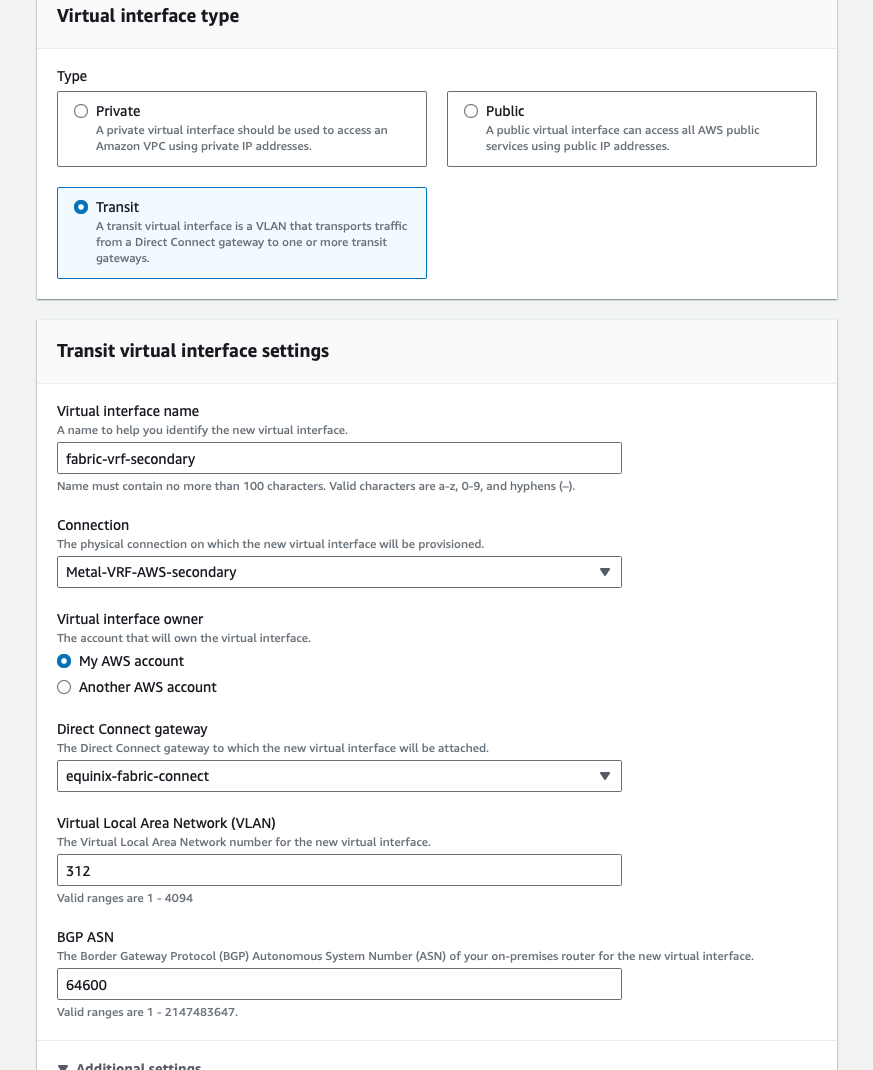
Start with the Virtual interface attachments. Click Create virtual interface, and enter the following configuration data.
- Type: Transit
- Name: pick a representative name; we will call it
fabric-vrf-primary - Connection: select the connection you want to use; in our case,
Metal-VRF-AWS-primary - Interface owner: my account
- Direct Connect gateway: the Gateway we created,
equinix-fabric-connect - VLAN: can be any number, as long as it does not conflict with anything else that the VRF connects to. We will use
305. - BGP ASN: This is the ASN from the far end, i.e. what VRF announces, which we configured earlier,
64600
Expand the Additional Settings by clicking on the triangle and enter the following data:
- "Address family": IPv4
- "Your router peer IP": The IP address on the Metal side
192.168.15.1/30 - "Amazon router peer IP": The IP address on the AWS side
192.168.15.2/30 - "BGP Authentication key": The hashed BGP password
dbc29529874661f92e089593c8adc10b
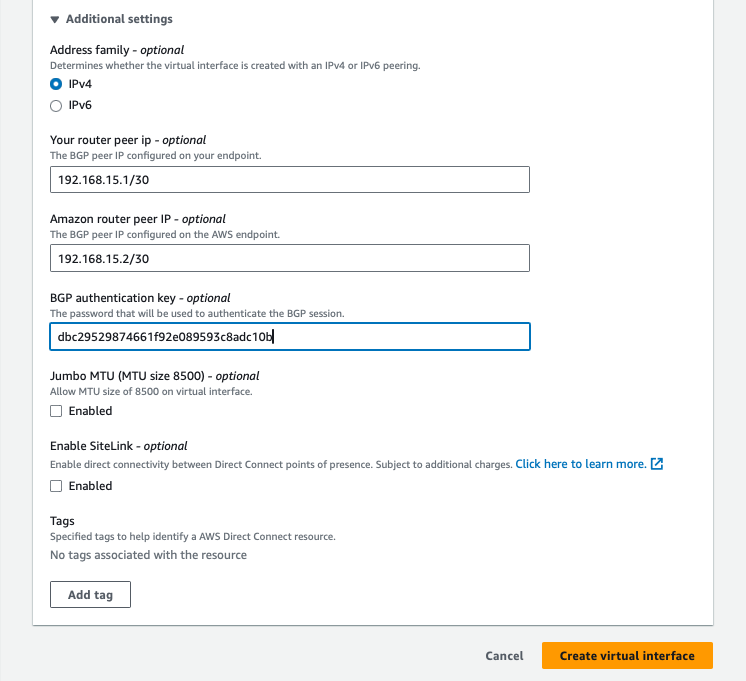
Click Create virtual interface.
Repeat the same steps for the secondary connection, using the following information:
- Type: Transit
- Name: pick a representative name; we will call it
fabric-vrf-secondary - Connection: select the connection you want to use; in our case,
AWS-VRF-secondary - Interface owner: my account
- Direct Connect gateway: the Gateway we created,
equinix-fabric-connect - VLAN: We will use
312 - BGP ASN: This is the ASN from the far end, what VRF announces, which we configured earlier,
64600
Expand the Additional Settings by clicking on the triangle and enter the following data:
- "Address family": IPv4
- "Your router peer IP": The IP address on the Metal side
192.168.15.5/30 - "Amazon router peer IP": The IP address on the AWS side
192.168.15.6/30 - "BGP Authentication key": The hashed BGP password
dbc29529874661f92e089593c8adc10b
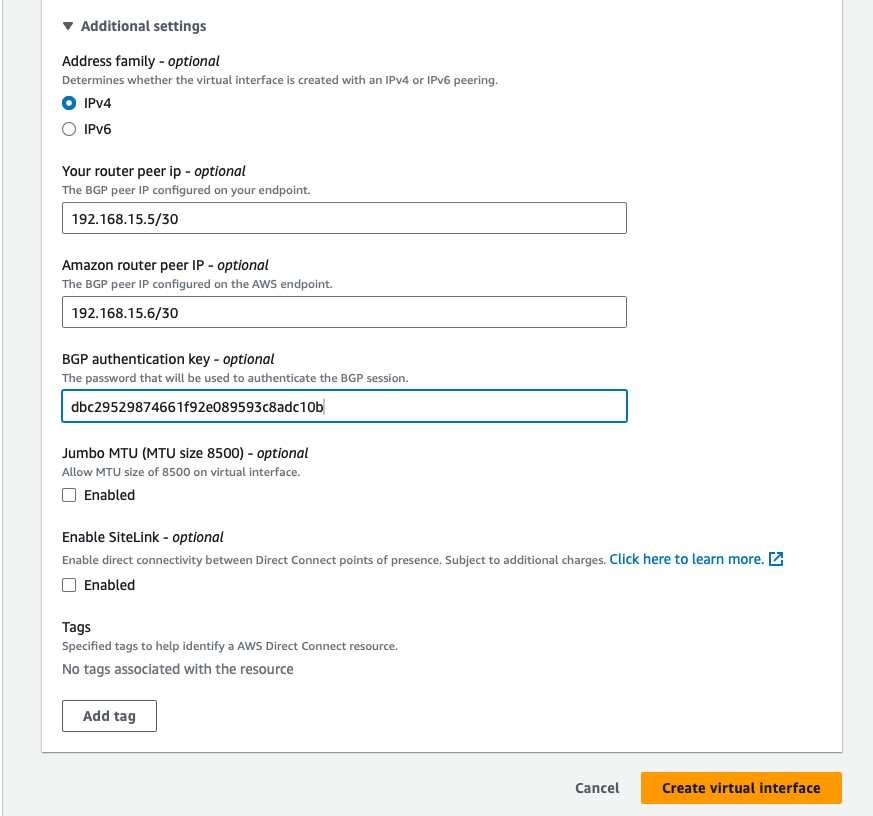
Click Create virtual interface.
Finally, connect the Direct Connect gateway to the Transit Gateway. Click the Gateway associations tab and then click Associate gateway.
Select your Transit Gateway and enter the IP addresses you want to make available. In our case,
we will allow the entire VPC of 10.20.0.0/16, but you can have one or more subsets.
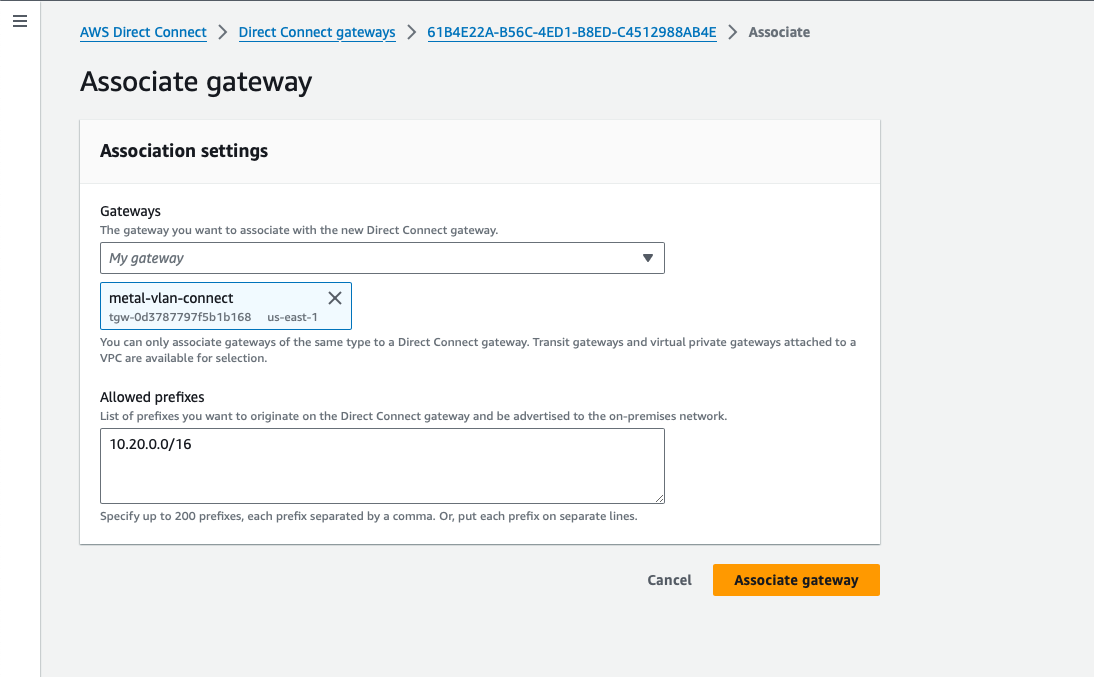
When you are done, the Transit Gateway will show as associated. It may take a few minutes.
Update AWS BGP peering in Metal
Return to the Metal console and click on Interconnections. You now will see the connection in the list under Fabric VCs, with a status of Pending, which eventually will change to Ready, when all of the other steps are done. Click on the connection.
Select the Primary Port tab:
At the bottom of the page, you will see the Virtual Circuits listed. Click the three bars button on the right to edit it:
This opens the "Manage Peering Details" window. Enter the following information from our configuration table above:
- "Peer ASN": AWS-side ASN
64550 - "Subnet": Primary VC subnet
192.168.15.0/30 - "Metal IP": IP address of the Metal side of the connection
192.168.15.1 - "Customer IP": IP address of the AWS side of the connection
192.168.15.2 - "MD5 Password":
dbc29529874661f92e089593c8adc10b
Click the "Update Virtual Circuit" button.
Repeat the process with Second Port, using the secondary VC subnet and IP addresses.
- "Peer ASN": AWS-side ASN
64550 - "Subnet": Primary VC subnet
192.168.15.4/30 - "Metal IP": IP address of the Metal side of the connection
192.168.15.5 - "Customer IP": IP address of the AWS side of the connection
192.168.15.6 - "MD5 Password":
dbc29529874661f92e089593c8adc10b
Click the "Update Virtual Circuit" button again.
Creating the Azure Connections
There are several steps to deploying the Fabric Virtual Connection (VC):
- Create the connection in Equinix Metal to Fabric
- Create the ExpressRoute circuit in Azure
- Create the Metal-Azure Fabric VC
- Configure BGP peering in Azure
- Create the Virtual Network Gateway in Azure
- Configure Azure BGP peering in Metal
Create the connection in Equinix Metal to Fabric
From the left navigation bar, select Interconnections:
Then click the "Request a new interconnection" button:
There are two kinds of interconnection you can request, AWS Direct Connect and Request Interconnection. Since we are not connecting to AWS, select the "Request Interconnection" button:
The next screen has two options for interconnections, Fabric VC and Dedicated Port. We won't cover dedicated ports in this guide, as we are focused on using Equinix Fabric. If you are interested in learning more about dedicated ports, please see our dedicated ports documentation, also available via the link in the "Dedicated Ports" box on the console.
There are two kinds of Fabric VC, Metal-billed and Fabric-billed. Either can be useful for this kind of interconnection, but we will use the Metal-billed one. Read the interconnections documentation for more information on the differences.
To create the connection, you need a few pieces of information:
- A name for the connection. It doesn't have any inherent meaning; it just needs to be useful to you. We will call it "Azure."
- The Metro. This must be the same metro as the VRF you are connecting to. In our case, it is Washington.
- The connection speed. Higher speeds have a higher cost. Since we are just creating a basic connection, we will use the lowest speed, 50Mbps. You can select a higher one if you need it.
- Single vs redundant. Each connection is exactly that, a single connection. If there are issues anywhere along the line, whether hardware issues such as a port on the Azure or Equinix end, or software problems, your connection will be out of service, at least until it is fixed. Like all good networking, you should plan for redundancy. We will use a redundant connection for this example.
- Connect to VLAN or VRF. The VC is a layer 2 connection between layer 3 routers with BGP support on each size. On the cloud provider side, the layer 3 routing is provided for you. On the Metal side, you can set up the layer 3 routing and BGP manually with software on Metal devices and additional VLANs connected directly to the VC, or you can let Metal do all of that for you with a VRF. We will use a VRF connection for this example.
- Primary and secondary connections. Since we selected redundant connections, we need to specify where each of the two connections attaches on the Equinix Metal side. In the case of a VLAN, that would require two distinct VLANs. Since we are using VRF, which is Virtual Routing and Forwarding, we can use the same VRF for both connections. This is a key advantage of VRF connections over VLAN connections. We will use our "Azure" VRF for both.
Click the "Submit Request" button.
Once the request is submitted, you need two things:
- An email to your address telling you that the service token is ready to use. You should get two such emails, one for each of the redundant connections. You know it is ready by the "Service Token Status" line.
- The service token itself. This is a long string of characters that you will need to create the Fabric VC to Equinix Metal. It will appear in the emails, as well as in the console after you submit your request.
Click Interconnections in the console. You now will see the connection in the list under Fabric VCs, with a status of pending, which eventually will change to ready, when all of the other steps are done.
Create the ExpressRoute circuit in Azure
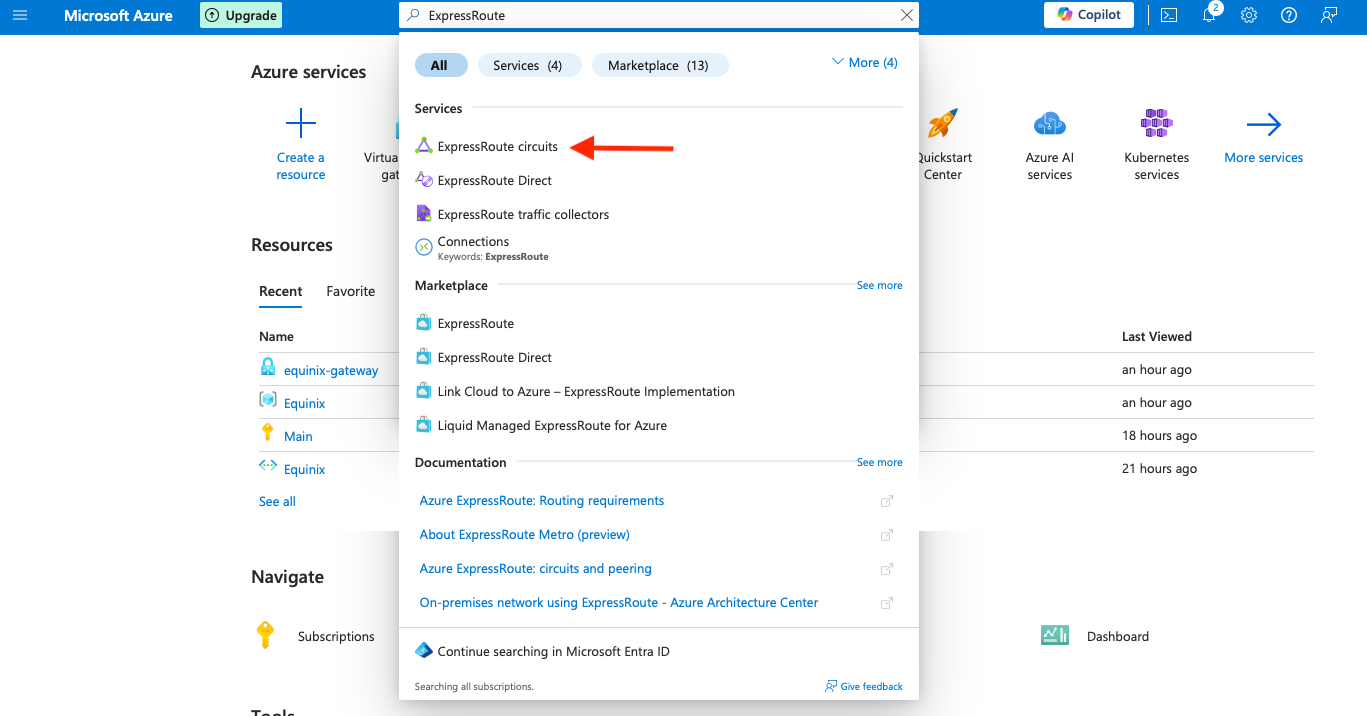
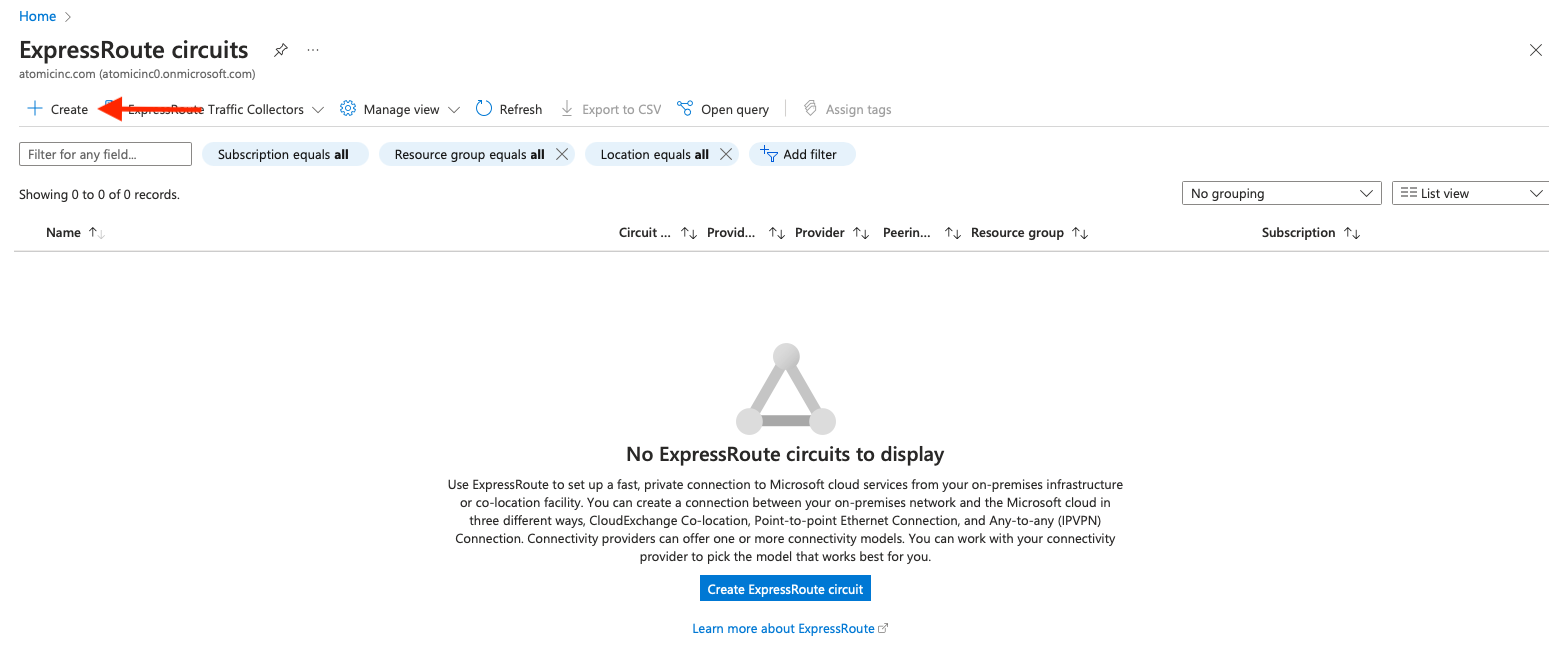
In the Azure portal, type "ExpressRoute" in the search bar, and select "ExpressRoute circuits."
Click Create:
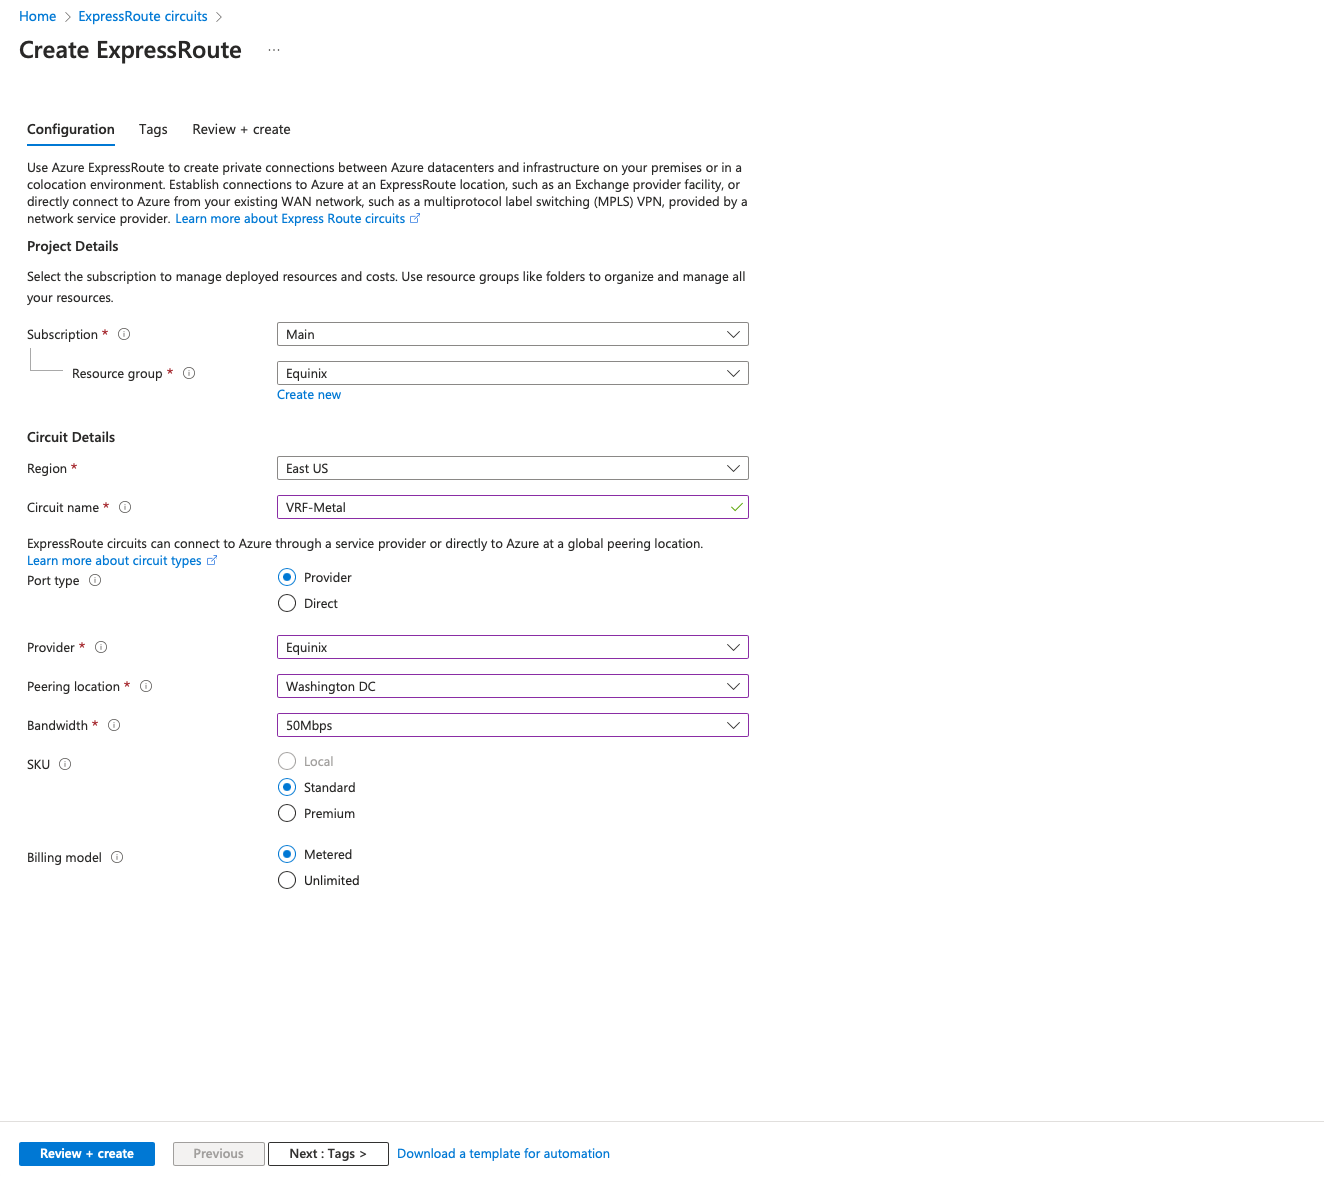
Enter the configuration information for your ExpressRoute circuit:
- Subscription: the billing subscription you are using
- Resource group: the resource group for this circuit, in our example,
Equinix - Region: the region in which to create the route, which must be the same as our Metal-side VRF; since the VRF is in Washington, we use "East US"
- Circuit name: a name for the circuit, in our example,
VRF-Metal - Port type: select Provider, as we will be connecting to a known provider
- Provider: search through the list and find "Equinix"
- Peering location: "Washington"
- Bandwidth: select the bandwidth you want for the circuit; we will use 50Mbps
- SKU: select the SKU you want for the circuit; we will use "Standard"
- Billing model: select metered or unlimited; for our example, we will use "Metered"
Click "Review+Create" and then "Create" to create a new circuit:
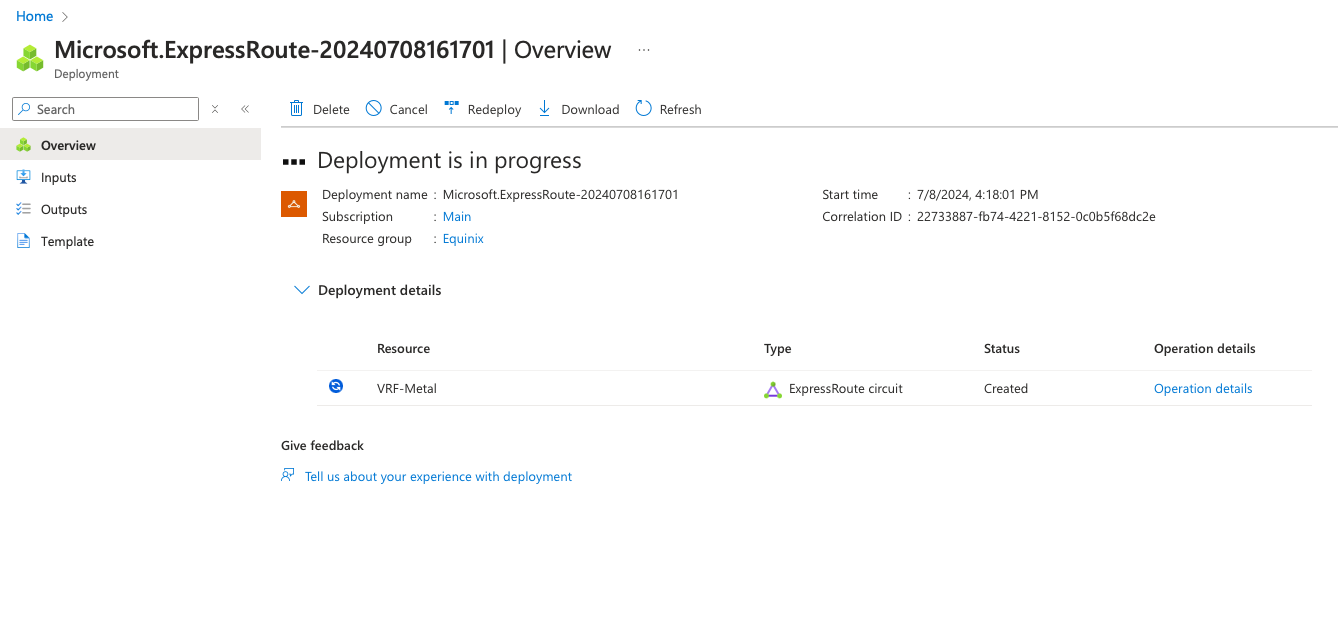
The status screen shows the deployment progress:
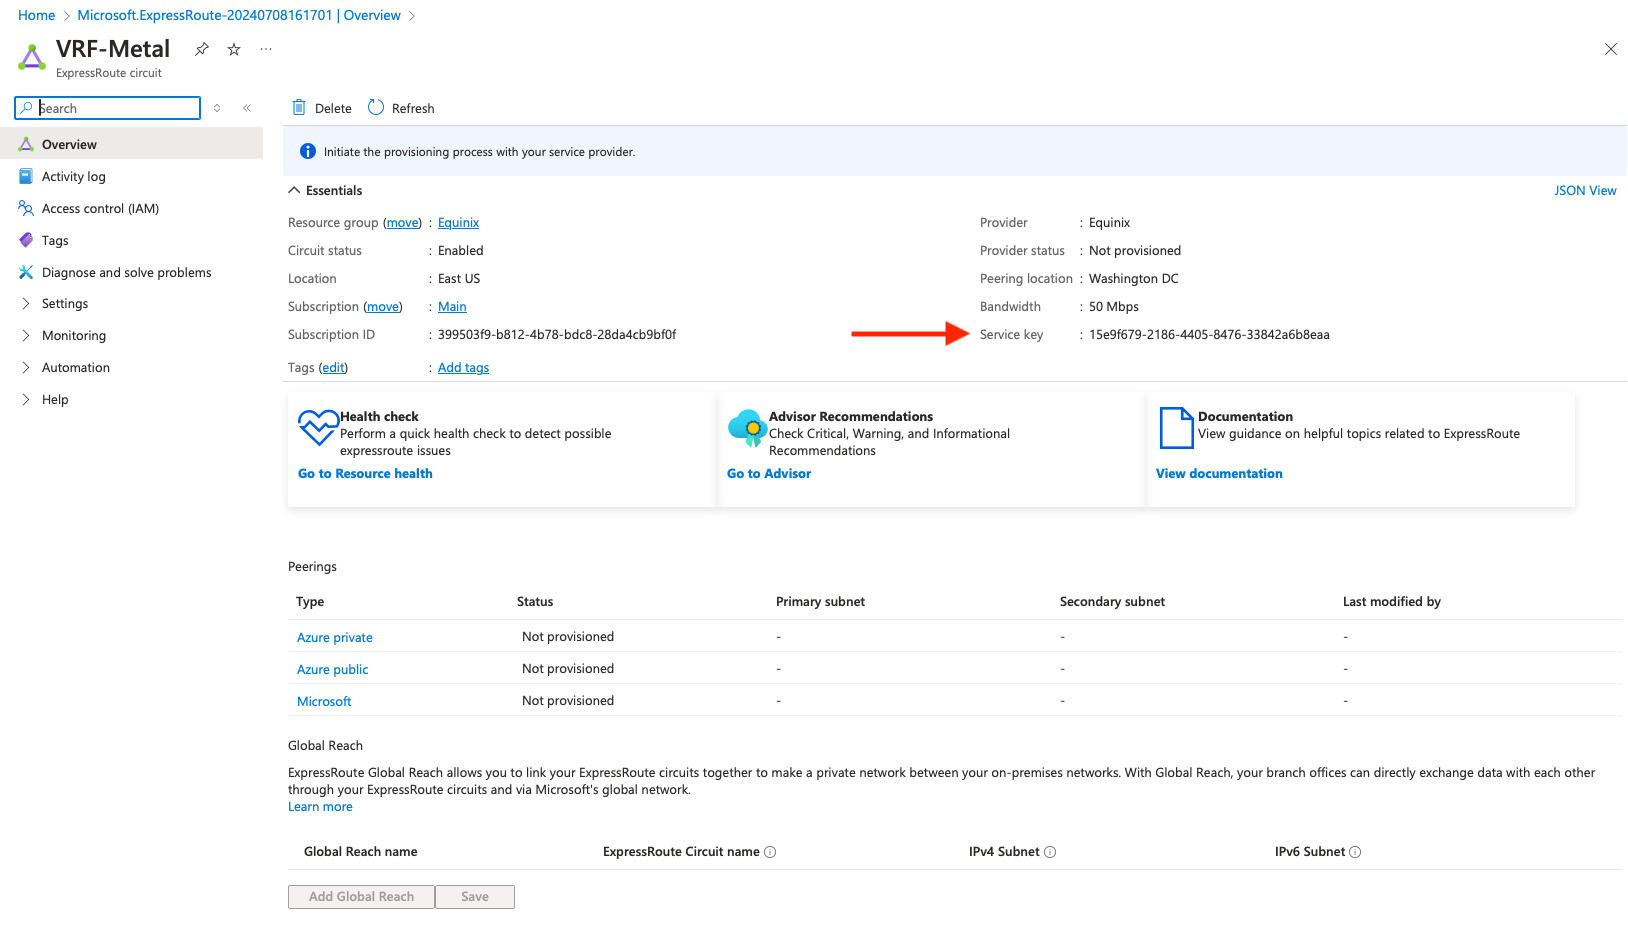
Wait for the deployment to complete, then click the "Go to resource" button:
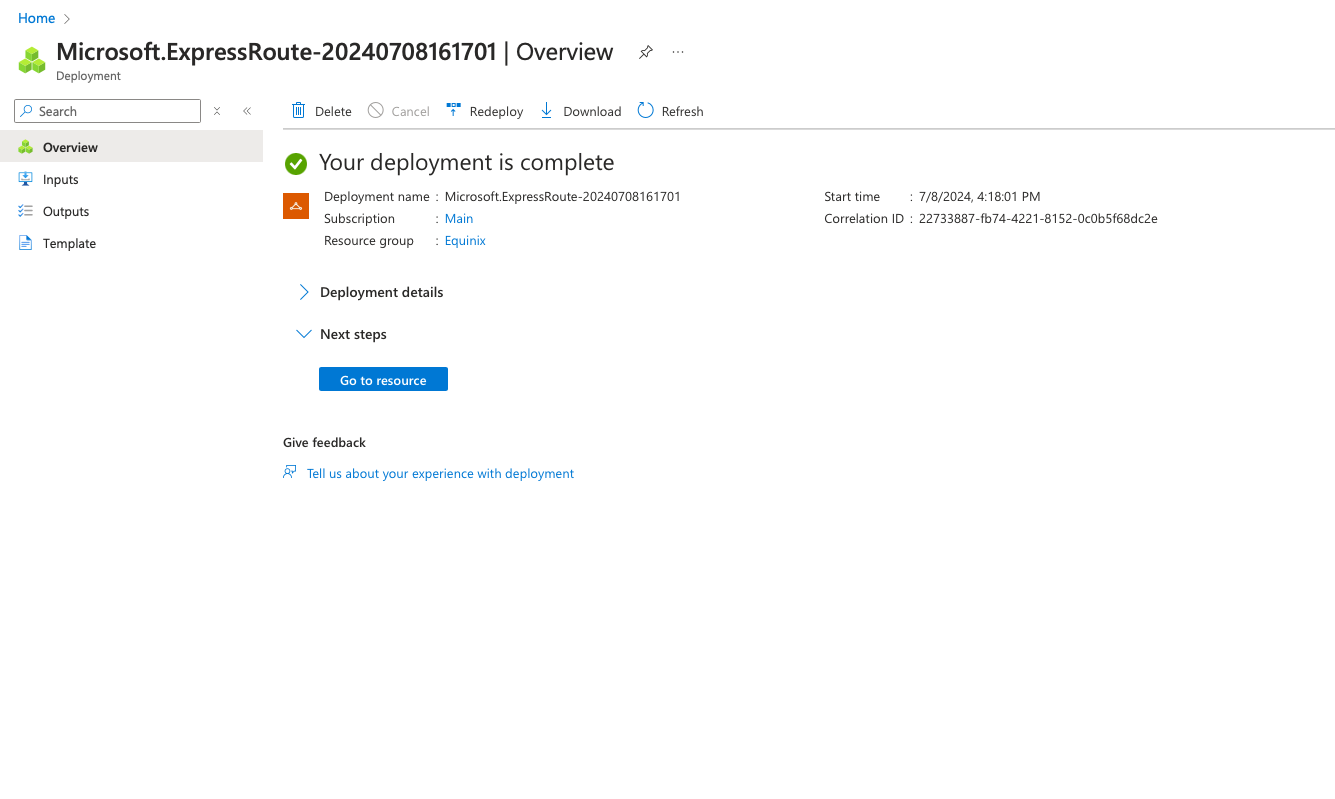
This brings up the resource details. The piece of information we need is the Service Key, which we will use for Fabric:
Create the Metal-Azure Fabric VC
In this section, you'll create a Fabric VC between the VRF on Metal and the ExpressRoute circuit at Azure.
Hop over to the Fabric console and log in.
Once you are logged in, you will see the Equinix Fabric portal:
On the top menu bar, go to "Connections" and "Create Connection":
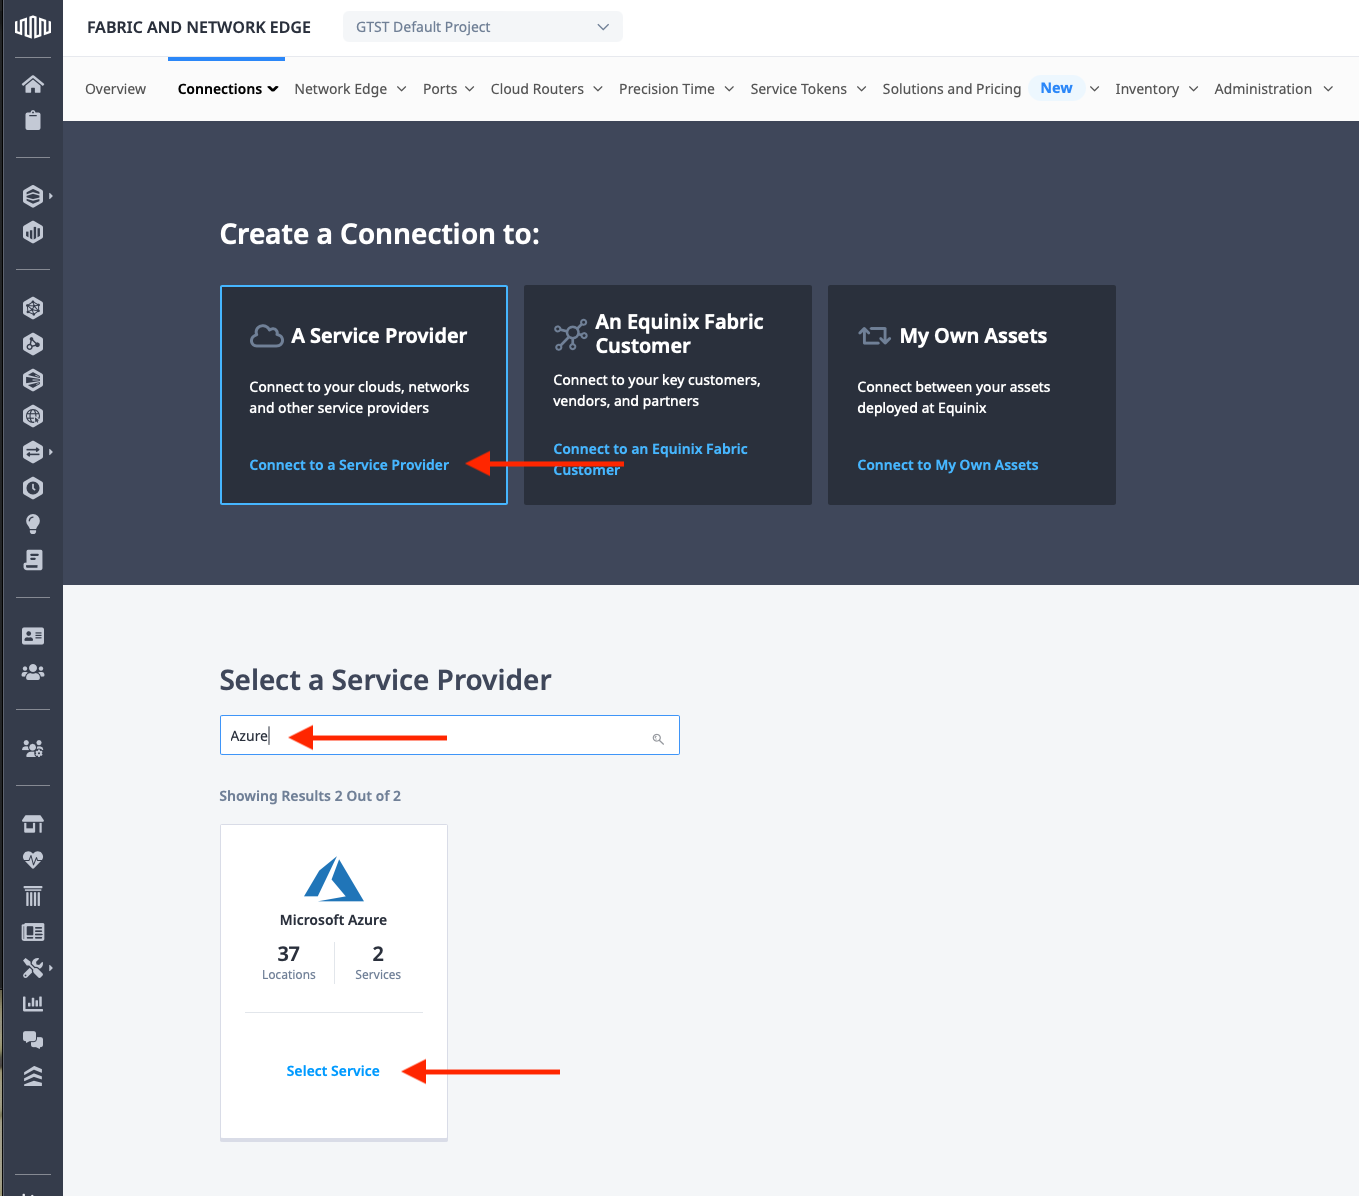
There are three main options for a connection: A Service Provider, An Equinix Fabric Customer, and My Own Assets. Click A Service Provider, then in the search box, type "Azure". This will filter the options below to just a few. Select "Azure" and click Select Service.
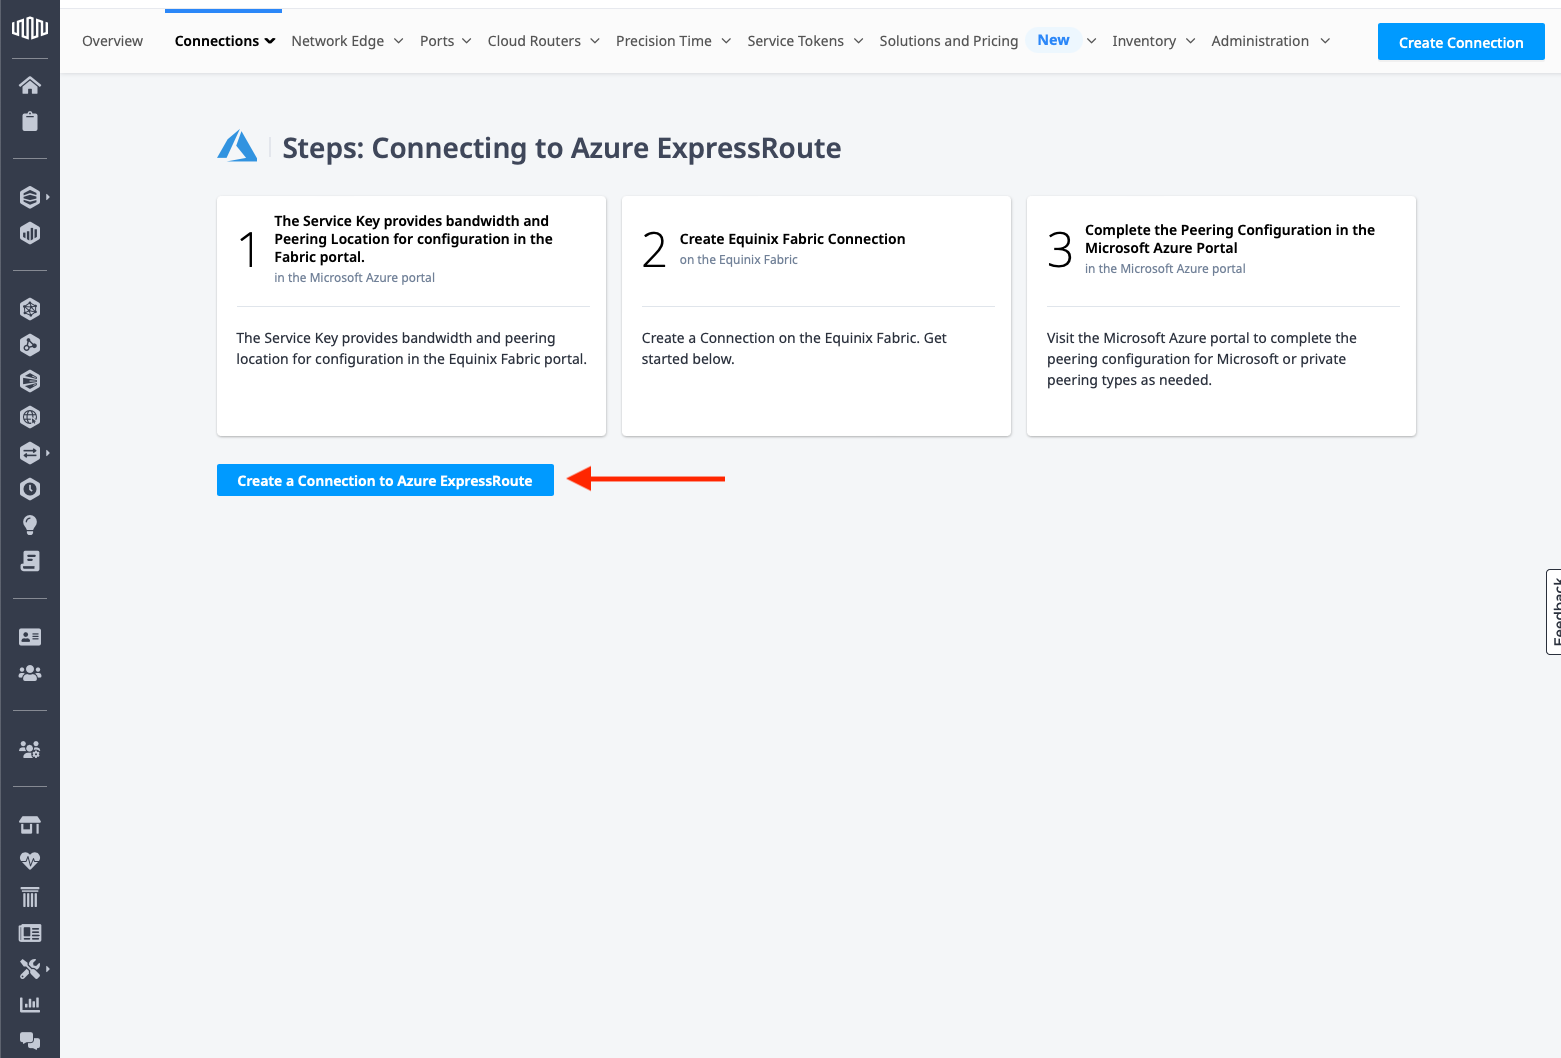
This opens up the options for Azure. Select "Azure ExpressRoute" and click Create Connection. You won't use "Quick Connect" in this case, as you need service keys on both the Metal and Azure ends:

Click "Create a Connection to Azure ExpressRoute":
Enter the Azure service key, which you retrieved when the ExpressRoute circuit setup was complete, in the Destination section. Fabric will validate the key with Microsoft. Once that is complete, it will return the location and connection speed.
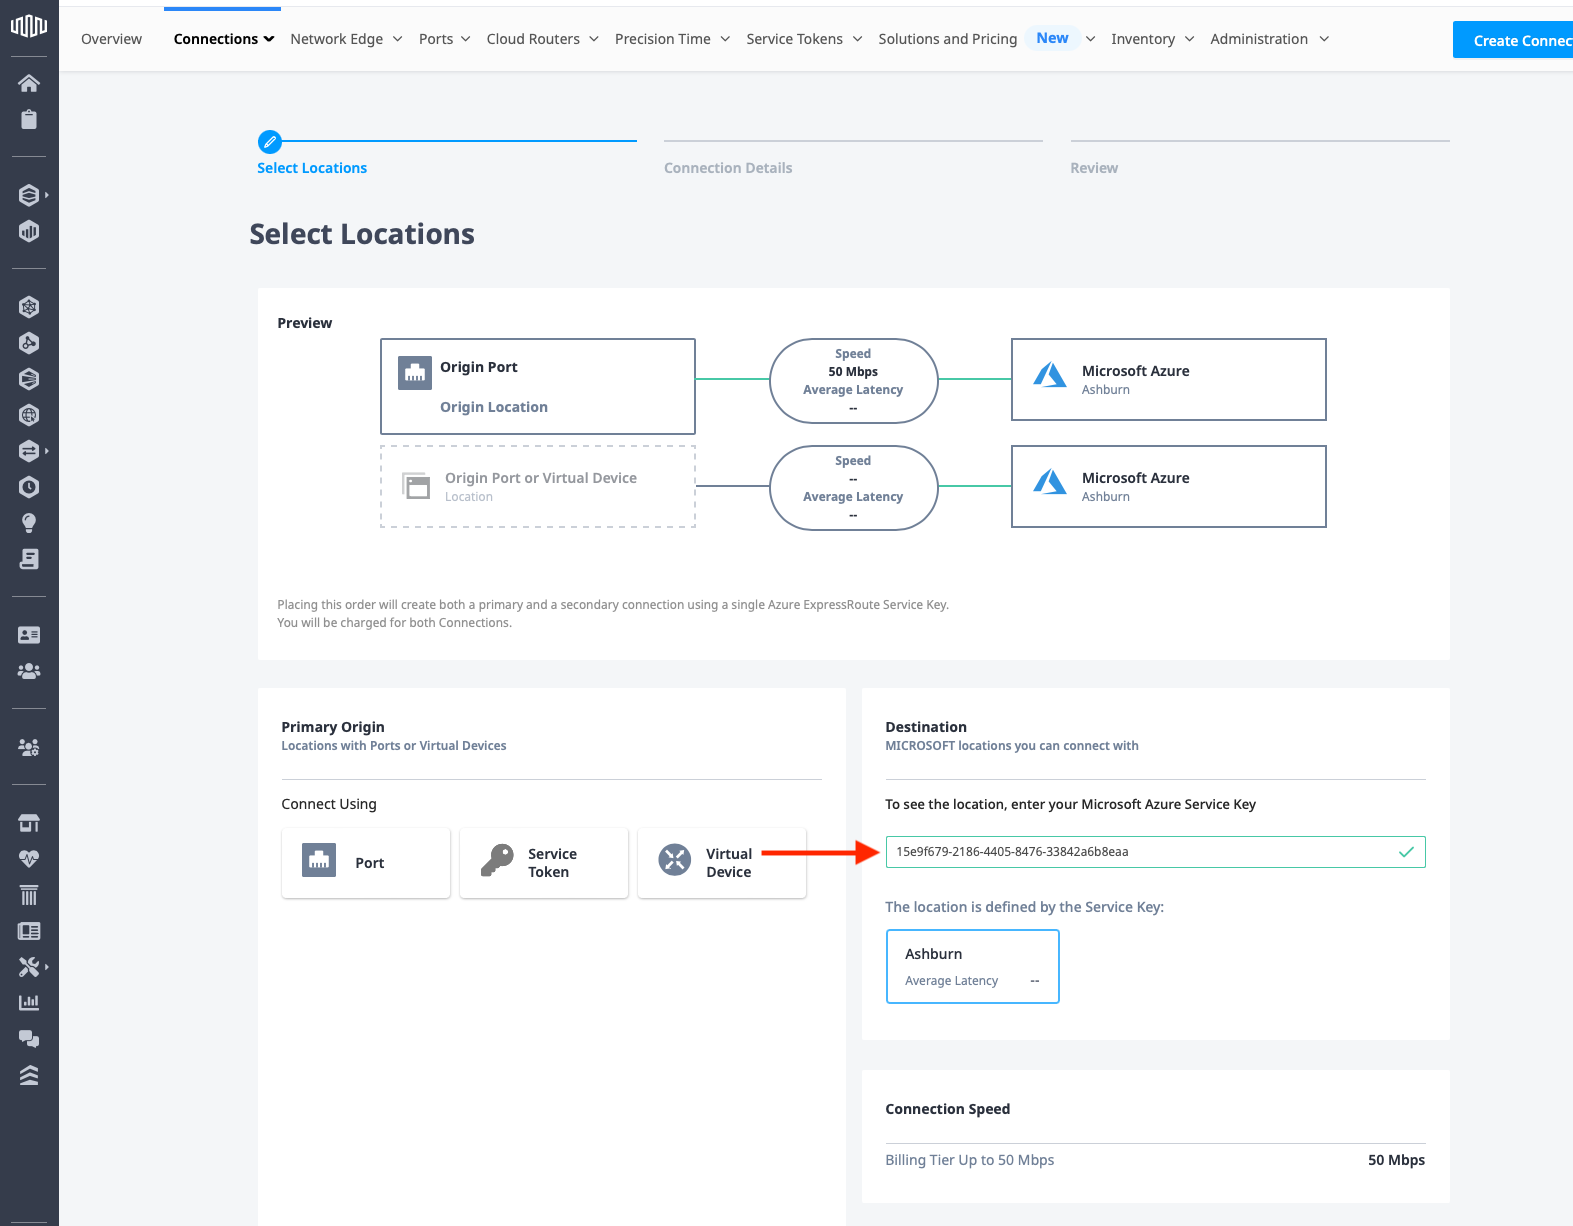
Next, enter the origin, specifically Metal. You have primary and secondary service tokens from when you created the interconnection.
In the Primary Origin section, click Service Token, and then enter the primary service token from the Metal interconnection. Fabric will validate the location.
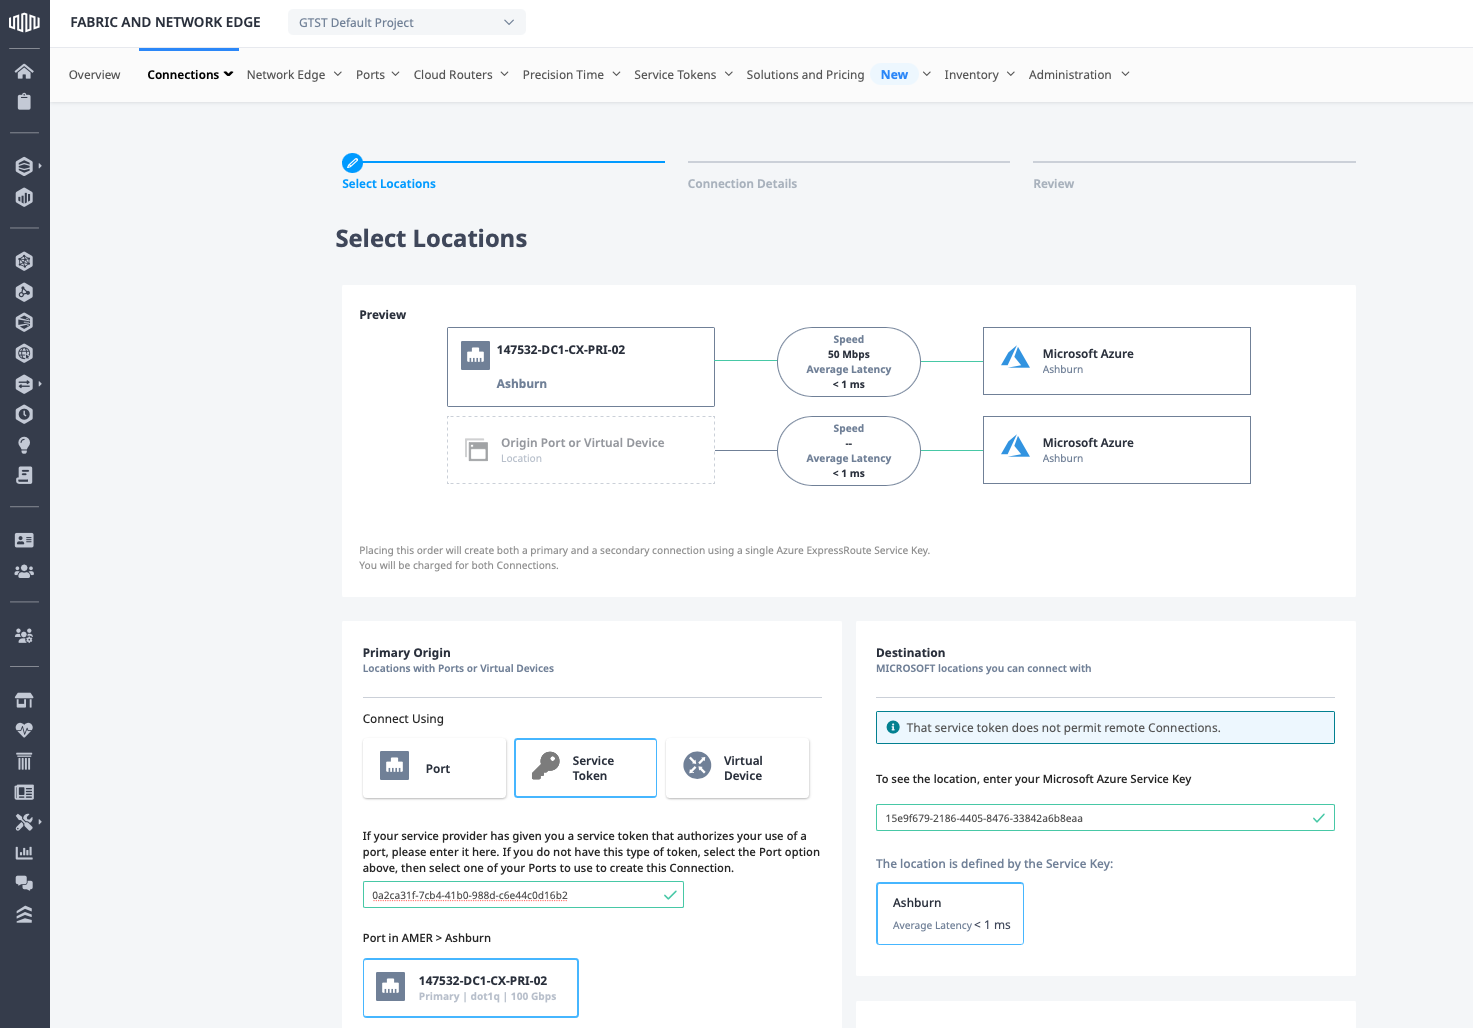
Repeat the process for the Redundant Origin, entering the Metal secondary token:
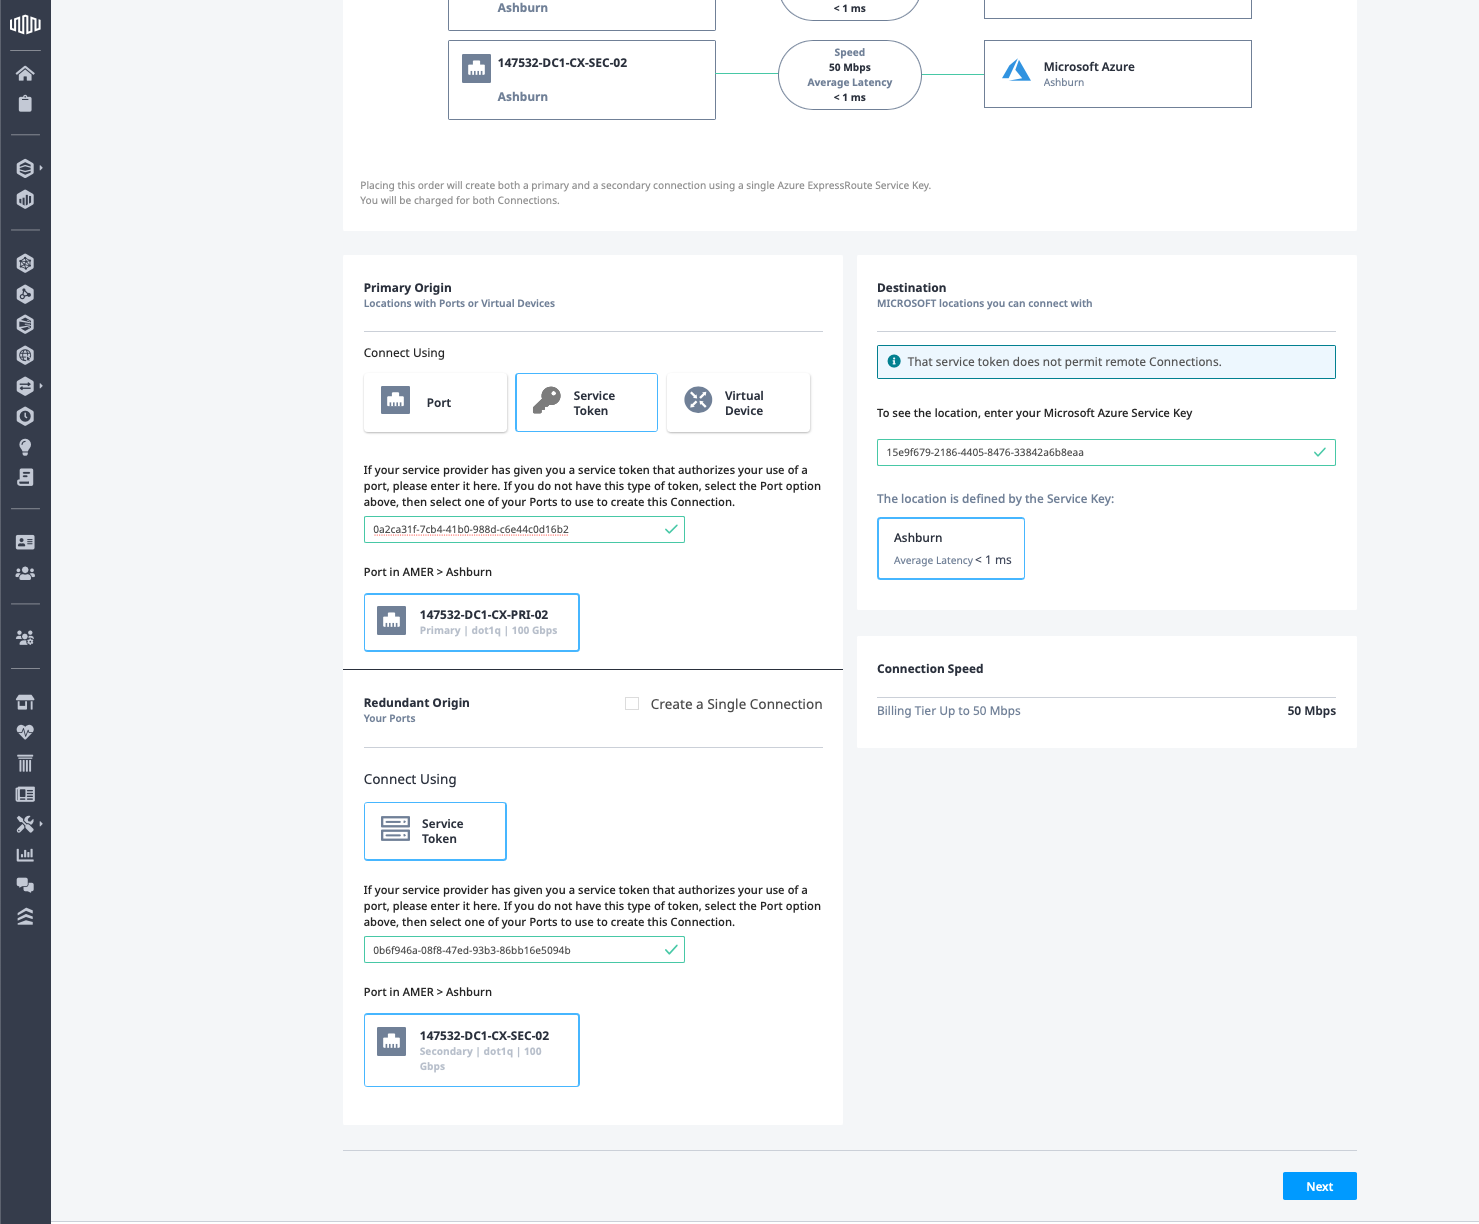
Click Next.
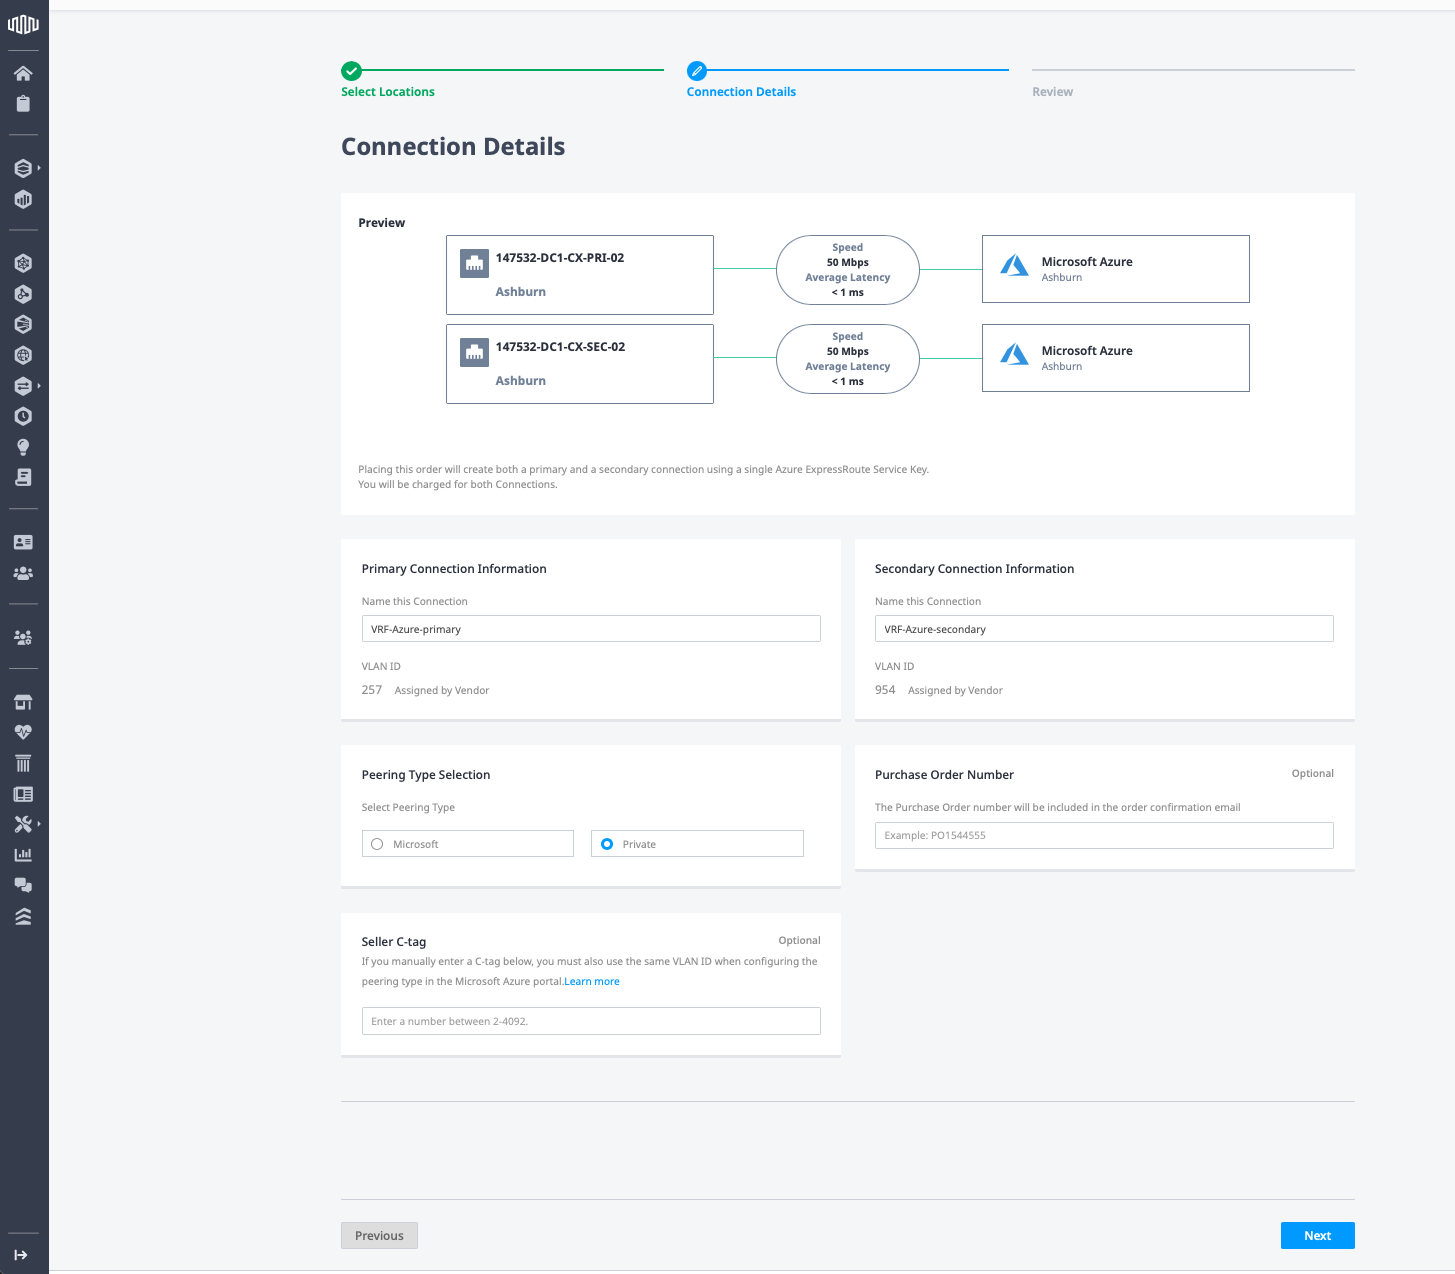
Enter the following configuration information:
- Names for the primary and secondary connections. These can be anything that has meaning to you. For our example, we will call them "VRF-Azure-primary" and "VRF-Azure-secondary".
- Peering type: select Private Peering. Read the Microsoft Azure documentation to understand the difference between the two.
Click Next:
Then review the details and click Submit Order.
At this point, the order is submitted. It may take a few minutes to complete. You can check the status by clicking on the connection:
The connections are ready when the status for them shows Pending BGP when you hover over them:

Configure BGP peering in Azure
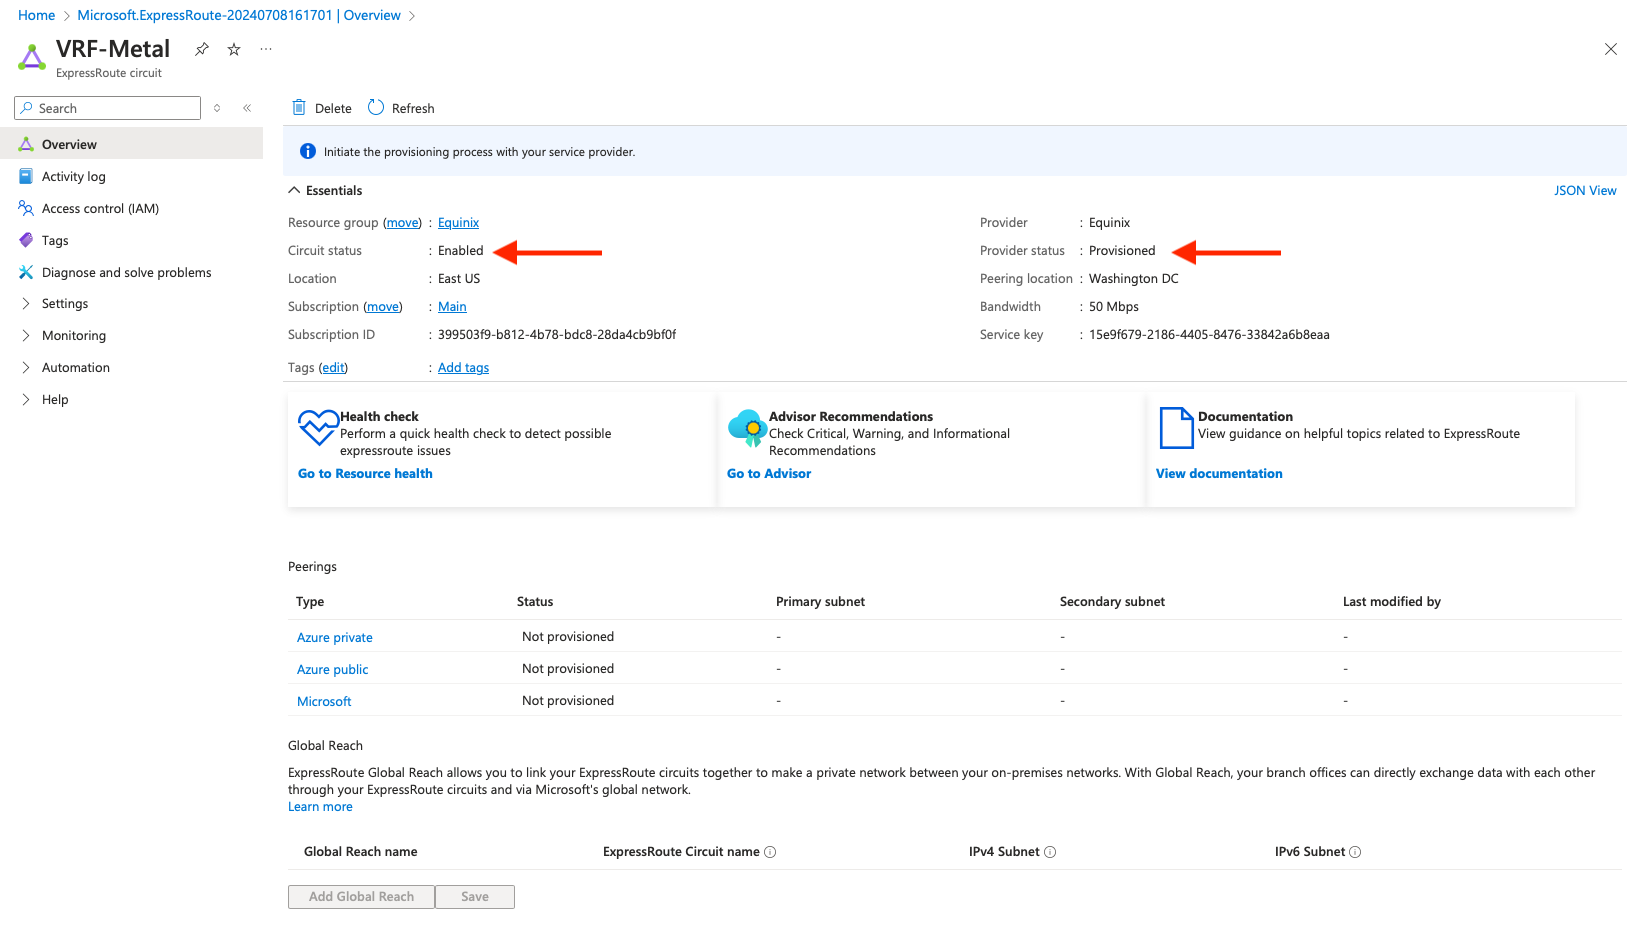
Return to the Azure portal to configure BGP peering for the ExpressRoute circuit. Return to the ExpressRoute details page, the same one that gave you the service key. The service status should be Enabled, and the provider status should be Provisioned:
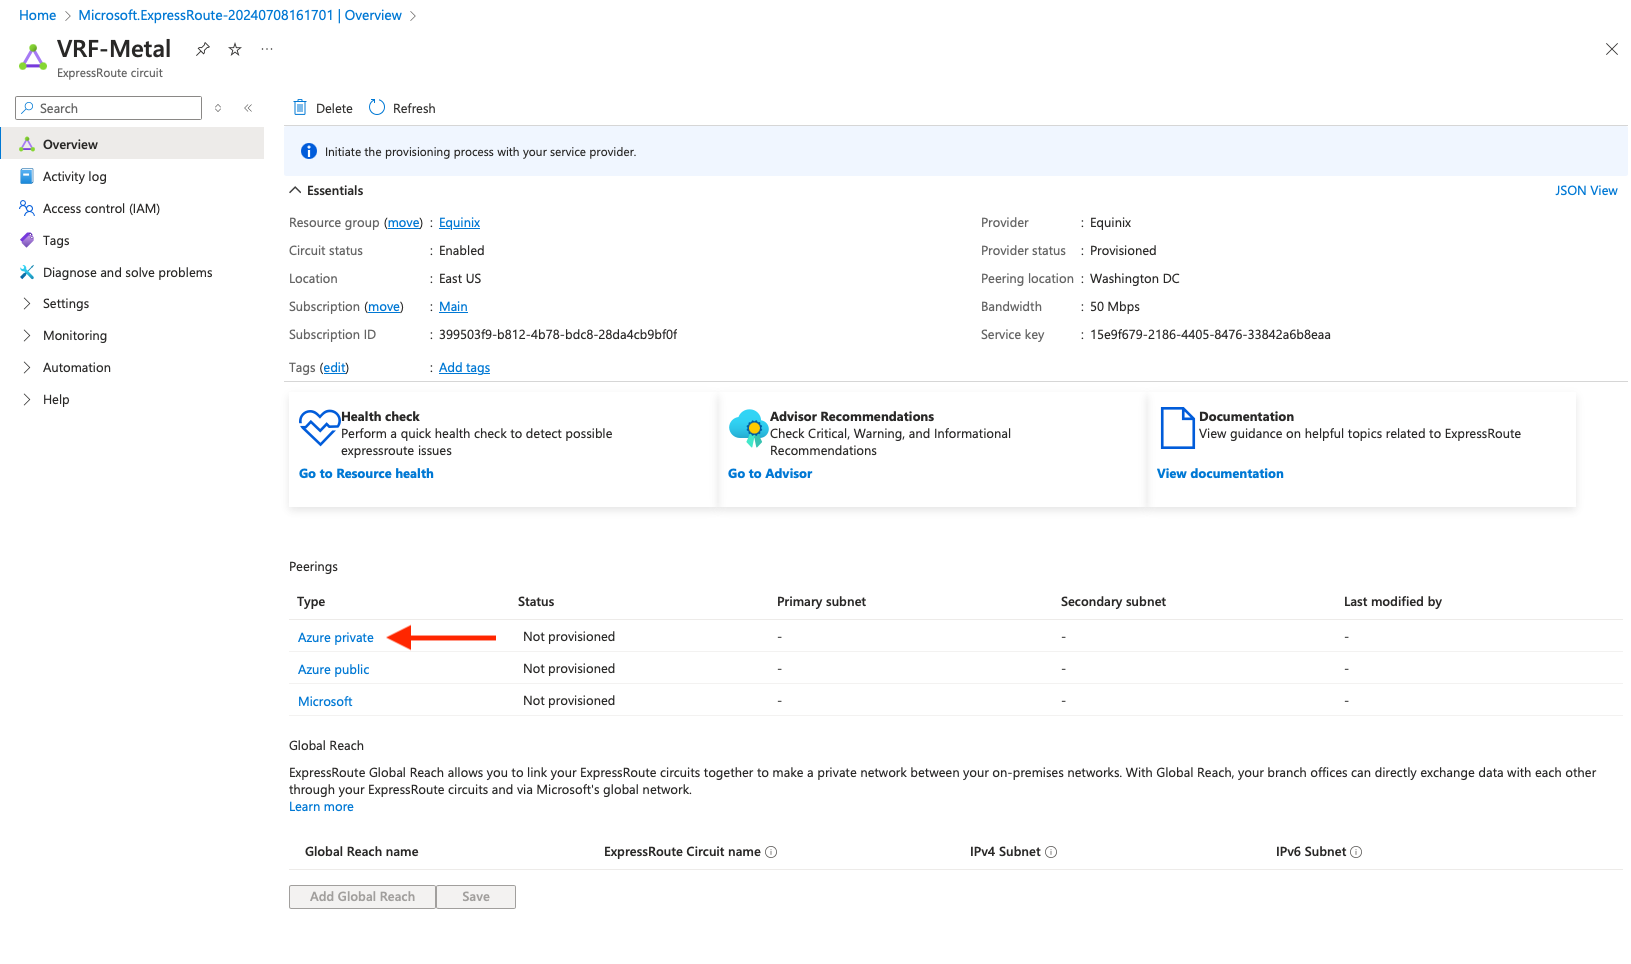
Under Peerings, click on Azure private:
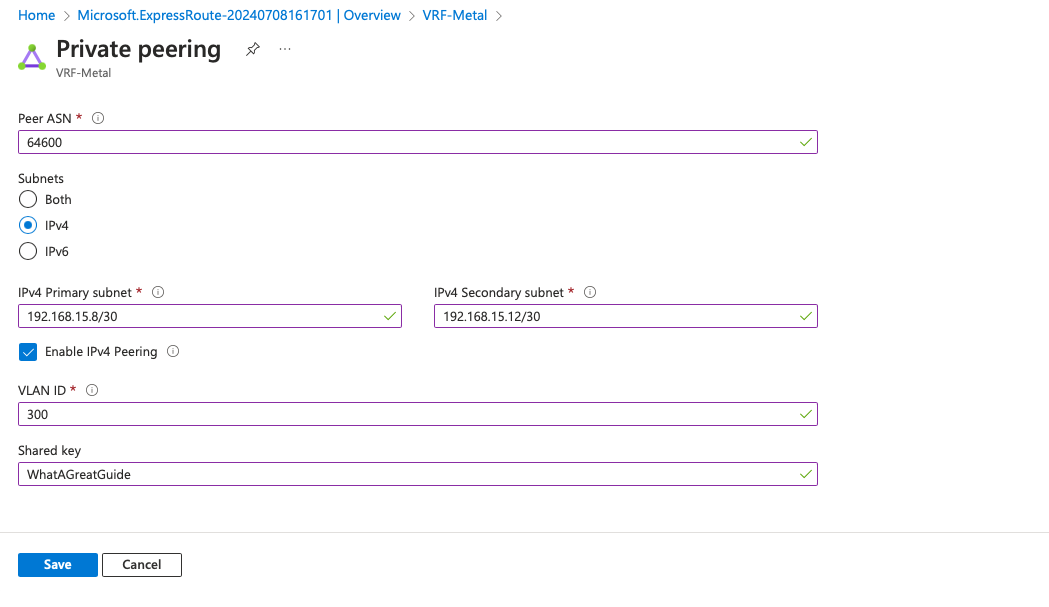
Enter the configuration information:
- Peer ASN: the Metal-side ASN selected earlier,
64600 - Subnets: IPv4
- IPv4 Primary subnet: the primary VC subnet from the configuration table above,
192.168.15.8/30 - IPv4 Secondary subnet: the secondary VC subnet from the configuration table above,
192.168.15.12/30 - Enable IPv4 peering: checked
- VLAN ID:
300 - Shared key: the MD5 password from our configuration table above,
WhatAGreatGuide
When you're done, click Save:
Create the Virtual Network Gateway in Azure
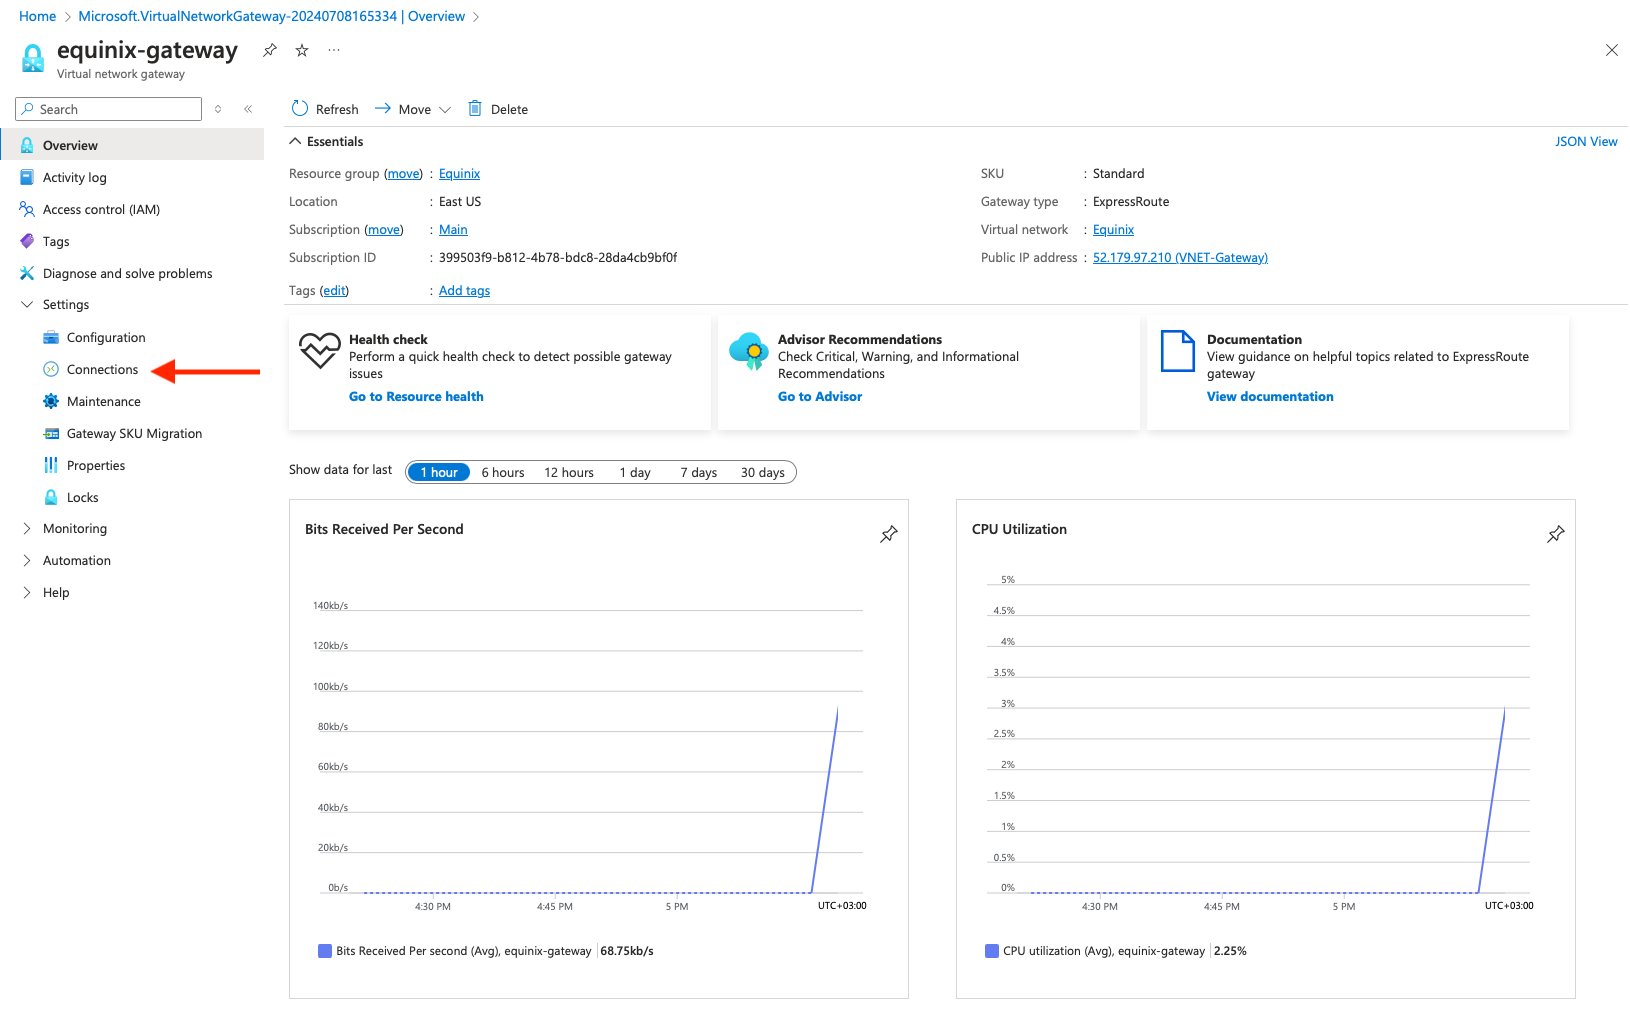
In Azure, a Virtual Network Gateway is a virtual router that connects a vnet to the rest of the world, including ExpressRoute circuits.
You may already have a Virtual Network Gateway created for your vnet. If not, create one now.
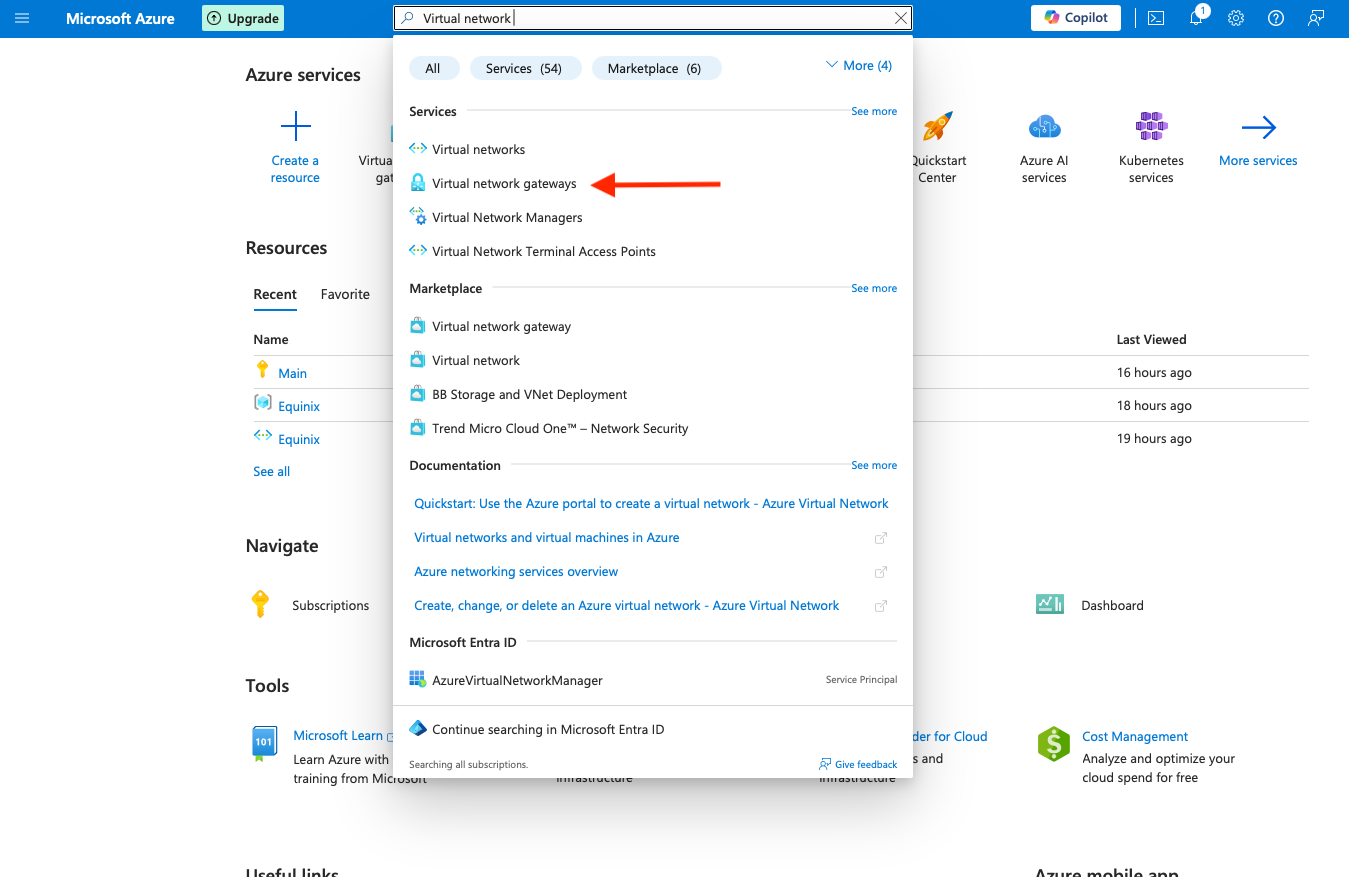
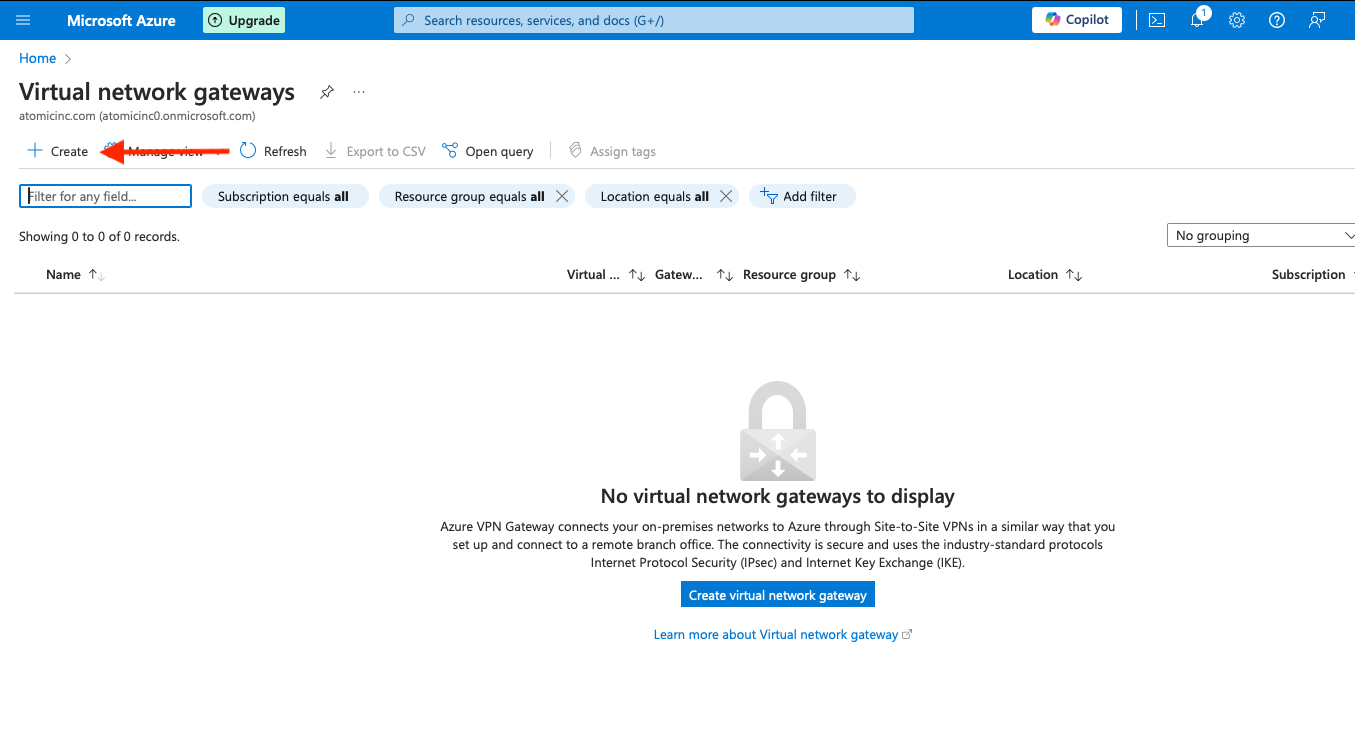
In the search box, enter "Virtual Network Gateway" and select it:
Then click Create:
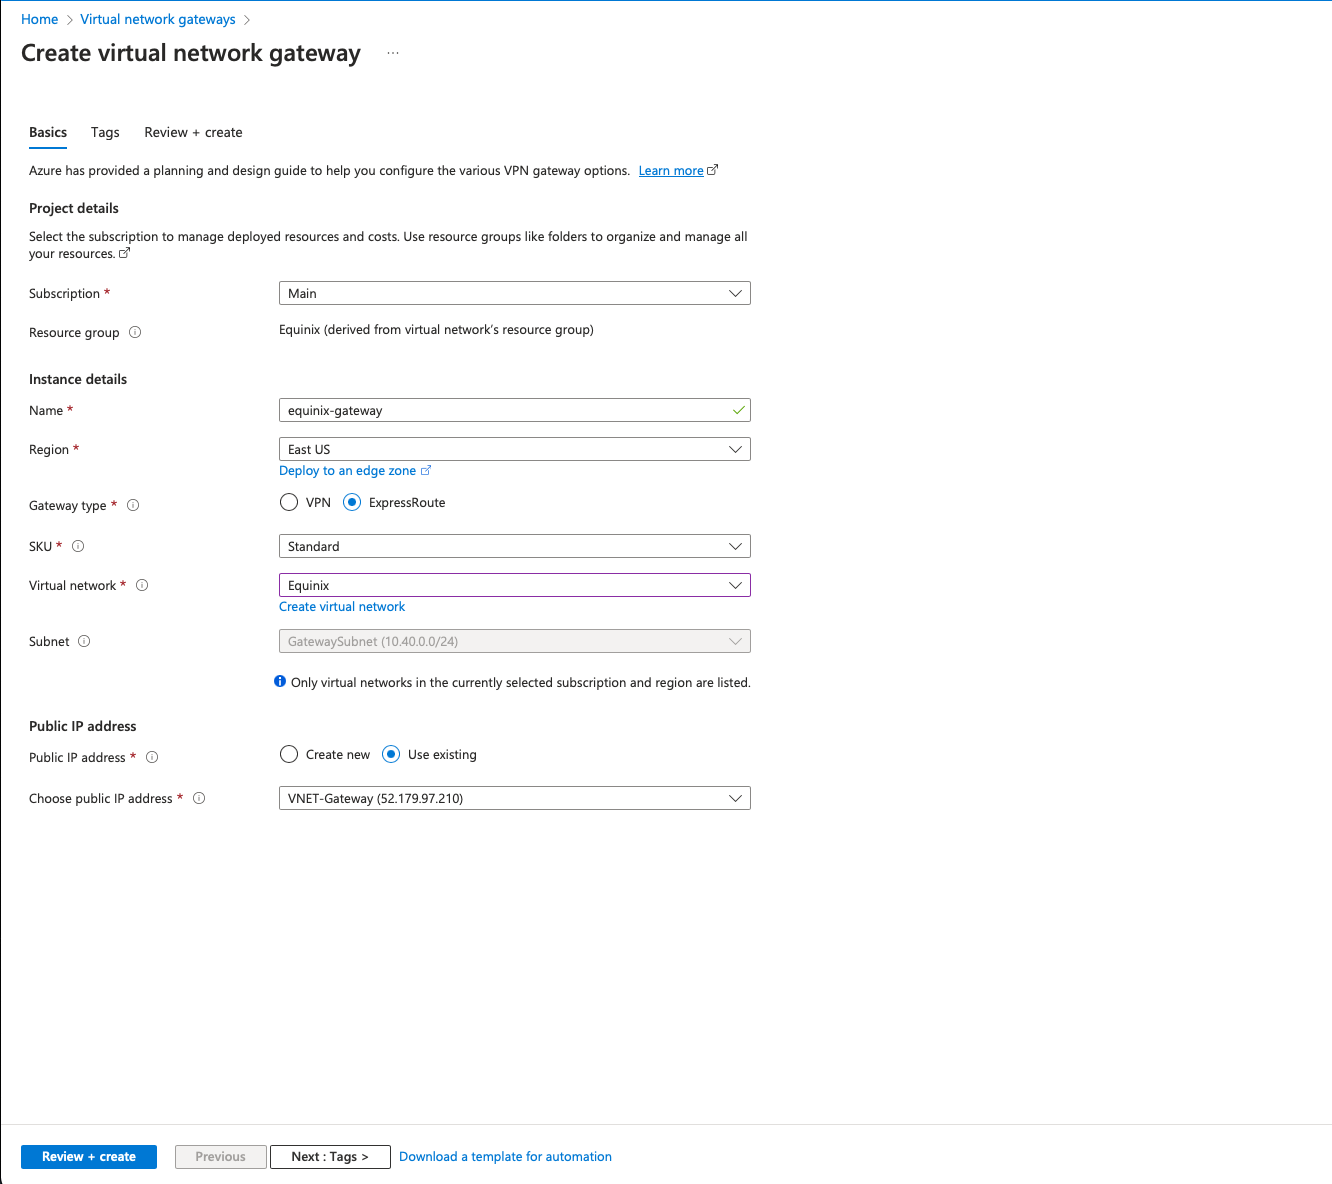
Enter the configuration information for your Virtual Network Gateway:
- Subscription: the billing subscription you are using
- Resource group: the resource group for this gateway, in our example,
equinix - Name: a name for the gateway, in our example,
equinix-gateway - Region: the region for the gateway, in our example,
East US - Gateway type: select ExpressRoute since we are connecting to ExpressRoute circuits
- SKU: this depends on your intended performance; we will use "Standard"
- Virtual network: select the vnet you are connecting to, in our example,
Equinix - Subnet: this must be a Virtual Network Gateway subnet, which is created for you; in our example,
GatewaySubnet - Public IP address: either use an existing one, if you have, or create a new one
Click the Review + Create button.
Then click Create.
You will see a page indicating that deployment is in progress:
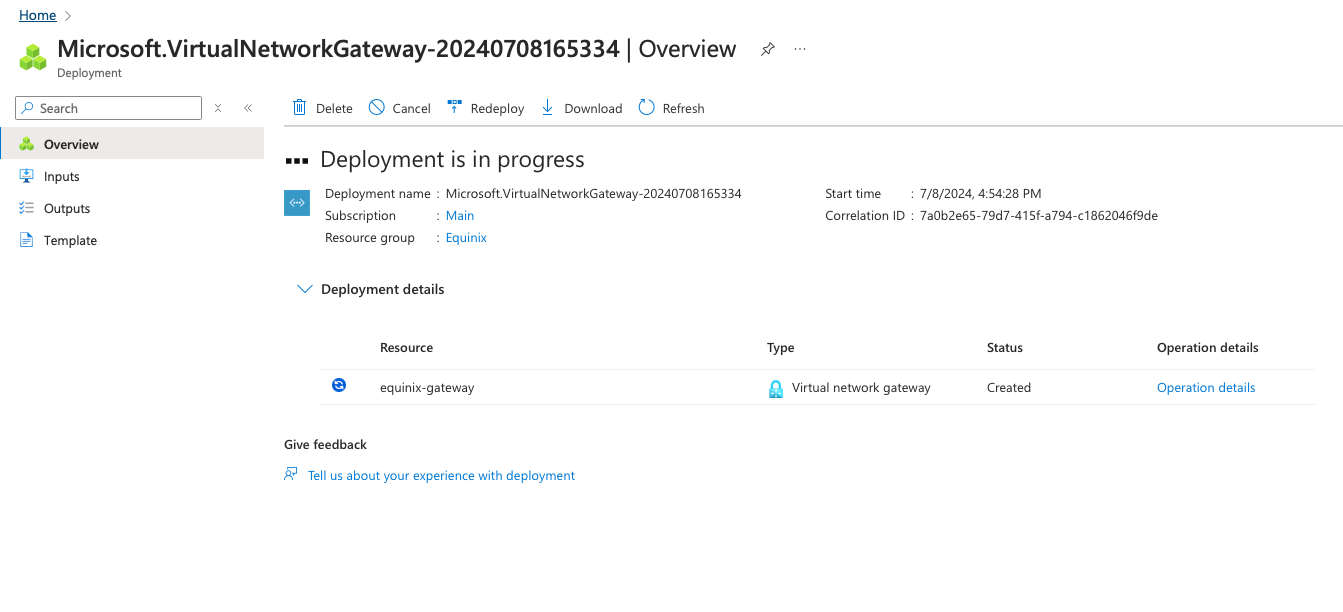
When deployment is complete, the message will update.
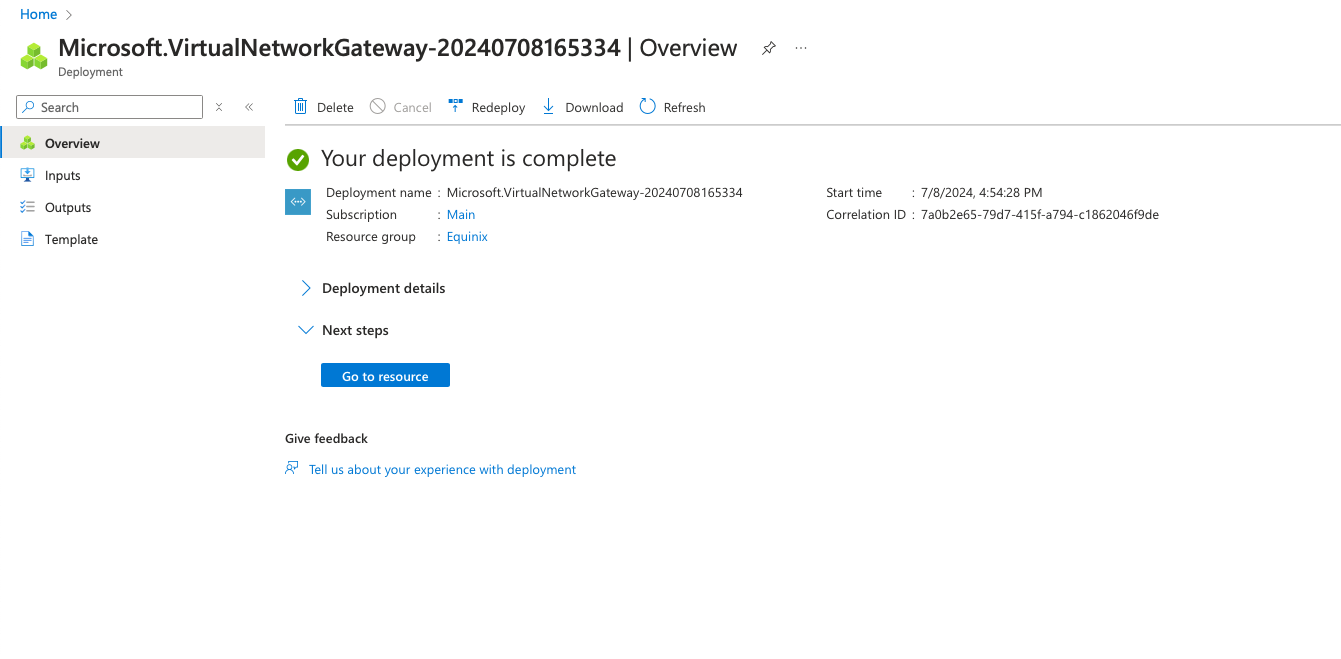
Note that it can take anywhere from several minutes to an hour for a Virtual Network Gateway to be created.
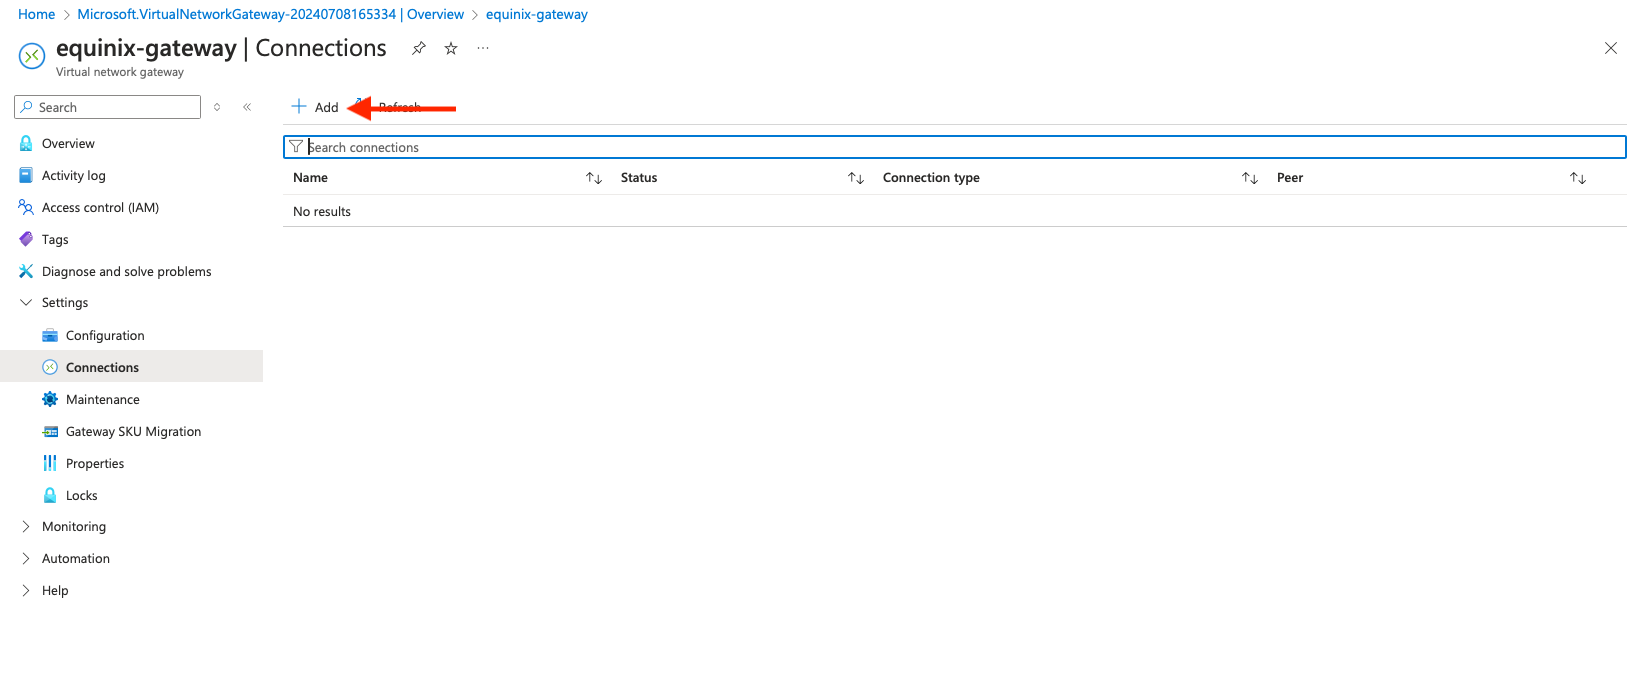
With the Virtual Network Gateway in place, you can link the ExpressRoute circuits with the Gateway. From within the Virtual Network Gateway, under Settings, click Connections:
Then click the "Add" button:
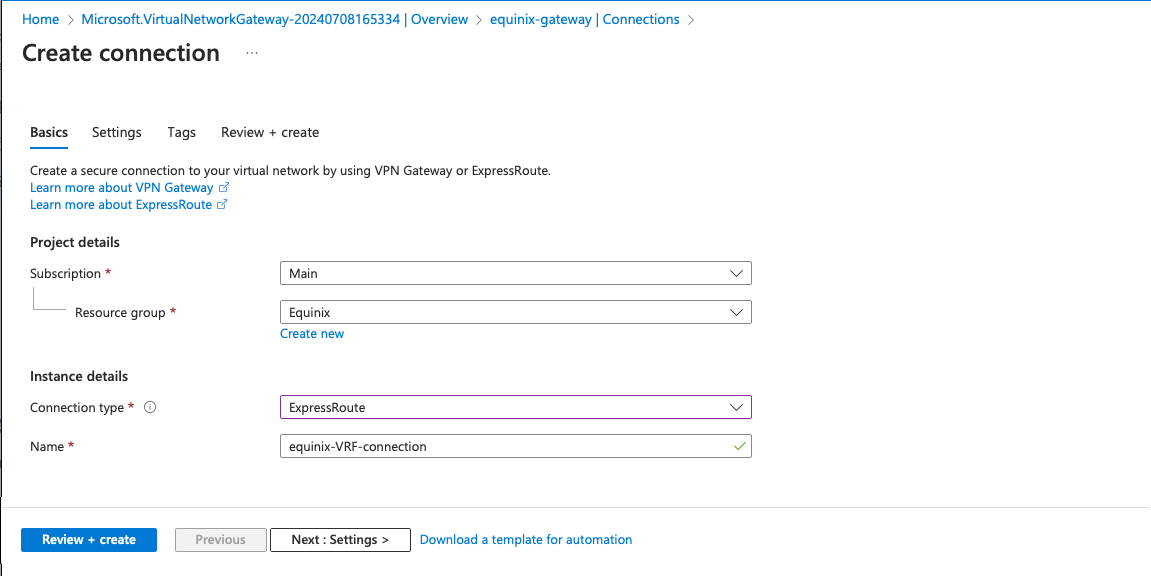
On the Create Connection page, enter the following information:
- Subscription: Azure subscription that will handle the billing of this connection
- Resource group: Resource Group for this connection, in our example,
Equinix - Connection type: select "ExpressRoute"
- Name: Any representative name that is meaningful to you, in our example,
equinix-VRF-connection
Click "Next: Settings".
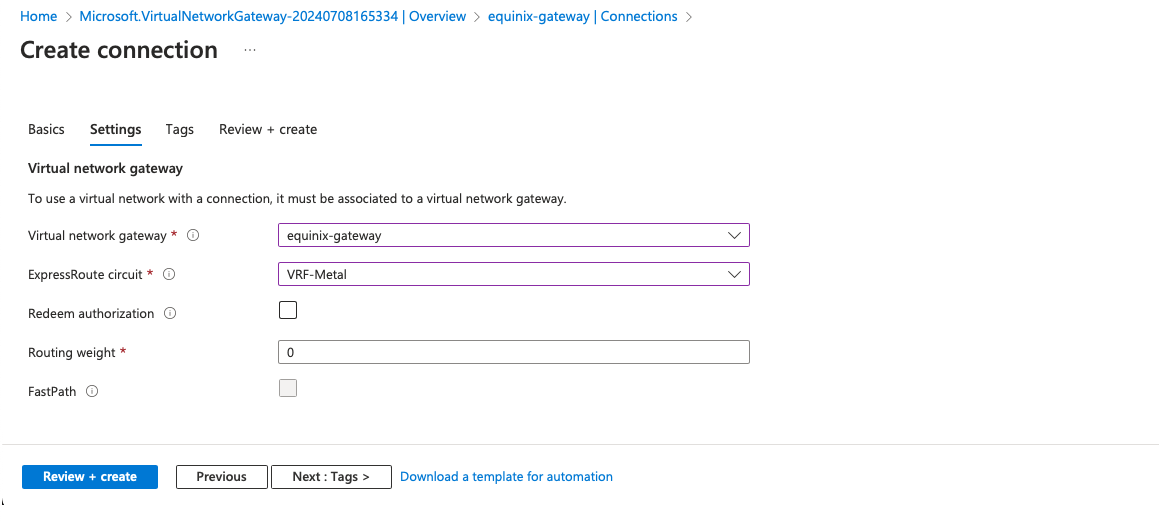
On the settings page, enter the following information:
- Virtual network gateway: select the Virtual Network Gateway you created earlier
- ExpressRoute circuit: select the Express Route circuit you created earlier
Leave the rest as defaults, and click the "Review + create" button, and then "Create".
Wait a few minutes for the connection to be created.
Configure Azure BGP peering in Metal
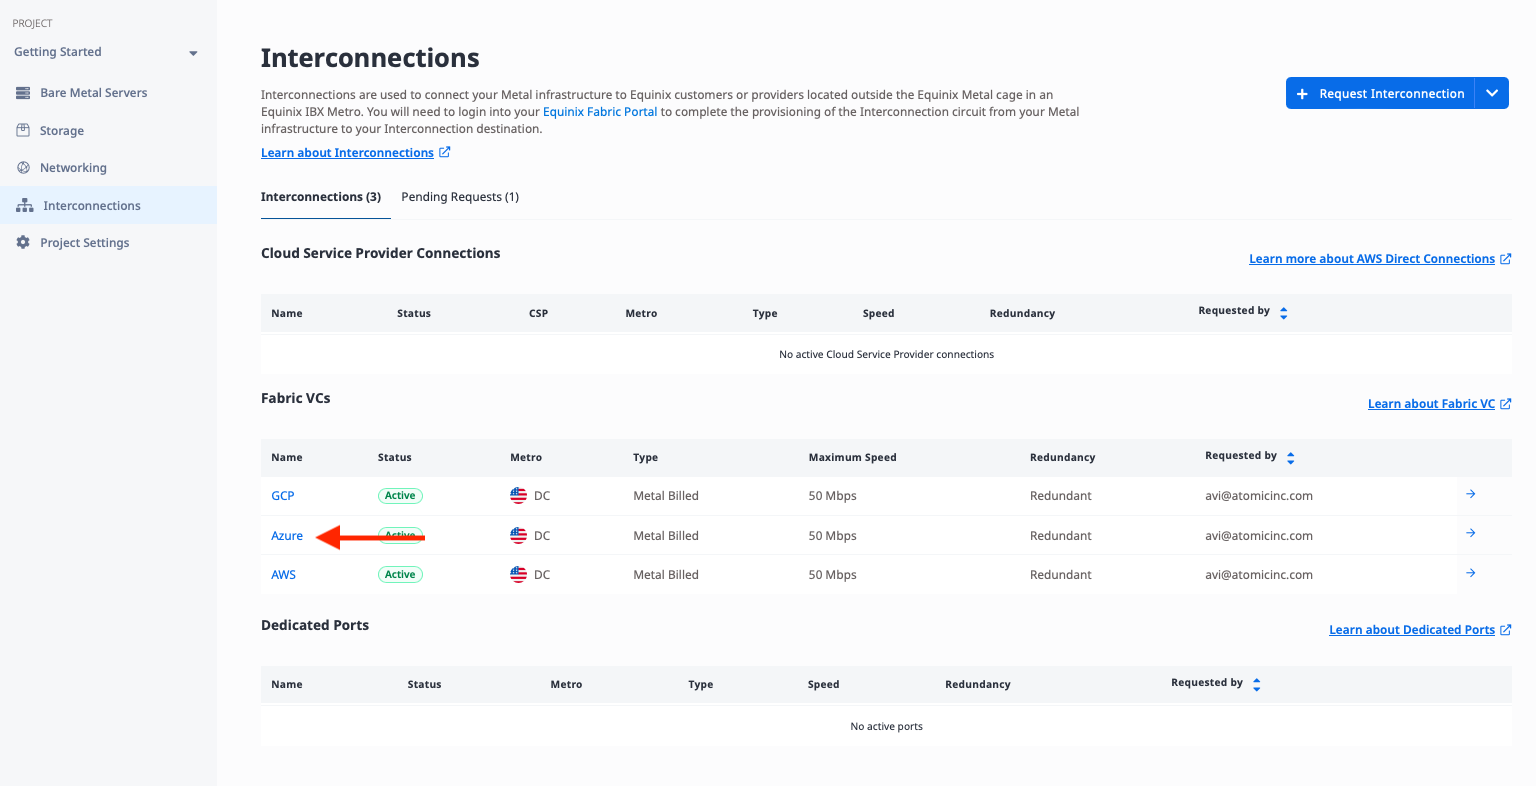
In the Metal console, click on the Azure connection:
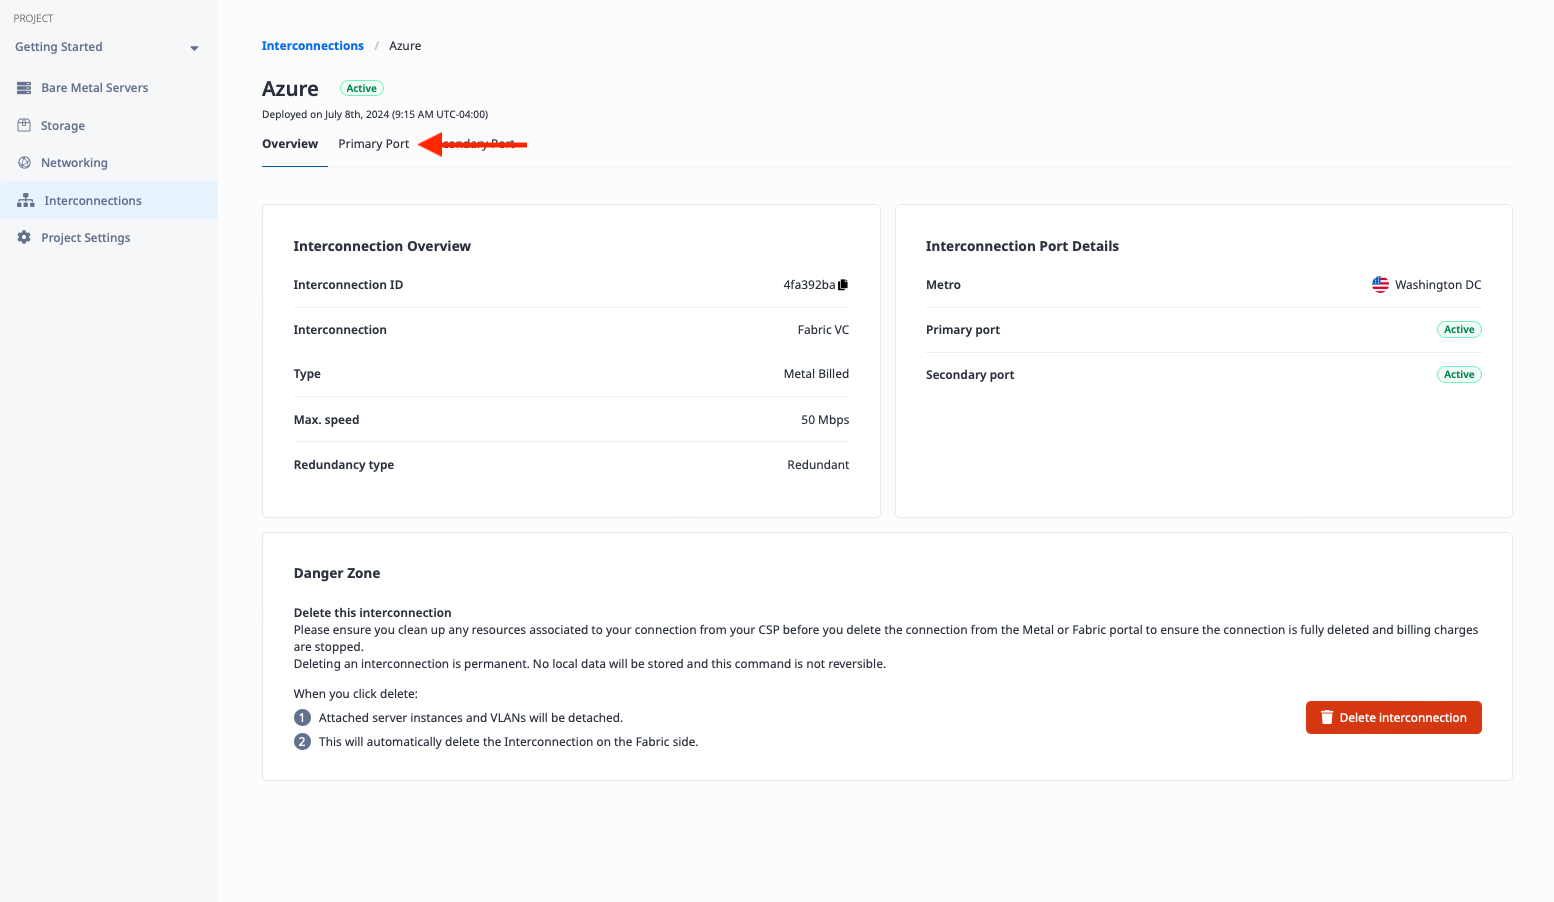
Select the Primary Port tab:
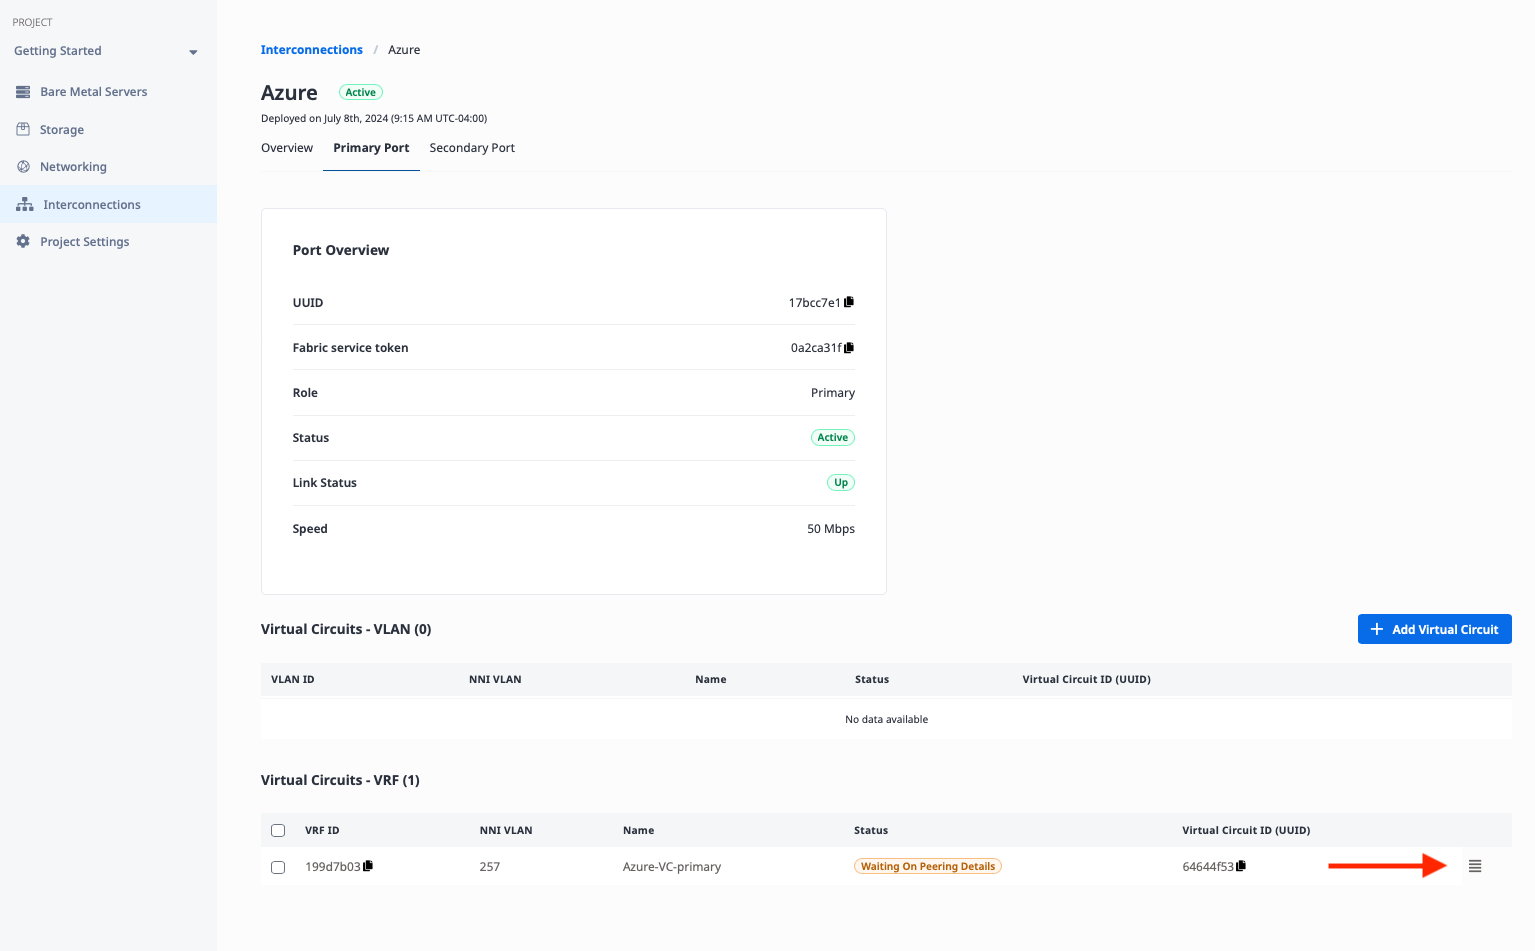
At the bottom of the page, you will see the Virtual Circuits listed. Click the three bars button on the right to edit it:
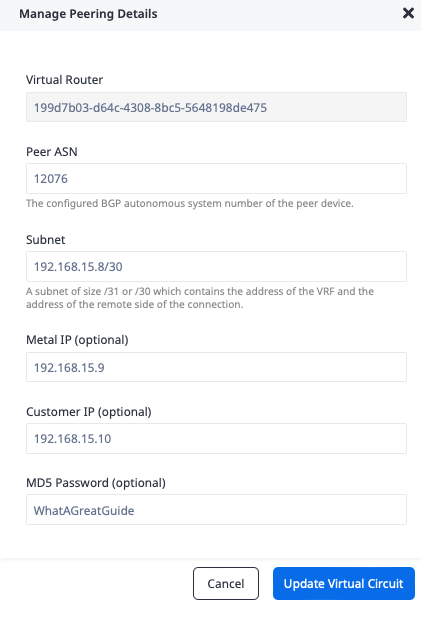
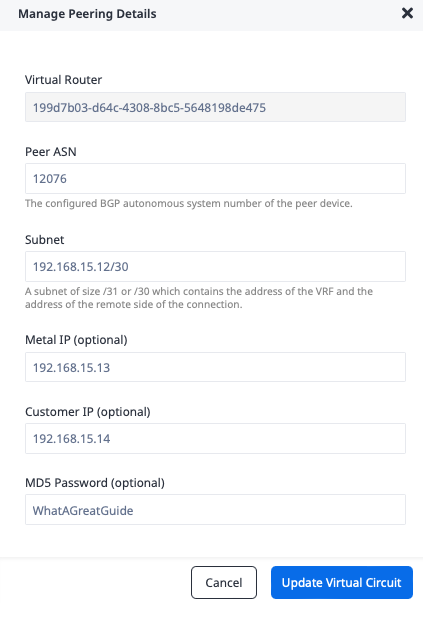
This opens the "Manage Peering Details" window. Enter the following information from our configuration table above.
- "Peer ASN": Azure-side ASN
12076 - "Subnet": Primary VC subnet
192.168.15.8/30 - "Metal IP": IP address of the Metal side of the connection
192.168.15.9 - "Customer IP": IP address of the Azure side of the connection
192.168.15.10 - "MD5 Password":
WhatAGreatGuide
Click the "Update Virtual Circuit" button.
Repeat the process with Second Port, using the secondary VC subnet and IP addresses.
- "Peer ASN": Azure-side ASN
12076 - "Subnet": Secondary VC subnet
192.168.15.12/30 - "Metal IP": IP address of the Metal side of the connection
192.168.15.13 - "Customer IP": IP address of the Azure side of the connection
192.168.15.14 - "MD5 Password":
WhatAGreatGuide
Click the "Update Virtual Circuit" button again.
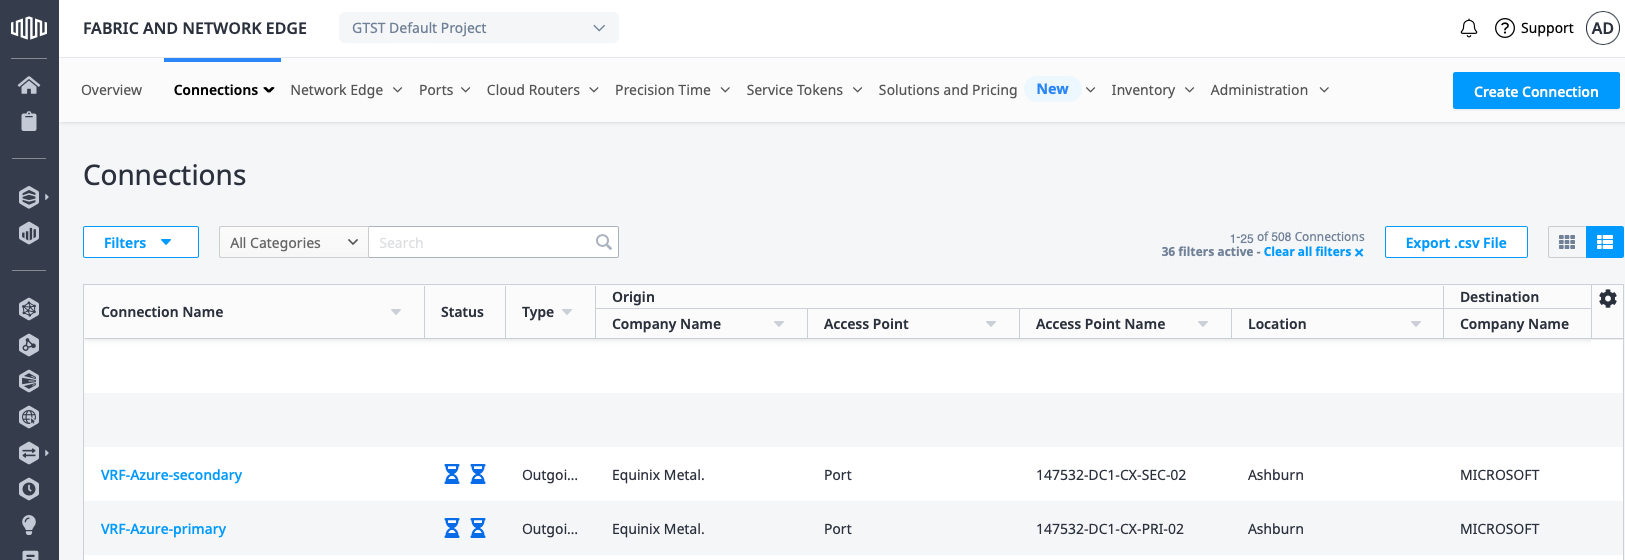
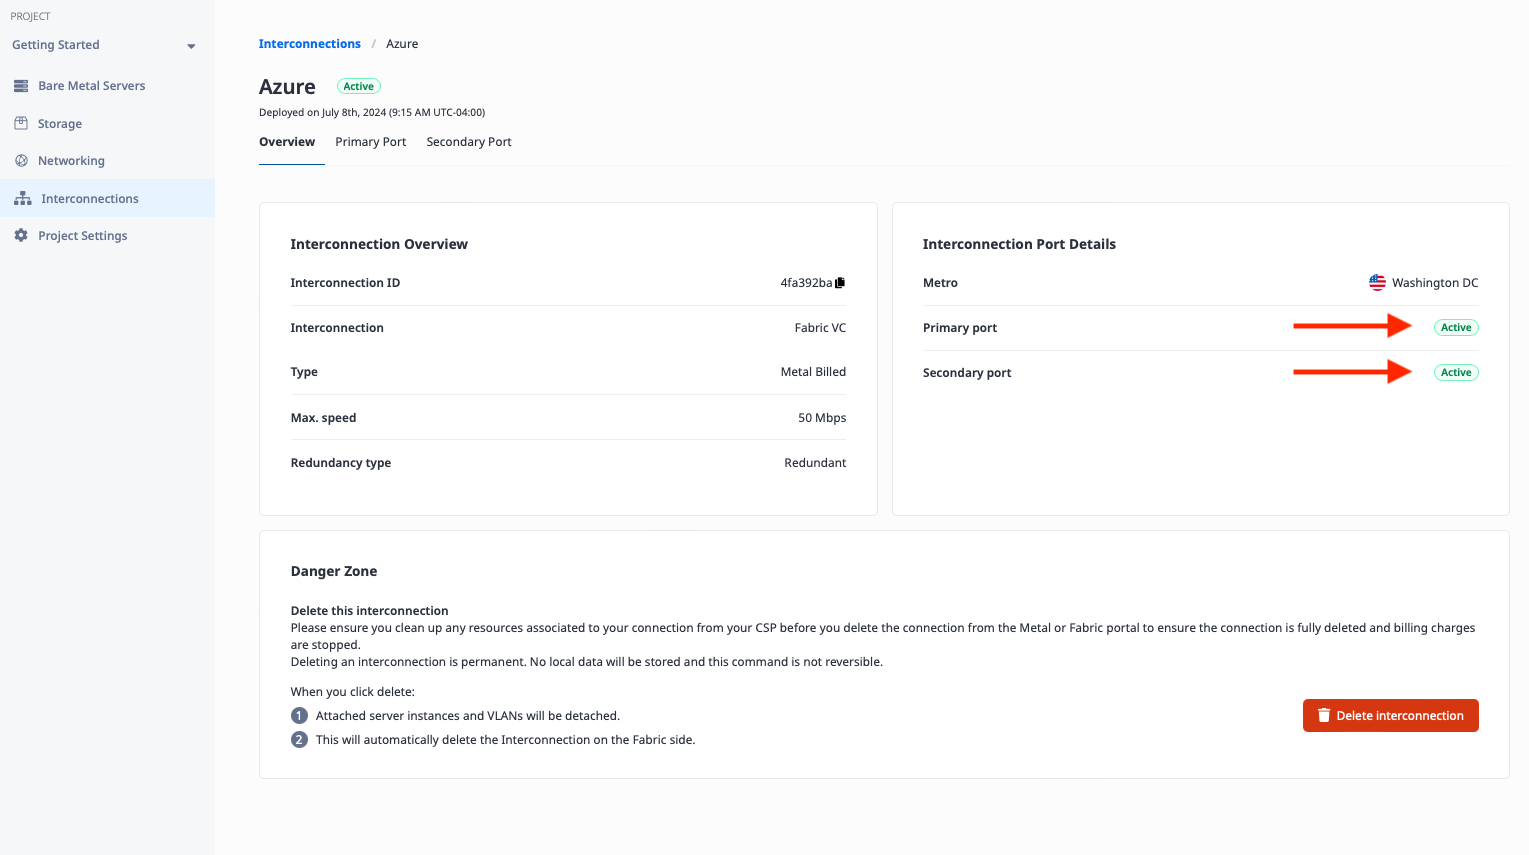
When you're done, if you wait a few moments and return to the main interconnection page, you should see both ports in the Active state:
Testing
With all of the connections in place, and BGP set up for sharing routes, you're ready to deploy some servers and test connectivity.
Checking BGP Routes
Before running any tests, check that all of the routes were learned correctly.
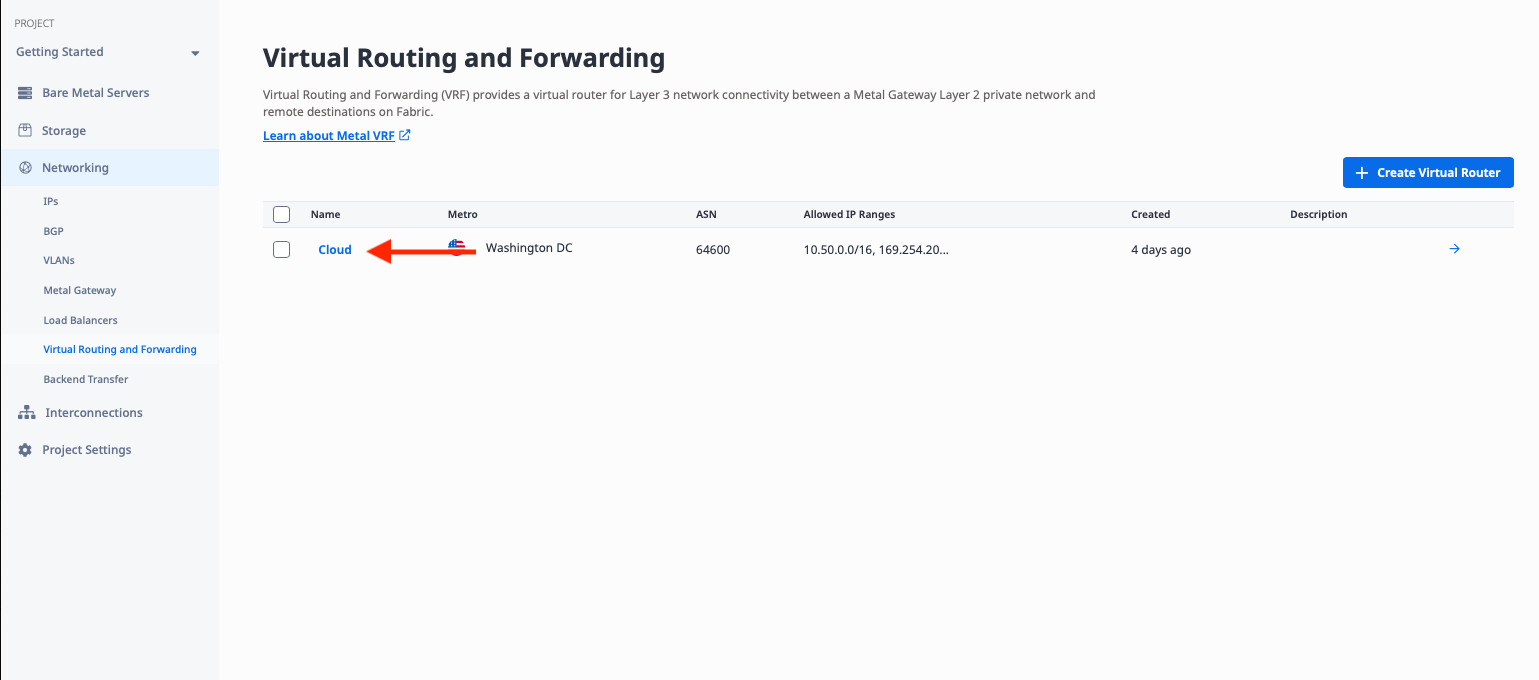
Return to the Networking tab of the console and select Virtual Routing and Forwarding:
Click on the Cloud VRF:
Then click on BGP Table:
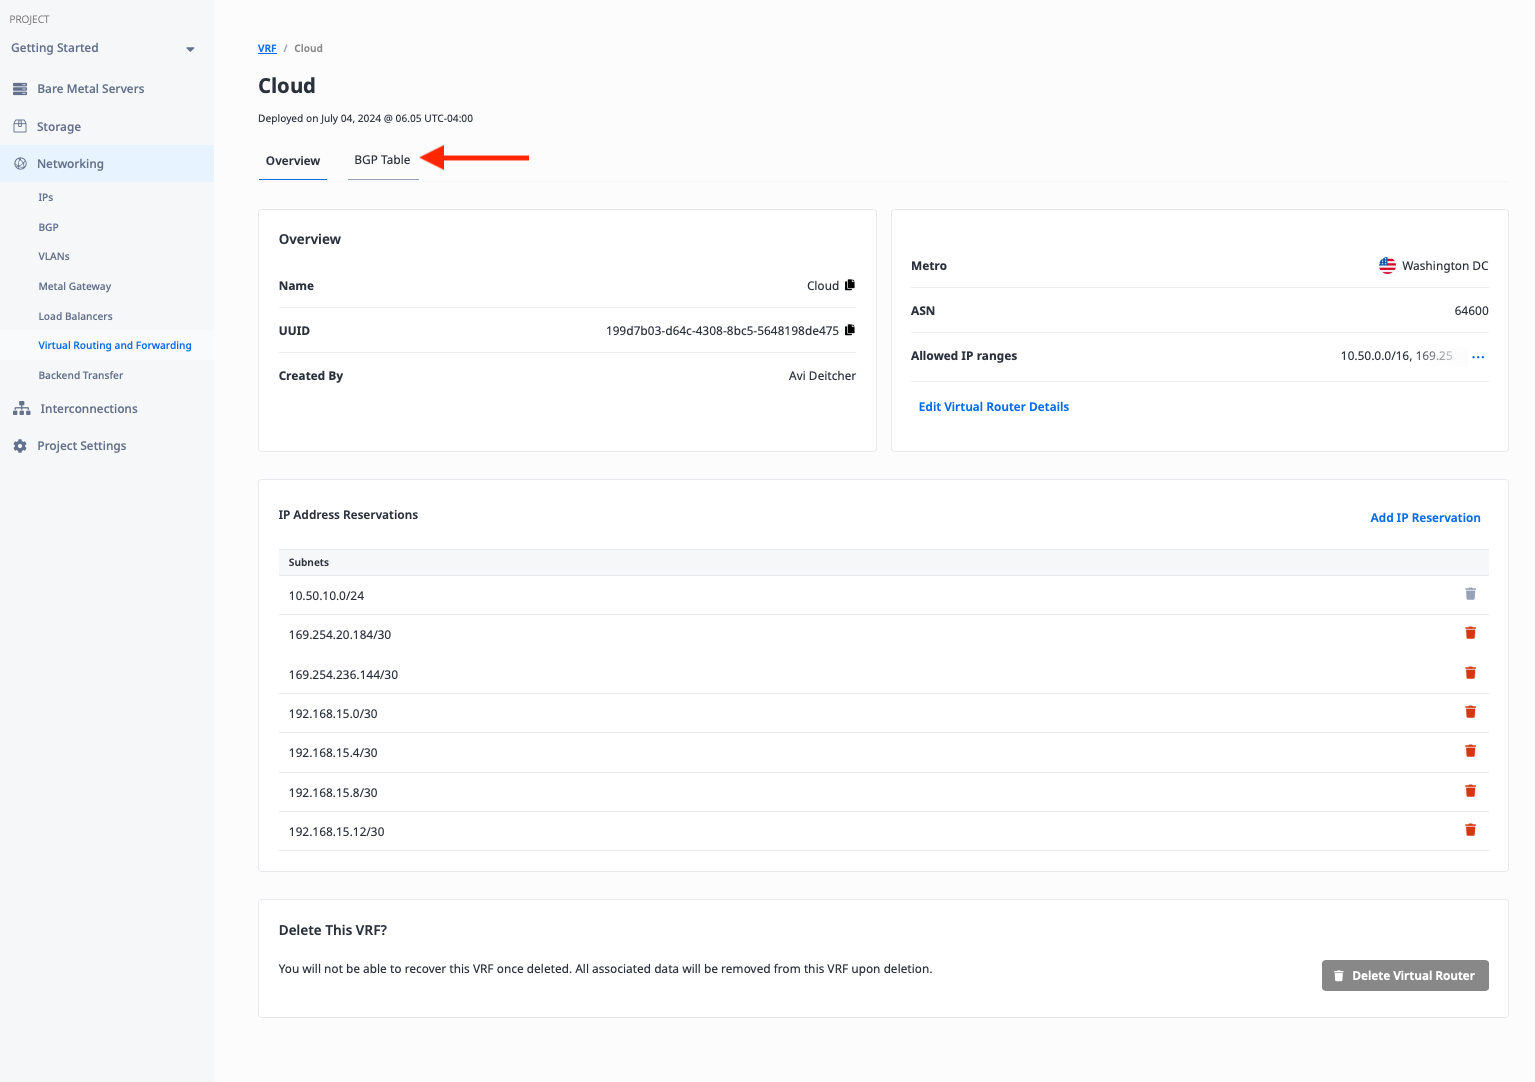
The details of the BGP table are displayed.
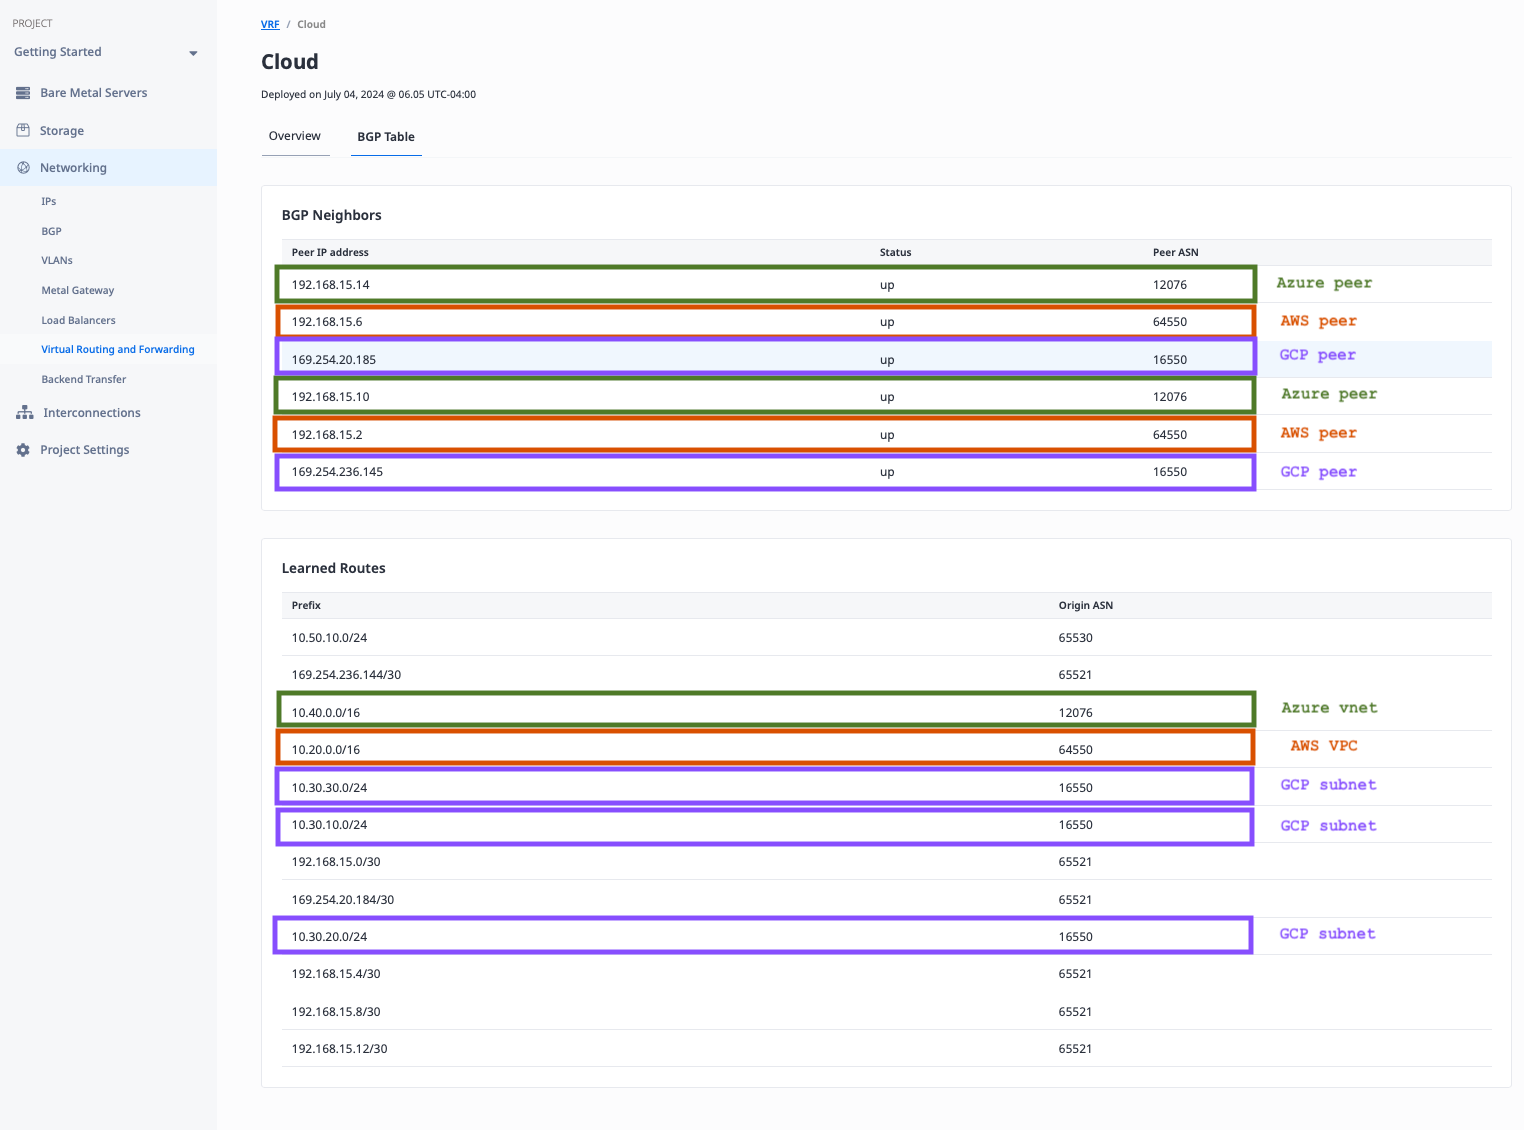
Let's look at it section by section.
BGP Neighbors:
- GCP: there are two peers, both with a status of "up," and the expected peer ASN
16550 - AWS: there are two peers, both with a status of "up," and the expected peer ASN
64550 - Azure: there are two peers, both with a status of "up," and the expected peer ASN
12076
Learned Routes:
- GCP: the learned routes include one for each of the subnets in the GCP VPC,
10.30.10.0/24,10.30.20.0/24, and10.30.30.0/24 - AWS: the learned routes include one for the AWS VPC,
10.20.0.0/16 - Azure: the learned routes include one for the Azure vnet,
10.40.0.0/16
Testing connectivity between servers on different clouds
To test the connectivity, we will deploy one server on each end:
- a Metal server in our VLAN
- a Virtual Machine Instance in GCP
- an EC2 instance in AWS
- a Virtual Machine (VM) in Azure
Since this is a guide on the connections, and not on deploying GCP VMIs, AWS instances, Azure VMs or Metal servers, we won't give detailed descriptions here. If you need help getting started with cloud providers, you can find:
- information on setting up GCP networking in the GCP documentation, as well as the Google Cloud training course.
- information on setting up AWS networking in the AWS documentation, as well as the AWS training course.
- information on setting up Azure networking in the Azure documentation, as well as the Azure training course.
There are a few things to keep in mind.
For the Metal server:
-
Deploy the server normally in the Washington metro.
-
Switch the server networking type to hybrid bonded, so you can SSH to it from the internet while also connecting to the VLAN. Then attach it to the VLAN and assign an IP address.
-
Add the route to each of the clouds in the Metal Gateway via
ip route add <target CIDR> via <Metal Gateway>:
- the GCP VPC
ip route add 10.30.0.0/16 via 10.50.10.1 - the AWS VPC
ip route add 10.20.0.0/16 via 10.50.10.1 - the Azure vnet
ip route add 10.40.0.0/16 via 10.50.10.1
For the GCP instance, ensure:
- It is in a subnet in the VPC that has the defined Cloud Router
- It has a public IP address
- It allows ICMP traffic from both of the private ranges,
10.30.0.0/16for the VPC, and10.50.0.0/16for the Metal VLAN; normally, this is configured in the firewall set for your VPC - Save the private IP of the server. In our example, GCP assigned
10.30.10.3
For the AWS instance, ensure:
- It is in a subnet in the VPC that is connected to the Transit Gateway
- It has a public IP address
- It allows ICMP traffic from both of the private ranges,
10.20.0.0/16for the VPC, and10.50.0.0/16for the Metal VLAN - Save the private IP of the server. In our example, AWS assigned
10.20.11.170
For the Azure VM, ensure:
- It is in a subnet in the vnet that has our defined Virtual Private Gateway
- It has a public IP address
- It allows ICMP traffic from both of the private ranges,
10.40.0.0/16for the vnet, and10.50.0.0/16for the Metal VLAN - Save the private IP of the server. In our example, Azure assigned
10.40.10.4
Let's set up the Metal server first.
root@c3-small-x86-01:~# apt-get install vlan
Reading package lists... Done
Building dependency tree... Done
Reading state information... Done
The following package was automatically installed and is no longer required:
  grub-pc-bin
Use 'apt autoremove' to remove it.
The following NEW packages will be installed:
  vlan
0 upgraded, 1 newly installed, 0 to remove and 0 not upgraded.
Need to get 10.4 kB of archives.
After this operation, 51.2 kB of additional disk space will be used.
Get:1 http://archive.ubuntu.com/ubuntu jammy/universe amd64 vlan all 2.0.5ubuntu5 [10.4 kB]
Fetched 10.4 kB in 0s (41.5 kB/s)
Selecting previously unselected package vlan.
(Reading database ... 74606 files and directories currently installed.)
Preparing to unpack .../vlan_2.0.5ubuntu5_all.deb ...
Unpacking vlan (2.0.5ubuntu5) ...
Setting up vlan (2.0.5ubuntu5) ...
Processing triggers for man-db (2.10.2-1) ...
Scanning processes...
Scanning processor microcode...
Scanning linux images...

Running kernel seems to be up-to-date.

The processor microcode seems to be up-to-date.

No services need to be restarted.

No containers need to be restarted.

No user sessions are running outdated binaries.

No VM guests are running outdated hypervisor (qemu) binaries on this host.

root@c3-small-x86-01:~# modprobe 8021q

root@c3-small-x86-01:~# echo "8021q" >> /etc/modules

root@c3-small-x86-01:~# ip link add link bond0 name bond0.200 type vlan id 200

root@c3-small-x86-01:~# ip addr add 10.50.10.2/24 dev bond0.200

root@c3-small-x86-01:~# ip ro add 10.20.0.0/16 via 10.50.10.1
root@c3-small-x86-01:~# ip ro add 10.30.0.0/16 via 10.50.10.1
root@c3-small-x86-01:~# ip ro add 10.40.0.0/16 via 10.50.10.1
With everything set up, first try to ping the Metal Gateway:
root@c3-small-x86-01:~# ping 10.50.10.1
PING 10.50.10.1 (10.50.10.1) 56(84) bytes of data.
64 bytes from 10.50.10.1: icmp_seq=1 ttl=64 time=0.901 ms
64 bytes from 10.50.10.1: icmp_seq=2 ttl=64 time=0.212 ms
64 bytes from 10.50.10.1: icmp_seq=3 ttl=64 time=0.238 ms
^C
--- 10.50.10.1 ping statistics ---
3 packets transmitted, 3 received, 0% packet loss, time 2029ms
rtt min/avg/max/mdev = 0.212/0.450/0.901/0.318 ms
That worked. Now try the GCP instance, using the IP you saved from earlier:
root@c3-small-x86-01:~# ping 10.30.10.3
PING 10.30.10.3 (10.30.10.3) 56(84) bytes of data.
64 bytes from 10.30.10.3: icmp_seq=1 ttl=62 time=2.11 ms
64 bytes from 10.30.10.3: icmp_seq=2 ttl=62 time=1.53 ms
64 bytes from 10.30.10.3: icmp_seq=3 ttl=62 time=1.44 ms
^C
--- 10.30.10.3 ping statistics ---
3 packets transmitted, 3 received, 0% packet loss, time 2004ms
rtt min/avg/max/mdev = 1.442/1.693/2.110/0.296 ms
That's successful. Next, test AWS, using the IP you saved from earlier:
root@c3-small-x86-01:~# ping 10.20.11.170
PING 10.20.11.170 (10.20.11.170) 56(84) bytes of data.
64 bytes from 10.20.11.170: icmp_seq=1 ttl=62 time=2.08 ms
64 bytes from 10.20.11.170: icmp_seq=2 ttl=62 time=1.49 ms
64 bytes from 10.20.11.170: icmp_seq=3 ttl=62 time=1.52 ms
^C
--- 10.20.11.170 ping statistics ---
3 packets transmitted, 3 received, 0% packet loss, time 2009ms
rtt min/avg/max/mdev = 1.491/1.696/2.080/0.205 ms
Finally, ping the Azure instance, using the IP you saved from earlier:
root@c3-small-x86-01:~# ping 10.40.10.4
PING 10.40.10.4 (10.40.10.4) 56(84) bytes of data.
64 bytes from 10.40.10.4: icmp_seq=1 ttl=61 time=2.26 ms
64 bytes from 10.40.10.4: icmp_seq=2 ttl=61 time=2.06 ms
64 bytes from 10.40.10.4: icmp_seq=3 ttl=61 time=2.07 ms
^C
--- 10.40.10.4 ping statistics ---
3 packets transmitted, 3 received, 0% packet loss, time 2003ms
rtt min/avg/max/mdev = 2.064/2.130/2.262/0.093 ms
It appears that all the connections are successfully set up and working.
Conclusion
You've now connected your private VLAN on Equinix Metal to multiple cloud providers at the same time: AWS, GCP, and Azure. You've configured gateways on each side of the connections, and you have a connection between them via Equinix Fabric Virtual Connection. You can communicate securely from Equinix Metal to any of the other three networks.
You may also like
Dig deeper into similar topics in our archives
Crosscloud VPN with WireGuard
Learn to establish secure VPN connections across cloud environments using WireGuard, including detailed setups for site-to-site tunnels and VPN gateways with NAT on Equinix Metal, enhancing...

Kubernetes Cluster API
Learn how to provision a Kubernetes cluster with Cluster API
Kubernetes with kubeadm
Learn how to deploy Kubernetes with kubeadm using userdata

OpenStack DevStack
Use DevStack to install and test OpenStack on an Equinix Metal server.