
Dedicated Ports
One of your options for Equinix Metal™ interconnections is through a Dedicated Port, where you are the manager of the physical Equinix Fabric port that handles the traffic. Use this option if:
- You want to be a Cloud Service Provider on Equinix Fabric so that other Equinix customers can make connections to your hosted service on Equinix Metal.
- You are connecting Equinix Metal to your colocated infrastructure in Equinix.
- You are setting up connections through Cross-Connect.
General Facts -
- Dedicated ports support up to a 9000 byte maximum transmission unit (MTU) and jumbo Ethernet frames.
- Dedicated ports also support VLAN stacking (or tag stacking) with Dedicated Tunnel mode, so that you can send and receive double-tagged packets from your Equinix Metal server instances.
- Dedicated Ports allow any VLAN in any project in the same organization as the Dedicated Port in the same metro to connect to its virtual circuits.
- Dedicated Ports are billed on Equinix Metal with a non-recurring charge (NRC) for setup and a monthly recurring charge (MRC) for usage. Rates for these charges can be found on the Interconnection product page. Any associated Fabric port charges or Cross Connect charges will appear on your Equinix Fabric or Equinix Customer accounts, separate from your Equinix Metal invoice.
- Dedicated Ports can use Virtual Routing and Forwarding. More information is on the VRF for Interconnections page.
Requesting Dedicated Ports
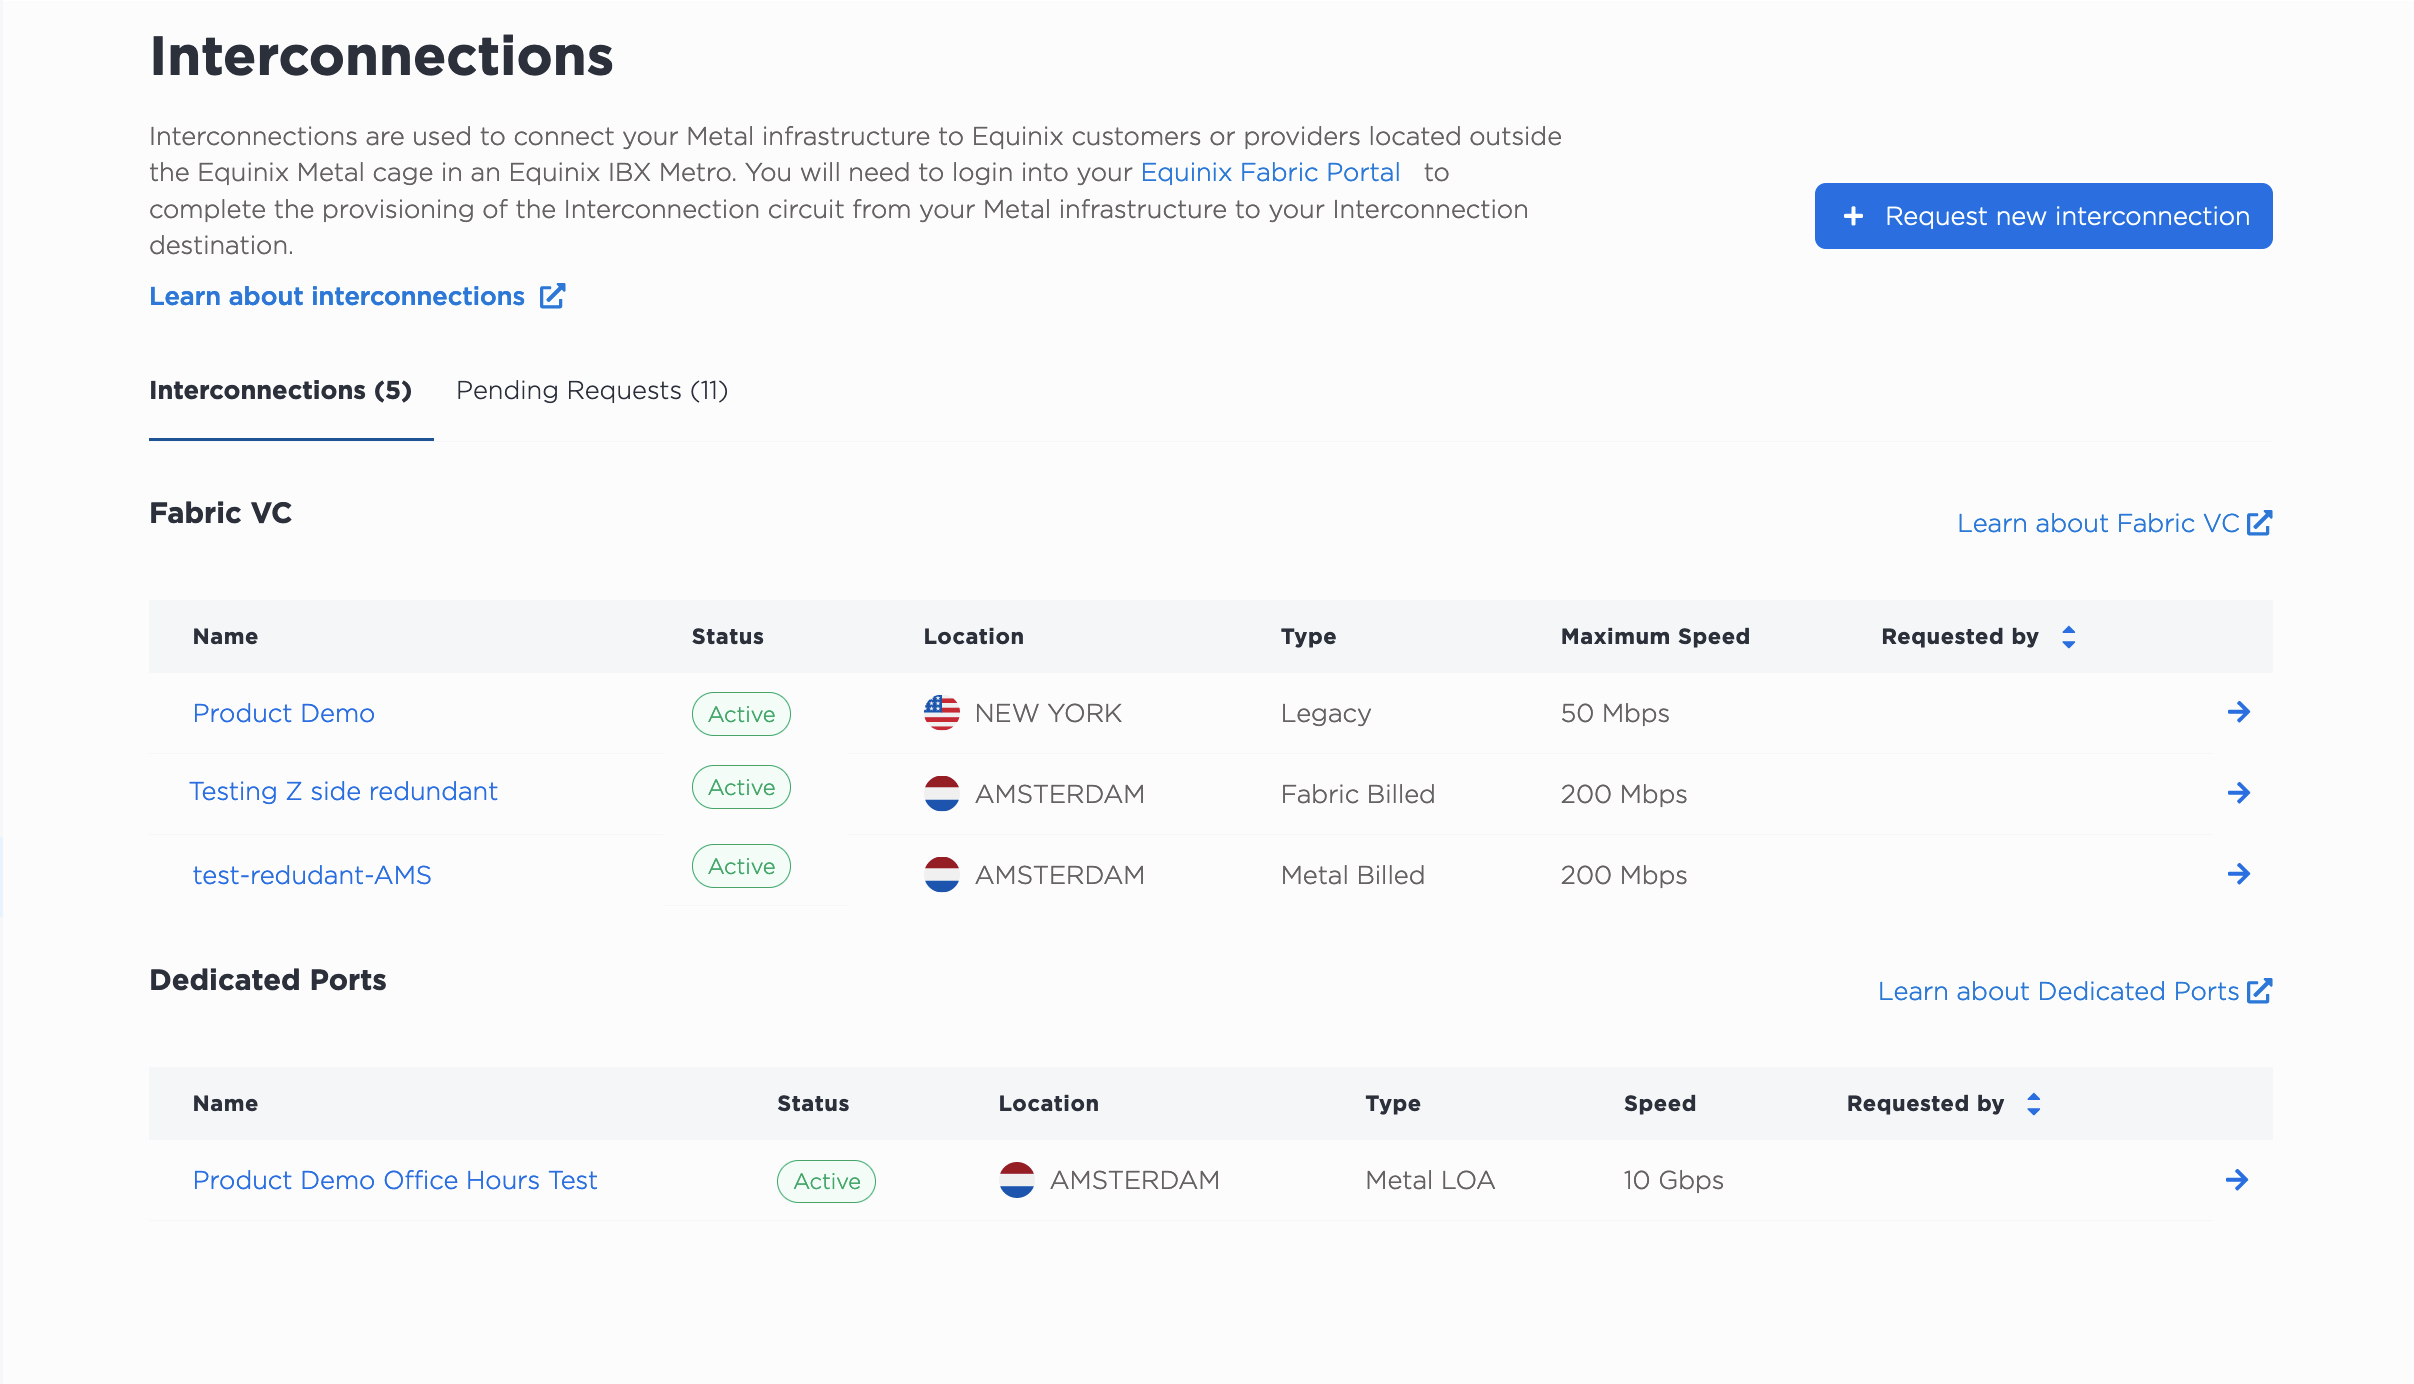
To request a Dedicated Port, open the Interconnections page. If any projects in your organization or project already has Fabric Virtual Connections or Dedicated Ports, you will be able to see them on this page.
Click + Request New Interconnection.
For Choose an Interconnection Type, select Dedicated Port.
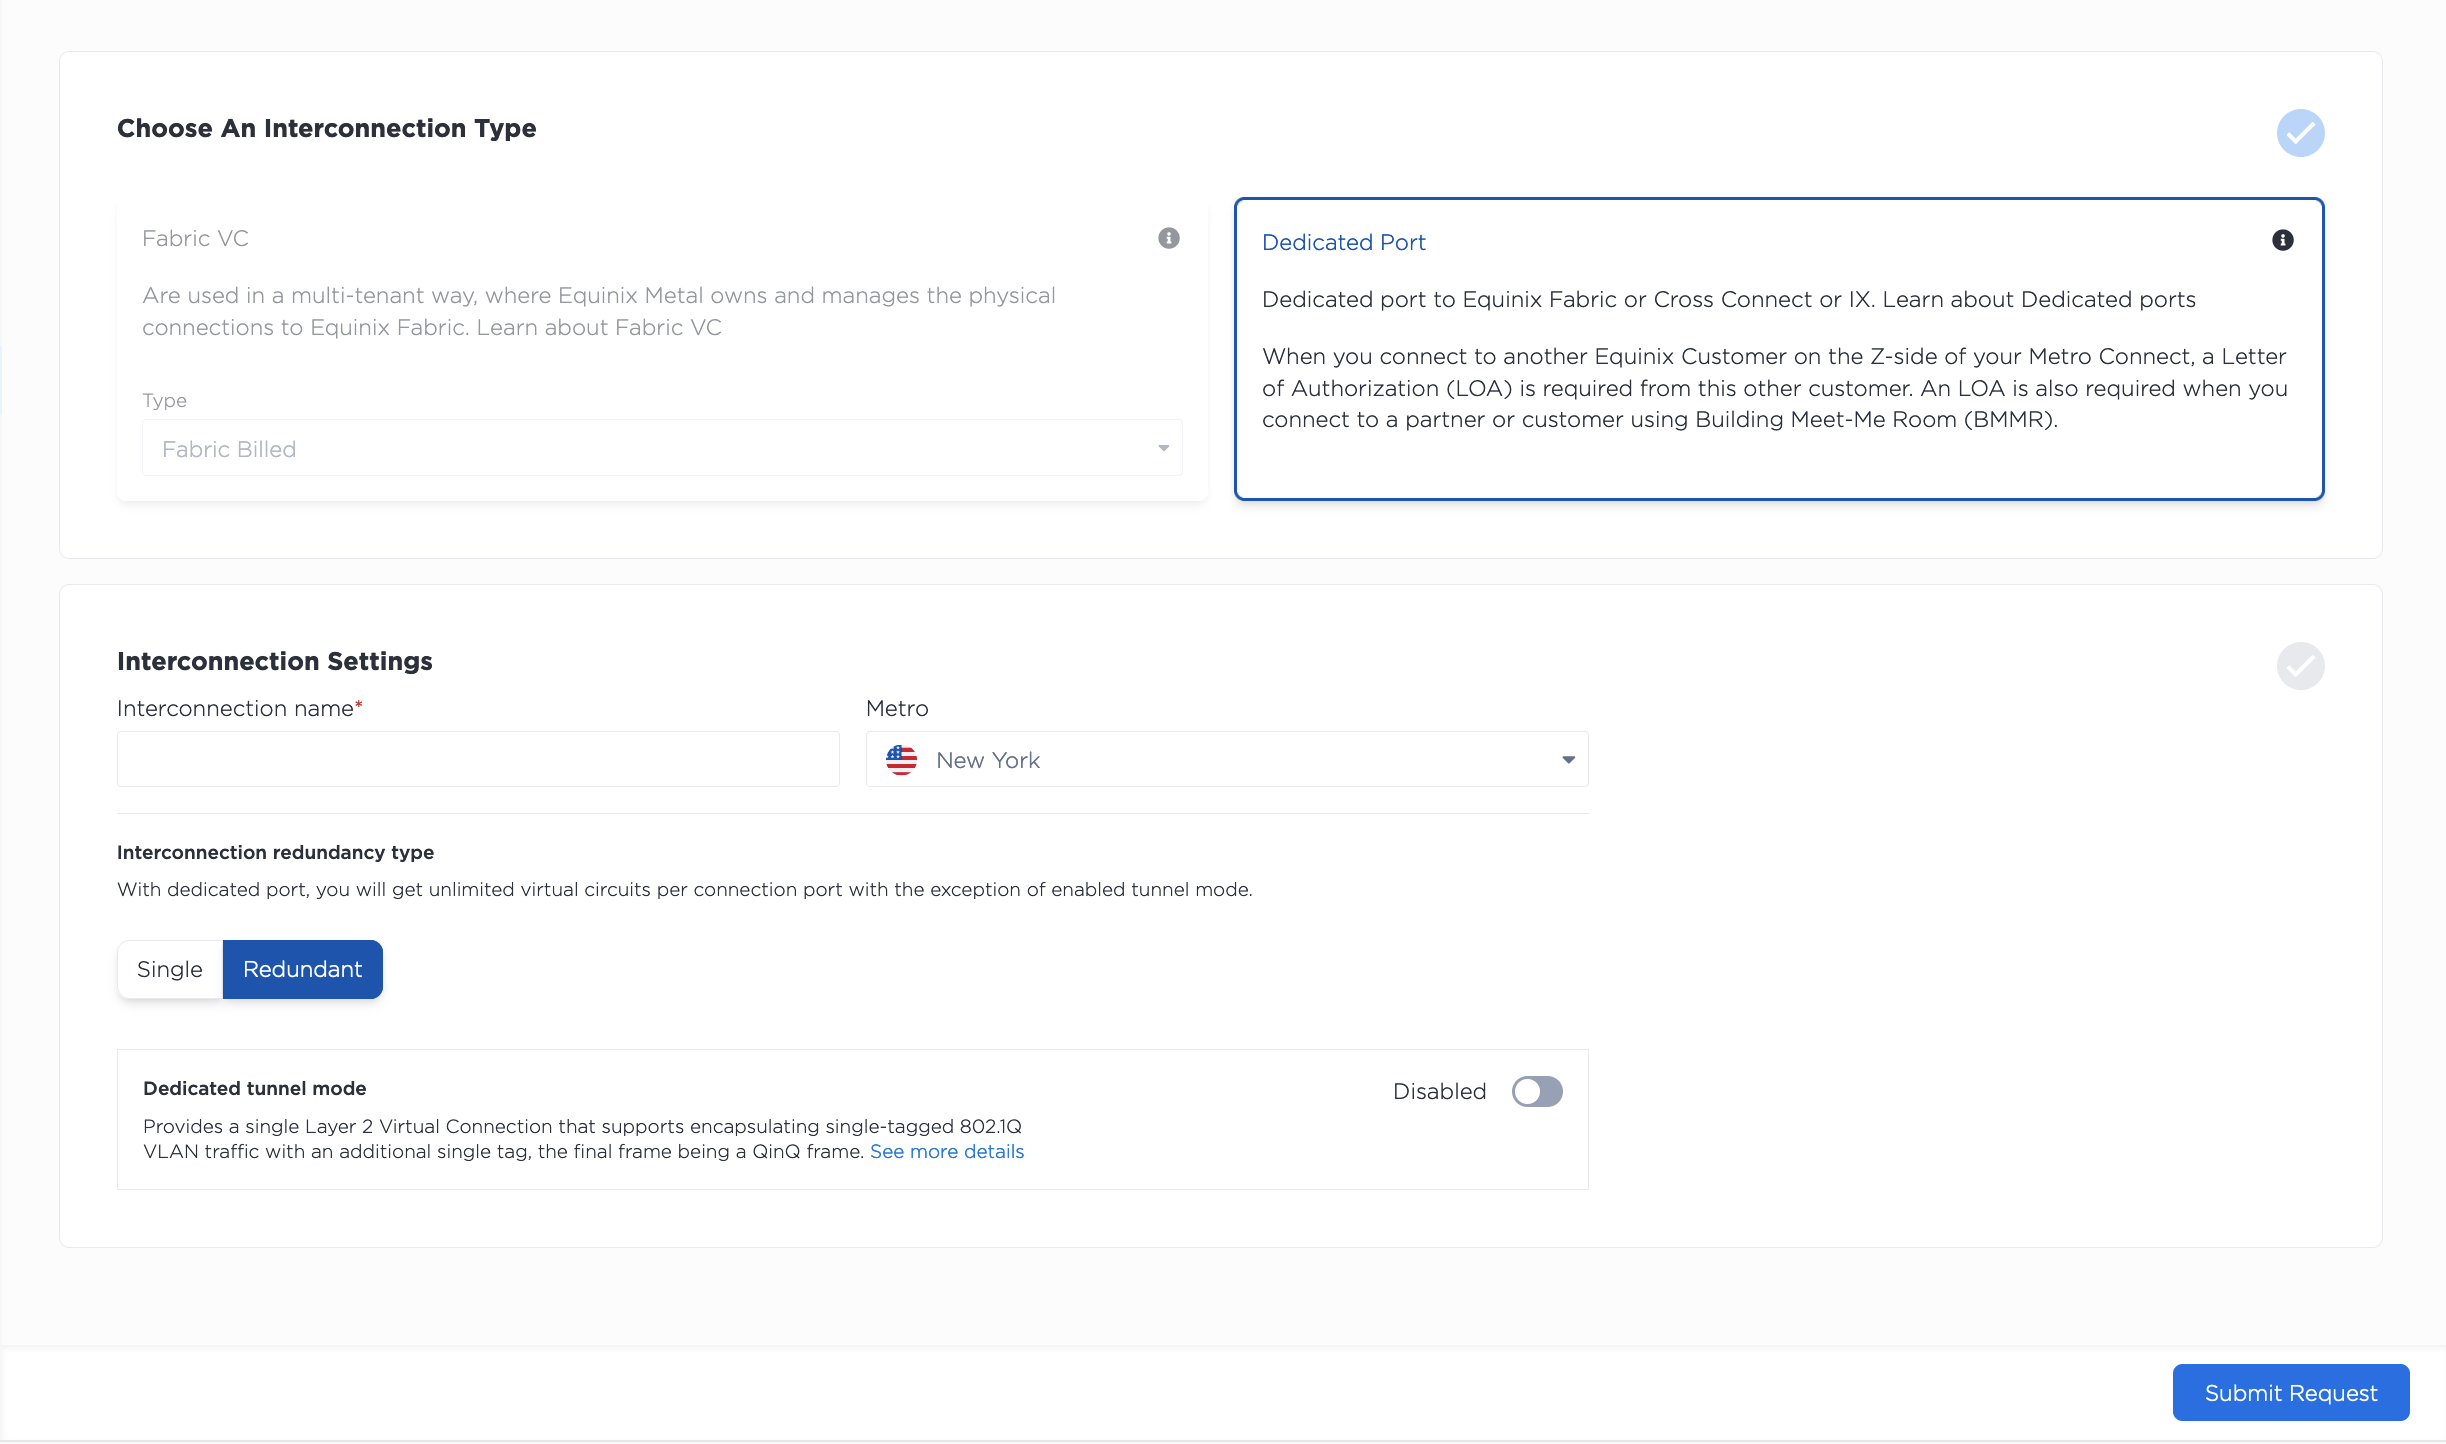
- Select the location for the new connection from the drop-down. You will want to select the Metro where your Equinix Metal infrastructure already lives, or where you plan on provisioning it.
- Give a name to your connection.
- Choose whether you want a redundant or single connection. If you choose a redundant connection, you get a primary and secondary port to attach Virtual Circuits and VLANs to, giving you some amount of redundancy and high-availability.
Next, there is a toggle to enable Dedicated Tunnel mode. Enabling this mode at provision-time is optional. You can enable and disable Dedicated Tunnel mode on already-provisioned Dedicated Ports.
Review the summary of your request. Click Submit Request to complete your Dedicated Port request and submit it to the Equinix Metal support team.
Once your request is submitted, it moves to the Pending Requests tab. Note that Dedicated Ports are scoped at the Organization level. Any request for a Dedicated Port in a particular project will be visible to the Organization the project belongs to.
To request a Dedicated Port in the CLI, use the metal interconnections create command.
metal interconnections create -p <project_id> -n <name> -m <metro> -r redundant -t dedicated
Options:
-p,--project-id(required) - Your Project's UUID.-n,--name(required) - A name for your Dedicated Port.-m,--metro(required) - The UUID or metro code for the Metro where you are requesting the Dedicated Port. Specify the Metro where your Equinix Metal infrastructure already lives, or where you plan on provisioning it.-r,--redundancy(required) - Selectprimaryorredundant. If you select a redundant connection, you will get a primary and secondary port, increasing the connection's redundancy and high availability.-t,--type(required) - To request a Dedicated Port, usededicated.
To view a complete list of the options supported in the CLI, refer to the CLI Reference page.
To request a connection through the API, send a POST request to the /projects/{project_id}/connections endpoint.
curl -X POST \
-H "Content-Type: application/json" \
-H "X-Auth-Token: <API_TOKEN>" \
"https://api.equinix.com/metal/v1/projects/{project_id}/connections" \
-d '{
    "name": "<string>",
    "description": "<string>",
    "contact_email": "<string>",
    "metro": "<metro_code>",
    "type": "dedicated",
    "redundancy": "redundant"
}'
Body Parameters:
"name"(required) - The name of the connection."description"(optional) - User-friendly description of the connection."contact_email"- The preferred email used for communication and notifications about the Interconnection. Required when using a Project API key. Optional and defaults to your user email address when using a User API key."metro"(required) - The UUID or metro code for the Metro where you are requesting the Dedicated Port. Specify the Metro where your Equinix Metal infrastructure already lives, or where you plan on provisioning it."type"(required) - To request a Dedicated Port, set to"dedicated"."redundancy"(required) - Select"primary"or"redundant". If you select a redundant connection, you will get a primary and secondary port, increasing the connection's redundancy and high availability.
A full parameter list is in the API Reference.
The Letter of Authorization
When you request your Dedicated Port, you specify the Metro where it and your Equinix Metal infrastructure lives. In each Metro, Equinix Metal has network onramps in specific IBXs where the Metal side of the connection will terminate for that Metro, according to the table (alphabetical).
| Metro | Metal Onramp Location |
|---|---|
| Amsterdam | AM2 |
| Atlanta | AT1 |
| Chicago | CH2 |
| Dallas | DA11 |
| Dublin | DB3 |
| Frankfurt | FR5 |
| Helsinki | HE7 |
| Hong Kong | HK2 |
| London | LD7 |
| Los Angeles | LA1 |
| Madrid | MD2 |
| Manchester | MA5 |
| Melbourne | ME2 |
| Mexico City | MX2 |
| Miami | MI1 |
| Milan | ML5 |
| Montreal | MT1 |
| Mumbai | MB2 |
| New York | NY5 |
| Osaka | OS3 |
| Paris | PA4 |
| São Paulo | SP4 |
| Seattle | SE2 |
| Seoul | SL1 |
| Silicon Valley | SV5 |
| Singapore | SG3 |
| Stockholm | SK2 |
| Sydney | SY4 |
| Tokyo | TY2 |
| Toronto | TR2 |
| Washington DC | DC1 |
As a result, the Equinix Metal Letter of Authorization (LOA) will be issued from the IBX where the Equinix Metal network onramp is located. It may not be the same IBX as your colo or your Metal infrastructure, but it will be in the same Metro.
This is important to be aware of because if you are ordering, for example, a Fabric port, you will need to use the location of the IBX in the LOA.
Support will work behind the scenes to set up the necessary ports for you and send the LOA to your email address.
If you are interested in a deep-dive on the LOA and remote ports, check out Connecting Virtual and Physical Environments from the Equinix docs.
Making Connections
There are multiple use-cases for Dedicated Ports on Equinix Metal, so the steps you take to continue setting up your connection depends on how you are going to use it.
If you are setting up a Dedicated Port to connect through Equinix Fabric, then you'll need Configuring Dedicated Ports for Equinix Fabric.
If you are setting up a Dedicated Port to connect to your own Equinix IBX Colocation Infrastructure or to a 3rd party NSP that IS NOT a destination on Fabric, then you'll want to continue with the order process for a Cross-Connect through the Equinix Customer Portal.
Whether you submit an order through Cross-Connect or Equinix Fabric, a work order is created and an IBX technician completes the installation according to the order and LOA. When the installation is complete, you will be notified by email of port order completion. You will need to forward the order completion email to support@equinixmetal.com. This step is required. Your order does not proceed unless your forward the completion email to Equinix Metal.
Note for installation: Equinix Metal is configured as the A-side, and Equinix Fabric is the Z-side.
Managing Dedicated Ports
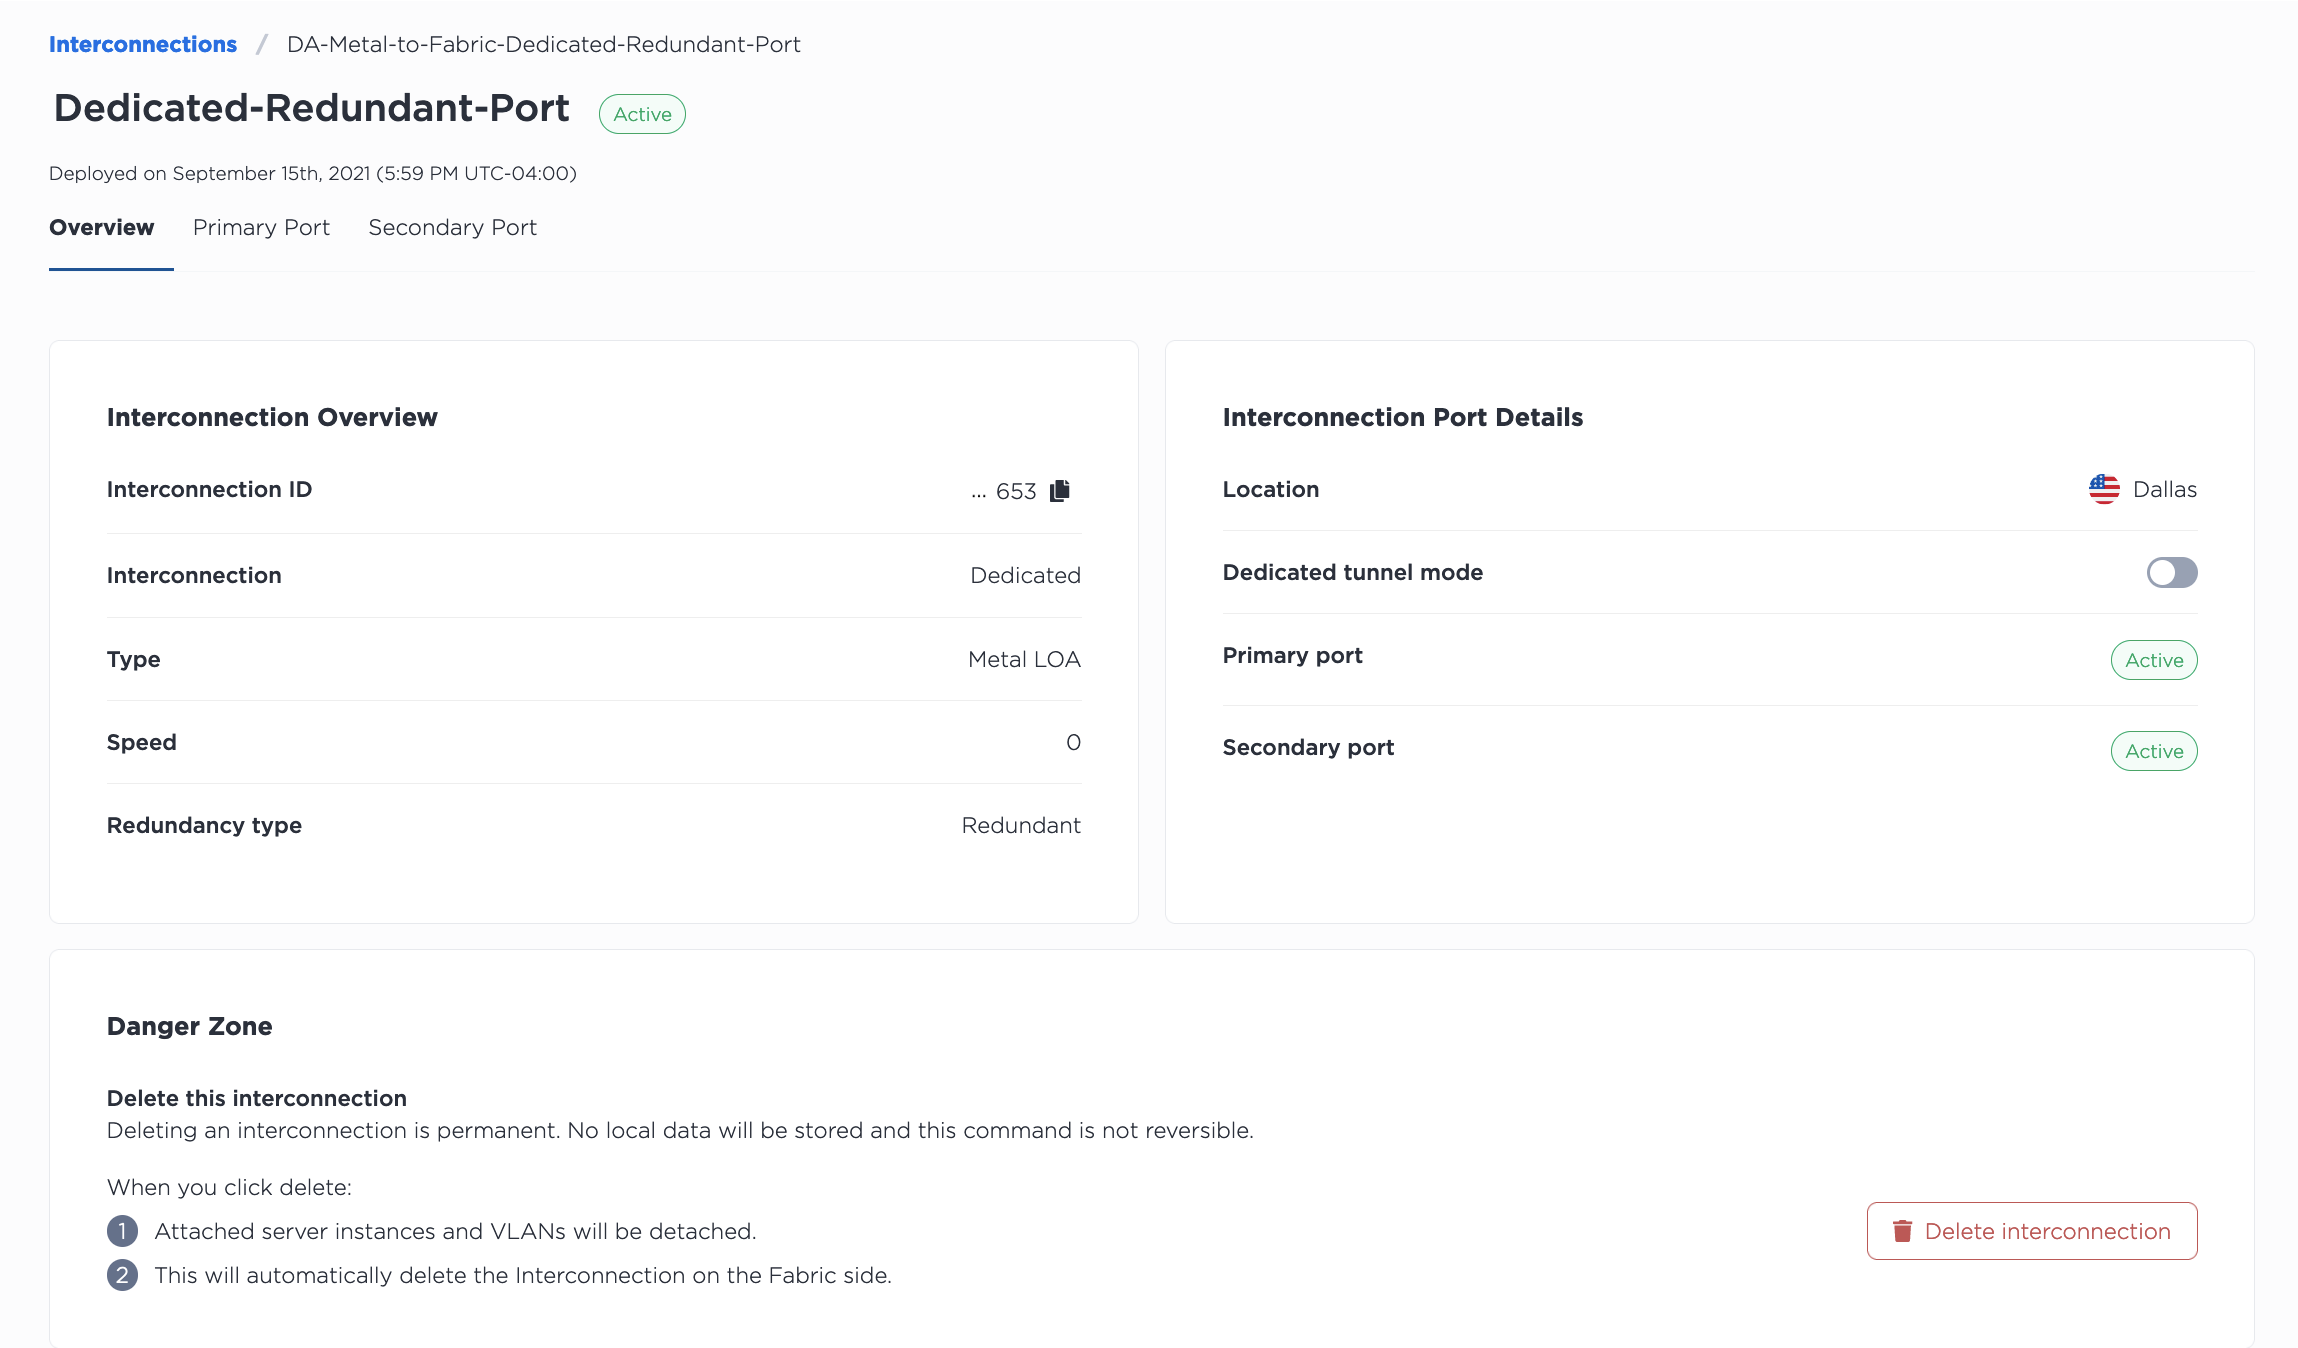
Once the Dedicated Port is established, it will appear on a Project's Interconnections page. Note that Dedicated Ports are managed at the organization level, so they will appear in any of your organization's Projects.
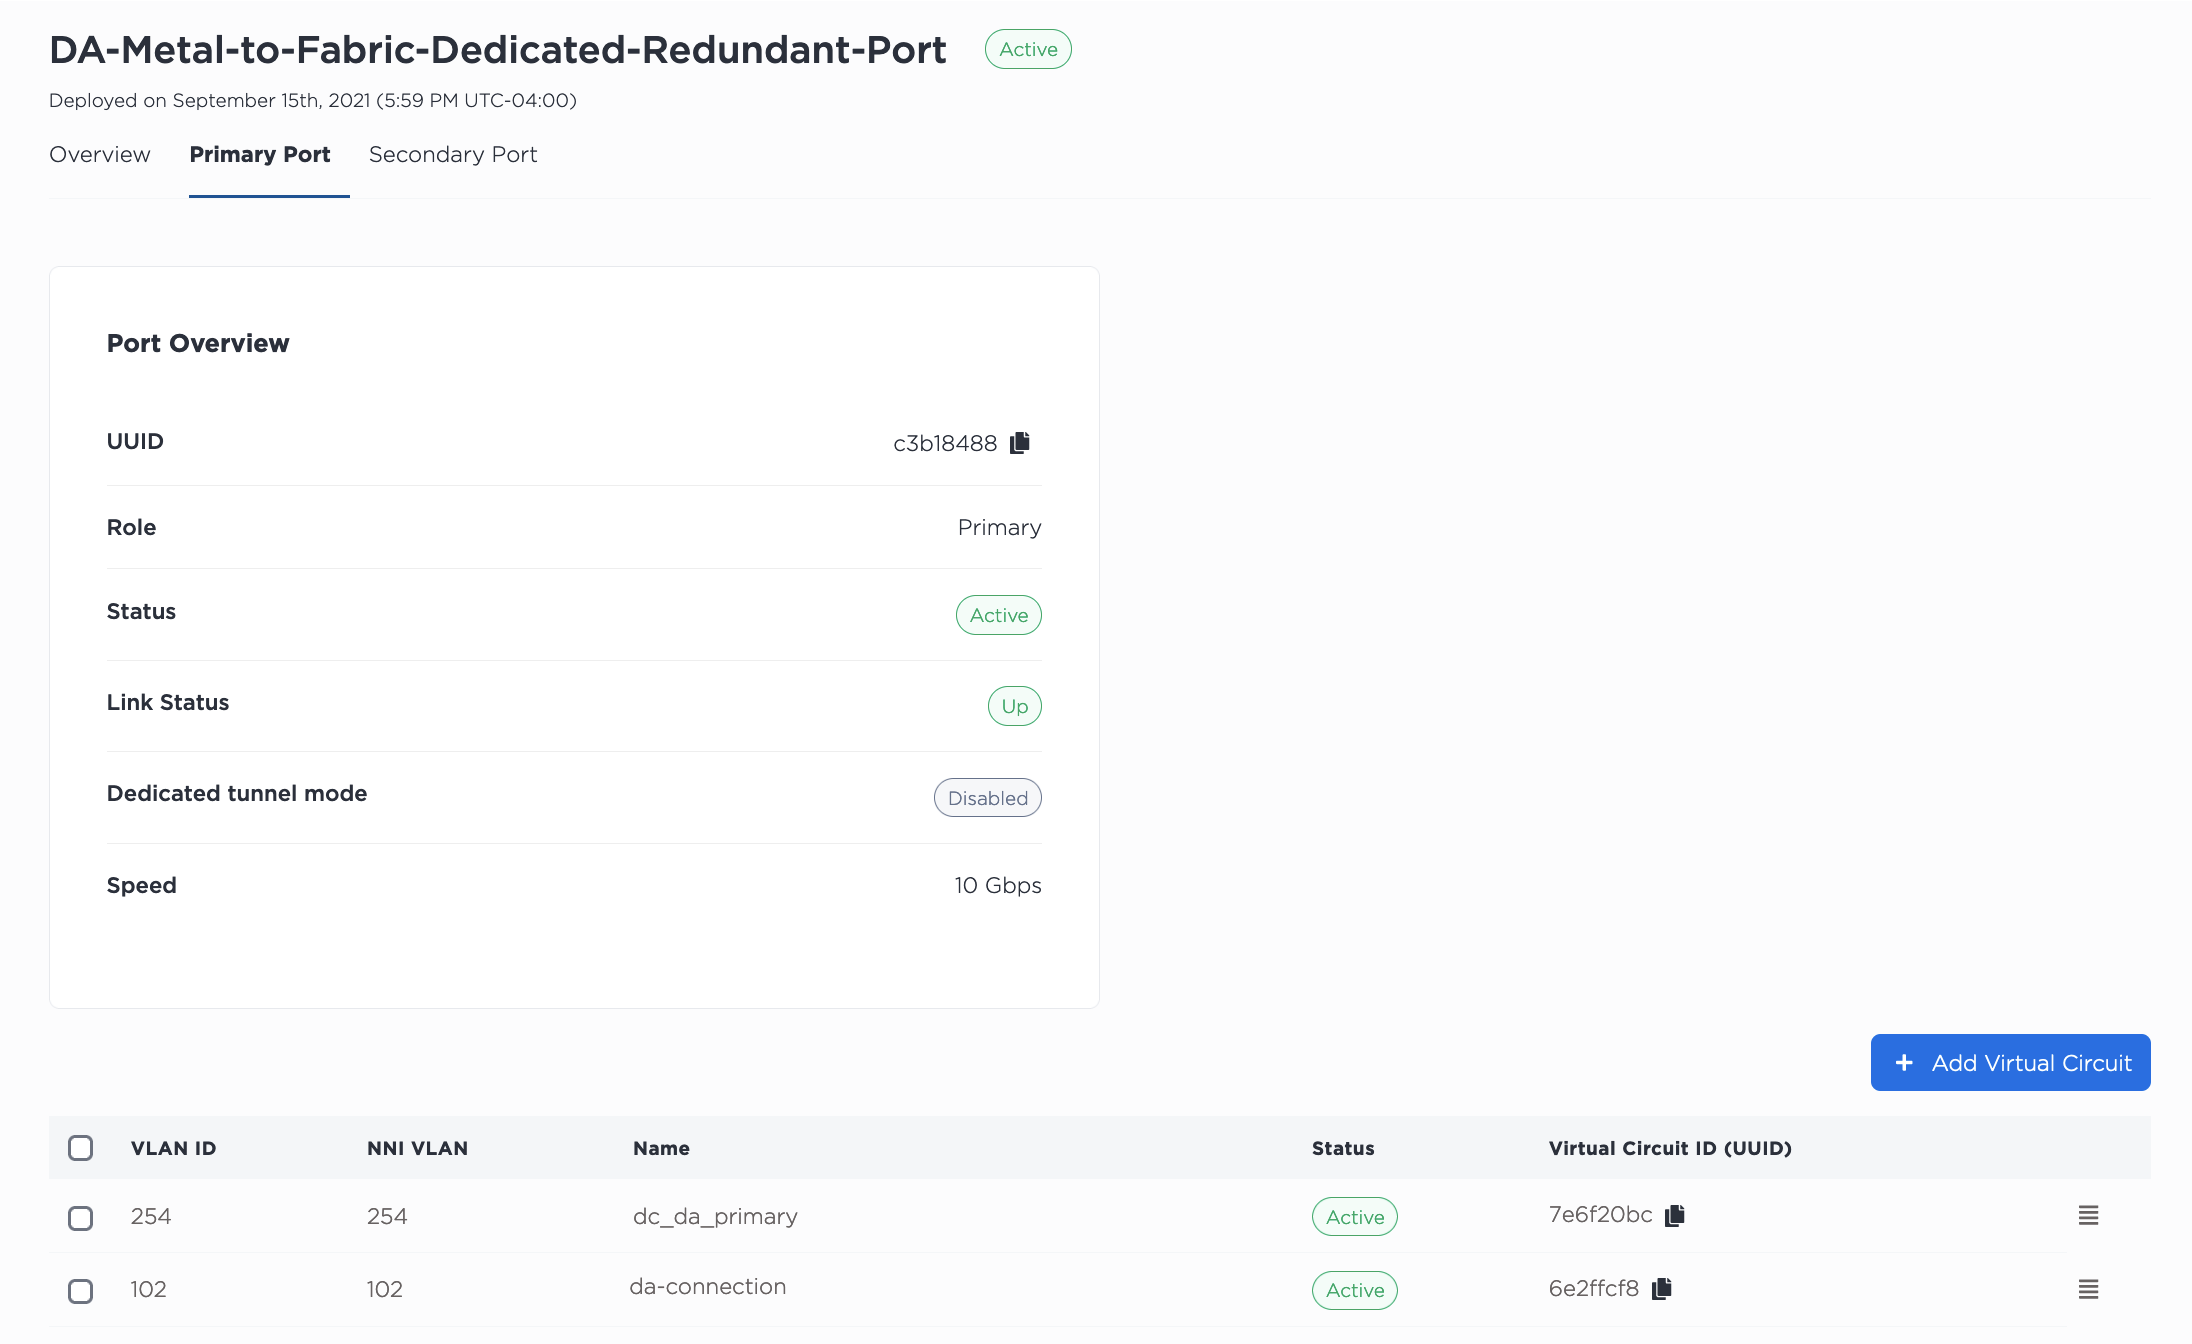
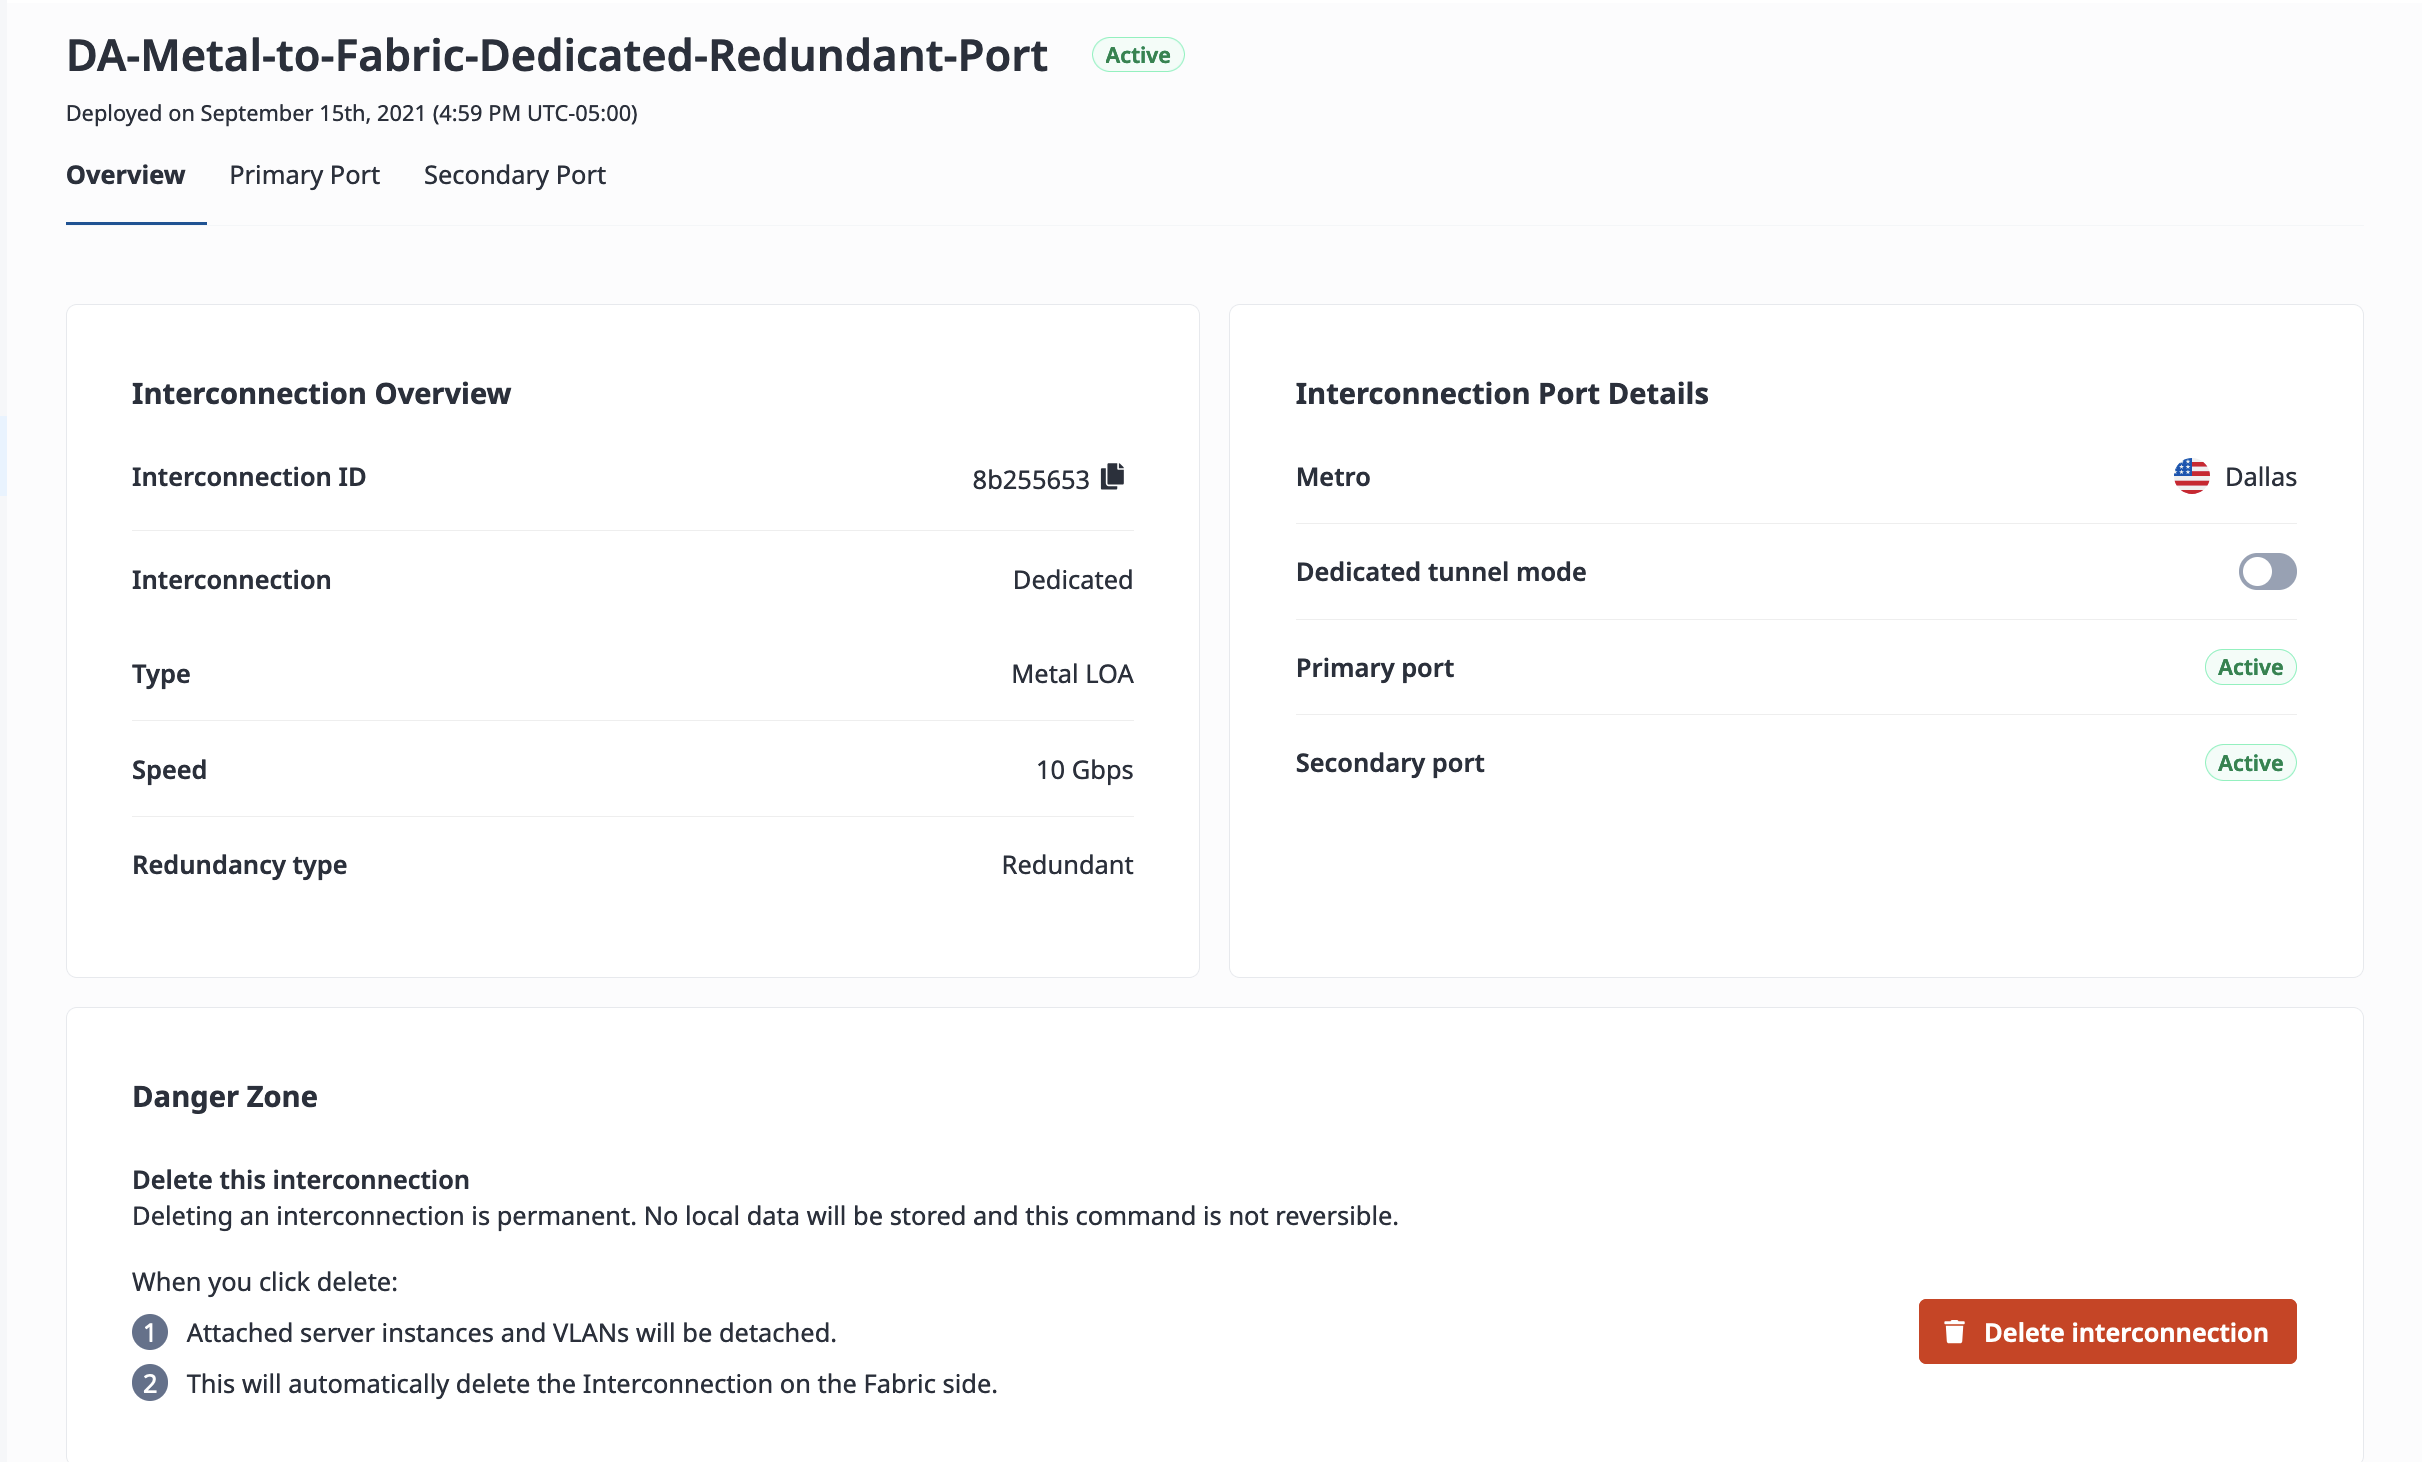
Clicking on a Dedicated Port brings you to its Overview page, which contains a detail view as well as a summary of the primary port and secondary port configurations. A detailed view of the ports is available by clicking the Primary Port and Secondary Port tabs.
List all the Interconnections for your Project, including Dedicated Ports with the metal interconnections get command. Specify the Project with -p, or --project_id.
metal interconnections get -p <project_id>
Get the details of a specific Dedicated Port with the metal interconnections get command, specifying the Dedicated Port by its UUID and -i or --connID.
metal interconnections get -i <dedicated_port_uuid>
To update a Dedicated Port, use the metal interconnections update command. The UUID of the Dedicated Port is required. All other fields are optional so they can be updated independently.
metal interconnections update -i <dedicated_port_id> -n <name> -d <description> -r <redundant|primary> -m <standard|tunnel> -e <E-mail> --tags="<tag1>,<tag2>"
Options:
-i,--id(required) - The UUID of the interconnection.-e,--contactEmail- Adds or updates the email contact for the Dedicated Port.-n,--name- Updates the name.-d,--description- Adds or updates the description.-r,--redundancy- Updating toprimarywill remove a secondary port, while updating toredundantwill add a secondary port.-m,--mode- Enable and disable Dedicated Tunnel mode by updating the mode to eitherstandardortunnel.-t,--tags- Adds or updates the tags.
To list all the Interconnections in a project, send a GET request to the /organizations/{organization_id}/connections endpoint, filtering the response to your project in the path of the request.
curl -X GET -H 'X-Auth-Token: <API_TOKEN>' \
https://api.equinix.com/metal/v1/organizations/{organization_id}/connections?project={project_id}
To get the details of a Dedicated Port, send a GET request to the /connections/{connection_id} endpoint, specifying the UUID in the request path.
curl -X GET -H 'X-Auth-Token: <API_TOKEN>' \
https://api.equinix.com/metal/v1/connections/{connection_id}
You can use this information to manage and update the Dedicated Port by sending a PUT request to the /connections/{connection_id} endpoint. Specify what you want changed in the body of the request. All fields are optional so they can be updated independently.
curl -X PUT \
-H "Content-Type: application/json" \
-H "X-Auth-Token: <API_TOKEN>" \
"https://api.equinix.com/metal/v1/connections/{connection_id}" \
-d '{
    "contact_email": "<string>",
    "description": "<string>",
    "name": "<string>",
    "redundancy": "<string>",
    "mode": "<standard>",
    "tags": [
        "<string>"
    ]
}'
Body Parameters:
"contact_email"- Adds or updates the email contact for the Dedicated Port."name"- Updates the name."description"- Adds or updates the description."redundancy"- Updating to"primary"will remove a secondary port, while updating to"redundant"will add a secondary port."mode"- Enable and disable Dedicated Tunnel mode by updating the mode to either"standard"or"tunnel".- "tags" - Adds or updates the tags.
You can also get the Dedicated Port's individual ports' information.
To get a list of a the ports, send a GET request to the /connections/{connection_id}/ports endpoint.
curl -X GET -H 'X-Auth-Token: <API_TOKEN>' \
https://api.equinix.com/metal/v1/connections/{connection_id}/ports
And to get one of the port's details, send a GET request to the /connections/{connection_id}/ports/{id} endpoint.
curl -X GET -H 'X-Auth-Token: <API_TOKEN>' \
https://api.equinix.com/metal/v1/connections/{connection_id}/ports/{id}
Creating and Managing Virtual Circuits
Once your Dedicated Port is physically ready, the Equinix Metal console shows the Port status is Active. You can create Virtual Circuits and attach VLANs or a VRF to them in the Equinix Metal console.
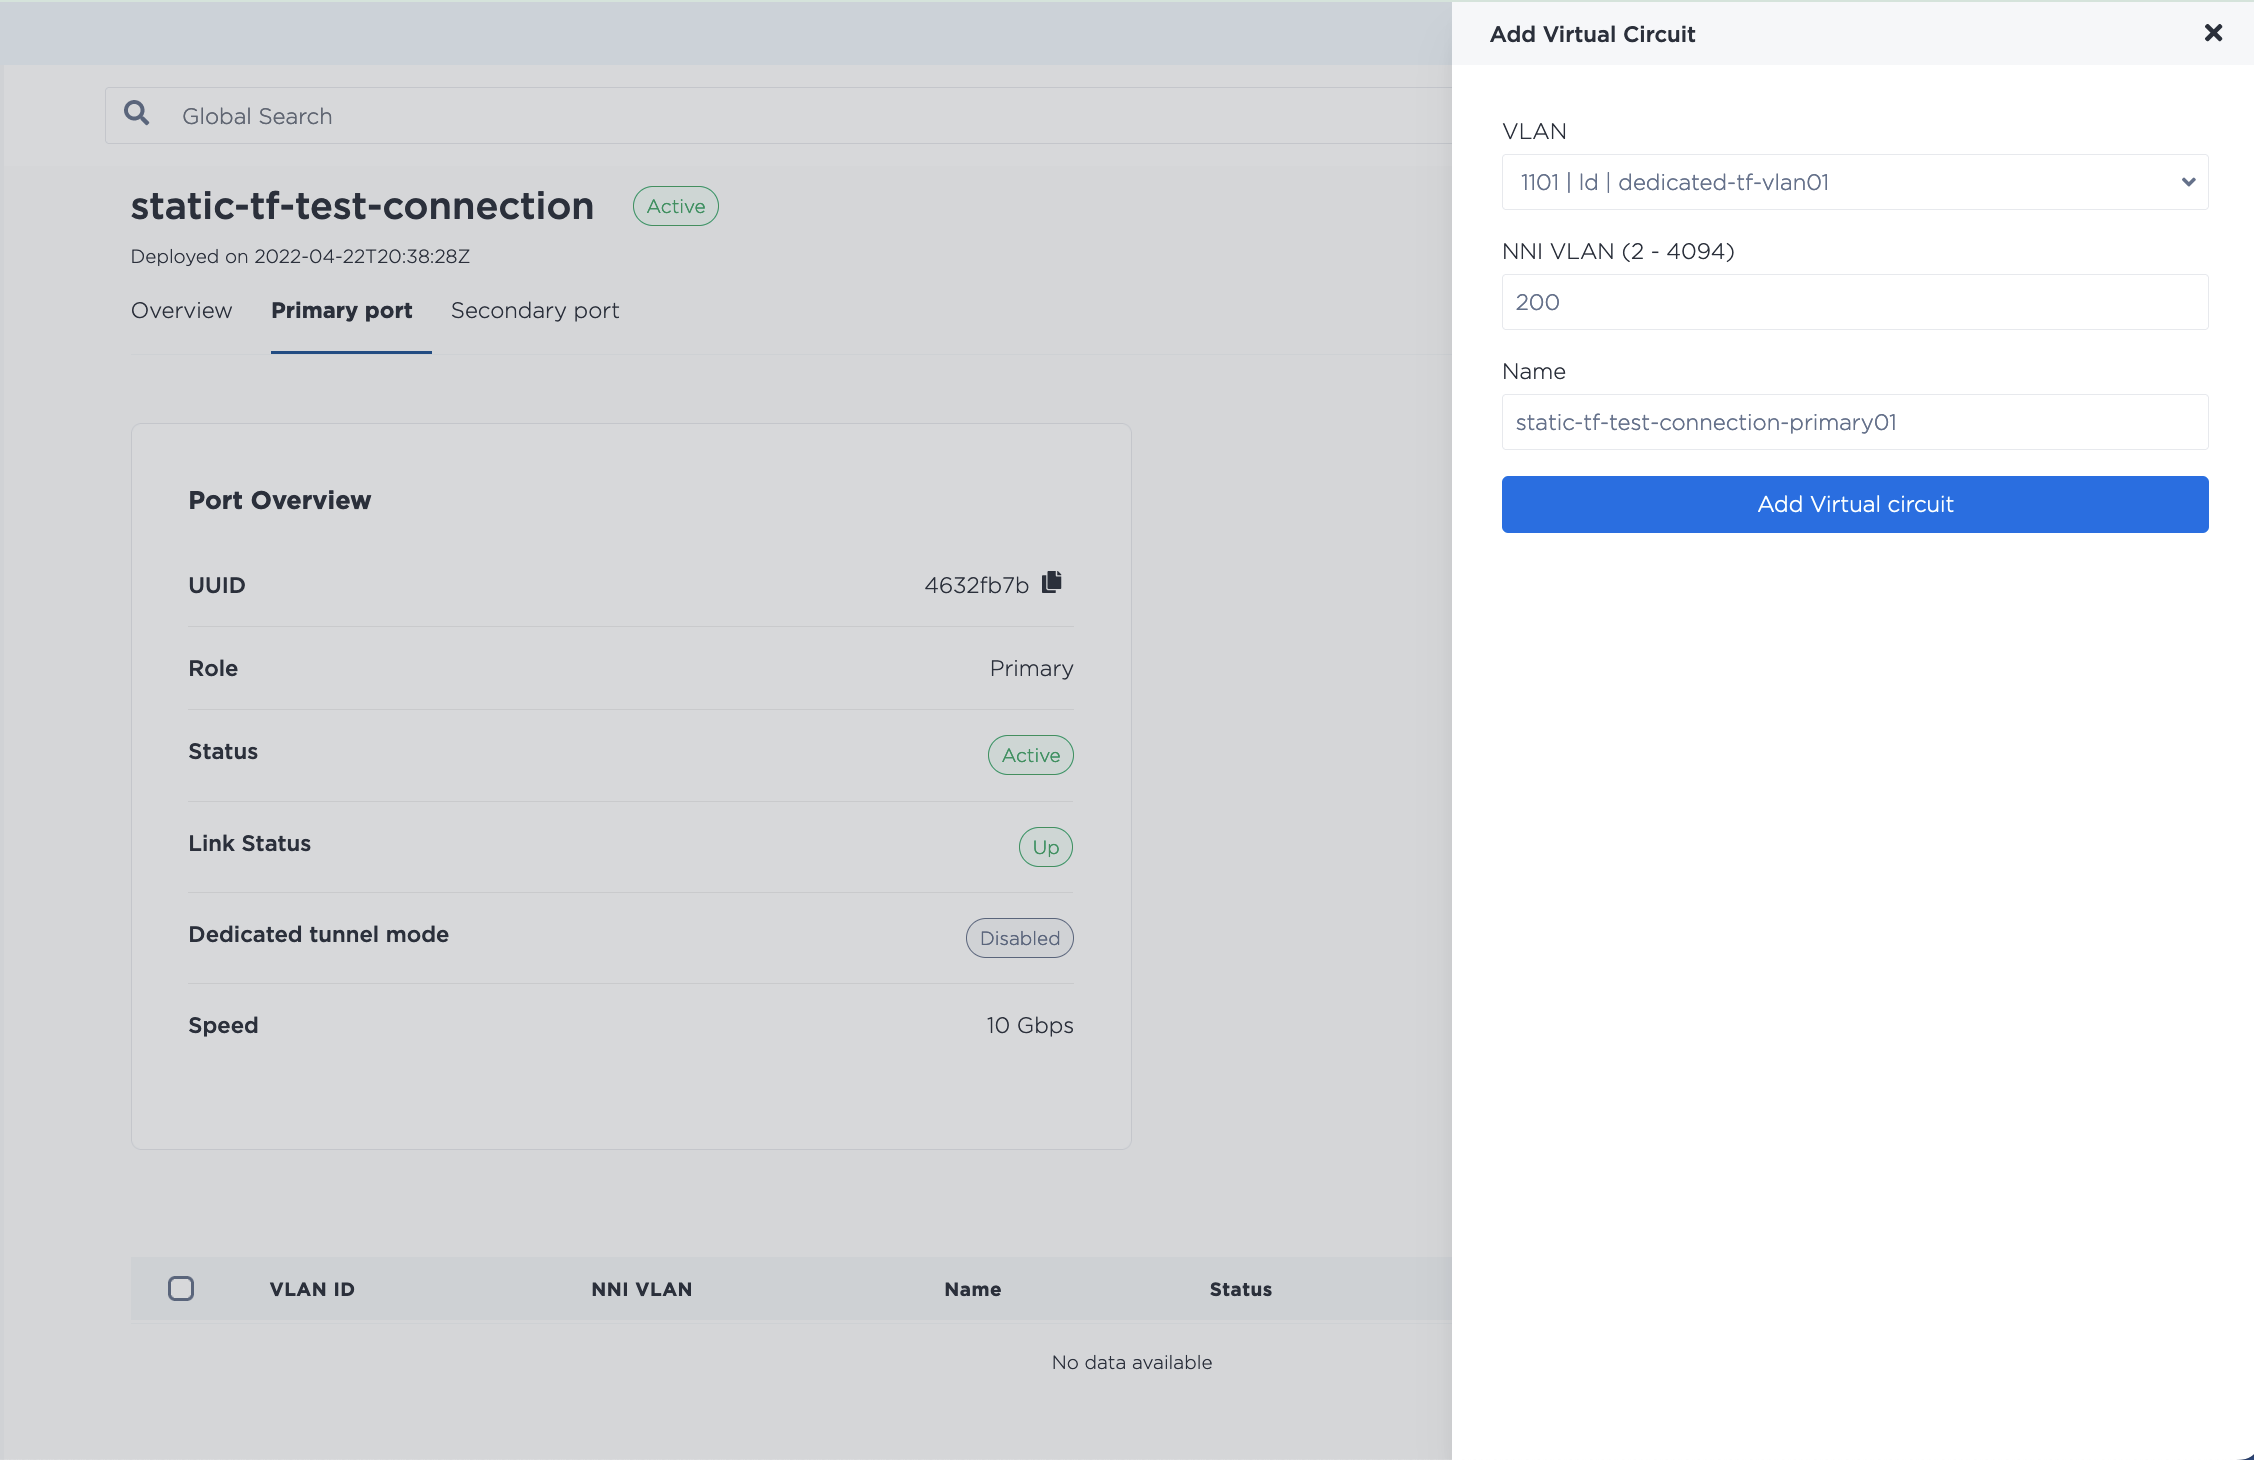
From your Dedicated Port's Overview, select the Primary Port tab.
Click +Add Virtual Circuit to create a virtual circuit. Choose whether to attach a VLAN or a VRF.
If you are using a VLAN, select the VLAN to associate with the virtual circuit and give it an NNI VLAN number (an integer between 2 and 4094). Each virtual circuit needs to have a unique NNI VLAN number.
Note: the VLAN has to be in the same metro as the Dedicated Port, but it does not have to be in the same project. Dedicated Ports are organization-level scoped. You are able to attach a VLAN from any project in your organization as long as it is in the same metro.
If you are using a Dedicated Port in it's default mode, then you are able to add multiple virtual circuits to attach multiple VLANs to. While you can have multiple virtual circuits per port, the relationship of virtual circuits to VLANs is 1:1. You can only attach one VLAN to one virtual circuit, and one virtual circuit to one VLAN.
If you are using VRF, select the VRF from the drop-down menu to attach to this Virtual Connection, and fill in the requested information. This is where you specify the peering information -- the subnet from the VRF IP address range that will be used to address the VRF and the remote side of the virtual circuit. The IP address reservation for this subnet will be created automatically. For more detailed information on configuring VRF with dedicated ports, refer to VRF for Interconnections.
To create a new Virtual Circuit, send a POST request to the /connections/{connection_id}/ports/{port_id}/virtual-circuits endpoint.
If you are using VLANs, use the "vnid" in the request body.
curl -X POST \
-H "Content-Type: application/json" \
-H "X-Auth-Token: <API_TOKEN>" \
"https://api.equinix.com/metal/v1/connections/{connection_id}/ports/{port_id}/virtual-circuits" \
-d '{
    "description": "<string>",
    "name": "<string>",
    "nni_vlan": <integer>,
    "vnid": "<string>",
    "tags": [
        "<string>"
    ]
}'
Request Fields
"name"(required) - The name of the connection."description"(optional) - User-friendly description of the connection."nni_vlan"- (required) - An integer between2and4094. Remember if you are connecting to a destination on Fabric the NNI VLAN has to match the Fabric side."vnid"- (optional) - VLAN ID or UUID of the VLAN to attach to the Virtual Circuit. If omitted, the VC is created and has status "Waiting on Customer VLAN". Note: the VLAN has to be in the same metro as the Dedicated Port, but it does not have to be in the same project. Dedicated Ports are organization-level scoped. You are able to attach a VLAN from any project in your organization as long as it is in the same metro. If you are using a dedicated port in it's default mode, then you are able to add multiple virtual circuits to attach multiple VLANs to. While you can have multiple virtual circuits per port, the relationship of virtual circuits to VLANs is 1:1. You can only attach one VLAN to one virtual circuit, and one virtual circuit to one VLAN."tags"- (optional) - String or array of strings to use as identifiers for the VC.
If you are using VRF, this is where you specify the peering information -- the subnet from the VRF IP address range that will be used to address the VRF and the remote side of the virtual circuit. The IP address reservation for this subnet will be created automatically.
For IPv4 subnets:
curl -X POST \
-H "Content-Type: application/json" \
-H "X-Auth-Token: <API_TOKEN>" \
"https://api.equinix.com/metal/v1/connections/{connection_id}/ports/{port_id}/virtual-circuits" \
-d '{
    "project_id": "<UUID>",
    "name": "<string>",
    "description": "<string>",
    "subnet": "<subnet>",
    "customer_ip": "<ip_address>",
    "metal_ip": "<ip_address>",
    "nni_vlan": <integer>,
    "peer_asn": <integer>,
    "md5": "<string>",
    "vrf": "<UUID>"
}'
For IPv6 subnets:
curl -X POST \
-H "Content-Type: application/json" \
-H "X-Auth-Token: <API_TOKEN>" \
"https://api.equinix.com/metal/v1/connections/{connection_id}/ports/{port_id}/virtual-circuits" \
-d '{
    "project_id": "<UUID>",
    "name": "<string>",
    "description": "<string>",
    "subnet_ipv6": "<subnet>",
    "customer_ipv6": "<ip_address>",
    "metal_ipv6": "<ip_address>",
    "nni_vlan": <integer>,
    "peer_asn": <integer>,
    "md5": "<string>",
    "vrf": "<UUID>"
}'
More documentation on configuring VRF with Dedicated ports is on the VRF for Interconnections page.
Repeat the process if you wish to create more Virtual Circuits on the Primary Port. If you have redundant ports, repeat the process on the Secondary Port as well.
Updating Virtual Circuits
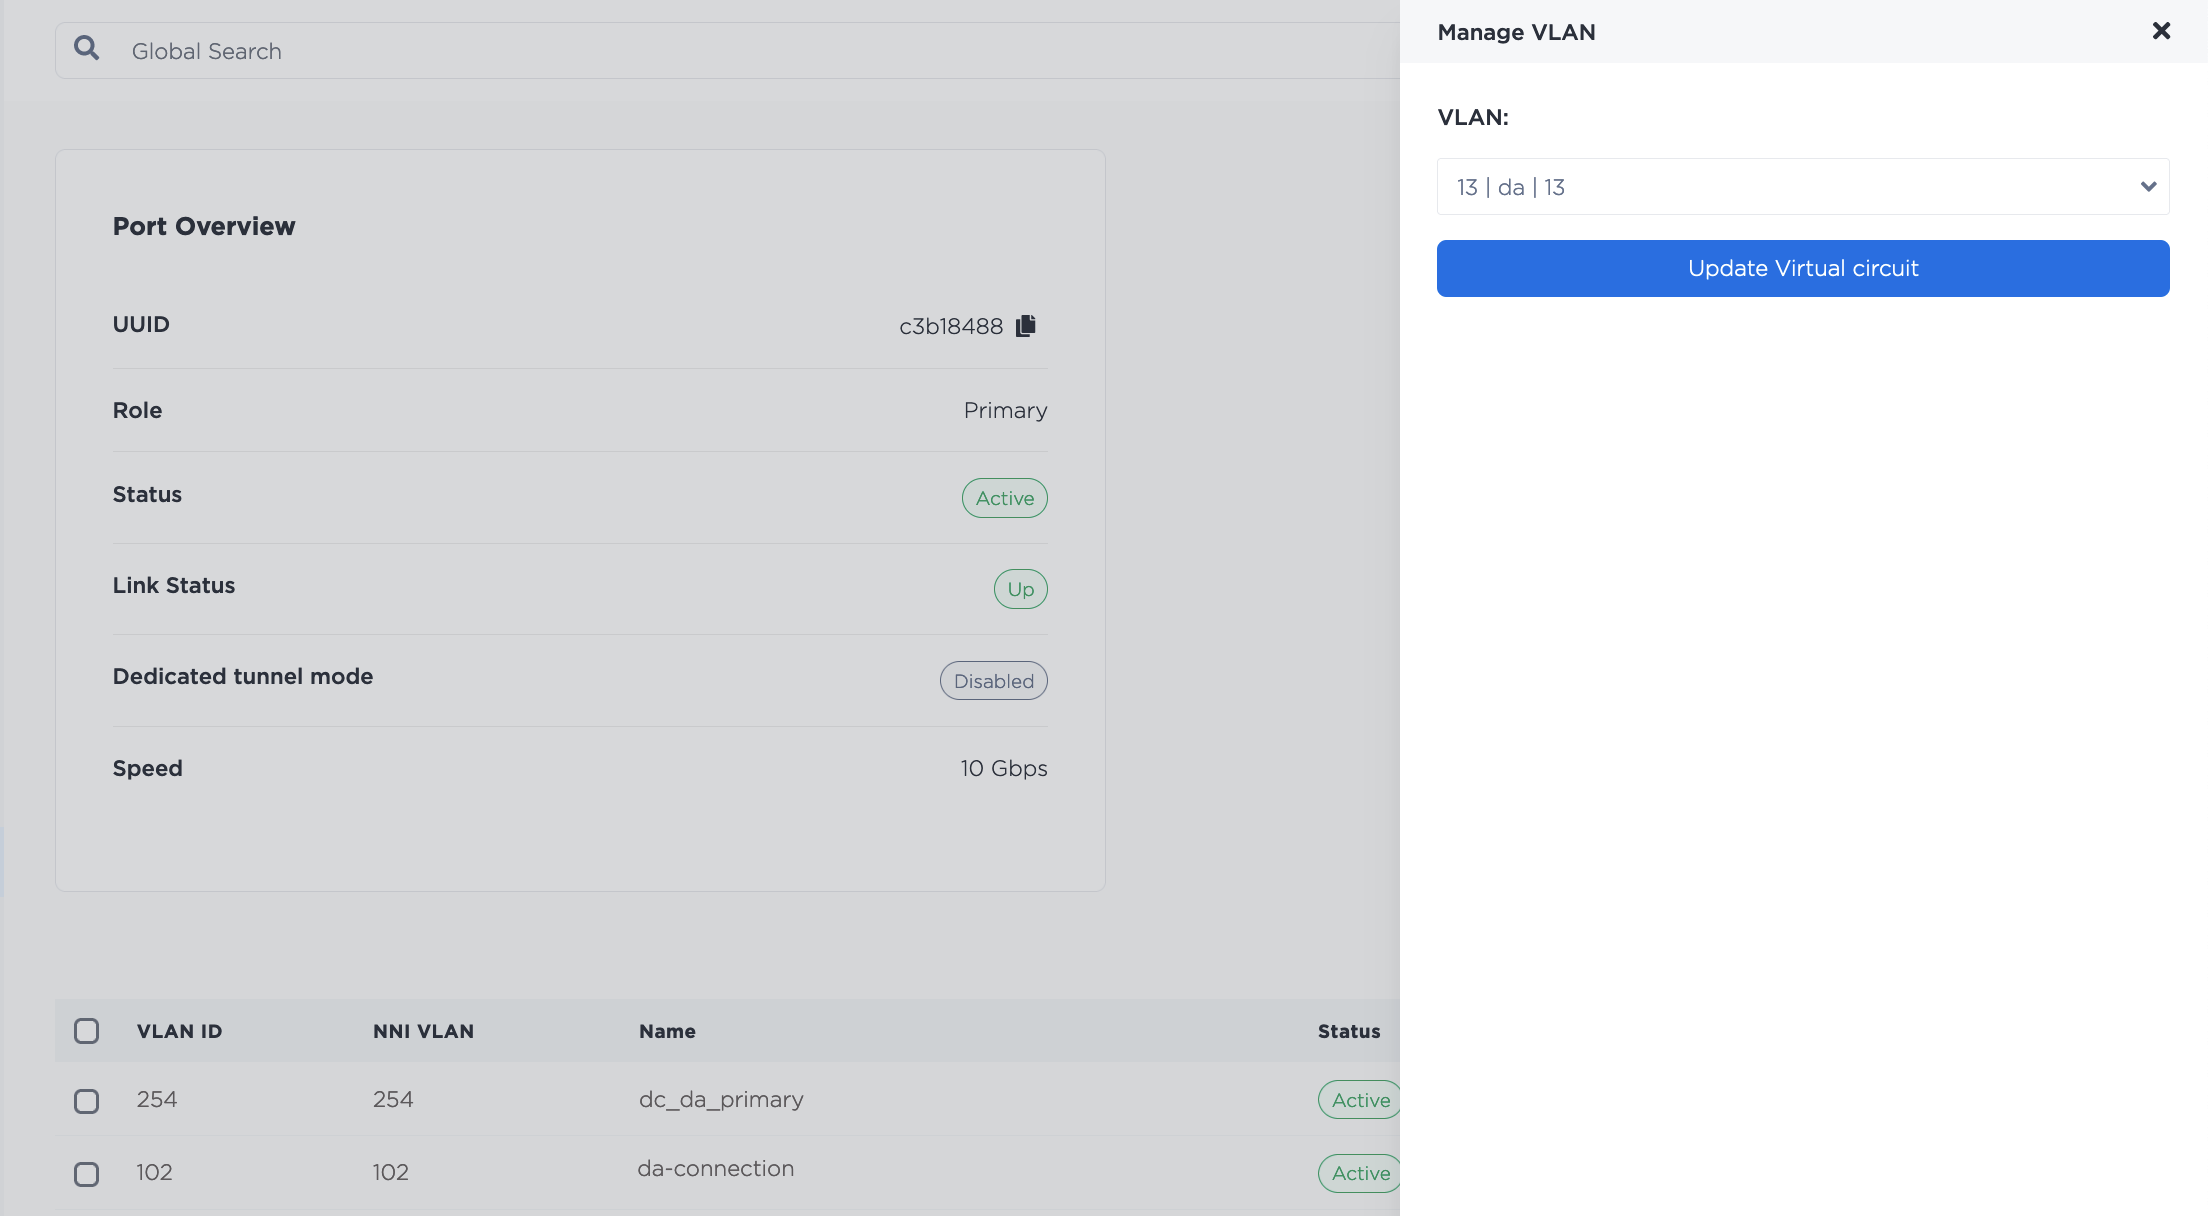
The Virtual Circuits on a port are listed on the Primary Port or Secondary Port tabs of the Dedicated Port.
To change the VLAN connected to the Virtual Circuit, click the the three-bar menu to open the Manage VLAN pane. Select the new VLAN from the drop-down, and click Update Virtual Circuit.
VRFs are listed in the Virtual Circuits - VRF section. Click the three-bar menu to open the Manage Peering Details pane.
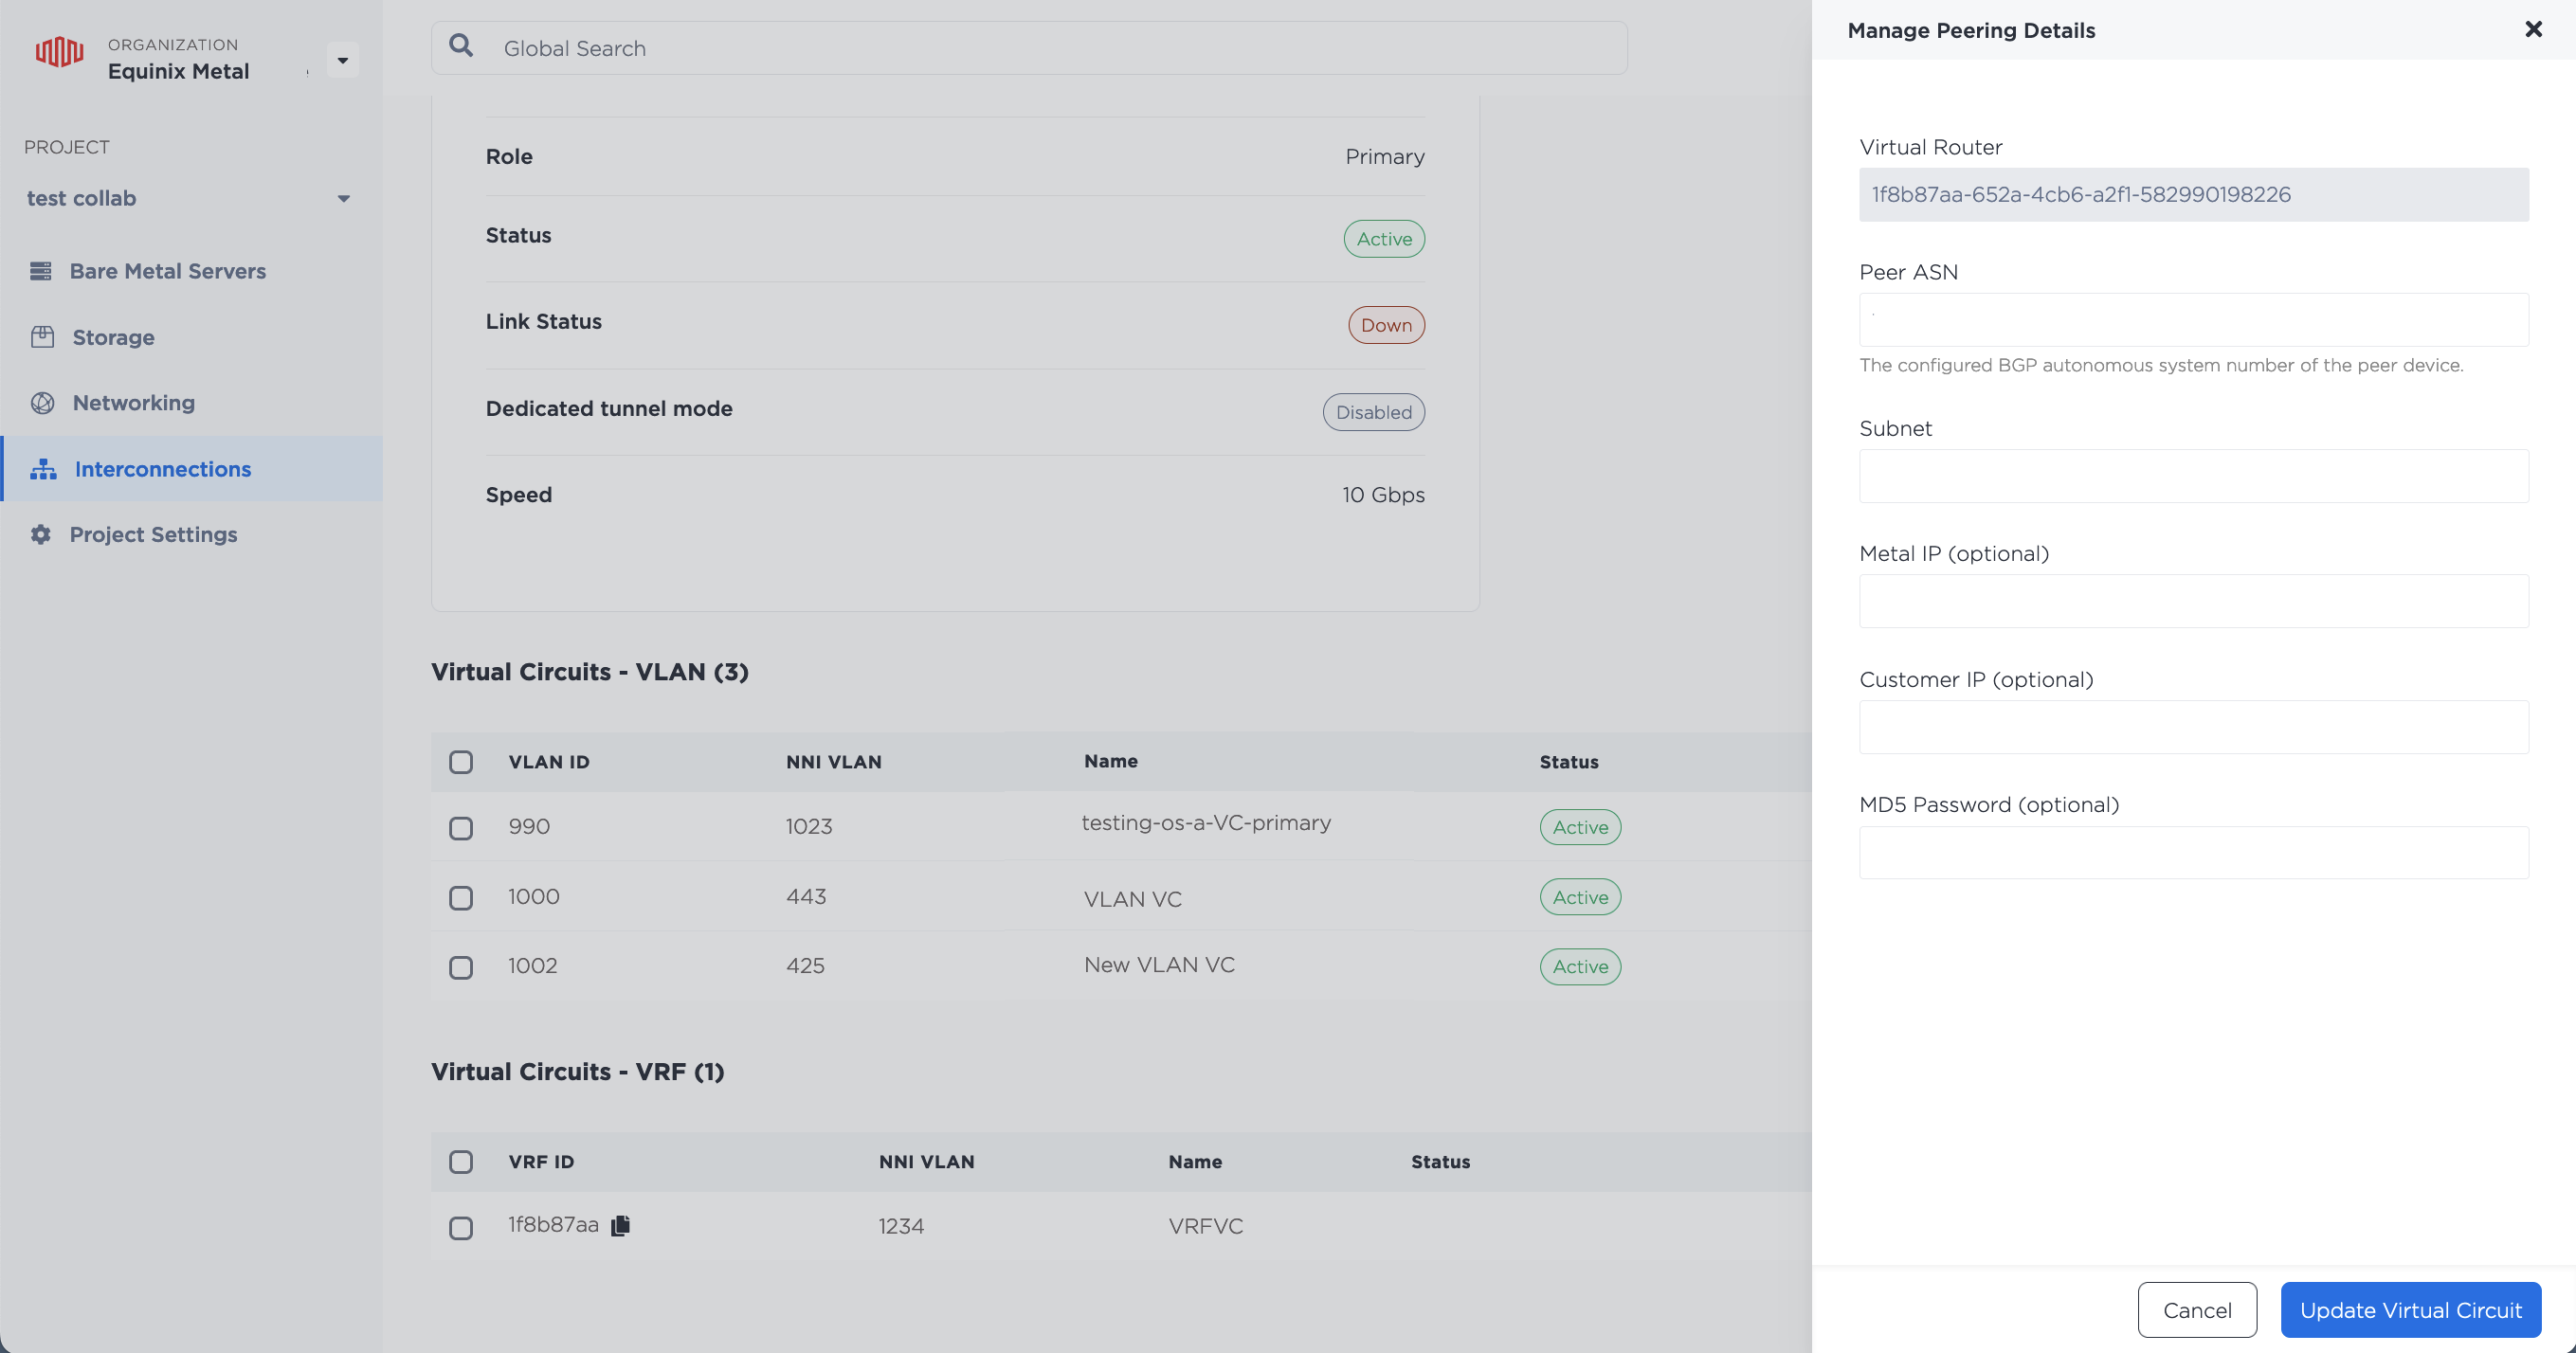
Fill in the fields with the new peering information and click Update Virtual Circuit.
To get a list of the Virtual Circuits connected to a port, send a GET request to the /connections/{connection_id}/ports/{port_id}/virtual-circuits endpoint.
curl -X GET -H 'X-Auth-Token: <API_TOKEN>' \
https://api.equinix.com/metal/v1/connections/{connection_id}/ports/{port_id}/virtual-circuits
You can update the Virtual Circuit by sending a PUT request to the /virtual-circuits/{id} endpoint. For example, to change the VLAN, specify the new VLAN ID in the body of the request.
curl -X PUT \
-H "Content-Type: application/json" \
-H "X-Auth-Token: <API_TOKEN>" \
"https://api.equinix.com/metal/v1/virtual-circuits/{id}" \
-d '{
    "vnid": "<string>"
}'
To update a VRF, use the fields you would like to update in the body of the request. All fields are optional, so they can be updated independently.
curl -X PUT \
-H "Content-Type: application/json" \
-H "X-Auth-Token: <API_TOKEN>" \
"https://api.equinix.com/metal/v1/virtual-circuits/{id}" \
-d '{
    "name": "<string>",
    "description": "<string>",
    "subnet": "<subnet>",
    "customer_ip": "<ip_address>",
    "metal_ip": "<ip_address>",
    "peer_asn": <integer>,
    "md5": "<string>"
}'
Removing VLANs and Virtual Circuits
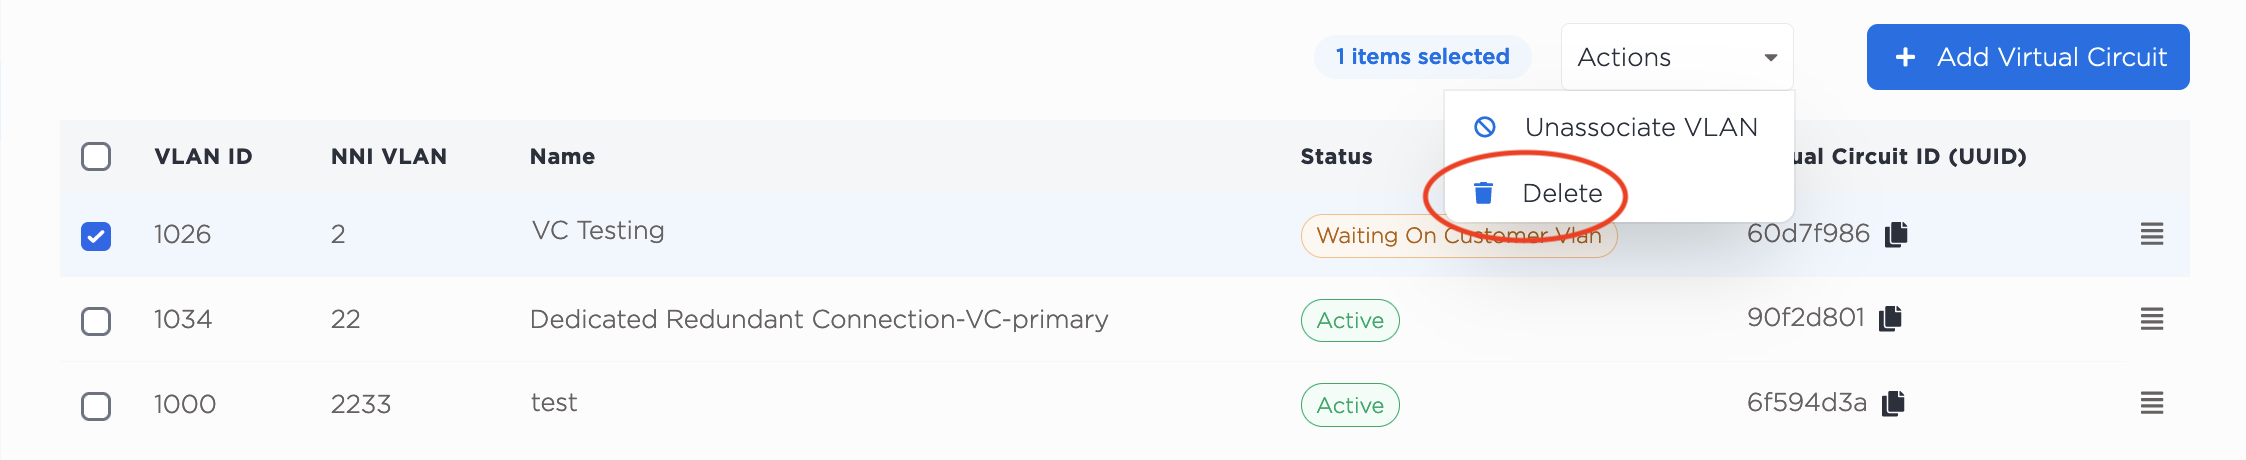
If you need to detach a VLAN from a Virtual Circuit, select the VLAN, and click Unassociate VLAN from the Actions. menu. Removing a VLAN from a VC does not delete it.

To delete a Virtual Circuit, you should first remove all attached VLANs.
After removing all VLANs, select the Virtual Circuit you would like to remove, and from the Actions drop-down, click Delete.
After removing all VLANs, send a DELETE request to the /virtual-circuits/{id} endpoint, specifying the UUID of the Virtual Circuit in the path of the request.
curl -X DELETE -H 'X-Auth-Token: <API_TOKEN>' \
https://api.equinix.com/metal/v1/virtual-circuits/{id}
Dedicated Tunnel Mode
Dedicated Tunnel mode provides a single Virtual Circuit that supports encapsulating single-tagged 802.1Q VLAN traffic with an additional single tag. The outer tag is used to identify and segregate traffic from different VLANs; the inner tag is preserved from the original frame.
This lets you pass the traffic from multiple VLANs over the single VLAN connected to the Virtual Circuit, while segregating and preserving the identity of the traffic of the multiple different encapsulated VLANs.
Consider the following about Dedicated Tunnel mode:
- Enabling Dedicated Tunnel mode limits you to only one Virtual Circuit for the Port.
- The NNI VLAN number for the Virtual Circuit is auto-assigned.
To set up your Virtual Connections with in Dedicated Tunnel mode, click the toggle next to the Dedicated Tunnel option on the Connection's Overview.
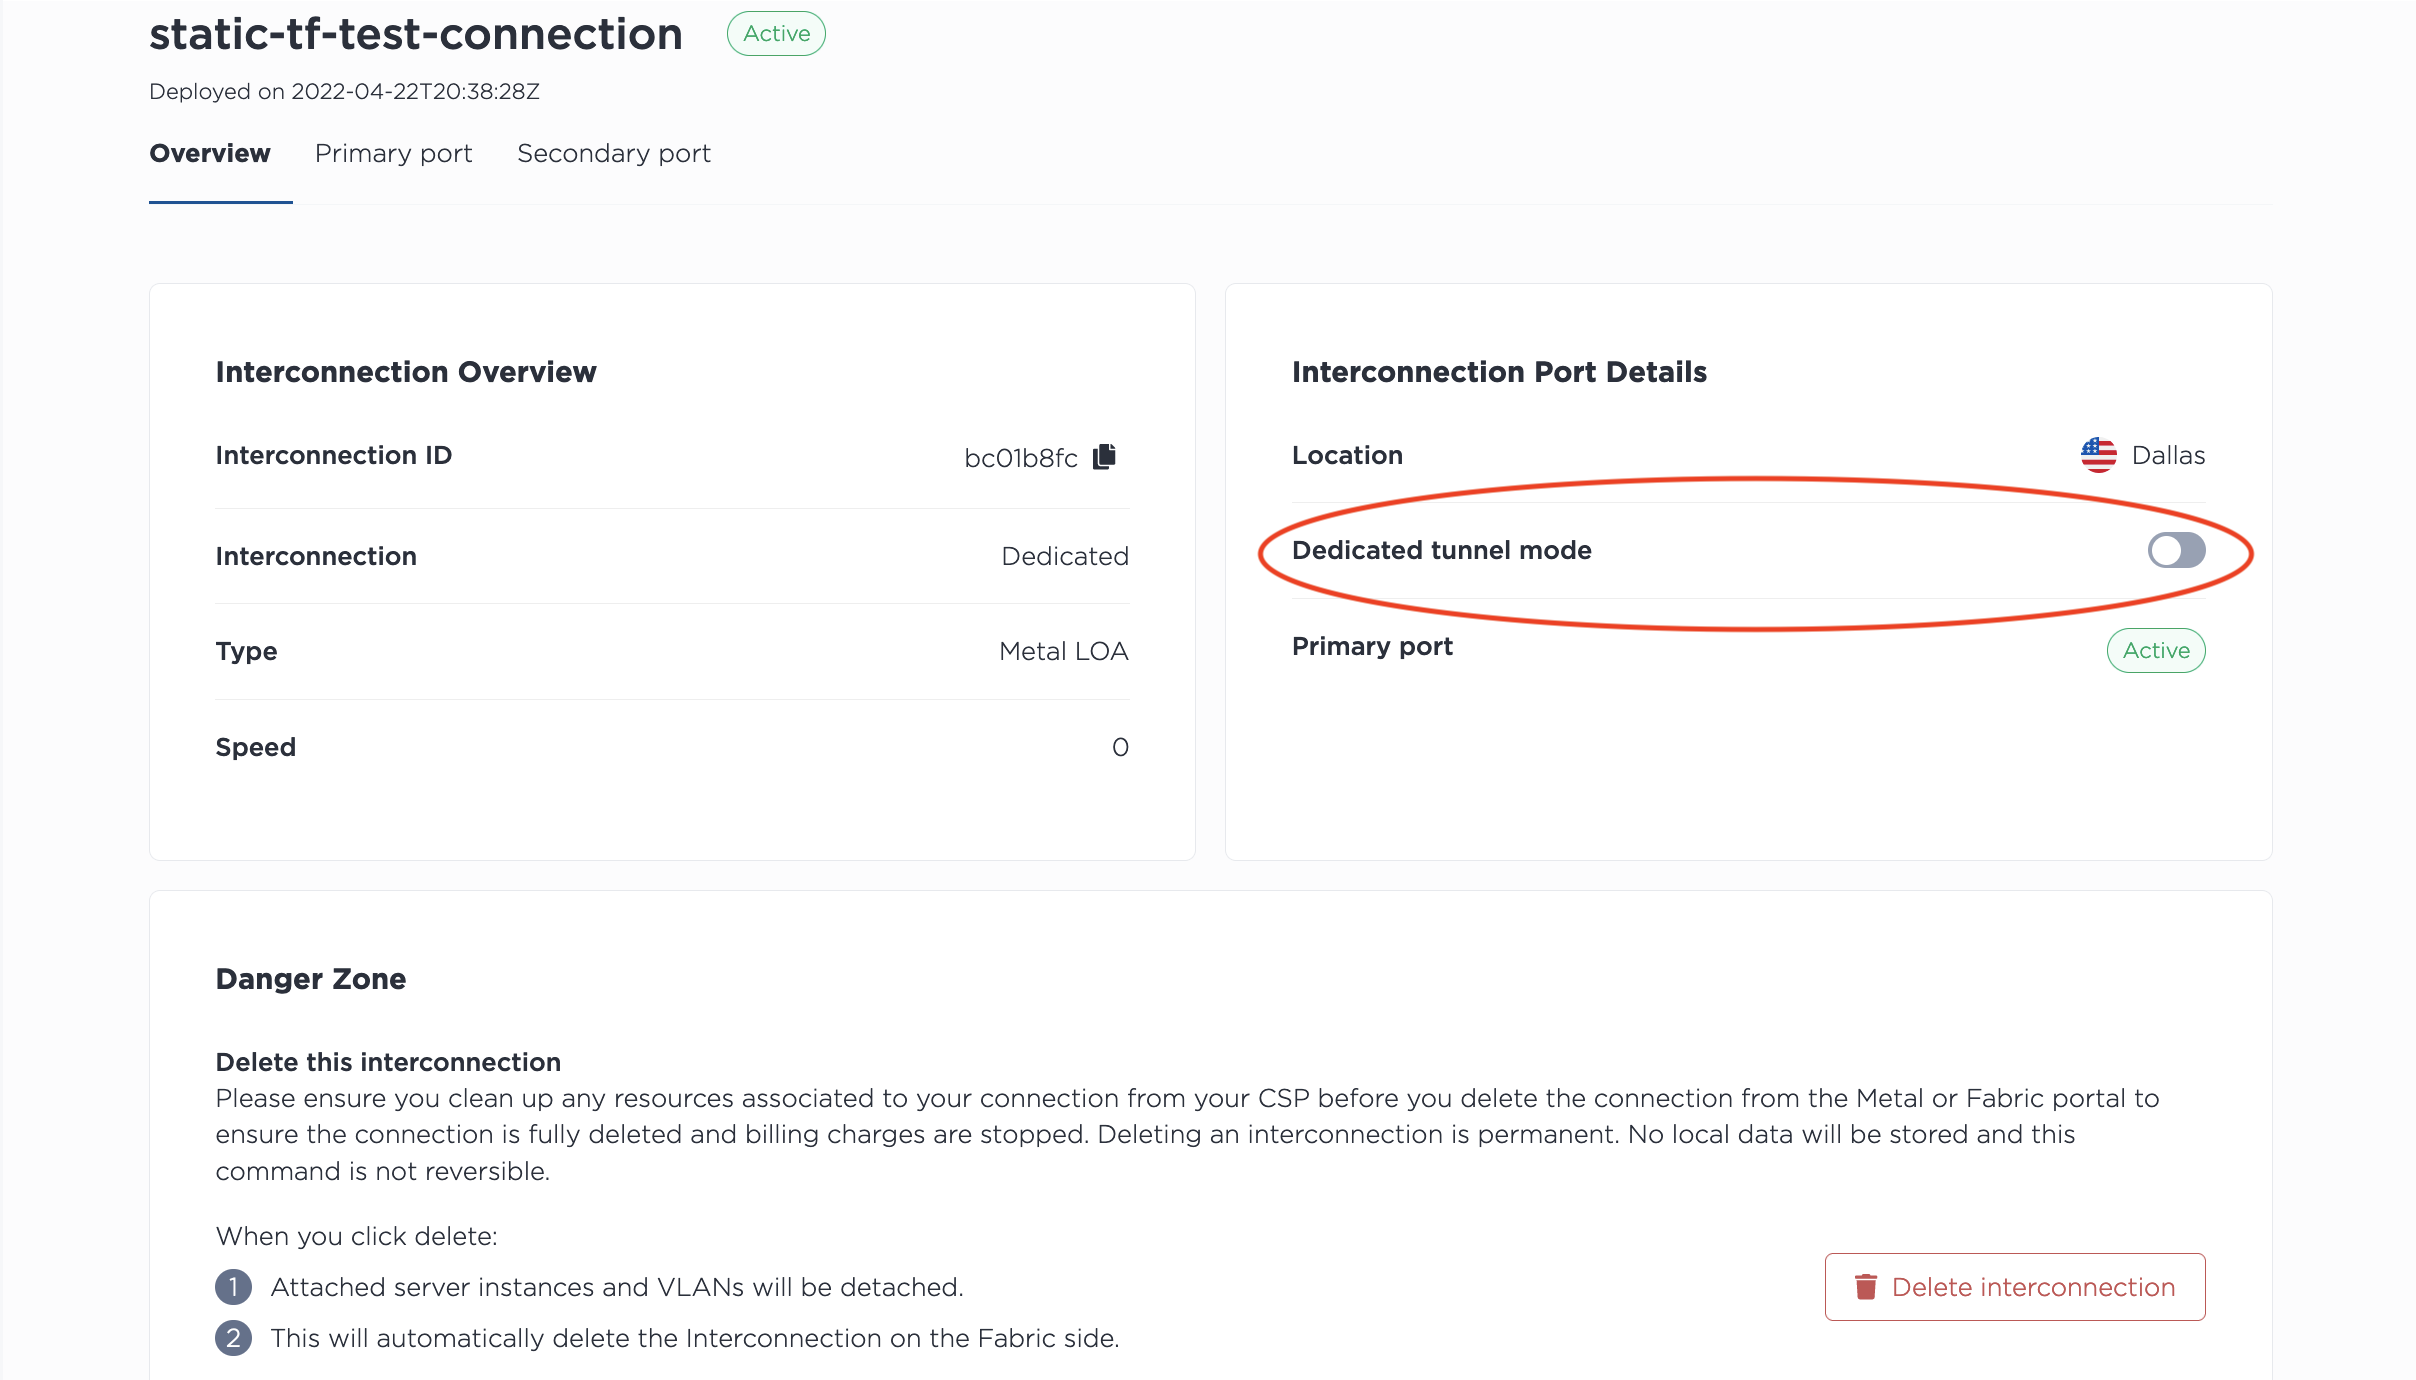
Then on each Port (Primary or Secondary or both), click Create Virtual Circuit. Select the VLAN you want to connect to the Virtual Circuit from the drop-down, and give a name to the Virtual Circuit. Click + Add Virtual Circuit.

You will not be able to enable or disable Dedicated Tunnel mode if you currently have Virtual Circuits attached to the Port. You have to remove any the Virtual Circuits before changing the mode.
In the API, you can enable Dedicated Tunnel on an existing port by sending a PUT to the /connections/{connection_id} endpoint with the mode field set to "tunnel" in the body of the request.
curl -X PUT \
    -H "Content-Type: application/json" \
    -H "X-Auth-Token: <API_TOKEN>" \
    "https://api.equinix.com/metal/v1/connections/{connection_id}" \
    -d '{
        "mode": "tunnel"
    }'
If the mode field is omitted, it defaults to "standard".
You can check the mode of a Connection by sending a GET to the /connections/{connection_id} endpoint.
curl -X GET -H 'X-Auth-Token: <API_TOKEN>' https://api.equinix.com/metal/v1/connections/{connection_id}
To disable Dedicated Tunnel mode, send the PUT to the /connections/{connection_id} endpoint with the mode field set to "standard" in the body of the request.
curl -X PUT \
    -H "Content-Type: application/json" \
    -H "X-Auth-Token: <API_TOKEN>" \
    "https://api.equinix.com/metal/v1/connections/{connection_id}" \
    -d '{
        "mode": "standard"
    }'
You will not be able to enable or disable Dedicated Tunnel mode if you currently have Virtual Circuits attached to the Port. You have to remove any the Virtual Circuits before changing the mode.
VLAN Configuration on the Server
Dedicated Tunnel mode only supports frames with 0x8100 as their ethertype on the outer VLAN tag. This does mean that when you are setting up your servers to handle traffic on the VLAN for your dedicated tunnel, you will have to specify the protocol. For example, when assigning the VLANs 1007, 1234 to the port (bond0) in Linux:
ip link add link bond0 bond0.1007 type vlan proto 802.1q id 1007
ip link add link bond0.1007 bond0.1007.1234 type vlan proto 802.1q id 1234
Deleting a Dedicated Port
Warning
Deleting a Dedicated Port is permanent. When you delete the connection, all attached VLANs will be detached, and traffic to or from your servers through this connection will be cut off.
Please be sure to stop traffic before deletion, and ensure you clean up any resources associated with the connection. Doing this before deleting the Dedicated Port in Equinix Metal ensures the connection will be fully deleted and billing charges are stopped. Deleting a Dedicated Port from the Equinix Metal side automatically deletes the connection in Fabric.
From the list of Dedicated Ports on the Interconnections page, click the name of the Dedicated Port you want to delete.
Click Delete Interconnection to delete the Fabric Virtual Connection permanently.
To delete a Dedicated Port, use the metal interconnections delete command. Specify the UUID of the Dedicated Port with -i or --id. To skip the confirmation step, use -f or --force.
metal interconnections delete -i <dedicated_port_uuid> -f
To delete a Dedicated Port from the API, send a DELETE request to the /connections/{connection_id} endpoint, specifying the ID of the Dedicated Port in the path.
curl -X DELETE -H 'X-Auth-Token: <API_TOKEN>' \
https://api.equinix.com/metal/v1/connections/{id}