- Home /
- Resources /
- Learning center /
- Deploying iSCSI on...
Deploying iSCSI on NetApp Storage via Equinix Metal
Set up NetApp Cloud Adjacent Storage with iSCSI on Equinix Metal, including steps for configuring a Storage VM (SVM) for iSCSI, adding LUNs, and connecting Windows and Linux hosts to the NetApp Storage system.

On this page
This guide covers how to set up and use NetApp Storage with the iSCSI protocol on Equinix Metal. We'll also guide you through key tasks such as adding volumes and managing initiator groups.
Before you can serve data over iSCSI, you'll need to complete some initial configuration steps. For detailed setup instructions, please refer to our Getting Started: Initial Setup of NetApp Storage on Equinix Metal
iSCSI Prerequisites
To successfully serve data with iSCSI from the NetApp Storage, there are some things you will need to keep in mind for configuration. Here are the prerequisites for a successful deployment:
Two VLANs for iSCSI traffic in Equinix Metal. In a NetApp deployment, it is typical to use two iSCSI data networks on different VLANs. If you need to add additional VLANs to the NetApp Storage cluster, you can find the detailed instructions on how to add it in the Metal Console and the NetApp interface in the getting started guide. In this example, we will be using VLANs 1001 and 1002.
An iSCSI Host. You will need a host in Equinix Metal to connect the NetApp storage to. The iSCSI host, whether Windows or Linux, should be properly set up. If you haven't deployed a server in Equinix Metal before, refer to the Deploying Your First Server guide for assistance.
NetApp Host Utilities Kit. Install the NetApp host utilities kit on the host if you are using a supported operating system. Please see the NetApp documentation for supported Windows versions and supported Linux versions. You will need a NetApp Support account to download this software.
IP Addresses. You will need the following IP addresses:
- Two IP addresses per NetApp Node, one on each VLAN
- Two IP addresses per iSCSI host, one on each VLAN
An SVM with iSCSI enabled on the NetApp cluster. Before you configure the SVM, ensure you have completed the steps in the getting started guide, including adding the VLAN to the NetApp Storage cluster in Equinix Metal and in the NetApp Interface.
Note that the NetApp Storage system is a unified storage system. You can use multiple storage protocols on the same hardware, with the same network links.
Creating a SVM for iSCSI
Before you can serve data using the iSCSI protocol, you must configure iSCSI on the NetApp Storage system. To do this, there must be a SVM with the iSCSI protocol enabled.
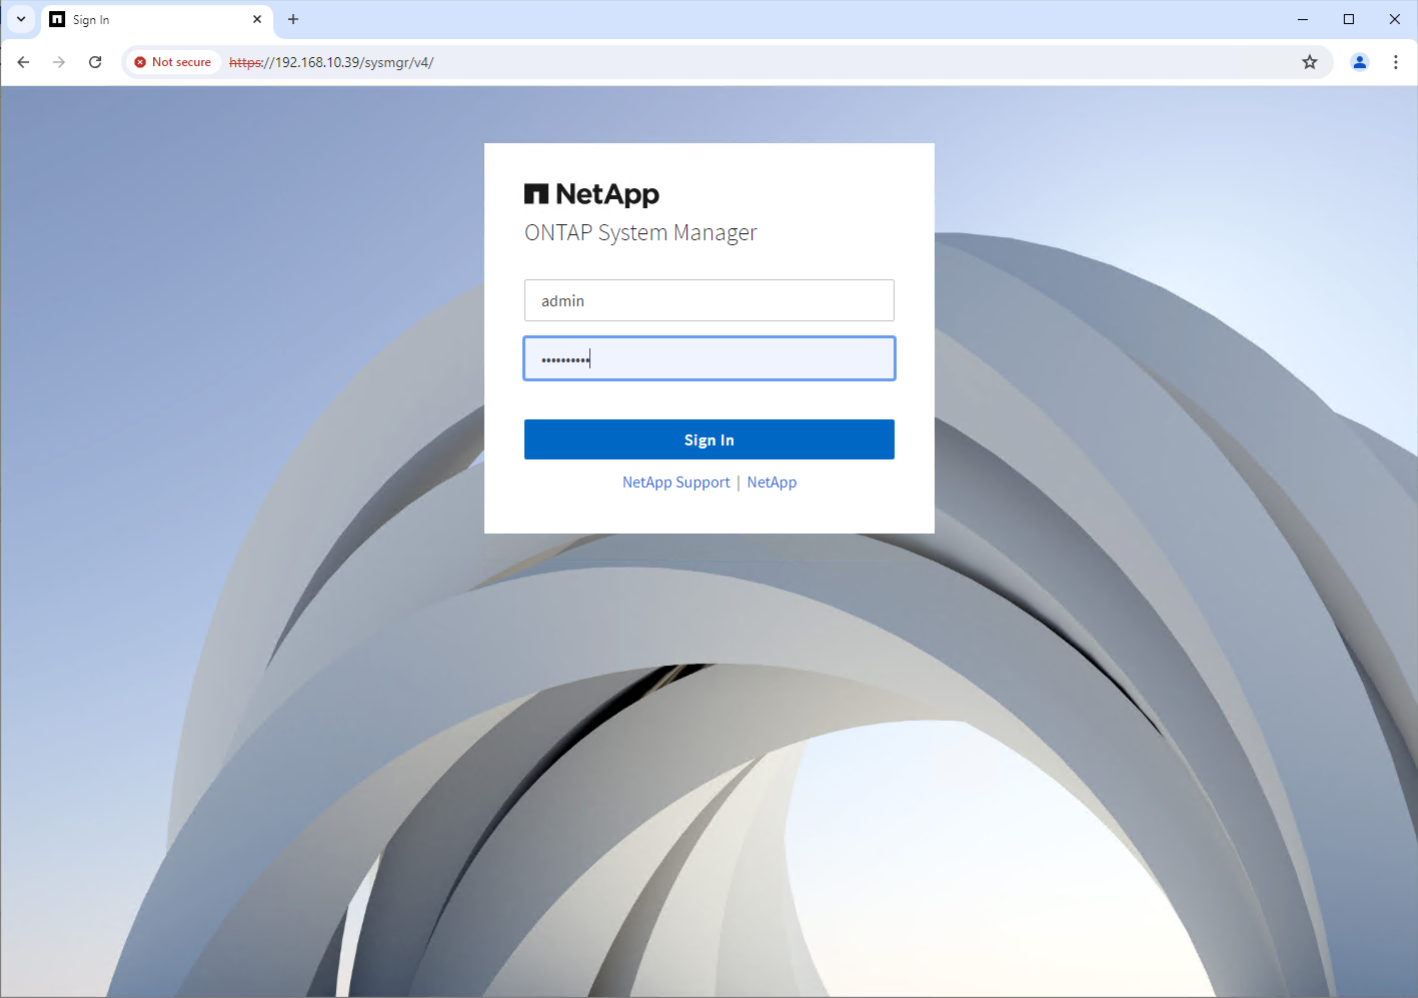
We will review the process of creating a new SVM for iSCSI on a NetApp Storage system. The NetApp cluster is administered with a web-based tool called ONTAP System Manager. To access ONTAP System Manager, enter the IP address of the cluster in a web browser and use the credentials you received during the handover to log in.
You can also use the more advanced command-line management option. For more information, please see Using the ONTAP command-line interface.
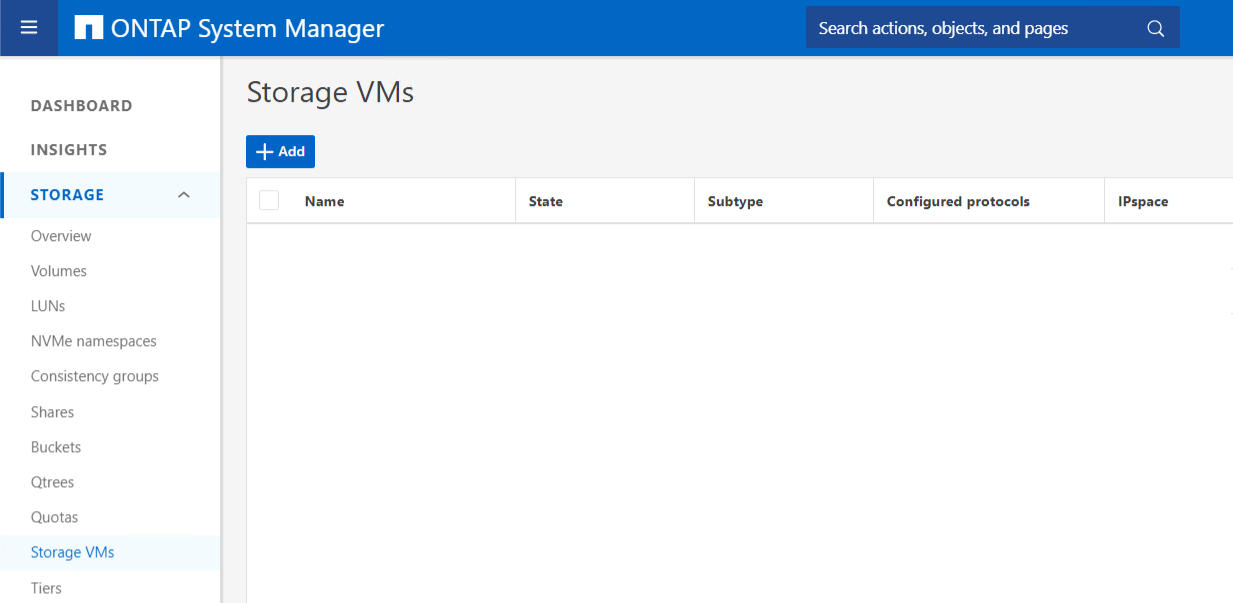
From the left navigation pane, expand Storage, and then click Storage VMs. Click the blue +Add button in the Storage VMs pane.
Enter a name for the SVM; in this case we are using "iSCSI-svm."
Click on the iSCSI tab, then check the box next to Enable iSCSI.
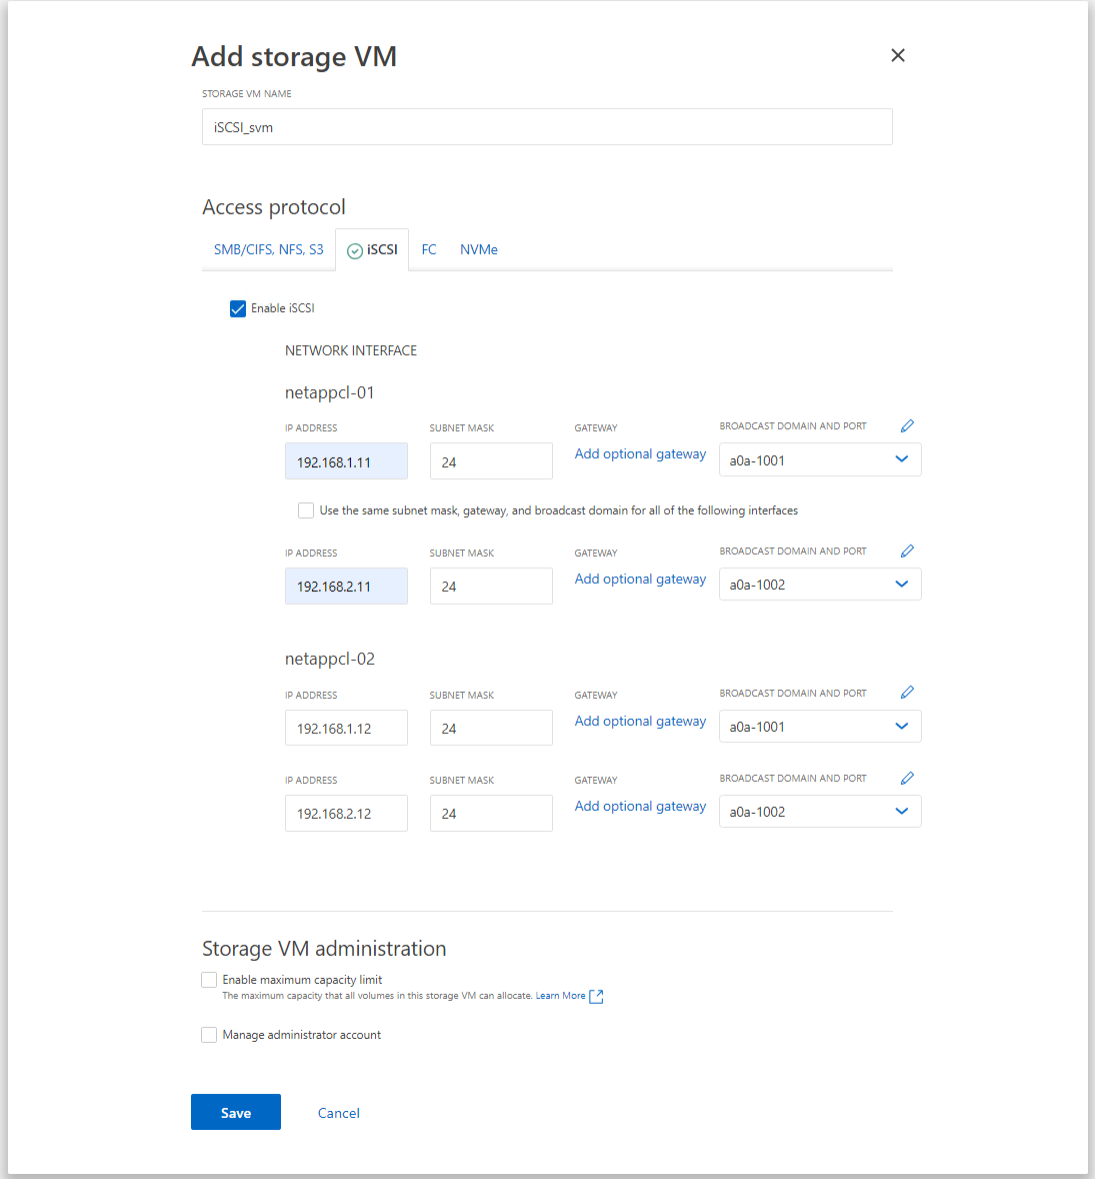
Each node requires two IP addresses to serve data, on each iSCSI VLAN. Enter the subnet mask, and select the correct broadcast domain.
There are two options under Storage VM administration.
First, you can set a maximum capacity for the SVM. This can be useful if you are delegating permissions on the Storage VM, or if you want to have an upper limit on consumed capacity.
Additionally, you may check the Manage administrator account box. This creates a "svmadmin" account for this SVM, which is a management delegation. This would allow a user to only administer the resources for this specific SVM, versus the whole cluster.
For more information, please see Cluster and SVM Administrators in the ONTAP 9 Documentation.
Click Save, and the new SVM will be created.
Additional NetApp iSCSI Concepts
While you have enabled iSCSI on the NetApp Storage system, there is some additional configuration needed before you can connect a host to the storage system.
As part of the configuration, you'll need to add the host's iSCSI initiators to the NetApp cluster. The initiator is responsible for sending SCSI commands over IP networks to the target, allowing it to access and interact with the storage device as if it were locally attached. This can be done during the LUN creation process, or it can be done ahead of time.
A LUN, which stands for Logical Unit Number, is essentially a chunk of storage on a storage system that a server can use just like a regular hard drive. Think of it like a virtual disk that’s stored on a large storage system, but the server or computer using it thinks it’s a physical drive attached to it. A LUN must be created on the NetApp storage cluster before a host can connect.
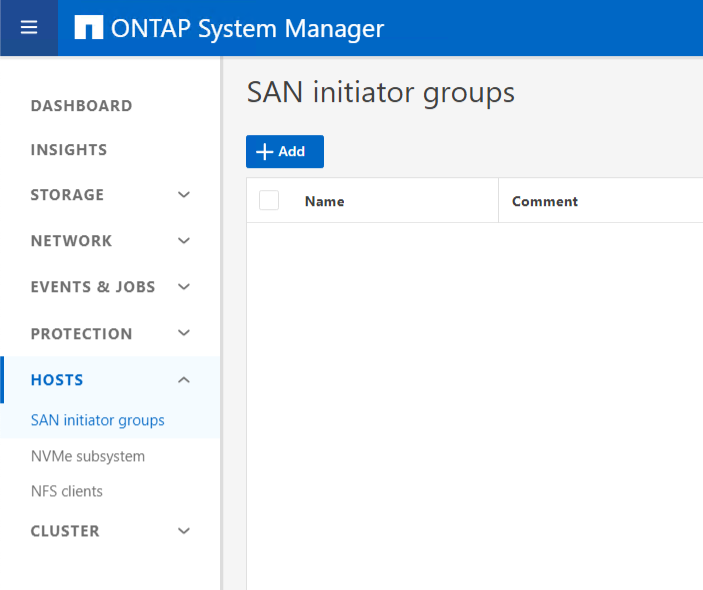
To add iSCSI initiators before adding the LUNs, expand Hosts in the left navigation pane. Then click SAN Initiator Groups, then the blue +Add button.
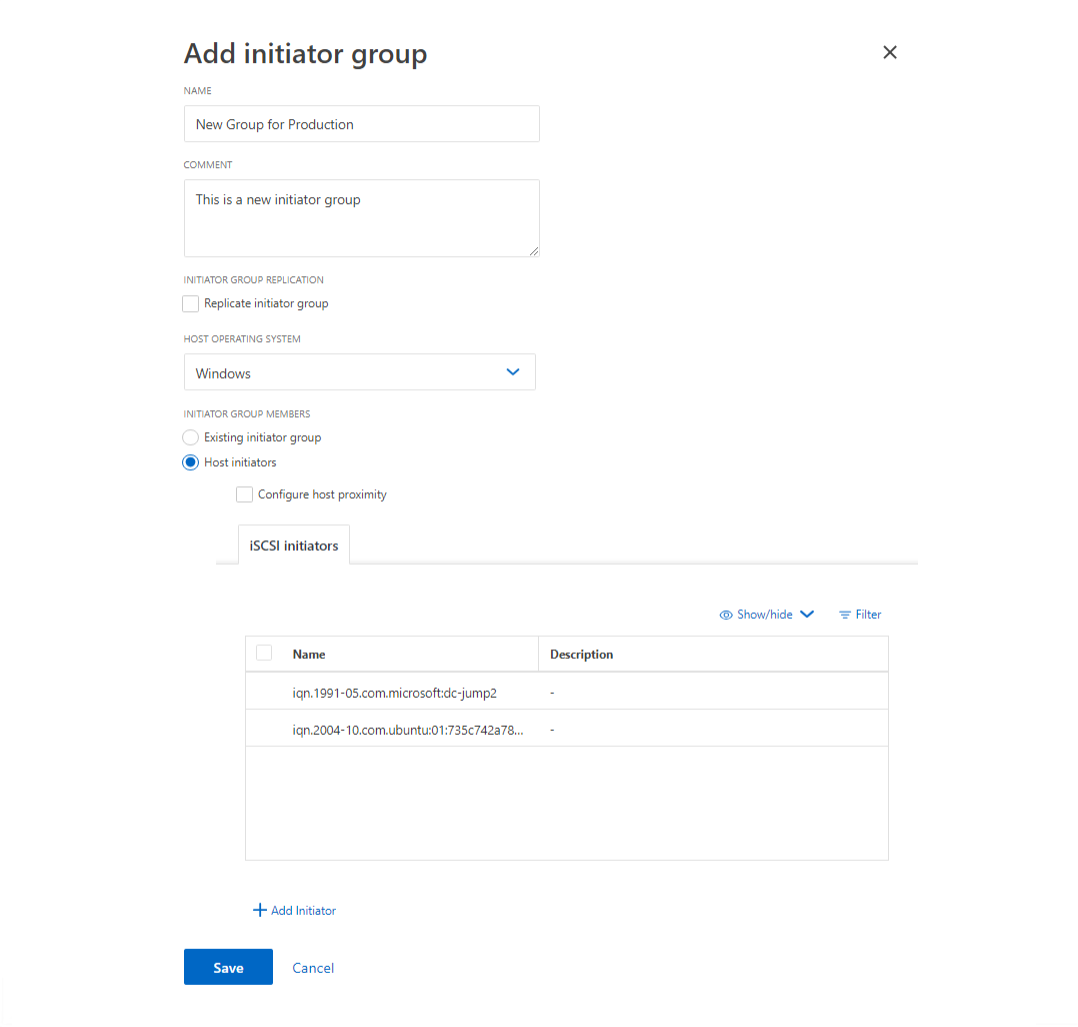
Enter a Name for the new Initiator Group, and a comment if desired. Ensure you have selected the correct Host Operating System.
You may create a new group from an existing group by selecting the Existing initiator group option.
You may also create a new group from initiators that have already been entered into the system, as they will be displayed. You can add a new initiator to the system by clicking +Add Initiator.
After you have configured the group, click Save.
Using an initiator group can streamline management and simplify operations. For example, you may choose to create an initiator group for a specific application, and add hosts to the group to ensure access. You can also nest initiator groups to provide access.
If you are working with a large number of hosts, adding them to initiator groups ahead of time can also streamline the LUN creation process. You can also edit an initiator group to add more LUNs as necessary.
For more information, see View and manage SAN initiators and igroups from the NetApp documentation.
Configuring NetApp Storage for Windows Hosts
In this section, you'll connect to the NetApp storage cluster from a Windows 2022 host. For more details, please see Using Windows Server 2022 with ONTAP
Make sure you have installed the NetApp Host Utilities Kit before proceeding. You must also enable Multipath IO on the Windows server, which can be done when connecting to the target, as shown later.
You will need the iSCSI Qualified Name, which may also be referred to as the IQN or iSCSI initiator name, for the Windows host you wish to connect from.
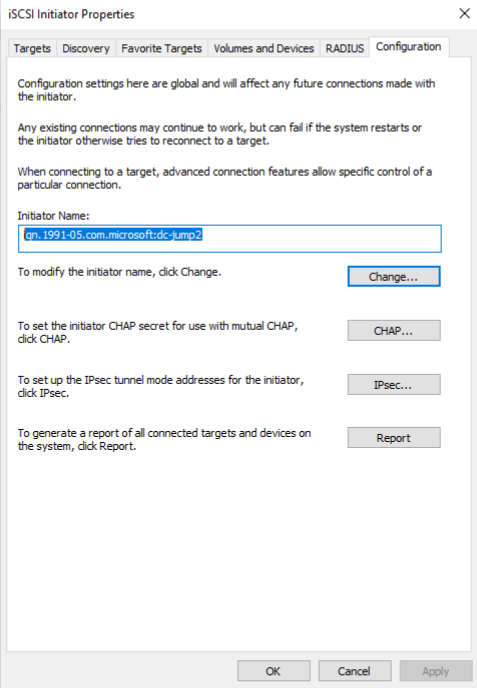
One common way to find the iSCSI initiator name is to use Sever Manager. Click Tools, and select iSCSI initiator from the dropdown menu.

Click the configuration tab, and copy the Initiator Name:
The initiator can be added to the NetApp storage system ahead of time or during the LUN creation process.
One of the most common issues when a host cannot connect to a NetApp Storage system is an issue with the initiator. Check the initiator name on the host OS if you experience problems.
Adding a LUN to the NetApp Storage
Before you can connect a host, you must add a LUN to the NetApp Storage. You can also follow this process to create additional LUNs.
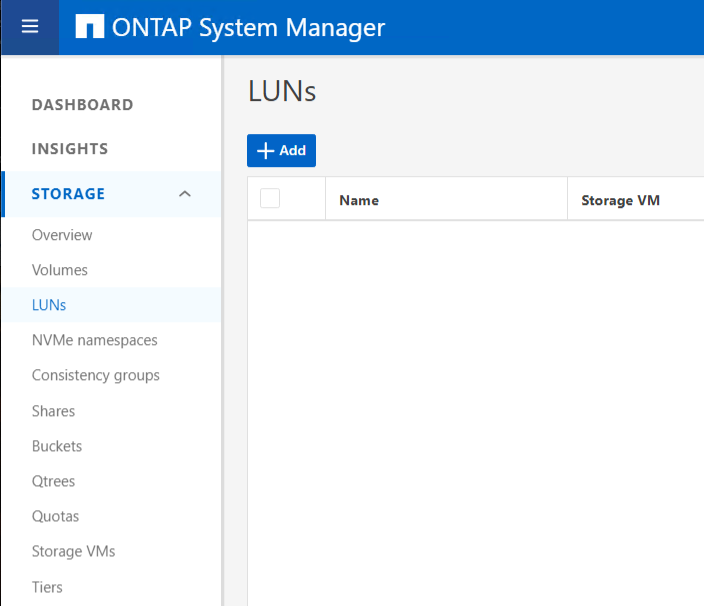
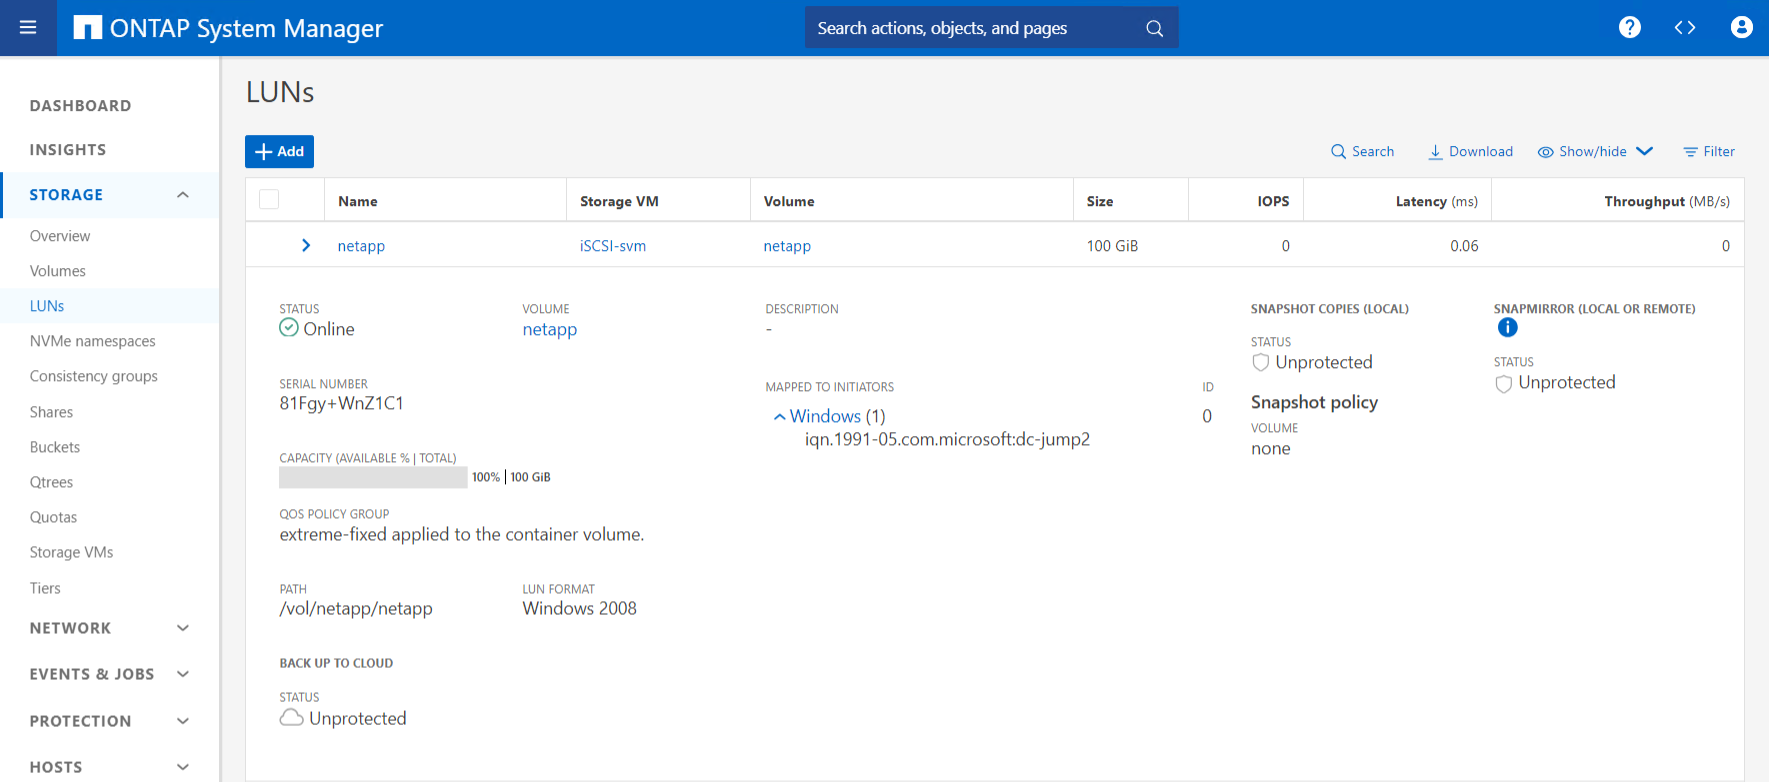
From the left navigation pane, expand storage, and then click LUNs. Then, click the blue +Add button.
Next, enter the information for the LUN. First enter the name prefix for the LUN. Enter the name for the LUN, the number of LUNs (if more than one is desired), and the size for the LUN.
NOTE: If you create multiple LUNs, _# will be appended to the end of the name prefix. For example, lun_1, lun_2, lun_3
Select the Host Operating System and LUN format from the dropdown menu.
If you have already created an Initiator Group, select it from the drop down menu.
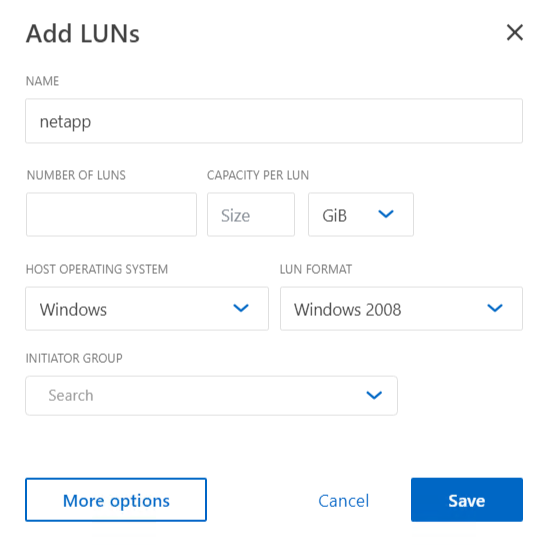
If you have not created an Initiator Group before now, select the More options button.
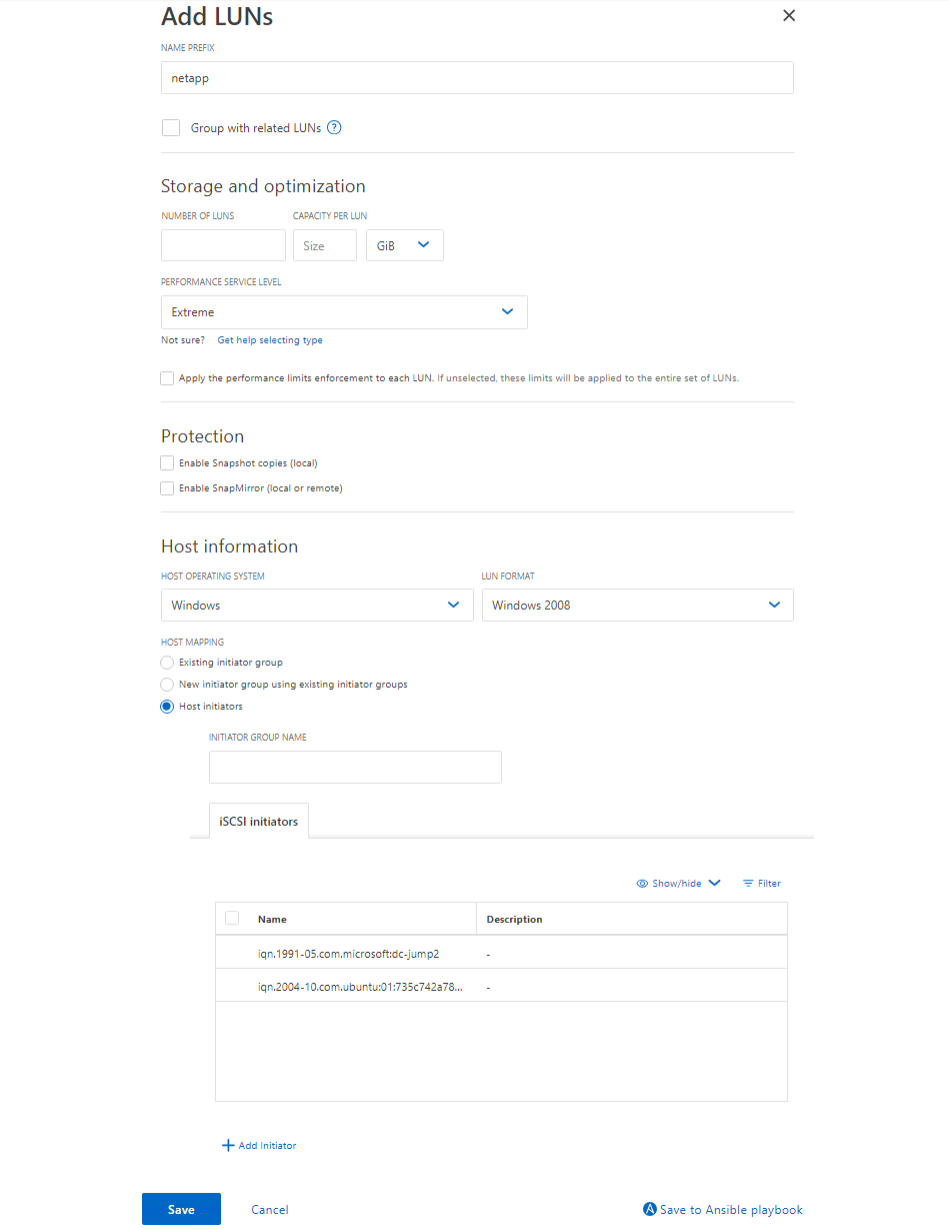
In addition to creating a new initiator group, there are several other options in this menu.
You can set a Performance Service Level. This is a quality of service implementation from NetApp.
The options are:
- Extreme Performance
- Performance
- Value
- Extreme for Database Logs
- Extreme for Database Shared Data
- Extreme for Database Data
You may also create your own Performance Service Levels. For more information, please see Performance Service Levels from the ONTAP Documentation.
In the Protection section, you may Enable Snapshot Copies (Local) or SnapMirror. If you have another NetApp Storage system in a different Equinix Metal Metro, consider enabling SnapMirror, which will replicate the SnapShots across metros. If you do not have a second NetApp Storage system, consider enabling Snapshot Copies and configure your schedule when setup is complete. For more information on how to do this, see Edit a snapshot schedule.
Beyond selecting an already created initiator group, you can now add a new one if you have not previously entered any IQNs into the NetApp system. To add a single initiator, click the radio button next to Host Initiators, then click the +Add Initiator and enter the initiator name. When you have finished, click Save.
After LUN creation has finished, you can now expand the LUN and see information including the volume name, size, and initiator mapping.
The most common issues when connecting a host to NetApp storage using iSCSI are incorrect initiator configuration, such as typos or simply forgetting to enter all initiator names. If you have problems connecting, check those settings.
Connect Your Windows Host
Now that the LUN has been created, you can now connect to the NetApp Storage from the Windows 2022 host.
From the Windows 2022 host, launch Server Manager. Click Tools in the upper-right corner and select iSCSI initiator.
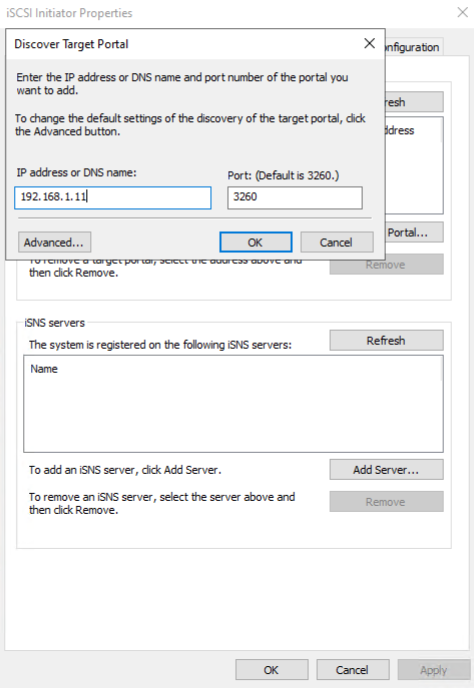
Click the Discovery tab, then click Discover Portal. Enter one of the iSCSI IP addresses from the NetApp Storage system, then click OK.
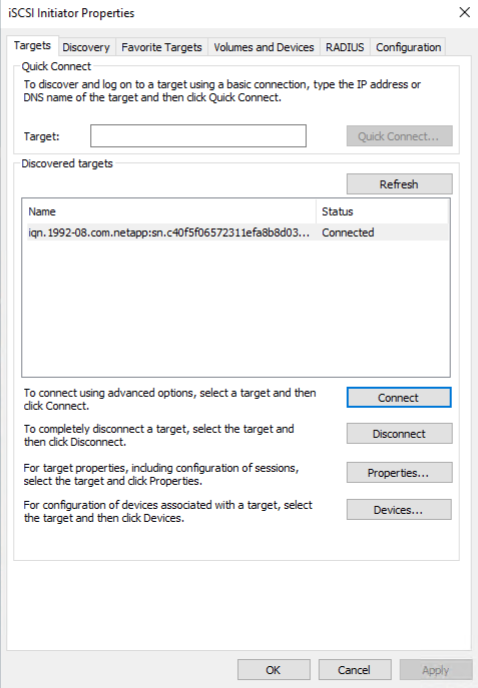
Click the Targets tab. You will see the IQN of the NetApp Storage system.
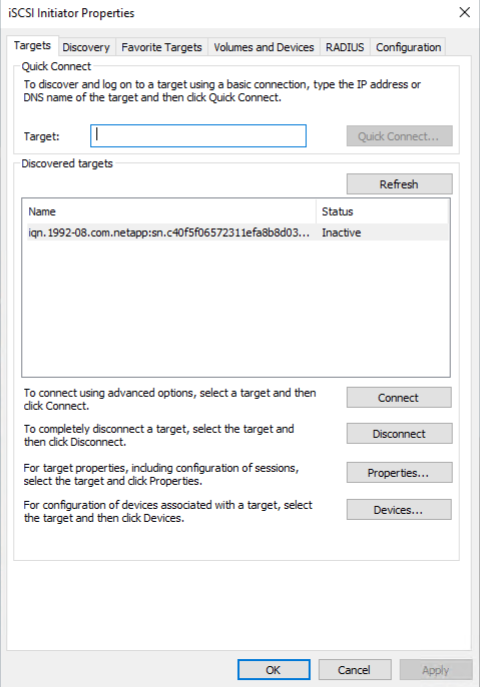
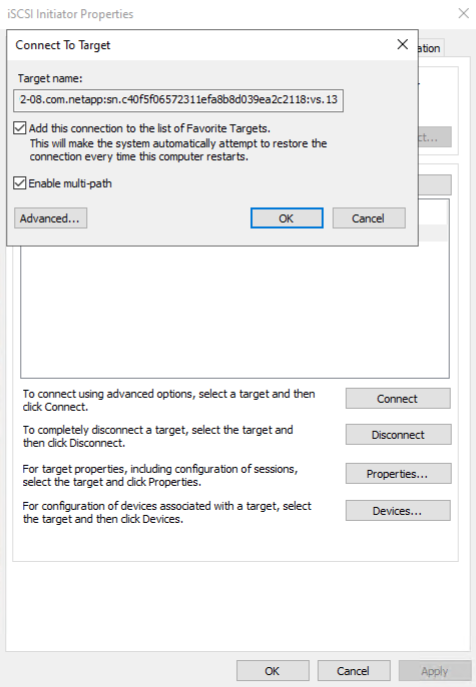
As you can see, the Status is Inactive. Click on the target, then click the Connect button. After clicking Connect, you will see the Connect to Target window. Be sure to clcik Enable muti-path, then click OK.
You will now see the Status is Connected.
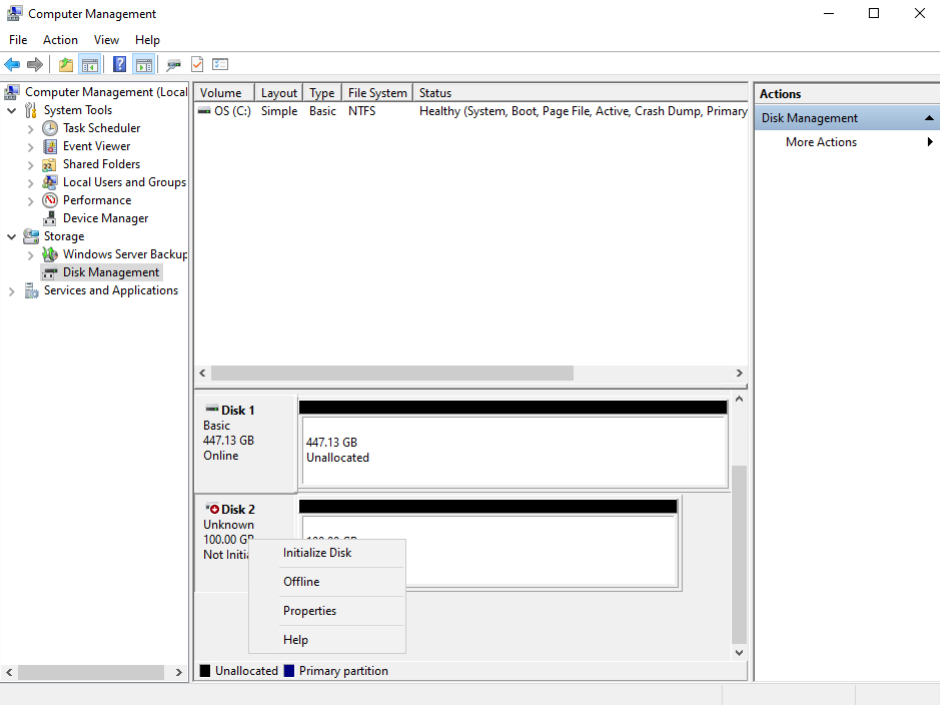
At this point, the Windows host can see the NetApp storage. You will now see the LUN as unallocated storage in the Storage section of Computer Management. The next step is to initialize the disk; right-click the Disk pane and select Initialize Disk.
After the disk is initialized, create a new volume. Right-click on the Unallocated space, and follow the wizard to create a volume of your choosing.
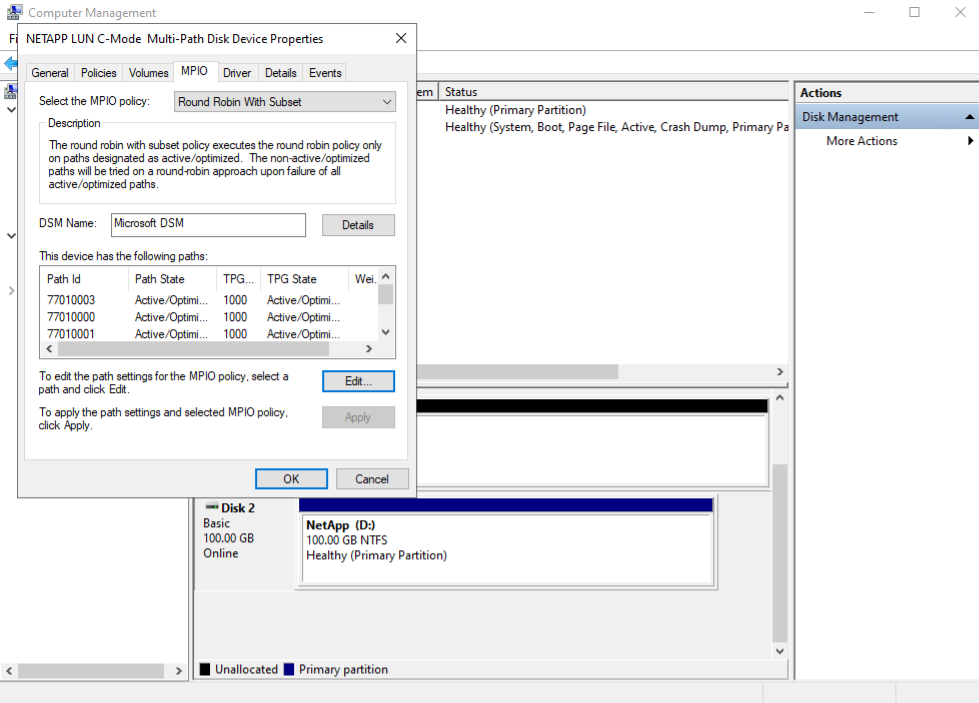
Next, you'll verify that the LUN is connected to the NetApp properly by confirming that there are four paths to the LUN.
Right-click the disk pane, and select Properties. Click the MPIO tab. You should see four paths listed, each with its own path ID. You will need to scroll down to see all the paths.
At this point, you may now begin to use the storage connected to your Windows host. You may also follow this process to add additional LUNs to your Windows host.
Configuring NetApp Storage for Linux Hosts
In this section, you'll connect to the NetApp storage cluster from a Ubuntu 22.04 LTS host. Please see Configure hosts with FCP and iSCSI in the NetApp ONTAP documentation.
Before proceeding, make sure you've completed the following steps:
- The iSCSI VLANs should be added to the NetApp Storage devices in the Metal Console (See Getting Started: Initial Setup of NetApp Storage on Equinix Metal)
- The iSCSI VLANs should be added to the NetApp Storage nodes in ONTAP System Manager (See Getting Started: Initial Setup of NetApp Storage on Equinix Metal)
- An iSCSI SVM should be created on the NetApp Storage cluster (see earlier in this document)
- An interface should be configured for each iSCSI VLAN on the Ubuntu Linux Host (See Equnix Metal Layer 2 Networking Documentation)
NetApp Host Utilities is not supported on every Linux platform. In the case of Linux host utilities, the utilities to do not make any changes to the Linux host. Please see Linux Unified Host Utilities 7.1. In this example, the Host Utilities do not support Ubuntu.
Configure on Ubuntu Linux Host
You'll need to install two software packages to use iSCSI: open-iscsi and multipath-tools. When you deploy a Ubuntu host from Equinix Metal, they are installed by default.
To install them manually, use the following command:
apt-get install open-iscsi multipath tools
If they are already installed on the system, you will be notified they already exist when you issue the commands.
After you have configured the network interfaces, restart the iscsi service with the following console command:
systemctl restart iscsid
Next, you'll need the initiator name. To find the initiator name, use the following command:
cat /etc/iscsi/initiatorname.iscsi
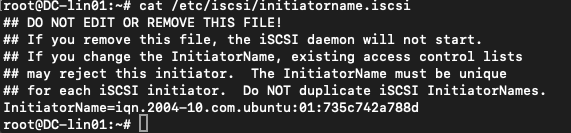
You are now ready to configure the LUN on the NetApp System.
Create LUN on NetApp Storage System
You will need to create a LUN on the NetApp storage system. Please refer to the "Adding a LUN to the NetApp Storage" section above.
After creating the LUN, you can then connect the Linux host to the NetApp Storage system.
Connect Linux Host to NetApp Storage
Now you can connect the Linux host to the NetApp storage. You will need one of the iSCSI IP addresses you have configured on the NetApp storage system.
You'll use the iscsiadm command for this process.
The -m switch is used to specify the mode you're operating under. The mode will change throughout the process based on what you're doing.
Use the following command to begin the connection process to the NetApp Storage. First, discover the storage system, using discovery mode.
sudo iscsiadm -m discovery -t st -p <target-ip>
You will see output similar to the following:

You can see all four iSCSI IP addresses on the NetApp, as well as the IQNs of each node.
Next, connect to the storage system with the following command:
sudo iscsiadm -m node -T <iqn-of-target> -p <target-ip> -l

Verify the connection by using the following command:
sudo iscsiadm -m session -o show

You can see that all of the configured iSCSI interfaces on the NetApp are now connected to the host.
Next, verify that you can see the LUN we configured, and that multipathing is working as expected with the following command:
multipath -ll
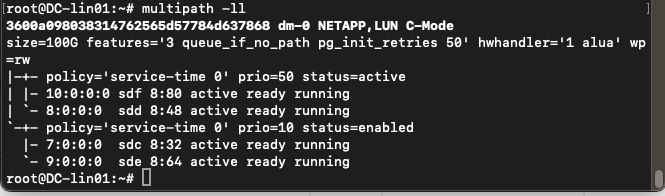
As you can see, there are four paths to the LUN.
Conclusion
With this guide, you have set up NetApp Storage using the iSCSI. You've managed LUNs, created export policies, and connected the hosts to the storage. For more advanced configurations and additional resources, you can see the NetApp documentation we have linked here or check out one of our other storage guides.
Additional Resources from NetApp
Here are additional resources from the NetApp documentation that have been consulted during the creation of this guide.
NetApp Host Utilities Supported Windows Versions
NetApp Host Utilities Supported Linux Versions
Provision SAN Storage in the NetApp ONTAP 9 Documentation.
Using Windows Server 2022 with ONTAP
NetApp Technical Report 4080: Best Practices for Modern SAN
Last updated
07 January, 2025Category
You may also like
Dig deeper into similar topics in our archives
Crosscloud VPN with WireGuard
Learn to establish secure VPN connections across cloud environments using WireGuard, including detailed setups for site-to-site tunnels and VPN gateways with NAT on Equinix Metal, enhancing...

Kubernetes Cluster API
Learn how to provision a Kubernetes cluster with Cluster API

Kubernetes with kubeadm
Learn how to deploy Kubernetes with kubeadm using userdata

OpenStack DevStack
Use DevStack to install and test OpenStack on an Equinix Metal server.