
Connect Your First Fabric Cloud Router with FCR and AWS

Learn the essentials of creating and connecting your first cloud router with Equinix FCR and AWS. Provision your cloud router, set up connections, and attach it to AWS Direct Connect.

Connect Your First Fabric Cloud Router with FCR and AWS

When you're working with multiple cloud locations, whether that's across data centers or across providers, you need to be aware of your networking throughput and latency. Using a cloud router means you're not transmitting data over the Internet, but rather sending your data securely on a private, direct connection.

In this guide, you'll set up and connect your first Equinix Fabric Cloud Router (FCR) to AWS Direct Connect on Amazon Web Services (AWS), following these steps:

  1. Log In: Log into your AWS account.
  2. Sign up: Use AWS marketplace to sign up for the free trial.
  3. Request resources: Fill out the form to turn on your Equinix availability.
  4. Configure your account: Set up your account.
  5. Create a Fabric Cloud Router: Provision a cloud router.
  6. Connect all the things: Set up all of your connections.
  7. Set up your routing: Accept the connection created through Equinix to AWS.

Step 1: Log into your AWS account

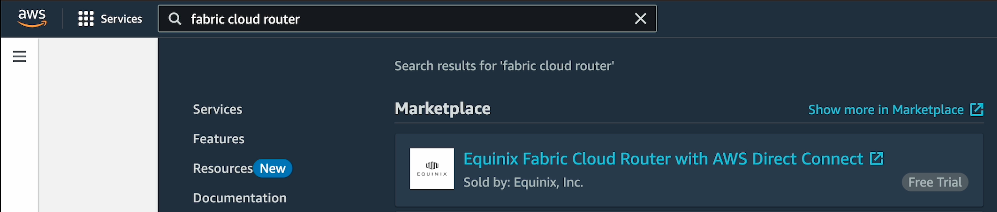
Let's use the AWS Marketplace to sign up for a trial so you can connect AWS to anywhere immediately.

Once you've logged into your console, use the search bar to get to the Equinix Fabric Cloud Router with AWS Direct Connect offering on AWS Marketplace.

The AWS Cloud Console with the search bar containing the search term "fabric cloud router" and the result in question highlighted

Step 2: Sign up for the trial

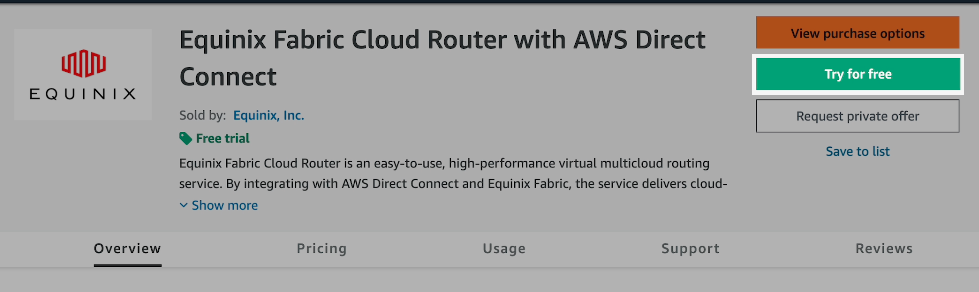
Use the Try for free button to go to the contract configuration page.

The AWS Marketplace listing for Equinix Fabric Cloud Router with AWS Direct Connect with the Try For Free button in the top right highlighted

Ensure the dropdown shows a Free trial tag.

A page with "Equinix Fabric Cloud Router with AWS Direct Connect" and "Configure your Software Contract" across the top. The important part, a dropdown inside the Offer Type box, is highlighted. On the dropdown, there is a tag icon with the words "Free trial", and the Offer Type is listed as a "Free trial" in both the selection title and the actual offer type field.

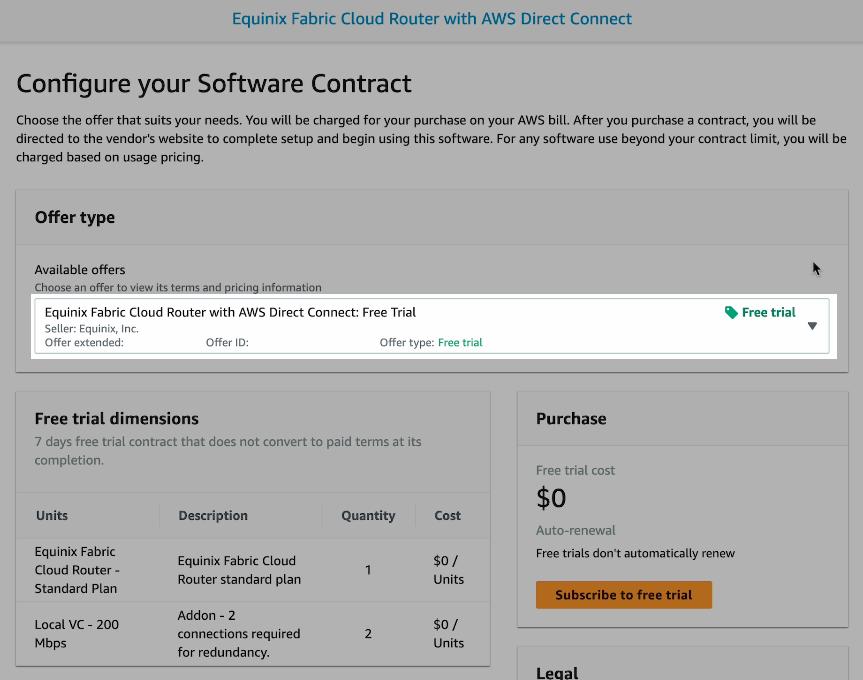
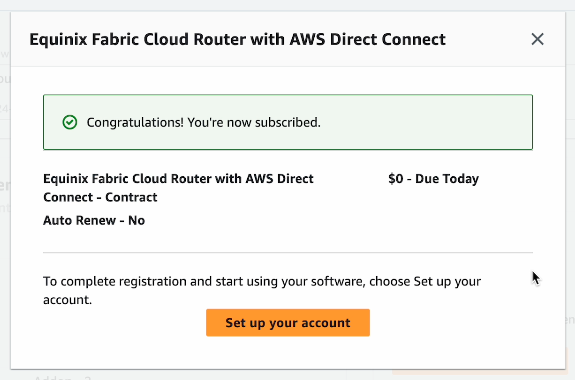
Select Subscribe to free trial.

Zoomed in from the previous image to the box titled Purchase. The Free trial cost is listed as $0 with a note that free trials do not automatically renew. The button titled "Subscribe to free trial" is highlighted.

You will get an alert congratulating you on starting your free trial. There will be a button to Set up your account. Select that button.

A box titled "Equinix Fabric Cloud Router with AWS Direct Connect". A note at the top has the words "Congratulations! You are now subscribed." in it.

Step 3: Fill out the form

To provision your FCR, you will fill out the form on this page.

A form. Above the form is a note as follows: "One more step... Thank you for your purchase of Equinix Fabric Cloud Router with AWS Direct Connect. Complete your registration now to activate your subscription. The purchase is not complete until this form has been submitted." The fields of the form include Company, Full Name, Email Address, Country Code (for your phone number), and Phone Number. There is a button at the end labeled "Complete Registration" along with a statement about the privacy policy and terms of use.

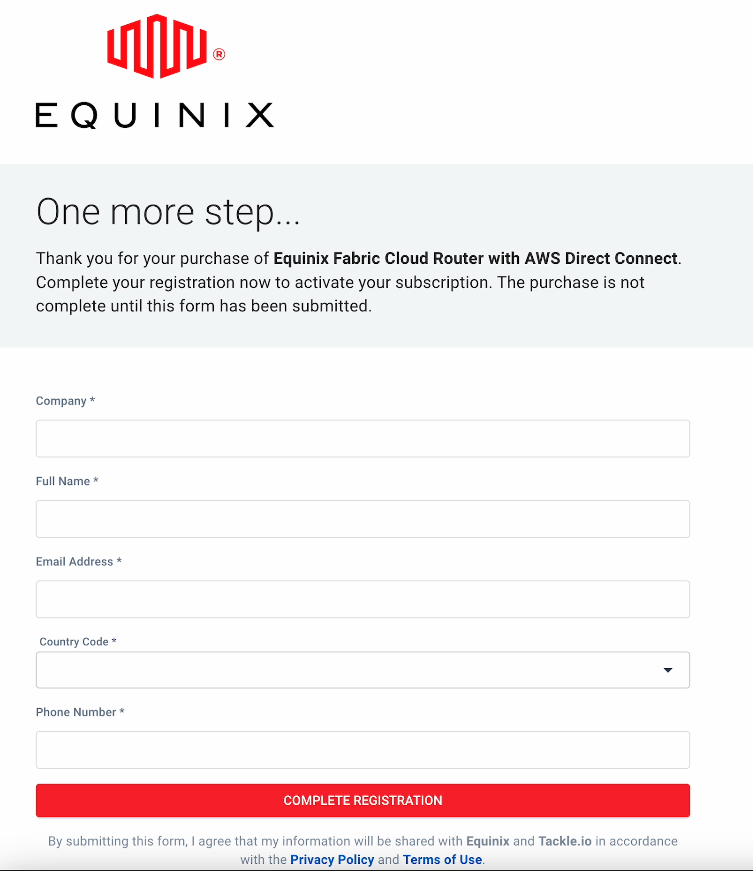
Once you've entered everything in, select Complete registration. You should get an immediate email from AWS acknowledging your AWS Marketplace purchase.

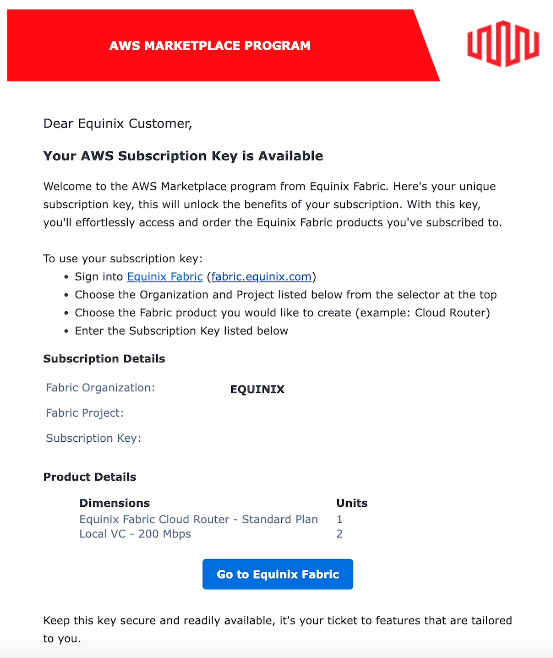
You'll wait about 10 minutes for an email from Equinix to arrive in your inbox with your account details. The email will contain your Fabric Organization, your Fabric Project number, and your Subscription Key, along with the same details about what exactly you have available as was on your trial configuration page on AWS Marketplace.

A screenshot of an email from Equinix regarding the AWS Marketplace program. The key pieces in the email are directions, your organization, your Fabric project number, your subscription key, and details on the product (the numbers are redacted here). The directions point you to sign into Equinix Fabric, open the organization listed, create an cloud router, and use the subscription key provided. The details are the same as in the AWS Marketplace offering for the free trial. There is also a button to go to the Equinix Fabric.

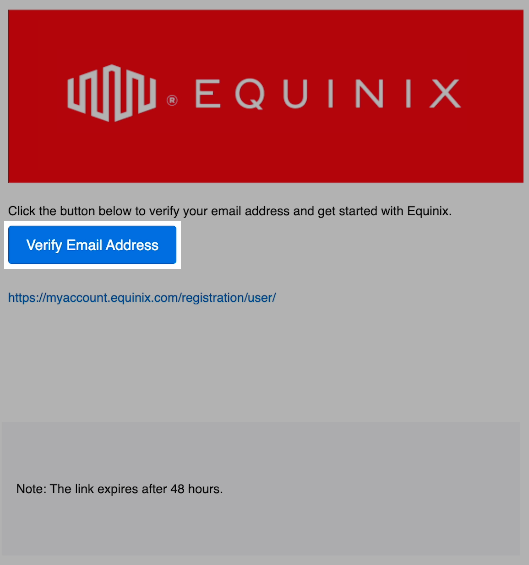
You will also receive another email from Equinix to verify your email address for your Equinix account, which gets set up when you start the free trial on AWS Marketplace.

Step 4: Configure your Equinix account

To proceed, use this second email to select Verify Email Address or use the link in the email to verify your email address and set up your Equinix account.

An email with the Equinix logo. There is a button labeled "Verify Email Address" that is highlighted. Below the button is a unique link, partially redacted, to verify your email address. A note indicates the link expires after 48 hours.

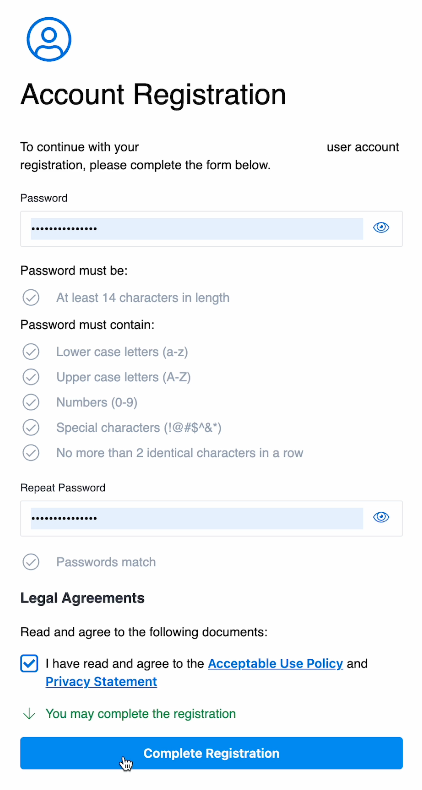
On the resulting form, generate and enter a new password, ensure it is the same in the Repeat Password field, accept the Acceptable Use Policy and Privacy Statement, then select Complete Registration.

An account registration form. There are two fields, a password field and a repeat password field. The directions indicate passwords must be at least 14 characters in length and must contain lowercase letters; uppercase letters; numbers; special characters of a limited set that include an exclamation mark, an "at" sign, an octothorpe, a dollar sign, a caret, an ampersand, and an asterisk; and no more than 2 identical characters in a row. The form has ensured that the two passwords match. Finally, there is a legal agreement checkbox at the end that confirms you have read the acceptable use policy and privacy statement, both linked. The box is checked, so the button labeled "Complete Registration" is active.

On the next page, use your email address and your new password to sign in.

Step 5: Create your Fabric Cloud Router

Now onward to the networking goodness!

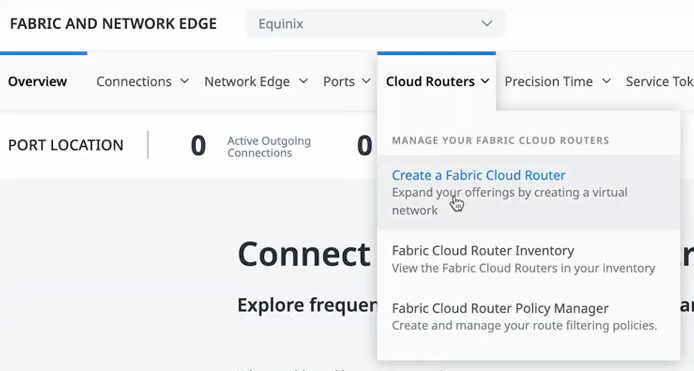
From the dashboard, open Cloud Routers > Create a Fabric Cloud Router.
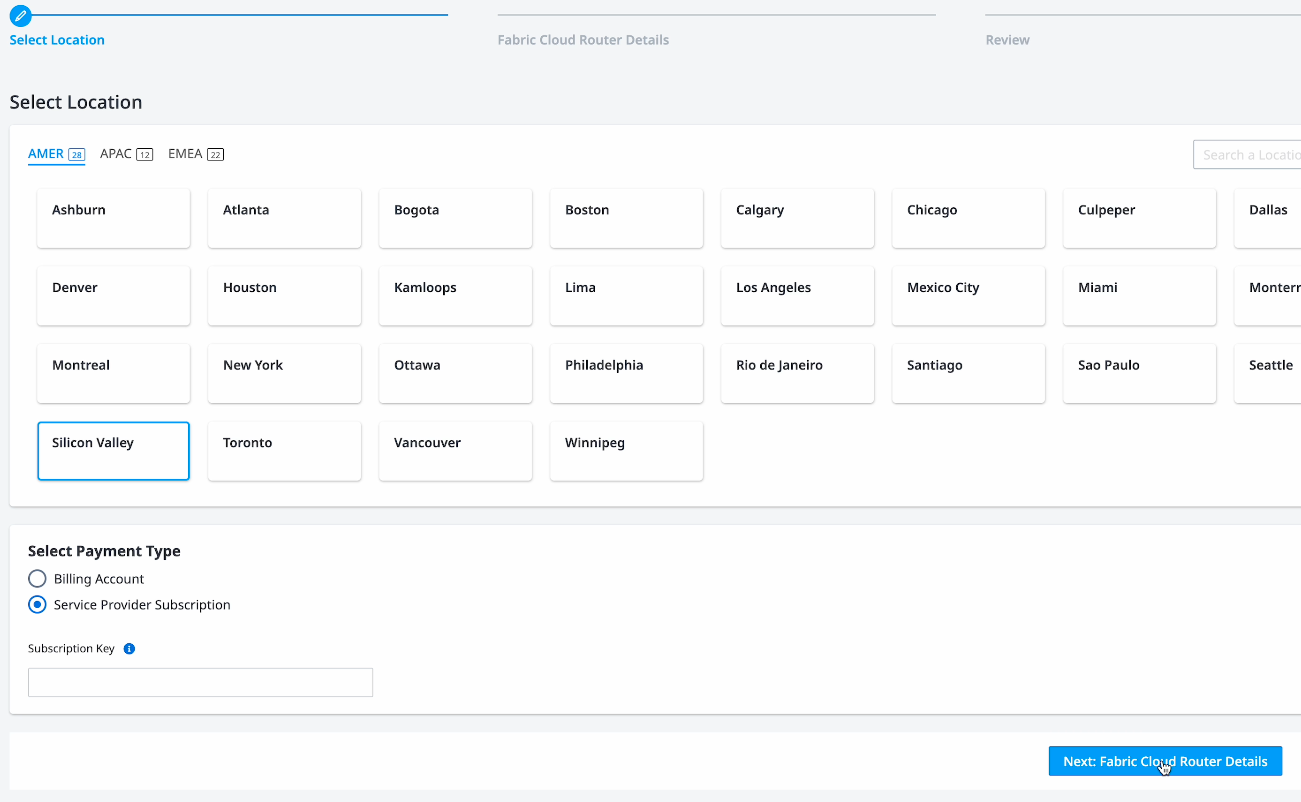
A menu opened from a top navigation bar on the Equinix portal. The menu is labeled Cloud Routers, and the menu contains three options with descriptions: Create a Fabric Cloud Router, Fabric Cloud Router Inventory, and Fabric Cloud Router Policy Manager. The Create a Fabric Cloud Router option is highlighted.

Select a location in the United States. (Unfortunately, for now, AWS Direct Connect with Fabric Cloud Router only works in US-based data centers.) From there, select Service Provider Subscription. Go back to your email, and copy the Subscription Key you received from Equinix. Paste that key into the entry box, then select Next: Fabric Cloud Router Details.

The Select Location page. It is step 1 of a 3 step process. There is list of datacenter locations. Of all of the locations, the Silicon Valley location is selected. Underneath the list, there is a Select Payment Type box. Inside that box are two options, Billing Account and Service Provider Subscription. The Service Provider Subscription option is selected, and a Selection Key text box has appeared (redacted). At the end, a button labeled "Next: Fabric Cloud Router Details" is active.

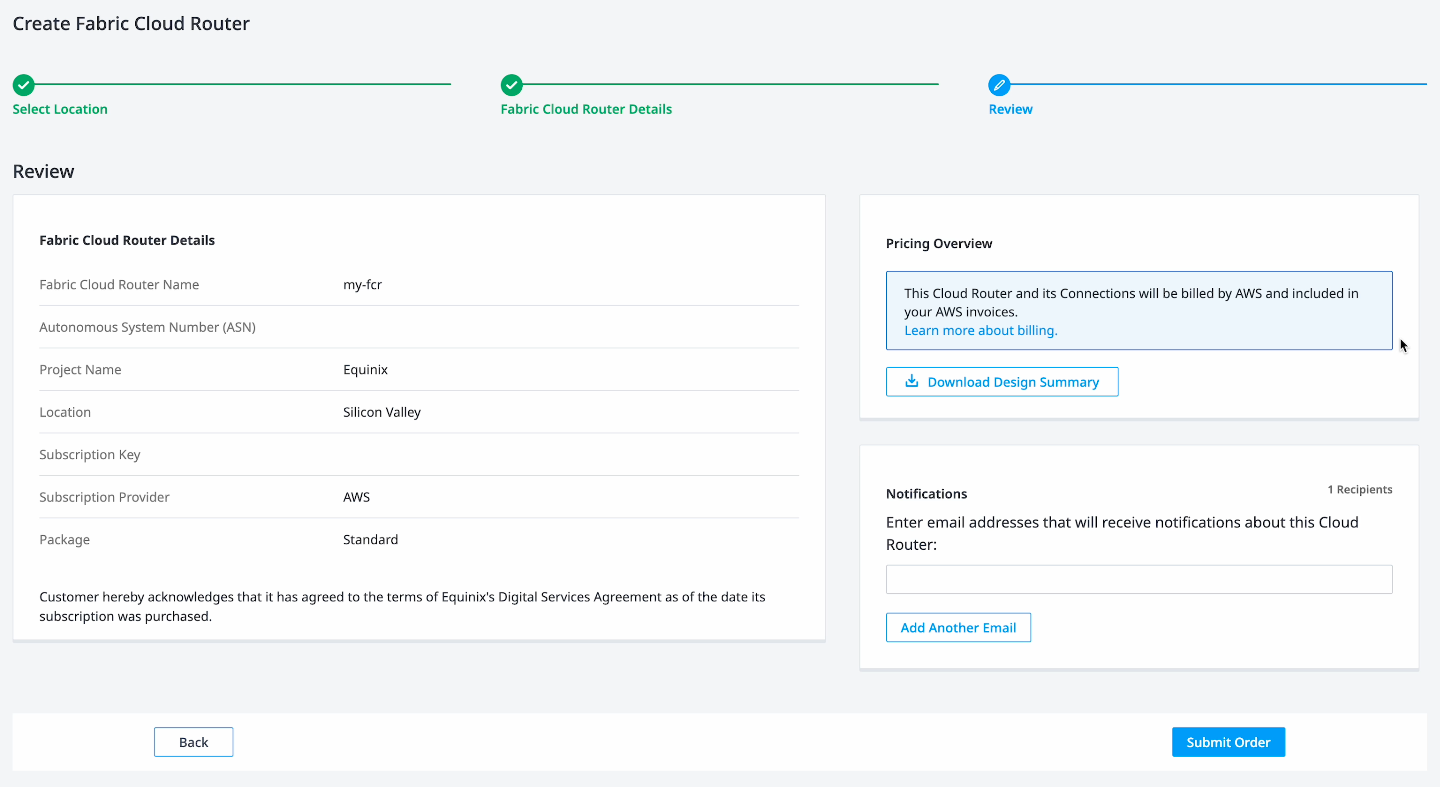
On the next page, name your cloud router. You will only have one package available to you for the router as the AWS Marketplace trial uses the Standard package only. Select Next: Review to continue.

The Create Fabric Cloud Router page. It is step 2 of a 3 step process. There is a text box under the heading Fabric Cloud Router Name, with an entry of "my-fcr". A table at the bottom is titled "Select Package" with the information that "The packages available are determined by the Cloud Router subscription." There are five columns in the table: package, IPv4 route quota, IPv6 route quota, VC bandwidth maximum, and subscription quantity available. There are three rows set up as options: Lab, Standard, and Advanced. The Lab option has 50 routes for IPv4 and IPv6 each, 50 Mbps as the VC bandwidth maximum, and nothing available for the subscription quantity available. The Standard option has 1000 routes for IPv4, 100 routes for IPv6, 10 Gbps as the VC bandwidth maximum, and 1 of 1 available for the subscription quantity. The Advanced option has 4000 routes for IPv4, 250 routes for IPv6, 50 Gbps as the VC bandwidth maximum, and nothing available for the subscription quantity availability. The standard option is selected. The button labeled "Next: Review" is highlighted.

On the review page, note that your billing information will reflect that you're using an AWS account subscription.

The Create Fabric Cloud Router Review page. It is step 3 of a 3 step process. The details and selection from the previous two screens is in a box, with the unit's autonomous system number and subscription key redacted. Another box titled Pricing Overview notes, "This Cloud Router and its Connections will be billed by AWS and included in your AWS invoices." There's a box below that titled Notifications with an empty box for email addresses that will receive notifications about this Cloud Router. Finally, there's a button labeled Submit Order at the bottom.

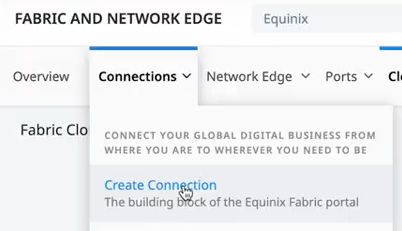
Step 6: Set up the connections

Now let's get some things connected. In the top menu bar, open Connections > Create Connection (or select the Create Connection button in the top right).

A menu opened from a top navigation bar on the Equinix portal. The menu is labeled Connections, and the menu itself is cut off. The only option on screen is highlighted with its description: Create Connection.

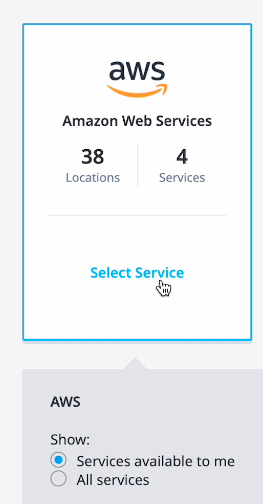
Select AWS on the Frequent Connections page.

A box with the AWS logo and the title Amazon Web Services noting how many locations and services are available. The Select Service link is selected, with a pane open below it. The pane is titled AWS and has two options available to show: Services available to me and All services. The Services available to me option is selected.

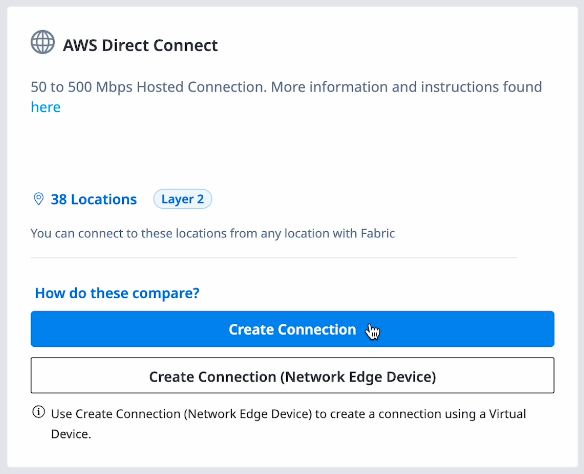
Then select Create Connection under the correct choice for your use case. Here, we'll select AWS Direct Connect.

A box titled AWS Direct Connect. The description notes, "50 to 500 Mbps Hosted Connection. More information and instructions found here" with a link. The box then shares how many locations the service is available, and notes it is a layer 2 connection. The button labeled Create Connection is highlighted, with another button titled Create Connection (Network Edge) available underneath it.

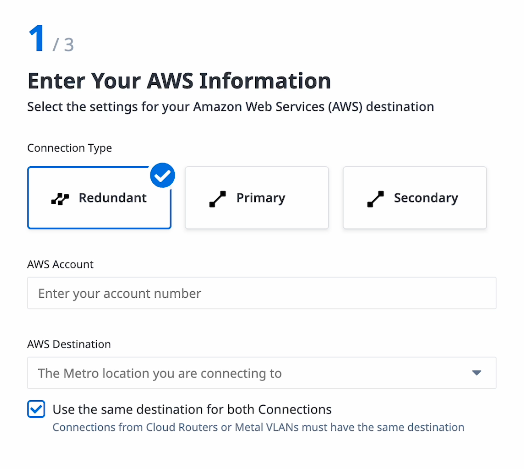
Next, we'll configure the AWS connection. You can choose Redundant, Primary, or Secondary. For demonstration purposes as this is not production, we'll select Primary, but if you're setting this up for production, you probably want a redundant connection for reliability. Get your account ID from AWS, then select where you would like to connect your cloud router to.

A box showing step 1 of 3, titled Enter Your AWS Information. There are three options for connection type: Redundant, Primary, and Secondary. Redundant is highlighted at the moment. There is a text box for your AWS Account number, and then a drop down for the AWS Destination metro. A checkbox is selected titled Use the same destination for both Connections, with a note that the connections from Cloud Routers or Metal VLANs must have the same destination.

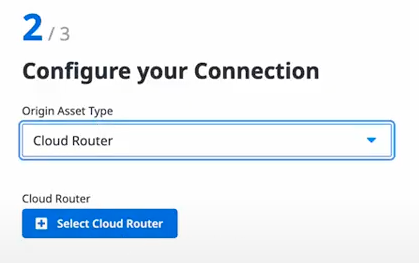
Select Cloud Router as the origin for the connection, then select the Select Cloud Router button.

A box showing step 2 of 3, titled Configure your Connection. There is a dropdown titled Origin Asset Type, with the option Cloud Router selected. A button labeled Select Cloud Router is below it.

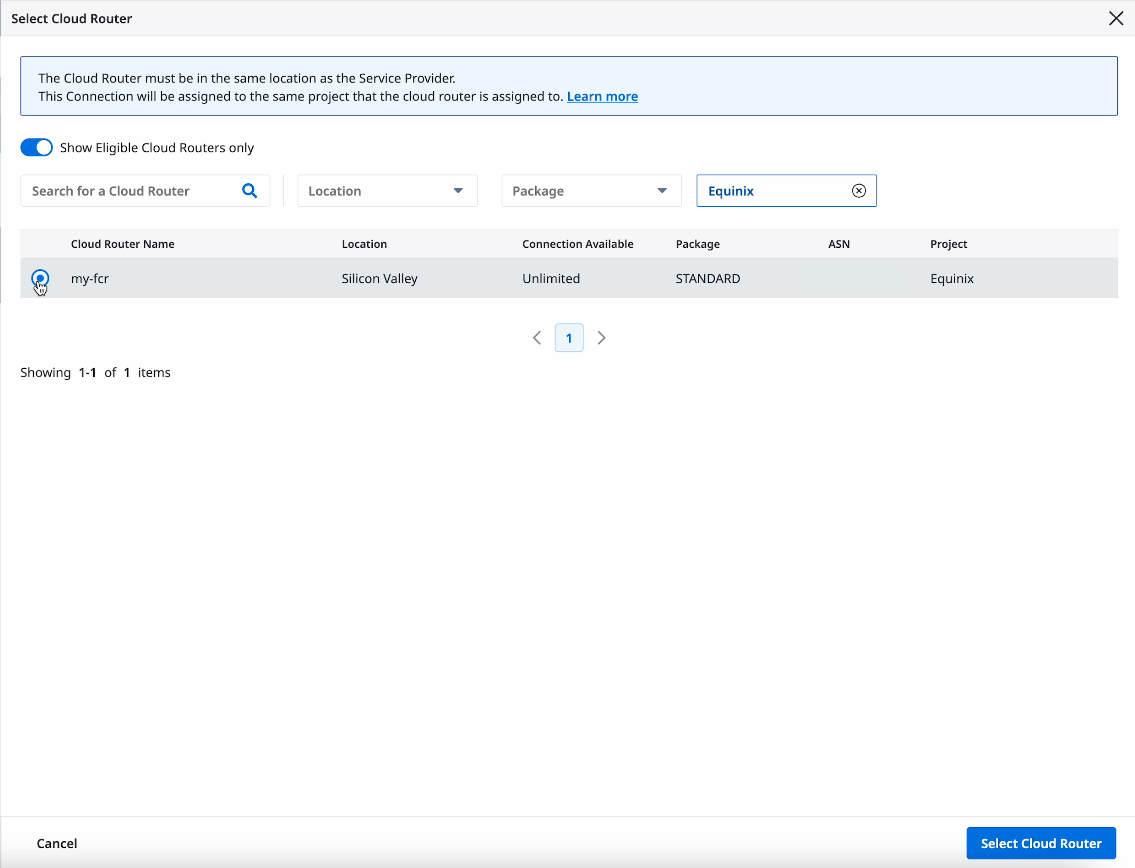
In the modal that appears, select the cloud router you created in step 5. Use the Select Cloud Router button at the bottom right to continue.

A panel titled Select Cloud Router. A note indicates, "The Cloud Router must be in the same location as the Service Provider. This Connection will be assigned to the same project that the cloud router is assigned to." with a link to learn more. A switch is toggled on labeled Show Eligible Cloud Routers only. In the table below the search options,

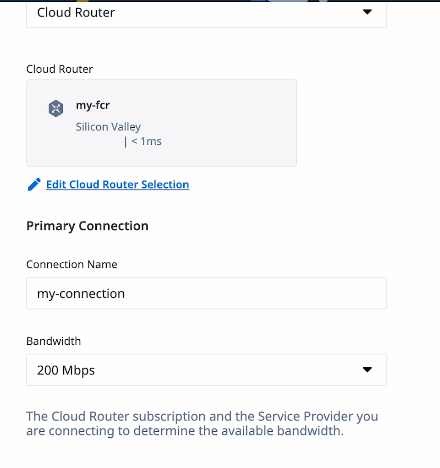
Then name the connection and select the bandwidth for the connection.

The Cloud Router section is populated with the "my-fcr" cloud router details. There is a link to edit the cloud router selection. Then in a section titled Primary Connection, there is a text box for the connectioon name, filled out with the name "my-connection", and a bandwidth dropdown populated with the 200 Mbps option. There is a note stating, "The Cloud Router subscription and the Service Provider you are connecting to determine the available bandwidth."

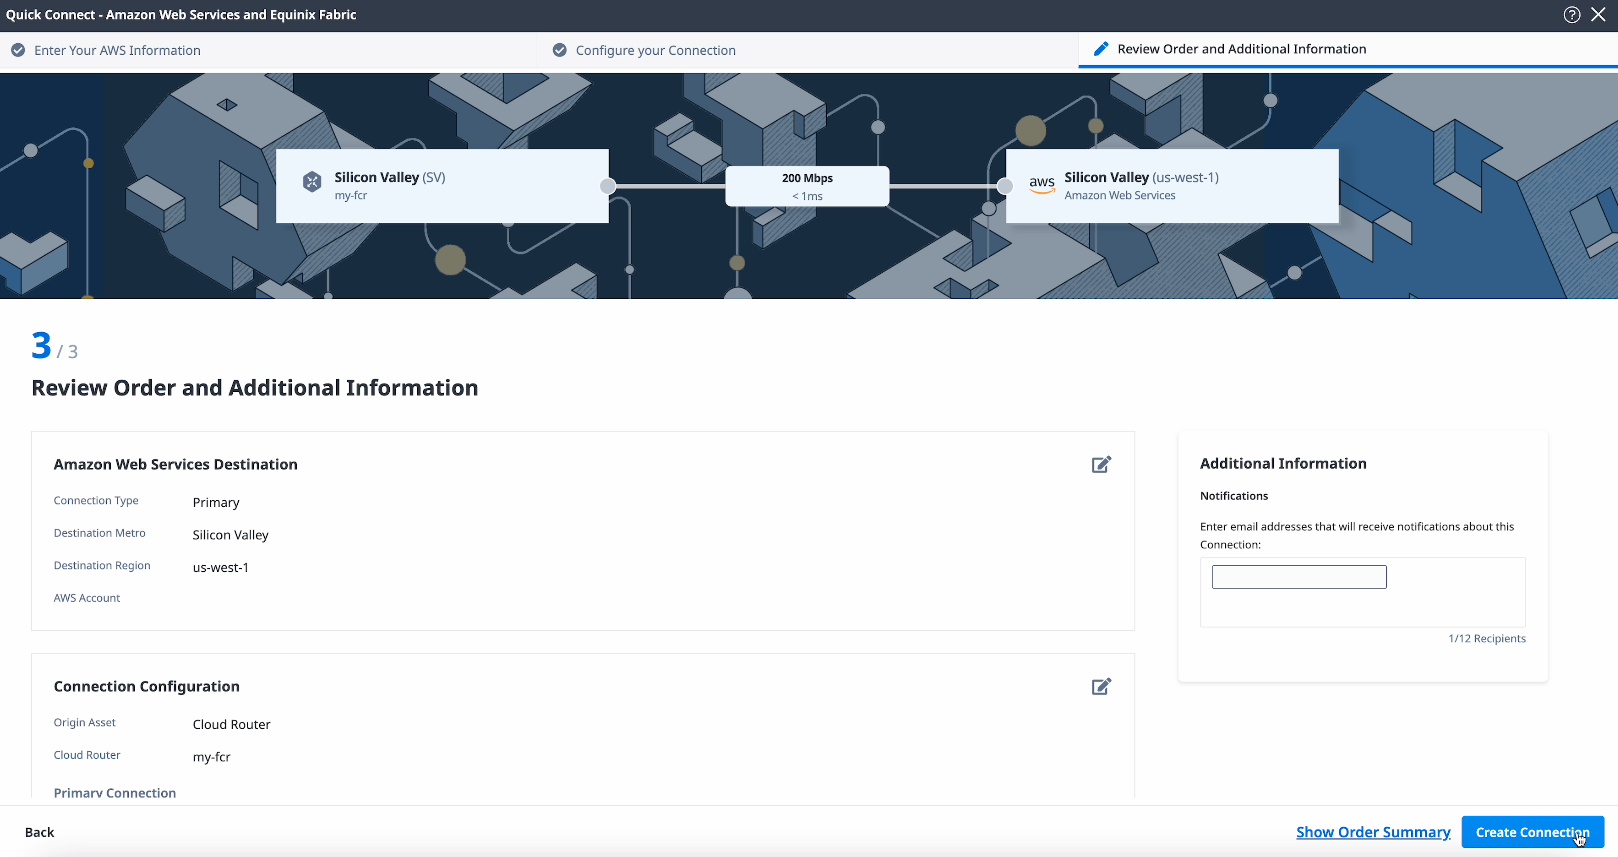
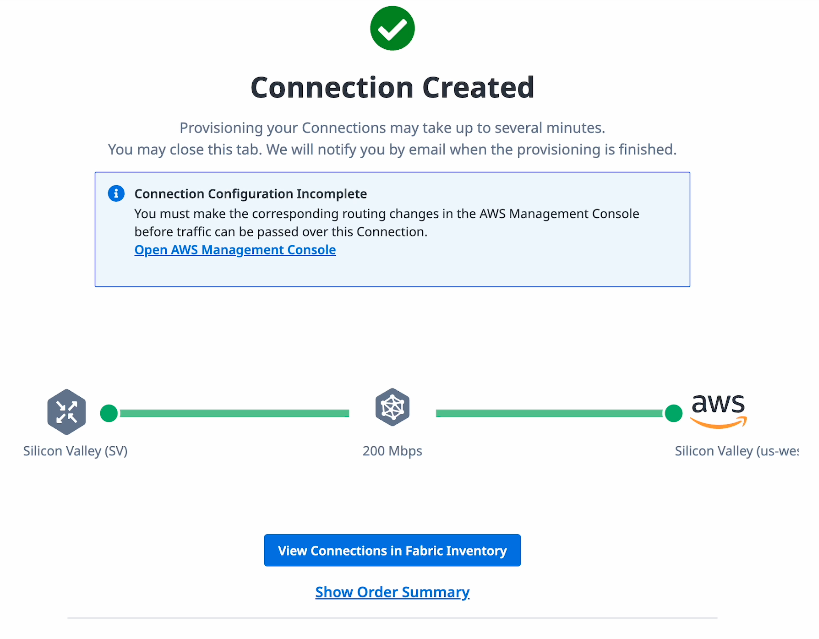
On the next screen, review and ensure everything is correct, then select Create Connection.

A full screen showing step 3 of 3 titled Review Order and Additional Information. There is a visualization above everything of the connection being made from the "my-fcr" cloud router to the AWS data center that notes there is a 200 Mbps connection. The details section include a box titled Amazon Web Services Destination with information about the connection as selected in prior screens and a box titled Connection Configuration that continues off screen. An Additional Information box has a text box to share an email address to get notifications about the connection. The Create Connection button at the bottom of the page is highlighted.

You can explore the Fabric Inventory if you want to check on the status of the provisioning later. Right now, you need to set up the routing changes in the AWS Management Console. You can use the link in the note on the page to get there.

A popup with a green checkmark and the title Connection Created. The description notes, "Provisioning your Connections may take up to several minutes. You may close this tab. We will notify you by email when the provisioning is finished." A further note indicates, "Connection Configuration Incomplete. You must make the corresponding changes in the AWS Management Console before traffic can be passed over this Connection." A link to open the AWS Management Console follows. Below the note is a graphic visualizing the connection from your new cloud router to AWS, and a button to explore the connections in your Fabric Inventory.

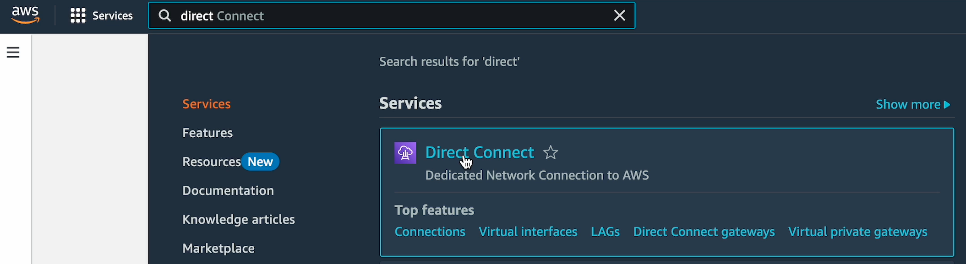
Step 7: Set up the routing in AWS

In the AWS Management Console, search for "Direct Connect" in the search bar.

The AWS Cloud Console with the search bar containing the search term "direct connect" and the result in question highlighted

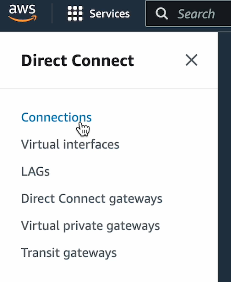
Open the Connections using the left nav.

The Direct Connect menu in the AWS Console, with the Connections entry highlighted

You'll find a connection waiting for you.

The Connections list on AWS, with a Connection appearing in the list. The connection's status is ordering.

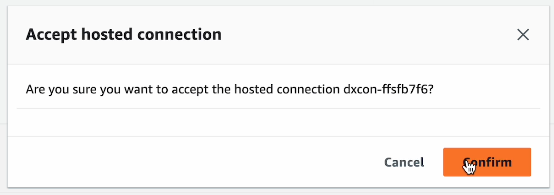
You need to accept the creation of that connection to use it. When you open that connection, select Accept.

The details of the connection from the connection list. The details all match the information entered in the Equinix Fabric Console. The Accept button is highlighted.

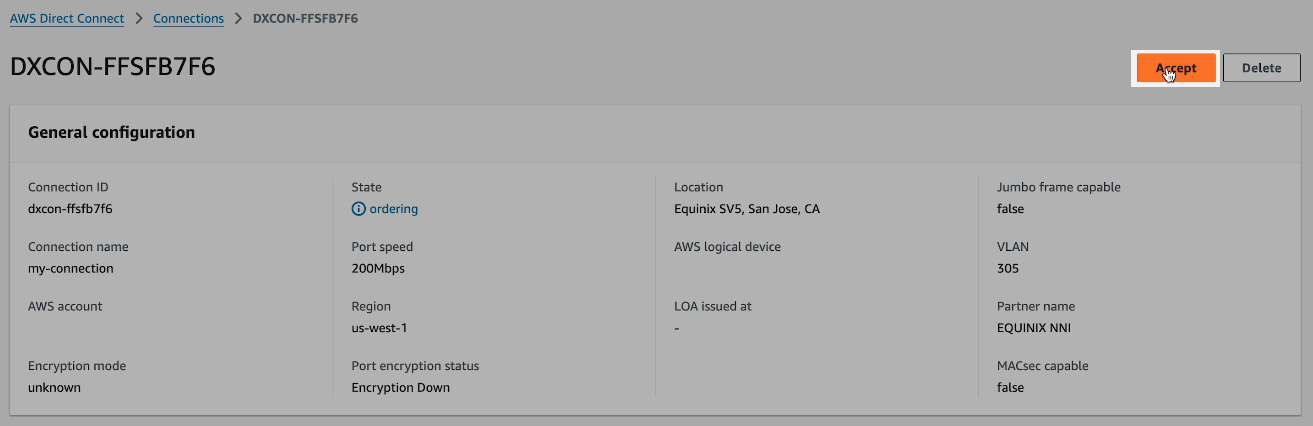
You'll need to confirm one more time.

A popup titled Accept Hosted Connection. The box asks if you're sure you want to accept the hosted connection. The Confirm button is highlighted.

And then wait for the connection to become available in AWS!

The details of that same connection from the connection list. The status now says available.

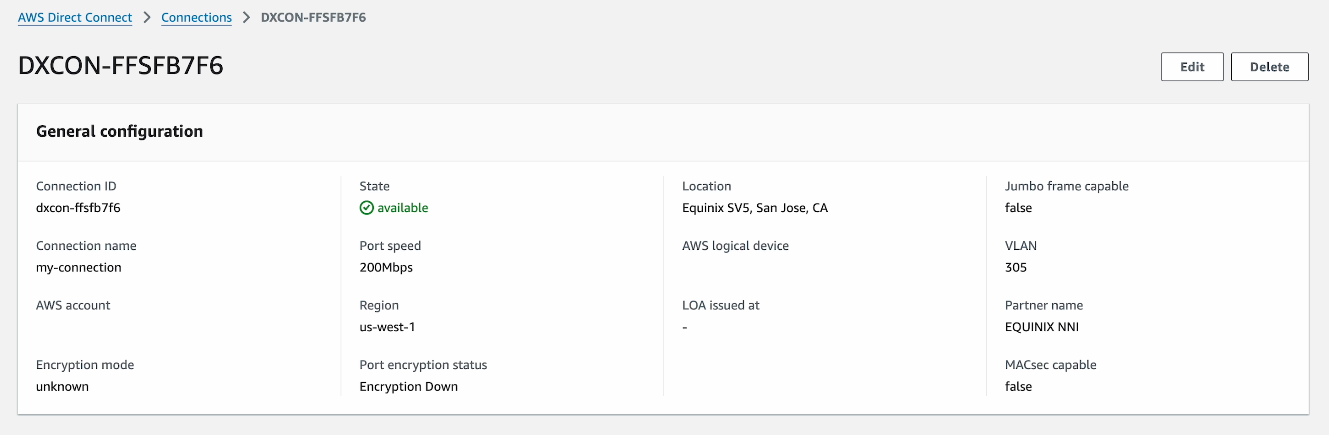
From here, you can check on the status of the connection as it's provisioning on either the AWS Console or the Equinix Fabric Console, add VPCs from the AWS side through AWS Direct Connect, or connect another cloud on the other side of the Fabric Cloud Router. Once you're done, if you were following along as an exercise, ensure you tear down the connections and the Fabric Cloud Router to ensure you don't get charged. Or sign up for a full subscription; up to you!

Conclusion

You've now provisioned a Fabric Cloud Router and connected it to AWS Direct Connect with a Connection. From here, you can start connecting clouds together and moving data.

Last updated

24 October, 2024

Category

Tagged

Quickstart
Subscribe to our newsletter

A monthly digest of the latest news, articles, and resources.